Stanley #2 Bench Plane Tote - Lee Valley Tools
Stanley #2 Bench Plane Tote - Lee Valley Tools
Stanley #2 Bench Plane Tote - Lee Valley Tools

Create successful ePaper yourself
Turn your PDF publications into a flip-book with our unique Google optimized e-Paper software.
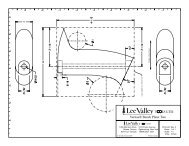
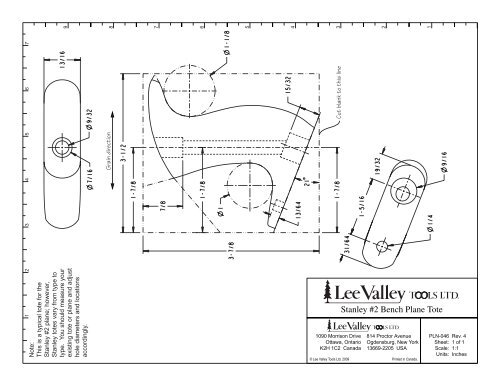
1 2 3 4 5 6 7Note:This is a typical tote for the<strong>Stanley</strong> <strong>#2</strong> plane; however,<strong>Stanley</strong> totes vary from type totype. You should measure yourexisting tote or plane and adjusthole diameters and locationsaccordingly.9Grain direction87654Cut blank to this line321<strong>Stanley</strong> <strong>#2</strong> <strong>Bench</strong> <strong>Plane</strong> <strong>Tote</strong>1090 Morrison DriveOttawa, OntarioK2H 1C2 Canada© <strong>Lee</strong> <strong>Valley</strong> <strong>Tools</strong> Ltd. 2009814 Proctor AvenueOgdensburg, New York13669-2205 USAPrinted in Canada.PLN-046Sheet:Scale:Units:Rev. 41 of 11:1Inches
<strong>Tote</strong> Template for <strong>Stanley</strong> <strong>#2</strong>, #3 or #4 <strong>Plane</strong>s<strong>Tote</strong> Template for <strong>Stanley</strong> <strong>#2</strong>, #3 or #4 <strong>Plane</strong>sInstructionsInstructionsThese templates can be used to make a replacementhandle for <strong>#2</strong>, #3 or #4 <strong>Stanley</strong> bench planes, as well asplanes that are essentially reproductions of those planes.<strong>Stanley</strong> #3 and #4 planes use the same tote, while the <strong>#2</strong>plane requires a smaller tote.Glue template tohandle blank.It should be noted that <strong>Stanley</strong> planes have beenmanufactured for many years and there are smalldifferences from type to type. The template is for atypical handle; however, it is best to measure the existinghandle and adjust the template accordingly, particularlywith regard to the relative sizes and locations of themounting details.The shape shown is that used on the standard productionplanes. Providing the critical dimensions (i.e., handle rodhole and associated mortises) are maintained, the outershape can be modified to suit the user. The template hasa 1 /4" scale printed along both edges of the sheet. Theseshould be checked against an accurate rule to ensurethat the template is at full scale before it is used. Thereare many reasons that a printed template may be offscale, including printer accuracy and humidity (likewood, paper moves with moisture content). In mostcases, scale the output from the printer, or use a scalingphotocopier to make any necessary adjustments. Also,do not print the template until you are ready to use it.Bore out the handle rod hole. Long narrow holes cansometimes be a problem to keep aligned. It may beeasier to bore halfway through from either end of theblank, providing the blank is perfectly parallel andcarefully aligned in the drill press.Counterbore and drill toterod hole centered on andcompletely through blank.Transfer axislines onto top andbottom surfaces.Start by cutting a blank to slightly larger than thedimensions shown on the template (3 15 /16" × 3 9 /16" fora <strong>#2</strong> tote; 4 11 /16" × 4 7 /16" for a #3 or #4 tote). Note thecorrect grain direction. The thickness shown is that of astock handle, but feel free to make any adjustments tosuit your grip.Cut out the template along the outer box lines and pasteit to the handle blank. Spray adhesive is suitable forthis. Avoid using white or carpenter’s glues, as theirmoisture content will deform the template.Trim the blank to match the outer template.Transfer the handle rod hole axis onto the top andbottom edges of the blank and mark the center point.
<strong>Tote</strong> Template for <strong>Stanley</strong> <strong>#2</strong>, #3 or #4 <strong>Plane</strong>sInstructionsCut the bottom surface at the indicated 21° line for a <strong>#2</strong>tote (26° for a #3 or #4 tote). Transfer the center of theforward hole onto the bottom surface and drill the holecentered on the blank.Trim the workpiece to the top, front and back contours.Depending on the final shaping method, it may beworthwhile to cut the contours slightly oversize.Saw outhandle shape.Trim lower surface anddrill lower counterbore.At this point, it should be possible to do a trial fit to theplane to check that the mounting details are correct. Anyerrors are easier to correct while the blank still has flatreference surfaces. Also, if the error is not correctable,the minimum amount of work has been wasted.Bore out the two holes that form the tightly curved partsof the handle contour.Final shaping can be done with a combination of roundoverrouter bits, rasps, carving tools, sandpaper, etc.Proceed carefully, testing the grip often to ensure acomfortable handle. Sand the final shape smooth andfinish as desired.Drill out indicatedholes to establishtight radii curves.Shape to suit.742© <strong>Lee</strong> <strong>Valley</strong> Ltd. 20091090 Morrison DriveOttawa, OntarioK2H 1C2 Canada1-800-267-8761www.leevalley.com814 Proctor AvenueOgdensburg, New York13669-2205 USA1-800-267-8735customerservice@leevalley.comINS-406 Rev. APrinted in Canada.