TABLE OF CONTENTS - Hannspree
TABLE OF CONTENTS - Hannspree TABLE OF CONTENTS - Hannspree
User’s ManualHOW TO ADJUST A SETTINGSBRIGHTNESS/ CONTRASTBRIGHTNESSCONTRASTACTIVE CONTRASTPRESET MODEINPUT SETTINGINPUT SETTINGAUTO SEARCHAdjust the brightness value of the display according to yourpreference. Select「BRIGHTNESS」option to adjust thebrightness value.Adjust the contrast value of the display according to yourpreference. Select「CONTRAST」option to adjust the contrastvalue.Optimal setting for high contrast images or videos. The dark andlight areas of the image are automatically detected, and thecontrast is enhanced to provide a clearer, sharper image. Also,you may select the「ACTIVE CONTRAST」option.Select the preset mode according to your preference: PC/MOVIE/ GAME/ ECO[The availability of this function depends upon the selectedmodel]Select the 「INPUT SETTING」option to change between analog(VGA) or Digital (DVI) source. Enter the option and selectAnalog or Digital. [Dual input mode optional]From the Signal Selection menu, select the 「AUTO SEARCH」option to activate or deactivate the automatic signal searchfunction. [For DVI/ HDMI Input only]COLOR SETTINGWARMNATURE (6500K)COOLUSERIMAGE SETTINGAUTO ADJUSTASPECT RATIOAdjust the color temperature value of the display according toyour preference: WARM /NATURE/ COOL.Move the cursor to the User option and select it,1. To adjust the red, enter the「R」option and adjust the level.2. To adjust the green, enter the「G」option and adjust the level.3. To adjust the blue, enter the「B」option and adjust the level.The auto adjustment function is used to optimize the「H-POSITION」, 「V-POSITION」,「CLOCK」,and 「PHASE」.[For VGA Input only]When the aspect ratio of screen is distorted, you may makeadjustments by using this function.「FULL」indicates full screen16
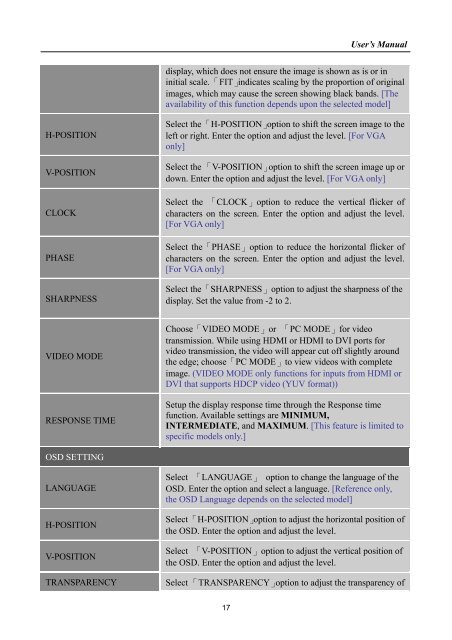
User’s Manualdisplay, which does not ensure the image is shown as is or ininitial scale. 「FIT」indicates scaling by the proportion of originalimages, which may cause the screen showing black bands. [Theavailability of this function depends upon the selected model]H-POSITIONV-POSITIONCLOCKPHASESHARPNESSSelect the 「H-POSITION」option to shift the screen image to theleft or right. Enter the option and adjust the level. [For VGAonly]Select the 「V-POSITION」option to shift the screen image up ordown. Enter the option and adjust the level. [For VGA only]Select the 「CLOCK」option to reduce the vertical flicker ofcharacters on the screen. Enter the option and adjust the level.[For VGA only]Select the「PHASE」option to reduce the horizontal flicker ofcharacters on the screen. Enter the option and adjust the level.[For VGA only]Select the「SHARPNESS」option to adjust the sharpness of thedisplay. Set the value from -2 to 2.VIDEO MODERESPONSE TIMEChoose「VIDEO MODE」or 「PC MODE」for videotransmission. While using HDMI or HDMI to DVI ports forvideo transmission, the video will appear cut off slightly aroundthe edge; choose「PC MODE」to view videos with completeimage. (VIDEO MODE only functions for inputs from HDMI orDVI that supports HDCP video (YUV format))Setup the display response time through the Response timefunction. Available settings are MINIMUM,INTERMEDIATE, and MAXIMUM. [This feature is limited tospecific models only.]OSD SETTINGLANGUAGEH-POSITIONV-POSITIONTRANSPARENCYSelect 「LANGUAGE」 option to change the language of theOSD. Enter the option and select a language. [Reference only,the OSD Language depends on the selected model]Select 「H-POSITION」option to adjust the horizontal position ofthe OSD. Enter the option and adjust the level.Select 「V-POSITION」option to adjust the vertical position ofthe OSD. Enter the option and adjust the level.Select 「TRANSPARENCY」option to adjust the transparency of17
- Page 5: User’s ManualTABLE OF CONTENTSSAF
- Page 9 and 10: User’s ManualINSTALLATION INSTRUC
- Page 11 and 12: User’s ManualMAKING CONNECTIONSCO
- Page 13 and 14: User’s ManualOPERATING INSTRUCTIO
- Page 15: User’s ManualResolution640×400@7
- Page 19 and 20: User’s ManualPLUG AND PLAYPlug &
- Page 21 and 22: User’s ManualINPUT as a PC option
- Page 23 and 24: User’s Manual28 1400×1050 @60Hz
User’s Manualdisplay, which does not ensure the image is shown as is or ininitial scale. 「FIT」indicates scaling by the proportion of originalimages, which may cause the screen showing black bands. [Theavailability of this function depends upon the selected model]H-POSITIONV-POSITIONCLOCKPHASESHARPNESSSelect the 「H-POSITION」option to shift the screen image to theleft or right. Enter the option and adjust the level. [For VGAonly]Select the 「V-POSITION」option to shift the screen image up ordown. Enter the option and adjust the level. [For VGA only]Select the 「CLOCK」option to reduce the vertical flicker ofcharacters on the screen. Enter the option and adjust the level.[For VGA only]Select the「PHASE」option to reduce the horizontal flicker ofcharacters on the screen. Enter the option and adjust the level.[For VGA only]Select the「SHARPNESS」option to adjust the sharpness of thedisplay. Set the value from -2 to 2.VIDEO MODERESPONSE TIMEChoose「VIDEO MODE」or 「PC MODE」for videotransmission. While using HDMI or HDMI to DVI ports forvideo transmission, the video will appear cut off slightly aroundthe edge; choose「PC MODE」to view videos with completeimage. (VIDEO MODE only functions for inputs from HDMI orDVI that supports HDCP video (YUV format))Setup the display response time through the Response timefunction. Available settings are MINIMUM,INTERMEDIATE, and MAXIMUM. [This feature is limited tospecific models only.]OSD SETTINGLANGUAGEH-POSITIONV-POSITIONTRANSPARENCYSelect 「LANGUAGE」 option to change the language of theOSD. Enter the option and select a language. [Reference only,the OSD Language depends on the selected model]Select 「H-POSITION」option to adjust the horizontal position ofthe OSD. Enter the option and adjust the level.Select 「V-POSITION」option to adjust the vertical position ofthe OSD. Enter the option and adjust the level.Select 「TRANSPARENCY」option to adjust the transparency of17


