
Create successful ePaper yourself
Turn your PDF publications into a flip-book with our unique Google optimized e-Paper software.
38 / MOUNTING<br />
MOUNTING PROCEDURE<br />
TYROLIA CARVE PLATES<br />
1. General<br />
For proper mounting use drill template 92 W.<br />
The compatible binding-plate combinations can<br />
be found in the compatibility chart. All TYROLIA<br />
CARVE Plates can be used for ski’s 140 cm and<br />
longer. If mounted on ski’s shorter 140 cm the<br />
screws have to be replaced by shorter ones, see<br />
screw chart on page 64. For mounting SP 70 ABS,<br />
SL 70 ABS, SL 70 or SR 70 on TYROLIA CARVE<br />
Plates you have to replace the pre-mounted<br />
screws by screws with 8 mm penetration depth.<br />
Only with these screws can we guarantee the<br />
right pullout strength (see page 39).<br />
2. Adjusting the Drill Template 92 W<br />
Unlock the adjustment lever (1) by rotating it<br />
counter clockwise and push the template together<br />
as far as possible (23 cm). Fix the position by rotating<br />
the adjustment lever (1) clockwise until it stops<br />
(see template 92).<br />
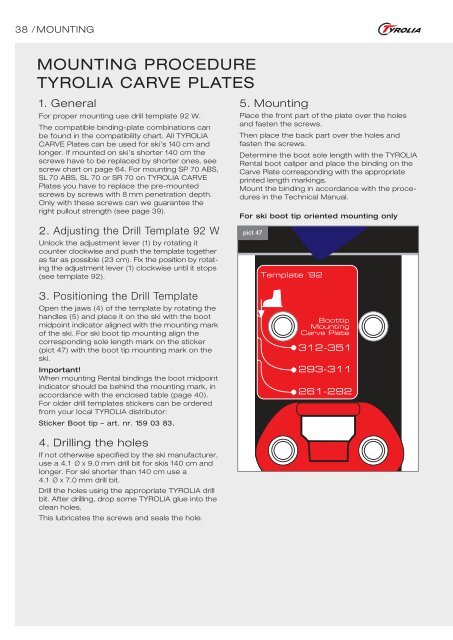
3. Positioning the Drill Template<br />
Open the jaws (4) of the template by rotating the<br />
handles (5) and place it on the ski with the boot<br />
midpoint indicator aligned with the mounting mark<br />
of the ski. For ski boot tip mounting align the<br />
corresponding sole length mark on the sticker<br />
(pict 47) with the boot tip mounting mark on the<br />
ski.<br />
Important!<br />
When mounting Rental bindings the boot midpoint<br />
indicator should be behind the mounting mark, in<br />
accordance with the enclosed table (page 40).<br />
For older drill templates stickers can be ordered<br />
from your local TYROLIA distributor:<br />
Sticker Boot tip – art. nr. 159 03 83.<br />
4. Drilling the holes<br />
If not otherwise specified by the ski manufacturer,<br />
use a 4.1 Ø x 9.0 mm drill bit for skis 140 cm and<br />
longer. For ski shorter than 140 cm use a<br />
4.1 Ø x 7.0 mm drill bit.<br />
Drill the holes using the appropriate TYROLIA drill<br />
bit. After drilling, drop some TYROLIA glue into the<br />
clean holes.<br />
This lubricates the screws and seals the hole.<br />
5. Mounting<br />
Place the front part of the plate over the holes<br />
and fasten the screws.<br />
Then place the back part over the holes and<br />
fasten the screws.<br />
Determine the boot sole length with the TYROLIA<br />
Rental boot caliper and place the binding on the<br />
Carve Plate corresponding with the appropriate<br />
printed length markings.<br />
Mount the binding in accordance with the procedures<br />
in the <strong>Technical</strong> <strong>Manual</strong>.<br />
For ski boot tip oriented mounting only<br />
pict 47