Create successful ePaper yourself
Turn your PDF publications into a flip-book with our unique Google optimized e-Paper software.
34 / MOUNTING<br />
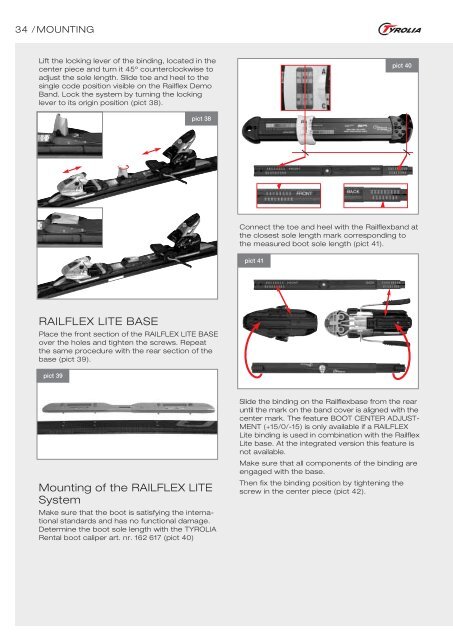
Lift the locking lever of the binding, located in the<br />
center piece and turn it 45º counterclockwise to<br />
adjust the sole length. Slide toe and heel to the<br />
single code position visible on the Railflex Demo<br />
Band. Lock the system by turning the locking<br />
lever to its origin position (pict 38).<br />
RAILFLEX LITE BASE<br />
Place the front section of the RAILFLEX LITE BASE<br />
over the holes and tighten the screws. Repeat<br />
the same procedure with the rear section of the<br />
base (pict 39).<br />
pict 39<br />
➤<br />
pict 38<br />
Mounting of the RAILFLEX LITE<br />
System<br />
Make sure that the boot is satisfying the international<br />
standards and has no functional damage.<br />
Determine the boot sole length with the TYROLIA<br />
Rental boot caliper art. nr. 162 617 (pict 40)<br />
Connect the toe and heel with the Railflexband at<br />
the closest sole length mark corresponding to<br />
the measured boot sole length (pict 41).<br />
pict 41<br />
pict 40<br />
Slide the binding on the Railflexbase from the rear<br />
until the mark on the band cover is aligned with the<br />
center mark. The feature BOOT CENTER ADJUST-<br />
MENT (+15/0/-15) is only available if a RAILFLEX<br />
Lite binding is used in combination with the Railflex<br />
Lite base. At the integrated version this feature is<br />
not available.<br />
Make sure that all components of the binding are<br />
engaged with the base.<br />
Then fix the binding position by tightening the<br />
screw in the center piece (pict 42).


