Create successful ePaper yourself
Turn your PDF publications into a flip-book with our unique Google optimized e-Paper software.
26 / MOUNTING<br />
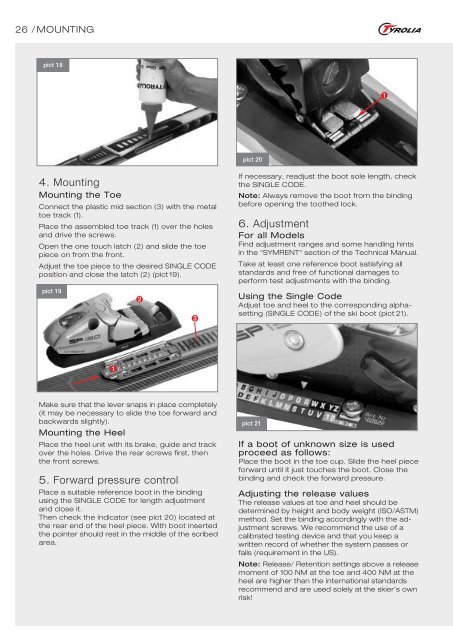
pict 18<br />
4. Mounting<br />
Mounting the Toe<br />
Connect the plastic mid section (3) with the metal<br />
toe track (1).<br />
Place the assembled toe track (1) over the holes<br />
and drive the screws.<br />
Open the one touch latch (2) and slide the toe<br />
piece on from the front.<br />
Adjust the toe piece to the desired SINGLE CODE<br />
position and close the latch (2) (pict 19).<br />
pict 19<br />
➊<br />
Make sure that the lever snaps in place completely<br />
(it may be necessary to slide the toe forward and<br />
backwards slightly).<br />
Mounting the Heel<br />
Place the heel unit with its brake, guide and track<br />
over the holes. Drive the rear screws first, then<br />
the front screws.<br />
5. Forward pressure control<br />
Place a suitable reference boot in the binding<br />
using the SINGLE CODE for length adjustment<br />
and close it.<br />
Then check the indicator (see pict 20) Iocated at<br />
the rear end of the heel piece. With boot inserted<br />
the pointer should rest in the middle of the scribed<br />
area.<br />
➋<br />
➌<br />
pict 20<br />
If necessary, readjust the boot sole length, check<br />
the SINGLE CODE.<br />
Note: Always remove the boot from the binding<br />
before opening the toothed lock.<br />
6. Adjustment<br />
For all Models<br />
Find adjustment ranges and some handling hints<br />
in the “SYMRENT“ section of the <strong>Technical</strong> <strong>Manual</strong>.<br />
Take at least one reference boot satisfying all<br />
standards and free of functional damages to<br />
perform test adjustments with the binding.<br />
Using the Single Code<br />
Adjust toe and heel to the corresponding alphasetting<br />
(SINGLE CODE) of the ski boot (pict 21).<br />
pict 21<br />
If a boot of unknown size is used<br />
proceed as follows:<br />
Place the boot in the toe cup. Slide the heel piece<br />
forward until it just touches the boot. Close the<br />
binding and check the forward pressure.<br />
Adjusting the release values<br />
The release values at toe and heel should be<br />
determined by height and body weight (ISO/ASTM)<br />
method. Set the binding accordingly with the adjustment<br />
screws. We recommend the use of a<br />
calibrated testing device and that you keep a<br />
written record of whether the system passes or<br />
fails (requirement in the US).<br />
Note: Release/ Retention settings above a release<br />
moment of 100 NM at the toe and 400 NM at the<br />
heel are higher than the international standards<br />
recommend and are used solely at the skier’s own<br />
risk!<br />
➊


