CZ3000 - Easy catalogue
CZ3000 - Easy catalogue
CZ3000 - Easy catalogue

You also want an ePaper? Increase the reach of your titles
YUMPU automatically turns print PDFs into web optimized ePapers that Google loves.
<strong>CZ3000</strong>Self-aligning Magnetic ShearlockVentouse à cisaillement et à auto-alignementRange: Locking devices /Gamme: VerrouillageGroup CompanyINSTALLATION MANUALMANUEL D’INSTALLATION
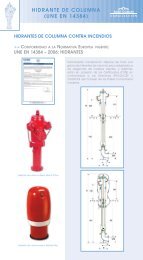
_ NC COM NO+INSTALLATION MANUAL<strong>CZ3000</strong>Self-aligning Magnetic Shearlock1] PRODUCT OVERVIEWThe <strong>CZ3000</strong> is a Shear magnet with a patentedself aligning mechanism. This magnet is mortiseand monitored as standard and can be surfacemounted (Surface housing kit). The magnet canbe mounted on any type of doors (vertical or horizontalmount). The <strong>CZ3000</strong> can be mounted onthe door leaf or on the door jamb.Technical specifications1500 daN holding force: 1500 KG in shear holding.Self aligningKick off springsForm C output (monitoring)Finish: aluminium/steelBuild-in varistor.Input voltage: 12 or 24 V DC.Consumption:- 12 V DC / 600mA,- 24 V DC / 300mA.High Resistanceto vandalism23031,5 273730230D0160D AerospaceStandard Certified2] RECOMMANDATIONSWiringDo not put the cable near a main voltageinstallation (ex: 230 V AC).MountingKeep imperatively a gap
INSTALLATION MANUAL<strong>CZ3000</strong>Self-aligning Magnetic Shearlock4] MOUNTING INSTRUCTIONSMake sure that there are no pieces missing in the mounting kit. Get the right tools accordingto the installation type (Drill, screw drivers, metre tape,...) and follow the mountinginstructions of the <strong>CZ3000</strong>.A - Wooden door12312Make a cut on the door leaf and a cuton the door jamb in order to insertthe magnet and the armature plateof the <strong>CZ3000</strong> magnet. Then markthe mounting holes of the mountingscrews. Drill the mounting holes of themagnet and of the armature plate inorder to facilitate the screwing. Drillthe cable access hole.B - Aluminium door1Insert the cable of the magnet. Unfastenthe screws on the side of thearmature plate (1) with the Allenkey. Mount temporarily the <strong>CZ3000</strong>.Then adjust the gap between themagnet and the armature plate byadjusting the top screws on the armature,allow 2mm distance maximum.Tighten the 2 screws on the side of thearmature plate (2) once the test onmagnet has been successfull.2Fasten definitively the magnet on thedoor.3(x8)12Make a cut on the door leaf and a cuton the door jamb in order to insert themagnet and the armature plate of the<strong>CZ3000</strong> magnet. Then mark the mountingholes of the mounting screwsand drill the mounting holes of themagnet and of the armature plate inorder to facilitate the screwing.Mount the back plate of the housing(note that the screws are not included).Unfasten the screws on the sideof the armature plate (1) with the Allenkey. Mount temporarily the <strong>CZ3000</strong>.Then adjust the gap between themagnet and the armature plate byadjusting the top screws on the armature,allow 2mm distance maximum.Tighten the 2 screws on the side of thearmature plate (2) once the test onmagnet has been successfull.Place the magnet on the back plate of thesurface housing as well as the armature onthe second back plate of the surface housingand fasten definitively the magnet onthe door.www.cdvi.comwww.cdvigroup.com3
INSTALLATION MANUAL<strong>CZ3000</strong>Self-aligning Magnetic ShearlockC - Surface mount (Optional: K<strong>CZ3000</strong> kit)123(x8)12(x2)Measure and mark the center lines todetermining the magnet position on thejamb and the armature plate on the doorleaf frame. Then drill the fixing screw holesto fasten the screws easily.Important: The surface housing can bemounted in horizontal or in vertical in thesecure side.Mount the brackets of the housing onthe jamb and on the door leaf. Insertthe cable and fasten temporarily themagnet and the armature plate tothe bracket of the housing. Unfastenthe screws on the side of the armatureplate (1) with the Allen key.Then adjust the gap between themagnet and the armature plate byadjusting the top screws on the armature,allow 2mm distance maximum.Tighten the 2 screws on the side of thearmature plate (2) once the test onmagnet has been successfull.Fasten definitively the magnet on the doorand place the housings.5] WIRING DIAGRAMTerminal block+ Input voltage 12 V or 24 VDC*- Input voltage 12 V or 24VDC*NC Normally closed contactC CommonNO Normally open contact12VDC24VDC+* Input voltage: 12 VDC or 24 VDCThe magnet can be powered in 12 VDCor in 24 VDC according to the jumpersettings._NC COM NO4www.cdvi.comwww.cdvigroup.com
_ NC COM NO+MANUEL D’INSTALLATION<strong>CZ3000</strong>Ventouse à cisaillement et à auto-alignement1] PRESENTATION DU PRODUITLa <strong>CZ3000</strong> est une ventouse à cisaillement équipéedu nouveau procédé d’auto-alignement par ailetteet fentes de guidage. Cette ventouse, disponibleen version encastrée ou saillie (kit en option), estpourvue des toutes dernières technologiesde la métallurgie qui favorise le positionnement surla majorité des huisseries ou porte (en vertical ouà l’horizontal). De plus, sa réversibilité vouspermettra de privilégier le raccordement le plusapproprié (sur la partie fixe ou mobile).Caractéristiques techniques230230D’une force de 1500 daN : 1,5 tonneen cisaillement.Auto-alignement.Dispositif d’anti-rémanence.Relais de position.Varistance intégrée.Finition : aluminium/acierAlimentation : 12 ou 24 V DC.Consommation :- 12 V DC / 600 mA,- 24 V DC / 300 mA.Haute Résistanceau Vandalisme31,5 273730Certification CE(Norme Air D0160D)2] RAPPELS ET RECOMMANDATIONSRappel de câblageAttention de ne pas passer vos fils à proximitéde câbles «Courant fort» (ex: 230 V AC).OptionKit de mise en saillie en option(sur demande - Réf : K<strong>CZ3000</strong>).Alimentations préconiséesIl existe deux alimentations adaptéespour la <strong>CZ3000</strong> (Voir www.cdvgroup.com) :- ARD2/12 ou BS60MontageLaissez impérativement une distance
MANUEL D’INSTALLATION<strong>CZ3000</strong>Ventouse à cisaillement et à auto-alignement4] MONTAGEAprès avoir vérifié que le kit de montage est complet, vous allez pouvoir procéderà l’installation finale du produit. Réunissez le matériel approprié (Perçeuse, tournevis,mètre,...) et suivez les recommandations de montage de la <strong>CZ3000</strong>.A - Montage sur surface pleine1 2312Découpez dans la surface déterminéeune partie creuse qui vaaccueillir la ventouse <strong>CZ3000</strong> et sonarmature. Puis faites les marquagesde la position des vis de fixation.Percez la surface au niveau desentraxes de la ventouse et de sonarmature pour faciliter le vissage.Percez le fond de la surface découpéeafin de passer les câbles.B - Montage sur profiléPassez vos fils, et branchez la ventouse.A l’aide de la clé fourniedévisser les 2 écrous de blocage(1). Puis avec une clé 6 pans, ajusterla contre-plaque à 2 mm de la ventouse.Ressérer ensuite les 2 écrousde blocage (2).Testez le fonctionnement de la ventouseet de la contre-plaque puisfixez-les (attention les vis de fixationne sont pas fournies).1 23(x8)12Découpez dans le profilé la surfacedéterminée qui va accueillir laventouse <strong>CZ3000</strong> et son armature.Faites les marquages de la positiondes vis de fixation puis percez lasurface au niveau de la fixation dela ventouse pour faciliter le vissage.ensuite, fixez les pattes de mise enaffleurement (attention les vis defixation ne sont pas fournies).Passez vos fils, et branchez la ventouse.A l’aide de la clé fourniedévisser les 2 écrous de blocage(1). Puis avec une clé 6 pans, ajusterla contre-plaque à 2 mm de la ventouse.Ressérer ensuite les 2 écrousde blocage (2).Testez le fonctionnement de la ventouseet de la contre-plaque puisfixez-les aux pattes de mise enaffleurement.6www.cdvi.comwww.cdvigroup.com
MANUEL D’INSTALLATION<strong>CZ3000</strong>Ventouse à cisaillement et à auto-alignementC - Montage en saillie (Option : Kit K<strong>CZ3000</strong>)1 23(x8)12(x2)Faites les marquages des entraxesde la ventouse sur ledormant et de la contre-plaquesur l’ouvrant puis percez lasurface pour faciliter le vissage.Important : le kit de mise ensaillie doit se poser en horizontalou en vertical sur une portes’ouvrant vers l’intérieur.Faites sortir le câble d’alimentationet fixez les éléments du kit surle dormant et l’ouvrant.Branchez la ventouse, puis àl’aide de la clé fournie dévisserles 2 écrous de blocage (1). Puisavec une clé 6 pans, ajusterla contre-plaque à 2 mm de laventouse. Ressérer ensuite les 2écrous de blocage (2).Testez le fonctionnement de laventouse et de la contre-plaquepuis fixez-les sur le kit du dormantet de l’ouvrant. Pour finaliserl’installation, vissez la partiesupérieure des kits.5] SCHÉMA DE RACCORDEMENTSBornier 5 points+ Alimentation 12 V ou 24 V DC *- Alimentation 12 V ou 24V DC *NC Contact «Normalement Fermé»COM Commun du relais 1NO Contact «Normalement Ouvert»12 V DC 24 V DC+* Alimentation : 12 V DC ou 24 V DCEn fonction du placement des cavaliersvous alimentez votre ventouseen 12 V DC ou en 24 V DC._NC COM NOwww.cdvi.comwww.cdvigroup.com7
Reference : G0301FR0276V01Extranet : EXE-CDVI_IM <strong>CZ3000</strong> CMYK A4 FR-EN 01Manufacturing Access Control since 1985All the specifications on this document (photos, drawing, features and dimensions) could be changed without prior notice.CDVI (Headquarters/Siège social)FRANCEPhone: +33 (0)1 48 91 01 02Fax: +33 (0)1 48 91 21 21CDVISWITZERLANDPhone: +41 (0)21 882 18 41Fax: +41 (0)21 882 18 42CDVIITALIAPhone: +39 0331 97 38 08Fax: +39 0331 97 39 70CDVIUKPhone: +44 (0)1628 531300Fax: +44 (0)1628 531003CDVIAMERICASPhone: +1 (450) 682 7945Fax: +1 (450) 682 9590CDVICHINAPhone: +86 (0)10 87664065Fax: +86 (0)10 87664165CDVIMAROCPhone: +212 (0)22 48 09 40Fax: +212 (0)22 48 34 69DIGITFRANCEPhone: +33 (0)1 41 71 06 85Fax: +33 (0)1 41 71 06 86CDVIBENELUXPhone: +32 (0)5 662 02 50Fax: +32 (0)5 662 02 55CDVIIBÉRICAPhone: +34 936 916 551Fax: +34 935 801 278CDVISWEDENPhone: +46 (0)31 760 19 30Fax: +46 (0)31 748 09 30TECHNO EMFRANCEPhone: +33 (0)4 42 96 58 73Fax: +33 (0)4 42 96 45 77www.cdvigroup.com


![TH857 [FR] - Easy catalogue](https://img.yumpu.com/47657762/1/184x260/th857-fr-easy-catalogue.jpg?quality=85)