
Create successful ePaper yourself
Turn your PDF publications into a flip-book with our unique Google optimized e-Paper software.
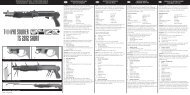
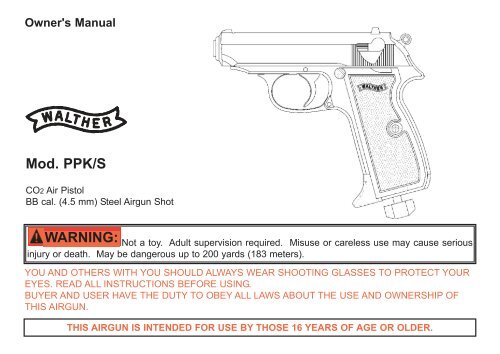
Owner's Manual<br />
<strong>Mod</strong>. <strong>PPK</strong>/S<br />
CO2 Air Pistol<br />
BB cal. (4.5 mm) Steel Airgun Shot<br />
<strong>WARNING</strong>: Not a toy. Adult supervision required. Misuse or careless use may cause serious<br />
injury or death. May be dangerous up to 200 yards (183 meters).<br />
YOU AND OTHERS WITH YOU SHOULD ALWAYS WEAR SHOOTING GLASSES TO PROTECT YOUR<br />
EYES. READ ALL INSTRUCTIONS BEFORE USING.<br />
BUYER AND USER HAVE THE DUTY TO OBEY ALL LAWS ABOUT THE USE AND OWNERSHIP OF<br />
THIS AIRGUN.<br />
THIS AIRGUN IS INTENDED FOR USE BY THOSE 16 YEARS OF AGE OR OLDER.
Please read this owner's manual completely. Remember, this air pistol is not a toy. Treat it with the same<br />
respect you would a firearm. Always carefully follow the safety instructions found in this owner's manual and<br />
keep this manual in a safe place for future use.<br />
If you have any questions, regarding your new air pistol, please contact Crosman Customer Service at 1-<br />
800-724-7486, 585-657-6161 or www.crosman.com.<br />
STEPS FOR SAFE SHOOTING<br />
1. Learning the Parts of Your New CO2 Air Pistol<br />
2. Operating the Safety<br />
3. Removing and Inserting CO2 Cylinders<br />
4. Loading and Unloading BBs<br />
5. Aiming and Firing Safely<br />
6. Removing a Jammed BB<br />
7. Field Stripping<br />
8. Maintaining Your Air Pistol<br />
Reviewing Safety<br />
SPECIFICATIONS<br />
WARRANTY
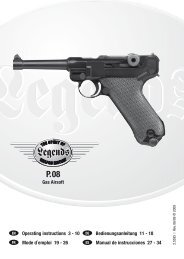
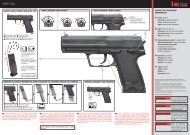
1.Learning the Parts of Your New CO2 Air Pistol<br />
Learning the names of the parts of your new air pistol will help you to understand your owner's manual.<br />
Use this manual to increase your enjoyment of this air pistol.<br />
Front Sight<br />
Muzzle<br />
Trigger<br />
Trigger guard<br />
Slide<br />
Magazine release button<br />
Grip Frame<br />
Rear Sight<br />
Hammer<br />
Magazine Piercing knob
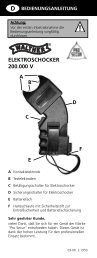
2. Operating the Safety Fig. 1<br />
<strong>WARNING</strong>: Keep the air pistol in the "ON SAFE"<br />
position until you are actually ready to shoot. Then push the<br />
safety to the "OFF SAFE" position.<br />
2.1 To Put The Air Pistol "ON SAFE:"<br />
Locate the safety on the right hand side of the grip frame.<br />
Push the safety lever all the way down, pointing at the "S"<br />
(Fig. 1). The safety is not "On Safe" unless it is pushed all<br />
the way down, pointing at the "S" and the RED dot is not<br />
showing. The air pistol will not fire when "On Safe".<br />
Even when the safety is "On Safe", you should continue to<br />
handle the air pistol safely. Do not ever point the air pistol<br />
at any person. Do not ever point the air pistol at anything<br />
you do not intend to shoot.<br />
2.2 To Take The Air Pistol "OFF SAFE":<br />
Press the safety lever against the grip frame and push the<br />
safety lever all the way up, pointing to the "F" (Fig. 1).<br />
When you can see the RED dot and the safety lever is<br />
pushed all the way up, pointing to the "F", the air pistol is<br />
"Off Safe" and can be fired.
3. Removing and Inserting CO2 Cylinders<br />
<strong>WARNING</strong>: CO2 cylinders may explode at temperatures<br />
above 120° F (48.9° C). Do not mutilate or incinerate them. Do not<br />
expose them to heat or store CO2 cylinders at temperatures above<br />
120°F (48.9°C).<br />
<strong>WARNING</strong>: Keep hands away from escaping CO2 gas. It<br />
can cause frostbite if allowed to come in contact with skin.<br />
3.1 Removing CO2 Cylinders<br />
Make sure the air pistol is "On Safe" (See Step 2.1).<br />
Make sure the air pistol is unloaded (See Step 4.2).<br />
Point the air pistol in a SAFE DIRECTION.<br />
Slowly turn the piercing knob counterclockwise (down) until it stops<br />
turning; allowing any remaining CO2 gas to escape.<br />
Remove the grip cover from the left side of the air pistol by lifting<br />
from the bottom edge (Fig. 2).<br />
Remove the empty CO2 cylinder by turning the air pistol over and<br />
shaking it. The cylinder will fall into your hand.<br />
Fig.2
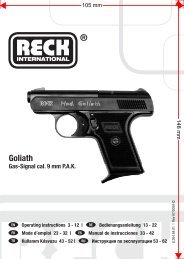
3.2 Inserting CO2 Cylinders<br />
Fig. 3<br />
If a CO2 cylinder is already installed, See Step 3.1 - Removing CO2<br />
cylinders. Otherwise, remove the grip cover from the left side of the<br />
air pistol by lifting from the bottom edge (Fig. 2).<br />
Insert the CO2 cylinder into the grip, bottom end first, and the small<br />
neck of the cylinder pointing upward toward the slide (Fig. 3).<br />
Snap the grip cover back into place.<br />
Turn piercing knob clockwise (up) to pierce the CO2 cylinder. Never<br />
use any tool on the piercing knob. Over-tightening can cause injury<br />
to you or damage to your air pistol.<br />
With the air pistol unloaded, pointed in a SAFE DIRECTION and<br />
cocked (See Step 4.2), take "Off Safe" (See Step 2.2) and pull the<br />
trigger to fire. If your air pistol does not make a popping noise<br />
after pulling the trigger, the CO2 is not being discharged. In that<br />
event, you will have to tighten the piercing knob a little more and<br />
repeat cocking and firing the air pistol again until there is a popping<br />
noise, which will mean the air pistol is releasing CO2 with each pull<br />
of the trigger.<br />
Return safety to the "On Safe" position (See Step 2.1).<br />
NOTE: High temperatures may cause damage to the air pistol. The<br />
maximum temperature for the storage or use of this air pistol should not<br />
exceed 120°F (48.9°C). This temperature can easily be reached when<br />
the air pistol is exposed to direct sunlight. FIRING THE AIR PISTOL<br />
WITH LOW GAS PRESSURE MAY CAUSE A BB TO GET STUCK IN<br />
THE BARREL. Never try to force any CO2 cylinder into or out of place<br />
as it may result in injury to you or damage to your air pistol. Do not store your air pistol with a CO2<br />
cylinder in it. This is very important to remember, as it will prolong the longevity of your air pistol seals.
4. Loading and Unloading BBs<br />
<strong>WARNING</strong>:<br />
Use BBs only in this air pistol. Never reuse<br />
BBs. Use of any other ammunition can cause injury to you or<br />
damage to the air pistol.<br />
4.1 Loading BBs<br />
Make sure the air pistol is "On Safe" (See Step 2.1).<br />
Point the air pistol in a SAFE DIRECTION.<br />
Remove the magazine by pressing the magazine release button and<br />
pulling the magazine from the bottom of the grip frame.<br />
While holding the magazine in a vertical position, pull the BB follower<br />
tab down and hold with your finger.<br />
With the other hand, load up to 15 BBs in the magazine loading port<br />
(Fig. 4).<br />
Insert the loaded magazine back into the bottom of the grip frame.<br />
Fig. 4<br />
Fig. 5A
4.2 Unloading the BBs<br />
NOTE: The air pistol must be charged with CO2 when following this procedure. After the last BB has<br />
been fired, the slide will remain in the rearward position.<br />
Make sure the air pistol is "On Safe" (See Step 2.1).<br />
Remove the magazine (See Step 4.1).<br />
Point the air pistol in a SAFE DIRECTION.<br />
Cock the air pistol by pulling the slide all the way back to the rearward position and releasing it, allowing<br />
it to move forward, or by cocking the hammer (Fig. 5A & 5B).<br />
Take the air pistol "Off Safe" and fire.<br />
Repeat this procedure several times until you are sure you are no longer firing BBs.<br />
You may also unload your air pistol by following the directions listed under Step 6 -Removing a<br />
Jammed BB.<br />
<strong>WARNING</strong>: To prevent your air pistol from accidentally firing when de-cocking it, your thumb<br />
MUST remain on the hammer as you slowly guide the hammer back to the upward position. If you do<br />
not keep your thumb on the hammer while de-cocking the air pistol, it can fire, causing possible injury.<br />
De-cock your air pistol by placing your thumb on the hammer and pulling the trigger as you slowly guide<br />
the hammer back into the forward portion.<br />
Return safety to "On Safe" position (See Step 2.2).<br />
<strong>WARNING</strong>: Even though you go through the unloading procedure, continue to treat the air<br />
pistol as though it were loaded. Do not point at anything you do not intend to shoot.
5. Aiming and Firing Safely<br />
Fig. 5B<br />
You and others with you should always wear shooting glasses<br />
to protect your eyes.<br />
Always aim your air pistol in a SAFE DIRECTION. When you<br />
are sure of your target and backstop, and the area around the<br />
target is clear, cock the air pistol (See Step 4.2) take "Off<br />
Safe" (See Step 2.2) and squeeze the trigger to fire.<br />
Do not shoot at hard surfaces or at the surface of water. The<br />
BB may bounce off or ricochet and hit someone or something<br />
you had not intended to hit.<br />
Always choose your target carefully. It is best to shoot at<br />
paper bullseye targets, which are attached to a safe backstop.<br />
Your backstop should be checked for wear before and after<br />
each use. Replace your backstop if the surface is worn or damaged, or if a ricochet occurs.<br />
Your air pistol is designed for target shooting and is suited for both indoor and outdoor use. Always<br />
remember to place your target carefully. THINK about what you will hit if you miss the target.<br />
The air pistol is correctly aimed when the front sight blade is positioned exactly in the notch of the rear<br />
sight. The top of the front sight blade should be even with the top of the notch in the rear sight. The<br />
bullseye should appear to rest on the top of the front sight.
6. Removing A Jammed BB<br />
IMPORTANT: Firing the air pistol with too little gas pressure left may cause a BB to get stuck in the barrel.<br />
Make sure the air pistol is "ON SAFE" (See Step 2.1).<br />
Unload all of the BBs (See Step 4.2).<br />
Remove the CO2 cylinder (See Step 3.1).<br />
Access the barrel by field stripping the air pistol (see step 7) or by holding the slide in a rearward<br />
position. Insert a ramrod of the proper size into the muzzle end of the barrel and carefully push the<br />
jammed BB into the breech. The barrel could be damaged if the proper sized ramrod is not used.<br />
Turn the air pistol on its side and shake until the jammed BB falls out.<br />
Do not try to reuse that BB. If you are not able to unjam your air pistol by following this procedure,<br />
take no further action. Crosman Corporation or an Authorized Service Station will unjam your air pistol<br />
(no cost during the warranty period).<br />
7. Field Stripping (built-in feature, but not necessary)<br />
Make sure the air pistol is "On Safe" (See Step 2.1).<br />
Remove CO2 cylinder (See Step 3.1).<br />
Make sure the air pistol is unloaded (See Step 4.2).<br />
Swing the trigger guard down and hold it in this position (Fig. 6).<br />
Pull the slide back and slowly lift it up at the rear portion and slide it forward until it comes off.<br />
Reassemble the slide onto the barrel by following the steps in reverse, making sure that the small end of<br />
the main spring is placed on the barrel first.
oil here<br />
8. Maintaining Your Air Pistol<br />
Fig. 6<br />
Your air pistol will maintain proper function for a long time if you oil the slide rails (See Fig. 6) with 2-3<br />
drops of Crosman brand Pellgunoil® lubricating oil after you have fired approximately 250 shots. DO<br />
NOT use a petroleum distillate based oil or solvent and DO NOT over-oil because this can cause<br />
damage to your air pistol. You can also clean the air pistol by using Walther Maintenance Cylinders.<br />
Tampering with the air pistol (other than for field stripping by following the directions in Step 8) or<br />
attempts to change the air pistol in any way may make it unsafe to use and will void the warranty.<br />
If you drop your air pistol, check to see that it works properly before you use it again. If anything seems<br />
changed, like a shorter or weaker trigger pull, this may mean worn out or broken parts. Call Customer<br />
Service at Crosman for assistance before using your air pistol again.
9. Reviewing Safety<br />
Do not ever point the air pistol at any person. Do not ever point the air pistol at anything you do not intend<br />
to shoot.<br />
Always treat the air pistol as though it is loaded and with the same respect you would a firearm.<br />
Always aim in a SAFE DIRECTION. Always keep the muzzle of the air pistol pointed in a<br />
SAFE DIRECTION.<br />
Always keep the air pistol "On Safe" until you are ready to shoot in a SAFE DIRECTION.<br />
Always check to see if the air pistol is "On Safe" and unloaded when getting it from another person or from<br />
storage.<br />
Always keep your finger off the trigger and out of the trigger guard until ready to shoot.<br />
You and others with you should always wear shooting glasses to protect your eyes.<br />
Use .177 (4.5 mm) caliber BBs only. Never reuse BBs.<br />
Do not shoot at hard surfaces or at the surface of water. The BB may bounce off or ricochet and hit<br />
someone or something you had not intended to hit.<br />
Replace the backstop if it becomes worn. Place the backstop in a location that will be safe should the back<br />
stop fail.<br />
Do not attempt to disassemble or tamper with your air pistol. Use an Authorized Service Station or return it<br />
to the factory for repair.<br />
Do not put the air pistol away with a CO2 cylinder inserted (See Step 3.1).<br />
Do not put the air pistol away loaded. Make sure ALL of the BBs are unloaded from the air pistol<br />
(See Step 4.2).<br />
Always store this air pistol in a secure location.
SPECIFICATIONS<br />
Mechanism: Repeater<br />
Caliber/Ammunition: BB cal (4.5 mm) Steel Airgun Shot<br />
Magazine: Up to 15 BBs<br />
Weight: 19.75 oz. (.56 kg)<br />
Overall Length: 6.1 in. (15.5 cm)<br />
Sights:<br />
Front Fixed Ramp<br />
Rear Fixed notch<br />
Barrel Length/Material: 3.5 in. (8.95 cm)/Smooth bore brass<br />
Power source CO2 12-gram small neck cylinder<br />
Safety: Lever<br />
Velocity: Up to 295 fps (90 m/s)<br />
PERFORMANCE<br />
Many factors affect velocity, including brand of projectile, type of projectile, amount of CO2 in cylinder,<br />
lubrication, barrel condition and temperature.<br />
REPAIR SERVICE<br />
If your air pistol needs repair, we recommend that you take or send it to an Authorized Service Station or<br />
Crosman Corporation. For an Authorized Service Station near you, visit our web site at www.crosman.com<br />
or call Customer Service at 1-800-724-7486 or 585-657-6161. (International customers<br />
should contact their distributor.), DO NOT ATTEMPT TO DISASSEMBLE IT! Your air pistol requires<br />
special tools and fixtures to repair it. If you take it apart, you probably will not be able to reassemble it<br />
correctly. Crosman assumes no warranty responsibility under such circumstances.
LIMITED ONE YEAR WARRANTY<br />
This product is warranted to the retail consumer for one year from date of retail purchase against defects<br />
in material and workmanship and is transferable.<br />
WHAT IS COVERED<br />
Replacement parts and labor. Transportation charges to consumer for repaired product.<br />
WHAT IS NOT COVERED<br />
Transportation charges to Crosman for defective product. Damages caused by abuse or failure to perform<br />
normal maintenance. (See Step 7) Any other expense. CONSEQUENTIAL DAMAGES, INCIDENTAL<br />
DAMAGES, OR INCIDENTAL EXPENSES, INCLUDING DAMAGE TO PROPERTY. SOME STATES DO<br />
NOT ALLOW THE EXCLUSION OR LIMITATION OF INCIDENTAL OR CONSEQUENTIAL DAMAGES,<br />
SO THE ABOVE LIMITATION OR EXCLUSION MAY NOT APPLY TO YOU.<br />
WARRANTY CLAIMS<br />
USA Customers: Attach your name, address, description of problem, phone number and copy of sales<br />
receipt to product. Package and return to Crosman Corporation, Rts. 5&20, E. Bloomfield, NY 14443.<br />
Canadian Customers: Follow packaging procedures above and send to Crosman Parts & Service Depot,<br />
611 Neal Drive, Peterborough, Ontario K9J 6X7 Canada.<br />
International Customers: Please return product to your nearest distributor. If you do not know your distributor,<br />
please call 585-657-6161 and ask for our International Department for assistance.<br />
IMPLIED WARRANTIES<br />
ANY IMPLIED WARRANTIES, INCLUDING THE IMPLIED WARRANTIES OF MERCHANTABILITY AND<br />
FITNESS FOR A PARTICULAR PURPOSE, ARE LIMITED IN DURATION TO ONE YEAR FROM DATE<br />
OF RETAIL PURCHASE. SOME STATES DO NOT ALLOW LIMITATIONS ON HOW LONG AN IMPLIED<br />
WARRANTY LASTS, SO THE ABOVE LIMITATIONS MAY NOT APPLY TO YOU.<br />
To the extent any provision of this warranty is prohibited by federal, state, or municipal law which cannot<br />
be preempted, it shall not be applicable. This warranty gives you specific legal rights, and you may also<br />
have other rights which vary from state to state and country to country.
Distributed by<br />
Crosman Corporation<br />
Routes 5 & 20<br />
E. Bloomfield, NY 14443 USA<br />
www.crosman.com<br />
1-800-7AIRGUN