
You also want an ePaper? Increase the reach of your titles
YUMPU automatically turns print PDFs into web optimized ePapers that Google loves.
User’s <strong>Guide</strong>KEEPING THE WORLD SEWING
This houshold sewing machine is designed to comply with IEC/EN 60335-2-28 and UL1594IMPORTANT SAFETY INSTRUCTIONSWhen using an electrical appliance, basic safety precautions should always be followed, includingthe following:Read all instructions before using this household sewing machine.DANGER - To reduce the risk of electric shock:• A sewing machine should never be left unattended when plugged in. Always unplug thissewing machine from the electric outlet immediately after using and before cleaning.• Always unplug before relamping. Replace bulb with same type rated 5 Watt.WARNING - To reduce the risk of burns, fi re, electricshock, or injury to persons:• This sewing machine is not intended for use by persons (including children) with reducedphysical, sensory or mental capabilities, or lack of experience and knowledge, unless theyhave been given supervision or instruction concerning use of the sewing machine by aperson responsible for their safety.• Children should be supervised to ensure that they do not play with the sewing machine.• Use this sewing machine only for its intended use as described in this manual. Use onlyattachments recommended by the manufacturer as contained in this manual.• Never operate this sewing machine if it has a damaged cord or plug, if it is not workingproperly, if it has been dropped or damaged, or dropped into water. Return the sewingmachine to the nearest authorized dealer or service center for examination, repair, electricalor mechanical adjustment.• Never operate the sewing machine with any air openings blocked. Keep ventilationopenings of the sewing machine and foot controller free from the accumulation of lint,dust, and loose cloth.• Keep fingers away from all moving parts. Special care is required around the sewingmachine needle.• Always use the proper needle plate. The wrong plate can cause the needle to break.• Do not use bent needles.• Do not pull or push fabric while stitching. It may deflect the needle causing it to break.• Wear safety glasses.• Switch the sewing machine off (“0”) when making any adjustment in the needle area,such as threading needle, changing needle, threading bobbin, or changing presser foot, etc.• Always unplug sewing machine from the electrical outlet when removing covers, lubricating,or when making any other user servicing adjustments mentioned in the instruction manual.• Never drop or insert any object into any opening.• Do not use outdoors.• Do not operate where aerosol (spray) products are being used or where oxygen is beingadministrated.• To disconnect, turn all controls to the off (“0”) position, then remove plug from outlet.• Do not unplug by pulling on cord. To unplug, grasp the plug, not the cord.• The sound pressure level under normal operating conditions is ≤75dB(A).SAVE THESE INSTRUCTIONS
CONTENTS1GET TO KNOW YOUR MACHINEMachine Overview 4Accessories 5Presser Feet 5Stitch Overview 72SET UPUnpacking 11Pack Away After Sewing 11Accessory Box 12Remove the Accessory Box /Use the Free Arm 12ExtensionTable (only EMERALD 203) 12Connect the Foot Control 13Connect to the Power Supply 13Sewing <strong>Guide</strong> Reference Chart 14Lower the Feed Teeth 15Changing the Presser Foot 15Changing the Needle 15Needles 16Universal Needles 16Stretch Needles 16Denim Needles 16Spool Pins 17Threading the Upper Thread 18Needle Threader 19Threading for Twin Needle 20Cutting the Thread 20Wind the Bobbin 21Place the Bobbin in the Machine 21Presser Foot Lifter 22Thread Tension 223MACHINE FUNCTIONSMachine Functions 23Speed Control Slide 23Foot Control 23Needle Stop Up/Down 24Stop 24Fix 24Reverse 24Presser Foot Pressure Dial 25Stitch Balance 25Function Buttons 26Direct Stitch Selection buttons 26Stitch Width 26Stitch Length 26Menu Selection 26Font Menu Selection (only EMERALD 203) 26Mirror Side to Side 27Stitch Elongation Button 27Memory Button 27Edit Button 27Clear Button 27Buzzer Sound 27Display icons 28Display Icons – Alphabet 28Display Icons – Elongation 29Display Icons – Memory 29Warning Messages 30The Presser Foot is not Lowered 30Main Motor Blocked 30The Buttonhole Lever is not Lowered 30Buttonhole Lever is not Lifted 30Bobbin Winding 30Programming 31Create a Combination 31Adding Stitches or Letters in a Sequence 31Editing Stitches/Letters 32Removing Stitches/Letters 32Opening and Sewing a Stitch Memory 32Stitch Elongation 32
4BASIC SEWING TECHNIQUESSeam 33Edge/Quilting <strong>Guide</strong> 34Overcast 34Seam and Overcast 34Darning and Mending 35Sewing Hems in Heavy Fabric 35Blind Hem 36Sewing Buttonholes 37Buttonhole Slider Foot C 37Corded Buttonhole (Stretch fabrics) 38Sewing on Buttons 38Sewing Zippers 39Center Zipper 39Gathering 40Dual Feeder (only Emerald 203) 405CARE OF YOUR MACHINECleaning 41Changing the Light Bulb 41Clean the Bobbin Area 42Cleaning Under the Bobbin Area 42Trouble Shooting 432
1GET TO KNOW YOUR MACHINE1. GET TO KNOW YOUR MACHINE 3
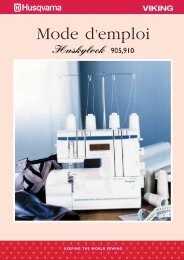
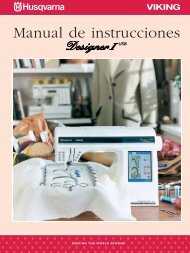
1214 261334512111517162223 24 2520211918610987MACHINE OVERVIEW1. Thread tension dial2. Lid3. InfoDisplay4. Handwheel5. Indicator for active menu6. Function panel7. Main power switch, connection to powersupply and foot control connection8. Accessory box9. Bobbin cover10. Needle plate11. Light12. Thread cutter13. Presser foot pressure dial14. Thread take-up lever15. Presser foot bar and presser foot ankle16. Presser foot17. Needle18. Needle clamp screw19. Presser foot lever20. Reverse button21. Drop feed lever22. Needle up / down23. STOP button24. FIX button25. Speed control slide26. Thread tension disks4
ACCESSORIES1. Screwdriver2. Felt pad3. Seam Ripper/brush1234. Multipurpose tool/Button reed5. Bobbins6. Spool cap large(attached on the machine upon delivery).7. Spool cap small(attached on the machine upon delivery)8. Edge/Quilting guide4859679. Light bulb remover10. Carrying case1011. Accessory box(attached on the machine upon delivery).1112. Needle pack (not in picture)13. Foot control and power cord(not in picture)14. Extension Table (not in picture)(only EMERALD 203)PRESSER FEET7Utility Foot AAttached on the machine upon delivery. This foot is used mainly for straight stitchingand zigzag stitching with a stitch length longer than 1.0.7Presser Foot BWhen sewing short zigzag stitches and satin stitches with less than 1.0 mm stitchlength, other utility stitches or decorative stitches, use this foot. The tunnel on theunderside of the foot is designed to feed smoothly over the stitches.Buttonhole Slider Foot CThis foot has a space in the back to set the size of the buttonhole. The machine willsew a buttonhole to fit that button size.1. GET TO KNOW YOUR MACHINE 5
Blind Hem Foot DThis foot is used for blind hem stitches. The inner edge of this foot guidesthe fabric. The right toe of the foot is designed to ride along the hem edge.7Zipper Foot EThis foot can be snapped on either to the right or to the left of the needle.This makes it easy to sew close to both sides of the zipper teeth. Moveneedle position to right or left to sew closer to zipper teeth or for coveringlarge cording.7Non Stich Glide Foot HThis foot, with a coating underneath, is used when sewing foam, vinyl,plastic, or leather to minimize the risk of these materials sticking to the foot.Edging Foot JThis foot is used for overcasting and seam/overcasting, i.e. stitches whichhave a stitch width of 5.0 and 5.5 mm. Stitches form over the pin whichprevents puckering at the edge of the fabric.Quilter’s 1/4” Piecing Foot PThis foot is used when piecing quilt blocks. The foot has seam guide marks1/4” (6 mm) and 1/8” (3 mm).7 Transparent Foot BThis foot is used for decorative sewing. The presser foot has the sameunderside as presser foot B.Gathering FootThis foot is used for gathering fabric or to gather and attach a ruffle in onestep. The foot is suitable for light to medium weight fabrics.Dual Feed Foot (only EMERALD 203)This foot equalizes the feeding of the upper and lower layers of fabric whichimproves the matching of plaids, stripes and patterns.6
STITCHESUtility Stitches, Menu 1 & 2Use those stitches for utility sewing, garment sewing and mending.1:0 – ButtonholeButtonhole for blouses shirts and linen.1:1 – Straight StitchFor all kinds of sewing in woven fabrics.1:2 – Stretch StitchFor seams in tricot and stretch fabrics.1:3 – Reinforced Straight StitchFor seams which are subject to considerable strain. Use to reinforce and topstitchsportswear and working clothes.1:4 – Three-Step ZigzagFor overcasting, mending, sewing on patches and elastics.1:5 – ZigzagFor lace edging and sewing on bands.1:6 – FlatlockDecorative hems and overlapped seams, belts and bands. For medium/heavystretch fabrics.1:7 – Overcast StitchSeam and overcast in one step along the edge or trim later. For light stretch andnon-stretch fabrics.1:8 – OverlockSeam and overcast in one step along the edge or trim later. For medium andmedium/heavy stretch fabrics.1:9 – Sewing on ButtonSew on buttons with two or four holes.CAAAAABJB_1. GET TO KNOW YOUR MACHINE 7
2:01 – Double OverlockSeam and overcast in one step along the edge or trim later. For heavy stretchfabrics.2:02 – Darning StitchDarn and mend work clothers, jeans, table cloths and towels.2:03 – RicRac StitchFor joining fabric edge to edge, overlapping leather, or decorative stitching.2:04 – Elastic Blind HemInvisible hems in stretch medium and heavy fabrics.2:05 – Woven Blind HemInvisble hems in woven fabrics.2:06 – Bridging StitchFor joining two pieces of fabric with finished edges and for elastic shirring.2:07 – Darning StitchDarn and mend work clothes, jeans, table cloths and more.2:08 – Bartack StitchFor applying belt loops and reinforcing pockets.2:09 - Rounded ButtonholeHeirloom buttonhole for ”hand look” on fine and delicate fabrics. Also for lapelsin suit coat.2:10 – Stretch ButtonholeHeavy reinforced buttonhole for heavy fabrics.2:11 – Keyhole ButtonholeKeyhole buttonhole with square end for tailored jackets, coats, etc.2:12 – EyeletFor garments and home textiles.2:13 – Satin Stitch 2mmFor appliqués, rounded edge, sewing on laces and bands.2:14 – Satin Stitch 4mmFor appliqués, rounded edge, sewing on laces and bands.2:15 – Satin Stitch 6mmFor appliqués, rounded edge, sewing on laces and bands.BBBDDBCCCCCBBBB8
Utility Stitches, Menu 2only EMERALD 2032:16 – Overlock StitchSeam and overcast in one step along the edge or trim later. For medium stretchfabrics.2:17 - Gathering StitchFor gathering.2:18 – Shell Edge StitchFor edgings, sew over the edge on light stretch fabrics, sew woven fabric on bias.2:19 – Elastic or Smocking StitchSew over two rows of elastic thread for elastic shirring.2:20 – Heirloom ButtonholeFor hand look on fine and delicate fabrics. Tip: For jeans buttonholes, increaselength and width of the buttonhole. Use thicker thread.2:21 – Heavy Duty ButtonholeWith reinforced bartacks.2:22 – Leather Buttonhole (Straight Stitch)For leather and suede.BAABCCC2:23 – Scallop Stitch B1. GET TO KNOW YOUR MACHINE 9
Decorative StitchesMenu 3only EMERALD 203Menu 4only EMERALD 203Menu 5only EMERALD 203Alphabet MenuEMERALD 203 EMERALD 183Alphabet Position Table10
2SET UPUNPACKING1. Place the machine on a sturdy, flat surface, remove the packaging and lift off the cover.2. The machine is delivered with an accessory bag, a main cord and a foot control cord.3. Wipe the machine, particularly around the needle and needle plate to remove anyoil before sewing.PACK AWAY AFTER SEWING1. Press the power switch to turn off themachine.2 Unplug the cord from the wall socket andthen from the machine.3 Wind the main cord around your hand andplace the cord in the space in the carryingcase (A).4 Unplug the foot control cord from themachine. Wind the foot control cordaround your hand and place it in the spaceof the foot control (B).5 Check to ensure that all accessories are inthe accessory box. Slide the box on to themachine.6 Press the foot control together and place itin the foot control space in your carryingcase (C).BAC2. SET UP 11
ACCESSORY BOXIn the accessory box there is a special trayfor presser feet and bobbins plus a space forother accessories.Store the presser feet and the bobbins in thetray so they are always easily accessible.Remove the Accessory Box /Use the Free armKeep the accessory box on the machine toprovide a larger flat work surface.Slide the accessory box to the left when youwish to remove it and use the free arm.To facilitate sewing trouser legs and sleevehems use the free arm.To replace the Accessory Box, slide it tightonto the machine until it fits in place.EXTENSION TABLE(only EMERALD 203)Use the Extension Table to extend the sewingsurface so you can easily sew large projectsand quilts.1. Unpack the table and remove theprotective plastic film.2. Place the table on a flat suface so thatthe holes for the legs are facing upwards.Mount the legs into the holes.3. Slide the table onto the free arm of themachine. If neccessary screw the feet upor down to adjust the height.12
CONNECT THE FOOT CONTROLAmong the accessories you will find thefoot control cord and the main power cord.Connecting the foot control cord to the footcontrol is only necessary the very first timeyou are going to use the machine.1. Take out the foot control cord. Turn thefoot control over. Connect the cord tothe socket inside the space of the footcontrol.2. Push firmly to make sure it is properlyconnected.3. Lay the cord into the slot on theunderside of the foot control.CONNECT TO THE POWER SUPPLYOn the underside of the machine you willfind information about the power supply (V)and the frequency (Hz).Before plugging in the foot control, checkto ensure that it is of type “FR4/FR5” (seeunderside of foot control).1. Connect the foot control cord to thefront socket on the bottom right side ofthe machine (A).2. Connect the power cord to the rearsocket on the bottom right side of themachine. (B)3. When you press the power switch to ON(C), both the machine and the light areswitched on.Note: Your EMERALD sewing machine isadjusted to provide the best stitch result at normalroom temperature. Extreme hot and cold temperaturescan affect the sewn result.CBAFor USA and CanadaThis sewing machine has a polarized plug(one blade wider than the other). To reducethe risk of electric shock, this plug is intendedto fit in a polarized outlet only one way. If theplug does not fit fully in the outlet, reverse theplug. If it still does not fit, contact a qualifiedelectrician to install the proper outlet. Do notmodify the plug in any way.2. SET UP 13
SEWING GUIDE REFERENCE CHARTConsult the Sewing <strong>Guide</strong> Reference Chart forthe fast easy way to select the best stitch, stitchlength, stitch width, thread tension, presserfoot and presser foot pressure for your sewingtechnique and fabric.Look in the column for your fabric type:WOVEN FABRICS: for stable fabrics that haveno stretch. Usually woven.STRETCH FABRICS: for fabrics that havestretch. Usually knit.LEATHER/VINYL: for suede, real leather andfor artificial leather and suede.1 23 4 5 61. Fabric2. Presser foot pressure3. Sewing technique4. Stitch5. Presser foot6. Thread tension7. Stitch length8. Stitch width78Select the stitch for the technique youwant to sew:SEAM: sews two pieces of fabric together.OVERCAST: overcast fabric edges to preventthem from fraying and to help them layflat.SEAM/OVERCAST: sews the seam andovercasts the edge all at one time.BASTE: a temporary stitching for fittinggarments, gathering and marking. Usemaximum stitch length.Note: Basting will leave permanent holes inleather and vinyl.BLIND HEM: creates an invisible hem ongarments. Is not recommended for lightweight fabric or for leather/vinyl.HEM: sews the best visible or top stitch hemfor your fabric type and weight.BUTTONHOLE: sews the best buttonholepossible for your fabric.14
LOWER THE FEED TEETHTo lower the feed teeth you need to removethe accessory box. The feed teeth lever islocated on the back of the machine at thebase of the free-arm.Slide the lever (A) to the right to lower thefeed teeth. The feed teeth are raised when youmove the lever (A)to the left. The feed teethwill come up when you begin to sew or turnthe handwheel towards you. The feed teethshould be lowered when sewing on buttons.CHANGING THE PRESSER FOOTTurn off the main switch1. Make sure the needle is in the highestposition. Pull the presser foot towardsyou.2. Line up the cross pin on the foot with thegap in the presser foot ankle. Press backuntil the foot snaps into place.12ACHANGING THE NEEDLETurn off the main switch1. Use the hole in the multipurpose tool tohold the needle.2. Loosen the needle screw (B).3. Remove the needle.4. Insert the new needle using themultipurpose tool. Push the new needleupwards with the flat side away from youuntil it will go no further.5. Tighten the needle screw (B).B2. SET UP 15
NEEDLESThe sewing machine needle plays an important role in successful sewing. To ensure you willget a quality needle, we recommend needle system 130/705H. The needle package includedwith your machine contains needles of the most popular sizes for sewing on woven andstretch fabrics.Universal Needles (A)Universal needles have a slightly roundedpoint and come in a variety of sizes. Forgeneral sewing in a variety of fabric types andweights.A B CStretch Needles (B)Stretch needles have a special scarf toeliminate skipped stitches when there is aflex in the fabric. For knits, swimwear, fleece,synthetic suedes and leathers. Marked with ayellow band.Denim Needles Sizes 90 (C)Denim needles have a sharp point topenetrate tightly woven fabrics withoutdeflecting the needle. For canvas, denim,microfibers. Marked with a blue band.Note: Change the needle often. Always use a straightneedle with a sharp point (1). A damaged needle(2) can cause skipped stitches, breakage of needlesor snapping of thread. A damaged needle can alsodamage the stitch plate.1216
SPOOL PINSYour sewing machine has two spool pins, amain spool pin and an auxiliary spool pin.The main horizontal spool pin (A) is usedfor sewing with normal threads. The auxiliaryvertical spool pin (B) can be used for largespools of thread or specialty threads. Also usethe vertical spool pin for bobbin winding.ABHorizontal PositionPlace a spool cap and the thread spool on thespool pin. Make sure that the thread reels overthe top. Slide on a second spool cap, slightlylarger than the thread spool.The flat side of the spool cap should bepressed firmly against the spool. There shouldbe no space between the spool cap and thethread spool.Vertical PositionThe vertical spool pin is used when windinga bobbin from a second spool of thread orfor a second spool when sewing with a twinneedle. It can also be used when you aresewing with specialty threads.Raise the spool pin to the vertical position.Slide on the large spool cap and place a feltpad under the thread spool to prevent thethread from reeling off too fast. Place threadspool on the spool pin.Do not place a spool cap on top of thevertical spool pin as it may prevent the spoolfrom rotating.Note: When the spool pin is used in the verticalposition, the thread tension might need to be adjustedmanually.2. SET UP 17
CABETHREADING THEUPPER THREADMake sure the presser foot is raised and theneedle is in the up position.Turn off the main switch.1. Pull the spool pin up. Place a spool cap andthen the thread on the spool pin. Place thesecond spool cap on the spool pin (A). Pushthe spool pin back in.2. Bring the thread in the direction of thearrow under the thread guide (B) so thatthe thread snaps into place. Then bring thethread under the second thread guide (C).3. Bring the thread down between the threadtension discs (D).4. Continue threading by drawing the thread upinto the slot on the take-up lever (E) fromthe right to the left.5. There are two thread guides close to theneedle: (F) and (G). Insert the thread into thetwo thread guides.6. The needle is threaded from front to back.The white on the presser foot ankle makes iteasy to see the eye of the needle. See needlethreader instructions on the next page.7. Place thread under the presser foot and intothe thread cutter where it is cut.EGFD18
Needle ThreaderThe needle must be in the up position to usethe built-in needle threader. We also recommendlowering the presser foot.A1. Use the handle to pull the needle threaderdown, catching the thread under the guide(A).2. Push the needle threader all the way downuntil the metal flanges cover the needle. Asmall hook will pass through the needle eye(B).3. Place the thread under the flanges in front ofthe needle, so the thread catches into the smallhook (C).4. Let the needle threader gently swing back.The hook pulls the thread through the needleeye and forms a loop behind the needle.5. Pull the thread loop out behind the needle.Place the thread under the presser foot andcut the thread.Note: The needle threader is designed to be used for size70-120 needles. You cannot use the needle threader for size60 needles or smaller, the wing needle, twin needle or tripleneedle. There are also some optional accessories that requiremanual threading of the needle.When threading the needle manually make sure that theneedle is threaded from front to back. The white presserfoot ankle makes it easy to see the eye of the needle.1.2.3.BC4.5.2. SET UP 19
Threading for Twin NeedleTurn off the main switch1. Insert a twin needle.2. LEFT NEEDLE: Thread the machine asexplained on page 18 and thread the leftneedle.3. Pull up the vertical spool pin and place aspool cap on the spool pin. Place a threadspool or wind a bobbin with the threadyou are going to use as the second upperthread.4. RIGHT NEEDLE: Thread the machine asbefore but this thread should lie outsidethe upper needle thread guide (A) andbehind the lower needle thread guide (B).Thread the right needle manually.Note: The maximum twin needle width to be used onthis machine is 2.5mm.Note: Only use symmetrical twin needles (C). Do notuse this type of twin needle (D), since it may damageyour sewing machine.ABBACDCUTTING THE THREADOnce you have finished sewing you can cutthe thread by raising the presser foot and drawthe threads to the left side of the machine andcut them using the thread cutter.20
ABCWIND THE BOBBIN1. Pull the vertical spool pin up (A). Place alarge spool cap on the spool pin and placethe thread on the spool pin.2. Bring the thread under the thread tensiondisk (B) and around clockwise.3. Insert the thread though the hole in thebobbin from the inside to the outside.Place the bobbin on the bobbin winderspindle with the free end of the thread atthe top.4. Push the bobbin to the right.5. Hold the thread end and press the footcontrol. After a few turns of the bobbin,cut off the thread end. When the bobbinis full it will stop rotating. Push thebobbin winder to the left and remove thebobbin. Cut off the thread.Place the Bobbin in the MachineTurn off the main switch1. Make sure that the needle is fullyraised before inserting or removingthe bobbin. Open the bobbin cover bymoving the release button to the right(A). Remove the cover (B).2. Place the bobbin in the bobbin caseso that the thread is running in acounterclockwise direction.3. Pull the thread though the slit and pull ittowards the left into the tension.4. Pull the thread so that you have about6 inches (15cm) of thread. Replace thebobbin cover plate.1.BA2.3.4.2. SET UP 21
PRESSER FOOT LIFTERThe presser foot is lowered or raised with the presser foot lifter. If you are sewing on heavyfabric or several layers of fabric, the presser foot can be raised higher to make it easier toplace the fabric underneath the presser foot.THREAD TENSIONTo understand the correct thread tension,sew a few sample straight stitches at differentsettings.1. Begin with a tension that is too loose,i.e. set at the lowest number. The bobbinthread will lie straight and the top threadwill be drawn to the underside of thefabric.2. If you set the tension at the highestnumber, the top thread might break andthe seam may pucker.3. The correct thread tension is set when thethreads interlock in the middle of bothfabric layers or, in the case of decorativestitches, on the underside.Make a few tests on a scrap piece of the fabricyou are going to sew and check the tension.22
3MACHINE FUNCTIONSMACHINE FUNCTIONSSpeed Control SlideWith the speed control slide, you can changethe maximum sewing speed to suit your needs.The slide limits how fast you can sew.To increase the sewing speed, slide the bar tothe right.To reduce the sewing speed, slide the bar tothe left.Foot ControlYou can control the sewing speed by using thefoot control. The harder you press the footcontrol, the faster the machine sews.If you press the foot control all the way, themachine runs at the maximum speed set bythe speed control slide.3. MACHINE FUNCTIONS 23
Needle Stop Up/Down (A)Press this button to lower the needle downor raise up. This function can be useful whenturning a corner on your garment or project.Stop (B)STOP is used to conclude a stitch or tosew just one unit of the stitch. Your sewingmachine ties off the thread and stopsautomatically when one stitch unit or stitchprogram has been completed. The stop iconwill be lit in the InfoDisplay.If you touch the STOP-button while themachine is running, the machine will completethe stitch unit, make lock stitches and stop.If you touch the STOP-button while themachine is standing still, the machine will sewone stitch unit and then stop.ABCDFix (C)By using the FIX button you can tie off astitch at the beginning and/or at the end. TheFIX icon on the InfoDisplay is lit when FIXis activated. Press the FIX button to turn on/off the function.If you touch the FIX-button while themachine is running, the machine will makelock stitches without completing the stitchunit. After the completion of the lock stitchesthe FIX-function is deactivated and the FIXiconin the InfoDisplay is unlit.If you touch the FIX button while themachine is standing still, the machine willmake lock stitches when you press the footcontrol and then continue to sew your stitch.Reverse (D)Reverse is pressed to sew in reverse. Anarrow will be shown in the InfoDisplay whenthe function is active. If you press and holdthe reverse button the machine will sewbackwards until you release the button. If youpress and release the button before startingto sew, the machine will permanently sew inreverse. Press the button again to sew forwardagain.The longest reverse stitch length is 3 mm.24
Presser Foot Pressure DialTurn the presser foot presser dial to adjustthe pressure of the presser foot on the fabricwhen sewing on different thicknesses offabric. The pressure dial should be set on 4for regular sewing. Reduce the pressure to 1-2for applique, cutwork, stretch fabric, chiffon,lace, organdy and other fine fabric sewing.53Stitch Balance (A)If you are sewing a manual buttonhole or adecorative stitch and the stitch is uneven, youcan adjust the stitch with the stitch balancedial. The dial is located on the side of themachine (A).Note: Always place the dial at the neutral positionwhen you have sewn your stitch.AWhen a stitch is too tight (B), correct it byturning the dial counter clockwise.When a stitch is too loose (C), correct it byturning the dial clockwise.BC3. MACHINE FUNCTIONS 25
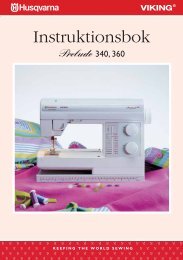
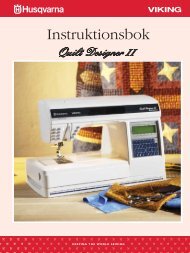
B CBCFAGD E F GDAHJHJIITouch Panel – EMERALD 203 Touch Panel – EMERALD 183FUNCTION BUTTONSDirect Stitch Selection Buttons (A)When menu one is activated you can use thedirect stitch selection buttons to choose yourstitch. By pressing any of the 0 to 9 buttonsyou select the stitch illustrated on that buttonimmediately.Stitch Width (B)The stitch width is set in the same manner asthe stitch length. The preset width is visibleon the InfoDisplay. The width can be adjustedbetween 0 and 7 mm. If a straight stitch isselected, the width button is used to adjust theneedle position to the left or right.Stitch Length (C)When you select a stitch, your machineautomatically sets the best stitch length. Thestitch length is visible on the InfoDisplay. Youcan change the stitch length by pressing the +or – button.Menu Selection (D)Press the Menu Selection button to selectdifferent stitch menus. When turning themachine on, the direct stitch selection mode(menu one) is always selected.There are five different stitch menus; twoutility stitch menus and 3 decorative stitchmenus. By looking at the LED lights to theright of the screen, you will be able to seewhich menu you have selected.There is also an alphabet menu with lowerand uppercase letters and numbers.For more information about the stitches seechapter 1.Font Menu Selection (E)(only EMERALD 203)Touch this button to toggle between thetwo fonts available (Block and Script). Thecurrently chosen font is highlighted on thedisplay.26
Mirror Side to Side (F)Press this button to mirror the selected stitchside to side. If this button is pressed whenstraight stitch with left needle position isselected, the needle position is changed fromleft to right. A stitch in a combination can alsobe mirrored. The change will be visible on theInfoDisplay.If you touch the Mirror side to side buttonwhile sewing, the machine will finish the stitchand mirror the following stitch.Stitch Elongation Button (G)The stitch elongation button can elongatesatin stitches 3:14, 3:15, 3:16, 4:01, 4:02 and4:04 up to five times its normal size whilemaintainig the density. See the change in thestitch in the InfoDisplay.Memory Button (H)Use the memory to store stitch combinations.The stored combinations will not be lost evenif you turn the sewing machine off.EMERALD 203 have eight memories andEMERALD 183 have four memories inthe machine. Each memory can hold up to20 different stitches. See page 31 to programstitches into memories.Clear Button (J)Use this button to erase an incorrect characteror stitch in a combination.The machine erasesthe character you have selected. Each press ofthe button erases one character, or stitch in acombination.BUZZER SOUNDThe machine makes a click sound when youpress a button on the machine to let youknow you are selecting that stitch or function.It also has a warning sound when selecting anincorrect function.It is possible to turn off the sound of thebuttonclicks and the warning sounds, pressthe “E” button while turning on the machine.On the InfoDisplay you will see two differentmodes. Select between the audio on or off bytouching the width + or - buttons. Touch the“M” button to return to normal mode.Edit Button (I)To modify the settings of a character or stitchin the memory mode, use the stitch width orlength + or - buttons to select the stitch to bemodified. Then press the Edit button to setthe selected stitch in the editing mode. Manualsetting of the stitch length, width and mirrorfor these memorized stitches is now possible.Press the edit button again to leave the editingmode and return to memory mode.3. MACHINE FUNCTIONS 27
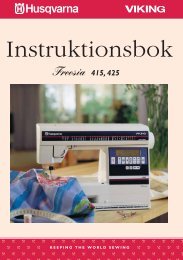
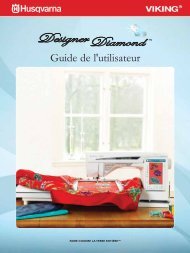
DISPLAY ICONSA. Stitch numberB. Thread tension recommendationC. Presser foot recommendationD. Reverse iconE. Needle up/down iconF. FIX iconG. STOP iconH. Mirror iconI. Stitch lengthJ. Needle positionK. StitchL. Stitch widthA B C DJ IKEFGHLDisplay Icons – AlphabetM. Stitch/Character numberN. Thread tension recommendationO. Presser foot recommendationP. Reverse iconQ. Needle up/down iconR. FIX iconS. STOP iconT. Stitch widthU StitchMUN O PTQRS28
Display Icons – ElongationV. Stitch numberW. Stitch elongationX. Thread tension recommendationY. Reverse iconZ. Needle up/down icona. FIX iconb. STOP iconc. Presser footd. Stitch lengthe. Stitch widthVWe d c bXYZaDisplay Icons – Memoryf. Memory numberfg hg. Number of the current unith. Total number of unitsi. Stitch widthj. Stitch lengthk. Needle up/down iconijkll. Mirror iconm. FIX icononmn. STOP icono. Stitch to editpp. Needle position3. MACHINE FUNCTIONS 29
WARNING MESSAGESThe Presser Foot is Not LoweredIf you touch the foot control and the presserfoot is not lowered, the machine will beep andgive you the following message.Main Motor BlockedThis message means that the thread is twistedor jammed and the hand wheel motor cannotmove. Look at the trouble shooting guide onpage 43.The Buttonhole Lever is not LoweredThe buttonhole or darning stich was selectedand the foot control was pressed while thebuttonhole lever was raised.Buttonhole Lever is not LiftedA stitch other than the buttonhole or darningstitch was selected and the foot control waspressed while the buttonhole lever was down.Bobbin WindingThe following screen will be shown while youare winding the bobbin. Once the bobbin isfull and you have pulled the bobbin winder tothe left, the message will disappear.30
PROGRAMMINGYour sewing machine has a programming function. You can program up to 20 stitches andcharacters into the same combination. Combine any stitches except the following: 1:09, 1:00,2:07, 2:08, 2:09, 2:10, 2:11 and 2:12 (and 2:20, 2:21, 2:22 on EMERALD 203). Save thecombination in one of the memories.Create a Combination1. Touch the memory button on your machine. Apop up appears on your InfoDisplay allowingyou to choose which memory you want tosave your stitches in. Select the number of thememory.2. When you are in the memory screen the cursorflashes on the first position.3. Choose a stitch with the menu selection buttonto get to the desired stitch menu and then thenumber of the stitch.4. The stitch you have selected will be shown inthe InfoDisplay and the cursor will move tothe next position. Repeat step 3 to insert morestitches.5. Start to sew your sequence.6. Touch the memory button to leave thememory mode.Adding Stitches or Letters in a Sequence1. To add a stitch or letter in a sequence youneed to place the cursor where you want thestitch to be placed. The stitch you add will beinserted where the cursor is (A). By pressingthe stitch width or length + or - buttons youwill move forward and backward in yoursequence.2. Select the stitch menu of your choice andchoose the number of the stitch you wish toadd.A3. MACHINE FUNCTIONS 31
Editing Stitches/Letters1. In the memory mode, use the stitch width orlength buttons + and - to place the cursor at thestitch you wish to edit.2. Touch the “E” button to edit the stitch. Thebackground of the stitch you wish to edit becomesblack (B). You can adjust the width, length, mirrorthe stitch and on some stitches, elongate the stitch.3. Touch the “E” button again to return to thememory mode.BRemoving Stitches/Letters1. In the memory mode, use the stitch width orlength buttons to go to the stitch you wish todelete. The machine will delete the stitch thecursor is under.2. Touch the “C” button to delete the stitch that youhave selected. The stitch behind the one that youhave deleted will move forward.Opening and Sewing a Stitch Memory1. Go into the memory mode by touching the “M”button.2. Choose the number of the memory you wish toenter and the memory will open.3. Start to sew by pressing the foot control. Thecursor on the display will move along with thestitch while sewing.Note: Once you have reached the end of the sequence themachine will start over again from the beginning unless you haveprogrammed a stop. The machine will start to sew the stitchwhere the cursor is.Stitch ElongationTo elongate a stitch means that you make the stitchlonger without changing the stitch density. You canelongate the following stitches:3:14, 3:15, 3:16, 4:01, 4:02 and 4:04.You can elongate the stitch up to five times its normallength. When you press the stitch elongation buttonyou will see the following display. The stitch on thescreen will change according to your changes.32
4BASIC SEWING TECHNIQUESSEAMA seam sews two pieces of fabric togetherwith a seam allowance that usually will bepressed open. In most cases edges of theseam allowance are finished with an overcaststitch before sewing the seam.Seams in stretch fabric must stretch with thefabric. The Stretch Stitch makes a stretchyseam that is suitable for sewing togetherpieces of light stretch fabric.1:1 Straight StitchFabric: Woven medium, cut intwo.Use: Presser Foot A and size 80needle.Line up the fabric edge withthe 5/8’’ (15 mm) seam guide.1:2 Stretch StitchFabric: Stretch light, cut in two.Use: Presser Foot A and size75 stretch needle.Line up the fabric edge withthe 3/8’’ (10 mm) seam guide.4. BASIC SEWING TECHNIQUES 33
EDGE/QUILTING GUIDEThe Edge/Quilting <strong>Guide</strong> is used for wideseam allowances, topstitching, or channelquilting. Slide the guide into the clip on theankle. Adjust to the desired position.OVERCASTThe three-step zigzag, is up to 1/4’’ (7mm)wide and suitable for all types of fabrics. Usethis stitch for overcasting, butting two edgestogether to join them, mending tears andother special finishing.Use Edging Foot J when overcasting.1:4 Three-Step ZigzagFabric: All types of fabric.Use: Presser Foot J.SEAM AND OVERCASTThe Seam/Overcast stitch sews the seam andovercasts the edge all at one time. There are anumber of different Seam/Overcast stitcheson your sewing machine, to give the bestresult for your chosen fabric.1:7 Overcast StitchFabric: Stretch light or wovenlight/medium, cut in two.Use: Presser Foot J.Let the toe of the presser footguide the fabric as shown in thepicture.2:1 Double Overlock StitchFabric: Woven heavy, cut in two.Use: Presser Foot B and size 80.1:8 Stretch Seam Overcast StitchFabric: Stretch heavy, cut in twoUse: Presser Foot B and size 90.34
SEWING BUTTONHOLESThe buttonholes in your sewing machine are specially adjusted for different kinds of fabric andgarment. Look at the stitch table on the last pages in this book to find descriptions of eachbuttonhole.Fabric should be interfaced and/or stabilized where buttonholes are to be sewn.Buttonhole Slider Foot C1. Make removable marks on fabric whereyou want the buttonholes to be placed.2. Attach the buttonhole slider foot C andpull out the button holder plate. Insertthe button. The button will determine thelength of the buttonhole.3. Make sure that the thread is passedthough the hole in the presser foot andplaced under the foot.4. Select the buttonhole you want to sew andthen adjust the stitch and length that youdesire.Note: Always sew a test buttonhole on a scrap pieceof fabric.5. Position the fabric under the presser footso that the marking is aligned with thecenter of the buttonhole foot.6. Lower the buttonhole lever, and push itaway from you.7. Hold the end of the upper thread andstart sewing. The buttonholes are sewnfrom the front of the presser foot to theback.8. Once the machine has sewn thebuttonhole, raise the presser foot.4. BASIC SEWING TECHNIQUES 37
Corded Buttonhole (StretchFabrics)When sewing buttonholes in stretch fabrics we recommendcording the buttonhole to increase the stabilityand to keep the buttonhole from stretching out.1. Loop a piece of heavy thread or perle cotton overthe finger at the back of the Buttonhole SliderFoot C.2. Stitch a buttonhole. Do not hold back the cord.The satin buttonhole columns will stitch over thecord.3. When the buttonhole is finished, lift the cord offthe finger and pull out the slack.4. Cross the cord in front of the needle and threadcord ends into a large needle, pull to the wrongside and knot ends before cutting excess.5. Use the seam ripper to carefully open thebuttonhole.SEWING ON BUTTONSSew buttons, snaps, hook and eyes quickly with yoursewing machine. Use the multipurpose tool to create athread shank.1. Select sew-on-button stitch 1:09.2. Snap off the presser foot and lower the feed teeth.3. Place the fabric, multipurpose tool and button underthe ankle with the holes in the button lined up withthe swing of the needle. Check the swing of theneedle by turning the handwheel and making surethat the needle does not hit the button.Note: The recommended width of 3.0 is set for most buttons. Ifyou sew a tiny button or a very large coat button, decrease (–) orincrease (+) the stitch width until the swing of the needle sews inthe holes of the button or snap.4. Press the foot control. The sewing machine willsew the button in place, make a fix and then stop.5. Raise feed teeth and remove the fabric.Note: Place the thin end of the clearance plate under the buttonwhen sewing on light fabrics. Use the thick end for heavierfabrics. Hold in place on the fabric with transparent tape.38
SEWING ZIPPERSThe Zipper Foot E can be snapped on either to the right or to the left of the needle, makingit easy to sew both sides of the zipper from the same direction. To sew the other side of thezipper, reposition the Zipper Foot.Center Zipper1. Sew the two fabrics right sides together alongthe 5/8’’ (15 mm) seam line, stopping at thenotch for the zipper placement.2. Baste the remaining seam where the zipperwill be placed. Press the seam open. Place thezipper right side to the pressed open seamallowance, placing the zipper stop at the notch.Pin the zipper on the right side so that it staysin place.3. Select straight stitch and move the needleposition to the left. Snap on the Zipper FootE so the needle is on the left side of the foot.Place fabric under the foot right side up withthe zipper foot on the right side of the zipper.4. Begin stitching across the bottom, turn thefabric and stitch the right side of the zipper tothe top.5. To avoid fabric shifting, sew the left side ofthe zipper in the same direction. Snap on theZipper Foot E so the needle is on the right sideof the foot. Move the needle position to theright.6. Begin stitching across the bottom, turn thefabric and stitch the left side of the zippersewing from the bottom to the top.7. Remove the basting stitches.Note: To adjust the position of the stitching line, adjust theneedle position.4. BASIC SEWING TECHNIQUES 39
5CARE OF YOUR MACHINETo keep your sewing machine operating well, clean it often. No lubrication (oiling) is needed.Turn off the main switch.CLEANINGWipe the exterior surfaces of your sewing machine with a soft cloth to remove any dust or lintbuilt up.CHANGING THE LIGHT BULBOnly use light bulbs of a type as indicated onthe front of the machine (12V, 5W). They areavailable at your authorized HUSQVARNAVIKING® dealer.Turn off the main switch.1. Place the light bulb remover with thedeep hole, marked OUT, around the bulb.Do not turn the bulb, just pull it out toremove it.2. When inserting a new light bulb place theremover with the shallow hole, markedIN, around the new bulb. Insert the newbulb by pushing it up.5. CARE OF YOUR MACHINE 41
CLEAN THE BOBBIN AREATurn off the main switch1. Remove the presser foot, the bobbin coverand bobbin.2. Clean the feed teeth with the brush.Cleaning Under the Bobbin AreaTurn off the main switchAfter sewing several projects or any time younotice an accumulation of lint in the bobbin casearea, the area under the bobbin case must becleaned.1. Remove the needle, presser foot, bobbincover and bobbin.2. Remove stitch plate by removing thetwo screws in the stitchplate. Lift up thestitchplate.3. Lift the bobbin case upwards and remove it.4. Clean the area with the brush or with a drycloth.5. Put the bobbin case back into the hook raceso that the tip fits into the stopper.42
TROUBLE SHOOTINGHave your Sewing Machine Serviced Regularlyby an Authorized HUSQVARNA VIKING ® Dealer!If you have followed the below trouble shooting information and still are having sewingproblems, take the sewing machine to your authorized dealer. If there is a specific problem, itis a great help to test sew with your thread on a scrap of your sewing fabric and bring it to yourdealer. A sewing sample will often give much better information than words.Non-Original Parts and AccessoriesThe warranty does not cover any defect or damage caused by use of non-original accessories orparts.Any Time You Experiencea Problem When Sewing:• Rethread the top and bobbin threads.• Use different spool pin positions (verticalor horizontal).• Use thread nets and quality thread. Werecommend the same sewing threadon top and bobbin for general sewing.For decorative sewing we recommendembroidery thread on top and regularsewing thread on bobbin.Fabric Puckers?• Check needle, it could be damaged.• Rethread top and bobbin threads.• Change thread type to match fiber andsewing technique.• Use quality thread• Shorten stitch length• Use stabilizer• Check your thread tensionSkipped Stitches?• Check needle - it could be damaged.• Change needle to recommended size andtype.• Be sure the needle is inserted correctlyand all the way into the clamp.• Rethread top and bobbin threads.• Use recommended presser foot.• Turn machine off and on to reset.• Consult your dealer for service.Needle Breaks?• Use care not to pull fabric when sewing.• Insert new needle size and type asrecommended.• Insert needle correctly as described in theUser’s <strong>Guide</strong> (page 15).Poor Tension?• Rethread top and bobbin - use qualitythread.• Insert new needle size and type asrecommended.• Follow recommendations for threadtension.Upper Thread Breaks?• Does thread feed smoothly/not catching?• Use thread nets and quality thread. Forspecial threads such as metallic etc pleaseconsult your Accessory User’s <strong>Guide</strong> forspecial needle recommendations.• Rethread top and bobbin threads - checkfor correct threading.5. CARE OF YOUR MACHINE 43
• Try different spool pin positions(horizontal or vertical).• If stitch plate hole is damaged, replacestitch plate.• Is the correct spool cap used in front ofthe thread?Fabric Does Not Move?• Feed teeth up.• Increase stitch length.Bobbin Thread Breaks?• Wind a new bobbin.• Replace the bobbin in the machine, checkcorrect threading.• If stitch plate hole is damaged - replacestitch plate.• Clean bobbin area.Machine Sews Slowly?• Check speed• Remove stitch plate and brush lint frombobbin and teeth area.• Have the sewing machine serviced at yourdealer.Machine Will Not Sew?• Put bobbin winder spindle up into sewingposition.• Check plugs are all the way into machine.• Check wall plug and power to wall plug.Main Motor Blocked• Clear out threads in bobbin case area (seepage 42).• Remove stitch plate and clear out threads• Re-thread machine - top and bobbin.Bobbin Winds Irregularly?• Check threading for bobbin winding.Wrong Stitch, Irregular or Narrow Stitches?• Turn machine off and on to reset.• Change needle, rethread top and bobbinthreads.• Use stabilizer.44
We reserve the right to change the machine equipmentand the ass ort ment of accessories without priornotice, or make modifications to the performance ordesign. Such modifications, however, will always be tothe benefit of the user and the product.INTELLECTUAL PROPERTYVIKING, KEEPING THE WORLD SEWING &Design and EMERALD are trademarks of KSINLuxembourg II, S.ar.l.HUSQVARNA and the “crowned H-mark” aretrademarks of <strong>Husqvarna</strong> AB. All trademarks are usedunder license by VSM Group AB.This machine is protected by the following patents/registration RCD 000651369-0001 ; USD 557,291Please note that on disposal, this product mustbe safely recycled in accordance with relevantNational legislation relating to electrical/electronicproducts. If in doubt please contact your retailerfor guidance.CE - Authorised RepresentativeVSM Group AB, SVP WorldwideDrottninggatan 2, SE-56184, Huskvarna, SWEDEN
www.husqvarnaviking.com413 24 06-26H • InHouse • © 2012 KSIN Luxembourg II, S.ar.l. • All rights reserved • Printed in Germany on environmentally-friendly paper