F3Dn Service Manual Parts Replacement / Section 2.2 ... - FFSNorge
F3Dn Service Manual Parts Replacement / Section 2.2 ... - FFSNorge
F3Dn Service Manual Parts Replacement / Section 2.2 ... - FFSNorge
- No tags were found...

You also want an ePaper? Increase the reach of your titles
YUMPU automatically turns print PDFs into web optimized ePapers that Google loves.
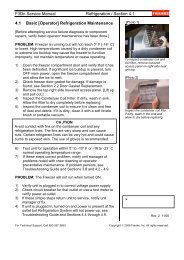
<strong>F3Dn</strong> <strong>Service</strong> <strong>Manual</strong> Motor Test / <strong>Section</strong> 2.52.5 Motor Test ProcedureNote: Follow this Motor Test Procedure before replacing:• Drum Rotor Motor [<strong>Section</strong> 2.6]• Door Lift Motor [<strong>Section</strong> 2.7]• Door [Open] Motor [<strong>Section</strong> 2.81) Roll the unit out to allow easy access to rearservice panel.2) Leave unit plugged in but be cautions whenopening unit back and touching Boards, etc.3) Remove the two screws to open rear serviceaccess panel.4) Go to Main Control Boards and locate thediagnostic display (upper right) and threewhite command buttons marked: SW1, SW2and SW3, just below the display surfacemount.Key: Bold type = Actual Display Content. // = Break to second line of DisplayStep Action Required Resulting Diagnostic Display1 From unit front turn Lane Power TouchPad ON.Display will cycle through setup screensending with: Stby [Standby].2 Push and hold buttons: SW1 and SW3: All Clear?? // 1=OK 3=Exit3 Press SW1 button. [=OK] U.S. or Alt?? // 1=US 2= Alt. [Alternate]4 Press SW1 or SW2 button as required.[Procedure assumes SW1=US pressed.]Preload = 2175 [Four digit number]Add Large Load [681 gm or 1.5 lbs.] //1=OKNote: Check to verify fries loading chute is in place and no stray fries are in loading area.5 Press SW1 button. [=OK]6 Add 1.5 pound weight [or six 4:1 Patties] tolane product loading chute.7 Press SW1 button. [=Cal] Large = 226 // Z = ---- P= ---- C=---- //Done 1= Cal 3 = Exit8 Press S3 button. [to exit Calibration Test]9 Press and hold S2 and S3 buttons Motor Test ? // 1=OK 2= Nxt 3=Exit10 Press SW1 button. [=OK] Drum Mtr? // 1= OK 3=Nxt [Next]11 Press SW1 button. [=OK] Drum Trq = 0000 [Torque value] // 1 =Run 3 = Next12 Press SW1 button to run motor. Checkmotor shaft and listen for excessive noise.Drum Trk = 00XX [Numeric value willchange. A high number means a problem.]13 Press SW3 button [=Next Test]. Lift Motor? // 1 = OK 3 = Next14 Press SW1 button. [=OK] Trq = 0000 LC = 0000 [Load Cell] //1 = Run 3 = Next15 Press SW1 button. [Lowers slide, turnscam & motor rotates.]Trq = 00XX [Typically small value] LC =XXXX [Live reading from Load Cell. Cancheck load cell function.]For Technical Support, Call 800-537-2653.Copyright Ó 2006 Franke, Inc. All rights reserved.