F3Dn Service Manual Parts Replacement / Section 2.2 ... - FFSNorge
F3Dn Service Manual Parts Replacement / Section 2.2 ... - FFSNorge
F3Dn Service Manual Parts Replacement / Section 2.2 ... - FFSNorge
- No tags were found...

Create successful ePaper yourself
Turn your PDF publications into a flip-book with our unique Google optimized e-Paper software.
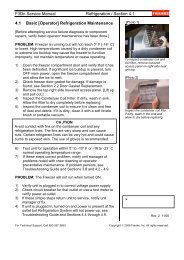
<strong>F3Dn</strong> <strong>Service</strong> <strong>Manual</strong> <strong>Parts</strong> <strong>Replacement</strong> / <strong>Section</strong> 2.122.12 Basket-Present Sensor <strong>Replacement</strong>[Part No. 19000182]1) Roll the unit out to allow access to rear service panel.2) Disconnect power at outlet. [Pull power cord plug.]3) Remove two screws securing service access panel.4) Locate Basket-Present Sensor cable lead connection toMain Control Board. [See Photo 1]5) Disconnect Basket Present Sensor cable where it matesto main wiring harness, just above Door Open Assembly.[See Photo 2]6) Using a crescent wrench or 1” [25 mm] box wrench,unscrew the sensor-retaining nut from the Basket-Present Sensor Sleeve. [See Photo 3]7) The Basket-Present Sensor must be unscrewedcounterclockwise from the mounting block. [The plasticthreads are very fine, so this will take some time.]8) Take the new Basket-Present Sensor [P/N 19000182]and screw [clockwise] back into plastic sensor sleeve,until fully seated.9) Replace the sensor-retaining nut and tighten securelywith wrench, but do NOT over-tighten.10) Reattach the Basket-Present Sensor cable lead to theMain Wiring Harness. [See Photo 2]11) Plug in unit power cord to power supply.[Photo 1]Disconnect Basket Load Sensorcable connector at Main ControlBoard.[Photo 2]The Basket-Present Sensor’scable can be disconnected fromthe main wiring harness.[Photo 3]Test the new Basket-Present Sensor by:12) Filling the Lane Hopper with Fries to a level past the LowProduct Sensor. Switch ON main power on front panel.Press LANE POWER and turn on Lane at the frontControl Panel. NOTE: Make sure Lane is in AUTO Mode.13) When LOAD READY light comes ON, insert empty frybasket into loading position. If fries are dispensed,Basket-Present Sensor is functioning properly.14) NOTE: A green indicator on the back of the sensorcomes on when it senses the basket.15) Close rear service access panel and return <strong>F3Dn</strong>Dispenser to normal operating location.Remove sensor-retaining nutwith wrench and screw out thebasket sensor.‣Rev. 1 12/06For Technical Support, Call 800-537-2653.Copyright Ó 2006 Franke, Inc. All rights reserved.