F3Dn Service Manual Parts Replacement / Section 2.2 ... - FFSNorge
F3Dn Service Manual Parts Replacement / Section 2.2 ... - FFSNorge
F3Dn Service Manual Parts Replacement / Section 2.2 ... - FFSNorge
- No tags were found...

You also want an ePaper? Increase the reach of your titles
YUMPU automatically turns print PDFs into web optimized ePapers that Google loves.
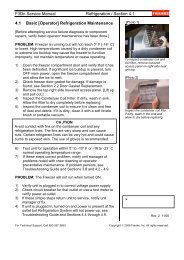
<strong>F3Dn</strong> <strong>Service</strong> <strong>Manual</strong> <strong>Parts</strong> <strong>Replacement</strong> / <strong>Section</strong> 2.82.8 Door [Open] Motor <strong>Replacement</strong>[Part No. 18000558]1) Roll the unit out to allow access to rear service panel.2) Disconnect power at outlet. [Pull power cord plug.]3) Remove two screws securing service access panel.4) Remove [and save] the spring retaining clip from the leftside Door Rotation Block Pin. Slip round loop over pinthen remove. Release tension on spring and allow it tohang from the right side spring mounting screw.5) Remove the spring retaining clip from the right side ofthe white plastic Door Cam Link. Remove that link. [Youdon’t need to remove the small plastic shaft spacers.]6) Using the 5/32” [4 mm] Allen/hex wrench, remove thefour motor mounting screws, beginning with the two TOPscrews.7) Removing the longer top screws will separate the DoorOpen Sensor & Bracket from the motor assembly.8) Detach the two motor electric power connections.9) Install new motor assembly [P/N 18000558] starting withthe two bottom mounting screws.10) Remount Door Open Sensor & bracket using the twoupper motor mount screws.11) Reconnect the two motor electric power connections:[Red = positive; Black = negative].12) Replace white plastic Door Cam Link, with Stop Screw tothe right side. [Note: Make sure bushings and spacersare on both left and right cam pins, before replacing link.]13) Attach the spring retainer clip to right side Door RotationBlock pin.14) Using both hands, extend spring eye to left side DoorRotation Block Pin. [CAUTION: Spring will be undertension and may snap back.] Plastic bushings must beinstalled in spring end loops, before mounting the spring.15) Replace spring retaining clip and lock in place over pin.Test the replacement Door [Open] Motor as follows:16) Plug in unit power cord to power outlet.17) Turn on main power switch & pressing LANE-POWERtouch pad on front control overlay.18) If LOAD READY light is on, position empty fry basketunder Hopper to activate fry loading cycle in AUTOMode. In MANUAL Mode press MANUAL DISPENSE.19) If Lane properly dispenses fries, replacement Motor anddispensing assembly is working properly.20) Close rear service access panel and return <strong>F3Dn</strong>Dispenser to normal operating location.[Photo 1]Remove the spring clip retainerfrom left side door rotation blockpin, then relieve spring tension.[Photo 2]Remove the two upper motormounting screws first.[Photo 3]Ensure motor drive aligns withthe slot in the slide plate counterbore.‣Rev. 1 9/06For Technical Support, Call 800-537-2653.Copyright Ó 2006 Franke, Inc. All rights reserved.