Channel Drains - NDS
Channel Drains - NDS
Channel Drains - NDS
- No tags were found...

You also want an ePaper? Increase the reach of your titles
YUMPU automatically turns print PDFs into web optimized ePapers that Google loves.
ContentsGeneral channel questions ........................................................................................................................... 5Which type of channel do I need? ............................................................................................................ 5Micro <strong>Channel</strong> <strong>Drains</strong> .................................................................................................................................... 6What lengths are available?...................................................................................................................... 6What is the Micro <strong>Channel</strong> load rating? ................................................................................................... 6Do I need to purchase a separate grate? .................................................................................................. 6How much water can the Micro <strong>Channel</strong> drain? ...................................................................................... 6Does the Micro <strong>Channel</strong> ship with any accessories? ................................................................................ 6Can the Micro <strong>Channel</strong> make bends? ....................................................................................................... 6How do I connect the channels together? ................................................................................................ 6How does the water drain out of the Micro <strong>Channel</strong>? ............................................................................. 6How do I clean out the inside of the Micro <strong>Channel</strong>? .............................................................................. 6Can I use rebar or any other method to stake the channel sections instead of the 6” channelinstallation stakes?.................................................................................................................................... 7Mini <strong>Channel</strong> <strong>Drains</strong> ...................................................................................................................................... 8What lengths are available?...................................................................................................................... 8What colors grates are available? ............................................................................................................. 8Are metal grates available? ...................................................................................................................... 8What is the Mini <strong>Channel</strong> load rating? ..................................................................................................... 8Does the Mini <strong>Channel</strong> ship with any accessories? .................................................................................. 8Can the Mini <strong>Channel</strong> make bends? ......................................................................................................... 8How do I connect the channels together? ................................................................................................ 8How does the water drain out of the Mini <strong>Channel</strong>? ............................................................................... 8Do I need to worry about expansion and contraction of the grates? ...................................................... 8How much water can the channel hold? .................................................................................................. 8How do I glue on the accessories? ............................................................................................................ 8Can I use rebar or any other method to stake the channel sections instead of the 6” channelinstallation stakes?.................................................................................................................................... 9How are the grates connected to the channel? ....................................................................................... 9Spee-D <strong>Channel</strong> <strong>Drains</strong>................................................................................................................................ 101
How are the grates connected to the channel? ..................................................................................... 19Dura Slope <strong>Channel</strong> <strong>Drains</strong> ......................................................................................................................... 20What is the load that the Dura Slope <strong>Channel</strong>s are designed to hold? .................................................. 20What about the Dura Slope Ductile Iron Frame (DS-200)?..................................................................... 20How do I attach the Universal End Cap (DS-224) or Universal End Outlet (DS-227) to the Dura Slope<strong>Channel</strong>? ................................................................................................................................................. 20Do the Dura Slope <strong>Channel</strong>s have to be installed in a particular order? ................................................ 20How do I connect to the bottom drain? ................................................................................................. 20How do I prevent concrete from filling the channel during the pour? ................................................... 20Can the Dura Slope <strong>Channel</strong> make bends? ............................................................................................. 20What is the built-in slope? ...................................................................................................................... 21What are the depths of the channels? ................................................................................................... 21What is the longest run that can be done using Dura Slope <strong>Channel</strong>s? ................................................. 21Do I need to worry about expansion and contraction of the grates? .................................................... 214
General channel questionsWhich type of channel do I need?Automobile traffic, runoff, and application are some of the factors to consider when choosingwhich channel to install. The advantages to each channel are listed below.Micro <strong>Channel</strong>• Slim 1 ¼” width• Designed for residential applications including pools, spas, and patios• 10 ft. long pieces reduces installation time and connections• <strong>Channel</strong> and grate are one integral pieceMini <strong>Channel</strong>• 3” wide grates• Decorative brass grate available• Similar uses as Micro <strong>Channel</strong> with more drainage capacity• Automobile and light truck ratedSpeed-D <strong>Channel</strong>• 4” wide grates• Effective in everything from patios to light vehicular traffic areas• 4’ and 10’ long channel sections• Fabricated 45°, 90°, cross, and tee pieces availablePro Series <strong>Channel</strong>• Available in 3”, 5”, 8”, and 12” widths. 5”, 8”, and 12” are available in shallowor deep channels• 5” channel is compatible with new radius coupling that allows smooth bends assmall as 30” radius• Ideal for locations with heavier traffic loads. PVC, reinforced nylon, and cast irongrates available• Bottom drain or end cap drain available on each channelDura Slope• 6” wide• Easy to assemble with snap together locking joints• Manufactured from durable, lightweight, and chemical resistant HDPE material• 0.7% built-slope is perfect for flat areas• Tested to loads up to XXX psi when coupled with the ductile iron frame and grate5
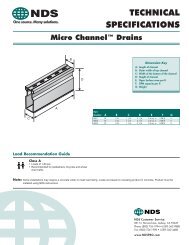
Micro <strong>Channel</strong> <strong>Drains</strong>What lengths are available?The Micro <strong>Channel</strong> only available in 10’ sections. The channel can be easily cut to any length.What is the Micro <strong>Channel</strong> load rating?The Micro <strong>Channel</strong> is rated for pedestrian traffic (up to 60 psi) only.3- What colors are available?The Micro <strong>Channel</strong> is available in white, sand and grey.Do I need to purchase a separate grate?No. The Micro <strong>Channel</strong> and grate are one integral part.How much water can the Micro <strong>Channel</strong> drain?The Micro <strong>Channel</strong> has 2.5 square inches of open space per foot of channel. The channel itselfwill hold about the same volume of water as a 2” diameter pipe. This channel is ideal for areassurrounding pool, spas, and patios.Does the Micro <strong>Channel</strong> ship with any accessories?No. The Micro <strong>Channel</strong> ships in 10 foot sections. Each section ships with 1 coupling. All otheraccessories are sold separatelyCan the Micro <strong>Channel</strong> make bends?Yes. Prefabricated 45°, 90°, and tee’s can be purchased. The channel can also be cut to anyangle using a miter saw. The same angle will need to be cut into another piece of channel. Gluethe pieces together and secure the joint before encasing in concrete.How do I connect the channels together?Sections of Micro <strong>Channel</strong> can be connected together using the Micro <strong>Channel</strong> Coupling (<strong>NDS</strong>part # 8481).How does the water drain out of the Micro <strong>Channel</strong>?There are three options to drain the water out of the Micro <strong>Channel</strong>; the end of the channel, thebottom of the channel, or the side of the channel. Each outlet connects to 1-1/2” schedule 40pipe. Drainage from the channel is limited by the outlets. The outlets have the same open areaas a 1-1/4” pipe.How do I clean out the inside of the Micro <strong>Channel</strong>?A section of the Micro <strong>Channel</strong> Clean Out would have to be installed to clean out the inside ofthe channel. The top of the clean out can be removed to allow for debris to be cleaned from thechannel.6
Can I use rebar or any other method to stake the channel sections instead ofthe 6” channel installation stakes?Yes. The recommended method install the channel is to drive a piece of ½” or 5/8” piece ofrebar into the ground in the trench. Then drill small holes in the bottom flange of the channel.Next, insert tie wire into the hole and twist it onto the rebar such that the top of the channel sits1/8” below the finished edge of the concrete.7
Mini <strong>Channel</strong> <strong>Drains</strong>What lengths are available?The Mini <strong>Channel</strong> only available in 6’ sections. The channel can be easily cut to any length.What colors grates are available?The Mini <strong>Channel</strong> grates are available in white, grey, green, black, sand, and brick red.Are metal grates available?Satin brass and polished brass grates are available for the Mini <strong>Channel</strong>.What is the Mini <strong>Channel</strong> load rating?The plastic grates are rated to support automobiles, light trucks, and medium-duty pneumatictires (up to 175 psi) at speeds less than 20 m.p.h. The brass grates are rated for pedestrian traffic(up to 60 psi).Does the Mini <strong>Channel</strong> ship with any accessories?No. The Mini <strong>Channel</strong> ships in 6 foot sections. All accessories are sold separately.Can the Mini <strong>Channel</strong> make bends?Yes. Prefabricated 45°, 90°, and tee’s can be purchased. The channel can also be cut to anyangle using a miter saw. The same angle will need to be cut into another piece of channel. Gluethe pieces together and secure the joint before encasing in concrete.How do I connect the channels together?Sections of Mini <strong>Channel</strong> can be connected together using the Mini <strong>Channel</strong> Coupling (<strong>NDS</strong> part# 548).How does the water drain out of the Mini <strong>Channel</strong>?There are two options to drain the water out of the Mini <strong>Channel</strong>; the end of the channel or thebottom of the channel. Each outlet connects to a 2” schedule 40 pipe. The bottom drain channelcomes with an atrium grate pre-inserted in the channel to prevent debris from entering the stormdrain system.Do I need to worry about expansion and contraction of the grates?We recommend a 1/8” gap be left between grates during installation to allow for expansion ofthe grates.How much water can the channel hold?The channel itself will hold about the same volume of water as a 3” diameter pipe.How do I glue on the accessories?The Mini <strong>Channel</strong> is made from PVC. PVC glue can be used to glue all pieces together.8
Can I use rebar or any other method to stake the channel sections instead ofthe 6” channel installation stakes?Yes. The recommended method install the channel is to drive a piece of ½” or 5/8” piece ofrebar into the ground in the trench. Then drill small holes in the bottom flange of the channel.Next, insert tie wire into the hole and twist it onto the rebar such that the top of the channel sits1/8” below the finished edge of the concrete.How are the grates connected to the channel?The grates can be screwed to the channel using <strong>NDS</strong> part # 529 – Stainless Steel Screws, PhillipsHead #4 x 5/8” screws (screws sold separately).9
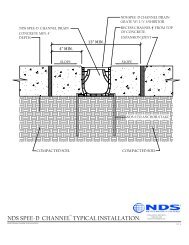
Spee-D <strong>Channel</strong> <strong>Drains</strong>What lengths are available?The Spee-D <strong>Channel</strong> is available in 4 foot and 10 foot sections. The channel can be easily cut toany length.What colors grates are available?The Spee-D <strong>Channel</strong> grates are available in white, grey, green, black, sand, and brick red.Are metal grates available?No. Only plastic grates are available for the Spee-D <strong>Channel</strong>.What is the Spee-D <strong>Channel</strong> load rating?The plastic grates are rated to support automobiles, light trucks, and medium-duty pneumatictires (up to 175 psi) at speeds less than 20 m.p.h.Does the Spee-D <strong>Channel</strong> ship with any accessories?No. All accessories are sold separately.Can the Spee-D <strong>Channel</strong> make bends?Yes. Prefabricated 45°, 90°, tee’s, and crosses can be purchased. The channel can also be cut toany angle using a miter saw. The same angle will need to be cut into another piece of channel.Glue the pieces together and secure the joint before encasing in concrete.How do I connect the channels together?Sections of Spee-D <strong>Channel</strong> can be connected together using the either the <strong>Channel</strong> StrainerCoupling (<strong>NDS</strong> part # 245) or the <strong>Channel</strong> Coupling (<strong>NDS</strong> part # 248).How does the water drain out of the Mini <strong>Channel</strong>?There are two options to drain the water out of the Spee-D <strong>Channel</strong>; the end of the channel or thebottom of the channel. There are two end caps that can be installed to the end of the channel.<strong>NDS</strong> part # 245 connects to 2” schedule 40 pipe and part # 249 connects to both 3” sewer anddrain pipe and 4” sewer and drain fittings. The bottom drain channel comes with an atrium gratepre-inserted in the channel to prevent debris from entering the storm drain system. The bottomdrain fits 3” or 4” sewer and drain fittings.Do I need to worry about expansion and contraction of the grates?We recommend a 1/8” gap be left between grates during installation to allow for expansion ofthe grates.How much water can the channel hold?The channel itself will hold about the same volume of water as a 4” diameter pipe10
Can I use rebar or any other method to stake the channel sections instead ofthe 6” channel installation stakes?Yes. The recommended method install the channel is to drive a piece of ½” or 5/8” piece ofrebar into the ground in the trench. Then drill small holes in the bottom flange of the channel.Next, insert tie wire into the hole and twist it onto the rebar such that the top of the channel sits1/8” below the finished edge of the concrete.How are the grates connected to the channel?The grates can be screwed to the channel using <strong>NDS</strong> part # 229 – Stainless Steel Screws, PhillipsHead #8 x 1” screws (screws sold separately).11
3” Pro Series <strong>Channel</strong> <strong>Drains</strong>What lengths are available?The 3” Pro Series <strong>Channel</strong> only available in 39-3/8” (3.28’) sections. The channel can be easilycut to any length.What colors grates are available?The 3” Pro Series <strong>Channel</strong> grates are only available in light grey.Are metal grates available?No. The only grate available for the 3” Pro Series <strong>Channel</strong> a high impact PVC grate.What is the 3” Pro Series <strong>Channel</strong> load rating?The plastic grate is rated to support automobiles, light trucks, and medium-duty pneumatic tires(up to 175 psi) at speeds less than 20 m.p.h.Does the 3” Pro Series <strong>Channel</strong> ship with any accessories?The 3” Pro Series <strong>Channel</strong> can be purchased in a kit that includes the channel, 2 grates, an endcap, and an end cap with outlet (<strong>NDS</strong> part # 764). The channel, end caps, end cap with outlets,and grates can also be purchased separately.Can the 3” Pro Series <strong>Channel</strong> make bends?There are no prefabricated accessories for the 3” Pro Series <strong>Channel</strong> to make bends, however,the channel can be cut to any angle using a miter saw. The same angle will need to be cut intoanother piece of channel. Glue the pieces together and secure the joint before encasing inconcrete.How do I connect the channels together?Sections of 3” Pro Series <strong>Channel</strong> can be connected using the interlocking end joints.How does the water drain out of the 3” Pro Series <strong>Channel</strong>?There are two options to drain the water out of the 3” Pro Series <strong>Channel</strong>; the end of the channelor the bottom of the channel. Each outlet connects to a 3” sewer and drain pipe.Do I need to worry about expansion and contraction of the grates?We recommend a 1/8” gap be left between grates during installation to allow for expansion ofthe grates.How much water can the channel hold?The channel itself will hold about the same volume of water as a 4” diameter pipe.How do I glue on the accessories?The 3” Pro Series <strong>Channel</strong> is made from PVC. PVC glue can be used to glue all pieces together.12
How are the grates connected to the channel?The grates can be screwed to the channel using <strong>NDS</strong> part # 229 – Stainless Steel Screws, PhillipsHead #8 x 1” screws (screws sold separately).13
5” Pro Series <strong>Channel</strong> <strong>Drains</strong>What lengths are available?The 5” Pro Series <strong>Channel</strong> is available in shallow and deep profile. The shallow profile is 19-11/16” and the deep profile is 39-3/8”. The channel can be easily cut to any length.What colors grates are available?The 5” Pro Series <strong>Channel</strong> plastic grates are available in light grey, green, black, sand, brick red,and white.Are metal grates available?Yes. Cast iron grates are available.What is the 5” Pro Series <strong>Channel</strong> load rating?The plastic grate is rated to support automobiles, light trucks, and medium-duty pneumatic tires(up to 175 psi) at speeds less than 20 m.p.h. The reinforced nylon grate is rated to supportheavy-duty pneumatic tire forklifts and tractor trailers (up to 325 psi) at speeds less than 20m.p.h. The cast iron grate is rated to support heavy-duty hard tire forklifts (up to 575 psi) atspeeds less than 20 m.p.h.Does the 5” Pro Series <strong>Channel</strong> ship with any accessories?The 5” Pro Series <strong>Channel</strong> (deep profile) can be purchased in a kit that includes the channel, 2grates, an end cap, and an end cap with outlet (<strong>NDS</strong> part # 864). The channel, end caps, end capwith outlets, grates, and other accesories can also be purchased separately.Can the 5” Pro Series <strong>Channel</strong> make bends?Yes. 90° and 45° elbows are available for the deep profile 5” Pro Series <strong>Channel</strong>. The newradius coupling (<strong>NDS</strong> part # XXXX) easily connects to the deep profile section to allows forbends as small as 30” radius. The channel can also be cut to any angle using a miter saw. Thesame angle will need to be cut into another piece of channel. Glue the pieces together and securethe joint before encasing in concrete.How do I connect the channels together?Sections of 5” Pro Series <strong>Channel</strong> can be connected using the interlocking end joints.How does the water drain out of the 5” Pro Series <strong>Channel</strong>?1. Shallow profile: End caps can be purchased that connects to a 1-1/2” schedule 40 spout.<strong>NDS</strong> part # 822 has knockouts that can be used to drain water out of the sides of thechannel. The side outlets have to 3” sewer and spout and the bottom has an 1-1/2”schedule 40 spout.2. Deep profile: End caps can be purchased that connected to a 3” sewer and storm drainpipe hub or a 4” sewer and drain pipe fitting.14
Do I need to worry about expansion and contraction of the grates?We recommend a 1/8” gap be left between grates during installation to allow for expansion ofthe grates.How much water can the channel hold?The shallow channel will hold about the same volume of water as a 3” diameter pipe. The deepchannel will hold about the same volume of water as a 5” diameter pipe.How do I glue on the accessories?The shallow profile 5” Pro Series <strong>Channel</strong> is made from PVC. PVC glue can be used to glue allpieces together. The deep profile 5” Pro Series <strong>Channel</strong> is made from HDPE. Welder contactadhesive by Homax Products Inc. can be used to glue the accessories to the deep profile.How are the grates connected to the channel?The grates can be screwed to the channel using <strong>NDS</strong> part # 229 – Stainless Steel Screws, PhillipsHead #8 x 1” screws (screws sold separately).15
8” Pro Series <strong>Channel</strong> <strong>Drains</strong>What lengths are available?The 8” Pro Series <strong>Channel</strong> is available in shallow and deep profile. Both profiles are available in19-11/16” lengths. The channel can be easily cut to any length.What colors grates are available?The 8” Pro Series <strong>Channel</strong> plastic grates are available in light grey.Are metal grates available?Yes. Cast iron grates are available.What is the 8” Pro Series <strong>Channel</strong> load rating?The plastic grate is rated to support automobiles, light trucks, and medium-duty pneumatic tires(up to 175 psi) at speeds less than 20 m.p.h. The reinforced nylon grate is rated to supportheavy-duty pneumatic tire forklifts and tractor trailers (up to 325 psi) at speeds less than 20m.p.h. The cast iron grate is rated to support heavy-duty hard tire forklifts (up to 575 psi) atspeeds less than 20 m.p.h.Does the 8” Pro Series <strong>Channel</strong> ship with any accessories?The 8” Pro Series channels and accessories are sold individually.Can the 8” Pro Series <strong>Channel</strong> make bends?There are no prefabricated accessories for the 8” Pro Series <strong>Channel</strong> to make bends, however thechannel can be cut to any angle using a miter saw. The same angle will need to be cut intoanother piece of channel. Glue the pieces together and secure the joint before encasing inconcrete.How do I connect the channels together?Sections of 8” Pro Series <strong>Channel</strong> can be connected using the interlocking end joints.How does the water drain out of the 8” Pro Series <strong>Channel</strong>?1. Shallow profile: End caps can be purchased that connects to a 3” sewer and drain pipe.<strong>NDS</strong> part # 832 has knockouts that can be used to drain water out of the sides of thechannel. The side outlets have to 3” sewer and spout and the bottom drain fits 4” sewerand drain pipe and 3” sewer and drain fittings.2. Deep profile: End caps can be purchased that has a 3” or 4” sewer and storm spout.Do I need to worry about expansion and contraction of the grates?We recommend a 1/8” gap be left between grates during installation to allow for expansion ofthe grates.16
How much water can the channel hold?The shallow channel will hold about the same volume of water as a 6” diameter pipe. The deepchannel will hold about the same volume of water as a 8” diameter pipe.How do I glue on the accessories?The 8” Pro Series <strong>Channel</strong> is made from PVC. PVC glue can be used to glue all pieces together.How are the grates connected to the channel?The grates can be screwed to the channel using <strong>NDS</strong> part # 229 – Stainless Steel Screws, PhillipsHead #8 x 1” screws (screws sold separately).17
12” Pro Series <strong>Channel</strong> <strong>Drains</strong>What lengths are available?The 12” Pro Series <strong>Channel</strong> is available in shallow and deep profile. Both profiles are availablein 19-11/16” lengths. The channel can be easily cut to any length.What colors grates are available?The 12” Pro Series <strong>Channel</strong> plastic grate is available in grey.Are metal grates available?Yes. Cast iron grates are available.What is the 12” Pro Series <strong>Channel</strong> load rating?The plastic grate is rated to support automobiles, light trucks, and medium-duty pneumatic tires(up to 175 psi) at speeds less than 20 m.p.h. The cast iron grate is rated to support heavy-dutypneumatic tire forklifts and tractor trailers (up to 325 psi) at speeds less than 20 m.p.h.Does the 12” Pro Series <strong>Channel</strong> ship with any accessories?The 12” Pro Series channels and accessories are sold individually.Can the 12” Pro Series <strong>Channel</strong> make bends?There are no prefabricated accessories for the 12” Pro Series <strong>Channel</strong> to make bends, however,the channel can also be cut to any angle using a miter saw. The same angle will need to be cutinto another piece of channel. Glue the pieces together and secure the joint before encasing inconcrete.How do I connect the channels together?Sections of 12” Pro Series <strong>Channel</strong> can be connected using the interlocking end joints.How does the water drain out of the 12” Pro Series <strong>Channel</strong>?The only way to drain from the 12” Pro Series <strong>Channel</strong> is out of the end of the channel. The endcap has a 4” sewer and drain spout.Do I need to worry about expansion and contraction of the grates?We recommend a 1/8” gap be left between grates during installation to allow for expansion ofthe grates.How much water can the channel hold?The shallow channel will hold about the same volume of water as an 8” diameter pipe. The deepchannel will hold about the same volume of water as a 12” diameter pipe.18
How do I glue on the accessories?The 12” Pro Series <strong>Channel</strong> is made from PVC. PVC glue can be used to glue all piecestogether.How are the grates connected to the channel?First the Grate Security Clip (<strong>NDS</strong> part # 849) must be inserted into the slot on the side of thechannel. The grate is then placed onto the clips and screwed into place.19
Dura Slope <strong>Channel</strong> <strong>Drains</strong>What is the load that the Dura Slope <strong>Channel</strong>s are designed to hold?The Dura Slope <strong>Channel</strong> and grates have been tested to the AASHTO M-306 and EN 1433 (DIN1958) test methods by an independent AASHTO accredited lab. The channels strength exceedsthe standards set forth by these tests. This rating is suitable for ____________ traffic.What about the Dura Slope Ductile Iron Frame (DS-200)?Adding the DS-200 to the Dura Slope system increases the load capacity by _____%. Thisrating is suitable for __________ traffic. DS-225 screws (sold separately) must be used to securethe grates.How do I attach the Universal End Cap (DS-224) or Universal End Outlet (DS-227) to the Dura Slope <strong>Channel</strong>?If added to the upstream (female) end, slide the Universal End Cap or Universal End Outlet intothe slot on the end of the channel. If added to the downstream (male) end, <strong>NDS</strong> part # DS-123Phillips head #6 x ¾” screws must be used to screw the Universal End Cap or Universal EndOutlet to the Dura Slope <strong>Channel</strong> (screws sold separately).Do the Dura Slope <strong>Channel</strong>s have to be installed in a particular order?Yes. All channel segments are clearly labeled with and <strong>NDS</strong> part number sticker. The channelsmust be installed in ascending numerical order starting with the smallest part number. The partnumber sticker also shows the number of the segment to be installed upstream and downstreamof segment.How do I connect to the bottom drain?If connecting to 4” sewer and drain (SDR35) pipe, cut out the bottom drain and insert the DS-126 Bottom Outlet Adapter. If using 4” schedule 40 pipes, connect <strong>NDS</strong> part # 56-44 flexiblecoupling to the 4” pipe and then to the bottom drain of the channel. Tighten the clamps to securein place. Other diameter pipes can be connected using the appropriate flexible coupling.How do I prevent concrete from filling the channel during the pour?All Dura Slope <strong>Channel</strong>s come with a removable cover. Put tape over the slots and screws priorto pouring concrete. After concrete has been finished and cured, remove and discard the covers.The screws are used to secure the grates to the channel.Can the Dura Slope <strong>Channel</strong> make bends?Yes. The Dura Slope <strong>Channel</strong> can make bends as small as 30” radius using the Dura SlopeRadius Couplings.20
What is the built-in slope?The fall in each sloped section of Dura Slope channel is 0.34”. Each section comes with a builtin0.7% slope. The neutral sections have flat bottoms.What are the depths of the channels?Each channel section is different. The shallowest channel is 3.99” from the bottom of the grateto the flow line in the channel. The deepest channel is 12.06” from the bottom of the grate to theflow line. All Dura Slope grates are ¾” thick.What is the longest run that can be done using Dura Slope <strong>Channel</strong>s?Without the use of neutral sections (no bottom slope), the maximum length run is 96 feet. Withthe use of one neutral section in its designed place, the maximum length run is 132 feet. Therewill be 8.07” of fall in these runs. The channel can be lengthened by adding additional neutralsections. We do not recommend connecting more than 4 consecutive neutral segments togetherto allow for proper flow and prevent standing water in the channel.Do I need to worry about expansion and contraction of the grates?We recommend a 1/8” gap be left between grates during installation to allow for expansion ofthe grates.21