Worksheet 3-4: Bridge Rectifier and Zener Diode
Worksheet 3-4: Bridge Rectifier and Zener Diode Worksheet 3-4: Bridge Rectifier and Zener Diode
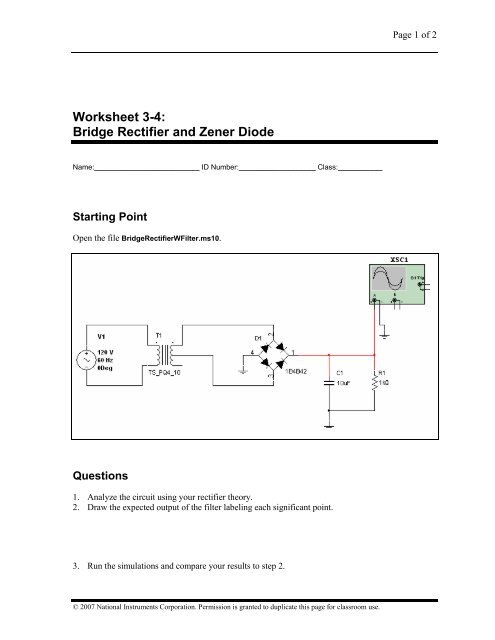
Page 1 of 2Worksheet 3-4:Bridge Rectifier and Zener DiodeName:__________________________ ID Number:___________________ Class:___________Starting PointOpen the file BridgeRectifierWFilter.ms10.Questions1. Analyze the circuit using your rectifier theory.2. Draw the expected output of the filter labeling each significant point.3. Run the simulations and compare your results to step 2.© 2007 National Instruments Corporation. Permission is granted to duplicate this page for classroom use.
- Page 2 and 3: Page 2 of 2 Worksheet 3-44. Open th
- Page 4 and 5: Page 2 of 4 Worksheet 3-52. Open th
Page 1 of 2<strong>Worksheet</strong> 3-4:<strong>Bridge</strong> <strong>Rectifier</strong> <strong>and</strong> <strong>Zener</strong> <strong>Diode</strong>Name:__________________________ ID Number:___________________ Class:___________Starting PointOpen the file <strong>Bridge</strong><strong>Rectifier</strong>WFilter.ms10.Questions1. Analyze the circuit using your rectifier theory.2. Draw the expected output of the filter labeling each significant point.3. Run the simulations <strong>and</strong> compare your results to step 2.© 2007 National Instruments Corporation. Permission is granted to duplicate this page for classroom use.
Page 2 of 2 <strong>Worksheet</strong> 3-44. Open the file <strong>Zener</strong>.ms10.5. Given that Vz = 10 V, check to see whether each zener is operating above or below the knee.Vo1 =Vo2 =6. Replace the parallel resistor in part B with a 200 ohm resistor by double-clicking on the resistor<strong>and</strong> changing its value. Re-calculate to determine if the zener is operating above or below theknee.Vo2 =© 2007 National Instruments Corporation. Permission is granted to duplicate this page for classroom use.
Page 1 of 4<strong>Worksheet</strong> 3-5:IV CurveName:__________________________ ID Number:___________________ Class:___________Starting PointOpen the file IV.ms10.Questions1. Draw the expected diode curve from your theory.© 2007 National Instruments Corporation. Permission is granted to duplicate this page for classroom use.
Page 2 of 4 <strong>Worksheet</strong> 3-52. Open the Oscilloscope by double-clicking on it. Run the simulation by pressing the switch to theright of the task bar or selecting Simulate/Run from the menu. You are now observing thecharacteristics of a silicon diode.3. Press the red arrow key at the bottom of the window until the blue vertical marker appears. Dragthe marker to the point where the diode begins to conduct. Note the voltage found at the bottomleft of the window. Vf = ________________4. Given that delta Rf = delta V/ delta I or V1 - V2 / I1 - I2, measure the voltage <strong>and</strong> current at anytwo points along the curve to calculate Rf. Use the voltage <strong>and</strong> current values shown at thebottom of the window.TransducerGoalTo familiarize the student with two of Multisim’s transducers. The characteristics of both an LED <strong>and</strong>a temperature-controlled resistor are examined.CommentsTransducers can be found in the Misc parts group, Transducers family.Procedure1. Open Transducer.ms10.2. Open the Description Box <strong>and</strong> complete the steps.3. Run the simulations by clicking on the switch or selecting Simulate/Run or clicking the switch.© 2007 National Instruments Corporation. Permission is granted to duplicate this page for classroom use.
<strong>Worksheet</strong> 3-5 Page 3 of 4Additional ChallengeThree circuit files contain faults <strong>and</strong> are denoted with the letters “TS”. These faults may be observedby de-selecting the Hide component faults checkbox found under Options/Circuit Restrictions/Generaltab, then double-clicking on the components <strong>and</strong> sources. Providing a password will prevent studentaccess. The use of Description Boxes is intended to guide the student through the troubleshootingprocess.The troubleshooting files are Clamper1TS.ms10, Clipper1TS.ms10 <strong>and</strong> <strong>Zener</strong>TS.ms10.NI ELVIS ExerciseStarting PointOn your NI ELVIS breadboard, create the diode circuit that you simulated <strong>and</strong> studied in the IV.ms10file. The image below is an example implementation. Open IV.ms10 <strong>and</strong> run the simulations so youhave a useful reference <strong>and</strong> a better idea of how the circuit functions.Analog output 0 (DAC 0) is used in the circuit above to generate the AC input signal. ACH0 is usedto measure the voltage across the diode while ACH1 is used to measure the current through the diode.© 2007 National Instruments Corporation. Permission is granted to duplicate this page for classroom use.


