Tanga Delta H / S2 - Lamello AG
Tanga Delta H / S2 - Lamello AG
Tanga Delta H / S2 - Lamello AG
- No tags were found...

Create successful ePaper yourself
Turn your PDF publications into a flip-book with our unique Google optimized e-Paper software.
<strong>Tanga</strong> <strong>Delta</strong> H / <strong>S2</strong>DFGBINLBedienungsanleitungMode d’emploiOperating instructionsIstruzioni d’usoHandleiding
DeutschSicherheitshinweise und HaftungBitte lesen Sie vor Inbetriebnahme Ihrer Fräsmaschineauch die beiliegenden allgemeinenSicherheitshinweise aufmerksam durch.– Bei Nichtgebrauch der Fräsmaschine, vor allen Servicearbeiten,vor dem Frässcheibenwechsel usw.:Netzstecker ziehen!– Stecker nur bei ausgeschalteter Maschine in dieSteckdose stecken.– Stecker und Kabel vor dem Einstecken auf Beschädigungenüberprüfen. Bei Beschädigung sofort voneinem Fachmann erneuern lassen.– Überzeugen Sie sich vor Inbetriebnahme derFräsmaschine, dass die Spannungsangabe auf demLeistungsschild mit der Netzspannung übereinstimmt.Die Maschine ist nur für Wechselstrom geeignet.– Die <strong>Lamello</strong> Fräsmaschine ist doppelt isoliert und hat(in Übereinstimmung mit den CEE- und VDE-Bestimmungen)ein zweiadriges Kabel ohne Schutzleiter. Siekönnen die Maschine ohne Bedenken an eine nichtgeerdete Steckdose anschliessen.– Das Motorgehäuse nicht anbohren (z.B. zum Anbringenvon Schildern), da dadurch die doppelte Isolationaufgehoben wird. Zur Bezeichnung nur Klebeetikettenverwenden.– Die Schutzeinrichtungen der Maschine sind unbedingtzu verwenden, ein Arbeiten ohne voll funktionsfähigeSchutzeinrichtungen ist nicht erlaubt.– Bei der Arbeit ist grundsätzlich Schutzbrille undGehörschutz zu tragen. Schutzhandschuhe und festesSchuhwerk sind immer zu verwenden.– Das Gerät muss immer mit beiden Händen gehaltenwerden, und es ist für einen sicheren Stand istzu sorgen.– Niemals in das rotierende Schneidewerkzeug fassen.– Es dürfen nur die vom Hersteller vorgesehenenSchneidwerkzeuge verwendet werden (siehe Zubehör).– Bei der Montage und Verwendung der Schneidewerkzeugesind die Anweisungen des Herstellers zubeachten. Es dürfen nur fachmännisch geschliffeneSchneidewerkzeuge einsetzt werden.– Die Grundplatte darf bei ausgefahrenem Schneidewerkzeugnicht festgeklemmt werden.– Das Ein- und Ausfahren des Schneidwerkzeuges, ausder Grundplatte muss leichtgängig funktionieren.– Nur einwandfreie geschärfte Schneidewerkzeugeverwenden, da sonst erhöhte Gefahr besteht, dassdie Werkzeuge zerschlagen.– Das Gerät ist nur für Trockenarbeiten zugelassen.– Das Gerät ist beim Schneiden von Stein und Holz mitgeeigneter Staubabsaugung zu betreiben.– Eine Bearbeitung von Asbest und künstlichen Mineralfasernist mit dem Gerät nicht zugelassen.– Das Gerät weder gewaltsam einspannen noch miteiner Halterung als stationäres Gerät verwenden.– Das Elektrokabel ist immer in sicherem Abstand zumSchneidewerkzeug zu führen, das Kabel immer nachhinten vom Gerät wegführen.– Vor dem Einsatz sicherstellen, dass keine elektrischenLeitungen, Gas- und Wasserrohre im Schneidebereichliegen. Der Arbeitsbereich ist generell zu überprüfen,z.B. mit Hilfe von Metallortungsgeräten.– Beim Schneiden kann Funkenflug entstehen. Daherist darauf zu achten, dass keine Personen gefährdetwerden, und dass sich keine brennbaren Materialienin der Nähe (Funkenflugbereich) befinden.– Die Drehrichtung des Schneidewerkzeugs ist zubeachten.– Beschädigte Schneidewerkzeuge sind sofort zu wechselnund dürfen nicht weiterverwendet werden.– Nur Schneidewerkzeuge für Handvorschub verwenden.– Die Maschine nur für den in dieser Betriebsanleitungbeschriebenen Verwendungszweck benützen.– Die Maschine vor Regen und Feuchtigkeit schützen.– Die einwandfreie Funktion des Gerätes ist nurgewährleistet, wenn original Zubehör- und Ersatzteileverwendet werden.– Hersteller und Verkäufer lehnen jede Produkthaftungab, wenn der Liefer- bzw. Originalzustand derFräsmaschine in irgendeiner Art verändert wird.
DeutschEG-KonformitätserklärungWir erklären in alleiniger Verantwortlichkeit, dass diesesProdukt mit den folgenden Normen oder normativenDokumenten übereinstimmt:EN 55014, EN 60745-1, EN 61000-3-2, EN 61000-3-3,gemäss den Bestimmungen der Richtlinien 73/23EWG,98/37/EG, 89/336/EWG.Geräuschemission und VibrationTypische A-bewertete Schallpegel dieses Elektrowerkzeugessind:Schalldruckpegel = 92 dB (A)Schalleistungspegel = 105 dB (A)Gehörschutz tragen!Die typische Hand-Arm-Schwingung ist kleiner als 5 m/s 2 .<strong>Lamello</strong> <strong>AG</strong>HolzverbindungstechnikHauptstrasse 149CH-4416 Bubendorf K. Steiner E.Zeller<strong>Lamello</strong> <strong>AG</strong>: Sitz Bubendorf, Gerichtsstand LiestalHaftende Gesellschafterin: <strong>Lamello</strong> <strong>AG</strong>, Sitz Bubendorf, Gerichtsstand LiestalGeschäftsführer: Herr Karl Steiner, stellv.: Herr Erich ZellerTechnische Daten<strong>Tanga</strong> <strong>Delta</strong> H<strong>Tanga</strong> <strong>Delta</strong> <strong>S2</strong>Motorenleistung:Drehzahl:Fräswerkzeug max.:Frästiefe max.:Gewicht Maschine:1‘600 W7‘700 U/Min.200 mm0 – 68 mm (Ø 200 mm)5.1 kgMotorenleistung:Drehzahl:Fräswerkzeug max.:Frästiefe max.:Gewicht Maschine:1‘600 W7‘700 U/Min.200 mm0 – 58 mm (Ø 180 mm)optional 0 – 68 mm(Ø 200 mm)5.1 kgLieferumfang<strong>Tanga</strong> <strong>Delta</strong> H<strong>Tanga</strong> <strong>Delta</strong> <strong>S2</strong>Maschine komplett mit HW-Holzblatt Z12 Ø 200 mm,4 m Absaugschlauch mit Anschlussstück fürStaubsauger, Werkzeugsatz, Bedienungsanleitung, Sicherheitshinweise,Schutzbrille, HolzkofferMaschine komplett mit Diamant-TrennscheibeØ 180 mm, 4 m Absaugschlauch mit Anschlussstück fürStaubsauger, Werkzeugsatz, Bedienungsanleitung, Sicherheitshinweise,Schutzbrille, HolzkofferZubehörHW-Holzblatt Z12 Ø = 180 mm, Schnitttiefe bis 58 mm 132317HW-Holzblatt Z12 Ø = 200 mm, Schnitttiefe bis 68 mm 132322 (Standard)HW-Holzblatt Z24 Ø = 180 mm, Schnitttiefe bis 58 mm 132318HW-Holzblatt Z24 Ø = 200 mm, Schnitttiefe bis 68 mm 132320Spez. HW-Trennblatt Z24 Ø = 180 mm (nagelfest) 132319Spez. HW-Trennblatt Z24 Ø = 200 mm (nagelfest) 132321Falzanschlag zu <strong>Tanga</strong> <strong>Delta</strong> 321555Diamant-Trennblatt Ø = 180 mm 132519 (Standard)Diamant-Trennblatt Ø = 180 mm (segmentiert) 132521
DeutschEinsatzbereich <strong>Tanga</strong> <strong>Delta</strong> HDie <strong>Tanga</strong> <strong>Delta</strong> H ist ideal für die Fensterrenovation.Der alte Fensterrahmen wird durch den Schnitt in denHolzrahmen demontiert.Die Maschine kann für folgende Arbeiten verwendet werden:– Heraustrennen alter Fensterrahmen ohne Demontagevon Simsen und Sturzbrettern– Zum Schneiden von Holzwerkstoffen wie Massivholz,Sperrholz, Spanplatten, Faserplatten sowie von verschiedenenKunststoffen– Kürzen von Türblätter, Zuschneiden von Blenden– Schneiden von Schattenfugen (Fugenbreite 7mm)– Wand- und Deckenausschnitte für Lüftungsgitter– Ablängen und Ausschneidarbeiten vie Dachabschlüssen,Ziegelrechen usw.Die Verwendung des Gerätes ist auf die oben genanntenMaterialien beschränkt aber nur bestimmungsgemäss beiEinhaltung der Vorgaben. Dabei müssen alle Weisungenbetr. Wartung und Unterhalt sowie des Einsatzes derunterschiedlichen Schneidwerkzeuge strikte eingehaltenwerden.AnwendungEin leistungsstarkes Absauggerät anschliessen; Filter häufig reinigen oder abrütteln!1. Schutzbrille und Gehöhrschutz aufsetzen2. Tiefensteller auf richtigen Blattdurchmesser einstellen (drehbar auf 180 oder 200 mm)3. Gewünschte Schnittiefe durch Verschieben der Anschlaghülse einstellen (stufenlos verstellbar)4. Gerät am Werkstück anlegen und eine sichere Anschlagmöglichkeit wählen.5. Maschine starten, eintauchen und mit leichtem Druck in Laufrichtung vorschieben (Achtung: Motor nicht überlasten!)Ohne FalzanschlagMit FalzanschlagWerkzeugwechsel1. Netzstecker ziehen2. Schnellverschluss öffnen3. Bodenblech nach vorne ausfahren4. Spindelstop drücken, Senkkopfschrauben mit demSchraubenzieher lösen, Blatt wechseln, Drehrichtungbeachten, Schrauben wieder anziehen.5. Bodenblech aufsetzen6. Tiefensteller auf richtigen Blattdurchmesser einstellen(drehbar auf 180 oder 200 mm)7. Fräswerkzeug mind. 30 Sekunden bei max. Leerlaufdrehzahlzur Probe laufen lassen.Hinweise– Die Maschine wird betriebsbereit geliefert.– Das Holzblatt tritt nur während des Arbeitsvorgangesaus dem Maschinengehäuse.– Überlastschutz: Die Maschine ist mit einem Überstrom-Schutzschalter ausgerüstet.– Zum Durchtrennen von Fremdkörpern wie Nägel undSchrauben steht folgendes spe zielles HM‐Trennblattmit Schnittwinkel null zur Verfügung:HM‐Trennblatt Z24, Art.-Nr. 132321Dieses Trennblatt ist nur zum Eintauchen geeignet.
DeutschEinsatzbereich <strong>Tanga</strong> <strong>Delta</strong> <strong>S2</strong> mit HolzblattDie <strong>Tanga</strong> <strong>Delta</strong> <strong>S2</strong> ist ideal für die Fensterrenovation. Deralte Fensterrahmen wird durch den Schnitt in die Mauerdemontiert.Die Maschine kann für folgende Arbeiten verwendet werden:Arbeiten mit dem Diamantblatt– Heraustrennen alter Fensterrahmen– Zum Schneiden von Baumaterialien wie Putz, Ziegel,Fliesen, Kalksandstein, Kunstmarmor, Granit, Beton,sowie deren Einbauten aus Metall. (Die max. Schnittflächeder Metalleinbauten darf 50 mm 2 nicht übersteigen)Arbeiten mit dem HM-Holzblatt– Heraustrennen alter Fensterrahmen ohne Demontagevon Simsen und Sturzbrettern– Zum Schneiden von Holzwerkstoffen wie Massivholz,Sperrholz, Spanplatten, Faserplatten sowie von verschiedenenKunststoffen– Kürzen von Türblätter, Zuschneiden von Blenden– Schneiden von Schattenfugen (Fugenbreite 7mm)– Wand- und Deckenausschnitte für Lüftungsgitter– Ablängen und Ausschneidarbeiten vie Dachabschlüssen,Ziegelrechen usw.Die Verwendung des Gerätes ist auf die oben genanntenMaterialien beschränkt aber nur bestimmungsgemäss beiEinhaltung der Vorgaben. Dabei müssen alle Weisungenbetr. Wartung und Unterhalt sowie des Einsatzes derunterschiedlichen Schneidwerkzeuge strikte eingehaltenwerden.AnwendungEin leistungsstarkes Absauggerät anschliessen; Filter häufig reinigen oder abrütteln!Die abgeschrägte Front (45°) darf nicht mit Holzblatt sondern nur mit dem Diamantblatt verwendet werden.1. Schutzbrille und Gehöhrschutz aufsetzen2. Tiefensteller auf richtigen Blattdurchmesser einstellen (drehbar auf 180 oder 200 mm)3. Gewünschte Schnitttiefe am Tiefensteller einstellen (stufenlos verstellbar)4. Gerät am Werkstück anlegen und eine sichere Anschlagmöglichkeit wählen.5. Maschine starten, eintauchen und mit leichtem Druck in Laufrichtung vorschieben (Achtung: Motor nicht überlasten! )Beim schneiden mit Diamantblatt folgendes beachten:– Arbeitsdruck = Maschinengewicht– Scheibe rechtwinklig zum Material halten– nicht verkanten– ab und zu Kühlpausen einlegen (Maschine im Freilaufdrehen lassen)– Drehrichtung der Scheibe beachtenWechsel von Front gerade auf Front 45°(für Schnitt bis in die Ecke)1. Netzstecker ziehen2. Schnellverschluss öffnen und arretieren, (Knopf ziehenund im Gegenuhrzeigersinn arretieren)3. Bodenblech nach vorne ausfahren4. Bodenblech mit 45° Ecken aufsetzen5. Schnellverschluss schliessenWerkzeugwechsel1. Netzstecker ziehen2. Schnellverschluss öffnen3. Bodenblech nach vorne ausfahren4. Spindelstop drücken, Senkkopfschrauben mit demSchraubenzieher lösen, Blatt wechseln, Drehrichtungbeachten, Schrauben wieder anziehen.5. Bodenblech aufsetzen6. Tiefensteller auf richtigen Blattdurchmesser einstellen(drehbar auf 180 oder 200 mm)7. Fräswerkzeug mind. 30 Sekunden bei max. Leerlaufdrehzahlzur Probe laufen lassen.Wechsel von Front 45° auf Front gerade1. Netzstecker ziehen2. Schnellverschluss öffnen und arretieren, (Knopf ziehenund im Gegenuhrzeigersinn arretieren)3. Bodenblech nach vorne ausfahren4. Bodenblech gerade aufsetzen5. Schnellverschluss schliessen
DeutschUnterhaltReinigung– Lüftungsschlitze der Maschine sauber halten– Maschine öfters ausblasen– Führungen von Zeit zu Zeit reinigen und leicht ölenReparaturenReparaturen an Elektrowerkzeugen dürfen nur von einerElektrofachkraft durchgeführt werden.Generell nur Originalzubehör verwenden. Bauteile, Anbauteile,deren Verwendung nicht beschrieben wurden,dürfen nur vom Hersteller ausgewechselt bzw. angebautwerden.Das Gerät darf nur verwendet werden, wenn die Grundplatteleicht gängig und automatisch bis zum Anschlagbzw. zur vollen Abdeckung des Werkzeuges zurück läuft.Bei defekter Grundplatte ist das Gerät sofort ausser Betriebzu nehmen und vom Hersteller instandsetzen zu lassen.KohlebürstenDer Motor ist mit selbstabschaltenden Kohlebürstenausgerüstet. Wenn diese abgenutzt sind (nach 100 – 200Betriebsstunden), unterbricht ihre Abschaltautomatik dieStromzufuhr, und der Motor bleibt stehen. Als Ersatz dürfennur original Kohlebürsten verwendet werden (Art. 31 7206),paarweise auswechseln).Nach ca 200 Betriebsstunden bedarf der Motor einer gründlichenReinigung und Kontrolle. Diese Arbeiten sollten nurvon einer autorisierten Fachwerkstatt vorgenommen werden.GarantieDie Garantiefrist beträgt 12 Monate ab Lieferdatum. Sieerstreckt sich auf die kostenlose Behebung aller Störungen,die sich infolge mangelhafter Ausführung oder Materialfehlerergeben. Von der Garantie ausgeschlossen sindSchäden, die auf Gewalteinwirkung, unsachgemässe Behandlungoder natürliche Abnutzung zurückzuführen sind.
FrançaisInstructions sur la sécurité et laresponsabilitéNous vous prions de lire attentivement lesprésentes indications de sécurité avant la mise enservice de votre tronçonneuse.– Dans les cas où la tronçonneuse n’est pas utilisée,avant tout entretien ou changement de lame, etc., lamachine est à débrancher!– N’insérer la fiche dans la prise que si la machine estéteinte.– Avant le branchement, s’assurer du bon état de lafiche et du câble. En cas d‘endommagement, faireimmédiatement réparer par un spécialiste.– Avant la mise en marche, s’assurer que la tensionindiquée sur la plaque signalétique correspond à latension du réseau. La machine est construite pour lecourant alternatif.– La tronçonneuse possède une double isolation ainsique, conformément aux prescriptions CEE et VDE, uncâble bifilaire sans conducteur de protection. Il estpossible de brancher la machine sans aucun risque àune prise sans mise à la terre.– Ne pas percer le boîtier du moteur (par exemplepour y fixer des plaques), la double isolation seraitsupprimée. N’utiliser dans ce cas que des étiquettesautocollantes.– Les dispositifs de protection de la machine sont àutiliser impérativement. Une utilisation sans dispositifsde protection en bon état de marche ne peut êtretolérée.– Porter toujours une paire de lunettes de protectionet un casque anti-bruit. Toujours travailler avec desgants de protection et des chaussures de sécurité.– Toujours tenir la machine à deux mains ets’assurer d‘avoir une position stable.– Ne jamais toucher l’instrument de coupe en rotation.– Seulement les outils de coupe prévus par le fabricantdoivent être utilisés (voir la rubrique accessoires).– Les instructions du fabricant sont à respecter pourtout montage et utilisation des outils de coupe.N’employer que des outils de coupe affûtés de façonprofessionnelle.– Le plateau de base ne doit pas être bloqué lorsquel’outil de coupe est sorti.– La sortie et le retrait de l’outil de coupe du plateau debase doit fonctionner sans à-coup.– N’utiliser que des outils de coupe irréprochablementaffûtés, sans quoi le risque de bris des outils estaugmenté.– La machine n’est autorisée que pour les travaux à sec.– Utiliser la machine pour la découpe de la pierre et dubois avec une aspiration de la poussière adéquate.– Ne pas utiliser la machine pour des travaux dansl’amiante et les fibres minérales synthétiques.– Ne pas encastrer la machine de force. Ne pas l’utiliseravec un dispositif de maintien pour en faire unemachine stationnaire.– Le câble électrique est toujours à tenir à l’écart del’outil de coupe. Le câble doit toujours être conduitderrière la machine.– Avant l’utilisation, s’assurer qu’aucune ligne électrique,ni tuyau de gaz ou conduite d’eau ne se trouve dansla zone de coupe. Vérifier d’une manière généralel’espace où les travaux sont à effectuer (par exempleà l’aide d’un détecteur de métaux).– Un jet de flammèches peut se former lors du travailde découpe. Veiller à ne mettre personne en péril et àtenir tout matériau inflammable à l’écart du périmètredu jet de flammèches.– Respecter le sens de rotation de l’outil de coupe.– Tout outil de coupe endommagé est à changerimmédiatement et ne doit plus être utilisé.– N’utiliser que des outils de découpe destinés à unchargement manuel.– La machine ne doit être utilisée que pour les applicationsdécrites dans ce mode d’emploi.– Ne pas exposer la machine à la pluie et ne pasl’utiliser dans des endroits humides.– Le fonctionnement irréprochable de la machine n’estassuré que si des accessoires et des pièces de rechangeoriginaux sont utilisés.– Le fabricant et le vendeur déclinent toute responsabilitésur la tronçonneuse, si quelconque modification a étéfaite sur celle-ci après livraison ou si le mode d’emploin’est pas respecté.
FrançaisDéclaration de conformité européenneNous déclarons sous notre seule responsabilité que ceproduit est en conformité avec les normes ou documentsnormatifs suivants:EN 55014, EN 60745-1, EN 61000-3-2, EN 61000-3-3,conformément aux réglementations des directives73/23EWG, 98/37/EG, 89/336/EWG.Bruit émis et accélération de vibrationLes mesures réelles (A) des niveaux de bruit de la machinesont:Intensité de bruit = 92 dB (A)Niveau de bruit = 105 dB (A)Porter le casque anti-bruitLa vibration de l’avant-bras est en-dessous de 5 m/s 2 .<strong>Lamello</strong> <strong>AG</strong>HolzverbindungstechnikHauptstrasse 149CH-4416 Bubendorf K. Steiner E.Zeller<strong>Lamello</strong> <strong>AG</strong>: Sitz Bubendorf, Gerichtsstand LiestalHaftende Gesellschafterin: <strong>Lamello</strong> <strong>AG</strong>, Sitz Bubendorf, Gerichtsstand LiestalGeschäftsführer: Herr Karl Steiner, stellv.: Herr Erich ZellerDonnées techniques<strong>Tanga</strong> <strong>Delta</strong> H<strong>Tanga</strong> <strong>Delta</strong> <strong>S2</strong>Puissance:Vitesse de rotation:Outils max.:Profondeur de coupe max.:Poids de la machine:1’600 W7’700 t/min200 mm0 – 68 mm (Ø 200 mm)5.1 kgPuissance:Vitesse de rotation:Outils max.:Profondeur de coupe max.:Poids de la machine:1’600 W7’700 t/min200 mm0 – 58 mm (Ø 180 mm)optionnel jusqu’à 68 mm(Ø 200 mm)5.1 kgFourniture<strong>Tanga</strong> <strong>Delta</strong> H<strong>Tanga</strong> <strong>Delta</strong> <strong>S2</strong>Machine complète avec lame de bois HW, Z12 Ø 200 mm,raccord et tuyau d‘aspiration 4 m, jeu d‘outils, lunettes deprotection, mode d‘emploi, coffret en bois solideMachine complète (plaque de base droite +45°),lame en diamant, Ø =180 mm, raccord et tuyaud’aspiration (4 m), jeu d’outils, lunettes de protection,mode d’emploi, coffret en bois solideAccessoires:Lame de bois HW Z12 Ø = 180 mm, prof. de coupe jusqu’à 58 mm 132317Lame de bois HW Z12 Ø = 200 mm, prof. de coupe jusqu’à 68 mm 132322 (standard)Lame de bois HW Z24 Ø = 180 mm, prof. de coupe jusqu’à 58 mm 132318Lame de bois HW Z24 Ø = 200 mm, prof. de coupe jusqu’à 68 mm 132320Lame de séparation spéc. HW Z24 Ø = 180 mm (résistance aux clous) 132319Lame de séparation spéc. HW Z24 Ø = 200 mm (résistance aux clous) 132321Butée de feuillure pour <strong>Tanga</strong> <strong>Delta</strong> 321555Lame en diamant Ø = 180 mm 132519 (standard)Lame en diamant Ø = 180 mm, segmentée 132521
FrançaisExemples d’emploi de la <strong>Tanga</strong> <strong>Delta</strong> HLa <strong>Tanga</strong> <strong>Delta</strong> <strong>Lamello</strong> est conçue pour les opérations derénovation de constructions anciennes, en particulier pourles travaux suivants:– séparer d’anciens cadres de fenêtres sans démontagedes moulures ni des tablettes– découpes de portes– découper des panneaux– couper des joints d’ombre (largeur du joint 8 mm)– découper des parois et plafonds pour des grilles deventilation, des canaux, etc.– travaux de coupe de longueur et de découpage debordures de toitures et de lattagespour tuiles, etc.L’utilisation de l’appareil est limitée aux matériauxénumérés ci-dessus. L’utilisation doit être conforme aurèglement, elle doit s’effectuer en respect des consignes.Toutes les instructions relatives à la maintenance etl’entretien, ainsi qu’à l’utilisation des différents outils decoupe doivent être rigoureusement respectées.UtilisationBrancher un appareil pour aspiration performant; nettoyer fréquemment le filtre ou le changer!1. Mettre des lunettes de protection et un casque anti-bruit2. Ajuster le réglage de profondeur sur le diamètre de lame correct (pivotant sur 180 ou 200 mm)3. Ajuster la profondeur de coupe souhaitée sur le réglage de profondeur (réglage continu)4. Positionner l’appareil sur l’objet à travailler et choisir une butée sûre5. Démarrer la machine, l’enfoncer et, avec une légère pression, la pousser vers l‘avant(Attention: ne pas surcharger le moteur!)Sans butée de feuillureAvec butée de feuillureChangement de l’outil1. Débrancher la machine2. Ouvrir l’attache rapide3. Sortir la tôle de fond en la tirant4. Pousser le stop de la broche, desserrer les vis à têtefraisée à l’aide du tournevis, changer la lame. Faireattention au sens de rotation. Serrer à nouveau les vis5. Placer la plaque de base6. Ajuster le réglage de profondeur sur le diamètre delame correct (pivotant sur 180 ou 200 mm)7. Pour tester, laisser tourner la lame pendant au moins30 secondes au régime ralentiRemarques– La machine est livrée prête à l’emploi.– La lame ne sort du boîtier de la machine que pendantla phase de travail.– Protection contre la surcharge: la machine est équipéed‘un disjoncteur protégeant de surintensité.– Pour le tronçonnage de corps étrangers tels que clouset vis, on dispose de lames spéciales en métal dur avecangle de coupe zéro: lame à tronçonner HM Z24,Art.no. 132321Ces lames supportent seulement la pénétration enplongé.
FrançaisRayon d’action <strong>Tanga</strong> <strong>Delta</strong> <strong>S2</strong>La <strong>Tanga</strong> <strong>Delta</strong> <strong>Lamello</strong> est conçue pour les opérations derénovation de constructions anciennes, en particulier pourles travaux suivants:Travaux avec la lame en diamant– Découpe de vieux châssis de fenêtres– Pour la découpe de matériaux de construction telsque le crépi, la brique, les carreaux, le grès calcaire,le marbre artificiel (faux marbre), le granit, le béton,ainsi que ses assemblages en métal (la surface de coupemaxi. des assemblages en métal ne doit pas excéder50 mm 2 )Travaux avec la lame de bois HM– Découpe de vieux châssis de fenêtres sans démontagedes rebords et linteaux.– Pour la découpe de matériaux en bois tels que le boismassif, le contreplaqué, les panneaux de particules,les panneaux de fibres, ainsi que différentes matièresplastiques.– Raccourcissements encadrements de portes, rafraîchissementspanneaux de portes– Découpe de joints d’ombre (largeur des joints 5 mm)– Découpe paroi et couverture pour grilles d’aération,canaux etc.L’utilisation de l’appareil est limitée aux matériauxénumérés ci-dessus. L’utilisation doit être conforme aurèglement, elle doit s’effectuer en respect des consignesdes performant, toutes les instructions relatives à la maintenanceet l’entretien, ainsi qu’à l’utilisation des différentsoutils de coupe doivent être rigoureusement respectées.UtilisationBrancher un aspirateur performant ou un appareil pour aspiration; nettoyer fréquemment le filtre ou le changer!Le front biseauté (45°) ne doit pas être utilisé avec la lame de bois mais seulement avec la lame en diamant.1. Mettre des lunettes de protection et un casque anti-bruit2. Ajuster le réglage de profondeur sur le diamètre de lame correct (pivotant sur 180 ou 200 mm)3. Ajuster la profondeur de coupe souhaitée sur le réglage de profondeur (réglage continu)4. Positionner l’appareil sur l’objet à travailler et choisir une butée sûre5. Démarrer la machine, l’enfoncer et, avec une légère pression, la pousser vers l‘avant (Attention: ne pas surcharger le moteur!)Lors de la découpe avec la lame en diamant,respecter les points suivants:– Pression de travail = poids de la machine– Tenir le disque à angle droit du matériau– Ne pas incliner– Aménager de temps en temps des pauses pour refroidissement(laisser tourner la machine en roue libre)– Faire attention au sens de rotation du disqueChangement du front pour l’incliner à 45° (pourcoupe jusque dans l’angle)1. Débrancher la machine2. Ouvrir l’attache rapide et la bloquer (tirer le bouton ettourner dans le sens inverse des aiguilles d’une montre)3. Sortir la tôle de fond vers l’avant4. Placer la tôle de fond 45°5. Fermer l’attache rapideChangement de l’outil1. Débrancher la machine2. Ouvrir l’attache rapide en tirant3. Sortir la tôle de fond vers l’avant4. Pousser le stop de la broche, desserrer les vis à têtefraisée à l’aide du tournevis, changer la lame. Faireattention au sens de rotation. Serrer à nouveau les vis.5. Placer la tôle de fond6. Ajuster le réglage de profondeur sur le diamètre delame correct (pivotant sur 180 ou 200 mm)7. Pour tester, laisser tourner la fraiseuse pendant aumoins 30 secondes au régime ralentiChangement du font à 45° pour le remettre dansl’alignement1. Débrancher la machine2. Ouvrir l’attache rapide et la bloquer (tirer le bouton etrégler dans le sens inverse des aiguilles d’une montre)3. Sortir la tôle de fond vers l’avant4. Placer la plaque de base droite5. Fermer l’attache rapide
FrançaisEntretienNettoyage– Tenir propres les fentes d’aération de la machine– Dépoussiérer la machine assez souvent– Nettoyer les dispositifs de guidage de temps en temps,et huiler légèrementRéparationsLes réparations sur des appareils électriques ne doivent êtreentreprises que par un électricien qualifié.De manière générale, n’utiliser que des accessoiresd’origine. Les éléments de construction, les accessoiresdont l’utilisation n’est pas décrite, ne doivent être remplacéset/ou montés que par le fabricant.L’appareil ne doit être utilisé que si la plaque de basecoulisse facilement et automatiquement vers l’arrièrejusqu’en butée et/ou jusqu’au recouvrement total del’outil. En cas de plaque de base défectueuse, l’appareildoit immédiatement être mis hors service et réparé par lefabricant.CharbonsLe moteur est équipé de balais de charbon se déconnectantautomatiquement. Si ceux-ci sont usés (au boutde 100– 200 heures de fonctionnement), leur systèmeautomatique de déconnexion interrompt l’alimentationen courant, et le moteur s’arrête. Pour le remplacement,n’utiliser que des balais de charbon d’origine(Art. 31 7206), remplacement par paire. Après environ200 heures de fonctionnement, le moteur requiert unnettoyage et un contrôle rigoureux. Ces travaux nedevraient être entrepris que par un atelier spécialiséautorisé.GarantieLa durée de garantie est de 12 mois à partir de la datede livraison. La garantie s’étend à l’élimination gratuitede tous les dérangements provenant d’un défaut defabrication ou de matière. Sont exclus de la garantie lesdommages provenant de forces extérieures, d’une utilisationnon conforme ou de l’usure normale.
EnglishSafety instructions and product liabilityBefore beginning to use your machine please readall safety instructions carefully.– Unplug the power cable whenever the machine is notin use, before the machine is serviced, before changingthe blade etc.– Ensure that the machine is switched off before insertingthe plug in the socket.– Check plug and cable for damage before inserting.If damage is found, have it replaced by a technicianimmediately.– Before the machine is put to use, ensure that the ratedvoltage on the rating plate corresponds with the mainsvoltage. The machine is only suitable for AC powersupplies.– The machine is double insulated and has a two-conductorcable without ground conductor. The machine can beconnected to an ungrounded socket without risk.– Do not drill into the motor housing (e.g. to attachlabels) since this damages the double insulation. Useadhesive labels only.– The protective elements of the machine are to be usedat all times. Working without fully functioning protectiveelements is prohibited.– Always wear ear protection and protective glasseswhen working with the machine. Wearing protectivegloves and good shoes is imperative.– Always hold the machine with both hands andmake sure you have a firm footing.– Never touch the rotating cutting blade.– Only use the tools designated by the manufacturer(see accessories).– When changing the tools follow the instructions by themanufacturer. Only use professionally sharpened tools.– It is not permitted to fix the base plate in positionwhen the tool is emerged.– Sliding the tool in and out of its housing needs to besmooth and easy.– Only use well sharpened tools to avoid damage of thecutter.– The use of the machine is only permitted for dry work.– When cutting wood and stone always attach an adequatedust extraction.– Cutting of asbestos or artificial mineral fibres with themachine is prohibited.– Do not clamp the machine in a fixed position and noruse it as a stationary tool.– Always keep the power cable in a safe distance fromthe cutting blade, lead the power cable backwardsaway from the machine.– Before cutting always make sure there are no electricalinstallations, gas or water pipes in the area of the cut.The area of the cut is to be checked, e.g. with a metallocation device.– Cutting can produce sparks. Therefore make sure thatno one is endangered and that there are no inflammablematerials in the area of the sparks.– Check the direction of the rotation of the blade.– Damaged blades are to be exchanged immediately andare not to be used anymore.– Only use blades designed for manual feed.– Only use the machine for the intended use mentionedin this manual.– Protect the machine from rain and moisture.– To guarantee problem-free use of the machine utilizeonly original accessories and spare parts.– The manufacturer and vendor refuse product liability ifthe original state of the tool has been altered in any way.
EnglishEU-Declaration of ConformityWe declare under our sole responsibility that this productis in conformity with the following standards or normativedocuments:EN 55014, EN 60745-1, EN 61000-3-2, EN 61000-3-3in accordance with the re gu lations of directives73/23EWG, 98/37/EG, 89/336/EWG.Sound emission and vibration accelerationTypically A-weighted noise levels of the tool are:Sound pressure level = 92 dB (A)Sound power level = 105 dB (A)Wear ear protection!Typically the hand-arm vibration is below 5 m/s 2 .<strong>Lamello</strong> <strong>AG</strong>HolzverbindungstechnikHauptstrasse 149CH-4416 Bubendorf K. Steiner E.Zeller<strong>Lamello</strong> <strong>AG</strong>: Sitz Bubendorf, Gerichtsstand LiestalHaftende Gesellschafterin: <strong>Lamello</strong> <strong>AG</strong>, Sitz Bubendorf, Gerichtsstand LiestalGeschäftsführer: Herr Karl Steiner, stellv.: Herr Erich ZellerTechnical data<strong>Tanga</strong> <strong>Delta</strong> H<strong>Tanga</strong> <strong>Delta</strong> <strong>S2</strong>Motor rating:Speed:Cutting tool max.:Cutting depth max.:Machine weight:1‘600 W7‘700 U/Min.200 mm0 – 68 mm (Ø 200 mm)5.1 kgMotor rating:Speed:Cutting tool max.:Cutting depth max.:Machine weight:1‘500 W7‘700 U/Min.200 mm0 – 58 mm (Ø 180 mm)optional 0 – 68 mm (Ø 200 mm)5.1 kgContent<strong>Tanga</strong> <strong>Delta</strong> H<strong>Tanga</strong> <strong>Delta</strong> <strong>S2</strong>Machine complete with Carbide wood blade Z12Ø 200 mm,4 m suction hose with adapter, Set of tools, Safetyglasses, Instruction manual, Wooden caseMachine complete (with straight front and front 45°)Diamond-blade Ø 180 mm, Dust collection set with adapter,Set of tools, Instruction manual, Safety instructions,Wooden caseAccessoriesCarbide wood blade, Z12 Ø = 180 mm, cutting depth 0-58 mm 13 2317Carbide wood blade, Z12 Ø = 200 mm, cutting depth 0-68 mm 13 2322 (standard)Carbide wood blade, Z24 Ø = 180 mm, cutting depth 0-58 mm 13 2318Carbide wood blade, Z24 Ø = 200 mm, cutting depth 0-68 mm 13 2320Carbide wood blade special Z24 Ø = 180 mm 13 2319Carbide wood blade special Z24 Ø = 200 mm 13 2321Rabbet stop for <strong>Tanga</strong> <strong>Delta</strong> 32 1555Diamond blade Ø = 180 mm 13 2519 (standard)Diamond blade Ø = 180 mm, spanned 13 2521
EnglishApplication <strong>Tanga</strong> <strong>Delta</strong> HThe <strong>Lamello</strong> <strong>Tanga</strong> <strong>Delta</strong> H is ideal for the windowreplacement. Ideal for cutting out the old window framesby cutting into the wood frame.It can be use for the following tasks:– Removing of old window frames without taking offthe window sills– Cutting wood materials such as soid wood, plywood,chipboard, fibre board as well as various plastic materials– Shortening doors and cutting of wood covers– Cutting of expansion gaps (gap width 7mm)– Making cuts into walls and ceiling for ventilationopenings etc.– Roofing apertures or cutting to length of roof battensThe use of the machine is limited to the specifiedmaterials. All instructions regarding use and maintenanceare to be strictly complied to.Instruction of useConnect a high performance vacuum cleaner; clean filters frequently!1. Use eye and ear protection2. Set the depth adjuster to the correct blade diameter (turn to 180 or 200 mm)3. Adjust the desired cutting depth by shifting the stop sleeve (stepless)4. Set machine onto the work-piece. Apply the machine securety.5. Start the machine, immerse and push forward in the direction of rotation with light pressure (Careful: Do notoverload the engine!)Without rabbet stopWith rabbet stopChanging of tool1. Disconnect machine from power supply2. Open quick-locking mechanism3. Remove bottom plate by pulling forward4. Press spindle stop, un-tighten the 4 countersunkscrews with a screw driver; change blade (considerdirection of rotation!); re-tighten the 4 screws5. Attache square bottom plate6. Adjust the depth adjuster to correct blade diameter(turn to 180 or 200 mm)7. Let the machine run free at maximum speed for atleast 30 seconds to test correct mounting of the toolPlease note– The machine is supplied ready for use.– The saw emerges from the machine housing onlyduring actual operation.– Overload protection: This machine is equipped with apower overload protection.– For cutting through nails and screws, the followingspecial carbide cut‐off blade with cutting angle zero isavailable: carbide cut‐off blade 24 teeth Art. no. 132321These blades are only suitable for plunge cutting.
EnglishApplication <strong>Tanga</strong> <strong>Delta</strong> <strong>S2</strong>The <strong>Lamello</strong> <strong>Tanga</strong> <strong>Delta</strong> <strong>S2</strong> is ideal for the for the windowreplacement. Ideal for cutting out the old window frames bycutting into the wall.It can be use for the following tasks:When working with the diamond blade– To remove old window frameworks– To cut building materials such as finery, brick, tiles,lime sandstone, artificial marble, granite, concrete, aswell as their metal fixations. (Total maximum cuttingsurface of metal fixations must not exceed 50 mm2)When working with the carbide wood blade– Removing of old window frames without taking offthe window sills– Cutting wood materials such as soid wood, plywood,chipboard, fibre board as well as various plastic materials– Shortening doors and cutting of wood covers– Cutting of expansion gaps (gap width 7mm)– Making cuts into walls and ceiling for ventilationopenings etc.– Roofing apertures or cutting to length of roof battensThe use of the machine is limited to the specifiedmaterials. All instructions regarding use and maintenanceare to be strictly complied to.Instruction of useConnect a high performance vacuum cleaner; clean filters frequently!The diagonal front (45°) must be used only with the diamond blade (not with the wood blade)1. Use eye and ear protection2. Set the depth adjuster to the correct blade diameter (turn to 180 or 200 mm)3. Adjust the desired cutting depth by shifting the stop sleeve (stepless)4. Set machine onto the work-piece. Apply the machine securety.5. Start the machine, immerse and push forward in the direction of rotation with light pressure (Careful: Do notoverload the engine!)When cutting with the Diamond blade, please observethe following:– Working pressure = weight of the machine– Keep cutting blade in a right angle to the working material– Do not twist the blade– Allow the machine to cool down from time to time (Letthe machine run free)– When mounting the blade consider direction of rotationas marked on the bladeChange from straight front to 45° front (for cuttinginto the corner)1. Disconnect machine from power supply2. Open quick-locking mechanism and lock, (pull buttonand lock the counterclockwise)3. Remove bottom plate by pulling forward4. Attach bottom plate with 45° corners5. Close quick-locking mechanismChanging of tool1. Disconnect machine from power supply2. Open quick-locking mechanism3. Remove bottom plate by pulling forward4. Press spindle stop, un-tighten the 4 countersunkscrews with a screw driver; change blade (considerdirection of rotation!); re-tighten the 4 screws5. Attach square bottom plate6. Adjust the depth adjuster to correct blade diameter(turn to 180 or 200 mm)7. Let the machine run free at maximum speed for atleast 30 seconds to test correct mounting of the toolPlease note– The machine is supplied ready for use.– The saw emerges from the machine housing onlyduring actual operation.– Overload protection: This machine is equipped with apower overload protection.Change from 45° front to straight front1. Disconnect machine from power supply2. Open quick-locking mechanism and lock, (pull buttonand lock the counterclockwise)3. Remove bottom plate by pulling forward4. Attach square bottom plate5. Close quick-locking mechanism
EnglishMaintenanceCleaning– Keep the air holes of the machine clean– blow out guidance frequently– from time to time, clean the guidance and oil it slightlyRepairsRepairs at electric power tools may be accomplished onlyby an authorised electrician.Only use original components with the machine. Accessoriesand attachments whose use are not described inthis manual may be replaced and/or mounted by themanufacturer only.The machine may be only used if the base plate runssmoothly and automatically all the way back to the stopto fully cover the cutting tool. In case of a defective baseplate the machine is to be taken immediately out ofoperation and must be repaired by the manufacturer.Carbon brushesThe motor is fitted with self-disconnecting carbon brushes.The motor stops when these have worn out.Only original carbon brushes must be used as replacement(<strong>Lamello</strong> part no. 317206).Always change carbon brushes in pairs!After approx. 100 - 200 hours of operation, the machinerequires a thorough cleaning and check-up.This work should be made only by a suitably equippedwork-shop.WarantyThe waranty is valid for 12 months from the date ofdelivery, during which time all faults due to bad workmanshipor defects in materials will be rectified free ofcharge. Damage due to the application of excessive force,incorrect use or normal wear and tear is not covered bythe waranty.
ItalianoNorme di sicurezza e responsabilitàPrima della messa in funzione della vostra fresatrice,leggere attentamente le istruzioni generali disicurezza allegate.– Quando la fresatrice non viene usata, prima di eseguirequalsiasi lavoro di manutenzione, di sostituire la fresa,ecc: staccare la spina!– Inserire la spina nella presa soltanto con macchina spenta.– Prima dell’inserimento controllare che spina e cavo nonsiano danneggiati. In caso di danni, farli subito sostituireda un tecnico.– Prima della messa in servizio della fresatrice, assicurarsiche i dati di tensione sulla targhetta coincidano con latensione di rete. La macchina è adatta solo per correntealternata.– La fresatrice è doppiamente isolata e (in accordo con lenorme CEE e VDE) ha un cavo a due conduttori senzafilo di massa. E possibile collegare senza problemi lamacchina ad una presa senza la messa a terra.– Non forare la carcassa del motore (ad es. per applicaretarghette), poiché in tal modo viene annullato il doppioisolamento. Per le indicazioni usare soltanto etichetteadesive.– Guidare la fresatrice sempre con entrambe lemani, e assicurarsi die mantenere una posizionestabile.– Utilizzare solo coltelli girabili perfettamente affilate,poiché altrimenti la maggiore forza richiesta dal tagliorompe il pezzo.– Usare la macchina soltanto secondo le norme prescritte.– Non esporre alla pioggia o usare nei dintorni umidi.– I dispositivi di protezione della fresatrice devono essereutilizzati sempre. Non è consentito lavorare senza idispositivi di protezione.– Durante il lavoro con la fresatrice portare sempre dellelenti di protezione e una cuffia per il rumore. Lavoraresempre con guanti di protezione e scarpe di sicurezza.– Non toccare mai la fresa in rotazione– Usare solo delle frese consigliate dal fabbricante (vedirubrica degli accessori.)– Le istruzioni del fabbricante devono essere rispettateper tutti i tipi di montaggio e per i tipo di fresa dautilizzare. Non usare mai delle frese che non sono stateaffilate da uno specialista.– La base della fresatrice non deve essere bloccata mentrela fresa e al di fuori.– L’uscire e il ritiro della fresa devono funzionare facilmentee senza sforzo.– La fresatrice deve essere utilizzata solo per lavori a secco.– Utilizzare la fresatrice per lavori con pietra o legno solocon un aspiratore di polvere adeguato.– Non è consentito usare la fresatrice per lavori con amiantoo con fibre minerali sintetiche.– Non incastrare la fresatrice con la forza, e non utilizzarecon un dispositivo di mantenimento per utilizzarla comemacchina stazionaria.– Il cavo elettrico deve essere tenuto sempre lontano dallafresa e deve essere sempre condotto dietro la fresatrice.– Prima dell’utilizzo assicurarsi che non ci sono cavi elettricio tubi di gas o acqua nella zona da lavoro. Controllarela zona in generale dove si vogliono eseguire i lavori (peresempio con l’aiuto di un lettore di materiale adatto)– Durante il lavoro con la fresatrice possono uscire dellefaville di fuoco. Per questo è consigliato verificare chenon ci siano persone che si possono ferire nei dintorni, eche non ci siano superfici infiammabili vicine alla zona dalavoro.– Rispettare il senso di rotazione della fresa.– Una fresa danneggiata deve essere subito sostituita.– Utilizzare frese destinate a un utilizzo manuale.– Il funzionamento irreprensibile è assicurato solo se siutilizzano attrezzi e pezzi di ricambio originali.– Sia i fabbricanti che i rivenditori sono esenti da ogniresponsabilità dovuta al cattivo utilizzo del prodotto, omanomissione dello stesso.
ItalianoDichiarazione di conformità CEDichiariamo sotto la nostra esclusiva respon sabilità chequesto prodotto è conforme alle seguenti norme e documentinormativi:EN 55014, EN 60745-1, EN 61000-3-2, EN 61000-3-3,conformemente alle disposizioni delle direttive73/23EWG, 98/37/EG, 89/336/EWG.Emissione sonora e accelerazione divibrazioneLa misurazione A del livello di rumorosità di un utensileè di solito:Livello di pressione acustica = 92 dB (A)Livello di potenza acustica = 105 dB (A)Utilizzare le protezioni per l’udito!Le vibrazioni sull’elemento mano-braccio di solito sonoinferiori a 5 m/s 2 .<strong>Lamello</strong> <strong>AG</strong>HolzverbindungstechnikHauptstrasse 149CH-4416 Bubendorf K. Steiner E.Zeller<strong>Lamello</strong> <strong>AG</strong>: Sitz Bubendorf, Gerichtsstand LiestalHaftende Gesellschafterin: <strong>Lamello</strong> <strong>AG</strong>, Sitz Bubendorf, Gerichtsstand LiestalGeschäftsführer: Herr Karl Steiner, stellv.: Herr Erich ZellerCaratteristiche tecniche<strong>Tanga</strong> <strong>Delta</strong> H<strong>Tanga</strong> <strong>Delta</strong> <strong>S2</strong>Potenza:Velocità:Utensili max.:Profondità di taglio max.:Peso:1600 W7700 g/min200 mm0 – 68 mm (Ø 200 mm)5,1 kgPotenza:Velocità:Utensili max.:Profondità di taglio max.:Peso:1600 W7700 g/min200 mm0 – 58 mm (Ø 180 mm)in opzione fino a 68 mm(Ø 200 mm)5,1 kgEquipaggiamento della fornitura<strong>Tanga</strong> <strong>Delta</strong> HMacchina completa, Lama da taglio HW Z12 Ø 200 mm,Raccordo e tubo d’aspirazione (4 m), Set di utensili, Istruzioniper l’uso, Indicazioni di sicurezza, Valigia<strong>Tanga</strong> <strong>Delta</strong> <strong>S2</strong>Macchina completa (piastra base per taglio diritto e45°), Disco diamantato Ø = 180 mm, Raccordo e tubod’aspirazione (4 m), Set di utensili, Istruzioni per l’uso,Occhiali di protezione, ValigiaAccessori specialiLama da taglio HW, Z=12 Ø = 180 mm, profondità taglio 58 mm 132317Lama da taglio HW, Z=12Ø = 200 mm, profondità taglio 68 mm 132322 (standard)Lama da taglio HW, Z=24 Ø = 180 mm, profondità taglio 58 mm 132318Lama da taglio HW, Z=24 Ø = 200 mm, profondità taglio 68 mm 132320Lama da taglio HW speciale, Z=24 Ø = 180 mm 132319Lama da taglio HW speciale, Z=24 Ø = 200 mm 132321Squadra frontale per <strong>Tanga</strong> <strong>Delta</strong> 321555Disco diamantato Ø = 180 132519 (standard)Disco diamantato Ø = 180, dentato 132521
ItalianoCampo di impiego <strong>Tanga</strong> <strong>Delta</strong> H<strong>Lamello</strong> <strong>Tanga</strong> <strong>Delta</strong> è adatto per l’impiego in ristrutturazionidi immobili, in particolare per i seguenti lavori:Lavori con la lama HM– Rimozione di vecchi telai per finestre senza lo smontaggiodi cornicioni e tavole di sostegno.– Per tagliare materiali in legno quali ad esempio il legnomassiccio, compensato, pannelli di truciolato, cartonidi fibra e diversi prodotti in materie plastiche.– Riduzione di battenti, taglio su misura di finestre– Taglio di profilati metallici di tenuta (larghezza giunzioni5 mm)– Ritagli su pareti e soffini per griglie di aerazione, canali ecc.Il campo di impiego dell’apparecchio è limitato aimateriali sopra citati, ma solo a regola d’arte nel rispettodelle prescrizioni. È assolutamente necessario rispettarescrupolosamente tutte le istruzioni relative alla manutenzioneordinaria e straordinaria, nonché quelle relativeall’impiego di utensili di taglio diversi.ApplicazioneCollegare un aspirapolvere o un dispositivo di aspirazione potente; pulire di frequente il filtro o scuoterlo!1. Indossare lenti protettive ed una protezione per l’udito2. Impostare il regolatore di profondità al giusto diametro della lama (registrabile a 180 o 200 mm)3. Impostare la profondità di taglio desiderata sul regolatore di profondità (regolazione continua)4. Posizionare l’apparecchio sul pezzo da lavorare e scegliere una possibilità di arresto sicura.5. Avviare la macchina, affondare ed avanzare con una leggera pressione in direzione di marcia(Attenzione: non sovraccaricare il motore!)Senza squadra frontaleCon squadra frontaleCambio utensile1. Sfilare la spina dalla presa di corrente2. Aprire il dispositivo di chiusura rapida3. Spostare la lamiera di fondo in avanti4. Premere il dispositivo per l’arresto del mandrino, svitarele viti a testa svasata, sostituire la lama, rispettare ilsenso di rotazione, stringere nuovamente le viti.5. Posizionare la lamiera di fondo6. Impostare il regolatore di profondità al giusto diametrodella lama (registrabile a 180 o 200 mm)7. Far funzionare l’utensile (di fresa) per prova peralmeno 30 secondi con il max. numero di giri a vuoto.Avvertenze– La macchina viene fornita già pronta per l’uso.– Durante il funzionamento la lama circolare fuoriescedal corpo della macchina.– Protezione contro il sovraccarico di corrente: La macchinaè dotata di un protezione di sicurezza.– Per tagliare corpi estranei come viti e chiodi, si possonoutilizzare le speciali lame troncatrici seguenti, conangolo di taglio negativo: lama troncatrice di metalloduro a 24 denti, Art.no. 132321Queste lame troncatrici sono adatte solo per penetrarenel materiale.
ItalianoCampo di impiego <strong>Tanga</strong> <strong>Delta</strong> <strong>S2</strong><strong>Lamello</strong> <strong>Tanga</strong> <strong>Delta</strong> è adatto per l’impiego in ristrutturazionidi immobili, in particolare per i seguenti lavori:Lavori con la lama al diamante– Rimozione di vecchi telai per finestre– Per tagliare materiali edili quali ad esempio intonaco,iaterizi, piastrelle, arenaria calcarea, marmo artificiale,granito, calcestruzzo e le loro strutture in metallo.(la max. superficie di taglio delle struttura in metalloinglobata non deve superare i 50 mm 2 )Lavori con la lama HM– Rimozione di vecchi telai per finestre senza lo smontaggiodi cornicioni e tavole di sostegno.– Per tagliare materiali in legno quali ad esempio il legnomassiccio, compensato, pannelli di truciolato, cartonidi fibra e diversi prodotti in materie plastiche.– Riduzione di battenti, taglio su misura di finestre– Taglio di profilati metallici di tenuta (larghezza giunzioni5 mm)– Ritagli su pareti e soffini per griglie di aerazione, canali ecc.Il campo di impiego dell’apparecchio è limitato aimateriali sopra citati, ma solo a regola d’arte nel rispettodelle prescrizioni. È assolutamente necessario rispettarescrupolosamente tutte le istruzioni relative alla manutenzioneordinaria e straordinaria, nonché quelle relativeall’impiego di utensili di taglio diversi.ApplicazioneCollegare un aspirapolvere o un dispositivo di aspirazione potente; pulire di frequente il filtro o scuoterlo!Il frontale (45°) obliquo non deve essere utilizzato con una lama per circolare ma solo con la lama al diamante.1. Indossare lenti protettive ed una protezione per l’udito2. Impostare il regolatore di profondità al giusto diametro della lama (registrabile a 180 o 200 mm)3. Impostare la profondità di taglio desiderata sul regolatore di profondità (regolazione continua)4. Posizionare l’apparecchio sul pezzo da lavorare e scegliere una possibilità di arresto sicura.5. Avviare la macchina, affondare ed avanzare con una leggera pressione in direzione di marcia(Attenzione: non sovraccaricare il motore! )Per il taglio con la lama al diamante è necessariorispettare quanto segue:– pressione di lavoro = peso della macchina– tenere la macchina ad angolo retto rispetto al materiale– non inclinare– ogni tanto effettuare delle pause per raffreddare (fargirare la macchina a vuoto)– rispettare il senso di rotazione della lamaCambio da frontale diritto a frontale 45° (per tagliofino all’angolo)1. Sfilare la spina dalla presa di corrente2. Aprire e bloccare il dispositivo di chiusura rapida,(sfilare la testa e bloccare in senso antiorario)3. Spostare la lamiera di fondo in avanti4. Posizionare la lamiera di fondo con gli angoli a 45°5. Chiudere il dispositivo di chiusura rapidaCambio utensile1. Sfilare la spina dalla presa di corrente2. Aprire il dispositivo di chiusura rapida3. Spostare la lamiera di fondo in avanti4. Premere il dispositivo per l’arresto del mandrino, svitarele viti a testa svasata, sostituire la lama, rispettare ilsenso di rotazione, stringere nuovamente le viti.5. Posizionare la lamiera di fondo6. Impostare il regolatore di profondità al giusto diametrodella lama (registrabile a 180 o 200 mm)7. Far funzionare l’utensile (di fresa) per prova peralmeno 30 secondi con il max. numero di giri a vuoto.Cambio da frontale 45° a frontale diritto1. Sfilare la spina dalla presa di corrente2. Aprire e bloccare il dispositivo di chiusura rapida,(sfilare la testa e bloccare in senso antiorario)3. Spostare la lamiera di fondo in avanti4. Posizionare la lamiera di fondo in modo diritto5. Chiudere il dispositivo di chiusura rapida
ItalianoManutenzionePulizia– Tenere pulite le fessure di aerazione della macchina– Soffiare spesso con aria compressa sulla macchina– Pulire di tanto in tanto le guide e lubrificarle leggermenteRiparazioniLe riparazioni ai dispositivi elettrici possono essere eseguitesolo da un elettrotecnico.In generale è necessario impiegare solo accessori originali.I componenti strutturali, le parti annesse, il cui uso non èstato descritto, possono essere sostituiti o montati solodalla casa produttrice.L’apparecchio può essere impiegato solo quando la piastradi fondo è liberamente scorrevole e si sposta automaticamentefino alla battuta o copre completamente l’utensile.In caso di piastra di fondo difettosa, è necessario mettereimmediatamente fuori servizio la macchina e farla ripararedalla casa produttrice.Spazzole carbonciniIl motore è dotato di spazzole di carbone ad arresto automatico.Quando queste sono consumate (dopo 100–200ore di funzionamento), l’automatismo di arresto interrompel’alimentazione elettrica ed il motore di arresta. Come sostituzioneè possibile utilizzare solo spazzole originali (Art.31 7206), sostituire sempre la coppia).Dopo ca. 200 ore di funzionamento, è necessario che ilmotore venga pulito e controllato a fondo. Questi interventidevono essere eseguiti solo da un’officina specializzataautorizzata.GaranziaLa garanzia dura 12 mesi a partire dalla data di fornitura.Essa copre la riparazione gratuita di tutti i guasti dovuti adifetti di fabbricazione o del materiale. Sono esclusi dallagaranzia i danni causati da azione violenta, uso e trattamentoimproprio o da normale usura.
NederlandsVeiligheidsmaatregelen enaansprakelijkheidLees voor de ingebruikname de bijgevoegdealgemene veiligheidsmaatregelen zorgvuldig door.– Bij het niet gebruiken van de machine, voor alle servicebeurten,voor het verwisselen van het snijwerktuigenz.: de stekker steeds uit het stopcontact trekken!– De stekker uitsluitend in het stopcontact steken alsde machine uitgeschakeld is.– De stekker en kabel steeds controleren op beschadigingvoor u deze in het stopcontact steekt. Bij beschadigingonmiddellijk door een vakman laten vervangen.– Controleer voor de ingebruikname van de machine of despanningsaanduiding op het kernplaatje overeenkomtmet de netspanning. De machine is uitsluitend geschiktvoor wisselstroom.– De machine is dubbel geïsoleerd en heeft (overeenkomstigCEE- en VDE-bepalingen) een kabel met tweedraden zonder veiligheidsaarding. U kunt de machinezonder enig bezwaar op een niet-geaard stopcontactaansluiten.– Boor niet in het motorhuis (bv voor het aanbrengenvan plaatjes), aangezien hierdoor de dubbele isolatieopgeheven wordt. Gebruik voor het markerenuitsluitend kleefetiketten.– De veiligheidsmaatregelen bij het gebruik van dezemachine moeten steeds gevolgd worden, zonder hetnaleven van deze maatregelen mag de machine nietgebruikt worden.– Bescherm uzelf tijdens het werken met deze machinesteeds door het dragen van een veiligheidsbril enoorbeschermers. Ook het dragen van veiligheidsschoenenen – handschoenen wordt aangeraden.– De machine moet steeds met beide handen bediendworden, en indien mogelijk moet het werkstuk goedvastgezet worden.– Raak nooit het draaiende snijwerktuig aan!– Gebruik uitsluitend de door de fabrikant voorzienesnijwerktuigen (zie toebehoren).– Bij het monteren en bij het gebruik van de snijwerktuigenmoeten de richtlijnen van de fabrikant opgevolgd worden.Gebruik uitsluitend perfect geslepen snijwerktuigen.– De bodemplaat mag bij een uitgeschoven snijwerktuigniet geklemd worden.– Het in- en uitschuiven van het snijwerktuig uit debodemplaat moet soepel verlopen.– Gebruik uitsluitend perfect geslepen snijwerktuigen,aangezien anders het risico bestaat dat het werkstukbreekt door de verhoogde snijkracht.– Het toestel enkel in een droge omgeving gebruiken.– Bij het snijden van steen en hout moet de juistestofafzuiging gebruikt worden.– Het bewerken van asbest en kunststof is niet toegelatenmet de machine.– Het toestel niet vastklemmen of met een houder alsstationaire machine gebruiken.– De kabel moet steeds op een zekere afstand van demachine gehouden worden, de kabel steeds achterde machine wegleiden.– Voor het inschakelen van de machine, zich ervanvergewissen dat er zich geen elektrische leidingen,gas- of waterbuizen in het snijbereik bevinden. Hetwerkoppervlak moet nagekeken worden op metalenonderdelen, bv met behulp van een metaaldetector.– Bij het snijden kunnen er vonken ontstaan. Daarommoet er opgelet worden dat er zich geen personenkunnen kwetsen, en dat er zich geen brandbarematerialen in de buurt bevinden.– Hou steeds rekening met de draairichting van hetsnijwerktuig.– Beschadigde snijwerktuigen dienen onmiddellijk vervangente worden en mogen niet verder gebruikt worden.– Enkel werktuigen voor handaangedreven machinesgebruiken.– Gebruik deze machine uitsluitend voor het doel dat indeze gebruiksaanwijzing wordt beschreven.– Bescherm de machine tegen regen en tegen vocht.– De foutloze werking van de machine is enkelgegarandeerd indien de originele toebehoren enonderdelen gebruikt worden.– Fabrikant en verkoper wijzen iedere vorm van aansprakelijkheidvoor het product van de hand, indiende originele toestand van de machine op enige wijzeveranderd is.
NederlandsEU-conformiteitsverklaringWij verklaren en wij stellen ons er alleen voor verantwoordelijkdat dit produkt voldoet aan de volgende normen ofnormatieve dokumenten:EN 55014, EN 60745-1, EN 61000-3-2, EN 61000-3-3,overeenkomstig de bepalingen van de richtlijnen73/23EWG, 98/37/EG, 89/336/EWG.Geruisemissie en trillingsversnellingHet kenmerkende A-gewaardeerde geluids niveau van deGeluidsdrukniveau = 92 dB (A)Geluidsvermogenniveau = 105 dB (A)Draag oorbeschermers!Kenmerkend is dat de hand-arm vibratie minder is dan5 m/s 2 .<strong>Lamello</strong> <strong>AG</strong>HolzverbindungstechnikHauptstrasse 149CH-4416 Bubendorf K. Steiner E.Zeller<strong>Lamello</strong> <strong>AG</strong>: Sitz Bubendorf, Gerichtsstand LiestalHaftende Gesellschafterin: <strong>Lamello</strong> <strong>AG</strong>, Sitz Bubendorf, Gerichtsstand LiestalGeschäftsführer: Herr Karl Steiner, stellv.: Herr Erich ZellerTechnische gegevens<strong>Tanga</strong> <strong>Delta</strong> H<strong>Tanga</strong> <strong>Delta</strong> <strong>S2</strong>Vermogen:Toerental:HW-blad max:Zaagdiepte max:Gewicht:1’600 W7’700 T/min200 mm0 – 68 mm (Ø 200 mm)5,1 kgVermogen:Toerental:Diamant-blad max:Zaagdiepte max:Gewicht:1’600 W7’700 T/min200 mm0 – 58 mm (Ø 180 mm)(optioneel tot 68 mm Ø 200 mm)5,1 kgStandaard uitrusting<strong>Tanga</strong> <strong>Delta</strong> H<strong>Tanga</strong> <strong>Delta</strong> <strong>S2</strong>Complete machine HW-blad Z12 Ø 200 mm, 4 mStofafzuigslang met afzuigaansluiting, Gereedschapsset,Handleiding, Veiligheidsadviezen, Houten kofferComplete machine (recht front + 45°), Diamant-blad,Ø = 180 mm, 4 m Stofafzauigslang met afzuigaansluiting,Gereedschapsset, Handleiding, Veiligheidsadviezen,Houten kofferExtra toebehorenDiamant-blad Ø = 180 mm 132519 (Standard)Gesegmenteerd Diamant-blad Ø = 180 mm 132521HW-blad Z12 Ø = 180 mm, zaagdiepte tot 58 mm 132317HW-blad Z12 Ø = 200 mm, zaagdiepte tot 68 mm 132322 (Standard)HW-blad Z24 Ø = 180 mm, zaagdiepte tot 58 mm 132318HW-blad Z24 Ø = 200 mm, zaagdiepte tot 68 mm 132320Spec. HW scheidingszaag Z24 Ø = 180 mm (bestand tegen spijkers) 132319Spec. HW scheidingszaag Z24 Ø = 200 mm (bestand tegen spijkers) 132321Sponningaanslag voor <strong>Tanga</strong> <strong>Delta</strong> 321555
NederlandsToepassingsgebied <strong>Tanga</strong> <strong>Delta</strong> HDe <strong>Lamello</strong> <strong>Tanga</strong> <strong>Delta</strong> H is geschikt om gebruikt te wordenbij saneringen van oude gebouwen, in het bijzonder voorvolgende werken:– Uitnemen van oude raamkozijnen zonder demontagevan lijsten en lateiliggers– Inkorten van deurbladen– Op maat snijden van blinderingen– Snijden van schaduwvoegen (voegbreedte 8 mm)– Uitsnijden van delen uit wand en plafond voorverluchtingsroosters, kanalen, enz.– Verlengen en uitsnijden van dakbedekkingen,dakroosters, enz.Het gebruik van het apparaat is beperkt tot de hierbovenbeschreven materialen, maar enkel en alleen inovereenstemming met de betreffende voorschriften enmits inachtneming van de instellingen. Daarbij moetenalle aanwijzingen betreffende onderhoud en verzorging,evenals het gebruik van de verschillende snijwerktuigenstrikt nageleefd worden.GebruikEen geschikte stofzuiger of afzuigapparaat aansluiten, de filter frequent reinigen of afschudden!1. Veiligheidsbril en gehoorbescherming opzetten2. Het diepte-instelmechanisme op de correcte bladdiameter instellen (draaibaar op 180 of 200 mm)3. De gewenste snijdiepte op het diepte-instellingsmechanisme instellen (traploos verstelbaar)4. Het apparaat op het werkstuk leggen en een veilige aanslagmogelijkheid kiezen5. De machine starten, inschuiven en met een lichte druk in looprichting verplaatsen (opgepast: de motor niet overbelasten!)Zonder sponningsaanslagMet sponningsaanslagWerktuigwissel1. De netstekker uittrekken2. De snelsluiting openen3. De bodemplaat naar voren uitschuiven4. De asblokkering indrukken, de schroeven met verzonkenkop met de schroevendraaier losdraaien, het blad vervangen,op de draairichting letten, de schroeven opnieuwaantrekken5. De bodemplaat opzetten6. Het diepte-instelmechanisme op de correcte bladdiameterinstellen (draaibaar op 180 of 200 mm)7. Het snijwerktuig minstens 30 seconden bij max.onbelast toerental bij wijze van test laten lopenNuttige opmerkingen– De machine wordt gebruiksklaar geleverd– Het snijwerktuig schuift enkel uit de bodemplaatwanneer het motorhuis naar voor wordt geduwd– Overbelasting: de machine is uitgerust met een overbelastingsschakelaar– Voor het doorsnijden van schroeven of nagels kan u hetvolgende speciale spijkervaste snijwerktuig gebruiken:HW-scheidingszaag Z24, art. nr 01 132321Dit snijwerktuig is enkel geschikt om in te snijden.
NederlandsToepassingsgebied <strong>Tanga</strong> <strong>Delta</strong> <strong>S2</strong>De <strong>Lamello</strong> <strong>Tanga</strong> <strong>Delta</strong> is geschikt om gebruikt te wordenbij saneringen van oude gebouwen, in het bijzondervoor de volgende werken:Werken met het diamantblad– Uitnemen van oude raamkozijnen– Snijden van bouwmaterialen zoals pleister, baksteen,tegels, kalkzandsteen, kunstmarmer, graniet, beton,evenals metalen delen (het max. snijdvlak van demetalen delen mag niet groter zijn dan 50 mm 2 )Werken met het HW-blad– Uitnemen van oude raamkozijnen zonder demontagevan lijsten en lateiliggers.– Snijden van houtmaterialen zoals massief hout, triplex,spaanplaten, vezelplaten,– evenals verschillende kunststoffen.– Inkorten van deurbladen, op maat snijden van blinderingen– Snijden van schaduwvoegen (voegbreedte 5 mm)– Uitsnijden van delen uit wand en plafond voorverluchtingsroosters, kanalen, enz.Het gebruik van het apparaat is beperkt tot de hierboven vermeldematerialen, maar enkel en alleen in overeenstemmingmet de betreffende voorschriften en mits inachtneming vande instellingen. Daarbij moeten alle aanwijzingen betreffendeonderhoud en verzorging evenals het gebruik van deverschillende snijdwerktuigen strikt nageleefd worden.GebruikEen degelijke stofzuiger of afzuigapparaat aansluiten; de filter frequent reinigen of afschudden!De afgeschuinde voorkant (45°) mag niet met het HW-blad, maar enkel met het diamantblad gebruikt worden.1. Veiligheidsbril en gehoorbescherming opzetten.2. Het diepte-instelmechanisme op de correcte bladdiameter instellen (draaibaar op 180 of 200 mm)3. De gewenste snijddiepte op het diepte-instelmechanisme instellen (traploos verstelbaar)4. Het apparaat op het werkstuk leggen en een veilige aanslagmogelijkheid kiezen.5. De machine starten, inschuiven en met lichte druk in looprichting verplaatsen(opgepast: de motor niet overbelasten!)Bij het snijden met diamantblad de volgende punten in acht nemen:– Werkdruk = gewicht van de machine– De schijf rechthoekig ten opzichte van het materiaal houden– Niet doen kantelen– Af en toe koelpauzes inleggen (de machine vrij laten lopen)– De draairichting van de schijf in acht nemenWissel van front recht naar front 45° (om tot in dehoek te snijden)1. De netstekker uittrekken2. De snelsluiting openen en arreteren (aan de knoptrekken en in tegengestelde richting van de wijzers vande klok arreteren)3. De bodemplaat naar voren uitschuiven4. De bodemplaat met hoeken van 45° opzetten5. De snelsluiting sluitenWerktuigwissel1. De netstekker uittrekken2. De snelsluiting openen uitschuiven4. De asblokkering indrukken, de schroeven met verzonkenkop met de schroevendraaier losdraaien, het bladvervangen, op de draairichting letten, de schroevenopnieuw aantrekken.5. De bodemplaat opzetten.6. Het diepte-instelmechanisme op de correcte bladdiameterinstellen (draaibaar naar 180 of 200 mm)7. Het snijwerktuig minstens 30 seconden bij max. onbelasttoerental bij wijze van test laten lopen.Wissel van front 45° naar front recht1. De netstekker uittrekken2. De snelsluiting openen en blokkeren(aan de knoptrekken en in de tegengestelde richting van de wijzersvan de klok blokkeren)3. De bodemplaat naar voren uitschuiven4. De bodemplaat recht opzetten5. De snelsluiting sluiten
NederlandsOnderhoudReiniging– De verluchtingsgleuven van de machine zuiver houden– De machine frequent uitblazen– De geleidingen van tijd tot tijd reinigen en lichtjes oliënReparatiesReparaties aan elektrische werktuigen mogen enkel en alleendoor een elektricien uitgevoerd worden.In het algemeen enkel originele accessoires gebruiken.Componenten, aan te bouwen delen, wiens gebruik nietbeschreven werd, mogen enkel door de fabrikant vervangenen/of gedemonteerd worden.Het apparaat mag enkel gebruikt worden wanneer degrondplaat goed glijdt en automatisch tot aan de aanslagen/of tot de volledige afdekking van het werktuig terugglijdt. Bij een defecte grondplaat moet het apparaat onmiddellijkuit bedrijf genomen en door de fabrikant gerepareerdworden.KoolborstelsDe motor is met automatisch uitschakelende koolborstelsuitgerust. Wanneer deze versleten zijn (na 100–200 bedrijfsuren)onderbreekt de automatische uitschakeling destroomtoevoer, en blijft de motor stilstaan. Als vervangingmogen enkel originele koolborstels gebruikt worden (Art.31 7206), paarsgewijs vervangen).Na ongeveer 200 bedrijfsuren moet de motor grondig gereinigden gecontroleerd worden. Deze werken mogen enkeldoor een bevoegde werkplaats uitgevoerd worden.GarantieDe duur van de garantie bedraagt 12 maanden vanaf dedatum van levering. Deze omvat het gratis repareren van allestoringen, die ontstaan zijn door foutieve fabrikatie of doormateriaalfouten. Uitgesloten van de garantie zijn schades,die zijn ontstaan door toepassing van geweld, door eenonjuiste behandeling of door normale slijtage.
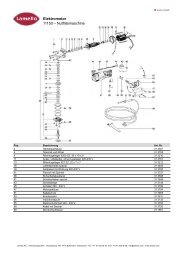
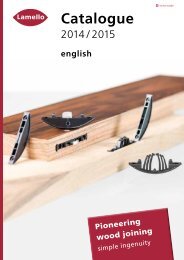
Ersatzteilzeichnung <strong>Tanga</strong> <strong>Delta</strong>12345678910111213141516171819202122232425262728293031323334353637
Ersatzteilliste <strong>Tanga</strong> <strong>Delta</strong>Pos. Bezeichnung Art.-Nr.1 Zylinderschraube M8x35 3528332,3,4 Handgriff 2515525 Flansch 3415216,7,8,9 Führungsschlitten komplett 25155110 Diamant-Trennscheibe, D 180 (Standard) 13251910 Diamant-Trennscheibe segmentiert, D 180 13252110 Diamant-Trennscheibe, D 200 13251710 HW-Holzblatt, D 180, Z 12 13231710 HW-Holzblatt, D 180, Z 24 13231810 HW-Holzblatt nagelfest, D 180, Z 24 13231910 HW-Holzblatt, D 200, Z 12 (Standard) 13232210 HW-Holzblatt, D 200, Z 24 13232010 HW-Holzblatt nagelfest, D 200, Z 24 13232111 Senkschraube M4x8 Torx 352408T12 Zylinderschraube M4x30, In-6kt. 35243013 Bodenblech 1,5mm 32154714,15,16,17 Rolle (nur <strong>Tanga</strong> <strong>Delta</strong> <strong>S2</strong>) 25155418 Gleitlineal 33155019 Ersatzmotor L73, 230V, CH 307300CH19 Ersatzmotor L73, 230V, D 307300D20 Führungswelle 34155021,22 Tiefensteller 25155323 Zugfeder 35155024-29 Grundplatte komplett 25155027 Flügelschraube 35551028 Arretierstift 35155130 Bodenblech 1,5mm, Ecken 45° (nur <strong>Tanga</strong> <strong>Delta</strong> <strong>S2</strong>) 32154831 Anschlussstück konisch 33180332 Absaugschlauch Vacuflex LW 30mm, 4,15m 33152033 Reduzierstück 54/ 58mm 33180534 Schraubenzieher Torx T20 27193035 Drahthaken für Zugfeder 27195736 Sechskant-Stiftschlüssel 6mm 27196037 Schutzbrille 251538
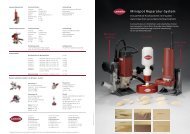
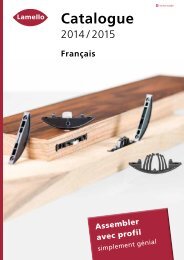
Ersatzteilzeichnung Motor L73
Ersatzteilliste Motor L73Pos. Bezeichnung Art.-Nr.4 Distanzscheibe 3172166 Rillenkugellager 6002 ZZ 3172178 Tellerrad 3172198,18 Tellerrad mit Ritzel 3172181-8 Spindel mit Tellerad und Flansch komplett 31731211,13,14,15,16 Spindelstopp komplett 31452910-16 Getriebegehäuse komplett 3172139 Linsenblechschraube 4.8 x 37 35483718 Ritzel 31722019 Dichtungsschnecke 31722120 Rillenkugellager 629 ZR 31452221 Abdeckung 31722223 Anker 31730124 Rillenkugellager 627 ZZ 31321217-25 Anker 230V komplett 31730326 Luftführungsscheibe 31730428 Feldpaket 230V 31730234 Motorengehäuse 31722435,41,43 Griff komplett 31730529,30 Bürstenkappe oben mit Senkschraube 31720431 Kohlenbürste 31720628,36 Bürstenkappe unten mit Senkschraube 31720539 Kabelschutz 31730840 Schalter 31730641 Regelektronik 31730744 Kabel 4m mit Stecker, CH 31721044 Kabel 4m mit Stecker, D 3172111-44 Ersatzmotor komplett 230V, D 307300D1-44 Ersatzmotor komplett 230V, CH 307300CH
Swiss made<strong>Lamello</strong> <strong>AG</strong>VerbindungstechnikHauptstrasse 149CH-4416 BubendorfTel. +41 61 935 36 36Fax +4161 935 36 06info@lamello.comwww.lamello.com© <strong>Lamello</strong> <strong>AG</strong> 09/12 Art. Nr. 9881171VS