Shirt Collar Pointers - Sewing.org
Shirt Collar Pointers - Sewing.org
Shirt Collar Pointers - Sewing.org

You also want an ePaper? Increase the reach of your titles
YUMPU automatically turns print PDFs into web optimized ePapers that Google loves.
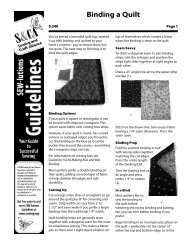
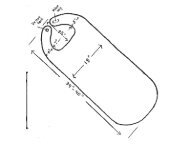
<strong>Shirt</strong> <strong>Collar</strong> <strong>Pointers</strong>12.226Page 1Whether you'rea beginner or aseasoned shirtmaker, gettingthe points oncollars to lookprofessionalcan be achallenge. It'seasy to getpoints thatdon't look thesame shape,are uneven, or worse yet, points that wantto stick up and fly away.Parts & PiecesMost shirt collars have two parts—anundercollar and an upper collar. On somepatterns, there are separate pieces forthese, on others, they're cut from the samepattern.If your pattern has two pattern pieces, theupper collar should be just slightly largerthan the undercollar to allow for the turn ofthe cloth over the curve as the collar sits onthe neckline.InterfacingA professionally sewn collar must beinterfaced. Most patterns call for interfacingthe top layer only, but a firmer roll line isachieved by using interfacing on both theupper and lower collar pieces.The interfacing also helps to hide the insideseam allowances for a nicer appearance, asit makes the fabric more opaque.For best results, choose a light- to mediumweightfusible woven or knit interfacing formost fabrics. Heavier interfacings will notallow the collar to roll smoothly and createa board-like appearance.To trim or not to trim? There are differingschools of thought about whether or not totrim interfacing seam allowances. Somebelieve that trimming the seam allowancesmakes for flatter edges, especially if you'retopstitching the edges. Others believe thatextending the interfacing into the seamlinecreates a firmer edge. Try both on samplesand see which you like best.Use an extra triangular layer of interfacingin both collar points to help keep themneat and flat (1).Slipping the <strong>Collar</strong>If your shirt collar is cut using the samepattern piece for the upper andundercollars, you'll need to slide the uppercollar as you pin the layers together. Allowthe undercollar to extend 1/8" on threecollar edges (not the neckline) (2). Whendoing this, the upper collar doesn't lie flat.If you find it easier, simply trim 1/8" off theundercollar, and then match the raw edgesas you join the two layers together.12Getting to the PointStitching matching collar points can be achallenge, as you're entering the point fromdifferent directions as you stitch.When you sew the collar edges together,shorten the stitch length on both sides ofthe point to reinforce it. Instead of stitchinga sharp corner, take two short stitches
12.226Page 2diagonally acrossthe point (3). Thisgives a bit of roomfor the trimmedseam allowances tofill out the pointonce the collar isturned right sideout.For a professionallook, stitch the3outer collar seam intwo steps—from the center outward, slightlyoverlapping stitching at the center back. This allows youto stitch more symmetric points since you'reapproaching them both from the same direction.TrimmingIt's imperative to trim out as much bulk as possible fromthe collar points so they turn and lie smoothly. Theshortened stitch length makes it easier to trim close tothe stitchingwithout weakeningthe point seaming.Trim off the cornerseam allowancesdiagonally, andthen trim offadditional bulkalong both sides ofthe point (4).4The remaining inside collar seams should be graded,leaving the upper collar seam the longest and theundercollar seam the shortest.PressingBefore you turn the collar right side out, press open thecollar seams. If you have a point presser tool, insert thatinto the point for easier pressing.Turn the collar right side out and press the stitchededges flat, ever so slightly rolling the top collar under toavoid having it roll up at the edges when completed.Perfect PointsTo create sharp corners, use the point of a pin to easeout the fabric at the collar points. Be careful not to snagthreads that can cause visible damage.TopstitchingMost ready-made shirts have topstitched collars.Whether you choose to sew right at the edge, or 1/4"inside the edge, or both, a row of stitches through allthe layers will help to hold a firm and tucked underedge.Baste the neckline edges of the collar together to makefor an easier application to the garment—note that theraw edges may not meet exactly because of the turn ofthe cloth. It takes more fabric to go over a curve thanunder it.Once the collar section is complete, follow the patterninstructions to attach it to the shirt—some collars aresewn directly to the shirt, others have a separate stand,depending on the style.6/11