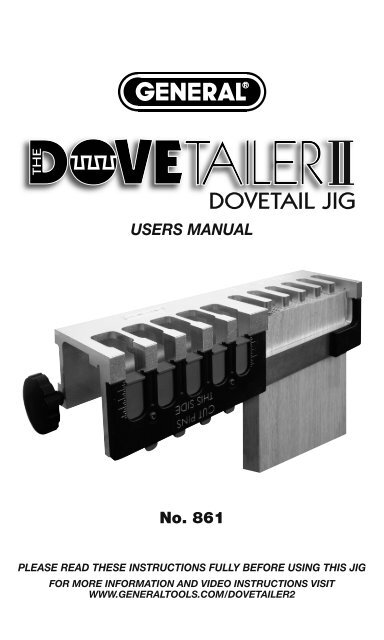
USERS MANUAL No. 861 - General Tools and Instruments
USERS MANUAL No. 861 - General Tools and Instruments
USERS MANUAL No. 861 - General Tools and Instruments

You also want an ePaper? Increase the reach of your titles
YUMPU automatically turns print PDFs into web optimized ePapers that Google loves.
<strong>861</strong> Dovetailer II Manual 11P-081711_Layout 1 8/17/11 5:12 PM Page 1<br />
THE<br />
<strong>USERS</strong> <strong>MANUAL</strong><br />
<strong>No</strong>. <strong>861</strong><br />
DOVETAIL JIG<br />
PLEASE READ THESE INSTRUCTIONS FULLY BEFORE USING THIS JIG<br />
FOR MORE INFORMATION AND VIDEO INSTRUCTIONS VISIT<br />
WWW.GENERALTOOLS.COM/DOVETAILER2
<strong>861</strong> Dovetailer II Manual 11P-081711_Layout 1 8/17/11 5:12 PM Page 2<br />
2<br />
CONTENTS<br />
Introduction . . . . . . . . . . . . . . . . . . . . . . . . . . . . . . . . . . . . . . . . . . 3<br />
Capacity <strong>and</strong> Specifications . . . . . . . . . . . . . . . . . . . . . . . . . . . . 4<br />
What’s in the Jig Kit . . . . . . . . . . . . . . . . . . . . . . . . . . . . . . . . . . . 4<br />
Anatomy of the DOVETAILERII Jig . . . . . . . . . . . . . . . . . . . . 5 – 6<br />
Dovetail Router Bit <strong>and</strong> Bearings . . . . . . . . . . . . . . . . . . . . . . 5<br />
Using the Built-In Depth Gauge . . . . . . . . . . . . . . . . . . . . . . . 6<br />
Preparing the Router . . . . . . . . . . . . . . . . . . . . . . . . . . . . . . . 6 – 7<br />
Safety Overview . . . . . . . . . . . . . . . . . . . . . . . . . . . . . . . . . . . . 6<br />
Router Set-Up . . . . . . . . . . . . . . . . . . . . . . . . . . . . . . . . . . 6 – 7<br />
Cutting Joints . . . . . . . . . . . . . . . . . . . . . . . . . . . . . . . . . . . . 7 – 13<br />
Cutting a Half Blind Dovetail Joint . . . . . . . . . . . . . . . . . 7 – 9<br />
Cutting Joints Longer Than the Jig Opening . . . . . . . . . . . 10<br />
Cutting a Full Through Dovetail Joint . . . . . . . . . . . . . . . . . 10<br />
Edge to Edge Jointing . . . . . . . . . . . . . . . . . . . . . . . . . . . . . 11<br />
Cutting a Box Joint . . . . . . . . . . . . . . . . . . . . . . . . . . . . 12 – 13<br />
Customer Support . . . . . . . . . . . . . . . . . . . . . . . . . . . . . . . . . . . 14<br />
Warranty Information . . . . . . . . . . . . . . . . . . . . . . . . . . . . . . . . . 14<br />
Return for Repair Policy . . . . . . . . . . . . . . . . . . . . . . . . . . . . . . . 14
<strong>861</strong> Dovetailer II Manual 11P-081711_Layout 1 8/17/11 5:12 PM Page 3<br />
INTRODUCTION<br />
Thank you for purchasing <strong>General</strong> <strong>Tools</strong> & <strong>Instruments</strong>’ DOVETAILERII Dovetail Jig. A simple <strong>and</strong><br />
easy way to make professional dovetail joints, the DOVETAILERII enables you to cut half blind,<br />
full through <strong>and</strong> box joints as well as edge to edge joining. The DOVETAILERII can be used on a<br />
router table (Fig. 1 or free h<strong>and</strong> with a h<strong>and</strong>held router (Fig. 2).<br />
FULL THROUGH HALF BLIND<br />
BOX JOINT EDGE JOINT<br />
FIG. 1<br />
FIG. 2<br />
3
<strong>861</strong> Dovetailer II Manual 11P-081711_Layout 1 8/17/11 5:12 PM Page 4<br />
CAPACITY AND SPECIFICATIONS:<br />
Accommodates stock from 1/2 in. to 1 in. thick.<br />
WHAT’S IN THE JIG KIT<br />
� The fully assembled jig<br />
� Two router table guide knobs<br />
� One 14° x 1/2 in. dovetail router bit with guide bearings<br />
(1/4 in. shank)<br />
� One alignment tool<br />
� One allen wrench<br />
It is highly recommended that you familiarize yourself with the nomenclature in Fig. 3 before<br />
proceeding.<br />
4<br />
�<br />
� FIG. 3<br />
� �<br />
�
<strong>861</strong> Dovetailer II Manual 11P-081711_Layout 1 8/17/11 5:12 PM Page 5<br />
ANATOMY OF THE DOVETAILER II JIG<br />
� – Jig Assembly<br />
� – Depth Plate<br />
2A – Template Position Rule<br />
� – Depth Adjuster Plate<br />
3A – Depth Measuring Working Surface<br />
3B – Edge Alignment Teeth<br />
FIG.4<br />
� – Template Lock Screws<br />
� – Two Router Table Guide Knobs<br />
� – Face Clamp<br />
� – Face Clamp Thumb Screws<br />
DOVETAIL JIG ASSEMBLY<br />
NOTE: Your jig comes fully assembled for use. The addition of the router control knobs aids in the<br />
use of this jig on router tables.<br />
1. For use on a router table, securely screw in the two Router Table Guide Knobs [6] into the holes<br />
provided on the ends of the jig. Always use the Router Table Guide Knobs when using the jig on<br />
a router table.(FIG. 4)<br />
DOVETAIL ROUTER BIT AND BEARINGS<br />
Included bearings are 1/2 in. outside diameter (OD) <strong>and</strong> 1/4 in. inner diameter (ID). Router sleeves<br />
or bushings can be used in place of the guide bearings as long as they are also 1/2 in. OD.<br />
Included router bit is 14˚ x 1/2 in. Other bits can be substituted provided they have a 1/4 in.<br />
diameter shank have no greater diameter than 17/32 in.<br />
Caution: Keep fingers on control knobs only when using the jig on a router table.<br />
5
<strong>861</strong> Dovetailer II Manual 11P-081711_Layout 1 8/17/11 5:12 PM Page 6<br />
USING THE BUILT-IN DEPTH GAUGE<br />
The built-in Depth Gauge is used to set both the depth of the Dovetail Cutter during router setup<br />
as well as to control the length of the pins during cutting. (FIG. 5).<br />
1. Loosen the Template Lock Screws � on the face of the Depth Plate �.<br />
2. Align the Depth Measuring Working Surface 3A with the desired measurement on the<br />
Template Position Rule 2A Make sure both sides are at the same measurement.<br />
3. Tighten the Template Lock Screws � to lock the Depth Adjuster Plate in position �.<br />
PREPARING THE ROUTER<br />
SAFETY OVERVIEW<br />
1. KNOW YOUR ROUTER. Read the owner’s manual that came with your router before<br />
you use it. Underst<strong>and</strong> the machine’s applications <strong>and</strong> limitations, as well as the<br />
specific potential hazards inherent in its use. Before using the router, check that none<br />
of its moving parts are broken, loose or misaligned.<br />
NOTE: <strong>General</strong> <strong>Tools</strong> & <strong>Instruments</strong> is not responsible for router misuse or the disregard of<br />
st<strong>and</strong>ard safety precautions associated with using a router.<br />
ROUTER SETUP<br />
1. Insert the dovetail cutter with<br />
its guide bearings fully into the<br />
router.<br />
2. Set the height of the Dovetail<br />
Cutter Bit using the Depth<br />
Measureing Working Surface<br />
3A . (FIG.6)<br />
For instructions on setting the<br />
depth gauge see USING THE<br />
DEPTH GAUGE above.<br />
6<br />
FIG. 5<br />
FIG. 6
<strong>861</strong> Dovetailer II Manual 11P-081711_Layout 1 8/17/11 5:12 PM Page 7<br />
3. FIG.7 shows the dimension of the<br />
dovetail joint affected by the cutter<br />
height.<br />
NOTE: Setting this height affects the<br />
length of the Tails <strong>and</strong> the depth of<br />
the Pins.<br />
4. <strong>No</strong>w that the router is setup,<br />
you need to reset the Depth<br />
Adjuster Plate � for the length<br />
of the pins. (FIG. 8) Set the<br />
depth gauge for the length of<br />
the “PINS”. This should be<br />
equal to the thickness of the<br />
wood used for the “TAILS”<br />
board. (FIG. 9)<br />
CUTTING JOINTS<br />
FIG. 7<br />
FIG. 8<br />
FIG. 9<br />
<strong>No</strong>te: Always cut the “TAILS” side of the joint first.<br />
CUTTING A HALF BLIND DOVETAIL JOINT<br />
1. When cutting a half-blind dovetail joint, using the included dovetail cutter, start with a bit<br />
height setting equal to the depth of the joint you desire. (FIG. 7)<br />
2. Cut a test joint with scrap wood to confirm the fit of the<br />
joint. If the boards do not fit together easily, the joint<br />
may be too tight. The joint can be made looser or<br />
tighter by setting the cutter depth shallower or deeper<br />
as shown in FIG. 8.<br />
3. Mark the center of your board, then center the mark<br />
on any one of the guide teeth in the “TAILS” portion<br />
of the jig.<br />
4. Make sure the outside face of the board faces inwards<br />
towards the clamp.<br />
5. Tighten the clamps securely.<br />
PINS TAILS<br />
OUTSIDE FACE<br />
7
<strong>861</strong> Dovetailer II Manual 11P-081711_Layout 1 8/17/11 5:12 PM Page 8<br />
8<br />
6. Clamp the board to a workbench or<br />
secure it in a vice as shown (FIG. 10)<br />
or if using a router table, make sure<br />
the face saying “cut tails this side” is<br />
faced to the router table (FIG. 11).<br />
7. Cut the “TAILS” portion of the joint<br />
always keeping the guide bearings<br />
against the template edges. When<br />
finished, remove “TAILS” board from<br />
the jig.<br />
8. Then to cut the “PINS”. Loosely<br />
clamp the “PINS” board into<br />
the jig with the outside face<br />
pointing inward.<br />
9. To align the edges, insert the<br />
tails of the “TAILS” board<br />
into the Edge Alignment<br />
Teeth teeth on the top of<br />
3B<br />
the Adjuster plate � with<br />
the rounded side in (inside<br />
face), <strong>and</strong> slide the loosely<br />
clamped “PINS” board to<br />
align its edges with the<br />
edges of the “TAILS” board.<br />
<strong>No</strong>w securely tighten the<br />
clamps <strong>and</strong> remove the<br />
“TAILS” board<br />
(FIG. 12).<br />
FIG. 12<br />
FIG. 11<br />
FIG. 10
<strong>861</strong> Dovetailer II Manual 11P-081711_Layout 1 8/17/11 5:12 PM Page 9<br />
10. Make all cuts to the pins board. For those cuts, the router should ride on the surface<br />
marked “cut pins this side” shown in FIG. 13 & 14. Be sure to follow the jig profile.<br />
FIG. 13<br />
FIG. 14<br />
11. Dry fit the two sections together. If problems arise, file or trim the joint as needed.<br />
9
<strong>861</strong> Dovetailer II Manual 11P-081711_Layout 1 8/17/11 5:12 PM Page 10<br />
CUTTING JOINTS LONGER THAN THE JIG OPENING<br />
Joints longer than the opening must be cut in multiple continuous segments. To align the jig with<br />
the previous cut, the aligning tool provided must be used.<br />
1. Move the previously cut wood in the jig <strong>and</strong> position the last slot from the previous cut in<br />
the last channel of the jig either going to the right or to the left.<br />
2. Loosely clamp the wood in the jig.<br />
3. Insert the aligning tool into the slot to properly align the wood with the jig. (FIG. 15)<br />
4. Tighten the clamps securely, <strong>and</strong> continue cutting.<br />
5. Repeat as necessary.<br />
CUTTING A FULL THROUGH DOVETAIL JOINT<br />
* This requires a dovetail cutter bit with a depth equal to or<br />
greater than the wood thickness you are cutting.<br />
<strong>No</strong>te: Do not use router bit with a maximum diameter<br />
greater than 17/32 in.<br />
The steps required to cut a full through joint (FIG. 16) are the<br />
same as to those described in the previous section CUTTING A<br />
HALF BLIND DOVETAIL JOINT. With the following exceptions:<br />
When cutting the “PINS” portion of the joint, set the depth<br />
gauge equal to the thickness of the “TAILS” board.<br />
10<br />
FIG. FIG. 15 15<br />
TAILS PINS<br />
FIG. 16
<strong>861</strong> Dovetailer II Manual 11P-081711_Layout 1 8/17/11 5:12 PM Page 11<br />
EDGE TO EDGE JOINTING<br />
1. When cutting an edge joint, the round-over<br />
created by the dovetail jig must be eliminated in<br />
order to join the two pieces of wood using a<br />
Dovetail-Joint. (FIG.17)<br />
2. Insert the first board into the “TAILS” section of<br />
the Dovetail Jig along with 1/4 in. thick shim to<br />
offset the board away from the rounded postion<br />
of the template in the jig. (FIG. 18)<br />
3. Align one edge of the board to be cut with the<br />
outside edge of the jig. (FIG. 18)<br />
4. Tighten the clamps securely, <strong>and</strong> make all cuts.<br />
FIG. 18<br />
FIG. 17<br />
5. Insert the second board into the jig along with the same shim <strong>and</strong> offset one edge of the<br />
board 1/2 in. in from the outside edge of the jig. FIG. 19. This spacing will offset the<br />
“TAILS” of the second board so that they align with the slots cut into the first board.<br />
FIG. 19<br />
11
<strong>861</strong> Dovetailer II Manual 11P-081711_Layout 1 8/17/11 5:12 PM Page 12<br />
CUTTING A BOX JOINT<br />
• When cutting a box joint, only use the “TAILS” portion of the jig for all cuts.<br />
• For box jointing, use a 1/2 in. diameter straight bit with a 1/4 in. shank with either a 1/2 in.<br />
O.D. guide bearing or a 1/2 in. O.D. guide sleeve insert in your router. Set the depth of the<br />
cutter to equal, or slightly greater than the thickness of the wood you are joining.<br />
Tip: Always make sure that the guide bearing or the guide sleeve tracks in the guide slot.<br />
• To avoid the “round-over” part of the jig’s guide finger, use a 1/4 in. thick shim between<br />
the wood <strong>and</strong> the inner surface of the jig to offset the board from the “round-over”.<br />
Tip: If you’re doing more than one joint, you can use a piece of double-face tape to hold<br />
the shim in place.<br />
12
<strong>861</strong> Dovetailer II Manual 11P-081711_Layout 1 8/17/11 5:12 PM Page 13<br />
FIG. 21<br />
• Cut the slots in the first board with the board edge set flush with the right h<strong>and</strong> edge of the<br />
jig. (FIG. 20). Make the entry <strong>and</strong> exit cuts using the left side of the guide slot only (FIG. 20)<br />
FIG. 20<br />
• For the joining board, clamp it in the jig with its edge offset 3/8 in. in from the right h<strong>and</strong><br />
edge of the jig. Make entry <strong>and</strong> exit cuts using the right side of the guide slot only (FIG. 21).<br />
• Dry fit the joint before gluing to be sure it is tight. If necessary, use a wood mallet to bring<br />
the two parts together.<br />
13
<strong>861</strong> Dovetailer II Manual 11P-081711_Layout 1 8/17/11 5:12 PM Page 14<br />
CUSTOMER SUPPORT<br />
Please visit our website at www.generaltools.com/dovetailer2 to obtain additional woodworking<br />
information, instructional videos <strong>and</strong> product manual.<br />
WARRANTY INFORMATION<br />
The <strong>No</strong>. <strong>861</strong> DovetailerII Dovetail Jig Kit from <strong>General</strong> <strong>Tools</strong> & <strong>Instruments</strong> is warranted to the<br />
original purchaser to be free from defects in material <strong>and</strong> workmanship for a period of one year.<br />
Subject to certain restrictions, <strong>General</strong> will repair or replace this product, if, after examination,<br />
it is determined by <strong>General</strong> to be defective in material or workmanship.<br />
RETURN FOR REPAIR POLICY<br />
Every effort has been made to provide you with a reliable product of superior quality. However, in<br />
the event your instrument requires repair, please contact our Customer Service to obtain an RGA<br />
(Return Goods Authorization) number before forwarding the unit via prepaid freight to the<br />
attention of our Service Center at this address:<br />
<strong>General</strong> <strong>Tools</strong> & <strong>Instruments</strong><br />
80 White Street<br />
New York, NY 10013<br />
212-431-6100<br />
Remember to include a copy of your proof of purchase, your return address, <strong>and</strong> your phone<br />
number <strong>and</strong>/or e-mail address.<br />
14
<strong>861</strong> Dovetailer II Manual 11P-081711_Layout 1 8/17/11 5:12 PM Page 15<br />
NOTES<br />
________________________________________________________<br />
________________________________________________________<br />
________________________________________________________<br />
________________________________________________________<br />
________________________________________________________<br />
________________________________________________________<br />
________________________________________________________<br />
________________________________________________________<br />
________________________________________________________<br />
________________________________________________________<br />
________________________________________________________<br />
________________________________________________________<br />
________________________________________________________<br />
________________________________________________________<br />
________________________________________________________<br />
________________________________________________________<br />
________________________________________________________<br />
________________________________________________________<br />
15
<strong>861</strong> Dovetailer II Manual 11P-081711_Layout 1 8/17/11 5:12 PM Page 16<br />
GENERAL TOOLS & INSTRUMENTS<br />
80 White Street, New York, NY10013-3567<br />
PHONE (212) 431-6100<br />
FAX (212) 431-6499<br />
TOLL FREE (800) 697-8665<br />
e-mail: sales@generaltools.com<br />
www.generaltools.com<br />
<strong>861</strong> User’s Manual<br />
Specifications subject to change without notice<br />
©2011 GENERAL TOOLS & INSTRUMENTS<br />
NOTICE - WE ARE NOT RESPONSIBLE FOR TYPOGRAPHICAL ERRORS.<br />
MAN#<strong>861</strong> 8/17/11