crimping instructions for catalog # 1368 hydraulic crimp tool - Atech ...
crimping instructions for catalog # 1368 hydraulic crimp tool - Atech ...
crimping instructions for catalog # 1368 hydraulic crimp tool - Atech ...

Create successful ePaper yourself
Turn your PDF publications into a flip-book with our unique Google optimized e-Paper software.
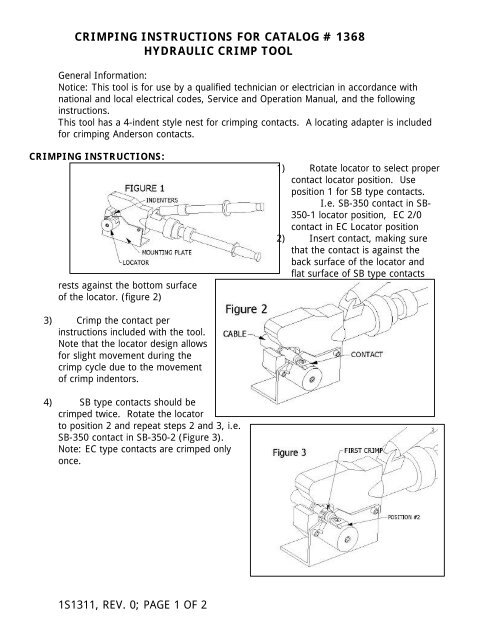
CRIMPING INSTRUCTIONS FOR CATALOG # <strong>1368</strong>HYDRAULIC CRIMP TOOLGeneral In<strong>for</strong>mation:Notice: This <strong>tool</strong> is <strong>for</strong> use by a qualified technician or electrician in accordance withnational and local electrical codes, Service and Operation Manual, and the following<strong>instructions</strong>.This <strong>tool</strong> has a 4-indent style nest <strong>for</strong> <strong><strong>crimp</strong>ing</strong> contacts. A locating adapter is included<strong>for</strong> <strong><strong>crimp</strong>ing</strong> Anderson contacts.CRIMPING INSTRUCTIONS:rests against the bottom surfaceof the locator. (figure 2)1) Rotate locator to select propercontact locator position. Useposition 1 <strong>for</strong> SB type contacts.I.e. SB-350 contact in SB-350-1 locator position, EC 2/0contact in EC Locator position2) Insert contact, making surethat the contact is against theback surface of the locator andflat surface of SB type contacts3) Crimp the contact per<strong>instructions</strong> included with the <strong>tool</strong>.Note that the locator design allows<strong>for</strong> slight movement during the<strong>crimp</strong> cycle due to the movementof <strong>crimp</strong> indentors.4) SB type contacts should be<strong>crimp</strong>ed twice. Rotate the locatorto position 2 and repeat steps 2 and 3, i.e.SB-350 contact in SB-350-2 (Figure 3).Note: EC type contacts are <strong>crimp</strong>ed onlyonce.1S1311, REV. 0; PAGE 1 OF 2
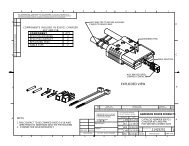
Instructions <strong>for</strong> Mounting cat. #B00508G (VC-7 Locating Adapter)1. Remove the two screws ( A & B) from the standard VC-7 <strong>crimp</strong> <strong>tool</strong>.2. 2. Position the <strong>tool</strong> as shown and mount the locator with the longer screws provided.Please Note: For proper <strong>crimp</strong> location the shoulder screw (C) should be periodicallychecked <strong>for</strong> tightness.1S1131, REV. 0; PAGE 2 OF 2