Transport Boxes.pdf - the Kanga Farm Equipment and Caroni ...
Transport Boxes.pdf - the Kanga Farm Equipment and Caroni ...
Transport Boxes.pdf - the Kanga Farm Equipment and Caroni ...

Create successful ePaper yourself
Turn your PDF publications into a flip-book with our unique Google optimized e-Paper software.
TABLE OF CONTENTSIntroduction … … … … … … … … … … … … … … … … … … … Front & 2General Information … … … … … … … … … … … … … … … … 2Specifications … … … … … … … … … … … … … … … … … 4Safety Rules … … … … … … … … … … … … … … … … … 5 - 6Safety Decals … … … … … … … … … … … … … … … … … 7Operation … … … … … … … … … … … … … … … … … … … 8 - 11Owners Daily Checklist … … … … … … … … … … … … … 11Maintenance … … … … … … … … … … … … … … … … … 11 - 12Assembly Instructions & Part Breakdown … … … … … … … … 13OH & S Compliance Certification … … … … … … … … … … … 14Dealer Pre-delivery Checklist … … … … … … … … … … … … … 15Warranty Registration & Installation Form … … … … … … … … 163
SPECIFICATIONS1.0m Tipping Box Carryall3 – Point Linkage … … … … … … … … … … … … … … … … … Category 1Bucket Material … … … … … … … … … … … … … … … … … 3.5mmBucket Dimensions … … … … … … … … … … … … … … … … 100 x 71 x 37cmMax. Load … … … … … … … … … … … … … … … … … … … 400kgWeight … … … … … … … … … … … … … … … … … … … … 127kgWeight (with rear door removed) … … … … … … … … … … … … … 113kgTractor Horsepower (hp) … … … … … … … … … … … … … … 12 – 301.4m Tipping Box Carryall3 – Point Linkage … … … … … … … … … … … … … … … … … Category 1Bucket Material … … … … … … … … … … … … … … … … … 4mmBucket Dimensions … … … … … … … … … … … … … … … … 140 x 82 x 43cmMax. Load … … … … … … … … … … … … … … … … … … … 500kgWeight … … … … … … … … … … … … … … … … … … … … 195kgWeight (with rear door removed) … … … … … … … … … … … … … 172kgTractor Horsepower (hp) … … … … … … … … … … … … … … 25 – 501.8m Tipping Box Carryall3 – Point Linkage … … … … … … … … … … … … … … … … … Category 1 & 2Bucket Material … … … … … … … … … … … … … … … … … 6mmBucket Dimensions … … … … … … … … … … … … … … … … 180 x 87 x 51cmMax. Load … … … … … … … … … … … … … … … … … … … 800kgWeight … … … … … … … … … … … … … … … … … … … … 342kgWeight (with rear door removed) … … … … … … … … … … … … … 300kgTractor Horsepower (hp) … … … … … … … … … … … … … … 40 – 801.2m Hydraulic <strong>Transport</strong> Box3 – Point Linkage … … … … … … … … … … … … … … … … … Category 1Bucket Material … … … … … … … … … … … … … … … … … 3.5mmBucket Dimensions … … … … … … … … … … … … … … … … 120 x 71 x 37cmMax. Load … … … … … … … … … … … … … … … … … … … 500kgWeight … … … … … … … … … … … … … … … … … … … … 167kgWeight (with rear door removed) … … … … … … … … … … … … … 150kgTractor Horsepower (hp) … … … … … … … … … … … … … … 18 – 401.6m Hydraulic <strong>Transport</strong> Box3 – Point Linkage … … … … … … … … … … … … … … … … … Category 1 & 2Bucket Material … … … … … … … … … … … … … … … … … 5mmBucket Dimensions … … … … … … … … … … … … … … … … 160 x 82 x 46cmMax. Load … … … … … … … … … … … … … … … … … … … 700kgWeight … … … … … … … … … … … … … … … … … … … … 324kgWeight (with rear door removed) … … … … … … … … … … … … … 287kgTractor Horsepower (hp) … … … … … … … … … … … … … … 35 – 602.0m Hydraulic <strong>Transport</strong> Box3 – Point Linkage … … … … … … … … … … … … … … … … … Category 1 & 2Bucket Material … … … … … … … … … … … … … … … … … 6mmBucket Dimensions … … … … … … … … … … … … … … … … 200 x 87 x 51cmMax. Load … … … … … … … … … … … … … … … … … … … 800kgWeight … … … … … … … … … … … … … … … … … … … … 387kgWeight (with rear door removed) … … … … … … … … … … … … … 340kgTractor Horsepower (hp) … … … … … … … … … … … … … … 50 – 1004
SAFETY RULES & ACCCIDENT PREVENTIONATTENTION! BE CAREFUL! YOUR SAFETY IS INVOLVED!Safety is a primary concern in <strong>the</strong> design <strong>and</strong> manufacture of our products. Unfortunately, our efforts to provide safeequipment can be wiped out by a single careless act of an operator.In addition to <strong>the</strong> design <strong>and</strong> configuration of equipment, hazard control <strong>and</strong> accident prevention are dependent upon <strong>the</strong>awareness, concern, prudence <strong>and</strong> proper training of personnel involved in <strong>the</strong> operation, transport, maintenance <strong>and</strong>storage of equipment.It has been said, “The best safety devise is an informed careful operator.” We ask you to be that kind of operator.• Safety instructions are important! Read all attachments <strong>and</strong> unit manuals; follow all safety rules <strong>and</strong> safetydecal information. Failure to follow instructions can result in serious injury or death.• If you do not underst<strong>and</strong> any part of this manual <strong>and</strong> need assistance <strong>the</strong> Department of Agriculture,Occupational Health & Safety Offices, any Agricultural School or college <strong>and</strong> your local dealer should beable to direct you on where you can receive appropriate training. No operator however experienced in farmmachinery operation <strong>the</strong>y maybe, should attempt to use any piece of machinery that <strong>the</strong>y have not beencompetently trained to use.• Keep h<strong>and</strong>s <strong>and</strong> body away from pressurized lines. Use paper or cardboard, not h<strong>and</strong>s or o<strong>the</strong>r body partsto check for leaks. Wear safety goggles. Hydraulic fluid (oil) under pressure can easily penetrate <strong>the</strong> skin<strong>and</strong> will cause serious injury or death.• Make sure that all operating <strong>and</strong> service personnel know that if hydraulic fluid (oil) penetrates <strong>the</strong> skin, itmust be surgically removed as soon as possible by a doctor familiar with this form of injury or gangrene,serious injury or death will result. CONTACT A PHYSICAN IMMEDIATELY IF FLUID ENTERS SKINOR EYES. DO NOT DELAY.• Know your controls <strong>and</strong> how to stop quickly in an emergency.• Operators must be instructed in <strong>and</strong> be capable of <strong>the</strong> safe operation of <strong>the</strong> equipment <strong>and</strong> all controls. Donot allow anyone to operate this equipment without proper instruction.• Do not allow children or untrained persons to operate equipment.• Check that all hardware is tight <strong>and</strong> properly installed.• Always wear relatively tight fitted clothing to avoid entanglement in moving parts. Wear heavy-duty,rough-soled boots <strong>and</strong> protective equipment for eyes, hair, h<strong>and</strong>s, hearing <strong>and</strong> head.• Ensure implement is properly attached, adjusted <strong>and</strong> in a good condition so that it can be operate safely.• Tractors MUST be fitted with Roll Over Protection Structure (ROBS) or ROBS Cap. It is also advisablethat your tractor be fitted with a seatbelt, where fitted it must be worn at all times. Falling from yourtractor can result in death from being run over or crushed. If your tractor is fitted with a folding ROBS,keep it in <strong>the</strong> “locked up” position at all times.• Inspect chains, shackles, deflectors <strong>and</strong> any wear parts for damage. Replace if damaged.• Remove any debris that has accumulated on <strong>the</strong> implement, tractor or engine to avoid fire hazard.• Ensure all safety decals are installed. Replace if damaged.• A minimum 20% of tractor <strong>and</strong> equipment weight must be on <strong>the</strong> tractor’s front wheels with implement in<strong>the</strong> transport position. Without this weight, tractor could tip over causing personal injury or death. Theweight maybe attained with a loader, front wheel weights, <strong>and</strong> ballast in <strong>the</strong> tyres or front tractor weights.When attaining <strong>the</strong> minimum 20% weight on <strong>the</strong> front wheels, you must not exceed <strong>the</strong> ROPS maxballasted mass certificate. Weight <strong>the</strong> tractor <strong>and</strong> implement. Do not estimate.• Watch for hidden hazards on <strong>the</strong> terrain during operation <strong>and</strong> avoid any hazards or object that could causeinjury or damage.• Inspect operating area, remove where possible any stones, branches or foreign objects that may cause injuryor damage. It is very important to always watch for foreign objects in <strong>the</strong> area you are operating <strong>and</strong> avoidany that could cause injury or damage.5
• When working in populated areas always place signs in <strong>the</strong> area to alert people or vehicles that may pass.Operation must be stopped when anyone comes within 50 meters.• Keep all people <strong>and</strong> animals away from <strong>the</strong> implement during start up, operating <strong>and</strong> when stopping.• Do not operate <strong>the</strong> implement or tractor while under <strong>the</strong> influence of drugs or alcohol.• Operate only in daylight or good artificial light.• Keep h<strong>and</strong>s, feet, hair, <strong>and</strong> clothing away from moving parts while engine is running.• Do not carry persons or objects on <strong>the</strong> Implement or tractor during work or while in transit.• For transportation on public roads <strong>the</strong> operator must ensure that <strong>the</strong> tractor <strong>and</strong> implement complies withcurrent State <strong>and</strong> Federal laws <strong>and</strong> must strictly adhere to all road traffic regulations in force in his/herparticular state.• Always operate equipment from <strong>the</strong> seat of <strong>the</strong> tractor with <strong>the</strong> seat belt securely fastened especially whenoperating controls or starting engine. Place transmission in neutral, engage break <strong>and</strong> ensure all o<strong>the</strong>rcontrols are disengaged before starting tractor engine.• Look down <strong>and</strong> to <strong>the</strong> rear <strong>and</strong> make sure area is clear <strong>and</strong> safe before operating in reverse.• Do not operate on steep slopes. If in doubt set rear axles wider for moderate slopes.• Do not stop, start or change directions suddenly on slopes’, working up <strong>and</strong> down is preferred.• Use extreme care <strong>and</strong> reduce ground speed on slopes <strong>and</strong> rough terrain.• Stop implement, <strong>the</strong>n tractor, immediately upon striking an obstruction. Turn off engine, remove key,inspect <strong>and</strong> repair any damage before resuming operations. Always block implement when inspecting.• Before commencing any adjustment, maintenance, or cleaning. Always switch off <strong>the</strong> tractor engine, removekey <strong>and</strong> wait until all moving parts have come to a complete stop, <strong>the</strong>n ensure <strong>the</strong> machine is on <strong>the</strong> groundor on a robust secure support.• Before dismounting tractor or performing any service or maintenance lower <strong>the</strong> 3-point linkage <strong>and</strong> anyo<strong>the</strong>r raised components (i.e. loader bucket) to <strong>the</strong> ground. Operate valve levers to release any hydraulicpressure, stop engine, set parking brake, remove key <strong>and</strong> unfasten seat belt.• Never place any part of <strong>the</strong> body underneath <strong>the</strong> implement or between moveable parts even when enginehas been turned off. Hydraulic systems can “creep” (i.e. slowly lower). They may fail or movement of <strong>the</strong>control levers can cause <strong>the</strong> implement to drop or rotate unexpectedly causing severe injury or death.Follow Operator’s Manual instructions for working on your implement or have servicing carried out by aqualified dealer.• During routine checks <strong>and</strong>/or repairs ensure that no one can switch on <strong>the</strong> tractor or Implementaccidentally. Keep <strong>the</strong> key to <strong>the</strong> tractor in your pocket.• For your own safety <strong>and</strong> that of o<strong>the</strong>rs <strong>and</strong> to avoid forfeiting your warranty, use only original spare parts.• Do not modify/alter or permit anyone else to modify/alter <strong>the</strong> implement or any of its components.• Ensure implement is properly attached, adjusted <strong>and</strong> in good operating condition.• Frequently check cutting edge blade. It should be free of nicks <strong>and</strong> cracks <strong>and</strong> securely fastened.• Do not h<strong>and</strong>le cutting edge blades with bare h<strong>and</strong>s. Careless or improper h<strong>and</strong>ling may result in seriousinjury.• Always use genuine <strong>Kanga</strong> cutting edges. Your dealer can supply you with genuine replacement parts.• Firmly tighten all nuts, bolts, screws <strong>and</strong> shackles before operating. If worn or damaged <strong>the</strong>n replaceimmediately.• Block implements securely for storage.• Keep children <strong>and</strong> byst<strong>and</strong>ers away from storage area.• <strong>Kanga</strong> <strong>Farm</strong> <strong>Equipment</strong> accepts no responsibility or liability for any losses, injuries or damages that mayresult from failing to observe <strong>the</strong>se safety rules <strong>and</strong> <strong>the</strong> safety decals on <strong>the</strong> implement.6
Once <strong>the</strong> rear door has been removed <strong>and</strong> you have checked that <strong>the</strong> mound is not “hard packed” select a low rangereverse gear. Line up <strong>the</strong> implement with <strong>the</strong> pile you are picking up from <strong>and</strong> slowly reverse towards <strong>the</strong> pile ofmaterial. You will need to lower <strong>the</strong> implement with <strong>the</strong> tractors lower linkage arms just before you arrive at <strong>the</strong> pile ofmaterial. Always make sure <strong>the</strong> bucket is level to <strong>the</strong> ground (see Figure 1). As <strong>the</strong> bucket starts to fill slowly raise <strong>the</strong>implement while still reversing (see Figure 2).Figure 1 – Level BucketFigure 2 - Raising BucketOnce <strong>the</strong> implement has been loaded slowly lower <strong>the</strong> implement into a safe transporting position. The load you arecarrying, <strong>the</strong> terrain you intended to travel over, <strong>the</strong> size <strong>and</strong> horsepower of your tractor will determine your safetransporting position <strong>and</strong> speed, but keep <strong>the</strong> bucket as low to <strong>the</strong> ground as possible to avoid tipping. Alwaysremember that you must always have a minimum 20% of tractor <strong>and</strong> equipment weight on <strong>the</strong> tractor’s front wheelswith implement in transport position. Remember anything you are carrying must be calculated into <strong>the</strong> weight of <strong>the</strong>implement. Always travel at a reduced speed when travelling on steep or rough terrainOnce you have reached your destination trip <strong>the</strong> h<strong>and</strong>le (or activate <strong>the</strong> hydraulic ram) to unload <strong>the</strong> implement.OPERATING TIPS1 Know your controls <strong>and</strong> how to stop quickly in an emergency.2 Ensure implement is properly attached, adjusted <strong>and</strong> in a good condition before operating.3 A minimum 20% of tractor <strong>and</strong> equipment weight must be on <strong>the</strong> tractor’s front wheels withimplement in <strong>the</strong> transport position. Without this weight, tractor could tip over causing personal injuryor death. The weight maybe attained with a loader, front wheel weights, <strong>and</strong> ballast in <strong>the</strong> tires or fronttractor weights. When attaining <strong>the</strong> minimum 20% weight on <strong>the</strong> front wheels, you must not exceed<strong>the</strong> ROPS max ballasted mass certificate. Weight <strong>the</strong> tractor <strong>and</strong> implement. Do not estimate.4 Watch for hidden hazards on <strong>the</strong> terrain you are driving avoid any hazards or object that could causeinjury or make <strong>the</strong> tractor unstable.5 Look down <strong>and</strong> to <strong>the</strong> rear <strong>and</strong> make sure area is clear <strong>and</strong> safe before operating in reverse.6 Do not operate on steep slopes. If in doubt set rear axles wider for moderate slopes.7 Do not stop, start or change directions suddenly on slopes’, working up <strong>and</strong> down is preferred.8 Use extreme care <strong>and</strong> reduce ground speed on slopes <strong>and</strong> rough terrain.9 Stop implement, <strong>the</strong>n tractor, immediately upon striking an obstruction. Turn off engine, remove key,inspect <strong>and</strong> repair any damage before resuming operations. Always block implement when inspecting.10 Before commencing any adjustment, maintenance, or cleaning. Always switch off <strong>the</strong> tractor engine,remove key <strong>and</strong> wait until all moving parts have come to a complete stop, <strong>the</strong>n ensure <strong>the</strong> machine is on<strong>the</strong> ground or on a robust secure support.11 Use extreme care <strong>and</strong> reduce ground speed on slopes <strong>and</strong> rough terrain.12 Pass diagonally through sharp dips <strong>and</strong> avoid sharp drops.13 Keep h<strong>and</strong>s <strong>and</strong> body away from pressurized lines. Use paper or cardboard, not h<strong>and</strong>s or o<strong>the</strong>r bodyparts to check for leaks. Wear safety goggles. Hydraulic fluid (oil) under pressure can easily penetrate<strong>the</strong> skin <strong>and</strong> will cause serious injury or death.14 Make sure that all operating <strong>and</strong> service personnel know that if hydraulic fluid (oil) penetrates <strong>the</strong> skin,it must be surgically removed as soon as possible by a doctor familiar with this form of injury organgrene, serious injury or death will result. CONTACT A PHYSICAN IMMEDIATELY IF FLUIDENTERS SKIN OR EYES. DO NOT DELAY.10
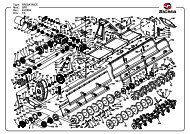
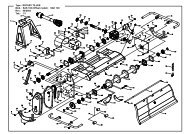
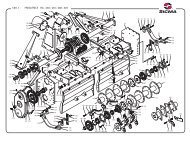
ASSEMBLY INSTRUCTIONS• Before dismounting tractor or performing any service or maintenance lower <strong>the</strong> 3-point linkage <strong>and</strong> anyo<strong>the</strong>r raised components (i.e. loader bucket) to <strong>the</strong> ground. Operate valve levers to release any hydraulicpressure, stop engine, set parking brake, remove key <strong>and</strong> unfasten seat belt (if fitted).• Never place any part of <strong>the</strong> body underneath <strong>the</strong> implement or between moveable parts even when enginehas been turned off. Hydraulic systems can “creep” (i.e. slowly lower). They can fail or movement of <strong>the</strong>control levers can cause <strong>the</strong> implement to drop or rotate unexpectedly causing severe injury or death.Follow Operator’s Manual instructions for working on your implement or have servicing carried out by aqualified dealer.• During routine checks <strong>and</strong>/or repairs, ensure that no one can switch on <strong>the</strong> tractor or Implementaccidentally. Keep <strong>the</strong> key to <strong>the</strong> tractor in your pocket.• Service work does not require going underneath this implement. Read Operators Manual for serviceinstructions• Always wear relatively tight fitted clothing to avoid entanglement in moving parts. Wear heavy-duty,rough-soled boots <strong>and</strong> protective equipment for eyes, hair, h<strong>and</strong>s, hearing <strong>and</strong> head.Assembly of this implement is <strong>the</strong> responsibility of <strong>the</strong> KANGA FARM EQUIPMENT dealer. It should be delivered to<strong>the</strong> new owner completely assembled, lubricated <strong>and</strong> adjusted for normal conditions.This implement should only require <strong>the</strong> bucket to be fitted. Fitting <strong>the</strong> bucket involves:1) Place frame on a robust support <strong>and</strong> make sure <strong>the</strong> implement cannot fall.2) Line up <strong>the</strong> frame with <strong>the</strong> bucket <strong>and</strong> slide frame over bucket.3) Lift one side of <strong>the</strong> frame <strong>and</strong> secure with Nyloc Nut <strong>and</strong> Bolt. DO NOT TIGHTEN.4) Lift o<strong>the</strong>r side into place <strong>and</strong> secure with Nyloc Nut <strong>and</strong> Bolt.5) Tighten both sides but only until <strong>the</strong> bolts just become tight. Over tightening will result in <strong>the</strong> bucket not tipping.Under tightening will mean <strong>the</strong> bucket can sway from side to side.Parts Diagram1. OVERTURN PIN2. LINKAGE PIN3. SAFETY PIN FOR ROAD USE4. HOOK SPRING5. HOOK BOLT6. HOOK7. HOOK REGISTER BOLT8. CABLE CLAMP9. CABLE10. HOOK PIN11. RELEASE LEVER12. PINS PLOUGH13. 3 POINT LINKAGE FRAME14. BUCKET15. (FOR HYDRAULIC MODEL) HYDRAULIC KIT13
Agricultural Machinery Product OHS Compliance FormWe,Of,Gavhall Pty Ltd t/as <strong>Kanga</strong> <strong>Farm</strong> <strong>Equipment</strong>16 Cahill StreetD<strong>and</strong>enong, Victoria, Australia, 3175Telephone: 03-9706-5166Fax: 03-9706-5050Confirm that <strong>the</strong> following machine(s)<strong>Kanga</strong> Tipping Box Carryall<strong>Kanga</strong> Hydraulic <strong>Transport</strong> Boxhave had a hazard identification, risk assessment <strong>and</strong> risk control procedure carried out on a representativemodel of <strong>the</strong> aforementioned product(s) in accordance with <strong>the</strong> Occupational Health <strong>and</strong> Safetyrequirements of all states <strong>and</strong> territories of Australia <strong>and</strong> where found necessary <strong>the</strong> appropriate risk controlmeasures have been incorporated in <strong>the</strong> product specifications.The Operators Manual contains <strong>the</strong> necessary Health <strong>and</strong> Safety information <strong>and</strong> safety warnings decalsare applied to <strong>the</strong> product where necessary.Product Description: <strong>Transport</strong> <strong>Boxes</strong>Model Number(s): Tipping Box Carryall – Product Code(s) 99100, 99200, 99300Hydraulic <strong>Transport</strong> Box – Product Code(s) 99450, 99550, 99650Name:Bruce J AlcottDate: 01 / 11 / 2010Position: Managing DirectorDetails of <strong>the</strong> unit assessed for <strong>the</strong> purpose of complianceModel # Size Serial # Inspection (date) LocationTipping Box Carryall 1.4m 01 / 11 / 2010 16 Cahill St, D<strong>and</strong>enongHydraulic <strong>Transport</strong> Box 1.6m 01 / 11 / 2010 16 Cahill St, D<strong>and</strong>enong14
PRE-DELIVERY CHECKLIST(Dealers Responsibility)Inspect implement thoroughly after assembly to be certain it is set up properly before delivering it to <strong>the</strong> customer. Thefollowing checklist is a reminder of points to inspect. Check off each item as it is found satisfactory ei<strong>the</strong>r before orafter corrections or services performed.□□□□□□□□□Check all bolts <strong>and</strong> ensure that <strong>the</strong>y are tight.Check all cotter pins <strong>and</strong> linkage pins <strong>and</strong> ensure <strong>the</strong>y are properly installed <strong>and</strong> can be secured.Refer to lubrication instructions <strong>and</strong> lubricate implement.Explain <strong>the</strong> importance of lubrication to <strong>the</strong> customer <strong>and</strong> point out all <strong>the</strong> lubrication points on <strong>the</strong> implement.Show customer how to make adjustments. Describe <strong>the</strong> options available for <strong>the</strong> implement <strong>and</strong> explain <strong>the</strong>repurpose <strong>and</strong> how <strong>the</strong>y work.Ensure <strong>the</strong> stability of <strong>the</strong> tractor has not been compromised with <strong>the</strong> implement <strong>the</strong> customer has purchased.Remember a minimum 20% of tractor <strong>and</strong> equipment gross weight must be on <strong>the</strong> tractor’s front wheels withimplement in <strong>the</strong> transport position. If you are adding weight to <strong>the</strong> tractor to attain <strong>the</strong> 20%, you must not exceed<strong>the</strong> ROPS max ballasted mass certificate. Weight <strong>the</strong> tractor <strong>and</strong> implement. Do not estimate.Give Operators Manual to <strong>the</strong> customer <strong>and</strong> recommend that customer become familiar with all sections, especially<strong>the</strong> safety <strong>and</strong> safe operating procedures.Explain to <strong>the</strong> customer that when transporting <strong>the</strong> implement on roads or highways, day or night, safety devicesshould be used to provide adequate warning to operators of o<strong>the</strong>r vehicles. Also explain <strong>the</strong> operator must ensurethat <strong>the</strong> tractor <strong>and</strong> implement complies with current State <strong>and</strong> Federal laws <strong>and</strong> must strictly adhere to all roadtraffic regulations in force in his/her particular state.Ensure <strong>the</strong> customer has signed <strong>the</strong> WARRANTY REGISTRATION & INSTALLATION FORM <strong>and</strong> a copyhas been returned to <strong>Kanga</strong> <strong>Farm</strong> <strong>Equipment</strong>, 16 Cahill Street, D<strong>and</strong>enong, Victoria, 3175.Name of person who carried out Pre-delivery: ______________________ Signature: ___________________Dealership Name: ________________________ Location carried out: _______________________________Date:_ _ / _ _ / _ _ _ _Top copy (manufacture’) Middle Copy (dealer’) Last page (purchaser’)15
WARRANTY REGISTRATION & INSTALLATION FORMOwners Name:_ _ _ _ _ _ _ _ _ _ _ _ _ _ _ _ _ _ _ _ _ _ _ _ _ _ _ _ _ _ _ _ _ _ _ _ _ _ _ _ _ _ _ _ _ _ _Town: _ _ _ _ _ _ _ _ _ _ _ _ _ _ _ _ _ _ _ _ _ _ _ _ _ _ _ State: _ _ _ _ _ _ _ _ _ _ _ _ P/Code: _ _ _ _Type of Implement PurchasedTipping Box CarryallHydraulic <strong>Transport</strong> BoxSize□ 1.0m □ 1.2m □ 1.4m □ 1.6m □ 1.8m □ 2.0mSerial Number ___________________Month of Manufactured:Year of Manufacture _ _ _ _□ Jan □ Feb □ Mar □ Apr □ May □ Jun □ Jul □ Aug □ Sept □ Oct □ Nov □ DecDate of Purchased _ _ / _ _ / _ _ _ _I have been fully instructed in <strong>the</strong> operation of this unit in <strong>the</strong> actual working conditions that I intended to operate <strong>and</strong> I am satisfiedthat I can use it safely. I acknowledge that I have been fully instructed in <strong>the</strong> care, maintenance, lubrication <strong>and</strong> that <strong>Kanga</strong>Implements have been designed for agricultural use in area away from people, animals, roads <strong>and</strong> property. I underst<strong>and</strong> that <strong>the</strong>re areFederal <strong>and</strong> State Laws as well as OH&S St<strong>and</strong>ards that dictate how I can operate should I wish to operate along roads or in anypopulated areas <strong>and</strong> that it is my responsibility to know <strong>and</strong> adhere to those laws. I have received a copy of <strong>the</strong> operating manual <strong>and</strong><strong>the</strong> dealer has instructed me to read <strong>the</strong> manual in full before commencing any operations._ _ _ _ _ _ _ _ _ _ _ _ _ _ _ _ _O w n e r’ s S i g n a t u r e._ _ / _ _ / _ _ _ _D a t e□□□□□□□□□FINAL ASSEMBLY – Checked all hardware to ensure it is firmly tightened as outlined in <strong>the</strong> Operators Manual. Customer has beeninstructed on how to make regular checks <strong>and</strong> tighten ALL hardware (i.e. all nuts <strong>and</strong> bolts).LUBRICATION – The implement has been lubricated <strong>and</strong> oil levels have been checked in all chain/gearbox transmissions. Customer hasbeen instructed on how to check oil levels <strong>and</strong> lubricate implement.GREASING & MAINTENANCE – Grease bearings, universals <strong>and</strong> ensure PTO shaft has been. Instruct customer how to re-grease <strong>the</strong>implement. Explain to <strong>the</strong> operator <strong>the</strong> requirements <strong>and</strong> repercussions of regular maintenance.CLUTCH ADJUSTMENT – Check that clutch has been correctly fitted <strong>and</strong> nuts are tight. Check <strong>the</strong> clutch has been adjusted for <strong>the</strong>customer’s situation. Instruct customer that an annual service is required.IMPLEMENT, DRIVESHAFT & TRACTOR COMPATIBILITY – Check implement <strong>and</strong> PTO compatibility, ensuring <strong>the</strong> PTO willnot foul on <strong>the</strong> tractor or implement during linkage operation. If PTO was cut make sure that it was re-greased <strong>and</strong> all spring activatedlocking pins on <strong>the</strong> PTO Shaft move freely.IMPLEMEMNT & TRACTOR COMPATIBILITY – Check implement <strong>and</strong> Tractor compatibility. Ensure that a minimum 20% oftractor <strong>and</strong> equipment weight is on <strong>the</strong> tractor’s front wheels with implement in transport position.OPERATION PROCEDURES – I Instruct <strong>the</strong> operator on correct procedures <strong>and</strong> techniques for <strong>the</strong> type of work <strong>the</strong>y have indicated<strong>the</strong>y intend to carry out. General safe operating procedures can be found in <strong>the</strong> Operators Manual. Advise customer to carry out a riskassessment <strong>and</strong> hazard identification of <strong>the</strong> property <strong>and</strong> alert <strong>the</strong> customer to <strong>the</strong> type of potential dangers <strong>the</strong>y should be looking to avoid.DANGERS – Instruct customer on <strong>the</strong> potential dangers of operating <strong>the</strong> implement. Outline <strong>the</strong> dangers associated with rotating blades, <strong>the</strong>possibility of fast moving debris, rotating PTO Shaft <strong>and</strong> ensure <strong>the</strong> customer knows that information about safe operating procedures <strong>and</strong>maintenance are in this Manual.OWNERS/OPERATORS MANUAL – Check that <strong>the</strong> implement has a booklet supplied. Emphasize <strong>the</strong> importance of reading <strong>the</strong>Manual. Note manuals can be down loaded from www.farmimplements.com.auPlease tick <strong>the</strong> boxes above as each point has been carried out.Dealership Name: _ _ _ _ _ _ _ _ _ _ _ _ _ _ _ _ _ _ _ _ _ Pre-delivered By: _ _ _ _ _ _ _ _ _ _ _ _ _ _ _ _ _ _ _ _Salesperson’s Name: _ _ _ _ _ _ _ _ _ _ _ _ _ _ _ _ _ _ _ _ Salesperson’s Signature: _ _ _ _ _ _ _ _ _ _ _ _ _ _ _ _ _Top copy (manufacture’) Middle Copy (dealer’) Last page (purchaser’)16