RSA SecurID Ready Implementation Guide - Emerson Community Site
RSA SecurID Ready Implementation Guide - Emerson Community Site
RSA SecurID Ready Implementation Guide - Emerson Community Site

Create successful ePaper yourself
Turn your PDF publications into a flip-book with our unique Google optimized e-Paper software.
<strong>RSA</strong> <strong>SecurID</strong> <strong>Ready</strong> <strong>Implementation</strong> <strong>Guide</strong><br />
Partner Information<br />
Last Modified: August 14, 2006<br />
Product Information<br />
Partner Name Avocent Corporation<br />
Web <strong>Site</strong> www.Avocent.com<br />
Product Name DSView® 3 Management Software<br />
Version & Platform Version 3, Win32, RedHat Linux and Solaris<br />
Product Description DSView® 3 Management Software --- The one solution for securely<br />
managing every device in your data center – now with virtual media<br />
DSView 3 management software gives you complete connectivity and<br />
control. It extends the Avocent® patented KVM over IP centralized<br />
management system with a unique benefit in the KVM industry -- a hub and<br />
spoke architecture. This innovative system increases KVM switching<br />
manageability and security and gives data centers a fully redundant system<br />
with built-in backup/failover capabilities.<br />
Product Category Remote Access<br />
1
Solution Summary<br />
<strong>RSA</strong> <strong>SecurID</strong> Authentication provides an additional security measure for authenticating users logging into<br />
the DSView® 3 Management Software. User accounts in the DSView 3 Management Software can be<br />
associated with an <strong>RSA</strong> <strong>SecurID</strong> authentication service. When these users login to the DSView 3<br />
Management Software, they will be authenticated against an external <strong>RSA</strong> Authentication Manager using<br />
two-factor user authentication.<br />
Partner Integration Overview<br />
Authentication Methods Supported Native <strong>RSA</strong> <strong>SecurID</strong> Authentication<br />
List Library Version Used Library Version # 5.0.3 for Java<br />
<strong>RSA</strong> Authentication Manager Name Locking Yes<br />
<strong>RSA</strong> Authentication Manager Replica Support Full Replica Supported<br />
Secondary RADIUS Server Support N/A<br />
Location of Node Secret on Agent<br />
<strong>RSA</strong> Authentication Agent Host Type Net OS<br />
<strong>RSA</strong> <strong>SecurID</strong> User Specification Designated Users<br />
<strong>RSA</strong> <strong>SecurID</strong> Protection of Administrative Users Yes<br />
<strong>RSA</strong> Software Token and <strong>RSA</strong> <strong>SecurID</strong> 800<br />
A tomation<br />
Use of Cached Domain Credentials<br />
No<br />
No<br />
“\rsaconf”<br />
For Example “C:\Program Files\Avocent DSView<br />
3\rsaconf”<br />
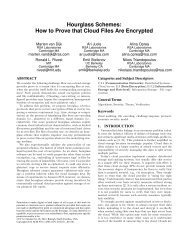
The following diagram shows a typical DSView 3 system in which users connect to a DSView Server from<br />
a browser based client and access managed appliances and target devices. Users connecting to the<br />
DSView Server will be prompted for credentials. When a user is associated with an <strong>RSA</strong> <strong>SecurID</strong><br />
authentication service, the DSView Server will communicate with the <strong>RSA</strong> Authentication Manager to<br />
authenticate the user. Once the user is authenticated; DSView will control the user’s access rights to the<br />
managed appliances and target devices.<br />
DSView<br />
Client<br />
<strong>RSA</strong> Authentication Manager<br />
TCP/IP<br />
LAN<br />
DSView<br />
Server<br />
Managed Appliance<br />
Cascade Device<br />
Target<br />
Devices<br />
2
Product Requirements<br />
The following table summarizes the minimum requirements for installing the DSView 3 Management<br />
Software on a dedicated hub server or spoke server<br />
Partner Product Requirements: Avocent DSView 3 Management Software<br />
CPU for supported Windows and Linux 2 GHz Pentium or equivalent processor<br />
Systems<br />
CPU for supported Solaris Systems 1GHz UltraSparc III<br />
1 GB RAM (additional memory may be needed,<br />
Memory<br />
depending on the number of plug-ins installed and<br />
appliances supported)<br />
Storage 1GB of free disk space<br />
Network 100BaseT NIC (1GB NIC/LAN recommended)<br />
Operating System<br />
Platform Required Patches<br />
Microsoft Windows 2000 Server Latest service pack<br />
Microsoft Windows 2000 Advanced Server Latest service pack<br />
Microsoft Windows Server 2003 Standard,<br />
Latest service pack<br />
Enterprise, or Web Edition<br />
Microsoft Windows XP Professional SP2 or later<br />
Red Hat Enterprise Linux Version 3 or 4 (AS,ES<br />
and WS products)<br />
Sun® Solaris SPARC 9 or 10<br />
Novell® SUSE Linux (x86) Enterprise Server 8 or<br />
9<br />
3
The following table summarizes the minimum requirements for client web browsers that will connect to a<br />
DSView 3 Management Software hub or spoke server.<br />
Partner Product Requirements: DSView 3 Management Software Clients<br />
CPU 1 GHz Pentium or equivalent processor<br />
Memory 512MB RAM<br />
Network 10 or 100BaseT NIC (100 recommended)<br />
Video XGA video with graphics accelerator<br />
Desktop Settings 800x600 with 256 colors<br />
Operating System<br />
Platform Required Patches<br />
Microsoft Windows 2000 Workstation or Server SP2 or later<br />
Windows XP Home Edition or Professional<br />
Microsoft Windows Server 2003 Standard,<br />
Enterprise, or Web Edition<br />
Red Hat Enterprise Linux<br />
(WS v3, AS v3, ES v3; kernel version 2.4.21)<br />
Sun® Solaris SPARC 9 or 10<br />
Novell® SUSE Linux (x86) Enterprise Server 8 or<br />
9<br />
Web Browsers<br />
Type Required Patches<br />
Internet Explorer 6.0 or later SP1 for version 6.0<br />
Mozilla version 1.7.3 or later<br />
Firefox version 1.0 or later<br />
Netscape version 7.2 or later<br />
On non-Windows clients the Video Viewer, Telnet, and VNC viewers require<br />
Java. The supported Java version is 1.5.0._02. The Telnet/SSH applet may<br />
work with other versions; the Video Viewer requires that version.<br />
On Windows clients,Java is required to run the Avocent Telnet/SSH Viewer.<br />
If the Win32 PuTTY Telnet/SSH Viewer is selected in the user’s profile, then<br />
Java is not required on the client.<br />
The DSView 3 Management Software will automatically download and<br />
install the Java JRE onto the client browser the fist time it is needed.<br />
4
Agent Host Configuration<br />
To facilitate communication between the DSView 3 Management Software and the <strong>RSA</strong> Authentication<br />
Manager / <strong>RSA</strong> <strong>SecurID</strong> Appliance, an Agent Host record must be added to the <strong>RSA</strong> Authentication<br />
Manager database for each DSView Server (hub and all spokes) in the SDView System for which <strong>RSA</strong><br />
<strong>SecurID</strong> authentication is being added. The Agent Host record identifies the DSView Servers within its<br />
database and contains information about communication and encryption.<br />
To create the Agent Host record, you will need the following information.<br />
• Hostname<br />
• IP Addresses for all network interfaces<br />
When adding the Agent Host Record, you should configure each DSView 3 server as Net OS. This<br />
setting is used by the <strong>RSA</strong> Authentication Manager to determine how communication with the DSView 3<br />
Management Software will occur.<br />
Note: Hostnames within the <strong>RSA</strong> Authentication Manager / <strong>RSA</strong> <strong>SecurID</strong><br />
Appliance must resolve to valid IP addresses on the local network.<br />
After creating the Agent Host records for each DSView Server, a configuration file must be created<br />
(typically known as the sdconf.rec file). This configuration file must be accessible to the DSView 3<br />
Management Software when adding an external <strong>RSA</strong> <strong>SecurID</strong> authentication service.<br />
Please refer to the appropriate <strong>RSA</strong> Security documentation for additional information about Creating,<br />
Modifying and Managing Agent Host records.<br />
5
Partner Authentication Agent Configuration<br />
Before You Begin<br />
This section provides instructions for integrating the partners’ product with <strong>RSA</strong> <strong>SecurID</strong> Authentication.<br />
This document is not intended to suggest optimum installations or configurations.<br />
It is assumed that the reader has both working knowledge of all products involved, and the ability to<br />
perform the tasks outlined in this section. Administrators should have access to the product<br />
documentation for all products in order to install the required components.<br />
All vendor products/components must be installed and working prior to the integration. Perform the<br />
necessary tests to confirm that this is true before proceeding.<br />
Documenting the Solution<br />
The following summarizes the steps required to setup and administer an <strong>RSA</strong> <strong>SecurID</strong> authentication<br />
service in the DSView 3 Management Software:<br />
1. Add an <strong>RSA</strong> <strong>SecurID</strong> external authentication service to the DSView 3 Management Software.<br />
2. Add users to the <strong>RSA</strong> <strong>SecurID</strong> authentication service.<br />
3. Log into the DSView 3 Management Software using an <strong>RSA</strong> user account.<br />
4. View the status and change the settings of the <strong>RSA</strong> <strong>SecurID</strong> authentication service in DSView.<br />
6
Add an <strong>RSA</strong> <strong>SecurID</strong> External Authentication Service<br />
1. Login to the DSView Hub Server and launch the Add Authentication Server Wizard as shown below.<br />
2. Enter a name for the service and select <strong>RSA</strong> <strong>SecurID</strong> for the Type.<br />
7
3. Select the configuration file that was created by the <strong>RSA</strong> Authentication Manager.<br />
The sdconf.rec file that is uploaded by the Add Authentication Service<br />
Wizard will automatically be distributed to all the DSView Servers. Each<br />
DSView Server will use the sdconf.rec file to communicate with the <strong>RSA</strong><br />
Authentication Manager. For some customer configurations, each DSView<br />
Server may require a different configuration and thus a different sdconf.rec<br />
configuration file. For some installations an advanced option file may also<br />
be required for manual load balancing called sdopts.rec. The Add<br />
Authentication Service Wizard will not allow this advanced level of<br />
configuration to be done. The advance configuration can be setup using<br />
the <strong>RSA</strong> <strong>SecurID</strong> Authentication Service Connection Settings page shown<br />
in the following section. See the <strong>RSA</strong> Authentication Manager<br />
Administrator <strong>Guide</strong> for details on the sdconf.rec and sdopts.rec files.<br />
8
4. The DSView 3 Management Software will use the sdconf.rec file to communicate with the <strong>RSA</strong><br />
Authentication Manager. Upon successful completion the following page will appear.<br />
By default, the <strong>RSA</strong> Authentication Manger software is configured to<br />
automatically create the node secret for new agent hosts (of which DSView<br />
is one). The node secret is not created on the DSView Server until the first<br />
<strong>RSA</strong> user logs into DSView. Therefore after adding a <strong>RSA</strong> <strong>SecurID</strong> service,<br />
the administrator should login to DSView so that the node secret will be<br />
created. To maximize protection against attacks this should be done<br />
locally on the DSView Server. See the “<strong>RSA</strong> Authentication Manger 6.0<br />
Administrator <strong>Guide</strong> section “<strong>RSA</strong> Node Secret File Best Practices for<br />
Automatic Delivery” for details.<br />
Only a single <strong>RSA</strong> <strong>SecurID</strong> authentication service can be added to the<br />
DSView 3 Management Software. The Add Authentication Service Wizard<br />
will report an error if an <strong>RSA</strong> <strong>SecurID</strong> authentication service already exists.<br />
After an <strong>RSA</strong> <strong>SecurID</strong> authentication service is deleted from the DSView 3<br />
Management Software, the DSView 3 Management Software must be<br />
restarted before the service can be added again. The Add Authentication<br />
Service Wizard will report an error if the DSView 3 Management Software<br />
needs to be restarted.<br />
DSView also allows for manual delivery of node secret files. After an <strong>RSA</strong><br />
Service is added to DSView, the <strong>RSA</strong> administrator may copy the node<br />
secret file to the rsaconf directory of the DSView sever (e.g. C:\Program<br />
Files\Avocent DSView 3\rsaconf). This directory is created when an <strong>RSA</strong><br />
<strong>SecurID</strong> service is added to DSView. The node secret filename must be<br />
securid.<br />
9
Add Users to the <strong>RSA</strong> Authentication Service<br />
1. Login to the DSView Hub Server and launch the Add User Wizard as shown below.<br />
2. Select the <strong>RSA</strong> <strong>SecurID</strong> authentication service that was previously added.<br />
10
3. Enter the name of the user.<br />
4. Assign the user to a user group.<br />
11
5. Assign the preemption level for the user.<br />
6. The next page completes the wizard and adds the new user. Repeat the execution of the wizard for each<br />
<strong>RSA</strong> <strong>SecurID</strong> user to be added.<br />
12
Logging into DSView 3 with an <strong>RSA</strong> <strong>SecurID</strong> User Account<br />
1. After an <strong>RSA</strong> <strong>SecurID</strong> authentication service has been added to DSView, the login page in DSView will<br />
change to show the <strong>RSA</strong> <strong>SecurID</strong> logo.<br />
The following picture shows the login page prior to adding an <strong>RSA</strong> <strong>SecurID</strong> authentication service.<br />
The following picture shows the login page after adding an <strong>RSA</strong> <strong>SecurID</strong> authentication service.<br />
The Password field is renamed to Passcode. All users will see this login<br />
page once an <strong>RSA</strong> <strong>SecurID</strong> authentication service has been added to<br />
DSView 3.<br />
13
When an <strong>RSA</strong> <strong>SecurID</strong> authenticator is first assigned to a user, a PIN is not yet associated with it. If the<br />
“PIN-Less” token functionality is not utilized on the <strong>RSA</strong> Authentication Manager, the <strong>RSA</strong> <strong>SecurID</strong><br />
authenticator cannot be used for authenticating until its assigned user performs the New PIN operation.<br />
Alternatively, an <strong>RSA</strong> Authentication Manager administrator can put an authenticator into New PIN mode<br />
at any time.<br />
When an <strong>RSA</strong> <strong>SecurID</strong> authenticator is in New PIN mode, it cannot be used for authenticating until its<br />
assigned user performs the New PIN operation unless “PIN-Less” token functionality is utilized on the<br />
Authentication Manager. During the New PIN operation, the <strong>RSA</strong> Authentication Manager will either<br />
assign a PIN to the user or allow the user to specify a PIN that he or she will use. Which options are<br />
displayed to the user who initiates a New PIN operation depends on how the <strong>RSA</strong> Authentication<br />
Manager is configured.<br />
The <strong>RSA</strong> Authentication Manager Software allows the following PIN options<br />
• User-Selectable PIN – User can choose to enter a PIN or allow the <strong>RSA</strong> server to generate it<br />
• User-Defined PIN – The user is only allowed to enter a PIN.<br />
• System Generated PIN – The user cannot enter a PIN; the PIN will be generated.<br />
For detailed information on setting this parameter see the <strong>RSA</strong> Authentication Manager Administrators<br />
guide.<br />
The following sections show examples of the pages that will appear in the DSView 3 Management<br />
Software when an <strong>RSA</strong> user logs in and the authenticator is in New PIN mode.<br />
New PIN Required Page<br />
The following page appears when an <strong>RSA</strong> <strong>SecurID</strong> user attempts to login to DSView 3 and the<br />
authenticator is in the New PIN mode. What the user is allowed to choose on this page is dependent<br />
upon how the authenticator is configured in the <strong>RSA</strong> Authentication Manager.<br />
14
Memorize PIN Warning Page<br />
If <strong>RSA</strong> <strong>SecurID</strong> will generate the PIN, the following page will appear after the user selects OK on the New<br />
PIN Required page.<br />
Memorize PIN Page<br />
Choosing Yes at the Memorize PIN Warning page will cause the following page to appear showing the<br />
PIN generated by <strong>RSA</strong> <strong>SecurID</strong>.<br />
15
New PIN Accepted<br />
The following page will appear after selecting OK on the Memorize PIN page or automatically after ten<br />
seconds. If the user entered their own PIN, this page will appear immediately after the user selects OK on<br />
the New PIN Required page.<br />
Next Tokencode Required Page<br />
When an authenticator is in Next Tokencode mode and it is used in a login attempt, the user is required to<br />
input a second successive Tokencode from the <strong>RSA</strong> <strong>SecurID</strong> token. See the <strong>RSA</strong> Authentication<br />
Manager Administrator <strong>Guide</strong> for details on Next Tokencode mode.<br />
The following picture shows the Next Tokencode Required page.<br />
16
Unsuccessful Login<br />
The login page will display an error when the user fails to login as shown in the following picture.<br />
Viewing the Status of the <strong>RSA</strong> <strong>SecurID</strong> Authentication Service<br />
The status of the <strong>RSA</strong> <strong>SecurID</strong> authentication service can be viewed in the DSView 3 Management<br />
Software.<br />
The following picture shows the Authentication Service Connection Settings page. The status is shown for<br />
each DSView Server in the system.<br />
17
Changing the Settings of the <strong>RSA</strong> <strong>SecurID</strong> Authentication Service<br />
Choosing one or more DSView Servers in the list then selecting the Clear Node Secret button will clear<br />
the node secret on the selected servers.<br />
Choosing one or more DSView Servers in the list then selecting the Update button will allow the<br />
configuration files to be updated on the selected DSView Servers. The following picture shows the<br />
Update <strong>RSA</strong> Configuration page that allows the sdconf.rec and sdopts.rec files to be updated.<br />
When the Update button is selected the configuration files will be uploaded to the selected DSView<br />
Servers.<br />
The configuration files are updated on the selected DSView Servers, but<br />
will not be activated until the selected DSView Servers are restarted.<br />
18
Certification Checklist<br />
Date Tested: August, 7, 2006<br />
Product Name<br />
Certification Environment<br />
Version Information Operating System<br />
<strong>RSA</strong> Authentication Manager 6.1 Windows 2000 Server<br />
DSView® 3 Management<br />
Software<br />
DSView 3 software version 3.3 Windows 2000 Advanced Server<br />
Mandatory Functionality<br />
<strong>RSA</strong> Native Protocol RADIUS Protocol<br />
New PIN Mode<br />
Force Authentication After New PIN Force Authentication After New PIN N/A<br />
System Generated PIN System Generated PIN N/A<br />
User Defined (4-8 Alphanumeric) User Defined (4-8 Alphanumeric) N/A<br />
User Defined (5-7 Numeric) User Defined (5-7 Numeric) N/A<br />
User Selectable User Selectable N/A<br />
Deny 4 and 8 Digit PIN Deny 4 and 8 Digit PIN N/A<br />
Deny Alphanumeric PIN Deny Alphanumeric PIN N/A<br />
PASSCODE<br />
16 Digit PASSCODE 16 Digit PASSCODE N/A<br />
4 Digit Password 4 Digit Password N/A<br />
Next Tokencode Mode<br />
Next Tokencode Mode Next Tokencode Mode N/A<br />
Load Balancing / Reliability Testing<br />
Failover (3-10 Replicas) Failover N/A<br />
Name Locking Enabled Name Locking Enabled<br />
No <strong>RSA</strong> Authentication Manager No <strong>RSA</strong> Authentication Manager N/A<br />
Additional Functionality<br />
<strong>RSA</strong> Software Token Automation<br />
System Generated PIN N/A System Generated PIN N/A<br />
User Defined (8 Digit Numeric) N/A User Defined (8 Digit Numeric) N/A<br />
User Selectable N/A User Selectable N/A<br />
Next Tokencode Mode<br />
<strong>RSA</strong> <strong>SecurID</strong> 800 Token Automation<br />
N/A Next Tokencode Mode N/A<br />
System Generated PIN N/A System Generated PIN N/A<br />
User Defined (8 Digit Numeric) N/A User Defined (8 Digit Numeric) N/A<br />
User Selectable N/A User Selectable N/A<br />
Next Tokencode Mode<br />
Domain Credential Functionality<br />
N/A Next Tokencode Mode N/A<br />
Determine Cached Credential State N/A Determine Cached Credential State<br />
Set Domain Credential N/A Set Domain Credential<br />
Retrieve Domain Credential N/A Retrieve Domain Credential<br />
SWA / PAR = Pass = Fail N/A = Non-Available Function<br />
19