Create an HTML Form - Shasta College
Create an HTML Form - Shasta College
Create an HTML Form - Shasta College
- No tags were found...

Create successful ePaper yourself
Turn your PDF publications into a flip-book with our unique Google optimized e-Paper software.
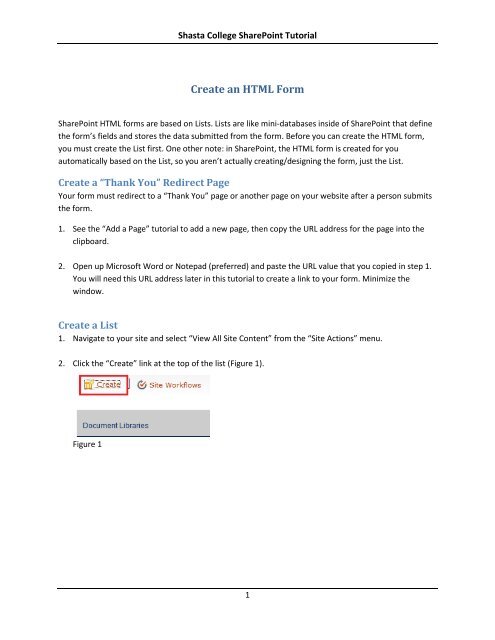
<strong>Shasta</strong> <strong>College</strong> SharePoint Tutorial<strong>Create</strong> <strong>an</strong> <strong>HTML</strong> <strong>Form</strong>SharePoint <strong>HTML</strong> forms are based on Lists. Lists are like mini-databases inside of SharePoint that definethe form’s fields <strong>an</strong>d stores the data submitted from the form. Before you c<strong>an</strong> create the <strong>HTML</strong> form,you must create the List first. One other note: in SharePoint, the <strong>HTML</strong> form is created for youautomatically based on the List, so you aren’t actually creating/designing the form, just the List.<strong>Create</strong> a “Th<strong>an</strong>k You” Redirect PageYour form must redirect to a “Th<strong>an</strong>k You” page or <strong>an</strong>other page on your website after a person submitsthe form.1. See the “Add a Page” tutorial to add a new page, then copy the URL address for the page into theclipboard.2. Open up Microsoft Word or Notepad (preferred) <strong>an</strong>d paste the URL value that you copied in step 1.You will need this URL address later in this tutorial to create a link to your form. Minimize thewindow.<strong>Create</strong> a List1. Navigate to your site <strong>an</strong>d select “View All Site Content” from the “Site Actions” menu.2. Click the “<strong>Create</strong>” link at the top of the list (Figure 1).Figure 11
<strong>Shasta</strong> <strong>College</strong> SharePoint Tutorial3. Select the “Custom List” option in the “<strong>Create</strong>” window (Figure 2).Figure 24. Click the “More Options” button on the right.5. Enter values in the “Name” <strong>an</strong>d “Description” fields.6. Click the [No] button in the “Navigation” section.7. Click the [<strong>Create</strong>] button at the bottom.8. The “List View” page will display <strong>an</strong>d the “List Tools” tab will appear in the ribbon bar.9. Before you begin creating columns (i.e. fields for your list/form), some List Settings <strong>an</strong>d ListPermissions need to be setup. Click the “List” tab just under the “List Tools” tab of the ribbon bar(Figure 3).Figure 310. Click the [List Permissions] button in the “Settings” section of the ribbon bar (Figure 4).Figure 42
<strong>Shasta</strong> <strong>College</strong> SharePoint Tutorial11. The List Permissions page will display. Click the [Stop Inheriting Permissions] button in the“Inherit<strong>an</strong>ce” section of the ribbon bar (Figure 5).Figure 512. Click the [OK] button for the popup message “You are about to create unique permissions …”13. Click the [Anonymous Access] button in the “M<strong>an</strong>age” section of the ribbon bar under the“Permissions Tools” tab (Figure 6).Figure 614. The “Anonymous Access” window will display. Click the “Add Items” checkbox (Figure 7) <strong>an</strong>d thenclick the [OK] button.Figure 715. Click the [Navigation Folder] button in the ribbon bar <strong>an</strong>d select the “Settings” option one level up(Figure 8).3
<strong>Shasta</strong> <strong>College</strong> SharePoint TutorialFigure 1122. The “List Information” page will display. The next few steps are to view/test your new form <strong>an</strong>dobtain the URL address for the form to create a link in your menu or on a page. Click the “NavigationFolder” in the ribbon bar <strong>an</strong>d select your list [name] above “Settings” (Figure 8).23. The “List View” page will display. To view/test your form, click the “Add new item” link under the listview (Figure 12).6
<strong>Shasta</strong> <strong>College</strong> SharePoint TutorialFigure 1224. Before you enter <strong>an</strong>y values in your form, you need to get the URL address of the form. Click in theaddress bar at the top of your browser, which should highlight the whole URL. Then copy it into theclipboard (e.g. Ctrl+C or right-click-select-copy) (Figure 13).Figure 1325. Enter values into your form <strong>an</strong>d click the [Save] button (Figure 14).Figure 1426. The “List View” page will display <strong>an</strong>d you will be able to view the submitted form data (Figure 15).Figure 157
<strong>Shasta</strong> <strong>College</strong> SharePoint Tutorial27. If you created a “Th<strong>an</strong>kYou” page at the beginning of this tutorial, open up the Microsoft Word orNotepad window that you previously opened <strong>an</strong>d paste the URL value that you copied in step 24(Figure 16).Figure 1628. This is where it gets a little tricky. Highlight the text “http://spdb” at the beginning <strong>an</strong>d delete it.Then highlight all the text after this text “Source=” <strong>an</strong>d delete it (Figure 16). This is the beginningpart of the URL to add as a menu item link or as a link in a page that will open your new form.(example below)/Information%20Services/Internet/Lists/Test%20<strong>Form</strong>%201/New<strong>Form</strong>.aspx?Source=29. If you created a “Th<strong>an</strong>k You” or redirect page for your form, copy the URL address for the page <strong>an</strong>dpaste it in your Word / Notepad document right after the equal sign “=” at the end of the URLaddress above (step 28). Note: do not include the “http://spdb” part at the beginning of the URLaddress (example below).Before (this is the URL address for the form redirect page):/Information%20Services/Internet/Pages/Th<strong>an</strong>kYou.aspxAfter (redirect page URL address appended to the end of the form URL address):/Information%20Services/Internet/Lists/Test%20<strong>Form</strong>%201/New<strong>Form</strong>.aspx?Source=/Information%20Services/Internet/Pages/Th<strong>an</strong>kYou.aspxIf you don’t need a “Th<strong>an</strong>k You” page, then just use your website’s home page (or other page) as theredirect page URL address (e.g. /Information%20Services/Internet/Pages/5016.aspx) (examplebelow)./Information%20Services/Internet/Lists/Test%20<strong>Form</strong>%201/New<strong>Form</strong>.aspx?Source=/Information%20Services/Internet/Pages/5016.aspxYou must provide a redirect page URL address to protect your form data.30. Creating links to your form:a. Menu Item Link: to create a menu item in your website’s menu to open the form, see the“Edit the Site Menu” tutorial on how to add a menu item <strong>an</strong>d paste the URL address above(step 29 – “After”) into the “URL” field (Figure 17). Don’t check the “Open link in newwindow” box.8
<strong>Shasta</strong> <strong>College</strong> SharePoint TutorialFigure 17b. Page Link: to create a link on a page to open your form, see the “Link Tools” tutorial on howto add a hyperlink (“From Address”) <strong>an</strong>d paste the URL address above (step 29 – “After”)into the “URL” field (Figure 18). Don’t check the “Open link in new window” box.Figure 18Adding <strong>an</strong> Alert (Email Notification) when the <strong>Form</strong> is Submitted1. If you wish to send <strong>an</strong> email notification to someone when the form is submitted, you will need toadd <strong>an</strong> “Alert” to your List. Navigate to the “List View” of your List either by the “Navigation Folder”or by going to the “Site Actions” menu, select the “View All Site Content” option, <strong>an</strong>d then clickingon your List’s title link in the Lists section.2. You should see the “List Tools” tab at the top of your screen in the blue ribbon bar. Click the “List”sub-tab, <strong>an</strong>d click the [Alert Me] button in the “Share & Track” section (Figure 1).Figure 19
<strong>Shasta</strong> <strong>College</strong> SharePoint Tutorial3. The “New Alert” window will display. Modify the “Alert Title” is you wish. Add or ch<strong>an</strong>ge users in the“Send Alerts To” section. Click the [Address Book] button below the “Users:” box to look-up <strong>an</strong>d addrecipients (Figure 2).Figure 2Import<strong>an</strong>t Note: The “Send Alerts To” recipient (i.e. email address in the “Users:” box) must be auser in SharePoint in order to actually receive the alert email. If they are not a user, they will have tobe added to SharePoint as a special user (contact the Webmaster for assist<strong>an</strong>ce).4. In the “Ch<strong>an</strong>ge Type” – “Only send me alerts when:” section, click the [New items are added] radiobutton. In the “Send Alerts for These Ch<strong>an</strong>ges” section, click the [Someone else ch<strong>an</strong>ges <strong>an</strong> item]radio button.5. In the “When to Send Alerts” section, choose the appropriate option. If you receive only a few formsubmissions per week, then the [Send notification immediately] option is best. However, if youreceive m<strong>an</strong>y form submissions per day, then the [Send a daily summary] option may be best.6. Click the [OK] button at the bottom of the window to save the alert. You will receive <strong>an</strong> emailnotifying you that the alert is in effect. You c<strong>an</strong> ch<strong>an</strong>ge the alert or delete it by selecting the“M<strong>an</strong>age My Alerts” option from the [Alert Me] button drop-down menu (Figure 3).Figure 310
<strong>Shasta</strong> <strong>College</strong> SharePoint TutorialAdding a CAPTCHA Field to the <strong>Form</strong>I have recently implemented some enh<strong>an</strong>ced security measures for our <strong>HTML</strong> forms, <strong>an</strong>d one of thosemeasures is the ability to add a CAPTCHA field to your form. Add a “what” to my form? A CAPTCHA fieldis one of those fields where you see <strong>an</strong> image on the form (Figure 1) <strong>an</strong>d you have to enter thecharacters in the image to prove that you’re a hum<strong>an</strong> submitting the form <strong>an</strong>d not a “spam-bot”. Ifyou’ve ever filled out a form online, then you’ve probably seen a CAPTCHA field before.Figure 1Following are the steps to add a CAPTCHA field to your <strong>HTML</strong> form. For security reasons, I stronglysuggest adding this CAPTCHA field to your <strong>HTML</strong> forms as soon as possible.1. Login, navigate to your site, <strong>an</strong>d then to your List (i.e. click on your List’s library link where you willthen see your List’s data/records).2. Click the “List” sub-tab under the “List Tools” tab in the ribbon bar.3. Click the [List Settings] button in the “Settings” section of the ribbon bar.4. Scroll down to the bottom of the “Columns” section where you’ll see some links.5. Click the “Add from existing site columns” link. The “Select Columns” window will appear (Figure 2).11
<strong>Shasta</strong> <strong>College</strong> SharePoint TutorialFigure 26. Select “Custom Columns” from the “Select site columns from:” field.7. Click the “Validation” column from the “Available site columns” box, <strong>an</strong>d then click the [Add >]button.8. Click the [OK] button <strong>an</strong>d you’re done. You’ll now see a CAPTCHA field like Figure 1 on your <strong>HTML</strong>form that won’t allow the form to be submitted until the image characters have been enteredcorrectly.Note: You won’t see the CAPTCHA field when you are logged into the website internally (<strong>an</strong> errormessage, “Input error: Invalid referrer,” will display, OK to ignore). It only appears correctly when fillingout the form on the public website where the form’s URL iswww.shastacollege.edu/path/to/your/form/etc.More …12
<strong>Shasta</strong> <strong>College</strong> SharePoint TutorialAdding a Heading to the <strong>Form</strong>As mentioned before, when you create a list, the <strong>HTML</strong> form is created automatically, but it onlydisplays the labels, fields, <strong>an</strong>d buttons. There isn’t <strong>an</strong>y heading or instruction text. The following stepsshow you how to add additional content to your form.1. Navigate to your List’s data view by clicking on the List’s title link in your site’s View All Site Contentpage.2. Click the “List” sub-tab under the “List Tools” tab.3. In the “Customize List” section of the ribbon bar, click the [<strong>Form</strong> Web Parts] button menu <strong>an</strong>d selectthe “Default New <strong>Form</strong>” option (Figure 1).Figure 14. The ribbon bar will ch<strong>an</strong>ge <strong>an</strong>d the form layout editor page will appear (Figure 2). Click the “Add aWeb Part” link above your form.Figure 25. The web part selector window will appear under the ribbon bar. Select “Media <strong>an</strong>d Content”from the “Categories” list. Then select “Content Editor” from the “Web Parts” list (Figure 3).Then click the [Add] button on the right.13
<strong>Shasta</strong> <strong>College</strong> SharePoint TutorialFigure 36. Click the “Click here to add new content” link in the “Main” content area to begin addingcontent similar to a regular publishing page. You’ll notice that the “Editing Tools” tab appears inthe ribbon bar, which allows you to format the text (Figure 4).Figure 47. When finished adding content, click the “Page” tab in the ribbon bar, <strong>an</strong>d then click the [StopEditing] button (Figure 5). There isn’t <strong>an</strong>y check-in or publish options for editing <strong>HTML</strong> forms.Figure 514