D-C MOTORS - Reliance Electric
D-C MOTORS - Reliance Electric
D-C MOTORS - Reliance Electric

Create successful ePaper yourself
Turn your PDF publications into a flip-book with our unique Google optimized e-Paper software.
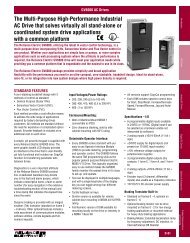
Instructions ForInstalling Motor MountedBlower Kit On<strong>Reliance</strong> ® D-C MotorsFrames DB180ATZ,B180ATZ thru B400ATZD-C <strong>MOTORS</strong>Instruction Manual C-3062-4April, 2007
IMPORTANTIt is important that these instructions bestudied by personnel installing and operatingthis equipment. Read thoroughly beforestarting. Keep these instructions for futurereference.2
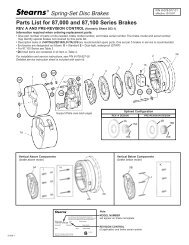
INSTRUCTIONS FOR INSTALLING MOTOR-MOUNTED BLOWER KIT(With or Without Filter)A blower kit consists of the following items:1. A blower assembly complete with a-c motor.2. Two solid hand-hole covers.A filter kit is supplied as a separate item if specified.The kit is suitable for modifying a drip-proof selfventilatedd-c motor of suitable rating and frame size toconvert it into forced-ventilated motor mounted blowerconstruction. The blower will provide to the motor aconstant supply of ventilating air with the cubic feetper minute and static pressure required for the rating.The blower is normally mounted on the top hand-holeopening of the commutator end bracket with the air inletpointed away from the drive shaft end of the motor. Theblower can also be mounted on the side of thecommutator end bracket opposite the conduit box side.The d-c motor internal fan may be left in position providedthe blower is installed on the commutator end bracket.The d-c motor must not be energized or operatedwithout the blower running.IMPORTANT — To insure adequate protection of ablower ventilated motor against loss of cooling air, amotor thermostat or air flow switch for interlocking withthe controller overload protection circuit isrecommended.FIGURE 1 — Blower without filter assembled on d-cmotor.To mount the blower:1. Remove all of the hand-hole covers from thecommutator end bracket. (Bracket opposite thedrive end.)2. Retain the solid cover and mounting cap screwsfor future use. Discard the louvered covers andscreen cover if provided.3. Mount the blower assembly on the selected handholeopening using the cap screws provided withthe kit. Refer to Figure 1.4. Mount the two solid hand-hole covers provided withthe kit and the one solid hand-hole coverremoved from the bracket on the three remaininghand-hole openings using the cap screws previouslyprovided for the hand-hole covers.5. Connect the a-c blower motor through a starter (notincluded in the blower kit) with a suitable source of a-cpower so that the blower motor will turn the blower'swheel in the proper direction. The standardblower motor is for three phase, 50/60 Hz,230/460 volt power.) Blower motors for singlephasedrive motors may be rated for single-phase,50/60 Hz, 230 volt power.) Blower motors for othera-c supplies are available on special order. Checkthe nameplate on the blower motor to make sure itmatches the available a-c source and control. Checkthe blower motor full load current on the motornameplate to make sure it matches the rating ofthe overload relay setting or heater in the blowerstarter.6. Before starting the blower motor, make sure theblower wheel mounted on the shaft of the blowermotor turns freely without any interference or binding.7. Start the blower motor and check for the properdirection of rotation. Check to make sure that theblower assembly and the solid covers on the frontend bracket are tight and properly gasketed toprevent leakage of ventilating air. Listen to theblower and blower motor for any noise that wouldindicate abnormal operation.IMPORTANT — Actually check blower rotation. Donot depend on the "feel" of the amount of exitair. Motors may appear to have sufficient aircoming out of the exit louvers when the blower isrotating in the wrong direction.8. Mount Filter Kit, if included, as follows:IMPORTANT — Follow instructions for yourspecific kit part number.Frames B320ATZ thru B400ATZFilter kits will fit blower kit as follows:Filter Kit Blower Kit DC Motor Frame Size417077-5417077-6417077-7417077-2417077-3417077-4B320ATZB360ATZB400ATZa. Remove inlet flange with screen.b. Mount inlet flange from filter kit using the boltsprovided for original flange.c. Install the filter studs in the inlet flange.d. Place 5 / 8 " wide by1 / 4 " thick foam gasketmaterial around face of inlet flange to seal gapbetween inlet flange and filter.e. Place filter against inlet flange and install filtermounting plate against end of filter. Secure withthe 5 / 16 wing nuts on the filter studs3
Frames DB180ATZ, B180ATZ thru B280ATZ withsquare filterFilter kits will fit blower kits as follows:Filter Kit Blower Kit D-C Motor Frame Size417703-10 417077-8 DB180ATZ — B180ATZ417703-11 417077-9 B210ATZ417703-11 417077-10 B250ATZ417703-11 417077-11 B280ATZa. Remove inlet screen on blower inlet.b. Place 5 / 8 " wide by ¼" thick foam gasket materialaround face of inlet flange to seal gap betweeninlet flange and filter.c. Mount filter housing on blower inlet with inletscreen inside housing using original #10 × ½inch hex head bolts.d. Place filter in filter housing. Secure with 4 — #10-24round head screws.Frames DB180ATZ, B180ATZ thru B360ATZ withround filter — Filter kits will fit blower kits as follows:Filter Kit Blower Kit D-C Motor Frame Size417077-57 417077-51 DB180ATZ — B180ATZ417077-58 417077-52 B210ATZ417077-58 417077-53 B250ATZ417077-58 417077-54 B280ATZ417077-58 417077-55 B320ATZ417077-59 417077-56 B360ATZRefer to Figure 2.a. Remove inlet screen. Do not use inlet screenwith filter. (Inlet screen should be saved if futureoperation without filter is required.)b. Install the three filter studs on the blowerhousing.c. Place inlet flange on the three filter studs andpush up to blower housing.d. Place filter on the three filter studs so that thestuds line up with the holes on the face of thefilter.e. Push inlet flange and filter against blowerhousing and secure with the three wing nuts onthe filter studs.WARNING: FILTER MUST BE IN PLACE WHENOPERATING THE MOTOR TO GUARD AGAINSTPOSSIBLE CONTACT WITH THE BLOWER WHEEL.SUMMARY CHECK LIST1. Confirm that the blower kit is matched to the d-cmotor frame and rating.2. Confirm that the blower motor rating matches thepower supply.3. Confirm that the blower motor overload ratingmatches the motor full load current.4. Confirm that motor thermostat or air flow switch isinterlocked with controller overload protection circuit.FIGURE 2 — (Top) Assembly of round filter onframes DB180ATZ — B360ATZ; (Bottom) Blower withround filter mounted on d-c motor.5. Confirm that the blower motor is connected for theproper direction of rotation.6. Confirm that the blower motor and wheel turn freelyby hand before starting.7. Confirm that the blower motor and wheel rotatesin the proper direction when running.8. Confirm that there is not unwanted leakage of air.9. Confirm that the blower and motor operates with thenormal sound of forced air.IMPORTANT — Filters will become clogged with dirt innormal operation and must be cleaned or replaced toinsure that the proper volume of ventilating air isprovided to the motor.CAUTION — SURFACE TEMPERATURE OFMOTOR ENCLOSURE MAY REACH TEMPERATURESWHICH CAN CAUSE DISCOMFORT OR INJURY TOPERSONNEL ACCIDENTALLY COMING INTOCONTACT WITH HOT SURFACES. (WHENINSTALLING, PROTECTION SHOULD BE PROVIDEDBY USER TO PROTECT AGAINST ACCIDENTALCONTACT WITH HOT SURFACE).4
D-C DRIVESTRAINING AND AUDIO/VISUAL PRODUCTS<strong>Reliance</strong> offers a wide variety of Industrial Training courses for electricians, electronic technicians and engineers who are responsible forthe installation, repair and maintenance of production equipment and systems.Professional quality A/V Programs are also available. These programs have been designed to provide years of efficient in-house training.Available for playback at the user's convenience, these videotape programs allow individual or groups to learn or review subjects at anytime.Printed reference materials come with all diagnostic and troubleshooting programs.Training CoursesNo.TitleD-C DRIVE COURSES1-1 Principles of Industrial <strong>Electric</strong>ity and Electronics1-2 Maintenance and Troubleshooting of Standard D-C Drives1-3 Maintenance and Troubleshooting of Engineered D-C Drives and Systems1-4 D-C Drives Hands-On Troubleshooting Lab1-6 Maintenance and Troubleshooting of MinPak and FlexPak® Style D-C Drives1-11 Maintenance and Troubleshooting of MaxPak® Plus Drives1-14 Maintenance and Troubleshooting of Maxline® and MaxPak® Plus Spindle Drives1- 5 Regional Class – Maintenance and Troubleshooting of D-C Drives and Systems116 Maintenance and Troubleshooting of MaxPak III Drives1-17 Application Configuration of MaxPak III Software4-15 Regional Class – Productive Maintenance TrainingAudio/Visual ProductsOrder No. Title Format PriceD-C DRIVES PROGRAMSTM2107 Troubleshooting 3-Phase, Full Wave, Half Control Power 35mm Slides/Modules using the OscilloscopeAudiotape$325TM2185 Introduction to the MaxPak Plus Drive Videotape 725TM2186 Troubleshooting the MaxPak Plus S-6 Power Module Videotape 995TM2200 Troubleshooting the S-6 Power Module Videotape 725TM2201 Troubleshooting the MaxLine® S-3R Power Module Videotape 425TM2202 Concepts of Regulation Videotape 725TM2203 Troubleshooting the MaxLine S-6 Regulator Videotape 725TM2239 Troubleshooting the S-6R Power Module Videotape 725TM2243 Principles of Field Weakened Motor Speed Control Videotape 725TM2276 D-C Machine Theory Videotape 725NEW VIDEO TRAINING PROGRAMSVMBA001 Fundamentals of A-C Motors Videotape $495VMBV001 Concepts of Digital Controls Videotape 495VWVS001 GP2000 Video Training Videotape 495VWVS002 HR2000 Video Training Videotape 495For details and prices on these courses, audio/visual products and FREE Training Schedule Brochure, HD-405 contact:Industrial Training Department <strong>Reliance</strong>35000 Curtis BoulevardEastlake, Ohio 44095Call Toll Free:800-RELIANCE(800-735-4262)ZA-225aData or Prices subject to change without notice.5
<strong>Reliance</strong> / 24701 Euclid Avenu / Cleveland, Ohio 44117/(216) 266-7000Printed in U.S.A. C-3062-4 04/076