Installation Instructions - Stillness® Basin Set Wall Mount - Kohler
Installation Instructions - Stillness® Basin Set Wall Mount - Kohler
Installation Instructions - Stillness® Basin Set Wall Mount - Kohler

Create successful ePaper yourself
Turn your PDF publications into a flip-book with our unique Google optimized e-Paper software.
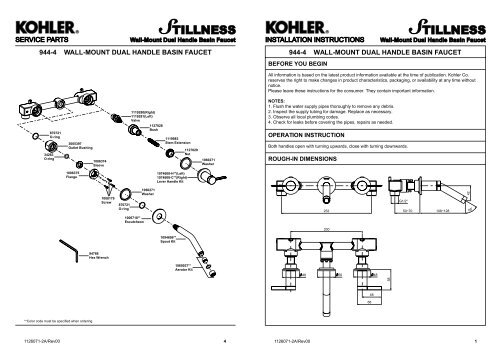
SERVICE PARTS<strong>Wall</strong>-<strong>Mount</strong> Dual Handle <strong>Basin</strong> FaucetINSTALLATION INSTRUCTIONS<strong>Wall</strong>-<strong>Mount</strong> Dual Handle <strong>Basin</strong> Faucet944-4 WALL-MOUNT DUAL HANDLE BASIN FAUCET944-4 WALL-MOUNT DUAL HANDLE BASIN FAUCETBEFORE YOU BEGINAll information is based on the latest product information available at the time of publication. <strong>Kohler</strong> Co.reserves the right to make changes in product characteristics, packaging, or availability at any time withoutnotice.Please leave these instructions for the consumer. They contain important information.870721O-ring34263O-ring3005397Outlet Bushing1006374Sleeve1119280(Right)1119281(Left)Valve1127028Bush1119983Stem Extension1127029Nut1060271WasherNOTES:1. Flush the water supply pipes thoroughly to remove any debris.2. Inspect the supply tubing for damage. Replace as necessary.3. Observe all local plumbing codes.4. Check for leaks before covering the pipes, repairs as needed.OPERATION INSTRUCTIONBoth handles open with turning upwards, close with turning downwards.ROUGH-IN DIMENSIONS1006375Flange1074608-H**(Left)1074608-C**(Right)Lever Handle Kit1008179Screw870721O-ring1060271Washer25250~70108~12860 。 421006718**Escutcheon2001094696**Spout Kit94786Hex Wrench1060037**Aerator Kit48 50 48586848**Color code must be specified when ordering1126071-2A/Rev00 41126071-2A/Rev00 1
INSTALLATIONINSTALLATION CHECKOUTEnsure that all connections are tightened. Ensure that the handles arein the off position.31Open the drain. Turn on the main water supply and check for leaks.Repair as required.250~70mmRemove the aerator assembly(15). Turn the faucet handles on andrun the hot and cold water through the spout for about one minute toremove any debris. Remove debris from the aerator assembly. Shutoff water supply and reinstall the aerator assembly.15How To Install The Handle KitsRemove and discard the guards after completed the finished wall.CLEANING INSTRUCTIONSRehearse the handle kit(4) installation for cutting the length of thestem extension(5) determination. Place the stem extension on thevalve making sure that the internal spline has correctly engaged thevalve, and the external spline has correctly engaged the handle kit.Measure the length from the bottom of the escutcheon(6) to thefinished wall. Remove the handle kit and stem extension. Mark thenearest stem extension groove according to the length. Cut throughthe marked stem extension groove.8576All Finishes: Clean the finish with mild soap and warm water. Wipe entire surface completely dry with a cleansoft cloth. Many cleaners may contain chemicals, such as ammonia, chlorine, toilet cleaner etc. which couldadversely affect the finish and are not recommended for cleaning.Do not use abrasive cleaners or solvents on <strong>Kohler</strong> faucets and fittings.Install the sticker washers(7) into the groove on the bottom of theescutcheons. Screw the nuts(8) onto the escutcheons. Press the stemextensions onto the valve stems. Screw and hand tight the handle kits(The handle kit with the red washer on the left when facing the front ofthe faucet) until the escutcheon against the finished wall.4The configuration shown is the correct position of the handle kits inthe closed position.How To Install The Spout KitRemove and discard the guard(9) from the spout kit(10).119Thread the spout kit onto the spout connector(11). Unscrew the spoutkit properly to make sure it adown. Adjust the flange(12), tighten thescrews(13) by hex wrench(14) to secure the spout kit. Push theescutcheon kit(14) against the wall and ensure the mark of “KOHLER”upward.141312101126071-2A/Rev00 21126071-2A/Rev00 3