Bluetooth Radio Adapter, QST August 2013 - KG4JJH
Bluetooth Radio Adapter, QST August 2013 - KG4JJH
Bluetooth Radio Adapter, QST August 2013 - KG4JJH
- No tags were found...

Create successful ePaper yourself
Turn your PDF publications into a flip-book with our unique Google optimized e-Paper software.
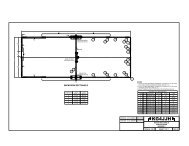
Tap the PCB mounting holes with a 4‐40 tap and install the PCB using four nylon 4‐40 x 3/16" machinescrews. The use of nylon screws prevents shorting any of the PCB traces and reduces the amount ofmetal around the antenna. A drill template is provided for the enclosure front and rear panels to aid inhole cutting. Print the PDF template full size by selecting “None” under Page Scaling, align the templatecenter lines with the panel center lines, and secure it to the panel using a temporary adhesive such as aglue stick. To complete the enclosure, add four sticky‐back rubber feet on the bottom.The cable for connecting the <strong>Bluetooth</strong> <strong>Radio</strong> <strong>Adapter</strong> audio input to the transceiver speaker/phoneoutput is a standard shielded cable with 3.5mm mono phone plugs on each end. The cable forconnecting the <strong>Bluetooth</strong> <strong>Radio</strong> <strong>Adapter</strong> microphone to the transceiver should have a 3.5mm monophone plug on one end and the appropriate microphone connector on the other end. I prepared onecable for use with my Yaesu FT‐817/857 and one for my Kenwood TS‐480SAT (both rigs use RJ‐45microphone connectors). J2 tip is audio out to the rig microphone, and J2 sleeve is microphone ground.Cut a five foot CAT‐5e cable in half and solder a 3.5mm mono phone plug on the cut end. Buildersshould consult their rig manual for microphone pinouts.<strong>Bluetooth</strong> HeadsetI chose the VXi Blue Parrott® B250‐XT 7 to test the <strong>Bluetooth</strong> <strong>Radio</strong> <strong>Adapter</strong> as it has a boom that placesthe microphone near the mouth, increasing intelligibility. This headset combines a high‐performancenoise‐canceling microphone and noise suppression technology to eliminate ambient noise. It features 16hours of talk time on a single charge and up to 150 hours standby time.Power Up and ConnectingTable 1 lists the LED event and state indicators. Table 2 lists the available button actions.Event LED Action SpecificPowering On Solid Blue 1s onPowering Off Solid Red 1s onDiscoverable Fast alternate Red Blue blink 60ms on, 60ms offConnectable Slow double Blue blink 80ms on/off/on, 1200ms offConnected Blue blip 40ms on, 2300ms offConnecting to Headset Fast Blue blinkSearching for new Headset Blue Red Blue blinkReset PairingTriple Red + Blue flashTable 1FeaturePower OnPower OffConnect LastSearch & ConnectVolume UpVolume DownInput Gain UpInput Gain DownReset PairingButton ActionHold <strong>Bluetooth</strong> button 2.5 sec when offHold <strong>Bluetooth</strong> button 2.5 sec when onPress <strong>Bluetooth</strong> buttonHold <strong>Bluetooth</strong> button 1 secPress VOL UP, hold for repeatPress VOL DN, hold for repeatDouble press VOL UPDouble press VOL DNHold VOL UP and VOL DN 2 secTable 2<strong>Bluetooth</strong> <strong>Radio</strong> <strong>Adapter</strong>, <strong>KG4JJH</strong> Page 3 of 5