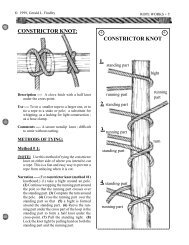
Mauls: Making a Club Maul: - Rope Works
Mauls: Making a Club Maul: - Rope Works
Mauls: Making a Club Maul: - Rope Works

Create successful ePaper yourself
Turn your PDF publications into a flip-book with our unique Google optimized e-Paper software.
174<br />
<strong><strong>Maul</strong>s</strong>:<br />
A maul is a wooden club or hammer that is<br />
used for driving stakes or wedges and for safety<br />
reasons should be used instead of an ax.<br />
Using an ax instead of a maul exposes the user<br />
to the danger of being cut by its sharp edge. Even<br />
if the edge is covered by a sheath, a glancing blow<br />
can cause the sheath to be ripped off or to be cut<br />
through.<br />
The pole of an ax serves as a counterweight to<br />
the blade. This counterweight adds to the balance<br />
of the ax head and helps to control and increase<br />
the force of momentum delivered to the bit. The<br />
ax head is shaped in such a way that the momentum<br />
of the ax head is delivered through the thin<br />
walls of the eye. However, when an ax is being<br />
used as a hammer, this same shape causes the eye<br />
of the ax head to spread and the handle to loosen.<br />
The flat surface and angular edges of an ax pole<br />
makes it difficult to strike a stake squarely. This<br />
difficulty in striking a square blow results in most<br />
blows delivering some there force sideways, causing<br />
the end of the wooden stake to flare and split<br />
very quickly. In addition, when the pole of an ax<br />
contacts a stake, the metal surface of the pole lacks<br />
the ability absorb any of the force of the impact<br />
this contributes to the destruction of the stake. A<br />
wooden maul, on the other hand, absorbs some of<br />
the impact of the initial contact and a maul has no<br />
angular edges. Therefore, more of the force of the<br />
maul is used to do useful work and less of the force<br />
is used up in deforming or splitting the stake.<br />
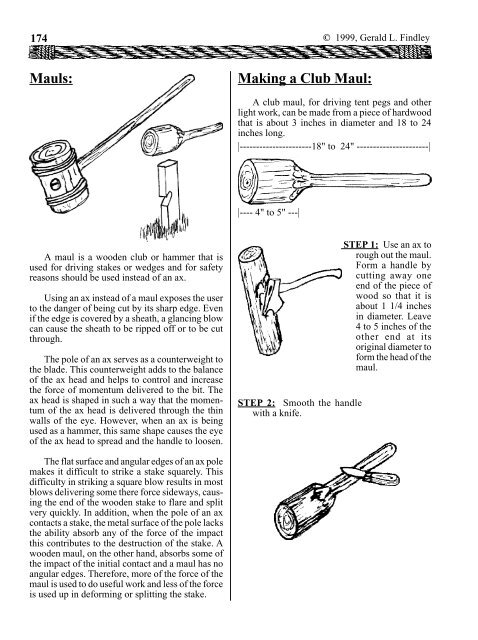
<strong>Making</strong> a <strong>Club</strong> <strong>Maul</strong>:<br />
© 1999, Gerald L. Findley<br />
A club maul, for driving tent pegs and other<br />
light work, can be made from a piece of hardwood<br />
that is about 3 inches in diameter and 18 to 24<br />
inches long.<br />
|----------------------18" to 24" ----------------------|<br />
|---- 4" to 5" ---|<br />
STEP 2: Smooth the handle<br />
with a knife.<br />
STEP 1: Use an ax to<br />
rough out the maul.<br />
Form a handle by<br />
cutting away one<br />
end of the piece of<br />
wood so that it is<br />
about 1 1/4 inches<br />
in diameter. Leave<br />
4 to 5 inches of the<br />
other end at its<br />
original diameter to<br />
form the head of the<br />
maul.
© 1999, Gerald L. Findley 175<br />
MAKING A HAMMER<br />
MAUL:<br />
Materials:<br />
To make the head of a hammer maul you will<br />
need a 4 inch diameter, 10 inch long piece of hard,<br />
dense, unchecked, well seasoned, hardwood such<br />
as elm, black gum or hophornbeam.<br />
For the handle you will need a piece of well<br />
seasoned ash, hickory, or similar straight grained<br />
wood; 1 1/2 inch diameter and 3 to 4 foot long.<br />
<strong>Making</strong> a <strong>Maul</strong>:<br />
STEP1: Square the ends of the head with a saw.<br />
-------midline<br />
STEP 2: Find and<br />
mark the midline<br />
between the two<br />
ends.<br />
STEP 3: Locate the center of the handle hole on<br />
each side of the maul head.<br />
[3A] Wrap a strip of paper<br />
around the maul head.<br />
----- midline Cut the strip of paper<br />
off so that the two ends<br />
just meet.<br />
[3B] Locate handle<br />
hole by folding the<br />
strip of paper in<br />
half to mark its<br />
mid point, then unfold<br />
it and wrap it<br />
around the maul<br />
head again. Mark<br />
the midline at the<br />
fold and at the<br />
ends of the strip of<br />
paper.<br />
STEP 4: Drill handle hole in head. Use a 1 1/4<br />
inch drill bit to drill a hole halfway through<br />
the head from one side, then finish drilling the<br />
hole from the other side of the maul head.<br />
[NOTE] If the holes do not lineup in the middle<br />
use a chisel or wood rasp to cut away some of<br />
the excess wood.<br />
STEP 5: Make maul handle.<br />
176<br />
STEP 7: Reinforce the maul head to keep it from<br />
splitting by wrapping several turns of rope or<br />
wire around each end of the maul head. These<br />
can be held in place with staples.<br />
Another method of reinforcing the head<br />
would be to drive a braided ring or a grommet<br />
over each end of the head.<br />
[NOTES]<br />
© 1999, Gerald L. Findley<br />
MAUL --- DOVE TAIL HANDLE:<br />
MATERIALS:<br />
1 ----- Piece of seasoned hardwood that is<br />
2 2/2 to 3 inches in diameter and 5 to 7<br />
inches long for the head.<br />
1 ----- piece of seasoned hardwood that is<br />
1 1/2 inches to 2 inches in diameter for<br />
the handle.<br />
CONSTRUCTION:<br />
STEP 1: With a saw, cut 3 kerfts as shown at the<br />
center of the side of the head.<br />
60 0<br />
|-----------|<br />
Less than the<br />
diameter of<br />
the handle<br />
60 0<br />
[NOTE] The width of the bottom of the dovetail<br />
notch must be less than the diameter of the<br />
handle.
© 1999, Gerald L. Findley 177<br />
STEP 2: Use a knife or chisel to remove the wood<br />
to form the dovetail notch.<br />
dovetail notch<br />
STEP 3: Shape and fit handle to head.<br />
3A] Flatten one side of the end of the handle.<br />
[2]<br />
|-----|<br />
|----|<br />
|----|<br />
[1] [3]<br />
[1] Equal to or greater than the width of<br />
the bottom of the dovetail notch.<br />
[2] Equal to or less than the depth of the<br />
dovetail notch.<br />
[3] Equal to the diameter of the head.<br />
3B] Fit the handle to the bottom of the dovetail<br />
notch. Gradually remove the surplus wood<br />
until the flattened part of the handle is the<br />
same width as the width of the dove tail<br />
notch.<br />
|-----| width of dovetail notch<br />
3B] Flatten the remaining two sides of the<br />
handle. Gradually remove the surplus wood<br />
until the handle fits snugly into the dovetail<br />
notch in the head.<br />
3A] Tap handle firmly into dovetail notch.<br />
ROPE WRENCH:<br />
The dovetail maul makes a good rope<br />
wrench. Pass the rope over the head of the<br />
maul and then take several wraps around the<br />
handle. The rope is then tightened by rotating<br />
the maul so that the rope wraps part way around<br />
the head of the maul.