AP® INVESTIGATION #4 - Ward's Natural Science
AP® INVESTIGATION #4 - Ward's Natural Science
AP® INVESTIGATION #4 - Ward's Natural Science

Create successful ePaper yourself
Turn your PDF publications into a flip-book with our unique Google optimized e-Paper software.
<strong>AP®</strong> InvestIgAtIon <strong>#4</strong><br />
Diffusion & osmosis – Teacher’s GuiDe Kit # 36W7404<br />
©2012, Ward’s <strong>Natural</strong> <strong>Science</strong><br />
All Rights Reserved, Printed in the U.S.A.<br />
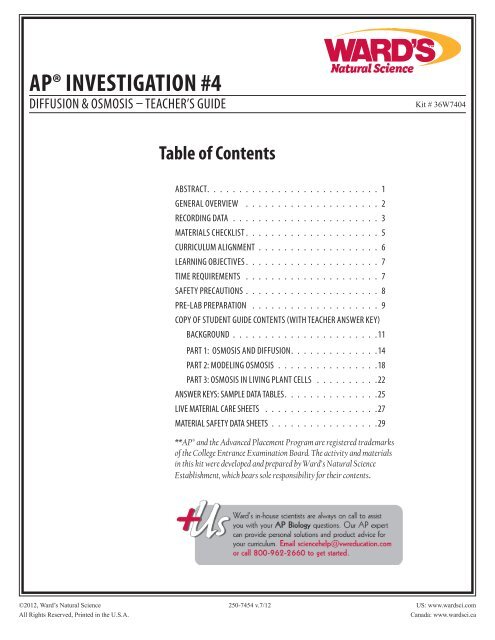
table of Contents<br />
absTracT 1<br />
General overview 2<br />
recorDinG DaTa 3<br />
maTerials checklisT 5<br />
curriculum aliGnmenT 6<br />
learninG objecTives 7<br />
Time requiremenTs 7<br />
safeTy PrecauTions 8<br />
Pre-lab PreParaTion 9<br />
coPy of sTuDenT GuiDe conTenTs (wiTh Teacher answer key)<br />
backGrounD 11<br />
ParT 1: osmosis anD Diffusion 14<br />
ParT 2: moDelinG osmosis 18<br />
ParT 3: osmosis in livinG PlanT cells 22<br />
answer keys: samPle DaTa Tables 25<br />
live maTerial care sheeTs 27<br />
maTerial safeTy DaTa sheeTs 29<br />
**AP ® and the Advanced Placement Program are registered trademarks<br />
of the College Entrance Examination Board. The activity and materials<br />
in this kit were developed and prepared by Ward’s <strong>Natural</strong> <strong>Science</strong><br />
Establishment, which bears sole responsibility for their contents.<br />
250-7454 v.7/12<br />
US: www.wardsci.com<br />
Canada: www.wardsci.ca
aP® invesTiGaTion <strong>#4</strong>: Diffusion & osmosis – Teacher’s GuiDe Kit # 36W7404<br />
AbstrACt<br />
This lab addresses osmosis and diffusion and the function of these processes in maintaining<br />
homeostasis in the cell. Students use two models to simulate the movement of water and nutrients<br />
across a cell membrane. Students also observe osmosis in living tissue. In Part 1, students simulate<br />
diffusion of molecules into cells, and calculate the surface area-to-volume ratios of differently-sized<br />
cuboidal cell models. In Part 2, the movement of molecules across a membrane is simulated using<br />
dialysis tubing and solutions of varying composition. In Part 3, students directly observe osmosis<br />
in a living specimen. In all parts of this lab, after performing a guided activity, students then design<br />
their own experiments, to further develop their understanding of the topics explored. The students’<br />
understanding of these exercises will allow them to explain how cell size and shape affect rates of<br />
diffusion, as well as to pose scientific questions about the selective permeability properties of cell<br />
membranes.<br />
©2012, Ward’s <strong>Natural</strong> <strong>Science</strong><br />
All Rights Reserved, Printed in the U.S.A.<br />
250-7454 v.7/12<br />
Page 1<br />
US: www.wardsci.com<br />
Canada: www.wardsci.ca
aP® invesTiGaTion <strong>#4</strong>: Diffusion & osmosis – Teacher’s GuiDe Kit # 36W7404<br />
generAl overvIew<br />
The College Board has revised the AP Biology curriculum to begin implementation in the fall of<br />
2012. Advanced Placement (AP) is a registered trademark of the College Entrance Examination<br />
Board. The revisions were designed to reduce the range of topics covered, to allow more depth of<br />
study and increased conceptual understanding for students. There is a shift in laboratory emphasis<br />
from instructor-designed demonstrations to student-designed investigations. While students may be<br />
introduced to concepts and methods as before, it is expected that they will develop more independent<br />
inquiry skills. Lab investigations now incorporate more student-questioning and experiment design.<br />
To accomplish this, the College Board has decreased the minimum number of required labs from 12<br />
to 8 while keeping the same time requirement (25% of instruction time devoted to laboratory study).<br />
The College Board has defined seven science practices that students must learn to apply over the<br />
course of laboratory study. In brief, students must:<br />
1. Use models<br />
2. Use mathematics (quantitative skills)<br />
3. Formulate questions<br />
4. Plan and execute data collection strategies<br />
5. Analyze and evaluate data<br />
6. Explain results<br />
7. Generalize data across domains<br />
The College Board published 13 recommended laboratories in the spring of 2011. They can be found<br />
at: http://advancesinap.collegeboard.org/science/biology/lab<br />
Many of these laboratories are extensions of those described in the 12 classic labs that the College<br />
Board has used in the past. The materials provided in this lab activity have been prepared by<br />
Ward’s to adapt to the specifications outlined in AP Biology Investigative Labs: An Inquiry-Based<br />
Approach (2012, The College Board). Ward’s has provided instructions and materials in the AP<br />
Biology Investigation series that complement the descriptions in this College Board publication.<br />
We recommend that all teachers review the College Board material as well as the instructions here<br />
to get the best understanding of what the learning goals are. Ward’s has structured each new AP<br />
investigation to have at least three parts: Structured, Guided, and Open Inquiry. Depending on a<br />
teacher’s syllabus, s/he may choose to do all or only parts of the investigations in scheduled lab<br />
periods.<br />
The College Board requires that a syllabus describe how students communicate their experiment<br />
designs and results. It is up to the teacher to define how this requirement will be met. Having<br />
students keep a laboratory notebook is one straightforward way to do this.<br />
©2012, Ward’s <strong>Natural</strong> <strong>Science</strong><br />
All Rights Reserved, Printed in the U.S.A.<br />
250-7454 v.7/12<br />
Page 2<br />
US: www.wardsci.com<br />
Canada: www.wardsci.ca
aP® invesTiGaTion <strong>#4</strong>: Diffusion & osmosis – Teacher’s GuiDe Kit # 36W7404<br />
reCordIng dAtA In A lAborAtory notebook<br />
All of the Ward’s Investigations assume that students will keep a laboratory notebook for studentdirected<br />
investigations. A brief outline of recommended practices to set up a notebook and one<br />
possible format is provided below.<br />
1. A composition book with bound pages is highly recommended. These can be found in most<br />
stationary stores. Ward’s offers several options with pre-numbered pages (for instance, item<br />
numbers 32-8040 and 15-8332). This prevents pages from being lost or mixed up over the<br />
course of an experiment.<br />
2. The title page should contain, at the minimum, the student’s name. Pages should be numbered in<br />
succession.<br />
3. After the title page, two to six pages should be reserved for a table of contents to be updated as<br />
experiments are done so they are easily found.<br />
4. All entries should be made in permanent ink. Mistakes should be crossed out with a single line<br />
and should be initialed and dated. This clearly documents the actual sequence of events and<br />
methods of calculation. When in doubt, over-explain. In research labs, clear documentation may<br />
be required to audit and repeat results or obtain a patent.<br />
5. It is good practice to permanently adhere a laboratory safety contract to the front cover of the<br />
notebook as a constant reminder to be safe.<br />
6. It is professional lab practice to sign and date the bottom of every page. The instructor or lab<br />
partner can also sign and date as a witness to the veracity of the recording.<br />
7. Any photos, data print-outs, or other type of documentation should be firmly adhered in the<br />
notebook. It is professional practice to draw a line from the notebook page over the inserted<br />
material to indicate that there has been no tampering with the records.<br />
For student-directed investigations, it is expected that the student will provide an experimental plan<br />
for the teacher to approve before beginning any experiment. The general plan format follows that of<br />
writing a grant to fund a research project.<br />
1. Define the question or testable hypothesis.<br />
2. Describe the background information. Include previous experiments.<br />
3. Describe the experiment design with controls, variables, and observations.<br />
4. Describe the possible results and how they would be interpreted.<br />
5. List the materials and methods to be used.<br />
6. Note potential safety issues.<br />
©2012, Ward’s <strong>Natural</strong> <strong>Science</strong><br />
All Rights Reserved, Printed in the U.S.A.<br />
(continued on next page)<br />
250-7454 v.7/12<br />
Page 3<br />
US: www.wardsci.com<br />
Canada: www.wardsci.ca
aP® invesTiGaTion <strong>#4</strong>: Diffusion & osmosis – Teacher’s GuiDe Kit # 36W7404<br />
reCordIng dAtA In A lAborAtory notebook (continued)<br />
After the plan is approved:<br />
7. The step by step procedure should be documented in the lab notebook. This includes recording<br />
the calculations of concentrations, etc., as well as the weights and volumes used.<br />
8. The results should be recorded (including drawings, photos, data print-outs).<br />
9. The analysis of results should be recorded.<br />
10. Draw conclusions based on how the results compared to the predictions.<br />
11. Limitations of the conclusions should be discussed, including thoughts about improving the<br />
experiment design, statistical significance and uncontrolled variables.<br />
12. Further study direction should be considered.<br />
The College Board encourages peer review of student investigations through both formal and<br />
informal presentation with feedback and discussion. Assessment questions similar to those on the AP<br />
exam might resemble the following questions, which also might arise in peer review:<br />
• Explain the purpose of a procedural step.<br />
• Identify the independent variables and the dependent variables in an experiment.<br />
• What results would you expect to see in the control group? The experimental group?<br />
• How does a specific concept (XXXX) account for the described findings (YYYY)?<br />
• Describe a method that could be used to determine a given concept/observation (XXXX).<br />
©2012, Ward’s <strong>Natural</strong> <strong>Science</strong><br />
All Rights Reserved, Printed in the U.S.A.<br />
250-7454 v.7/12<br />
Page 4<br />
US: www.wardsci.com<br />
Canada: www.wardsci.ca
aP® invesTiGaTion <strong>#4</strong>: Diffusion & osmosis – Teacher’s GuiDe Kit # 36W7404<br />
MAterIAls CheCklIst<br />
MAterIAls InCluded In kIt<br />
Units per kit Description<br />
1 pkg./72 Precleaned microscope slides<br />
1 22-mm glass coverslips<br />
4 Dialysis tubing, 10 ft. roll<br />
1 Cork borer, 3/16”<br />
5 1000-mL disposable beakers<br />
30 12-oz. plastic cups<br />
1 pkg./20 Disposable Petri dishes<br />
1 ScholAR Chemistry New MSDS CD<br />
100 g Albumin (egg), lab grade<br />
500 g Sucrose, lab grade<br />
500 g Sodium chloride, lab grade<br />
8 6” rulers<br />
1 bottle Vinegar, white, 473 mL<br />
8 Plastic knives<br />
8 Plastic spoons<br />
500 g Glucose anhydrous, lab grade<br />
1 Sucrose solution set (to mix 0.2 M, 0.4 M, 0.6 M, 0.8 M and 1.0 M solutions)<br />
1 Food coloring, pkg. of 4 bottles, 3 oz. each<br />
1 Live/Perishable Items Fulfillment Coupon* for Elodea canadensis tips and agar cubes<br />
(NOTE: Elodea densa may be substituted in some cases)<br />
1 Instructions (this booklet)<br />
MAterIAls needed but not ProvIded<br />
©2012, Ward’s <strong>Natural</strong> <strong>Science</strong><br />
All Rights Reserved, Printed in the U.S.A.<br />
Balance<br />
String<br />
Cellophane<br />
Scale<br />
Graduated cylinder, 1 L<br />
Plastic beakers, 1L<br />
Distilled water<br />
Compound microscope<br />
Paper towels<br />
16 celery sticks<br />
White potato<br />
Timer<br />
Forceps<br />
Lab Notebook<br />
Optional materials as determined by students’ experiment design (Part 3)<br />
250-7454 v.7/12<br />
Page 5<br />
For a list of replacement items, visit:<br />
www.wardsci.com, and click on the<br />
AP Biology tab for this kit/item #.<br />
* - It is recommended that you<br />
redeem your coupon for live/<br />
perishable materials as soon as<br />
possible and specify your preferred<br />
delivery date. Generally, for timely<br />
delivery, at least two weeks advance<br />
notice is preferred.<br />
US: www.wardsci.com<br />
Canada: www.wardsci.ca
aP® invesTiGaTion <strong>#4</strong>: Diffusion & osmosis – Teacher’s GuiDe Kit # 36W7404<br />
This lab activity is aligned with the 2012 AP Biology Curriculum (registered trademark of the College Board).<br />
Listed below are the aligned Content areas (Big Ideas and Enduring Understandings), the <strong>Science</strong> Practices, and the<br />
learning objectives of the lab as described in AP Biology Investigative Labs: An Inquiry-Based Approach (2012). This<br />
is a publication of the College Board that can be found at http://advancesinap.collegeboard.org/science/biology/lab.<br />
CurrICuluM AlIgnMent<br />
Big Idea<br />
‹<br />
©2012, Ward’s <strong>Natural</strong> <strong>Science</strong><br />
2. Biological systems utilize energy and molecular building blocks to grow, to reproduce, and to<br />
maintain homeostasis.<br />
Enduring Understandings<br />
‹<br />
‹<br />
‹<br />
‹<br />
2A3. Organisms must exchange matter with the environment to grow, reproduce, and maintain<br />
organization.<br />
2B. Growth, reproduction, and dynamic homeostasis require that cells create and maintain internal<br />
environments that are different from their external environments.<br />
2B1: Cell membranes are selectively permeable due to their structure.<br />
2B2: Growth and dynamic homeostasis are maintained by the constant movement of molecules<br />
across membranes.<br />
<strong>Science</strong> Practices<br />
‹<br />
‹<br />
‹<br />
‹<br />
‹<br />
‹<br />
‹<br />
‹<br />
2.1 The student can justify the selection of a mathematical routine to solve problems.<br />
2.2. The student can apply mathematical routines to quantities that describe natural phenomena.<br />
4.2. The student can design a plan for collecting data to answer a particular scientific question.<br />
4.3. The student can collect data to answer a particular scientific question.<br />
4.4. The student can evaluate sources of data to answer a particular scientific question.<br />
5.1. The student can analyze data to identify patterns or relationships.<br />
5.2. The student can refine observations and measurements based on data analysis.<br />
5.3. The student can evaluate the evidence provided by data sets in relation to a particular<br />
scientific question.<br />
All Rights Reserved, Printed in the U.S.A.<br />
250-7454 v.7/12<br />
Page 6<br />
US: www.wardsci.com<br />
Canada: www.wardsci.ca
aP® invesTiGaTion <strong>#4</strong>: Diffusion & osmosis – Teacher’s GuiDe Kit # 36W7404<br />
leArnIng objeCtIves<br />
‹<br />
‹<br />
‹<br />
‹<br />
‹<br />
©2012, Ward’s <strong>Natural</strong> <strong>Science</strong><br />
The student is able to use calculated surface area-to-volume ratios to predict which cell(s) might<br />
eliminate wastes or procure nutrients faster by diffusion (2A3 & SP 2.2).<br />
The student is able to explain how cell size and shape affect the overall rate of nutrient intake and<br />
the rate of waste elimination (2A3 & SP 2.2).<br />
The student is able to use representations and models to pose scientific questions about the<br />
properties of cell membranes and selective permeability based on molecular structure (2B1 &<br />
SP 4.2, SP 4.3, SP 4.4).<br />
The student is able to construct models that connect the movement of molecules across<br />
membranes with membrane structure and function (2B2 & SP 2.1, SP 2.2, SP 5.1).<br />
The student is able to use representations and models to analyze situations or solve problems<br />
qualitatively and quantitatively to investigate whether dynamic homeostasis is maintained by the<br />
active movement of molecules across membranes (2B1 & 2B2 & SP 2.2, SP 5.2, SP 5.3).<br />
tIMe requIreMents<br />
All Rights Reserved, Printed in the U.S.A.<br />
Part 1: Diffusion and Osmosis<br />
Part 2: Modeling Osmosis<br />
Part 3: Osmosis in Living Plant Cells<br />
Analyzing Results and Class Discussion 45 minutes<br />
250-7454 v.7/12<br />
Page 7<br />
Structured Inquiry: 5 minutes<br />
Guided Inquiry: 45 minutes<br />
Open Inquiry: Will vary, depending on students’<br />
experiment designs<br />
Structured Inquiry: 45 minutes<br />
Guided Inquiry: 45 minutes<br />
Open Inquiry: Will vary, depending on students’<br />
experiment designs<br />
Structured Inquiry: 45 minutes<br />
Guided Inquiry: 45 minutes<br />
Open Inquiry: Will vary, depending on students’<br />
experiment designs<br />
US: www.wardsci.com<br />
Canada: www.wardsci.ca
aP® invesTiGaTion <strong>#4</strong>: Diffusion & osmosis – Teacher’s GuiDe Kit # 36W7404<br />
sAfety PreCAutIons<br />
Lab-Specific Safety<br />
‹<br />
©2012, Ward’s <strong>Natural</strong> <strong>Science</strong><br />
White vinegar and phenolphthalein agar are used in this kit. Both are irritants to the skin and<br />
eyes. Use with caution. Review the Material Safety Data Sheets (MSDSs) for additional safety<br />
precautions, handling procedures, storage, and other information. MSDSs are provided at the end<br />
of this booklet. Additionally, visit: www.scholarchemistry.com for the latest and most up-to-date<br />
MSDSs.<br />
General Safety<br />
‹<br />
‹<br />
‹<br />
‹<br />
‹<br />
‹<br />
‹<br />
The teacher should 1) be familiar with safety practices and regulations in his/her school (district<br />
and state) and 2) know what needs to be treated as hazardous waste and how to properly dispose<br />
of non-hazardous chemicals or biological material.<br />
Consider establishing a safety contract that students and their parents must read and sign. This is<br />
a good way to identify students with allergies (e.g., latex) so that you (and they) will be reminded<br />
of specific lab materials that may pose risks to individuals. A good practice is to include a copy<br />
of this contract in the student lab book (glued to the inside cover).<br />
Students should know where all emergency equipment (safety shower, eyewash station, fire<br />
extinguisher, fire blanket, first aid kit etc.) is located.<br />
Require students to remove all dangling jewelry and tie back long hair before they begin.<br />
Remind students to read all instructions, Material Data Safety Sheets (MSDSs) and live care<br />
sheets before starting the lab activities, and to ask questions about safety and safe laboratory<br />
procedures. Appropriate MSDSs and live care sheets can be found on the last pages of this<br />
booklet. Additionally, the most updated versions of these resources can be found at www.<br />
wardsci.com. The most updated version of most MSDSs can usually be found on the chemical<br />
manufacturer’s website.<br />
In student directed investigations, make sure that collecting safety information (like MSDSs) is<br />
part of the experimental proposal.<br />
As general laboratory practice, it is recommended that students wear proper protective<br />
equipment, such as gloves, safety goggles, and a lab apron.<br />
At the end of the lab:<br />
‹<br />
‹<br />
All laboratory bench tops should be wiped down with a 10% bleach solution or disinfectant to<br />
ensure cleanliness.<br />
Remind students to wash their hands thoroughly with soap and water before leaving the<br />
laboratory.<br />
All Rights Reserved, Printed in the U.S.A.<br />
250-7454 v.7/12<br />
Page 8<br />
US: www.wardsci.com<br />
Canada: www.wardsci.ca
aP® invesTiGaTion <strong>#4</strong>: Diffusion & osmosis – Teacher’s GuiDe Kit # 36W7404<br />
PreP<br />
tIP (for PArt 1)<br />
‹<br />
‹<br />
PreP<br />
tIPs (for PArt 2)<br />
‹<br />
‹<br />
In this portion of this<br />
lab activity you will use<br />
phenolphthalein agar cubes.<br />
Prior to starting this lab<br />
activity, submit your<br />
live/perishable material<br />
redemption coupon via mail,<br />
fax, or simply calling into<br />
customer service at 1-800-<br />
962-2660. It is recommended<br />
that you do this at least one<br />
week before the lab.<br />
The phenolphthalein agar<br />
cubes are already prepared<br />
and cut to the appropriate<br />
size for this lab activity. The<br />
phenolphthalein agar cubes<br />
were prepared with 2% sodium<br />
hydroxide (NaOH).<br />
Store the egg albumin in the<br />
refrigerator to avoid clumping<br />
of the powder.<br />
The pores of the dialysis tubing<br />
are extremely small, and can be<br />
easily clogged by any oil or dirt<br />
on your fingers or hands. Wash<br />
your hands before handling the<br />
dialysis tubing and keep the<br />
physical contact to a minimum.<br />
©2012, Ward’s <strong>Natural</strong> <strong>Science</strong><br />
All Rights Reserved, Printed in the U.S.A.<br />
Pre-lAborAtory PrePArAtIon<br />
for PArt 1: dIffusIon And osMosIs<br />
1.<br />
2.<br />
3.<br />
Soak eight sticks of celery in water overnight.<br />
Soak eight sticks of celery in saltwater (1 M) overnight.<br />
Make sure that you have redeemed your coupon and have<br />
received your phenolphthalein agar cubes.<br />
‹<br />
‹<br />
On the day of the lab, remove the cubes from the jar and,<br />
for every lab group, place one of each size cubes into a<br />
disposable cup. Each lab group should receive one cup with<br />
three phenolphthalein cubes of different sizes (1 x 1 cm,<br />
2 x 2 cm, and 3 x 3 cm).<br />
Cover each cup with cellophane. Do not allow the cubes to<br />
dry out.<br />
4. To save time, measure and pour 100 mL of white vinegar into a<br />
cylinder or additional plastic cup for each lab group. Label the<br />
cups “white vinegar.”<br />
for PArt 2: ModelIng dIffusIon by osMosIs<br />
1. Prepare solutions for laboratory:<br />
‹<br />
‹<br />
‹<br />
‹<br />
1 M Sucrose – In a 1 L (or larger) beaker, dissolve 342.3 g<br />
sucrose in 500 mL of distilled water. After the sucrose has<br />
completely dissolved, bring the volume up to 1 liter with<br />
distilled water.<br />
1 M Sodium chloride (NaCl) – In a 1 L (or larger) beaker,<br />
dissolve 58.44 g of NaCl in 500 mL of distilled water. After<br />
the NaCl has completely dissolved, bring the volume up to 1<br />
liter with distilled water.<br />
1 M Glucose - In the beakers provided, dissolve 180 g of<br />
glucose in 500 mL of distilled water. After the glucose has<br />
completely dissolved, bring the volume up to 1 liter with<br />
distilled water.<br />
5% Egg albumin – In the beakers provided, dissolve 50 g<br />
of egg albumin in 500 mL of distilled water. After the egg<br />
albumin has completely dissolved, bring the volume up to<br />
1 liter with distilled water.<br />
2. Prepare the dialysis tubing:<br />
‹<br />
‹<br />
Cut five 20 cm pieces of dialysis tubing for each lab group.<br />
Soak the dialysis tubing overnight in paper or plastic cups.<br />
Keep the pieces in water until they are needed.<br />
250-7454 v.7/12<br />
Page 9<br />
US: www.wardsci.com<br />
Canada: www.wardsci.ca
aP® invesTiGaTion <strong>#4</strong>: Diffusion & osmosis – Teacher’s GuiDe Kit # 36W7404<br />
PreP<br />
tIP (for PArt 3)<br />
‹<br />
‹<br />
In this portion of this lab<br />
activity you will use Elodea<br />
tips. Prior to starting this<br />
lab activity, submit your<br />
live/perishable material<br />
redemption coupon via mail,<br />
fax, or simply calling into<br />
customer service at<br />
1-800-962-2660. It is<br />
recommended that you do this<br />
at least one week before the lab.<br />
A french fry cutter can be used<br />
to cut the potato into more<br />
uniform pieces. Peel the potato<br />
before cutting it into pieces.<br />
©2012, Ward’s <strong>Natural</strong> <strong>Science</strong><br />
All Rights Reserved, Printed in the U.S.A.<br />
Pre-lAborAtory PrePArAtIon (ContInued)<br />
for PArt 3: osMosIs In lIvIng PlAnt Cells<br />
1.<br />
2.<br />
3.<br />
Make sure that you have redeemed your coupon and have<br />
received your Elodea tips.<br />
You may wish to prepare the potato cylinder in advance, to save<br />
time during the lab. Peel the potato. Then, using a cork borer,<br />
cut four cylinders from a potato for each solution to be used. Cut<br />
each cylinder to a length of 3 cm for greater accuracy. Place the<br />
cylinders in a covered cup or beaker until they are ready to be<br />
used.<br />
Prepare solutions for laboratory:<br />
‹<br />
‹<br />
‹<br />
The kit provides prepackaged sucrose to make solutions<br />
of 0.2 M, 0.4 M, 0.6 M, 0.8 M, and 1.0 M. In the beakers<br />
provided, dissolve each sucrose package in 500 mL of<br />
distilled water. After the sucrose has completely dissolved,<br />
bring the volume up to 1 liter with distilled water.<br />
Fill another beaker with 1 L of distilled water.<br />
In order to keep the solution concentrations unknown from<br />
the students, add food coloring to the solutions. Use the<br />
chart below to create colored solutions.<br />
‹<br />
Solution<br />
Concentration<br />
for All PArts of the lAb<br />
250-7454 v.7/12<br />
Page 10<br />
Color<br />
Number of Food<br />
Coloring Drops and Color<br />
0.2 M Red Red - 1 drop<br />
0.4 M Orange Red -1 drop and Yellow - 1 drop<br />
0.6 M Yellow Yellow - 1 drop<br />
0.8 M Green<br />
Yellow - 2 drops<br />
Blue - 1 drop<br />
1.0 M Clear – – – – – –<br />
0 M (Water) Blue Blue - 1 drop<br />
1. Copy the student copymaster pages prior to starting class.<br />
US: www.wardsci.com<br />
Canada: www.wardsci.ca