I&O Manual - Solaris Water Heaters - Categories On Thermal ...
I&O Manual - Solaris Water Heaters - Categories On Thermal ...
I&O Manual - Solaris Water Heaters - Categories On Thermal ...

Create successful ePaper yourself
Turn your PDF publications into a flip-book with our unique Google optimized e-Paper software.
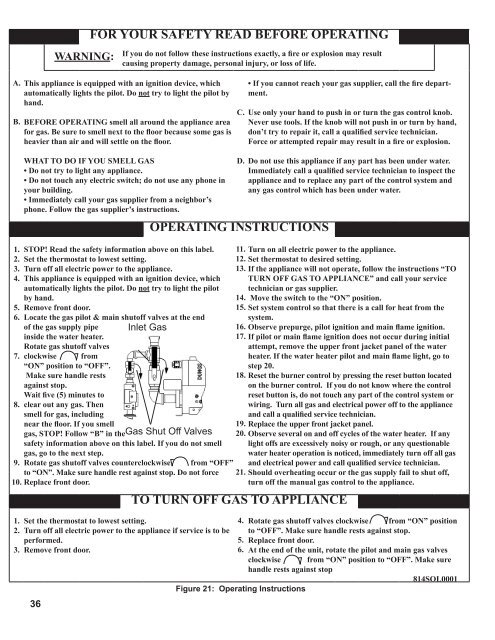
FOR YOUR SAFETY READ BEFORE OPERATINGWARNING:If you do not follow these instructions exactly, a fire or explosion may resultcausing property damage, personal injury, or loss of life.A.B.This appliance is equipped with an ignition device, whichautomatically lights the pilot. Do not try to light the pilot byhand.BEFORE OPERATING smell all around the appliance areafor gas. Be sure to smell next to the floor because some gas isheavier than air and will settle on the floor.C.• If you cannot reach your gas supplier, call the fire department.Use only your hand to push in or turn the gas control knob.Never use tools. If the knob will not push in or turn by hand,don’t try to repair it, call a qualified service technician.Force or attempted repair may result in a fire or explosion.1.2.3.4.5.6.7.8.WHAT TO DO IF YOU SMELL GAS• Do not try to light any appliance.• Do not touch any electric switch; do not use any phone inyour building.• Immediately call your gas supplier from a neighbor’sphone. Follow the gas supplier’s instructions.STOP! Read the safety information above on this label.Set the thermostat to lowest setting.Turn off all electric power to the appliance.This appliance is equipped with an ignition device, whichautomatically lights the pilot. Do not try to light the pilotby hand.Remove front door.Locate the gas pilot & main shutoff valves at the endof the gas supply pipeinside the water heater.Rotate gas shutoff valvesclockwise from“ON” position to “OFF”.Make sure handle restsagainst stop.Wait five (5) minutes toclear out any gas. Thensmell for gas, includingnear the floor. If you smellgas, STOP! Follow “B” in the36D.OPERATING INSTRUCTIONS11.12.13.14.15.16.17.19.Gas Shut Off Valves 20.safety information above on this label. If you do not smellgas, go to the next step.9. Rotate gas shutoff valves counterclockwise from “OFF”to “ON”. Make sure handle rest against stop. Do not force 21.10. Replace front door.1.2.3.Inlet GasSet the thermostat to lowest setting.Turn off all electric power to the appliance if service is to beperformed.Remove front door.18.TO TURN OFF GAS TO APPLIANCE4.5.6.Do not use this appliance if any part has been under water.Immediately call a qualified service technician to inspect theappliance and to replace any part of the control system andany gas control which has been under water.Turn on all electric power to the appliance.Set thermostat to desired setting.If the appliance will not operate, follow the instructions “TOTURN OFF GAS TO APPLIANCE” and call your servicetechnician or gas supplier.Move the switch to the “ON” position.Set system control so that there is a call for heat from thesystem.Observe prepurge, pilot ignition and main flame ignition.If pilot or main flame ignition does not occur during initialattempt, remove the upper front jacket panel of the waterheater. If the water heater pilot and main flame light, go tostep 20.Reset the burner control by pressing the reset button locatedon the burner control. If you do not know where the controlreset button is, do not touch any part of the control system orwiring. Turn all gas and electrical power off to the applianceand call a qualified service technician.Replace the upper front jacket panel.Observe several on and off cycles of the water heater. If anylight offs are excessively noisy or rough, or any questionablewater heater operation is noticed, immediately turn off all gasand electrical power and call qualified service technician.Should overheating occur or the gas supply fail to shut off,turn off the manual gas control to the appliance.Rotate gas shutoff valves clockwise from “ON” positionto “OFF”. Make sure handle rests against stop.Replace front door.At the end of the unit, rotate the pilot and main gas valvesclockwise from “ON” position to “OFF”. Make surehandle rests against stop814SOL0001Figure 21: Operating Instructions