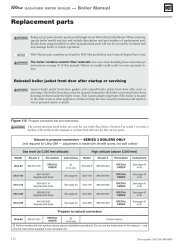
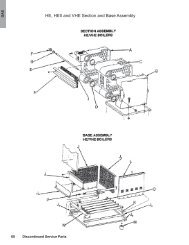
GV90+ gas-fired water boiler — <strong>Boiler</strong> <strong>Manual</strong>Prepare the boiler (continued)Check orifice plate — replace if necessaryThe correct orifice plate must be used. Failure to do sowill result in severe personal injury, death or substantialproperty damage. The boiler is shipped with a naturalgas orifice plate. It MUST BE CONVERTED to usepropane.Natural gas:For natural gas installations, inspect the silver gas/air orifice platemarking. It must be the same as the boiler size. If the orifice plate isstamped with another size, obtain the correct plate from your wholesaler.The boiler size is stamped where the “X” is shown in the platestamping, Figure 6.Propane:For propane installations, replace the silver gas/air orifice platewith the red/white plate, per following instructions. Ensure the red/white plate boiler size is correct for the GV90+ boiler being installed.The boiler size is stamped where the “X” is shown in the plate stamping,Figure 6.Also fill out the propane label in the conversion kit and attach to theleft side of the jacket, above the gas inlet opening, as shown in Figure 5.Figure 5Check for correct gas orifice plateA Remove jacket frontpanel to access the bottomside of the blowerhousing.B Complete the propaneconversion label includedwith the conversionkit. Install label on jacketleft side, as shown.Leave the boiler on its back,on the skid as shown, untilyou have checked the gas/airorifice plate and replace it ifnecessary.Figure 6Follow instructions to check or replacegas orifice plate ("X" = boiler size)Orifice plate installation, when requiredAccess the bottom of the blower housing as shown in Figure 5.To inspect the plate only, read the marking on the plate edge. Itmust read the same as the boiler size and fuel, as follows:<strong>Boiler</strong> model Natural gas marking Propane markingGV90+3 NG 3 SEC LP 3 SECGV90+4 NG 4 SEC LP 4 SECGV90+5 NG 5 SEC LP 5 SECGV90+6 NG 6 SEC LP 6 SECTo replace the plate, using a manual screwdriver or nut driver, seeFigure 6:1. Loosen screws 1 and 2 two full turns.2. Remove screws 3 and 4.3. Pull the gas/air orifice plate forward to remove it.4. Slide in the new plate as shown in Figure 6. The red side of apropane plate must go next to the blower housing.5. Replace screws 3 and 4. Tighten all four screws securely and uniformly.DO NOT overtighten. DO NOT exceed 40 inch-poundstorque.6. Bend down plate label tab at score mark as shown in lower rightcorner of Figure 6, item 10.DO NOT use electric or pneumatic screwdrivers to removeor tighten the gas/air boss screws. Hand-tightenonly, using manual screwdriver. Should the torque exceed40 inch-pounds, the threaded holes could strip out,causing an inadequate seal of the orifice plate. Failure toproperly seal the plate to the housing could result in a gasleak, causing severe personal injury, death or substantialproperty damage.1–4 Screws — follow instructions for loosening and tightening5 Gas/air manifold6 Front section, bottom view, component details omitted7 Side shown must point toward air inlet hose — WARNINGlabel side for natural gas; WHITE side for propane gas8 Propane orifice plate, RED one side and WHITE on theother (red side must face the blower housing9 Natural gas orifice plate, SILVER10 Orifice plate after bending along score mark — label isvisible when installed8Part number 550-142-054/1211
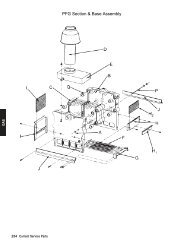
GV90+ gas-fired water boiler — <strong>Boiler</strong> <strong>Manual</strong>Prepare the boiler (continued)Install condensate trap1. Before placing the boiler in position, install the condensate trapline, shown in Figure 7. Items shown are provided with the boiler.Step 1 Attach the flue drain hose (C) to the in-line flue drainnipple (B).Step 2 Slide a screw driver or pencil through the condensatedrain nipple (G).Slide the end of the screwdriver or pencil into the openend of the flue drain hose (C).Feed the in-line flue drain (A) assembly into the flue connection(D), guiding the flue drain hose through the condensatedrain nipple (G) with the screwdriver or pencil.Step 3 Press the in-line flue drain (A) into the flue connection(D) and through the seal ring until it reaches the stop.Then tighten the flue connection hose clamp to secure.The flue drain hose (C) should now extend down past theend of the condensate drain nipple (G).Step 4 Slide the U-clamp (F) over the condensate trap tee (E)and into the two holes in the rail. Attach the two nuts providedto the U-clamp and tighten to secure the condensatetrap tee to the rail.Step 5 Slide the ends of the condensate trap hose (H) onto thecondensate drain nipple (G) and the condensate trap tee(E). Secure the condensate trap hose at each end with thehose clamps (J).Check the height of the condensate trap tee outlet.Before rotating the boiler into position, measure thedistance from the condensate tee outlet to the bottomof the boiler mounting rails. When the boiler is place inposition, the condensate tee outlet must be higher thanthe condensate pump inlet connection (when a condensatepump is used). Increase the foundation heightif necessary.Figure 7A In-line flue drainB Flue drain nippleC Flue drain hoseD Flue connectionE Condensate trap teeFInstall condensate trapU-clamp and nuts (notshown)G Condensate drainnippleH Condensate trap hoseJHose clampsFinished assemblyPart number 550-142-054/1211 9