C2-359 Fire Magic Heat Shield Kit Installation ... - Spotlight Retail
C2-359 Fire Magic Heat Shield Kit Installation ... - Spotlight Retail
C2-359 Fire Magic Heat Shield Kit Installation ... - Spotlight Retail
- No tags were found...

You also want an ePaper? Increase the reach of your titles
YUMPU automatically turns print PDFs into web optimized ePapers that Google loves.
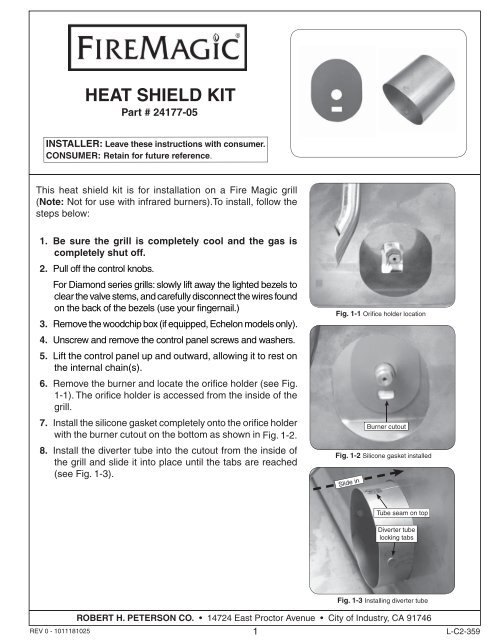
HEAT SHIELD KITPart # 24177-05INSTALLER: Leave these instructions with consumer.CONSUMER: Retain for future reference.This heat shield kit is for installation on a <strong>Fire</strong> <strong>Magic</strong> grill(Note: Not for use with infrared burners).To install, follow thesteps below:1. Be sure the grill is completely cool and the gas iscompletely shut off.2. Pull off the control knobs.For Diamond series grills: slowly lift away the lighted bezels toclear the valve stems, and carefully disconnect the wires foundon the back of the bezels (use your fingernail.)3. Remove the woodchip box (if equipped, Echelon models only).Fig. 1-1 Orifi ce holder location4. Unscrew and remove the control panel screws and washers.5. Lift the control panel up and outward, allowing it to rest onthe internal chain(s).6. Remove the burner and locate the orifi ce holder (see Fig.1-1). The orifi ce holder is accessed from the inside of thegrill.7. Install the silicone gasket completely onto the orifice holderwith the burner cutout on the bottom as shown in Fig. 1-2.8. Install the diverter tube into the cutout from the inside ofthe grill and slide it into place until the tabs are reached(see Fig. 1-3).Fig. 1-2 Silicone gasket installedSlide inBurner cutoutTube seam on topDiverter tubelocking tabsFig. 1-3 Installing diverter tubeREV 0 - 1011181025ROBERT H. PETERSON CO. • 14724 East Proctor Avenue • City of Industry, CA 917461L-<strong>C2</strong>-<strong>359</strong>
9. To lock the diverter tube in place, push out the innerliner wall, while pushing in on the diverter tube fromthe inside of the fi rebox (see Fig. 2-1 and Fig. 2-2).10. Push the diverter tube in completely until tabs clickinto place on each side (see Fig. 2-2 and Fig. 2-3).11. Replace the burner.12. Repeat for each additional burner as applicable.13. Reinstall the control panel, woodchip box (ifequipped), bezels (if equipped), and control knobs.Important: When re-installing the control panel, set itback over the front lip of the grill so thatthe lid-closed-sensor plunger protrudesthrough the hole on the upper right of thecontrol panel. Prior to opening the gasshutoff valve, be sure the control knobsare in the OFF position.Fig. 2-1 Locking diverter tube in placeFig. 2-2 Secure tabsFig. 2-3 Gasket installedREV 0 - 10111810252L-<strong>C2</strong>-<strong>359</strong>