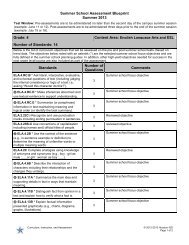
PlascoTraco Mobile User Guide
PlascoTraco Mobile User Guide
PlascoTraco Mobile User Guide
- No tags were found...

You also want an ePaper? Increase the reach of your titles
YUMPU automatically turns print PDFs into web optimized ePapers that Google loves.
<strong>Mobile</strong>Trac Lite System <strong>User</strong> <strong>Guide</strong>Version 5.7
<strong>Mobile</strong>Trac Lite System<strong>Mobile</strong>Trac is part of the <strong>Mobile</strong> Lite System, used to track student activity in remote locationsinstantly. It includes all the Student Entry and Compliance features as the desktop PlascoTracsoftware. <strong>Mobile</strong>Trac runs on the Socket <strong>Mobile</strong> SoMo 650 and passes are printed using theZebra MZ220 printer. These two devices connect via Bluetooth technology.In this manual, you will find instructions on: How to use <strong>Mobile</strong>Trac Transfer information between PlascoTrac and <strong>Mobile</strong>Trac Setup hardware for the <strong>Mobile</strong>Trac Lite System Resetting the Socket <strong>Mobile</strong> SoMo 650
Table of Contents1- <strong>Mobile</strong>Trac .................................................................................................... 41.1 Sign-In screen................................................................................................... 41.2 Student Entry Screen........................................................................................ 41.2.1 Scanning a student for an Infraction .......................................................... 5Auto Save Feature ................................................................................................... 5Summary View......................................................................................................... 51.2.2 Search for a Student.................................................................................. 51.2.3 View Student Information........................................................................... 61.3 Compliance Screen........................................................................................... 61.4 Event Tracking Screen...................................................................................... 72- Transferring information between PlascoTrac and <strong>Mobile</strong>Trac................... 132.1 Synchronizing and Activating <strong>Mobile</strong>Trac ....................................................... 132.2 Adding a mobile unit to the pool...................................................................... 153- <strong>Mobile</strong> Lite Hardware Setup........................................................................ 163.1 Activating BlueTooth on Socket <strong>Mobile</strong> SoMo 650 and Zebra MZ220 setup .. 163.2 Setting up scanning triggers............................................................................ 203.3 Setting Date and Time on Socket <strong>Mobile</strong> SoMo 650....................................... 214- Resetting the Socket <strong>Mobile</strong> SoMo 650 ...................................................... 234.1 Soft Reset ....................................................................................................... 234.2 Hard Reset...................................................................................................... 234.3 Clean Reset .................................................................................................... 24
1 - <strong>Mobile</strong>Trac1.1 Sign-In screenThis is the first screen a user will see when logging in to<strong>Mobile</strong>Trac. Any user that has access to PlascoTrac willbe able to log in.<strong>User</strong> name:Enter user’s PlascoTrac user name.Password:Enter user’s corresponding Plasco Trac password.Lock when idle:When <strong>Mobile</strong>Trac is idle for the amount of time that isselected, the application will lock and the user will haveto sign-in again. This security feature helps users protectstudent information.1.2 Student Entry ScreenOnce signed into <strong>Mobile</strong>Trac, the user will see theStudent Entry Screen. In this screen the user has theability to:1. Search for students by first name, last name, andvehicle VIN and tag number.2. View students’ information such as: demographicinformation, class schedule and vehicleinformation.3. View student’s summary of infractions4. Enter infractions and print passes5. Undo6. RedoIn addition, <strong>Mobile</strong>Trac will alert the user if the studenthas any un-served disciplinary actions.
1.2.1 Scanning a student for an InfractionFollow the steps below to add infractions to a student record.1. Select the Trac Code from the TCode drop down menu.2. Scan the Student’s badge. The ID number will show in the ID No. field. Make certain that the focus isin this field at the time of scanning.3. Select Save TRAC to record the entry to the student’s history.4. If the Print option is selected the pass will print on the mobile printer.Auto Save FeatureThis feature is enabled by checking the box labeled ‘Auto Save’ located next to the Save TRAC button.Once enabled, it will automatically ‘Save TRAC’ when a students’ badge is scanned and will alsoautomatically print a pass if the Print Pass feature is enabled. This allows the user to quickly scanmultiple students with the same TracCode. To disable Auto Save, uncheck the box.Summary ViewThis screen shows the user the student’s cumulative count of infractions per TracCode. The last scan ofeach infraction will show at the far right. This is just a summary view. To view more details on eachinfraction, log-in to PlascoTrac on the workstation.1.2.2 Search for a StudentBy tapping on the Search icon in the Entry screen, anew screen will open called <strong>Mobile</strong>Trac Search. Hereyou can search for students using different criteria: Firstand/or Last name, vehicle VIN and tag number.Follow the steps below to search for a student:1. Populate the fields with the information you wishto search by.2. When all of the information has been populatedtap on ‘Search!’. A list of students that matchesthe criteria will show on the screen.3. Select the student you wish to view and tap on‘Scan’ to see the student on the Entry screen.Select Details to view the student’s information.Note: If the keyboard is not visible, tap on the keyboardicon to pull up the keyboard.
1.2.3 View Student InformationIn the Entry Screen, tap on the Details button to view Student Information. Once in the Details page,the user can tap on any of the tabs at the bottom of the screen to view the information. This informationis read-only and cannot be modified in <strong>Mobile</strong>Trac.Photo Tab: The student’s photo willbe displayed in the screen. Photos areonly visible here if they are configured inPlascoTrac main application.Student Tab: The student’sdemographic information will bedisplayed on this screen.Schedule Tab: If the school is usingthe Data Exchange Module, thestudent’s schedule will be displayedhere.Vehicle Tab: The student’s vehicleinformation will be displayed here.1.History Tab: A summary of alldisciplinary actions issued.
1.3 Compliance ScreenThe Compliance Screen is used to clear the studentsfrom their un-served disciplinary actions.Follow the steps below to register the compliance for astudent:1. Select the Action type by expanding the ‘ActionType’ menu. Tap on the down arrow to seeadditional entries.2. Scan the student’s badge. If the student hasany matching disciplinary actions they will belisted on the Entries field.3. Select the correct action (in the Entries field) andtap on ‘Comply’.4. A status message will appear stating thecompliance has been registered.NOTE: Auto Comply will automatically register thestudent’s compliance when scanned. Check this box toenable this feature.1.4 Event Tracking ScreenThe Event Tracking Screen allows students to bechecked in and out of events and classrooms.Follow the steps below to open an event:1. Tap on the ‘Event’ tab.2. Select the Category of the Event by expandingthe ‘Category’ menu.3. Select the Event by expanding the ‘Event’ menu4. Select the Location of the Event by expandingthe ‘Location’ menu.5. Enter the ID number of the default supervisor ofthe Event in the ‘Super ID’ field.6. Once the supervisor is checked in, the Event will openand allow the user to start scanning students.
7. Scan the student’s badge. If the Student is authorized to attend the Event, the student’s information willdisplay along with the student picture. The status will say ‘’ on top of the student’s picture. If thestudent is not authorized, the status will say “Restricted to selected list”. Tapping on the photo will displaythe Student Information screen. If there is no student photo, you can still tap on the blank photo area andit will display the Student Information screen.8. If a student has any unserved disciplinary actions a message will appear in red text alerting the user. Tapon the red text to get more details on the unserved disciplinary actions. Tap on ok to close the UnservedActon(s) window.
9. To Scan Out a student, scan the student’s badge again. The status will display ‘’ on top of thestudent’s picture.10. Select Summary to view details on which students have been Scanned In and Scanned Out for the event.Tapping on a student will populate the Name and Grade fields. Select the details button (to the right of theName field) and this will display the Student Information screen.a. At Event: Displays the students that have been Scanned In to the Event..
. Left event: Displays the students that have been Scanned Out of the Event.c. Not at event: Displays the students that have been pre-registered to the event, but have not beenscanned In.
d. All: Displays all students pre-registered in the event and any additional students Scanned In.11. To close an event, tap on the ‘Close Event’ button on the bottom of the screen. Select ‘Yes’ to close theevent without scanning out the remaining students that are scanned in. Select ‘No’ to Scan Out theremaining students and close the event or select ‘Cancel’ to return to the event.
12. If the Event needs to be reopened, select the Event again. The message below will be displayed. Tap‘Yes’ to reopen.
2- Transferring information between PlascoTrac and <strong>Mobile</strong>Trac2.1 Synchronizing and Activating <strong>Mobile</strong>TracIn order to share information between the mobile and the desktop, the mobile must be synchronized andactivated after every use.1. Connect the mobile to the sync cable. Make certain that the cable is connected to a USB port on thecomputer.2. Once ActiveSync is connected, you will see that the mobile will be highlighted in yellow on thePlascoTrac screen. The status of the mobile is ‘Active’. Click on ‘Synchronize’When the mobile is synchronizing, <strong>Mobile</strong>Trac will shut down and PlascoTrac will fetch all the dataon the mobile. This means any new entries will be transferred over to PlascoTrac. When it’s donesynchronizing the status will change from ‘Active’ to ‘Inactive’ and the Synchronize’ button willchange to ‘Activate’. When the mobile is Inactive, <strong>Mobile</strong>Trac is not in a useable state and will notallow the user to launch the application on the mobile. It must first be activated before it can beused.
3. Click on Activate.When activating the mobile, PlascoTrac will send all data to the mobile and launch <strong>Mobile</strong>Trac.During the activation process, student pictures will be sent to the mobile. This step does not need tooccur with every activation. Simply uncheck the ‘Send Student Pictures’ check box to disable thisfunction before clicking on Activate.4. When the activation process is complete, the status of the mobile will change back to ‘Active’ and the‘Activate’ button will change to ‘Synchronize’. At this point the mobile can be removed from the synccable and <strong>Mobile</strong>Trac can be used.
2.2 Adding a mobile unit to the poolFollow the steps below to add a new unit to the list of mobiles in <strong>Mobile</strong>Trac.1. Connect the mobile to the sync cable. Make certain that the cable is connected to a USB port on thecomputer.2. If the mobile is not found in the pool, the following message will display. Click on ‘Yes’ to add to thepool.3. The status will show as ‘Inactive’. Click on ‘Activate’ to launch <strong>Mobile</strong>Trac on the <strong>Mobile</strong>.
3 - <strong>Mobile</strong> Lite Hardware Setup3.1 Activating BlueTooth on Socket <strong>Mobile</strong> SoMo 650 and Zebra MZ220 setup1. Turn on printer by holding power button for 2 seconds. Ensure green power indicator is lit.2. In the main mobile Windows screen, select Start Settings3. Select the Connections tab and tap on the Bluetooth icon. Tap the Mode tab. Check Turn onBluetooth.4. Tap on the Devices tab on the bottom of the page and tap on ’Add new device…’
5. The search will look for all devices in the area that have BlueTooth activated. When the printer isfound, it will display the serial number. Select the printer and select ‘Next’.6. Leave passcode blank and select ‘Next’
7. A message will display asking if you want to add printer to device list. Select ‘No’.8. On the Partnership Setting screen check Serial Port and select ‘Finish’
9. Select the ‘COM Ports’ tab and select ‘New Outgoing Port’.Note: If the keyboard is not visible, tap on the keyboard iconto pull up the keyboard10. Select mobile printer and tap ‘Next’.
11. From the drop down menu select COM3. Uncheck ‘Secure Connection’ and select ‘Finish’12. To exit out of the Settings page Select ‘Ok’ on top of screen then tap on the ‘X’.3.2 Setting up scanning triggers1. In the main mobile Windows screen Open Start Settings Personal Buttons.2. Select ‘L Button’, and in drop down menu under Assign a program, select Socket Scan.
3. Select ‘R Button’ and in drop down menu under Assign a program, select Read Barcode.4. Click on ‘ok’ on the top right to close out of the Buttons screen. The click on the ‘X’ to exit the settingspage.3.3 Setting Date and Time on Socket <strong>Mobile</strong> SoMo 6501. In the main mobile Windows screen, tap on the area where it shows the date and time.
2. Tap on the up and down arrows to select the Time Zone, Time, and Date.3. Tap on ‘ok’ on the top left corner to exit and select yes to save the changes to the Clock.
Resetting the Socket <strong>Mobile</strong> SoMo 6504.1Soft ResetA soft reset is like rebooting a computer. No files are deleted, but applications are stopped. Anytemporary data may be lost if an application has not stored it to a file. To perform a soft reset:Using the tip of your stylus, lightly press the Reset button inside the hole on the bottom of your SoMo 650and then release.4.2Hard ResetA hard reset will clear all user-installed settings, applications, and data from RAM (Random AccessMemory). It is useful for clearing some states that are not normally cleared with a Soft ResetTo perform a hard reset:1. Press and hold the Calendar and Contacts shortcut buttons on your SoMo 650.2. While holding the two buttons, using the tip of your stylus, lightly press the Reset button inside thehole on the bottom of your SoMo 650.3. Press the two shortcut buttons with the index and middle finger of one hand. Hold the stylus in yourother hand to press the reset button and then release.4. Keep pressing the two buttons until a splash screen appears with the Socket logo and thendisappears.5. After the Socket <strong>Mobile</strong> Splash Screen disappears, release the two buttons and follow the onscreeninstructions.
4.3Clean ResetNOTE: If you set a security password on the SoMo and forget it, a clean reset will remove the passwordsetting.To perform a clean reset:1. Press and hold the Left Programmable Application Button, the Calendar and Contacts shortcutbuttons on your SoMo 650.2. While holding the three buttons, using the tip of your stylus, lightly press the Reset button inside thehole on the bottom of your SoMo 650 and then release.3. It is recommended that you hold the SoMo 650 in your left hand. Press the left programmable actionbutton with your left thumb and the two shortcut buttons with your left index and middle finger. Holdthe stylus in your right hand to press the reset button.4. Keep pressing all three buttons until a splash screen appears with the Socket logo and thendisappears.5. After the Socket Splash Screen disappears, release the three buttons and follow the onscreeninstructions.