laminate flooring installation instructions - Lumber Liquidators
laminate flooring installation instructions - Lumber Liquidators
laminate flooring installation instructions - Lumber Liquidators
- No tags were found...

You also want an ePaper? Increase the reach of your titles
YUMPU automatically turns print PDFs into web optimized ePapers that Google loves.
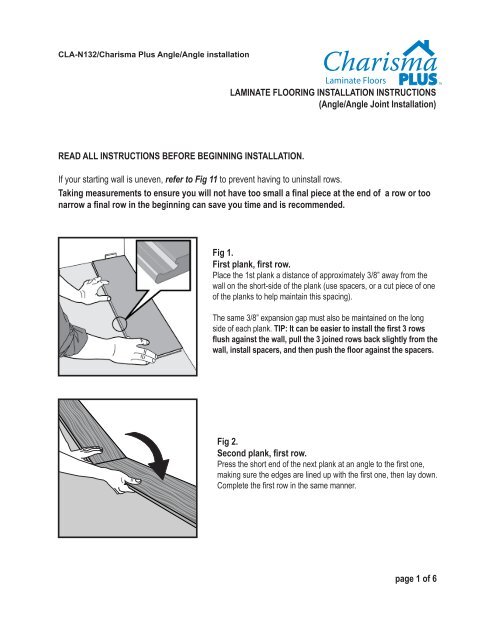
CLA-N132/Charisma Plus Angle/Angle <strong>installation</strong>LAMINATE FLOORING INSTALLATION INSTRUCTIONS(Angle/Angle Joint Installation)READ ALL INSTRUCTIONS BEFORE BEGINNING INSTALLATION.If your starting wall is uneven, refer to Fig 11 to prevent having to uninstall rows.Taking measurements to ensure you will not have too small a final piece at the end of a row or toonarrow a final row in the beginning can save you time and is recommended.Fig 1.First plank, first row.Place the 1st plank a distance of approximately 3/8” away from thewall on the short-side of the plank (use spacers, or a cut piece of oneof the planks to help maintain this spacing).The same 3/8” expansion gap must also be maintained on the longside of each plank. TIP: It can be easier to install the first 3 rowsflush against the wall, pull the 3 joined rows back slightly from thewall, install spacers, and then push the floor against the spacers.Fig 2.Second plank, first row.Press the short end of the next plank at an angle to the first one,making sure the edges are lined up with the first one, then lay down.Complete the first row in the same manner.page 1 of 6
CLA-N132/Charisma Plus Angle/Angle <strong>installation</strong>LAMINATE FLOORING INSTALLATION INSTRUCTIONS(Angle/Angle Joint Installation)Fig 3.At the end of the first row, be sure to leave another 3/8” expansiongap between the short end of the plank and the wall. Measure thedistance carefully, ensuring proper gap after the plank is cut andjoined. The last plank of every row should be a minimum of 12inches in length.(See Fig 4. for cutting <strong>instructions</strong>)Fig 4.Planks can be cut with a jig saw, power saw, or hand saw. If usingpower tools, it is recommended that the décor side of the plank (theside that looks like the floor will look after <strong>installation</strong>) is facing down.If using a hand saw, the décor should be facing up while cutting.Fig 5.Second row.When starting the 2nd row, the short-side seams need to be staggeredfrom the 1st row. Typically, the portion of the plank cut from thelast piece in the 1st row can be used to start the 2nd row, althoughany piece used to start or end a row must be at least 12” in length.Fig 6.The Stagger is the distance between short ends from one row to thenext and should follow the following: minimum distance between theseams of the short ends of planks in parallel rows shall not be lessthan 2 times the width of the plank (for example, if a plank is 8” wide,ends should be staggered by at least 16”).page 2 of 6
CLA-N132/Charisma Plus Angle/Angle <strong>installation</strong>LAMINATE FLOORING INSTALLATION INSTRUCTIONS(Angle/Angle Joint Installation)Fig 7.Place the floorboard an angle against the floorboard in the previousrow, press forward and fold down at the same time. NOTE: The plankshould not be folded all the way to the floor. It must stay slightlyraised, until all of the planks in the row are installed. Only afterthe entire row is installed, are all the planks pushed fully down at thesame time.Fig 8.Second plank second row.Place the short end of the floorboard at an angle against the previousinstalled floorboard and fold down.Fig 9.Angle plank (together with the previous installed in the same row)slightly (about 1”) and push it against the row in front. This lift/pushwill slide the plank into alignment with the plank next to it in the samerow, and will engage the glueless click joint. After the planks are fullyengaged, allow them to drop back to a natural angle and DO NOTpush the planks flush with the floor until this angle/push techniqueis complete for all planks in the row (prematurely pushingthe planks down will prevent proper <strong>installation</strong> of subsequentplanks in the row, and may damage product).page 3 of 6
CLA-N132/Charisma Plus Angle/Angle <strong>installation</strong>LAMINATE FLOORING INSTALLATION INSTRUCTIONS(Angle/Angle Joint Installation)Fig 10.After 2-3 rows.Adjust the distance to the front wall by sliding the entire floor back,placing 3/8” spacers against the wall, and sliding the entire flooragainst the spacers.Fig 11.If the wall is uneven, the planks must be cut to match the “contour”of the wall. Mark the floorboards with the contour of the wall (usinga ruler to trace the contour of the wall on the plank). Do not forget toleave the 3/8” expansion gap .Fig 12.To remove the first row, lift the floorboard about an inch and tap theplanks along the joint. Cut the floorboards as required.page 4 of 6
CLA-N132/Charisma Plus Angle/Angle <strong>installation</strong>LAMINATE FLOORING INSTALLATION INSTRUCTIONS(Angle/Angle Joint Installation)Fig 13.Reinstall the first row from left to right.Press the boards against the edge of floorboards that are already inposition, with the strip first.Fig 14.Last row.The last row should be no narrower than 2”, and must be cut to sufficientwidth to allow for the 3/8” expansion gap. Use a table saw torip planks to the appropriate width. If resulting planks would be lessthan 2”, the planks from the 1st row may need to be ripped to width toaccommodate wider planks in the last row.page 5 of 6
CLA-N132/Charisma Plus Angle/Angle <strong>installation</strong>LAMINATE FLOORING INSTALLATION INSTRUCTIONS(Angle/Angle Joint Installation)HORIZONTAL INSTALLATION (UNDER DOOR JAMS, BASEBOARD HEATERS, ETC.)Fig 15. Fig 16.Cut off the “lip” from the groove using a chisel, knife, or paint scraper. Put a smallbead of white glue (PVAc, carpenter’s glue, etc.) on the adjusted groove and pushthe planks horizontally together. If necessary place some spacers between last boardand the wall during the hardening time of the glue. The method can also be appliedto the short ends.RADIATOR PIPESform no. CLA-N132rev 07/11Fig 17. Fig 18.Mark the center of the holes and drill the hole with ¾” diameter or larger than thepipe diameter (=10 mm gap around), cut as shown. Install the floor plank. Put whitePVAc glue on the cut piece and replace.page 6 of 6