AT&T 9452 2-Line 900 MHz Digital Cordless Phone with Caller ID ...
AT&T 9452 2-Line 900 MHz Digital Cordless Phone with Caller ID ...
AT&T 9452 2-Line 900 MHz Digital Cordless Phone with Caller ID ...
- No tags were found...

Create successful ePaper yourself
Turn your PDF publications into a flip-book with our unique Google optimized e-Paper software.
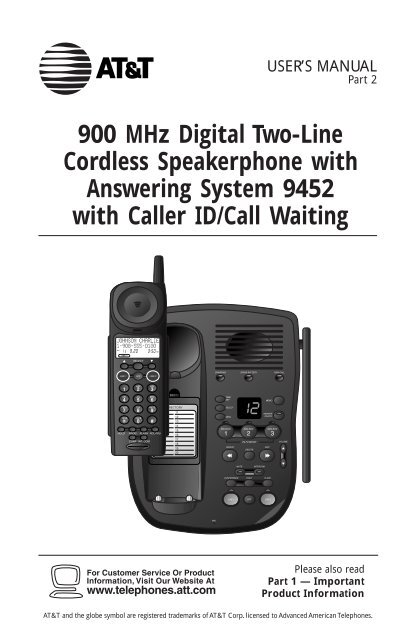
USER’S MANUALPart 2<strong>900</strong> <strong>MHz</strong> <strong>Digital</strong> Two-<strong>Line</strong><strong>Cordless</strong> Speakerphone <strong>with</strong>Answering System <strong>9452</strong><strong>with</strong> <strong>Caller</strong> <strong>ID</strong>/Call WaitingPlease also readPart 1 — ImportantProduct InformationAT&T and the globe symbol are registered trademarks of AT&T Corp. licensed to Advanced American Telephones.
© 2000 Advanced American Telephones. All rights reserved.Printed in China. 850004409 Issue 1AT&T 10/00
CONTENTSBEFORE YOU BEGIN . . . . . . . . . . . . . 3About <strong>Caller</strong> <strong>ID</strong> <strong>with</strong> Call Waiting.. 3About the Data Port .......................3About the Spare Battery Charger.. 3INSTALLATION . . . . . . . . . . . . . . . . . . . . . . 4Before You Install .......................... 4Table/Desk Installation...................6Wall Installation ............................ 7FEATURE SETUP . . . . . . . . . . . . . . . . . . . 9Telephone Feature Setup .............. 9Telephone Features........................9TELEPHONE OPERATIONAT THE HANDSET . . . . . . . . . . . . . . . . . . . . . 10Make a Call.................................. 10Answer a Call .............................. 10End a Call .....................................10Hold ............................................ 10Flash/Call Waiting........................ 10Redial .......................................... 10Intercom ..................................... 10Handset Volume .......................... 10Temporary Tone Dialing.............. 11Conference Calls......................... 11Switching from Handset toBase Speakerphone ................. 12Call Timer.................................... 12Headset Jack................................ 12Operating Range ......................... 13TELEPHONE OPERATIONAT THE BASE . . . . . . . . . . . . . . . . . . . . . . . . . . .14Answer a Call .............................. 14Switching from BaseSpeakerphone to Handset ....... 14Mute............................................ 14Conference Calls......................... 14End a Call .................................... 15Base Ringer Volume..................... 15Hold ............................................ 15Page/Intercom............................. 15Speakerphone Volume ................ 15Flash/Call Waiting........................ 15CALLER <strong>ID</strong> OPERATION . . . . . . . 16View Call History ........................ 16Dial a Number fromCall History.............................. 16Erase a Call Record ..................... 17Erase All Call Records.................. 17Display Screen Messages............. 17TELEPHONE DIRECTORY . . . . . 18Store a Directory Name& Number................................ 18Edit a Directory Name& Number................................ 19Erase a Directory Name& Number................................ 19Store a Call History Recordin Directory ............................. 19Dial a Directory Number ............ 19ANSWERING SYSTEMOPERATION . . . . . . . . . . . . . . . . . . . . . . . . 20Audible Indicators....................... 20About Mailboxes......................... 20About Announcements ............... 20Record Your Announcement....... 21Answering SystemFeature Setup........................... 22Feature Summary .........................22Listen To, Save, & DeleteMessages .................................. 23Call Screening/Intercept............. 24Record a Memo........................... 24Connect <strong>with</strong> the AnsweringSystem...................................... 24Voice Menu ................................. 24Remote Access Commands ......... 25Message Window Display............ 26BATTERIES . . . . . . . . . . . . . . . . . . . . . . . . . 27Charging the HandsetBattery Pack............................. 27Replacing the HandsetBattery Pack............................. 27Installing a Spare Battery .............28IN CASE OF DIFFICULTY . . . . . 301
BEFORE YOU BEGINAbout <strong>Caller</strong> <strong>ID</strong> <strong>with</strong> Call WaitingThis product has a <strong>Caller</strong> <strong>ID</strong> <strong>with</strong> Call Waiting feature that works <strong>with</strong>service from your local phone service provider.<strong>Caller</strong> <strong>ID</strong> <strong>with</strong> Call Waiting lets you see who’s calling before you answer thephone, even when you’re on another call.You may need to change your phone service to use this feature. Contactyour phone service provider if:• You have both <strong>Caller</strong> <strong>ID</strong> and Call Waiting, but as separate services(you may need combined service)• You have only <strong>Caller</strong> <strong>ID</strong> service, or only Call Waiting service• You don’t subscribe to any <strong>Caller</strong> <strong>ID</strong> or Call Waiting services.You can also use this product <strong>with</strong> regular <strong>Caller</strong> <strong>ID</strong> service, and you can usethis product’s other features <strong>with</strong>out subscribing to either <strong>Caller</strong> <strong>ID</strong> orcombined <strong>Caller</strong> <strong>ID</strong> <strong>with</strong> Call Waiting service.There are fees for <strong>Caller</strong> <strong>ID</strong> services, and they may not be available inall areas.This phone can provide information only if both you and the caller are inareas offering <strong>Caller</strong> <strong>ID</strong> service and if both telephone companies usecompatible equipment.About the Data PortIf you want to connect another device (such as a modem or fax machine)to the wall jack, you can use the jack on the phone labeled DATA PORT.This convenience port uses <strong>Line</strong> 2; a call picked up on <strong>Line</strong> 2 at this oranother extension, or incoming <strong>Caller</strong> <strong>ID</strong> information, may interrupt a fax,modem, or message transmission.About the Spare Battery ChargerThis phone is equipped <strong>with</strong> a built-in spare battery charger in the baseunit. The spare battery charger allows you to always have a chargedbattery available should the handset battery charge become low. Forcomplete information, see page 29.3
INSTALLATIONBefore You Install1 Choose a location for the base near an electrical outlet and atelephone jack.This phone requires a modular telephone jack and a standard electricaloutlet (110v AC) not controlled by a wall switch. For optimumperformance, install the base on the highest floor of your home.a) Remove batterycompartmentcover by pressingon the indentationand slidingdownward.b) Place the batterypack in thehandset. Align themetal contacts onthe battery <strong>with</strong>the contacts in thebatterycompartment.c) Replace cover bysliding it on its trackup over battery caseuntil it snaps firmlyinto place.4
INSTALLATIONTable/Desk Installation1 Connect the power cord.Use only the power cord supplied <strong>with</strong> this product.need a replacement, call 1 800 222-3111.If you2 Charge the handset battery.Place the handset in the base. Charge the battery for at least 16 hoursthe first time. After the first charge, the battery is typically fullycharged overnight.3 Connect the telephone line cord(s).If you have a twolinejack, use only the4-wire (RJ-14) line cord.Connect the line cordfrom the wall jack tothe jack labeledL1/L1+L2 on the base.Make sure the plugssnap firmly into place.Power cordStandardelectricaloutletL1/L1+L2 jackModulartelephonejackIf you have two separatejacks, use both long linecords. Connect a line cordfrom the wall jack youwish to designate asyour <strong>Line</strong> 1 to the jacklabeled L1/L1+L2 on theback of the base.Connect the other linecord from the remainingwall jack to the jacklabeled L2 on the backof the base. Make surethe plugs snap firmlyinto place.Power cordStandardelectricaloutletL2 jackL1/L1+L2 jackModulartelephonejacks6
INSTALLATION4 Check for dial tone.After the batteries are charged, pick up the handset, press L, andlisten for a dial tone. Then press l. If you don’t hear a dial tone, see“IN CASE OF DIFFICULTY.”Wall Installation1 Position the wall mount adapter on the base.Wall mountadapterAlign tabs on wall mountadapter <strong>with</strong> holes on bottomof base. Snap wall mountadapter firmly into place.2 Connect the power cord to the phone.Use only the power cord supplied <strong>with</strong> this product. If youneed a replacement, call 1 800 222-3111.3 Connect the telephone line cord(s). See illustrations on previouspage for connections. Use the short line cord instead of a long linecord for the connection to the L1/L1+L2 phone jack.7
INSTALLATION4 Mount the base on the wall.a) Align holes onbase <strong>with</strong>mounting studson wall jack.b) Place power cordas shown, guidingit through tabs onbase.c) Pull base down onmounting studsuntil it locks intoplace.4 Plug the power cord into the outlet.5 Charge the handset battery.Place the handset in the base. Charge the battery for at least 16 hoursthe first time. After the first charge, the battery is typically fullycharged overnight.6 Check for dial tone.After the batteries are charged, pick up the handset, press L, andlisten for a dial tone. Then press l. If you don’t hear a dial tone, see“IN CASE OF DIFFICULTY.”8
FEATURE SETUPTelephone Feature Setup1 Make sure the handset is off.2 Press G.3 Press - until the feature you want to set is flashing on the screen.(Features are described in the chart below.)4 Press S.5 Press - or + until the setting you want flashes.6 Press S— OR —If necessary, use the keypad to enter numbers (for example, when youprogram the area code), then press S.Telephone FeaturesFeature:AREA-HOMEDirections:Select HOME. The screen displays ENTER AREA CODE.If you live in an area where you make calls <strong>with</strong>in yourown area code by dialing seven digits, enter your three-digitarea code, then press S— OR —If you live in an area where all local calls require 10 digits(area code plus phone number, <strong>with</strong>out dialing “1” first),enter 000 for the area code, then press S.AREA-LOCALKEY BEEPSRINGERAn area code is local if you do not dial “1” before the areacode. Enter up to five three-digit local area codes. SelectLOCAL, use - or + to move from area code #1 througharea code #5, and enter area codes. Press S to save.If you turn this feature on, the handset sounds a toneevery time you press a button. Select KEYBEEPS, press -until OFF or ON is flashing, then press S.You can choose from four different ringers for each line.Press - or + until LINE 1 or LINE 2 is flashing, thenpress S. Press - to hear the different ringers, thenpress S to save the last ringer heard or choose OFF.Repeat for the other line, then press O.NOTE: When editing an area code, use + to delete existing digits, thenenter the new area code. Press S to save.9
TELEPHONE OPERATIONAT THE HANDSETHandsetVolumeAdjust volume ofwhat you hearthrough thehandset.Make a CallPress L orl and wait fordial tone— OR —Dial the phonenumber (use + tobackspace andedit), then press aLINE button.Answer a CallPress the flashingLINE button.ConferenceCallsHoldPress to put a callon hold. To returnto the call, pressthe lit LINE buttonon handset or base— OR —Lift the handset ofanother phoneconnected to thesame line.10IntercomPress to signalbase; intercom callis automaticallyconnected.End a CallExitprogrammingCancel a pageFlash/Call WaitingAccess specialtelephone companysubscriber services.RedialPress to displaylast numberdialed. Use +and - to scrollthrough last fivenumbers dialed.Press a LINEbutton to callthe displayednumber.
TELEPHONE OPERATIONAT THE HANDSETTemporary Tone DialingIf you have dial pulse (rotary) service, you can change from dial pulse totouch tone dialing during a call by pressing *. This is useful if you need tosend touch tone signals for access to telephone banking or long-distanceservices.1 Dial the number.2 Press *. Buttons pressed after this send touch tone signals.3 After you end the call, the phone automatically returns to dial pulse(rotary) service.Conference CallsThree-Way Conference CallsYou can use both lines at the same time to set up a three-way conferencecall from the handset.1 Answer or make a call on one line.2 Press H.3 Press the other LINE button, and make or answer another call.4 Press c to connect all parties. Both LINE buttons flash during aconference call.5 Press O to end the entire conference call.NOTE: If you want to end the call <strong>with</strong> just one side of a conference, pressthat LINE button, press O, and then press the other LINE button to speak<strong>with</strong> the other party.Four-Way Conference CallsYou can set up a four-way conference call <strong>with</strong> <strong>Line</strong> 1, <strong>Line</strong> 2, the handset,and the base speakerphone.1 Establish a conference call at the handset (see “Three-Way ConferenceCalls” above).2 Press L on the base.3 Press l on the base.4 Press c on the base to connect all parties.11
TELEPHONE OPERATIONAT THE HANDSETSwitching from Handset to Base Speakerphone1 At the handset, make or answer a call on <strong>Line</strong> 1 or <strong>Line</strong> 2— OR —Establish a conference call.2 Press H on the handset.3 At the base, press the appropriate LINE button— OR —Press c to pick up a conference call.Call TimerWhile the handset or base is on a call, the screen displays the approximateduration of the call.Headset JackYou can use this telephone hands-free when you install a 2.5 mm headset(AT&T SKU# 24099), purchased separately.Plug the headset into the jack located on the left side of the handset(under the small rubber flap). Do not force the connection, but make surethe plug fits securely.12
TELEPHONE OPERATIONAT THE HANDSETOperating RangeThis cordless telephone operates <strong>with</strong>in the maximum power allowed bythe Federal Communications Commission (FCC). Even so, this handset andbase can communicate over only a certain distance — which can vary <strong>with</strong>the locations of the base and handset, the weather, and the constructionof your home or office. For best performance, keep the base antennafully upright.If you receive a call while you are out of range, the handset might notring — or if it does ring, the call might not connect when you press Lor l. Move closer to the base, then press L or l to answer.If you move out of range during a phone conversation, you mighthear noise or interference. To improve reception, move closer to the base.If you move out of range <strong>with</strong>out pressing O, your phone will beleft “off the hook.” To hang up properly, walk back into range, periodicallypressing O.13
TELEPHONE OPERATIONAT THE BASESwitching fromBase Speakerphoneto Handset1 While on a call,press H onthe base.2 Press theappropriateLINE buttonon the handset.Indicates handsetis charging in baseMutePress to prevent yourcaller from hearing you(you can hear yourcaller). Press again toreturn to theconversation.Conference CallsSee “Conference Calls”and “Switching fromHandset to BaseSpeakerphone” inTELEPHONEOPERATION AT THEHANDSET.Answer a CallPress the flashing LINEbutton and speaktoward themicrophone.14
TELEPHONE OPERATIONAT THE BASEIndicates sparebattery is installedBase Ringer VolumeUse switches on side of phone toadjust how loudly the phone ringsfor each line. Set each base ringerto HIGH or LOW, or turn OFF.HoldPress to put a call on hold. To returnto the call, press the lit LINE button— OR —Lift the handset of another phoneconnected to the same line.Page/IntercomPress to ring the handset.Handset presses i to respond,O to cancel.Speakerphone VolumeWhile on a call, adjust thevolume of what you hear.Flash/Call WaitingAccess subscriberservices while on a call.End a CallEnd a telephone orintercom call.15
CALLER <strong>ID</strong> OPERATION<strong>Caller</strong>’s number<strong>Caller</strong>’s nameDate of callTime of callThe handset stores up to 50 <strong>Caller</strong> Identification records in the call history,<strong>with</strong> the most recent call record displayed first.View Call History1 Make sure the handset is off.2 Press + or -. The screen displays thenumber of new, unreviewed and old callsin the call history.3 Continue to press + or - to view allcall information.JOHNSON CHARLIE1-908-555-0100NEW11 9 20 3 50 . : PMLDial a Number from Call History1 Make sure the handset is off.2 Press + or - until the screen displays the number you want to call.3 Press a LINE button. You will hear a dial tone and the displayednumber will be dialed automatically.16
CALLER <strong>ID</strong> OPERATIONErase a Call Record1 Make sure the handset is off.2 Press + or - until the screen displays the call record youwant to erase.3 Press S.4 Press - until ERASE is flashing, then press S.5 Press - until YES is flashing, then press S.Erase All Call Records1 Make sure the handset is off.2 Press + or - until the screen displays a call record.3 Press S.4 Press - until ERASE is flashing, then press S.5 Press - until ALL is flashing, then press S. The screen displaysERASE ALL? NO YES.6 Press - until YES is flashing, then press S.Display Screen MessagesScreen Displays:When:PRIVATE NAMEPPPPRIVATE CALLERUNKNOWN NAMEOUT of AREAUNKNOWN CALLEREXTENSION USEDThe other party is blocking name information.The other party is blocking number information.The other party is blocking name andnumber information.Your phone company is unable to receiveinformation about this caller’s name.Your phone company is unable to receiveinformation about this caller’s number.Your phone company is unable to receiveinformation about this caller’s name and number.An extension phone on this line is being used, socall information cannot be received.17
TELEPHONE DIRECTORYThis cordless phone can store 50 telephone numbers, each up to16 digits long.Store a Directory Name & Number1 Make sure the handset is off.2 Press G on the handset. The screen flashes DIRECTORY.3 Press S. The screen displays ENTER NAME.4 Use the chart below to enter a name to be stored <strong>with</strong> the number.Press - to move to the next space; press + to back up for correction.5 Press S. The screen displays ENTER NUMBER.6 Enter the telephone number you want to store. (Press r to entera two-second delay in the dialing sequence).7 Press S to store.PressesDial Key 1 2 3 4 51 12 A B C 23 D E F 34 G H I 45 J K L 56 M N O 67 P Q R S 78 T U V 89 W X Y Z 90 0* *# # ’ , - .Change/Replace a Stored Directory NumberStore a new number in its place.18
TELEPHONE DIRECTORYEdit a Directory Name & Number1 Press S. The screen displays DIRECTORY.2 Use + or - to scroll to the entry you want— OR —Enter the first letter of the name, then use + or - to scroll.3 When the screen displays the entry you want, press S.4 Press - until EDIT is flashing.DIAL EDIT ERASE123456785 Press + to erase letters. Use the keypad to enter new letters.6 Press S.Erase a Directory Name & Number1 Follow Steps 1–3 under “Edit Directory Name and Number.”2 Press - until ERASE is flashing.3 Press S.4 Press - until YES is flashing.5 Press S.Store a Call History Record in DirectoryNOTE: For more information about call history, see page 16.1 Make sure the handset is off.2 Press + or - until the screen displays the call record youwant to store.3 Press S.4 Press - until PGM is flashing.5 Press S twice.Dial a Directory Number1 Press S. The screen displays DIRECTORY.2 Use + or - to scroll to the entry you want— OR —Enter the first letter of the name, then use + or - to scroll.3 Press L or l. You will hear a dial tone, and the number willbe dialed.19
ANSWERING SYSTEM OPERATIONAudible IndicatorsThis system gives you voice prompts for feature operations and voiceconfirmations when you press a button or complete an operation.About MailboxesThis answering system has three voice mailboxes. <strong>Caller</strong>s using a touchtone phone can select the mailbox in which their messages will berecorded by pressing * 1, * 2, or * 3 after the system answers the call.All other messages will be recorded in Mailbox 1.About Announcements• You can record up to two different announcements — one for normalanswering and one for when you’ve set the system to play theannouncement only.• Use normal answering when you want the system to record callers’messages. Use Announce Only when you want to give information tocallers <strong>with</strong>out accepting messages.• If you choose not to record an announcement, the system answers <strong>with</strong>a pre-recorded announcement.• The normal answering pre-recorded announcement says: “Hello. I’munable to answer your call right now. Please leave your name,number and message after the tone.” The Announce Onlypre-recorded announcement says: “Hello. I’m unable to answer yourcall right now. Please call again. Thank you.” The Announce Onlyrecording is repeated, then the line is disconnected.• By setting Announce Only to On or Off, you decide whichannouncement your callers will hear when the system answers a call(the system comes set for normal answering, <strong>with</strong> Announce Onlyturned off). See “Set Announce Only” on page 22 to change yourannouncement selection.20
ANSWERING SYSTEM OPERATIONRecord Your AnnouncementNOTE: If you have assigned different mailboxes to different people, besure to tell callers in your announcement to press * 1, * 2, or * 3 toleave a message in the appropriate mailbox.1 Press U until you hear “Set outgoing message.”2 Press M. After you hear “Now recording” followed by a beep,speak toward the base to record an announcement up to 90seconds long. After recording your announcement, wait a fewseconds (so your caller will have time to select a mailbox).3 Press any MAILBOX button to stop recording. The system playsback your recorded message, then beeps.To review your announcement at any time:1 Press U until you hear “Set outgoing message.”2 Press any MAILBOX button.To delete your announcement:Press D during announcement playback. The system will use thepre-recorded announcement until you record a new one.Confirm/reviewfeature settingSelect afeature settingEnter AnsweringSystem featuresetup and choosea feature to setRecord outgoingannouncementTurn AnsweringSystem on or offDelete outgoingannouncement,messages21
ANSWERING SYSTEM OPERATIONAnswering System Feature SetupYou can set up one feature at a time, or you can set up a feature and thenmove on to set up another feature.1 Make sure the answering system is on.2 Press and release U until you hear the system announce thefeature you want to set. Refer to the “Feature Summary” below for adescription of the features and your choices.3 Press S to hear the feature’s settings.4 Press t to confirm your selection.NOTE: Exit Feature Setup at any time by pressing a MAILBOX button.Feature SummaryAsterisk (*) indicates default settings.System announces:“Set Outgoing Message”Description/directions:See “Record Your Announcement” onpage 21.“Set Security Code” Set the remote access code you will use19 * to access features and functions of theanswering system from a touch tone phone.“Set Day and Time”“Set Audible Message Alert”Off *On“Set Announce Only”Off *On“Set Call Screening”On *OffSet the clock: After you set the day, repeatSteps 3 and 4 in “Answering SystemFeature Setup” to set hours and minutes.When Message Alert is turned on, the basebeeps once every 10 seconds when newmessages have been received.When you turn on Announce Only,callers hear your announcement, butcannot leave a message.When this feature is set to On, you canhear messages at the base as callersare recording them.“Set Number of Rings” Choose how many times the phone will2 ring before the system answers a call.4 * With Toll Saver active,the system answers6 after two rings when you have newToll Savermessages and after four rings when youhave no new messages.22
ANSWERING SYSTEM OPERATIONListen To, Save & Delete MessagesThe system automatically saves your messages until you delete them,and can store approximately 15 minutes of messages, memos, andannouncements (up to a maximum of 99 messages).After playing a message, the system announces the day and time it wasreceived. While the message plays, the Message Window displays thenumber of the message. After playing the last message in a mailbox, thesystem announces “End of messages.” If the system has less than fiveminutes of recording time left, it announces remaining time.To play and delete messages, either press and release the appropriatebutton or hold it down for more than two seconds as indicated below.The system beeps while a button is held down.Play MessagesPress to play newmessages in amailbox; pressagain to play oldmessages (if any).New messagesmust be playedbefore oldmessages can bereviewed.Press < torepeat amessage; holdto slow downplayback.Press > toskip to thenext message;hold to speedup playback.Adjust Playback VolumeSystem beeps three timesat highest or lowestsetting.MessageWindowDelete Messages• Press to deletethe messagethat’s playing.• Hold, then pressa MAILBOXbutton to deleteall messages inthat mailbox.• You cannotdelete a messageuntil it’s beenreviewed;deletedmessages cannotbe recovered.23
ANSWERING SYSTEM OPERATIONCall Screening/Intercept1 Make sure the answering system and the Call Screening featureare on (see page 22).2 If you decide to take the call, press L or l on the handset.3 If you pick up an extension phone during the announcement and theannouncement does not stop right away, press and release thetelephone switchhook.Record a MemoYou can record a memo up to four minutes long to store as an incomingmessage.1 Press and release M.2 Press a MAIL BOX button to select a mailbox for the memo. Afterthe beep, speak toward the microphone.3 To stop recording, press the MAILBOX button again.Connect <strong>with</strong> the Answering SystemYou can access many features of this system remotely from a touchtone phone.1 Dial your telephone number.2 When the system answers, press #, then enter yourRemote Access Code (preset to 19). The system beeps twice.3 Within two seconds, enter a remote command (see “Remote AccessCommands” on page 25).4 Press * 0 to exit remote operation.Voice MenuThe system has voice prompts to help you <strong>with</strong> remote operation. Press* 5 to hear the menu while remotely connected to the answering system.24
ANSWERING SYSTEM OPERATIONRemote Access CommandsFunction:Play messages ina mailboxRepeat a messageSkip a messageCommand:Press #, then the appropriate mailboxnumber (1, 2, or 3). The system playsnew messages. If there are no newmessages, the system plays old messages.Press # 4 while message is playing toreturn to message beginning; each pressgoes back another message.Press # 6 while message is playing;each press advances another message.Stop Press # 5.Save messagesDelete messageReview announcementRecord announcementRecord memoHang up.Press # 9 while message is playing.Press # 7; system plays announcement,then beeps.Press * 7; after beep, recordannouncement, press # 5 to stop.System plays back announcement.Press * 8; then mailbox number whereyou want memo recorded; speak afterbeep; press # 5 to exit.End remote access call Press * 0.Turn system offPress # 0; the system announces,“The machine is off.” Press # 0 againto turn the system back on.Turn system on When system is off, it answers after 10rings and announces, “Please enter yoursecurity code.” Press #, then enter yourremote access code.NOTE: The remote access call will automatically end after 20 seconds<strong>with</strong>out a key press (other than when recording or playing messages orannouncements).25
ANSWERING SYSTEM OPERATIONMessage Window DisplayWindow Displays:When:0 No new messages in any mailbox1 – 98, flashing Total number of new messages in all mailboxes0 – 99 ↔ F Memory is full, or total number of messages is 99Counting 1 to 99Duration of announcement or memo recording99, flashing Length of recording is more than 99 seconds1 – 99 Current message number during message playback1 – 8, steady for Indicates volume level selected when VOLUME +one secondor VOLUME - is pressed00 – 99 Current Remote Access Code while settingAON or OFF, steady forone secondCL ↔ normal displayAnnounce Only modeDisplayed when any setting is changed fromOn or OffClock needs to be set– – System is answering a call or is in remote operation– – , flashing System is in programming mode or initializing26
BATTERIESCharging the Handset Battery PackThis battery should remain charged up to six days <strong>with</strong> the ringer turnedon and up to 12 days <strong>with</strong> the ringer off. A fully charged battery providesan average talk time of about six hours.The battery pack needs charging when:• A new battery is installed in the handset.• The phone beeps twice when you press L or l.Place the handset in the base so the CHARGING light turns on. The batterypack is typically fully charged in eight hours.You can keep the battery fully charged by returning the handset to thebase after each use.If you repeatedly get a low battery indicator, even after eight hours ofcharging, the battery should be replaced.Replacing the Handset Battery Pack1 Remove the battery compartment cover on the handset bypressing on the indentation and sliding the cover downward.2 Lift out the old battery pack.3 Place the new battery pack into the handset.4 Replace the cover by sliding it up into place.5 The new battery pack must be charged before using the phone.Place the handset in the base and allow it to charge for at least16 hours the first charge. The telephone might operate before that, butfor best performance, let the battery pack charge fully.27
BATTERIESInstalling a Spare Battery1 Open the base unit spare battery compartment.Spare batterycompartmentcover2 Place the sparebattery pack(purchased separately,Replacement Battery#3095, AT&T SKU#92070) in thecompartment.Spare batterycompartment3 Replace the spare battery compartment cover.4 When the battery is installed properly, the SPARE BATTERY light on thebase will be on.5 The spare battery will be fully charged after 24 hours.28
IN CASE OF DIFFICULTYIf you have difficulty operating this phone, try the suggestions below.For Customer Service, visit our website at www.telephones.att.com or call1 800 222–3111. Please retain your receipt as your proof of purchase.If the phone doesn’t work at all, check these items first:• Make sure the AC adapter is plugged into an outlet not controlled by awall switch.• Make sure the telephone line cord is plugged firmly into the base unitand the modular jack.• Make sure the base antenna is fully upright.• Make sure the battery pack is installed correctly.• If the handset does not beep when you press L or l, thebattery might need charging.• If you have dial pulse (rotary) service on your phone line, make surethe dial mode switch is set to PULSE (see INSTALLATION).If the above suggestions don’t solve the problem, try re-initializingthe handset and base:1 Disconnect the power to the base.2 Remove the handset battery pack.3 Wait a few minutes.4 Connect the power to the base.5 Insert the handset battery pack.6 Put the handset in the base to re-initialize.If you hear a two-beep signal when you try to use the handset:• The handset battery pack might need recharging or replacement.• You might be out of range. Move closer to the base and try again.• If moving closer to the base doesn’t help, try following the directionsabove for re-initializing the handset and base.If the handset does not ring when you receive a call:• Make sure the handset ringer is on.• Make sure the telephone line cord is connected firmly to the base andthe telephone jack.• Make sure the AC adapter is plugged firmly into an outlet notcontrolled by a wall switch.• You might be too far from the base; move closer.• You might have too many extension phones on your telephone line toallow all of them to ring. Try unplugging some of them.29
IN CASE OF DIFFICULTYIf you hear noise or interference when using the phone:• Make sure the base antenna is fully upright.• You may be out of range. Move closer to the base.• Household appliances plugged into the same circuit as the base cansometimes cause interference. Try moving the appliance or the base toanother outlet.• The layout of your home or office might be limiting the operatingrange. Try moving the base to another location, preferably on anupper floor.• If the buttons don’t work, try placing the handset in the base for atleast 15 seconds.If you hear other calls while using your phone:Disconnect the base from the modular jack and plug in a cordedtelephone. If you still hear other calls, the problem is probably in yourwiring or local service. Call your local telephone service company.If you are unable to operate special telephone services or otherequipment requiring touch tone signals:If you have dial pulse (rotary) service, follow the directions under“Temporary Tone Dialing” in the TELEPHONE OPERATION section ofthis manual.If messages are incomplete:• If a caller leaves a very long message, part of it may be lost when thesystem disconnects the call after four minutes.• If the caller pauses for more than seven seconds, the system stopsrecording and disconnects the call.• If the system’s memory becomes full during a message, the systemstops recording and disconnects the call.If you have difficulty hearing messages:Check the volume setting.30
IN CASE OF DIFFICULTYIf the system does not answer after the correct number of rings:• Make sure that the ANSWER ON/OFF light on the base is on. If it is off,press A.• If Toll Saver is on, the system answers after two rings when you havenew messages waiting, and after four rings when there are no newmessages• In some cases, the system may be affected by the ringing system usedby the local telephone company.• If the memory is full or the system is off, the system answers after10 rings.If CL appears in the Message Window:You need to reset the clock.If the system does not respond to commands from a remotetouch tone phone:• Make sure you are calling from a touch tone phone. When you dial anumber, you should hear tones. If you hear clicks instead, the phone isnot a touch tone telephone.• The answering system may not detect the Remote Access Code whileyour announcement is playing. Try waiting until the announcement isover before entering the code.• Make sure you enter your Remote Access Code correctly.• There may be noise or interference on the phone line you are using.Press keys firmly.If your outgoing announcement isn’t clear:• When you record your announcement, make sure you speak in anormal tone of voice, about nine inches from the base.• Make sure there is no “background” noise (TV, music, etc.) while youare recording.31
PERF.© 2000 Advanced American Telephones. All rights reserved.Printed in China. 850004417 9/00foldAnswering System <strong>9452</strong>Remote CommandsTo connect <strong>with</strong> your answering system:1 Dial your telephone number from a touch tone phone.2 When the system answers, press #, then enter yourRemote Access Code (preset to 19).3 Within two seconds, enter a remote command from insidethis card.foldAnswering System <strong>9452</strong>Remote CommandsTo connect <strong>with</strong> your answering system:1 Dial your telephone number from a touch tone phone.2 When the system answers, press #, then enter yourRemote Access Code (preset to 19).3 Within two seconds, enter a remote command from insidethis card.PERF.© 2000 Advanced American Telephones. All rights reserved.Printed in China. 850004417 9/00
Remote Command PressVoice Help menu * 5Play messages #, then mailbox number(1, 2, or 3)Repeat message # 4Skip message # 6Stop # 5Save messages Hang upDelete message # 9 while message playsReview announcement # 7Record announcement * 7, speak after beep,press # 5 to stopRecord memo * 8, then mailbox number,speak after beep, press # 5to stopEnd remote access call * 0Turn system off # 0, system announces, “Themachine is off”; press # 0 againto turn system back onTurn system on When off, system answers after10 rings and announces, “Pleaseenter your security code”; press#, then enter your remote accesscodeRemote Command PressVoice Help menu * 5Play messages #, then mailbox number(1, 2, or 3)Repeat message # 4Skip message # 6Stop # 5Save messages Hang upDelete message # 9 while message playsReview announcement # 7Record announcement * 7, speak after beep,press # 5 to stopRecord memo * 8, then mailbox number,speak after beep, press # 5to stopEnd remote access call * 0Turn system off # 0, system announces, “Themachine is off”; press # 0 againto turn system back onTurn system on When off, system answers after10 rings and announces, “Pleaseenter your security code”; press#, then enter your remote accesscodePERF.