Portable Clamping System and SwissRex Lathe Manual
Portable Clamping System and SwissRex Lathe Manual
Portable Clamping System and SwissRex Lathe Manual
- No tags were found...

Create successful ePaper yourself
Turn your PDF publications into a flip-book with our unique Google optimized e-Paper software.
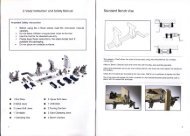
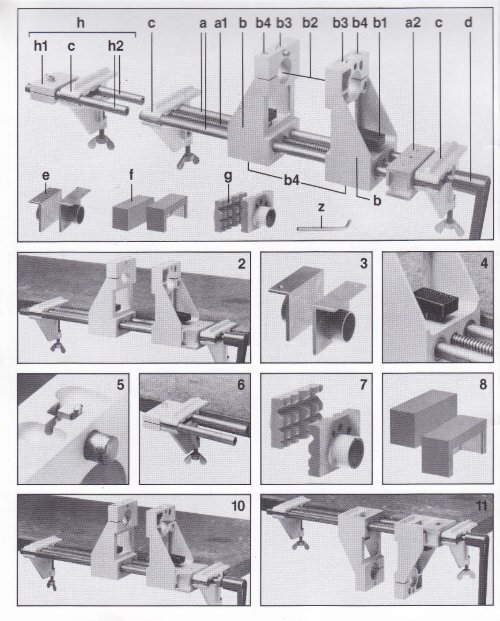
Operating inslructionsSyslem WorkshopEnglishThe<strong>System</strong> Workshop was designedlor the easy <strong>and</strong> precise use with workpieces ofall kinds of material, such as metal, wood, plastic,glass, ceramics, etc. by lhe craftsman <strong>and</strong>the home h<strong>and</strong>yman. The universal systemworkshop is equipped for various functions.Basic equipment (Fig. 1)The <strong>System</strong> Workshop consistingof the basic unit with 2 columns (a), spindle (a1)<strong>and</strong> bearing block (a2), removable h<strong>and</strong>le (d),2 holding clamps (c), 2 system jaws, capable ofbeing rnoved independently of one another (b)(jaw surface 100 x 70 x 35 mm/4 x23/q x13/s")with high-speed adjustment (b1). By just simplypressing the button (bl), the clamp jaws (b) canbe adjusted in a second. Opening 320mm/121/2"; in addition, the opening size can beexlended as required by using the extensionunit (h), parallel clamping with four bearingsurfaces, plane bench with any length required,2 integral drilling machine holders (b2) - Europeanst<strong>and</strong>ard 43 mm/13/a" - tor combined usewith electric drills. Locking sciews (b4), stay iawf itting (b3) for all-round working on items of anylength (wheelwright <strong>and</strong> cartwright fitting) integratedin the system jaws (b). Steel jaws (e) fornretal working (jaw surface 100x70x35mm/4x23/c x 1%"), round <strong>and</strong> pipe-clamp fitting withprisms (g), fully pivoted 360 degrees, additionallyfixable at 30 degrees <strong>and</strong> 45 degrees. Plasticjaws (f) for clamping items sensitive to pressure.Extension unil (h) with holding clamp (c), toolholder (h1), 2 short columns (h2), hexagonsocket spanner 6mml1/a" (zl.The holding clamps can be fitted in 3 differentbasic positions on the unit.Pos. A Both clamps on the outer side.Pos. B - One clamp on the outer side, one betweenthe jaws.Pos. C - Both clamps on one outer side.Pos. D - When the extension unit is being used,one holding clamp is fitted between the systemjaws, as in B.Pos. E - The <strong>System</strong> Workshop can bemounted either on the right or left h<strong>and</strong> cornerof the bench or in the centre of the bench.Maximum benchtop thickness 65 mml 21/2".Pos. APos. BPos. CPos. Dff;4-1,;;;r; flf,-IFig.2:drilling machine holders (European st<strong>and</strong>ard43mm Ol13/t"\.Fig. 3: Steel jaws of the vice {e).Fig.4: Both system jaws with rapid adjustment(b1). By simply pressing the button, the systemjaws can be adjusted in a second.Fig. 5: Both system jaws integrated with a stayiawattachment for all-round working.Fig. 6: Extension unit (h).Fig. 7: Round <strong>and</strong> pipe-clamp jaws (g).Fig. 8: Plastic iaws for clamping ilems sensiliveto pressure (f).Fig. 10 + 11: The holding clamps are mountedwith the unit either facing upwards (vice), ordownwards (plane bench).<strong>System</strong> Workshop with 2 integra, Pos' E'taaw;a'6[r,- ]il
Fig. 14: When being used as a vice with anopening width up to 320mm/1272", both systemjaws (b) move on the columns (a). One systemjaw must always be at the localion block (a2),locked in position.Fig. 15: ll the opening width is to be extended,lhe second system javy is mounted on theextension unit (h), note the sequence 1-2-3, i.e.law - holding clamp - tool holder.Fig. 16: The steel jaws (e) are mounted whenusing the vice with all harder working materials(e.9. metals).Fig. 17: Mount the plastic jaws (f) for sensitiveworkpieces <strong>and</strong> surtaces.Fig. 18: The drilling machine can be fitted on theright or left in the round holders of the systemiaws (b2). Tighten up fixing screw (b4).Fig. 19: When working on items which have tobe turned on their own axis, lhe stay jaw unii(b3) is used. The bearing m<strong>and</strong>rels are pushedforward with the locking device (on the top sideof the system jaw) <strong>and</strong> retracted again after use.Fig.20: Flound, oval <strong>and</strong> angular workpieces canbe clamped in place with the round <strong>and</strong> pipeclampiaws.Fig. 21: The angles 30 degrees <strong>and</strong> 45 degreescan be fixed additionally with the stay iawunit (b3).F19.22:. Vice with steel jaws (optimum hold)thanks to the bearing surf aces 100 x 70 x 35 mm/4 x 23/e x '13h" .Flg.23: Vice with parallel clamping (large bearingsurfaces), without jaws e <strong>and</strong> l.Fig.24: Round <strong>and</strong> pipe-clamp jaws.Fig. 25: <strong>Clamping</strong> sensitive materials withplastic jaws (f).Fig. 26: Workpiece mounted as a planing benchwith extension unit.Fig.27: Stay jaws in use.Fig. 28: Workpiece as a screw or glue clamp.GuaranteeThe <strong>System</strong> Workshop is manufacturedin accordance with the mostmodern production methods, <strong>and</strong> subiect toconlinuous quality controls. We give a guaranteeof 5 years for material <strong>and</strong> productionfaults. Damage caused by incorrect h<strong>and</strong>ling<strong>and</strong> normal wear <strong>and</strong> tear is excludedfrom the guarantee. Transport costs are nolincluded in the extent of warranty.
a Accessoire pour Multi-Service SWISSREX: Appareil de tournagep2 hl plr-u )"i 11)
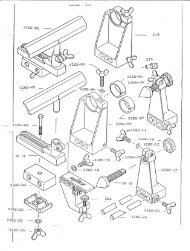
Additionally available: <strong>Lathe</strong> unil lor the<strong>System</strong> Workshop.This lathe unit is notable for its very sturdydesign <strong>and</strong> high-quality finish. Workpieces witha diameter up to 220 mml83/r" (diameter turned110 mm/47e"), <strong>and</strong> up to a maximum length of800 mm/31 1/2" can be turned. This guide showsthe operation <strong>and</strong> function. We recommend inaddition a specialist instruction book withimportant tips lor the correct tools <strong>and</strong> wood.Available as an attachment <strong>and</strong> extension unit:Turning lathe unit (p), consisting of 2 steelcolumns 560 x 18 mml22x 3/a",lool holder (p2),ball-bearing tailstock tip (p3), driving lug (p4),tool surface 200 mml75/a" wide with holder (p5).Assembly instructions: <strong>Lathe</strong> unitFig. A: Mount one system iaw (b) on thecolumns (a) in such a way that the high-speedsetting (b'l) locks on the spindle (a1).Fig. B: Mount the second system jaw on theextension columns (p'l). Always lix the holdingclamp (c) <strong>and</strong> the tool holder (h'l) in the vicinityof the system jaw, either in front of or behindthe iaw, depending on the length of the item tobe turned. Tighten up fixing screw (b4) with thehexagon socket spanner (z).Fig. C: Connect the extension unit to the alreadyassembled basic unit.Fig. D: The tool holder (h1) or holding clamp (c)is at the middle ol the connection.Fig. E: Fit the ball-bearing tailstock tip (c3) intothe adjustable system jaw. Clamp the drivinglug (p4) into the drilling machine.Fig. F: Fit the tool bearing plate p2 <strong>and</strong> p5.Fig. G: Prepare the workpiece: mark centre <strong>and</strong>centre up for tailstock tip (p3).Fig. H: Clamp in workpiece <strong>and</strong> tighten up allfixing screws 1, 2, 3 <strong>and</strong> (b4).Fig. l: Set the tool bearing plate at the workpieceaxis height ! Distance about 10 mmlTa".The lathe is ready for operation!NoteFig. K: The pitches of the turning chisel dependon the hardness of the workpieces. Use wellsharpened turning chisels.Fig. L: The working of forms is shown on thediagram in Fig. M.lmportant: Care should be taken when workingon the lathe that clothing does not get caughtup in the workpiece being turned (roll up yoursleeves, put on protective goggles). The workpiecesshould be rounded roughly (removeedges) before being put onto the lathe. The toolsupport must always be moved as close aspossible to the workpiece so that lhe turningchisel cannot become caught between the bearingsurface <strong>and</strong> the workpiece. Please use apowerful drilling machine as a drive.