Camera selection recommendations - Nuuo.com
Camera selection recommendations - Nuuo.com
Camera selection recommendations - Nuuo.com
- No tags were found...

You also want an ePaper? Increase the reach of your titles
YUMPU automatically turns print PDFs into web optimized ePapers that Google loves.
2012<strong>Camera</strong>sGuide for <strong>selection</strong>, installation and setting of video surveillance cameras<strong>Camera</strong>s : <strong>selection</strong>, installation and setting guide VIT 12012
ContentCAMERA AND LENS REQUIREMENTS ................................................................................................................. 3CAMERA INSTALLATION ..................................................................................................................................... 6CAMERA SETTING ................................................................................................................................................ 8EXPOSURE .................................................................................................................. ERROR! BOOKMARK NOT DEFINED.CAMERA SHARPNESS ............................................................................................................................................... 8VIDEOSIGNAL AMPLIFICATION ............................................................................................................................... 9“GOOD” AND “BAD” NUMBER PLATES .......................................................................................................... 10RECOMENDED EQUIPMENT ............................................................................................................................... 12ANALOG CAMERAS ................................................................................................................................................. 12IP CAMERAS ............................................................................................................................................................ 14IR PROJECTORS ..................................................................................................................................................... 15<strong>Camera</strong>s : <strong>selection</strong>, installation and setting guide 2
<strong>Camera</strong> and Lens RequirementsFor recognition systems number plates should fulfill the following requirements:According to the Vienna Convention number plate should be formed in suchway so it can be recognized under good weather conditions from distance notless than 40 m (130 feet) while placed on the axis of the not moving vehicle.According to the Russian Government Standard 50577-93 number plate shouldbe placed in such way so it can be recognized in the dark from distance notless than 20 m while lighted with vehicle’s standard lighting.For recognition it is necessary to make sure that frames with number platesfulfill the following characteristics:Number plate should be fully placed in the frame;Height of the symbols: not less than 15px, width: not less than 2px;Symbols should be sharp, not smeared, undistorted, not overexposed, evenlylighted;Symbols should be visually differentiated;Technical requirements for the number plates should follow accordinggovernment standards;Minimum allowed contrast with evenly dirty number plate should not be lessthan 10% (contrast differentiation of symbols to the background is 25 on 256point scale);Maximum allowed uneven dirtiness is not more than 12% (ratio of the dirtyarea of the number plate to its whole area);Geometrical proportions of the number plate picture should not differ fromsuch proportions of the number plate itself with more than 10%.Without the effect of interlacing (on speed)*.* for analog cameras<strong>Camera</strong>s : <strong>selection</strong>, installation and setting guide 3
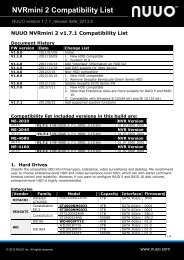
It is necessary to fulfill the requirements for video cameras listed in the Table 1.Таблица 1. Video camera requirements# Characteristic Range of values Comment1 <strong>Camera</strong> type Analog2 Resolution ofvideo surveillancecamera3 Lighting in thecontrol zone4 Automatic gaincontrolIP-camerasFrom 520 TV lineshorizontally.Not less than 50 luxfor TV cameras withsensitivity of CCDmatrix 0.05 lux;Not less than 20 luxfor TV cameras withsensitivity of CCDmatrix 0.0002 lux;0 lux for TV cameraswith IR backlightingLOW or MIDDLEdepending on camera.List of re<strong>com</strong>mended camerascan be found in the“Re<strong>com</strong>mended Equipment”section.It is necessary to use highresolution cameras. Only insuch case percentage ofcorrect recognition that isstated in the systemcharacteristics is guaranteed.In the dark 50 lux areprovided by the standardlighting of the roads forvehicles.This function should be turnedon. Turning on automatic gaincontrol increases not onlyvideo signal, but all noisefrom matrix as well. Thevalue is set individually foreach camera.<strong>Camera</strong>s : <strong>selection</strong>, installation and setting guide 4
5 Auto diaphragmand autoelectronic shutterNot more than1/500с – for speedless than 40km/h;Not more than1/1000 – for fastmovement (morethan 40 km/h).Image should be sharp.Sharpness is reached by fixedshutter speed of lens’selectronic shutter. Setting ofthe shutter to the fixedposition is the most importantparameter. With highexposure, i.e. low shutterspeed (1/100, 1/50 sec)images of moving objectsappear blurred.If the declivity angle of rollof the camera relatively tothe registration numberexceeds 10°, it isre<strong>com</strong>mended to reduce theshutter speed half as muchfor the increasing of picturesharpness.6 <strong>Camera</strong>chromaticityBlack and whiteIt is re<strong>com</strong>mended to useblack and white camerasunless it is necessary to storecolor pictures of the vehicle.This is because color cameraswhile having samecharacteristics have lesssensitivity and picturesappear less sharp.<strong>Camera</strong>s : <strong>selection</strong>, installation and setting guide 5
<strong>Camera</strong> InstallationAllowed range of distortion is provided by conditions of shooting: the angle of vertical inclination of the camera is not more than 40°(declination of the camera to the horizon);horizontal deflection angle is up to 30° (deviation of the optical axis of thecamera from motion vector of the mainstream vehicles);declivity angle of roll of the registration number relatively to the road doesnot exceed 10° (both clockwise and counter clockwise).If the above parameters are exceeded, recognition will be carried out withdecrease of quality.2.The main installation parameters for video cameras are presented in the TableName of the parameterTable 2. <strong>Camera</strong> installation parametersMaximum Re<strong>com</strong>mended (optimal)allowed value valueHeight of the camera’s placement 20 meters 6 meters<strong>Camera</strong>’s vertical incline 30 º 18 º<strong>Camera</strong>’ s horizontal incline 20 º 5-10 ºDeclivity angle of roll of theregistration number relatively to theroad10 º 10 ºStandard placement of cameras above roads is 6 meters above the center ofthe controlled lane. This places center of the control zone 20 meters from mountedvideo camera.<strong>Camera</strong>s : <strong>selection</strong>, installation and setting guide 6
Fig.1 <strong>Camera</strong> placement on the highwayStandard placement for control of entrances and exits to the territory is 3meters above the edge of the lane. This places center of the control zone 11 metersfrom the camera on the center of the lane.Fig.3 Placement of the camera at the territory entrance<strong>Camera</strong>s : <strong>selection</strong>, installation and setting guide 7
<strong>Camera</strong> SettingExposureExposure is the time interval during which the shutter holds the camera lens open.Modern cameras have the exposure range 1/50 -1/500 000 sec. This parameter is adjustedmanually or selected automatically. The lowerthe shutter speed the longer the exposure andthe lighter the pictures. But as the result of theincreasing of each frame shooting time theregistration numbers of the vehicles moving withhigh speed may be found blurred.This is the example of the blurred registration number.It can be observed from the picture that the vehicledrifted in the frame on 6 pixels during the shooting. Asthe result the correct recognition is impossible.<strong>Camera</strong>s which don’t allow assigning the shutter speed rate manually cannot beused in the recognition system.The low shutter speed brings about the smearing effect on the pictures when theregistration number seems clear visible on the video. But using the stop-motion viewit can be observed that the registration number is blurred.To escape the effects shown on the picture it is necessary to disable the automaticshutter speed adjustment and assign it manually in following way:If the vehicle speed is less than 40 km/h - the shutter speed must be no morethan 1/500 sec.If the vehicle speed is more than 40 km/h and reaches 150 km/h than theshutter speed must be no more than 1/1000 sec.** If the declivity angle of roll of the camera relatively to the registration number exceeds 10°,it is re<strong>com</strong>mended to reduce the shutter speed half as much for the increasing of picturesharpness.<strong>Camera</strong> SharpnessTo provide the correct registration number recognition the number must besharp (fine) in a whole frame. The diaphragm settings and the depth of field shouldbe taken into account during the sharpness adjustment. More detailed review of thisparameter can be received from the supplier of lens for your cameras or from thecamera manual. If the sharpness is low, the image will be fine only in the point of<strong>Camera</strong>s : <strong>selection</strong>, installation and setting guide 8
focus and fuzzy on the edges. Over the time of passing the vehicle control zone thecamera will make several (3-5) photos.If on the most of the frames the image is fuzzy, but on the one (in the center ofcontrol zone) the image is fine, the SDK may recognize the number incorrectly basingon the ‘fuzzy’ majority of frames.The sharpness is regulated by the adjustment of the diaphragm. The more thediaphragm is open, the less is the depth of the field and the more light hits an array(the image will be lighter).The lenses with auto diaphragm have two settings - Level and Auto LightControl, ALC. The mean value of the diaphragm is manually assigned using the first ofthe settings; the second one controls the brightness changes sensitivity of thediaphragm automatic control circuit. Usually this adjustment is set at middle positionbecause the excessively fast response of the automatic control circuit may cause itsself-excitation under the minimal brightness changes and as a result the lensdiaphragm will intermittently spontaneously open and close.To adjust the camera it is necessary to direct it so that the maximal lightquantity hit camera lens. CAREFULLY it is forbidden to direct the camera at the sun;this may cause the breakdown of the camera array. Reduce the Level until thediaphragm is not closed and then you will see that the image is black. Then swell theLevel until the image appears. Then close the camera lens for 5 seconds. Make surethat the image occurs when the lens is open. If the image doesn`t appear, repeat theadjustment.Video Signal AmplificationThe adjustment is performed under the bad light conditions. The aim of theadjustment is to choose such gain coefficient under which the useful video signalamplification doesn’t result in its noise pollution.<strong>Camera</strong>s : <strong>selection</strong>, installation and setting guide 9
“Good” and “Bad” Number PlatesBefore starting the recognition, make sure that the camera is set up properlyand frames contain number plates that fulfill the recruitments stated in the “<strong>Camera</strong>and Lens Requirements” section.Weather condition (rain, snow) make up natural distortion of the picture. Thisnegatively affects recognition percentage as well. Increasing of the number’s size inthe frame will help to reduce this negative impact.Be careful with what number templates are supported by your recognitionmodule. Moreover, be attentive to what templates are selected in the configuration(only main types are selected by default).Examples of “bad” and “good” number plates can be found in the Table 3.Table 3. Number plate examples“Bad” number plates“Good” number plateInterlacingUneven number plate exposure(uneven lighting and shading ofparts)Smeared symbolsExcessive distortionOverexposed numbers<strong>Camera</strong>s : <strong>selection</strong>, installation and setting guide 10
Flat contrast(re<strong>com</strong>mended contrast: notless than 20% difference withbackground)Low resolution(required height of symbols: notless than 15px; width: not lessthan 2px)<strong>Camera</strong>s : <strong>selection</strong>, installation and setting guide 11
Re<strong>com</strong>mended EquipmentWe re<strong>com</strong>mend using the following equipment for video surveillance systemswith vehicle recognition function:Analog cameraso Acumen AI-CC91 *o Acumen AI-CC93 *o Balter BM-KA61o Baxal ICE-CM2XUTPo Baxal ICE-B2XHTPo Bosch REG-L1 *o Bosch LTC-0385o Bosch LTC 0485o Bosch LTC 0495o Bosch LTC 0498o Bosch LTC 0620o Infinity CX-TWDN560SD *o Infinity MX-580SD *o Infinity QX-580S *o Infinity SR-TDN530SD *o Komoto AVN-320L6~60o Komoto AVP-320L6~60o Komoto AVN-240L6~60o Komoto AVP-240L6~60o Komoto PVN-80L16o Komoto PVP-80L16o Komoto PVN-80RL12o Komoto PVP-80RL12o Komoto PVN-80RL16o Komoto PVP-80RL16o Komoto PVN-80RL25o Komoto AVN-240ZL22o Komoto AVP-240ZL22<strong>Camera</strong>s : <strong>selection</strong>, installation and setting guide 12
o Komoto AVN-320ZL22o Komoto AVP-320ZL22o Komoto AVN-240ZL10o Komoto AVP-240ZL10o Komoto MVN-80RLo Komoto PVN-80RLo Komoto AVN-80RLo Komoto MVP-80RLo Komoto PVP-80RLo Komoto AVP-80RLo Komoto KMT-7780 CNI-T/CPI-To Komoto KMT-1658 HN-TB/ HP-TBo Komoto KMT-1779No Komoto KMT-1779Po Komoto KMT-1767HNo Komoto KMT-1767HPo Komoto KMT-1796HINo Komoto KMT-1796HIPo Komoto KMT-1797HINo Komoto KMT-1797HIPo Komoto KMT-1799HINo Komoto KMT-1799HIPo Komoto KMT-7785HNo Komoto KMT-7785HPo Komoto NVB-1200To Komoto NVB-1200o Komoto NVB-960To Komoto NVB-960o Komoto NVB-600To Komoto NVB-600o Lilin CMP176Po Samsung SCC-B2335Po SPTT ТКН259<strong>Camera</strong>s : <strong>selection</strong>, installation and setting guide 13
o Watec WAT-902H2 Supremeo Watec WAT-902H3 Supremeo Watec WAT-902H2 Ultimateo Watec WAT-902H3 UltimateIP cameraso Arecont Vision AV1115-DNo Arecont Vision AV1305-DNo Arecont Vision AV1310-DNo Arecont Vision AV1300-DNo Arecont Vision AV2105-DNo Arecont Vision AV2110-DNo Arecont Vision AV2115-DNo Arecont Vision AV3100-DNo Arecont Vision AV3105-DNo Arecont Vision AV3115-DNo Arecont Vision AV1125-IRo Arecont Vision AV1325-IRo Arecont Vision AV2125-IRo Arecont Vision AV3125-IRo Axis 221o Axis Р1343o Axis P1344o Axis P1346o Basler BIP2-640c dno Basler BIP2-1000c dno Mobotix MX-M12D-Sec-DNight-D43N135o Mobotix MX-M12D-Sec-DNight-D22N22o Mobotix MX-M12D-Sec-DNight-D22N43o Mobotix MX-M12D-Sec-DNight-D22N135o Mobotix MX-M12D-Sec-DNight-D43N43o Mobotix MX-M12D-Sec-DNight-D43N22o Mobotix MX-M12D-Sec-DNight-D135N135o Mobotix MX-M12D-Sec-DNight-D135N22<strong>Camera</strong>s : <strong>selection</strong>, installation and setting guide 14
o Mobotix MX-M12D-Sec-DNight-D135N43o Panasonic SP-WV306* can be used only with Parking type systemsIR projectorso Komoto KMT-7797o Komoto KMT-7795o Komoto NV-960o Komoto NV-960Fo Komoto MV-1080o Komoto MV-960o Komoto MV-640o Komoto MV-540o Komoto MV-400o Komoto MV-320o Komoto KMT-7799So Komoto KMT-6081Bo Komoto KMT-6082Bo Komoto KMT-6083Bo Komoto KMT-6081Co Komoto KMT-6082Co Komoto KMT-6083Co Komoto KMT-1200Wo Komoto A913o Komoto NV-320o Komoto NV-600Vo Komoto AV-320o Komoto AV-946To Komoto AS-154o Komoto AS-308o Komoto HV6o Komoto HV12o Komoto HV24<strong>Camera</strong>s : <strong>selection</strong>, installation and setting guide 15