JABIRU AIRCRAFT PTY LTD Engineering Report: AVDALSR087-1 ...
JABIRU AIRCRAFT PTY LTD Engineering Report: AVDALSR087-1 ...
JABIRU AIRCRAFT PTY LTD Engineering Report: AVDALSR087-1 ...
- No tags were found...

Create successful ePaper yourself
Turn your PDF publications into a flip-book with our unique Google optimized e-Paper software.
<strong>JABIRU</strong> <strong>AIRCRAFT</strong> <strong>PTY</strong> <strong>LTD</strong>P.O. Box 5186 Phone: +61 7 4155 1778Bundaberg West Fax: +61 7 4155 2669Queensland, Australia. Email: info@jabiru.net.au<strong>Engineering</strong> <strong>Report</strong>:<strong>AVDALSR087</strong>-1Issue: 1 Date: 21st August 2013Subject:Procedure For Upgrading 12 Pole AlternatorPrepared By: J. WilliamsPreparedApproved By: D. SmithCheckedRodney StiffDouglas SmithBE (Aerospace)Issue1 Original IssueDetails of Change1 Table of Contents1 TABLE OF CONTENTS ........................................................................................................................................ 11.1 LIST OF FIGURES .............................................................................................................................................. 12 BACKGROUND .................................................................................................................................................... 32.1 GENERAL ......................................................................................................................................................... 32.2 APPLICABILITY .................................................................................................................................................. 32.3 VOLTAGE READINGS AND LIMITS ....................................................................................................................... 32.1 BEFORE YOU START ......................................................................................................................................... 32.2 RECORDING ..................................................................................................................................................... 33 PROCEDURE FOR MODIFICATION ................................................................................................................... 41.1 List of FiguresFigure 1 – Rear plate removal ...................................................................................................................................... 4Figure 2 – Stator assembly removal ............................................................................................................................. 5Figure 3 – Terminal exposure ....................................................................................................................................... 6Figure 4 – Circuit identification ..................................................................................................................................... 6Figure 5 – Twisted wire connection .............................................................................................................................. 7Figure 6 – Harness location .......................................................................................................................................... 7Figure 7 – Wiring Schematics ....................................................................................................................................... 8
Procedure For Upgrading 12 Pole Alternator<strong>AVDALSR087</strong>-1 21st August 201Issue 1 Issued By: DS Page: 2 of 8L:\files\Avtech_<strong>Engineering</strong>\<strong>Report</strong>s\<strong>AVDALSR087</strong>-1_12_Pole_Alternator_Mod.docx
Procedure For Upgrading 12 Pole Alternator<strong>AVDALSR087</strong>-1 21st August 2012 Background2.1 GeneralAt manufacture, the 12 pole stator assembly was wound with 2 circuits in parallel. This reduces the effective lengthof the windings, limiting the output at low engine RPM. By re-connecting the wound coils on the stator in series,the effective length of the windings are increased, with a corresponding increase to the output voltage. Theprocedure given below details how the change may be carried out to engines in service.This change will increase alternator voltage at low RPM. This means that at idle or low RPM more power will beavailable to the aircraft, reducing the tendency to drain the battery during low RPM operations. In turn this willbenefit engine starting by tending to increase battery voltage at shut-down.Note that while the output is increased, operators must continue to minimise power use during low RPM operation(such as taxi and descent/landing) and to avoid prolonged periods of low RPM operation with high powerconsumption – for example, while holding clear of the runway leave landing lights OFF to save power.2.2 ApplicabilityThe following procedure is applicable and approved by Jabiru Aircraft Pty Ltd to be carried out to Jabiru Enginesoperating in the following categories:- Special Light Sport Aircraft- Experimental Light Sport Aircraft- Other Experimental categories – including “Experimental – Amateur-Built”.- International equivalents to these Australian categories.- International categories allowing modifications approved by the manufacturer.2.3 Voltage Readings and LimitsTypically the point at which the alternator generated sufficient voltage to charge the battery was around 1800 RPM.After the change this point is typically reached at around 900 RPM.When altered as detailed in this report the specifications of the alternator will vary from those noted in the currentapproved revision of the Jabiru Engine Overhaul Manual (JEM0001-4):Coil resistance:A.C. output:1.4 Ω to 1.9 ΩUp to 40 VAC at 3000 RPMThis will be addressed in future revisions of the Overhaul Manual.2.1 Before You StartThe following procedure involves making modifications to the stator assembly wiring connections. The procedure isrelatively simple, however there is potential to severely damage the electrical circuit and components.In the context of the “Spanner Scale” used in the current engine maintenance and overhaul manuals, this isconsidered a “3-spanner” task: “Straightforward, but requires special tools, training and/or judgement. Sound basicknowledge guidance and a careful approach are required.”Personnel must realistically assess their skills and equipment before carrying out this task. If in doubt, professionalassistance must be sought. Personnel must hold current maintenance approvals appropriate to the aircraft’soperating category.2.2 RecordingOn completion of the work the aircraft or engine’s maintenance logbook must be annotated to indicate completionof the work in accordance with Jabiru Aircraft Procedure <strong>AVDALSR087</strong>.Issue 1 Issued By: DS Page: 3 of 8L:\files\Avtech_<strong>Engineering</strong>\<strong>Report</strong>s\<strong>AVDALSR087</strong>-1_12_Pole_Alternator_Mod.docx
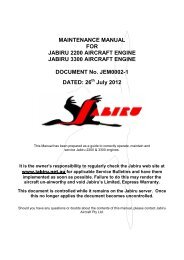
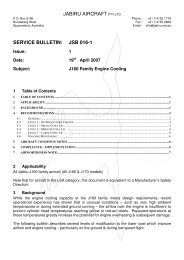
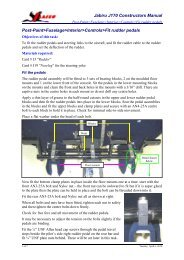
Procedure For Upgrading 12 Pole Alternator<strong>AVDALSR087</strong>-1 21st August 2013 Procedure for modificationThe procedure to increase the alternator voltage is as follows.1. A schematic showing the current and altered wiring is shown in Figure 7.2. Disconnect the battery before you commence any work.3. Disconnect stator wiring terminals and harness wire ties, then remove retaining bolts holding the rear plateand stator assembly from the engine, as shown in Figure 1.Remove 4 bolts holding rear plate, gentlytap off dowels, leaving spacers andignition coils in placeFigure 1 – Rear plate removal4. With the assembly on the bench, use a heat gun to soften the Loctite on the 4 screws holding the statorassembly. Take care not to snap screws or damage threads: apply more heat of the screws are hard toturn. Remove stator. Note harness exit hole on rear plates so you can assemble in the correct orientation,see Figure 2.1 Issued By: DS Page: 4 of 8
Procedure For Upgrading 12 Pole Alternator<strong>AVDALSR087</strong>-1 21st August 201Apply heat gun around 4 screwsNote harness exit hole for reassembly(mark using permanent marker orsimilar)Figure 2 – Stator assembly removal5. Cut string holding the harness to the stator assembly and straighten out the lead assembly. Slide back theblack and while layers of insulation to expose the 2 terminals connecting the coil wires.6. Unsolder coil wires from both terminals, as shown in Figure 3. Due to the size of these parts a largesoldering iron or a small gas burner is recommended to get enough heat into the connection. Take carenot to damage the insulating lacquer on the wires.1 Issued By: DS Page: 5 of 8
Procedure For Upgrading 12 Pole Alternator<strong>AVDALSR087</strong>-1 21st August 201SolderedTerminalsSlide back black and white insulationto expose terminalsFigure 3 – Terminal exposure7. With the coil wires exposed, use a multimeter to identify which wires have continuity and those that don’t, atypical reading for each continuous wire will be 1.3 – 1.4 ohms. Multimeters equipped with continuity testfeatures (beepers) can also be used, provided that the resistance threshold is set appropriately.Figure 4 – Circuit identification1 Issued By: DS Page: 6 of 8
Procedure For Upgrading 12 Pole Alternator<strong>AVDALSR087</strong>-1 21st August 2018. Twist any 2 wires together that do not have continuity, solder and insulate with heat shrink. Fold downbetween the coils. Take care that the connection is appropriately insulated, restrained and positioned: overtime parts rubbing are likely to eventually damage the insulating lacquer on the wires and produce a short.Note that loads and vibrations applied to the alternator assembly from the magnets of the rotor are ofrelatively high magnitude and parts must be treated appropriately.Figure 5 – Twisted wire connection9. Insert the other 2 wires, one into each lead terminal and re-solder. Slide the white and black insulationback down over the soldered terminals and fold down between the coils over the previously joined pair ofwires, as shown in Fig 6Soldered and heat-shrunkconnected wire pair (red)Insulated wirepair to regulatorFigure 6 – Harness location10. With some light string, tie down the harness to the adjacent coil windings as on the original assembly.11. Check the resistance between the 2 terminals. Acceptable readings are 1.4 – 1.9 ohms.12. Clean screws using a wire brush to remove Loctite residue. Clean threads in rear plate using a suitablysized thread tap to remove Loctite residue.13. Refit stator assembly to rear plate of the engine in the same orientation as it was before removal. UseLoctite 620 sparingly (approx. 0.5 - 1 match-head per screw) on 4 securing screws as per the enginemanual.1 Issued By: DS Page: 7 of 8
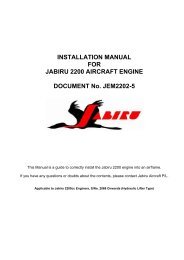
Procedure ForUpgrading 12 Pole Alternator<strong>AVDALSR087</strong>-121st August 20114. Assemble rear plate and stator to the engine. Replace wire ties and connect both harness terminals to theaircraft harness. Check that the terminals are a tight fit and secure when connected. If in doubt, fit newterminals: this connection is a common cause of charging issues and radio noise resulting from loose orpoorly conductive connections. Insulateconnection using heat shrink or good quality insulation tape.15. Ensure ignitions are both in the OFF position and rotate the propeller by hand while monitoring thealternator assembly for any noise, rubbing or similar.16. Reconnect battery.17. Refer to manufacturer specifications and allow Loctite to cure before starting engine. Note that this may beaccelerated using Loctite 7471 Cure Accelerator Spray or equivalent.18. To check for correct operation, insert multimeter probes into the spade terminals of the stator harness whileit is connected to the regulator. Place the multimeter inside the cockpit with the operator before starting theengine. Do not attempt to carry out this operation from outside the cockpit, or with any persons in the nearvicinity of the spinning propeller.19. An indication of 12 V AC at around 900 RPM indicates correct operation.20. Remove the multi-meter and re-assemble the aircraft.21. Refer to item 2.2 and complete the required log book entries.Figure 7 – Wiring Schematics1Issued By: DSPage: 8 of 8