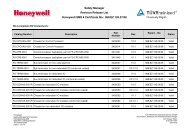
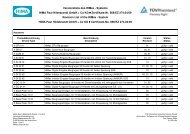
1756-RM095C-EN-P, GuardLogix Safety Application Instruction Set ...
1756-RM095C-EN-P, GuardLogix Safety Application Instruction Set ...
1756-RM095C-EN-P, GuardLogix Safety Application Instruction Set ...

You also want an ePaper? Increase the reach of your titles
YUMPU automatically turns print PDFs into web optimized ePapers that Google loves.
<strong>GuardLogix</strong> <strong>Safety</strong> <strong>Application</strong><br />
<strong>Instruction</strong> <strong>Set</strong><br />
<strong>Safety</strong> Reference Manual<br />
(Catalog Numbers <strong>1756</strong>-L61S, <strong>1756</strong>-L62S,<br />
<strong>1756</strong>-L63S, <strong>1756</strong>-LSP)
Important User Information<br />
Solid state equipment has operational characteristics differing from those of electromechanical equipment. <strong>Safety</strong><br />
Guidelines for the <strong>Application</strong>, Installation and Maintenance of Solid State Controls (publication SGI-1.1 available<br />
from your local Rockwell Automation sales office or online at http://literature.rockwellautomation.com) describes<br />
some important differences between solid state equipment and hard-wired electromechanical devices. Because of<br />
this difference, and also because of the wide variety of uses for solid state equipment, all persons responsible for<br />
applying this equipment must satisfy themselves that each intended application of this equipment is acceptable.<br />
In no event will Rockwell Automation, Inc. be responsible or liable for indirect or consequential damages resulting<br />
from the use or application of this equipment.<br />
The examples and diagrams in this manual are included solely for illustrative purposes. Because of the many<br />
variables and requirements associated with any particular installation, Rockwell Automation, Inc. cannot assume<br />
responsibility or liability for actual use based on the examples and diagrams.<br />
No patent liability is assumed by Rockwell Automation, Inc. with respect to use of information, circuits, equipment,<br />
or software described in this manual.<br />
Reproduction of the contents of this manual, in whole or in part, without written permission of Rockwell<br />
Automation, Inc., is prohibited.<br />
Throughout this manual, when necessary, we use notes to make you aware of safety considerations.<br />
WARNING<br />
IMPORTANT<br />
ATT<strong>EN</strong>TION<br />
SHOCK HAZARD<br />
BURN HAZARD<br />
Identifies information about practices or circumstances that can cause an explosion in a<br />
hazardous environment, which may lead to personal injury or death, property damage, or<br />
economic loss.<br />
Identifies information that is critical for successful application and understanding of the product.<br />
Identifies information about practices or circumstances that can lead to personal injury or death,<br />
property damage, or economic loss. Attentions help you identify a hazard, avoid a hazard, and<br />
recognize the consequence<br />
Labels may be on or inside the equipment, for example, a drive or motor, to alert people that<br />
dangerous voltage may be present.<br />
Labels may be on or inside the equipment, for example, a drive or motor, to alert people that<br />
surfaces may reach dangerous temperatures.<br />
Allen-Bradley, Rockwell Automation, TechConnect, <strong>GuardLogix</strong>, RSLogix 5000, CompactBlock Guard I/O, ControlLogix, Logix5000, and Logix are trademarks a of Rockwell Automation Inc.<br />
Trademarks not belonging to Rockwell Automation are property of their respective companies.
Summary of Changes<br />
The information below summarizes the changes to this manual since<br />
the last publication.<br />
To help you find new and updated information in this release of the<br />
manual, we included change bars as shown to the right of this<br />
paragraph.<br />
Topic Section<br />
New General <strong>Safety</strong> <strong>Application</strong> <strong>Instruction</strong>s for RSLogix 5000<br />
software, version 17 and later<br />
Chapter 1<br />
New Metal Form <strong>Instruction</strong>s for RSLogix 5000 software, version 17<br />
and later<br />
Chapter 2<br />
Minor updates as indicated by change bars Appendix A<br />
Execution times for <strong>Safety</strong> <strong>Application</strong> <strong>Instruction</strong>s Appendix B<br />
3Publication <strong>1756</strong>-<strong>RM095C</strong>-<strong>EN</strong>-P - July 2008 3
Summary of Changes<br />
4 Publication <strong>1756</strong>-<strong>RM095C</strong>-<strong>EN</strong>-P - July 2008
General <strong>Safety</strong> <strong>Application</strong><br />
<strong>Instruction</strong>s<br />
Table of Contents<br />
Preface<br />
Introduction . . . . . . . . . . . . . . . . . . . . . . . . . . . . . . . . . . . . 13<br />
About This Publication . . . . . . . . . . . . . . . . . . . . . . . . . . . . 13<br />
Who Should Use This Publication . . . . . . . . . . . . . . . . . . . . 13<br />
Understand <strong>GuardLogix</strong> Controller Operation. . . . . . . . . . . . 13<br />
Understand Terminology . . . . . . . . . . . . . . . . . . . . . . . . . . . 13<br />
Additional Resources. . . . . . . . . . . . . . . . . . . . . . . . . . . . . . 15<br />
Chapter 1<br />
Introduction . . . . . . . . . . . . . . . . . . . . . . . . . . . . . . . . . . . . 17<br />
Dual-channel Input Start (DCSRT) . . . . . . . . . . . . . . . . . . . . 18<br />
DCSRT – <strong>Instruction</strong> Parameters . . . . . . . . . . . . . . . . . . . 18<br />
DCSRT – Normal Operation . . . . . . . . . . . . . . . . . . . . . . 21<br />
DCSRT – Input Status Fault Operation. . . . . . . . . . . . . . . 22<br />
DCSRT – Discrepancy Fault Operation . . . . . . . . . . . . . . 23<br />
DCSRT– False Rung State Behavior . . . . . . . . . . . . . . . . . 23<br />
DCSRT – Fault Codes . . . . . . . . . . . . . . . . . . . . . . . . . . . 24<br />
DCSRT – Diagnostic Codes. . . . . . . . . . . . . . . . . . . . . . . 24<br />
DCSRT – Wiring and Programming Example . . . . . . . . . . 25<br />
Dual-channel Input Monitor (DCM) . . . . . . . . . . . . . . . . . . . 28<br />
DCM – <strong>Instruction</strong> Parameters . . . . . . . . . . . . . . . . . . . . 28<br />
DCM – Normal Operation . . . . . . . . . . . . . . . . . . . . . . . 31<br />
DCM – Input Status Fault Operation . . . . . . . . . . . . . . . . 32<br />
DCM – Discrepancy Fault Operation. . . . . . . . . . . . . . . . 33<br />
DCM – False Rung State Behavior. . . . . . . . . . . . . . . . . . 33<br />
DCM – Fault Codes . . . . . . . . . . . . . . . . . . . . . . . . . . . . 34<br />
DCM – Diagnostic Codes . . . . . . . . . . . . . . . . . . . . . . . . 34<br />
DCM – Wiring and Programming Example . . . . . . . . . . . 35<br />
Dual-channel Input Stop (DCS) . . . . . . . . . . . . . . . . . . . . . . 38<br />
DCS – <strong>Instruction</strong> Parameters . . . . . . . . . . . . . . . . . . . . . 38<br />
DCS – Normal Operation (Manual Restart, Manual<br />
Cold Start) . . . . . . . . . . . . . . . . . . . . . . . . . . . . . . . . . . . 41<br />
DCS – Normal Operation (Manual Restart, Automatic<br />
Cold Start) . . . . . . . . . . . . . . . . . . . . . . . . . . . . . . . . . . . 43<br />
DCS – Normal Operation (Automatic Restart, Manual<br />
Cold Start) . . . . . . . . . . . . . . . . . . . . . . . . . . . . . . . . . . . 44<br />
DCS – Normal Operation (Automatic Restart, Automatic<br />
Cold Start) . . . . . . . . . . . . . . . . . . . . . . . . . . . . . . . . . . . 45<br />
DCS – Input Status Fault (Manual Cold Start). . . . . . . . . . 46<br />
DCS – Input Status Fault (Automatic Cold Start). . . . . . . . 47<br />
DCS – Cycle Inputs Fault . . . . . . . . . . . . . . . . . . . . . . . . 48<br />
DCS – Discrepancy Fault . . . . . . . . . . . . . . . . . . . . . . . . 49<br />
DCS – False Rung State Behavior . . . . . . . . . . . . . . . . . . 49<br />
DCS – Fault Codes . . . . . . . . . . . . . . . . . . . . . . . . . . . . . 50<br />
DCS – Diagnostic Codes. . . . . . . . . . . . . . . . . . . . . . . . . 50<br />
DCS – Wiring and Programming Example . . . . . . . . . . . . 51<br />
5Publication <strong>1756</strong>-<strong>RM095C</strong>-<strong>EN</strong>-P - July 2008 5
Table of Contents<br />
Dual-channel Input Stop with Test (DCST). . . . . . . . . . . . . . 54<br />
DCST – <strong>Instruction</strong> Parameters . . . . . . . . . . . . . . . . . . . . 54<br />
DCST – Functional Test Operation (Manual Restart) . . . . 58<br />
DCST – Functional Test Operation (Automatic Restart) . . 59<br />
DCST – False Rung State Behavior . . . . . . . . . . . . . . . . . 59<br />
DCST – Fault Codes . . . . . . . . . . . . . . . . . . . . . . . . . . . . 60<br />
DCST – Diagnostic Codes. . . . . . . . . . . . . . . . . . . . . . . . 60<br />
DCST – Wiring and Programming Example . . . . . . . . . . . 61<br />
Dual-channel Input Stop with Test and Lock (DCSTL) . . . . . 65<br />
DCSTL – <strong>Instruction</strong> Parameters . . . . . . . . . . . . . . . . . . . 66<br />
DCSTL – Start-up Operation (Manual Cold Start) . . . . . . . 69<br />
DCSTL – Start-up Operation (Automatic Cold Start) . . . . . 70<br />
DCSTL – Device Not Tested After Unlock Fault . . . . . . . . 71<br />
DCSTL – Functional Test after Fault Operation . . . . . . . . 72<br />
DCSTL – False Rung State Behavior . . . . . . . . . . . . . . . . 73<br />
DCSTL – Fault Codes . . . . . . . . . . . . . . . . . . . . . . . . . . . 73<br />
DCSTL – Diagnostic Codes . . . . . . . . . . . . . . . . . . . . . . . 74<br />
DCSTL – Wiring and Programming Example . . . . . . . . . . 75<br />
Dual-channel Input Stop with Test and Mute (DCSTM) . . . . . 80<br />
DCSTM – <strong>Instruction</strong> Description . . . . . . . . . . . . . . . . . . 81<br />
DCSTM – Normal Operation. . . . . . . . . . . . . . . . . . . . . . 85<br />
DCSTM – Muting Lamp Status Fault Operation . . . . . . . . 86<br />
DCSTM – False Rung State Behavior . . . . . . . . . . . . . . . . 87<br />
DCSTM – Fault Codes . . . . . . . . . . . . . . . . . . . . . . . . . . 87<br />
DCSTM – Diagnostic Codes . . . . . . . . . . . . . . . . . . . . . . 88<br />
DCSTM – Wiring and Programming Example . . . . . . . . . 88<br />
<strong>Safety</strong> Mat (SMAT). . . . . . . . . . . . . . . . . . . . . . . . . . . . . . . . 94<br />
SMAT – <strong>Instruction</strong> Parameters . . . . . . . . . . . . . . . . . . . . 94<br />
SMAT – Circuit Verification Test . . . . . . . . . . . . . . . . . . . 96<br />
SMAT – Manual Restart Operation . . . . . . . . . . . . . . . . . 97<br />
SMAT – Automatic Restart Operation . . . . . . . . . . . . . . . 98<br />
<strong>Safety</strong> Mat Occupied Operation . . . . . . . . . . . . . . . . . . . 99<br />
<strong>Safety</strong> Mat Unoccupied Operation . . . . . . . . . . . . . . . . 100<br />
SMAT – Fault Detection Operation . . . . . . . . . . . . . . . . 101<br />
SMAT – False Rung State Behavior . . . . . . . . . . . . . . . . 101<br />
SMAT – Fault Codes. . . . . . . . . . . . . . . . . . . . . . . . . . . 102<br />
SMAT – Diagnostic Codes . . . . . . . . . . . . . . . . . . . . . . 102<br />
SMAT – Wiring and Programming Example. . . . . . . . . . 103<br />
Two-hand Run Station – Enhanced (THRSe). . . . . . . . . . . . 106<br />
THRSe – <strong>Instruction</strong> Parameters . . . . . . . . . . . . . . . . . . 107<br />
Disconnecting the Two-hand Run Station . . . . . . . . . . . 109<br />
Connecting the Two-hand Run Station . . . . . . . . . . . . . 109<br />
THRSe – Normal Operation . . . . . . . . . . . . . . . . . . . . . 109<br />
THRSe – Button Held Down Diagnostic Operation . . . . 111<br />
THRSe – Button Glitch Diagnostic Operation . . . . . . . . 112<br />
6 Publication <strong>1756</strong>-<strong>RM095C</strong>-<strong>EN</strong>-P - July 2008
Table of Contents<br />
THRSe – Button Discrepancy Fault (Channel-to-channel)<br />
Operation . . . . . . . . . . . . . . . . . . . . . . . . . . . . . . . . . . 113<br />
THRSe – Run Station Disconnected (Station Bypassed)<br />
Operation . . . . . . . . . . . . . . . . . . . . . . . . . . . . . . . . . . 115<br />
THRSe – False Rung State Behavior . . . . . . . . . . . . . . . 116<br />
THRSe – Fault Codes . . . . . . . . . . . . . . . . . . . . . . . . . . 117<br />
THRSe – Diagnostic Codes . . . . . . . . . . . . . . . . . . . . . . 118<br />
THRSe – Wiring and Programming Example . . . . . . . . . 119<br />
Configurable Redundant Output (CROUT) . . . . . . . . . . . . . 123<br />
CROUT – <strong>Instruction</strong> Parameters. . . . . . . . . . . . . . . . . . 123<br />
CROUT – Normal Operation. . . . . . . . . . . . . . . . . . . . . 125<br />
CROUT – Feedback Fault . . . . . . . . . . . . . . . . . . . . . . . 126<br />
CROUT – False Rung State Behavior . . . . . . . . . . . . . . . 126<br />
CROUT – Fault Code . . . . . . . . . . . . . . . . . . . . . . . . . . 127<br />
CROUT – Diagnostic Codes . . . . . . . . . . . . . . . . . . . . . 128<br />
CROUT – Wiring and Programming Example . . . . . . . . 128<br />
Two-sensor Asymmetrical Muting (TSAM) . . . . . . . . . . . . . 133<br />
TSAM – <strong>Instruction</strong> Parameters . . . . . . . . . . . . . . . . . . . 134<br />
TSAM – Normal Operation . . . . . . . . . . . . . . . . . . . . . . 138<br />
TSAM – Invalid Sequence. . . . . . . . . . . . . . . . . . . . . . . 140<br />
TSAM – Tolerated Sequence. . . . . . . . . . . . . . . . . . . . . 141<br />
TSAM – Dangerous Portion of Cycle . . . . . . . . . . . . . . . 142<br />
TSAM – Override Operation . . . . . . . . . . . . . . . . . . . . . 143<br />
TSAM – False Rung State Behavior . . . . . . . . . . . . . . . . 144<br />
TSAM – Fault Codes. . . . . . . . . . . . . . . . . . . . . . . . . . . 144<br />
TSAM – Diagnostic Codes . . . . . . . . . . . . . . . . . . . . . . 147<br />
TSAM – Wiring and Programming Example. . . . . . . . . . 148<br />
Two-sensor Symmetrical Muting (TSSM). . . . . . . . . . . . . . . 153<br />
TSSM – <strong>Instruction</strong> Parameters . . . . . . . . . . . . . . . . . . . 154<br />
TSSM – Normal Operation . . . . . . . . . . . . . . . . . . . . . . 158<br />
TSSM – Invalid Sequence . . . . . . . . . . . . . . . . . . . . . . . 160<br />
TSSM – Tolerated Sequence . . . . . . . . . . . . . . . . . . . . . 161<br />
TSSM – Dangerous Portion of Cycle . . . . . . . . . . . . . . . 162<br />
TSSM – Override Operation . . . . . . . . . . . . . . . . . . . . . 163<br />
TSSM – False Rung State Behavior . . . . . . . . . . . . . . . . 164<br />
TSSM – Fault Codes . . . . . . . . . . . . . . . . . . . . . . . . . . . 164<br />
TSSM – Diagnostic Codes . . . . . . . . . . . . . . . . . . . . . . . 167<br />
TSSM – Wiring and Programming Example . . . . . . . . . . 167<br />
Four-sensor Bidirectional Muting (FSBM) . . . . . . . . . . . . . . 172<br />
FSBM – <strong>Instruction</strong> Parameters . . . . . . . . . . . . . . . . . . . 173<br />
FSBM – Normal Operation . . . . . . . . . . . . . . . . . . . . . . 177<br />
FSBM – Invalid Sequence . . . . . . . . . . . . . . . . . . . . . . . 180<br />
FSBM – Tolerated Sequence . . . . . . . . . . . . . . . . . . . . . 181<br />
FSBM – Dangerous Portion of Cycle . . . . . . . . . . . . . . . 182<br />
FSBM – Override Operation . . . . . . . . . . . . . . . . . . . . . 183<br />
FSBM – False Rung State Behavior . . . . . . . . . . . . . . . . 184<br />
Publication <strong>1756</strong>-<strong>RM095C</strong>-<strong>EN</strong>-P - July 2008 7
Table of Contents<br />
FSBM – Fault Codes . . . . . . . . . . . . . . . . . . . . . . . . . . . 185<br />
FSBM – Diagnostic Codes. . . . . . . . . . . . . . . . . . . . . . . 197<br />
FSBM – Wiring and Programming Example . . . . . . . . . . 197<br />
Chapter 2<br />
Metal Form <strong>Instruction</strong>s Introduction . . . . . . . . . . . . . . . . . . . . . . . . . . . . . . . . . . . 203<br />
Clutch Brake Inch Mode (CBIM) . . . . . . . . . . . . . . . . . . . . 204<br />
CBIM – <strong>Instruction</strong> Parameters . . . . . . . . . . . . . . . . . . . 206<br />
CBIM – Energizing Output 1. . . . . . . . . . . . . . . . . . . . . 208<br />
CBIM – De-energizing Output 1 . . . . . . . . . . . . . . . . . . 210<br />
CBIM – False Rung State Behavior . . . . . . . . . . . . . . . . 211<br />
CBIM – Diagnostic Codes. . . . . . . . . . . . . . . . . . . . . . . 212<br />
Clutch Brake Single Stroke Mode (CBSSM). . . . . . . . . . . . . 214<br />
CBSSM – <strong>Instruction</strong> Parameters . . . . . . . . . . . . . . . . . . 215<br />
CBSSM – Energizing Output 1 . . . . . . . . . . . . . . . . . . . 218<br />
CBSSM – De-energizing Output 1 . . . . . . . . . . . . . . . . . 220<br />
CBSSM – False Rung State Behavior . . . . . . . . . . . . . . . 221<br />
CBSSM – Diagnostic Codes. . . . . . . . . . . . . . . . . . . . . . 222<br />
Clutch Brake Continuous Mode (CBCM) . . . . . . . . . . . . . . 225<br />
CBCM – <strong>Instruction</strong> Parameters. . . . . . . . . . . . . . . . . . . 226<br />
CBCM – Energizing Output 1 . . . . . . . . . . . . . . . . . . . . 230<br />
CBCM – Immediate Mode. . . . . . . . . . . . . . . . . . . . . . . 231<br />
CBCM – Immediate with Arming Mode . . . . . . . . . . . . . 232<br />
CBCM – Half Stroke with Arming Mode . . . . . . . . . . . . 233<br />
CBCM – Stroke-and-a-half with Arming Mode . . . . . . . . 234<br />
CBCM – De-energizing Output 1 . . . . . . . . . . . . . . . . . 235<br />
CBCM – <strong>Safety</strong> Enable and Takeover Mode. . . . . . . . . . 236<br />
CBCM – False Rung State Behavior . . . . . . . . . . . . . . . . 237<br />
CBCM – Diagnostic Codes . . . . . . . . . . . . . . . . . . . . . . 237<br />
Crankshaft Position Monitor (CPM) . . . . . . . . . . . . . . . . . . 241<br />
CPM – <strong>Instruction</strong> Parameters. . . . . . . . . . . . . . . . . . . . 242<br />
CPM – Cam Profiles . . . . . . . . . . . . . . . . . . . . . . . . . . . 246<br />
CPM – Normal Operation with Cam Profile A . . . . . . . . 248<br />
CPM – Normal Operation with Cam Profile B . . . . . . . . 249<br />
CPM – False Rung State Behavior . . . . . . . . . . . . . . . . . 250<br />
CPM – Fault Codes. . . . . . . . . . . . . . . . . . . . . . . . . . . . 250<br />
CPM – Diagnostic Codes . . . . . . . . . . . . . . . . . . . . . . . 251<br />
Camshaft Monitor (CSM) . . . . . . . . . . . . . . . . . . . . . . . . . . 252<br />
CSM – <strong>Instruction</strong> Parameters . . . . . . . . . . . . . . . . . . . . 252<br />
CSM – Input Pulse Conversion . . . . . . . . . . . . . . . . . . . 255<br />
CSM – Normal Operation . . . . . . . . . . . . . . . . . . . . . . . 256<br />
CSM – Uncommanded Motion Fault . . . . . . . . . . . . . . . 257<br />
CSM – Start Time Exceeded Fault . . . . . . . . . . . . . . . . . 258<br />
CSM – Stop Time Exceeded Fault . . . . . . . . . . . . . . . . . 259<br />
CSM – Loss of Motion Fault (Case 1). . . . . . . . . . . . . . . 260<br />
CSM – Loss of Motion Fault (Case 2). . . . . . . . . . . . . . . 261<br />
8 Publication <strong>1756</strong>-<strong>RM095C</strong>-<strong>EN</strong>-P - July 2008
Table of Contents<br />
CSM – Input Status Fault . . . . . . . . . . . . . . . . . . . . . . . 262<br />
CSM – False Rung State Behavior . . . . . . . . . . . . . . . . . 262<br />
CSM – Fault Codes. . . . . . . . . . . . . . . . . . . . . . . . . . . . 263<br />
CSM – Diagnostic Codes. . . . . . . . . . . . . . . . . . . . . . . . 264<br />
Clutch Brake Wiring and Programming Example . . . . . . . . 265<br />
Eight-position Mode Selector (EPMS) . . . . . . . . . . . . . . . . . 273<br />
EPMS – <strong>Instruction</strong> Parameters . . . . . . . . . . . . . . . . . . . 274<br />
EPMS – Lock Input OFF (0) . . . . . . . . . . . . . . . . . . . . . 276<br />
EPMS – Lock Input ON (1) . . . . . . . . . . . . . . . . . . . . . . 277<br />
EPMS – False Rung State Behavior . . . . . . . . . . . . . . . . 277<br />
EPMS – Fault Codes . . . . . . . . . . . . . . . . . . . . . . . . . . . 278<br />
EPMS – Diagnostic Codes. . . . . . . . . . . . . . . . . . . . . . . 278<br />
EPMS – Wiring and Programming Example . . . . . . . . . . 279<br />
Auxiliary Valve Control (AVC) . . . . . . . . . . . . . . . . . . . . . . 283<br />
AVC – <strong>Instruction</strong> Parameters . . . . . . . . . . . . . . . . . . . . 284<br />
Normal Auxiliary Valve Reaction (Delay Type = On) . . . 286<br />
Normal Auxiliary Valve Reaction (Delay Type = Off) . . . 287<br />
Immediate Auxiliary Valve Reaction (Delay Type = On) 288<br />
Immediate Auxiliary Valve Reaction (Delay Type = Off) 288<br />
Auxiliary Valve Feedback Fault. . . . . . . . . . . . . . . . . . . 289<br />
AVC – False Rung State Behavior . . . . . . . . . . . . . . . . . 289<br />
AVC – Fault Codes. . . . . . . . . . . . . . . . . . . . . . . . . . . . 290<br />
AVC – Diagnostic Codes. . . . . . . . . . . . . . . . . . . . . . . . 290<br />
AVC – Wiring and Programming Example. . . . . . . . . . . 291<br />
Main Valve Control (MVC). . . . . . . . . . . . . . . . . . . . . . . . . 296<br />
MVC – <strong>Instruction</strong> Parameters. . . . . . . . . . . . . . . . . . . . 296<br />
MVC – Normal Operation. . . . . . . . . . . . . . . . . . . . . . . 299<br />
MVC – Feedback Fault . . . . . . . . . . . . . . . . . . . . . . . . . 300<br />
MVC – False Rung State Behavior . . . . . . . . . . . . . . . . . 300<br />
MVC – Fault Codes . . . . . . . . . . . . . . . . . . . . . . . . . . . 301<br />
MVC – Diagnostic Codes . . . . . . . . . . . . . . . . . . . . . . . 302<br />
MVC – Wiring and Programming Example . . . . . . . . . . 303<br />
Maintenance Manual Valve Control (MMVC) . . . . . . . . . . . 307<br />
MMVC – <strong>Instruction</strong> Parameters . . . . . . . . . . . . . . . . . . 308<br />
MMVC – Normal Operation . . . . . . . . . . . . . . . . . . . . . 310<br />
MMVC – Actuate in Non-permissive State . . . . . . . . . . . 311<br />
MMVC – Fault After Output 1 Energized . . . . . . . . . . . . 312<br />
MMVC – False Rung State Behavior . . . . . . . . . . . . . . . 312<br />
MMVC – Fault Codes . . . . . . . . . . . . . . . . . . . . . . . . . . 313<br />
MMVC – Diagnostic Codes . . . . . . . . . . . . . . . . . . . . . . 313<br />
MMVC – Wiring and Programming Example . . . . . . . . . 314<br />
Publication <strong>1756</strong>-<strong>RM095C</strong>-<strong>EN</strong>-P - July 2008 9
Table of Contents<br />
RSLogix 5000 Software, Version 14<br />
and Later, <strong>Safety</strong> <strong>Application</strong><br />
<strong>Instruction</strong>s<br />
Appendix A<br />
Introduction . . . . . . . . . . . . . . . . . . . . . . . . . . . . . . . . . . . 319<br />
General Information . . . . . . . . . . . . . . . . . . . . . . . . . . . . . 319<br />
De-energize to Trip System . . . . . . . . . . . . . . . . . . . . . 319<br />
System Dependencies . . . . . . . . . . . . . . . . . . . . . . . . . 320<br />
False Rung State Behavior . . . . . . . . . . . . . . . . . . . . . . 323<br />
I/O Point Mapping. . . . . . . . . . . . . . . . . . . . . . . . . . . . 324<br />
Diverse Input (DIN) <strong>Instruction</strong> . . . . . . . . . . . . . . . . . . . . . 326<br />
<strong>Instruction</strong> Parameters . . . . . . . . . . . . . . . . . . . . . . . . . 326<br />
Normal Operation . . . . . . . . . . . . . . . . . . . . . . . . . . . . 328<br />
Operation with Inconsistent Inputs . . . . . . . . . . . . . . . . 329<br />
Operation with Circuit Reset Held On<br />
- Manual Reset Only. . . . . . . . . . . . . . . . . . . . . . . . . . . 330<br />
Cycle Inputs Operation . . . . . . . . . . . . . . . . . . . . . . . . 330<br />
Diverse Input with Manual Reset Wiring Example . . . . . 331<br />
Diverse Input with Manual Reset Programming<br />
Example . . . . . . . . . . . . . . . . . . . . . . . . . . . . . . . . . . . 331<br />
Diverse Input with Automatic Reset Wiring Example . . . 333<br />
Diverse Input with Automatic Reset Programming<br />
Example . . . . . . . . . . . . . . . . . . . . . . . . . . . . . . . . . . . 334<br />
Redundant Input (RIN) <strong>Instruction</strong>. . . . . . . . . . . . . . . . . . . 335<br />
<strong>Instruction</strong> Parameters . . . . . . . . . . . . . . . . . . . . . . . . . 335<br />
Normal Operation . . . . . . . . . . . . . . . . . . . . . . . . . . . . 337<br />
Operation with Inconsistent Inputs . . . . . . . . . . . . . . . . 338<br />
Operation with Circuit Reset Held On<br />
- Manual Reset Only. . . . . . . . . . . . . . . . . . . . . . . . . . . 339<br />
Cycle Inputs Operation . . . . . . . . . . . . . . . . . . . . . . . . 339<br />
Redundant Input with Manual Reset Wiring Example . . 340<br />
Redundant Input with Manual Reset Programming<br />
Example . . . . . . . . . . . . . . . . . . . . . . . . . . . . . . . . . . . 340<br />
Redundant Input with Automatic Reset Wiring<br />
Example . . . . . . . . . . . . . . . . . . . . . . . . . . . . . . . . . . . 342<br />
Redundant Input with Automatic Reset Programming<br />
Example . . . . . . . . . . . . . . . . . . . . . . . . . . . . . . . . . . . 343<br />
Emergency Stop (ESTOP) <strong>Instruction</strong> . . . . . . . . . . . . . . . . . 344<br />
<strong>Instruction</strong> Parameters . . . . . . . . . . . . . . . . . . . . . . . . . 344<br />
Normal Operation . . . . . . . . . . . . . . . . . . . . . . . . . . . . 346<br />
Operation with Inconsistent Inputs . . . . . . . . . . . . . . . . 347<br />
Operation with Circuit Reset Held On<br />
- Manual Reset Only. . . . . . . . . . . . . . . . . . . . . . . . . . . 348<br />
Cycle Inputs Operation . . . . . . . . . . . . . . . . . . . . . . . . 348<br />
Emergency Stop with Manual Reset Wiring Example . . . 349<br />
Emergency Stop with Manual Reset Programming<br />
Example . . . . . . . . . . . . . . . . . . . . . . . . . . . . . . . . . . . 349<br />
Emergency Stop with Automatic Reset Wiring<br />
Example . . . . . . . . . . . . . . . . . . . . . . . . . . . . . . . . . . . 351<br />
10 Publication <strong>1756</strong>-<strong>RM095C</strong>-<strong>EN</strong>-P - July 2008
Table of Contents<br />
Emergency Stop with Automatic Reset Programming<br />
Example . . . . . . . . . . . . . . . . . . . . . . . . . . . . . . . . . . . 352<br />
Enable Pendant (<strong>EN</strong>P<strong>EN</strong>) <strong>Instruction</strong> . . . . . . . . . . . . . . . . . 353<br />
<strong>Instruction</strong> Parameters . . . . . . . . . . . . . . . . . . . . . . . . . 353<br />
Normal Operation . . . . . . . . . . . . . . . . . . . . . . . . . . . . 355<br />
Operation with Inconsistent Inputs . . . . . . . . . . . . . . . . 356<br />
Operation with Circuit Reset Held On<br />
- Manual Reset Only. . . . . . . . . . . . . . . . . . . . . . . . . . . 357<br />
Cycle Inputs Operation . . . . . . . . . . . . . . . . . . . . . . . . 357<br />
Enable Pendant with Manual Reset Wiring Example . . . 358<br />
Enable Pendant with Manual Reset Programming<br />
Example . . . . . . . . . . . . . . . . . . . . . . . . . . . . . . . . . . . 358<br />
Enable Pendant with Automatic Reset Wiring Example . 360<br />
Enable Pendant with Automatic Reset Programming<br />
Example . . . . . . . . . . . . . . . . . . . . . . . . . . . . . . . . . . . 361<br />
Light Curtain (LC) <strong>Instruction</strong>. . . . . . . . . . . . . . . . . . . . . . . 362<br />
<strong>Instruction</strong> Parameters . . . . . . . . . . . . . . . . . . . . . . . . . 363<br />
Normal Operation . . . . . . . . . . . . . . . . . . . . . . . . . . . . 365<br />
Light Curtain Muting Operation . . . . . . . . . . . . . . . . . . 365<br />
Inputs Inconsistent Operation. . . . . . . . . . . . . . . . . . . . 367<br />
Circuit Reset Held On Operation - Manual Reset<br />
Mode Only . . . . . . . . . . . . . . . . . . . . . . . . . . . . . . . . . 368<br />
Cycle Inputs Operation . . . . . . . . . . . . . . . . . . . . . . . . 368<br />
Input Filter Time . . . . . . . . . . . . . . . . . . . . . . . . . . . . . 369<br />
Light Curtain with Manual Reset Wiring Example . . . . . 369<br />
Light Curtain with Manual Reset Programming<br />
Example . . . . . . . . . . . . . . . . . . . . . . . . . . . . . . . . . . . 370<br />
Light Curtain with Automatic Reset Wiring Example . . . 372<br />
Light Curtain with Automatic Reset Programming<br />
Example . . . . . . . . . . . . . . . . . . . . . . . . . . . . . . . . . . . 373<br />
Five-position Mode Selector (FPMS) <strong>Instruction</strong> . . . . . . . . . 375<br />
<strong>Instruction</strong> Parameters . . . . . . . . . . . . . . . . . . . . . . . . . 375<br />
Operation . . . . . . . . . . . . . . . . . . . . . . . . . . . . . . . . . . 376<br />
Five-position Mode Selector Wiring Example. . . . . . . . . 377<br />
Five-position Mode Selector Programming Example . . . 378<br />
Redundant Output with Continuous Feedback Monitoring<br />
(ROUT) . . . . . . . . . . . . . . . . . . . . . . . . . . . . . . . . . . . . . . 379<br />
<strong>Instruction</strong> Parameters . . . . . . . . . . . . . . . . . . . . . . . . . 379<br />
Operation . . . . . . . . . . . . . . . . . . . . . . . . . . . . . . . . . . 380<br />
Redundant Output with Negative Feedback Wiring<br />
Example . . . . . . . . . . . . . . . . . . . . . . . . . . . . . . . . . . . 383<br />
Redundant Output with Negative Feedback<br />
Programming Example. . . . . . . . . . . . . . . . . . . . . . . . . 383<br />
Redundant Output with Positive Feedback Wiring<br />
Example . . . . . . . . . . . . . . . . . . . . . . . . . . . . . . . . . . . 385<br />
Publication <strong>1756</strong>-<strong>RM095C</strong>-<strong>EN</strong>-P - July 2008 11
Table of Contents<br />
Execution Times for <strong>Safety</strong><br />
<strong>Application</strong> <strong>Instruction</strong>s<br />
Redundant Output with Positive Feedback<br />
Programming Example. . . . . . . . . . . . . . . . . . . . . . . . . 385<br />
Two-hand Run Station (THRS) <strong>Instruction</strong> . . . . . . . . . . . . . 387<br />
<strong>Instruction</strong> Parameters . . . . . . . . . . . . . . . . . . . . . . . . . 388<br />
Normal Operation . . . . . . . . . . . . . . . . . . . . . . . . . . . . 390<br />
Button Tie-down Operation . . . . . . . . . . . . . . . . . . . . . 391<br />
Cycle Buttons Operation . . . . . . . . . . . . . . . . . . . . . . . 392<br />
Button Fault Operation . . . . . . . . . . . . . . . . . . . . . . . . 393<br />
Two-hand Run Station with Active Pin Disabled<br />
Wiring Example . . . . . . . . . . . . . . . . . . . . . . . . . . . . . . 394<br />
Two-hand Run Station with Active Pin Disabled<br />
Programming Example. . . . . . . . . . . . . . . . . . . . . . . . . 395<br />
Two-hand Run Station with Active Pin Enabled Wiring<br />
Examples. . . . . . . . . . . . . . . . . . . . . . . . . . . . . . . . . . . 396<br />
Two-hand Run Station with Active Pin Enabled<br />
Programming Example. . . . . . . . . . . . . . . . . . . . . . . . . 397<br />
Appendix B<br />
Index<br />
12 Publication <strong>1756</strong>-<strong>RM095C</strong>-<strong>EN</strong>-P - July 2008
Introduction<br />
About This Publication<br />
Who Should Use This<br />
Publication<br />
Understand <strong>GuardLogix</strong><br />
Controller Operation<br />
Understand Terminology<br />
Topic Page<br />
About This Publication 13<br />
Who Should Use This Publication 13<br />
Understand <strong>GuardLogix</strong> Controller Operation 13<br />
Understand Terminology 13<br />
Additional Resources 15<br />
Preface<br />
This reference manual is intended to describe Rockwell Automation’s<br />
<strong>GuardLogix</strong> <strong>Safety</strong> <strong>Application</strong> <strong>Instruction</strong> <strong>Set</strong> which is type-approved<br />
and certified for safety-related function in applications up to and<br />
including <strong>Safety</strong> Integrity Level (SIL) 3 according to IEC61508,<br />
Performance Level (PL) e according to ISO13849-1, and category<br />
(CAT) 4 according to <strong>EN</strong>954-1.<br />
The timing diagrams presented in the manual are for illustrative<br />
purposes only. The actual response times will be determined by the<br />
performance characteristics of your application.<br />
Use this manual if you are responsible for designing, programming, or<br />
troubleshooting safety applications that use <strong>GuardLogix</strong> controllers.<br />
You must have a basic understanding of electrical circuitry and<br />
familiarity with relay ladder logic. You must also be trained and<br />
experienced in the creation, operation, programming, and<br />
maintenance of safety systems.<br />
The <strong>GuardLogix</strong> <strong>Safety</strong> controller is part of a de-energize to trip<br />
system. This means that all of its outputs are set to zero when a fault is<br />
detected.<br />
The following table defines abbreviations used in this manual.<br />
Abbreviation Description<br />
AOPD Active Opto-electronic Protective Device<br />
BCAM Brake Cam<br />
BDC Bottom Dead Center<br />
CVT Circuit Verification Test<br />
DCAM Dynamic Cam<br />
ESPE Electro-sensitive Protective Equipment<br />
TCAM Takeover Cam<br />
13Publication <strong>1756</strong>-<strong>RM095C</strong>-<strong>EN</strong>-P - July 2008 13
Preface Preface<br />
Abbreviation Description<br />
Version 17 and Later Metal Form and General <strong>Instruction</strong>s<br />
AVC Auxiliary Valve Control<br />
CBCM Clutch Brake Continuous Mode<br />
CBIM Clutch Brake Inch Mode<br />
CBSSM Clutch Brake Single Stroke Mode<br />
CPM Crankshaft Position Monitor<br />
CROUT Configurable Redundant Output<br />
CSM Camshaft Monitor<br />
DCM Dual Channel Input Monitor<br />
DCS Dual Channel Input Stop<br />
DCSRT Dual Channel Input Start<br />
DCST Dual Channel Input Stop with Test<br />
DCSTL Dual Channel Input Stop with Test and Lock<br />
DCSTM Dual Channel Input Stop with Test and Mute<br />
EPMS Eight Position Mode Selector<br />
FSBM Four Sensor Bidirectional Muting<br />
MMVC Maintenance Manual Valve Control<br />
MVC Main Valve Control<br />
SMAT <strong>Safety</strong> Mat<br />
THRSe Two Hand Run Station – Enhanced<br />
TSAM Two Sensor Asymmetrical Muting<br />
TSSM Two Sensor Symmetrical Muting<br />
Version 14 and Later General <strong>Instruction</strong>s<br />
DIN Diverse Input<br />
<strong>EN</strong>P<strong>EN</strong> Enable Pendant<br />
ESTOP Emergency Stop<br />
FPMS Five-position Mode Selector<br />
LC Light Curtain<br />
RIN Redundant Input<br />
ROUT Redundant Output<br />
THRS Two-hand Run Station<br />
14 Publication <strong>1756</strong>-<strong>RM095C</strong>-<strong>EN</strong>-P - July 2008
Additional Resources<br />
Preface Preface<br />
This table lists publications that contain important information about<br />
<strong>GuardLogix</strong> controller systems.<br />
Related Documentation<br />
Resource Description<br />
<strong>GuardLogix</strong> Controller Installation <strong>Instruction</strong>s, publication<br />
<strong>1756</strong>-IN045<br />
Provides information on installing the <strong>GuardLogix</strong> controller<br />
<strong>GuardLogix</strong> Controllers User Manual, publication <strong>1756</strong>-UM020 Provides information on configuring and programming the <strong>GuardLogix</strong><br />
system<br />
<strong>GuardLogix</strong> Controller Systems <strong>Safety</strong> Reference Manual, Contains detailed requirements for achieving and maintaining SIL 3 with<br />
publication <strong>1756</strong>-RM093<br />
the <strong>GuardLogix</strong> controller system<br />
CompactBlock Guard I/O DeviceNet <strong>Safety</strong> Module Installation Provides information on installing CompactBlock Guard I/O DeviceNet<br />
<strong>Instruction</strong>s, publication 1791DS-IN002<br />
<strong>Safety</strong> modules<br />
Guard I/O DeviceNet <strong>Safety</strong> Modules User Manual, publication<br />
1791DS-UM001<br />
Provides information on using Guard I/O DeviceNet <strong>Safety</strong> modules<br />
Guard I/O EtherNet/IP <strong>Safety</strong> Modules Installation <strong>Instruction</strong>s, Provides information on installing CompactBlock Guard I/O EtherNet/IP<br />
publication 1791ES-IN001<br />
<strong>Safety</strong> modules<br />
Guard I/O EtherNet/IP <strong>Safety</strong> Modules User Manual, publication<br />
1791ES-UM001<br />
Provides information on using Guard I/O EtherNet/IP <strong>Safety</strong> modules<br />
Using ControlLogix in SIL2 <strong>Application</strong>s <strong>Safety</strong> Reference Manual, Describes requirements for using ControlLogix controllers, and<br />
publication <strong>1756</strong>-RM001<br />
<strong>GuardLogix</strong> standard tasks, in SIL2 safety control applications.<br />
Logix5000 General <strong>Instruction</strong> <strong>Set</strong> Reference Manual, publication Provides information on the Logix5000 <strong>Instruction</strong> <strong>Set</strong><br />
<strong>1756</strong>-RM003<br />
Logix Common Procedures Programming Manual, publication Provides information on programming Logix5000 controllers, including<br />
<strong>1756</strong>-PM001<br />
managing project files, organizing tags, programming and testing<br />
routines, and handling faults<br />
ControlLogix System User Manual, publication <strong>1756</strong>-UM001 Provides information on using ControlLogix in non-safety applications<br />
DeviceNet Modules in Logix5000 Control Systems User Manual, Provides information on using the <strong>1756</strong>-DNB module in a Logix5000<br />
publication DNET-UM004<br />
control system<br />
EtherNet/IP Modules in Logix5000 Control Systems User Manual, Provides information on using the <strong>1756</strong>-<strong>EN</strong>BT module in a Logix5000<br />
publication <strong>EN</strong>ET-UM001<br />
control system<br />
ControlNet Modules in Logix5000 Control Systems User Manual, Provides information on using the <strong>1756</strong>-CNB module in Logix5000<br />
publication CNET-UM001<br />
control systems<br />
Logix5000 Controllers Execution Time and Memory Use Reference Provides information on estimating the execution time and memory use<br />
Manual, publication <strong>1756</strong>-RM087<br />
for instructions<br />
Logix Import Export Reference Manual, publication <strong>1756</strong>-RM084 Provides information on using RSLogix 5000 Import/Export utility<br />
If you would like a manual, you can:<br />
• download a free electronic version from the Internet at<br />
http://literature.rockwellautomation.com.<br />
• purchase a printed manual by contacting your local<br />
Allen-Bradley distributor or Rockwell Automation sales office.<br />
Publication <strong>1756</strong>-<strong>RM095C</strong>-<strong>EN</strong>-P - July 2008 15
Preface Preface<br />
16 Publication <strong>1756</strong>-<strong>RM095C</strong>-<strong>EN</strong>-P - July 2008
Introduction<br />
General <strong>Safety</strong> <strong>Application</strong> <strong>Instruction</strong>s<br />
Topic Page<br />
Dual-channel Input Start (DCSRT) 18<br />
Dual-channel Input Monitor (DCM) 28<br />
Dual-channel Input Stop (DCS) 38<br />
Dual-channel Input Stop with Test (DCST) 54<br />
Dual-channel Input Stop with Test and Lock (DCSTL) 65<br />
Dual-channel Input Stop with Test and Mute (DCSTM) 80<br />
<strong>Safety</strong> Mat (SMAT) 94<br />
Two-hand Run Station – Enhanced (THRSe) 106<br />
Configurable Redundant Output (CROUT) 123<br />
Two-sensor Asymmetrical Muting (TSAM) 133<br />
Two-sensor Symmetrical Muting (TSSM) 153<br />
Four-sensor Bidirectional Muting (FSBM) 172<br />
Chapter 1<br />
17Publication <strong>1756</strong>-<strong>RM095C</strong>-<strong>EN</strong>-P - July 2008 17
Chapter 1 General <strong>Safety</strong> <strong>Application</strong> <strong>Instruction</strong>s<br />
Dual-channel Input Start<br />
(DCSRT)<br />
• BG-certified<br />
•<br />
The Dual-channel Input Start instruction is for safety devices whose<br />
main function is to start a machine safely, for example, an enable<br />
pendant. This instruction will energize its output (O1) only if the<br />
Enable input is ON (1), and both safety inputs, Channel A and<br />
Channel B, transition to the active state within the Discrepancy Time.<br />
DCSRT – <strong>Instruction</strong> Parameters<br />
IMPORTANT<br />
Dual-channel Input Start <strong>Instruction</strong>: Configuration Parameters<br />
Do not use the same tag name for more than one instruction in<br />
the same program. Do not write to any instruction output tag<br />
under any circumstances.<br />
The following table provides the parameters that are used to configure<br />
the instruction. These parameters cannot be changed at runtime.<br />
Parameter Data Type Description<br />
<strong>Safety</strong> Function List This parameter provides a text name for how this instruction is being used. Choices include<br />
enable pendant, start button, and user-defined.<br />
Input Type List<br />
Note: Does not affect instruction behavior. This is for information/documentation purposes<br />
only.<br />
This parameter selects input channel behavior.<br />
Equivalent - Active High: Inputs are in the active state when Channel A and Channel B inputs<br />
are 1.<br />
Complementary: Inputs are in the active state when Channel A is 1 and Channel B is 0.<br />
18 Publication <strong>1756</strong>-<strong>RM095C</strong>-<strong>EN</strong>-P - July 2008
Dual-channel Input Start <strong>Instruction</strong>: Configuration Parameters<br />
Parameter Data Type Description<br />
General <strong>Safety</strong> <strong>Application</strong> <strong>Instruction</strong>s Chapter 1<br />
Discrepancy Time (ms) Integer The amount of time that the inputs are allowed to be in an inconsistent state before an<br />
instruction fault is generated. The inconsistent state depends on the Input Type.<br />
Dual-channel Input Start <strong>Instruction</strong>: Inputs<br />
Equivalent: Inconsistent state is when:<br />
• Channel A = 0 and Channel B = 1, or<br />
• Channel A = 1 and Channel B = 0<br />
Complementary: Inconsistent state is when:<br />
• Channel A = 0 and Channel B = 0, or<br />
• Channel A = 1 and Channel B = 1<br />
The valid range is 5...3000 ms.<br />
The following table explains instruction inputs. The inputs may be<br />
field device signals from input devices or derived from user logic.<br />
Name Data Type Description<br />
Enable Boolean This input enables or disables the instruction.<br />
Channel A Boolean<br />
ON (1): The instruction is enabled. Output 1 is energized when Channel A and Channel B<br />
transition to the active state within the Discrepancy Time.<br />
OFF (0): The instruction is disabled. Output 1 is not energized.<br />
This input is one of the two safety inputs to the instruction.<br />
Channel B Boolean This input is one of the two safety inputs to the instruction.<br />
Input Status Boolean If instruction inputs are from a safety I/O module, this is the input status from the I/O module<br />
or modules (Input Status or Combined Status). If instruction inputs are derived from internal<br />
logic, it is the application programmer’s responsibility to determine the conditions.<br />
Reset<br />
ON (1): The inputs to this instruction are valid.<br />
OFF (0): The inputs to this instruction are invalid.<br />
(1) Boolean This input clears instruction and circuit faults provided the fault condition is not present.<br />
OFF (0) -> ON (1): The Fault Present and Fault Code outputs are reset.<br />
(1) ISO 13849-1 stipulates instruction reset functions must occur on falling edge signals. To comply with ISO 13849-1<br />
requirements, add this logic immediately before this instruction. Rename the “Reset_Signal” tag in this example<br />
to your reset signal tagname. Then use the OSF instruction Output Bit tag as the instruction’s reset source.<br />
Publication <strong>1756</strong>-<strong>RM095C</strong>-<strong>EN</strong>-P - July 2008 19
Chapter 1 General <strong>Safety</strong> <strong>Application</strong> <strong>Instruction</strong>s<br />
Dual-channel Input Start <strong>Instruction</strong>: Outputs<br />
The following table explains instruction outputs. The outputs may be<br />
used to drive external tags (safety output modules) or internal tags for<br />
use in other logic routines.<br />
Name Data Type Description<br />
Output 1 (O1) Boolean This output is energized when the input conditions have been satisfied.<br />
The output becomes de-energized when:<br />
Fault Present (FP) Boolean<br />
• either Channel A or Channel B transitions to the safe state.<br />
• the Input Status input is OFF (0).<br />
• the Enable input turns OFF (0).<br />
ON (1): A fault is present in the instruction.<br />
OFF (0): The instruction is operating normally.<br />
Fault Code Integer This output indicates the type of fault that occurred. See the DCSRT – Fault Codes on page<br />
24 for a list of fault codes.<br />
Diagnostic Code Integer<br />
This parameter is not safety-related.<br />
This output indicates the diagnostic status of the instruction. See the DCSRT – Diagnostic<br />
Codes on page 24 for a list of diagnostic codes.<br />
This parameter is not safety-related.<br />
IMPORTANT<br />
Do not write to any instruction output tag under any<br />
circumstances.<br />
20 Publication <strong>1756</strong>-<strong>RM095C</strong>-<strong>EN</strong>-P - July 2008
DCSRT – Normal Operation<br />
General <strong>Safety</strong> <strong>Application</strong> <strong>Instruction</strong>s Chapter 1<br />
The timing diagram illustrates the normal operation for a start device,<br />
for example, an enable pendant. At (A), Output 1 is not energized<br />
because the Enable input is OFF (0). At (B), Output 1 is not energized<br />
because the transition of the Enable signal ON (1) can never enable<br />
Output 1. At (C), Output 1 is energized 50 ms after the safety inputs<br />
transition through the safe state and to the active state with the Enable<br />
input ON (1). At (D), Output 1 is de-energized when either one of the<br />
safety inputs transition to the safe state. At (E), Output 1 is energized<br />
50 ms after the safety inputs return to the active state. At (F), Output 1<br />
is de-energized because the Enable input has transitioned to OFF (0).<br />
Normal Operation (Equivalent Inputs)<br />
1<br />
Channel A<br />
0<br />
1<br />
Channel B<br />
0<br />
1<br />
Enable<br />
0<br />
1<br />
Output 1<br />
0<br />
50 ms 50 ms<br />
A B C D E F<br />
Input Type = Equivalent - Active High Discrepancy Time = 250 ms<br />
If the Input Status input is not shown, it is assumed that the input status is valid (ON = 1) for the<br />
entire timing diagram.<br />
The same behavior is demonstrated below as in the previous timing<br />
diagram except that the Input Type is Complementary.<br />
Normal Operation (Complementary Inputs)<br />
1<br />
Channel A<br />
0<br />
Channel B<br />
1<br />
0<br />
1<br />
Enable<br />
0<br />
1<br />
Output 1<br />
0<br />
A B C D E F<br />
Publication <strong>1756</strong>-<strong>RM095C</strong>-<strong>EN</strong>-P - July 2008 21<br />
50 ms<br />
50 ms<br />
Input Type = Complementary Discrepancy Time = 250 ms<br />
If the Input Status input is not shown, it is assumed that the input status is valid (ON = 1) for the<br />
entire timing diagram.
Chapter 1 General <strong>Safety</strong> <strong>Application</strong> <strong>Instruction</strong>s<br />
DCSRT – Input Status Fault Operation<br />
The timing diagram illustrates fault behavior when the Input Status<br />
becomes invalid. At (A), Output 1 is not energized because the Input<br />
Status has not become active for the first time. At (B), with the Input<br />
Status active and after a 50 ms delay, Output 1 is energized because<br />
the safety inputs have transitioned through the safe state to the active<br />
state. At (C), the Input Status becomes invalid, which immediately<br />
de-energizes Output 1 and generates a fault. At (D), the fault cannot<br />
be reset because the Input Status is still inactive. At (E), the fault is<br />
reset because the Input Status is now active and a reset is triggered. At<br />
(F), Output 1 is active.<br />
1<br />
Channel A<br />
0<br />
1<br />
Channel B<br />
0<br />
1<br />
Enable<br />
0<br />
1<br />
Input Status<br />
0<br />
1<br />
Reset<br />
0<br />
1<br />
Fault Present<br />
0<br />
1<br />
Output 1<br />
0<br />
A<br />
Input Type = Equivalent - Active High<br />
Discrepancy Time = 250 ms<br />
B C<br />
50 ms 50 ms<br />
D E F<br />
22 Publication <strong>1756</strong>-<strong>RM095C</strong>-<strong>EN</strong>-P - July 2008
DCSRT – Discrepancy Fault Operation<br />
General <strong>Safety</strong> <strong>Application</strong> <strong>Instruction</strong>s Chapter 1<br />
The timing diagram illustrates a discrepancy fault occurring when<br />
Channel A and Channel B are in an inconsistent state for longer than<br />
than the configured Discrepancy Time. At (A), a fault is generated<br />
when the safety inputs are in an inconsistent state for longer than the<br />
Discrepancy Time, for example, 250 ms. At (B), the fault is cleared<br />
because both safety inputs are inactive and the Reset input went<br />
active. At (C), Output 1 is energized 50 ms after both safety inputs<br />
transition to the active state together within the Discrepancy Time. At<br />
(D), Output 1 is de-energized when Channel B transitions to the safe<br />
state. At (E), a fault is generated because the safety inputs are again in<br />
an inconsistent state for longer than the Discrepancy Time. At (F), the<br />
fault is cleared, but Output 1 will not be energized until both safety<br />
inputs transition to the active state together.<br />
1<br />
Channel A<br />
0<br />
1<br />
Channel B<br />
0<br />
1<br />
Enable<br />
0<br />
1<br />
Reset<br />
0<br />
Fault Present<br />
1<br />
0<br />
1<br />
Output 1<br />
0<br />
250ms 250ms<br />
A<br />
Input Type = Equivalent - Active High<br />
Discrepancy Time = 250 ms<br />
B C D E F<br />
If the Input Status input is not shown, it is assumed that the input status is valid (ON = 1) for the<br />
entire timing diagram.<br />
DCSRT– False Rung State Behavior<br />
When the instruction is executed on a false rung, all instruction<br />
outputs are de-energized.<br />
Publication <strong>1756</strong>-<strong>RM095C</strong>-<strong>EN</strong>-P - July 2008 23<br />
50ms
Chapter 1 General <strong>Safety</strong> <strong>Application</strong> <strong>Instruction</strong>s<br />
DCSRT – Fault Codes<br />
Fault Code Description Corrective Action<br />
00H No fault. None.<br />
20H The Input Status input transitioned from ON (1) to OFF (0) • Check the I/O module connection or the internal logic<br />
while the instruction was executing.<br />
used to source input status.<br />
• Reset the fault.<br />
4000H Channel A and Channel B were in an inconsistent state for • Check the wiring.<br />
4001H<br />
longer than the Discrepancy Time. At the time of the fault,<br />
Channel A was in the active state. Channel B was in the safe<br />
state.<br />
Channel A and Channel B were in an inconsistent state for<br />
longer than the Discrepancy Time. At the time of the fault,<br />
Channel A was in the safe state. Channel B was in the active<br />
state.<br />
• Perform a functional test of the device (put Channel A<br />
and Channel B in a safe state).<br />
• Reset the fault.<br />
4002H Channel A went to the safe state and back to the active state<br />
while Channel B remained active.<br />
4003H Channel B went to the safe state and back to the active state<br />
while Channel A remained active.<br />
DCSRT – Diagnostic Codes<br />
Diagnostic Code Description Corrective Action<br />
00H No fault. None.<br />
20H The Input Status input was OFF (0) when the Check the I/O module connection or the internal logic<br />
instruction started.<br />
used to source input status.<br />
4000H The device is not in a safe state at start-up. Release the start device (put Channel A and Channel B in<br />
a safe state).<br />
4060H The device is not enabled. Enable the device (set Enable to 1).<br />
24 Publication <strong>1756</strong>-<strong>RM095C</strong>-<strong>EN</strong>-P - July 2008
DCSRT – Wiring and Programming Example<br />
General <strong>Safety</strong> <strong>Application</strong> <strong>Instruction</strong>s Chapter 1<br />
This example complies with <strong>EN</strong>954-1, Category 4 operation. The<br />
standard control portion of the application is not shown.<br />
24V DC<br />
24V Ground<br />
DeviceNet<br />
1<br />
V<br />
G<br />
11<br />
This programming diagram shows the instruction with inputs and test<br />
outputs.<br />
Programming Diagram<br />
Equivalent Active High<br />
TBD ms<br />
See Note 1<br />
Module1:I.Pt06Data<br />
Module1:I.Pt07Data<br />
Publication <strong>1756</strong>-<strong>RM095C</strong>-<strong>EN</strong>-P - July 2008 25<br />
3 4<br />
I0 I1<br />
Module1:I.Combined Status<br />
See Note 3<br />
1791-DS-IB12<br />
Momentary<br />
Push Button<br />
14<br />
T1<br />
Momentary<br />
Push Button<br />
(reset)<br />
13<br />
T0<br />
Module 1<br />
24<br />
I11<br />
DCSRT<br />
Input Type<br />
Output 1<br />
Discrepancy Time<br />
MomentaryPushButton<br />
Enable<br />
Channel A<br />
Channel B<br />
Input Status<br />
Reset<br />
Fault Present<br />
See Note 2<br />
Note 1:This is an internal Boolean tag which has its value determined by other parts of the user application<br />
not shown in this example.<br />
Note 2:This is an internal Boolean tag used by other parts of the user application not shown in this example.<br />
Note 3:The source can be mapped or safety data.<br />
Key: Color code represents data or value typically used.<br />
Tag-mapped Variable<br />
Standard Output<br />
<strong>Safety</strong> Input <strong>Safety</strong> Output<br />
Configuration Constant/Value<br />
Internal <strong>Safety</strong> Variable
Chapter 1 General <strong>Safety</strong> <strong>Application</strong> <strong>Instruction</strong>s<br />
Ladder Logic<br />
RSLogix 5000 software is used to configure the input and output<br />
parameters of the Guard I/O module, as illustrated.<br />
Module Definition<br />
DCSRT<br />
Dual Channel Input Start<br />
DCSRT MomentaryPushButton<br />
<strong>Safety</strong> Function START BUTTON<br />
Input Type EQUIVAL<strong>EN</strong>T - ACTIVE HIGH<br />
Discrepancy Time (Msec) 500<br />
Enable SeeNote1<br />
0<br />
Channel A Module1:I.Pt00Data<br />
1<br />
Channel B Module1:I.Pt01Data<br />
1<br />
Input Status Module1:I.CombinedStatus<br />
1<br />
Reset Module1:I.Pt11Data<br />
0<br />
Note 1:This is an internal Boolean tag which has its value determined by other parts of the user<br />
application not shown in this example.<br />
Rockwell Automation suggests using Exact Match, as shown.<br />
However, setting Electronic Keying to Compatible Match is allowed.<br />
26 Publication <strong>1756</strong>-<strong>RM095C</strong>-<strong>EN</strong>-P - July 2008<br />
O1<br />
FP
Module Input Configuration<br />
Module Test Output Configuration<br />
General <strong>Safety</strong> <strong>Application</strong> <strong>Instruction</strong>s Chapter 1<br />
Publication <strong>1756</strong>-<strong>RM095C</strong>-<strong>EN</strong>-P - July 2008 27
Chapter 1 General <strong>Safety</strong> <strong>Application</strong> <strong>Instruction</strong>s<br />
Dual-channel Input Monitor<br />
(DCM)<br />
• BG-certified<br />
•<br />
The Dual-channel Input Monitor instruction monitors dual-input safety<br />
devices and sets Output 1 based on the Input Type parameter and the<br />
combined state of Channel A and Channel B.<br />
DCM – <strong>Instruction</strong> Parameters<br />
IMPORTANT<br />
Dual-channel Input Monitor <strong>Instruction</strong>: Configuration Parameters<br />
Do not use the same tag name for more than one instruction in<br />
the same program. Do not write to any instruction output tag<br />
under any circumstances.<br />
The following table provides the parameters that are used to configure<br />
the instruction. These parameters cannot be changed at runtime.<br />
Parameter Data Type Description<br />
<strong>Safety</strong> Function List This parameter provides a text name for how this instruction is being used. Choices include<br />
cam switch, position limit switch, and user-defined.<br />
Input Type List<br />
Note: Does not affect instruction behavior. This is for information/documentation purposes<br />
only.<br />
This parameter selects input channel behavior.<br />
Equivalent - Active High: Inputs are in the active state when Channel A and Channel B inputs<br />
are 1.<br />
Equivalent - Active Low: Inputs are in the active state when Channel A and Channel B inputs<br />
are 0.<br />
Complementary: Inputs are in the active state when Channel A is 1 and Channel B is 0.<br />
28 Publication <strong>1756</strong>-<strong>RM095C</strong>-<strong>EN</strong>-P - July 2008
Dual-channel Input Monitor <strong>Instruction</strong>: Configuration Parameters<br />
Parameter Data Type Description<br />
General <strong>Safety</strong> <strong>Application</strong> <strong>Instruction</strong>s Chapter 1<br />
Discrepancy Time (ms) Integer The amount of time that the inputs are allowed to be in an inconsistent state before an<br />
instruction fault is generated. The inconsistent state depends on the Input Type.<br />
Dual-channel Input Monitor <strong>Instruction</strong>: Inputs<br />
Equivalent: Inconsistent state is when:<br />
• Channel A = 0 and Channel B = 1, or<br />
• Channel A = 1 and Channel B = 0<br />
Complementary: Inconsistent state is when:<br />
• Channel A = 0 and Channel B = 0, or<br />
• Channel A = 1 and Channel B = 1<br />
If this parameter is 0, the Discrepancy Time checking is disabled (0 = infinite).<br />
The valid range is 0...3000 ms.<br />
The following table explains instruction inputs. The inputs may be<br />
field device signals from input devices or derived from user logic.<br />
Name Data Type Description<br />
Channel A Boolean This input is one of the two inputs being monitored. When either input is in the safe state,<br />
Output 1 is de-energized.<br />
Channel B Boolean This input is one of the two inputs being monitored. When either input is in the safe state,<br />
Output 1 is de-energized.<br />
Input Status Boolean If instruction inputs are from a safety I/O module, this is the input status from the I/O module<br />
or modules (Input Status or Combined Status). If instruction inputs are derived from internal<br />
logic, it is the application programmer’s responsibility to determine the conditions.<br />
Reset<br />
ON (1): The inputs to this instruction are valid.<br />
OFF (0): The inputs to this instruction are invalid.<br />
(1) Boolean This input clears instruction and circuit faults provided the fault condition is not present.<br />
OFF (0) -> ON (1): The Fault Present and Fault Code outputs are reset.<br />
(1) ISO 13849-1 stipulates instruction reset functions must occur on falling edge signals. To comply with ISO 13849-1<br />
requirements, add this logic immediately before this instruction. Rename the “Reset_Signal” tag in this example<br />
to your reset signal tagname. Then use the OSF instruction output Bit tag as the instruction’s reset source.<br />
Publication <strong>1756</strong>-<strong>RM095C</strong>-<strong>EN</strong>-P - July 2008 29
Chapter 1 General <strong>Safety</strong> <strong>Application</strong> <strong>Instruction</strong>s<br />
Dual-channel Input Monitor <strong>Instruction</strong>: Outputs<br />
The following table explains instruction outputs. The outputs may be<br />
external tags (safety output modules) or internal tags for use in other<br />
logic routines.<br />
Name Data Type Description<br />
Output 1 (O1) Boolean This output is energized when the input conditions are satisfied.<br />
<strong>Instruction</strong> Status (IS) Boolean<br />
The output becomes de-energized when:<br />
• either Channel A or Channel B transitions to the safe state.<br />
• the Input Status input is OFF (0).<br />
This output is ON (1) when Output 1 of this instruction is valid (no faults or diagnostics are<br />
present).<br />
Fault Present (FP) Boolean ON (1): A fault is present in the instruction.<br />
OFF (0): This instruction is operating normally.<br />
Fault Code Integer This output indicates the type of fault that occurred. See the DCM – Fault Codes on page 34<br />
for a list of fault codes.<br />
Diagnostic Code Integer<br />
This parameter is not safety-related.<br />
This output indicates the diagnostic status of the instruction. See the DCM – Diagnostic<br />
Codes on page 34 for a list of diagnostic codes.<br />
This parameter is not safety-related.<br />
IMPORTANT<br />
Do not write to any instruction output tag under any<br />
circumstances.<br />
30 Publication <strong>1756</strong>-<strong>RM095C</strong>-<strong>EN</strong>-P - July 2008
DCM – Normal Operation<br />
General <strong>Safety</strong> <strong>Application</strong> <strong>Instruction</strong>s Chapter 1<br />
The timing diagram illustrates the normal monitoring of a<br />
dual-channel input with the Input Type configured as Equivalent -<br />
Active High. Output 1 is ON (1) initially because the safety inputs are<br />
in the active state. At (A), Channel A transitions to the safe state,<br />
which causes Output 1 to go to the safe state. At (B), both of the<br />
safety inputs have transitioned to the active state, which energizes<br />
Output 1. At (C), Output 1 is de-energized and energized again at (D).<br />
The <strong>Instruction</strong> Status output is ON (1) the entire time because no<br />
faults or diagnostics occur.<br />
Channel A<br />
Channel B<br />
<strong>Instruction</strong> Status<br />
Output 1<br />
1<br />
0<br />
1<br />
0<br />
1<br />
0<br />
1<br />
0<br />
A B C D<br />
Input Type = Equivalent - Active High<br />
Discrepancy Time = 250 ms<br />
If the Input Status input is not shown, it is assumed that the input status is valid (ON = 1) for the<br />
entire timing diagram.<br />
Publication <strong>1756</strong>-<strong>RM095C</strong>-<strong>EN</strong>-P - July 2008 31
Chapter 1 General <strong>Safety</strong> <strong>Application</strong> <strong>Instruction</strong>s<br />
DCM – Input Status Fault Operation<br />
The timing diagram illustrates instruction behavior with fault<br />
conditions. At (A), Output 1 turns ON (1) when the Input Status<br />
becomes valid. This also energizes Output 1 because the safety inputs<br />
are in the active state. At (B), a fault is generated when the Input<br />
Status becomes invalid. This also turns OFF (0) the <strong>Instruction</strong> Status<br />
output. At (C), the fault cannot be reset because the Input Status is still<br />
invalid. At (D), the fault is cleared when a reset is triggered with the<br />
Input Status being valid. This also turns the <strong>Instruction</strong> Status output<br />
ON (1).<br />
1<br />
Channel A<br />
0<br />
1<br />
Channel B<br />
0<br />
1<br />
Reset<br />
0<br />
1<br />
Input Status<br />
0<br />
1<br />
<strong>Instruction</strong>s Status<br />
0<br />
1<br />
Fault Present<br />
0<br />
1<br />
Output 1<br />
0<br />
Input Type = Equivalent - Active High<br />
Discrepancy Time = 250 ms<br />
A B C D<br />
32 Publication <strong>1756</strong>-<strong>RM095C</strong>-<strong>EN</strong>-P - July 2008
DCM – Discrepancy Fault Operation<br />
General <strong>Safety</strong> <strong>Application</strong> <strong>Instruction</strong>s Chapter 1<br />
The timing diagram illustrates a discrepancy fault occurring when<br />
Channel A and Channel B are in an inconsistent state for longer than<br />
the configured Discrepancy Time. At (A), a fault is generated when<br />
the safety inputs are in an inconsistent state for longer than the<br />
Discrepancy Time. This also turns Output 1 OFF (0). At (B), the fault<br />
is cleared because a Reset is triggered when the safety inputs are no<br />
longer in an inconsistent state. At (C), a fault is generated when the<br />
safety inputs are again in an inconsistent state for longer than the<br />
Discrepancy Time. At (D), the fault is reset.<br />
1<br />
Channel A<br />
0<br />
1<br />
Channel B<br />
0<br />
1<br />
Reset<br />
0<br />
1<br />
<strong>Instruction</strong> Status<br />
0<br />
1<br />
Fault Present<br />
0<br />
1<br />
Output 1<br />
0<br />
DCM – False Rung State Behavior<br />
250ms 250ms<br />
A B C<br />
Input Type = Equivalent - Active High<br />
Discrepancy Time = 250 ms<br />
If the Input Status input is not shown, it is assumed that the input status is valid (ON = 1) for the<br />
entire timing diagram.<br />
When the instruction is executed on a false rung, all instruction<br />
outputs are de-energized.<br />
Publication <strong>1756</strong>-<strong>RM095C</strong>-<strong>EN</strong>-P - July 2008 33<br />
D
Chapter 1 General <strong>Safety</strong> <strong>Application</strong> <strong>Instruction</strong>s<br />
DCM – Fault Codes<br />
Fault Code Description Corrective Action<br />
00H No fault. None.<br />
20H The Input Status input transitioned from ON (1) to OFF (0) • Check the I/O module connection or the internal logic<br />
while the instruction was executing.<br />
used to source input status.<br />
• Reset the fault.<br />
4000H Channel A and Channel B were in an inconsistent state for • Check the wiring.<br />
4001H<br />
longer than the Discrepancy Time. At the time of the fault,<br />
Channel A was in the active state. Channel B was in the safe<br />
state.<br />
Channel A and Channel B were in an inconsistent state for<br />
longer than the Discrepancy Time. At the time of the fault,<br />
Channel A was in the safe state. Channel B was in the active<br />
state.<br />
• Perform a functional test of the device (put Channel A<br />
and Channel B in a safe state).<br />
• Reset the fault.<br />
4002H Channel A went to the safe state and back to the active state<br />
while Channel B remained active.<br />
4003H Channel B went to the safe state and back to the active state<br />
while Channel A remained active.<br />
DCM – Diagnostic Codes<br />
Diagnostic Code Description Corrective Action<br />
00H No fault. None.<br />
20H The Input Status input was OFF (0) when the Check the I/O module connection or the internal logic<br />
instruction started.<br />
used to source input status.<br />
34 Publication <strong>1756</strong>-<strong>RM095C</strong>-<strong>EN</strong>-P - July 2008
DCM – Wiring and Programming Example<br />
General <strong>Safety</strong> <strong>Application</strong> <strong>Instruction</strong>s Chapter 1<br />
This example complies with <strong>EN</strong>954-1, Category 4 operation. The<br />
standard control portion of the application is not shown.<br />
Wiring Diagram<br />
24V DC<br />
24V Ground<br />
DeviceNet<br />
1<br />
V<br />
G<br />
11<br />
This programming diagram shows the instruction with inputs and<br />
outputs.<br />
Programming Diagram<br />
Equivalent Active High<br />
TBD ms<br />
Module1:I.Pt00Data<br />
Module1:I.Pt01Data<br />
Module1:I.Combined Status<br />
Module1:I.Pt11Data<br />
Cam Switch<br />
Momentary<br />
Push Button<br />
(reset)<br />
3 4 14 13 24<br />
I0 I1<br />
T1 T0 I11<br />
1791-DS-IB12<br />
Module 1<br />
CamSwitch<br />
DCM<br />
Input Type<br />
Output 1<br />
Discrepancy Time<br />
<strong>Instruction</strong> Status<br />
Channel A<br />
Channel B<br />
Input Status<br />
Publication <strong>1756</strong>-<strong>RM095C</strong>-<strong>EN</strong>-P - July 2008 35<br />
Reset<br />
Fault Present<br />
See Note 1<br />
Note 1:This is an internal Boolean tag used by other parts of the user application not shown in this example.<br />
Key: Color code represents data or value typically used.<br />
Tag-mapped Variable<br />
Standard Output<br />
<strong>Safety</strong> Input <strong>Safety</strong> Output<br />
Configuration Constant/Value<br />
Internal <strong>Safety</strong> Variable
Chapter 1 General <strong>Safety</strong> <strong>Application</strong> <strong>Instruction</strong>s<br />
Ladder Logic<br />
RSLogix 5000 software is used to configure the input and output<br />
parameters of the Guard I/O module, as illustrated.<br />
Module Definition<br />
DCM<br />
Dual Channel Input Monitor<br />
DCM CamSwitch<br />
<strong>Safety</strong> Function CAM SWITCH<br />
Input Type EQUIVAL<strong>EN</strong>T - ACTIVE HIGH<br />
Discrepancy Time (Msec) 500<br />
Channel A Module1:I.Pt00Data<br />
1<br />
Channel B Module1:I.Pt01Data<br />
1<br />
Input Status Module1:I.CombinedStatus<br />
1<br />
Reset Module1:I.Pt11Data<br />
0<br />
Rockwell Automation suggests using Exact Match, as shown.<br />
However, setting Electronic Keying to Compatible Match is allowed.<br />
36 Publication <strong>1756</strong>-<strong>RM095C</strong>-<strong>EN</strong>-P - July 2008<br />
O1<br />
IS<br />
FP
Module Input Configuration<br />
Module Test Output Configuration<br />
General <strong>Safety</strong> <strong>Application</strong> <strong>Instruction</strong>s Chapter 1<br />
Publication <strong>1756</strong>-<strong>RM095C</strong>-<strong>EN</strong>-P - July 2008 37
Chapter 1 General <strong>Safety</strong> <strong>Application</strong> <strong>Instruction</strong>s<br />
Dual-channel Input Stop<br />
(DCS)<br />
• BG-certified<br />
•<br />
The Dual-channel Input Stop instruction monitors dual-input safety<br />
devices whose main function is to stop a machine safely, for example,<br />
an E-stop, light curtain, or safety gate. This instruction can only<br />
energize Output 1 when both safety inputs, Channel A and Channel B,<br />
are in the active state as determined by the Input type parameter, and<br />
the correct reset actions are carried out.<br />
DCS – <strong>Instruction</strong> Parameters<br />
IMPORTANT<br />
Dual-channel Input Stop <strong>Instruction</strong>: Configuration Parameters<br />
Do not use the same tag name for more than one instruction in<br />
the same program. Do not write to any instruction output tag<br />
under any circumstances.<br />
The following table provides the parameters that are used to configure<br />
the instruction. These parameters cannot be changed at runtime.<br />
Parameter Data Type Description<br />
<strong>Safety</strong> Function List This parameter provides a text name for how this instruction is being used. Choices include<br />
E-stop, safety gate, light curtain, area scanner, safety mat, cable (rope) pull switch, and<br />
user-defined.<br />
Input Type List<br />
Note: Does not affect instruction behavior. This is for information/documentation purposes<br />
only.<br />
This parameter selects input channel behavior.<br />
Equivalent - Active High: Inputs are in the active state when Channel A and Channel B inputs<br />
are 1.<br />
Complementary: Inputs are in the active state when Channel A is 1 and Channel B is 0.<br />
38 Publication <strong>1756</strong>-<strong>RM095C</strong>-<strong>EN</strong>-P - July 2008
Dual-channel Input Stop <strong>Instruction</strong>: Configuration Parameters<br />
Parameter Data Type Description<br />
General <strong>Safety</strong> <strong>Application</strong> <strong>Instruction</strong>s Chapter 1<br />
Discrepancy Time (ms) Integer The amount of time that the inputs are allowed to be in an inconsistent state before an<br />
instruction fault is generated. The inconsistent state depends on the Input Type.<br />
Equivalent: Inconsistent state is when:<br />
• Channel A = 0 and Channel B = 1, or<br />
• Channel A = 1 and Channel B = 0<br />
Restart Type List<br />
Complementary: Inconsistent state is when:<br />
• Channel A = 0 and Channel B = 0, or<br />
• Channel A = 1 and Channel B = 1<br />
The valid range is 5...3000 ms.<br />
This input configures Output 1 for either manual or automatic restart.<br />
Manual A transition of the Reset input from OFF (0) to ON (1), while all of the<br />
Output 1 enabling conditions are met, is required to energize Output 1.<br />
Automatic Output 1 is energized 50 ms after all of the enabling conditions are met.<br />
ATT<strong>EN</strong>TION: Automatic restart may only be used in application situations<br />
!<br />
where you can prove that no unsafe conditions can occur as a result of its<br />
use, or the reset function is being performed elsewhere in the safety circuit<br />
(for example, output function).<br />
Cold Start Type List This parameter specifies the Output 1 behavior when applying controller power or mode<br />
change to Run.<br />
Manual Output 1 is not energized when the Input Status becomes valid or when the<br />
Input Status fault is cleared. (The device must be tested before Output 1<br />
can be energized.)<br />
Automatic Output 1 is energized immediately when the Input Status becomes valid or<br />
when the Input Status fault is cleared and both inputs are in their active<br />
state.<br />
Publication <strong>1756</strong>-<strong>RM095C</strong>-<strong>EN</strong>-P - July 2008 39
Chapter 1 General <strong>Safety</strong> <strong>Application</strong> <strong>Instruction</strong>s<br />
Dual-channel Input Stop <strong>Instruction</strong>: Inputs<br />
The following table explains instruction inputs. The inputs may be<br />
field device signals from input devices or derived from user logic.<br />
Name Data Type Description<br />
Channel A Boolean This is one of the two safety inputs to the instruction.<br />
Channel B Boolean This is one of the two safety inputs to the instruction.<br />
Input Status Boolean If instruction inputs are from a safety I/O module, this is the input status from the I/O module<br />
or modules (Input Status or Combined Status). If instruction inputs are derived from internal<br />
logic, it is the application programmer’s responsibility to determine the conditions.<br />
Reset<br />
ON (1): The inputs to this instruction are valid.<br />
OFF (0): The inputs to this instruction are invalid.<br />
(1) Boolean If Restart Type = Manual, this input is used to energize Output 1 once Channel A and Channel<br />
B are both in the active state.<br />
If Restart Type = Automatic, this input is not used to energize Output 1.<br />
This input clears instruction and circuit faults provided the fault condition is not present.<br />
OFF (0) -> ON (1): The Fault Present and Fault Code outputs are reset.<br />
(1) ISO 13849-1 stipulates instruction reset functions must occur on falling edge signals. To comply with ISO 13849-1<br />
requirements, add this logic immediately before this instruction. Rename the “Reset_Signal” tag in this example<br />
to your reset signal tagname. Then use the OSF instruction Output Bit tag as the instruction’s reset source.<br />
Dual-channel Input Stop <strong>Instruction</strong>: Outputs<br />
The following table explains instruction outputs. The outputs may be<br />
external tags (safety output modules) or internal tags for use in other<br />
logic routines.<br />
Name Data Type Description<br />
Output 1 (O1) Boolean The output is energized when the input conditions are satisfied.<br />
Fault Preset (FP) Boolean<br />
The output becomes de-energized when:<br />
• either Channel A or Channel B transitions to the safe state.<br />
• the Input Status input is OFF (0).<br />
ON (1): A fault is present in the instruction.<br />
OFF (0): This instruction is operating normally.<br />
Fault Code Integer This output indicates the type of fault that occurred. See the DCS – Fault Codes on page 50<br />
for a list of fault codes.<br />
Diagnostic Code Integer<br />
This parameter is not safety-related.<br />
This output indicates the diagnostic status of the instruction. See the DCS – Diagnostic<br />
Codes on page 50 for a list of diagnostic codes.<br />
This parameter is not safety-related.<br />
IMPORTANT<br />
Do not write to any instruction output tag under any<br />
circumstances.<br />
40 Publication <strong>1756</strong>-<strong>RM095C</strong>-<strong>EN</strong>-P - July 2008
General <strong>Safety</strong> <strong>Application</strong> <strong>Instruction</strong>s Chapter 1<br />
DCS – Normal Operation (Manual Restart, Manual Cold Start)<br />
The timing diagram illustrates normal operation with Restart Type<br />
configured for Manual and Cold Start Type configured for Manual. At<br />
(A), Output 1 will not be energized because the safety inputs have not<br />
been through the safe state (0 in this case). At (B), Output 1 is<br />
energized because the safety inputs have been cycled through the safe<br />
state and are in the active state when the reset is triggered. At (C),<br />
Output 1 is de-energized because one of the safety inputs (Channel A)<br />
has transitioned to a safe state. At (D), Output 1 is once again<br />
energized when a reset is triggered with both safety inputs in the<br />
active state.<br />
Normal Operation (Manual Restart, Manual Cold Start)<br />
1<br />
Channel A<br />
0<br />
1<br />
Channel B<br />
0<br />
1<br />
Reset<br />
0<br />
1<br />
Output 1<br />
0<br />
A B C D<br />
Input Type = Equivalent - Active High<br />
Restart Type = Manual<br />
Cold Start Type = Manual<br />
Discrepancy Time = 250 ms<br />
If the Input Status input is not shown, it is assumed that the input status is valid (ON = 1) for the<br />
entire timing diagram.<br />
Publication <strong>1756</strong>-<strong>RM095C</strong>-<strong>EN</strong>-P - July 2008 41
Chapter 1 General <strong>Safety</strong> <strong>Application</strong> <strong>Instruction</strong>s<br />
The same behavior is demonstrated below as in the previous timing<br />
diagram except that the Input Type is Complementary.<br />
Normal Operation (Complementary Inputs)<br />
1<br />
Channel A<br />
0<br />
1<br />
Channel B<br />
0<br />
1<br />
Reset<br />
0<br />
1<br />
Output 1<br />
0<br />
A B C D<br />
Input Type = Complimentary<br />
Restart Type = Manual<br />
Cold Start Type = Manual<br />
Discrepancy Time = 250 ms<br />
If the Input Status input is not shown, it is assumed that the input status is valid (ON = 1) for the<br />
entire timing diagram.<br />
42 Publication <strong>1756</strong>-<strong>RM095C</strong>-<strong>EN</strong>-P - July 2008
General <strong>Safety</strong> <strong>Application</strong> <strong>Instruction</strong>s Chapter 1<br />
DCS – Normal Operation (Manual Restart, Automatic Cold Start)<br />
The timing diagram illustrates normal operation with Cold Start Type<br />
configured for Automatic. When Cold Start Type is automatic,<br />
Output 1 will be energized as soon as the Input Status becomes valid<br />
[OFF (0) to ON (1) transition] for the first time, such as when power is<br />
applied to a PLC controller. At (A), Output 1 is energized when the<br />
Input Status becomes valid with the safety inputs in the active state. At<br />
(B), Output 1 is de-energized when one of the safety inputs transitions<br />
to the safe state. Output 1 will not be energized again until (C), when<br />
the reset is triggered with the safety inputs in the active state.<br />
The automatic cold start only has effect the first time the Input Status<br />
becomes valid.<br />
1<br />
Channel A<br />
0<br />
1<br />
Channel B<br />
0<br />
1<br />
Reset<br />
0<br />
1<br />
Input Status<br />
0<br />
1<br />
Output 1<br />
0<br />
Input Type = Equivalent - Active High<br />
Restart Type = Manual<br />
Cold Start Type = Automatic<br />
Discrepancy Time = 250 ms<br />
A B C<br />
Publication <strong>1756</strong>-<strong>RM095C</strong>-<strong>EN</strong>-P - July 2008 43
Chapter 1 General <strong>Safety</strong> <strong>Application</strong> <strong>Instruction</strong>s<br />
DCS – Normal Operation (Automatic Restart, Manual Cold Start)<br />
The timing diagram illustrates normal operation with automatic restart<br />
and manual cold start. Because Cold Start Type is Manual, both safety<br />
inputs must go through the safe state before Output 1 can be<br />
energized. At (A), Output 1 is energized automatically 50 ms after the<br />
safety inputs transition to the active state (1 in this case). At (B),<br />
Output 1 is de-energized when one of the safety inputs transitions to<br />
the safe state. At (C), Output 1 is automatically energized 50 ms after<br />
both safety inputs transition back to the active state.<br />
1<br />
Channel A<br />
0<br />
1<br />
Channel B<br />
0<br />
1<br />
Output 1<br />
0<br />
50 ms 50 ms<br />
A B C<br />
Input Type = Equivalent - Active High<br />
Restart Type = Automatic<br />
Cold Start Type = Manual<br />
Discrepancy Time = 250 ms<br />
If the Input Status input is not shown, it is assumed that the input status is valid (ON = 1) for the<br />
entire timing diagram.<br />
There is always a 50 ms delay before energizing Output 1 when it is configured to be energized<br />
automatically (Restart Type = Automatic).<br />
44 Publication <strong>1756</strong>-<strong>RM095C</strong>-<strong>EN</strong>-P - July 2008
General <strong>Safety</strong> <strong>Application</strong> <strong>Instruction</strong>s Chapter 1<br />
DCS – Normal Operation (Automatic Restart, Automatic Cold<br />
Start)<br />
The timing diagram illustrates normal operation with automatic restart<br />
and automatic cold start. Here the instruction does not have to wait<br />
for the safety inputs to go through the safe state. At (A), Output 1 is<br />
energized immediately after the Input Status becomes valid for the first<br />
time with the safety inputs in the active state.<br />
Channel A<br />
Channel B<br />
Input Status<br />
Output 1<br />
1<br />
0<br />
1<br />
0<br />
1<br />
0<br />
1<br />
0<br />
A B C<br />
Input Type = Equivalent - Active High<br />
Restart Type = Automatic<br />
Cold Start Type = Automatic<br />
Discrepancy Time = 250 ms<br />
There is always a 50 ms delay before energizing Output 1 when it is configured to be energized<br />
automatically (Restart Type = Automatic).<br />
Publication <strong>1756</strong>-<strong>RM095C</strong>-<strong>EN</strong>-P - July 2008 45<br />
50 ms
Chapter 1 General <strong>Safety</strong> <strong>Application</strong> <strong>Instruction</strong>s<br />
DCS – Input Status Fault (Manual Cold Start)<br />
The timing diagram illustrates a fault occurring when the Input Status<br />
becomes invalid. When Cold Start Type is configured for Manual, the<br />
safety inputs must go through the safe state after a fault has been<br />
cleared. At (A), Output 1 is energized when a reset is triggered with<br />
the safety inputs in the active state. At (B), a fault occurs because the<br />
Input Status becomes invalid, which de-energizes Output 1. At (C), the<br />
fault cannot be cleared because the Input Status is still invalid. At (D),<br />
the fault is cleared, but Output 1 cannot yet be energized because the<br />
safety inputs must transition through the safe state when Cold Start<br />
Type is Manual. At (E), the safety inputs have gone through the safe<br />
state. At (F), Output 1 is once again energized when the reset is<br />
triggered.<br />
1<br />
Channel A<br />
0<br />
1<br />
Channel B<br />
0<br />
1<br />
Reset<br />
0<br />
1<br />
Input Status<br />
0<br />
1<br />
Fault Present<br />
0<br />
1<br />
Output 1<br />
0<br />
Input Type = Equivalent - Active High<br />
Restart Type = Manual<br />
Cold Start Type = Manual<br />
Discrepancy Time = 250 ms<br />
A B C D E F<br />
46 Publication <strong>1756</strong>-<strong>RM095C</strong>-<strong>EN</strong>-P - July 2008
DCS – Input Status Fault (Automatic Cold Start)<br />
General <strong>Safety</strong> <strong>Application</strong> <strong>Instruction</strong>s Chapter 1<br />
The timing diagram illustrates a fault occurring when the Input Status<br />
becomes invalid. When Cold Start Type is configured for Automatic,<br />
the safety inputs are not required to go through the safe state after a<br />
fault has been cleared. At (A), Output 1 is energized when the Input<br />
Status becomes valid because the Cold Start Type is automatic. At (B),<br />
a fault occurs because the Input Status becomes invalid, which<br />
de-energizes Output 1. At (C), the fault cannot be cleared because the<br />
Input Status is still invalid. At (D), the fault is cleared because the<br />
Input Status is valid and a reset occurred. Output 1 is then energized<br />
because the Cold Start Type is Automatic.<br />
It is not necessary for the <strong>Safety</strong> Inputs to go through the safe state<br />
after an Input Status fault is cleared when the Cold Start Type is<br />
Automatic.<br />
Channel A<br />
Channel B<br />
Reset<br />
Input Status<br />
Fault Present<br />
Output 1<br />
1<br />
0<br />
1<br />
0<br />
1<br />
0<br />
1<br />
0<br />
1<br />
0<br />
1<br />
0<br />
A B C D<br />
Input Type = Equivalent - Active High<br />
Restart Type = Manual<br />
Cold Start Type = Automatic<br />
Discrepancy Time = 250 ms<br />
If the Input Status input is not shown, it is assumed that the input status is valid (=1) for the entire<br />
timing diagram.<br />
Publication <strong>1756</strong>-<strong>RM095C</strong>-<strong>EN</strong>-P - July 2008 47
Chapter 1 General <strong>Safety</strong> <strong>Application</strong> <strong>Instruction</strong>s<br />
DCS – Cycle Inputs Fault<br />
The timing diagram illustrates one of the two safety inputs<br />
transitioning to the safe state and back to the active state while<br />
Output 1 is energized. At (A), Output 1 is energized in the normal<br />
way. At (B), Channel A transitions to the safe state which immediately<br />
de-energizes Output 1. At (C), Channel A transitions back to the active<br />
state before the 250 ms Discrepancy Time causes a fault. At (D),<br />
Output 1 is energized because the safety inputs have cycled through<br />
the safe state, and a reset has been triggered.<br />
Channel A<br />
Channel B<br />
Reset<br />
Fault Present<br />
1<br />
0<br />
1<br />
0<br />
1<br />
0<br />
1<br />
0<br />
1<br />
Output 1<br />
0<br />
A B C D<br />
Input Type = Equivalent - Active High<br />
Restart Type = Manual<br />
Cold Start Type = Manual<br />
Discrepancy Time = 250 ms<br />
If the Input Status input is not shown, it is assumed that the input status is valid (ON = 1) for the<br />
entire timing diagram.<br />
48 Publication <strong>1756</strong>-<strong>RM095C</strong>-<strong>EN</strong>-P - July 2008
DCS – Discrepancy Fault<br />
General <strong>Safety</strong> <strong>Application</strong> <strong>Instruction</strong>s Chapter 1<br />
The timing diagram illustrates a fault occurring when Channel A and<br />
Channel B are in an inconsistent state for longer than the configured<br />
Discrepancy Time. At (A), a Discrepancy fault occurs because Channel<br />
A has been in the active state and Channel B has been in the safe state<br />
for 250 ms (Discrepancy Time). At (B), the fault is reset, but Output 1<br />
is not energized because the safety inputs must cycle through the safe<br />
state after a Discrepancy fault is cleared, in order to energize Output<br />
1. At (C), Output 1 is energized because the safety inputs have<br />
transitioned through the safe state and a reset has been triggered. At<br />
(D), another Discrepancy fault occurs when the safety inputs are again<br />
in an inconsistent state for longer than 250 ms.<br />
1<br />
Channel A<br />
0<br />
1<br />
Channel B<br />
0<br />
1<br />
Reset<br />
0<br />
1<br />
Fault Present<br />
0<br />
1<br />
Output 1<br />
0<br />
DCS – False Rung State Behavior<br />
A B<br />
C<br />
When the instruction is executed on a false rung, all instruction<br />
outputs are de-energized.<br />
Publication <strong>1756</strong>-<strong>RM095C</strong>-<strong>EN</strong>-P - July 2008 49<br />
250ms<br />
250ms<br />
Input Type = Equivalent - Active High<br />
Restart Type = Manual<br />
Cold Start Type = Manual<br />
Discrepancy Time = 250 ms<br />
If the Input Status input is not shown, it is assumed that the input status is valid (ON = 1) for the<br />
entire timing diagram.<br />
D
Chapter 1 General <strong>Safety</strong> <strong>Application</strong> <strong>Instruction</strong>s<br />
DCS – Fault Codes<br />
Fault Code Description Corrective Action<br />
00H No fault. None.<br />
20H The Input Status input transitioned from ON (1) to OFF (0) • Check the I/O module connection or the internal logic<br />
while the instruction was executing.<br />
used to source input status.<br />
• Reset the fault.<br />
4000H Channel A and Channel B were in an inconsistent state for • Check the wiring.<br />
4001H<br />
longer than the Discrepancy Time. At the time of the fault,<br />
Channel A was in the active state. Channel B was in the safe<br />
state.<br />
Channel A and Channel B were in an inconsistent state for<br />
longer than the Discrepancy Time. At the time of the fault,<br />
Channel A was in the safe state. Channel B was in the active<br />
state.<br />
• Perform a functional test of the device (bring Channel<br />
A and Channel B to the safe state).<br />
• Reset the fault.<br />
4002H Channel A went to the safe state and back to the active state<br />
while Channel B remained active.<br />
4003H Channel B went to the safe state and back to the active state<br />
while Channel A remained active.<br />
DCS – Diagnostic Codes<br />
Diagnostic Code Description Corrective Action<br />
00H No fault. None.<br />
05H The Reset input is held ON (1). <strong>Set</strong> the Reset input to OFF (0).<br />
20H The Input Status input was OFF (0) when the Check the I/O module connection or the internal logic<br />
instruction started<br />
used to source input status.<br />
4000H The device was not functionally tested at Perform a functional test of the device (bring Channel A<br />
start-up.<br />
and Channel B to the safe state).<br />
4001H The device was not functionally tested after a • Check the wiring.<br />
fault occurred.<br />
• Perform a functional test of the device (bring Channel<br />
A and Channel B to the safe state).<br />
50 Publication <strong>1756</strong>-<strong>RM095C</strong>-<strong>EN</strong>-P - July 2008
DCS – Wiring and Programming Example<br />
General <strong>Safety</strong> <strong>Application</strong> <strong>Instruction</strong>s Chapter 1<br />
This example complies with <strong>EN</strong>954-1, Category 4 operation. The<br />
standard control portion of the application is not shown.<br />
Wiring Diagram<br />
24V DC<br />
24V Ground<br />
DeviceNet<br />
1<br />
V<br />
G<br />
11<br />
Latching E-stop<br />
Momentary<br />
Push Button<br />
(reset)<br />
3 4 14 13<br />
24<br />
I0 I1<br />
T1 T0<br />
I11<br />
1791-DS-IB12<br />
Module 1<br />
This programming diagram shows the instruction with inputs and<br />
outputs.<br />
Programming Diagram<br />
DCS<br />
MainPanelEStop<br />
Equivalent Active High<br />
Input Type Output 1<br />
TBD ms<br />
Discrepancy Time<br />
Manual Restart Type<br />
Manual<br />
Coldstart Type<br />
Module1:I.Pt00Data<br />
Module1:I.Pt01Data<br />
Module1:I.Combined Status<br />
Module1:I.Pt11Data<br />
Channel A<br />
Channel B<br />
Input Status<br />
Publication <strong>1756</strong>-<strong>RM095C</strong>-<strong>EN</strong>-P - July 2008 51<br />
Reset<br />
Fault Present<br />
See Note 1<br />
Note 1:This is an internal Boolean tag used by other parts of the user application not shown in this example.<br />
Key: Color code represents data or value typically used.<br />
Tag-mapped Variable<br />
Standard Output<br />
<strong>Safety</strong> Input <strong>Safety</strong> Output<br />
Configuration Constant/Value<br />
Internal <strong>Safety</strong> Variable
Chapter 1 General <strong>Safety</strong> <strong>Application</strong> <strong>Instruction</strong>s<br />
Ladder Logic<br />
RSLogix 5000 software is used to configure the input and output<br />
parameters of the Guard I/O module, as illustrated.<br />
Module Definition<br />
DCS<br />
Dual Channel Input Stop<br />
DCS MainPanelEStop<br />
<strong>Safety</strong> Function EMERG<strong>EN</strong>CY STOP<br />
Input Type EQUIVAL<strong>EN</strong>T - ACTIVE HIGH<br />
Discrepancy Time (Msec) 500<br />
Restart Type MANUAL<br />
Cold Start Type MANUAL<br />
Channel A Module1:I.Pt00Data<br />
1<br />
Channel B Module1:I.Pt01Data<br />
1<br />
Input Status Module1:I.CombinedStatus<br />
1<br />
Reset Module1:I.Pt11Data<br />
0<br />
Rockwell Automation suggests using Exact Match, as shown.<br />
However, setting Electronic Keying to Compatible Match is allowed.<br />
52 Publication <strong>1756</strong>-<strong>RM095C</strong>-<strong>EN</strong>-P - July 2008<br />
O1<br />
FP
Module Input Configuration<br />
Module Test Output Configuration<br />
General <strong>Safety</strong> <strong>Application</strong> <strong>Instruction</strong>s Chapter 1<br />
Publication <strong>1756</strong>-<strong>RM095C</strong>-<strong>EN</strong>-P - July 2008 53
Chapter 1 General <strong>Safety</strong> <strong>Application</strong> <strong>Instruction</strong>s<br />
Dual-channel Input Stop<br />
with Test (DCST)<br />
• BG-certified<br />
•<br />
The Dual-channel Input Stop with Test instruction monitors dual-input<br />
safety devices whose main function is to stop a machine safely, for<br />
example, an E-stop, light curtain, or safety gate. This instruction can<br />
only energize Output 1 when both safety inputs, Channel A and<br />
Channel B, are in the active state as determined by the Input Type<br />
parameter, and the correct reset actions are carried out.<br />
In addition, this instruction has the ability to force a functional test of<br />
the stop device upon request.<br />
The timing diagrams from the Dual-channel Input Stop (DCS)<br />
instruction are applicable to this instruction as well.<br />
DCST operation diagrams, beginning on page 58, highlight the<br />
features of the test-related parameters such as Test Request and Test<br />
Command.<br />
DCST – <strong>Instruction</strong> Parameters<br />
IMPORTANT<br />
Do not use the same tag name for more than one instruction in<br />
the same program. Do not write to any instruction output tag<br />
under any circumstances.<br />
54 Publication <strong>1756</strong>-<strong>RM095C</strong>-<strong>EN</strong>-P - July 2008
Dual-channel Input Stop with Test <strong>Instruction</strong>: Configuration Parameters<br />
General <strong>Safety</strong> <strong>Application</strong> <strong>Instruction</strong>s Chapter 1<br />
The following table provides the parameters that are used to configure<br />
the instruction. These parameters cannot be changed at runtime.<br />
Parameter Data Type Description<br />
<strong>Safety</strong> Function List This parameter provides a text name for how this instruction is being used. Choices include<br />
E-stop, safety gate, light curtain, area scanner, safety mat, cable (rope) pull switch, and<br />
user-defined.<br />
Input Type List<br />
Note: Does not effect instruction behavior. This is for information/documentation purposes<br />
only.<br />
This parameter selects input channel behavior.<br />
Discrepancy Time (ms) Integer<br />
Equivalent - Active High: The inputs are in the active state when Channel A and Channel B<br />
inputs are 1.<br />
Complementary: The inputs are in the active state when Channel A is 1 and Channel B is 0.<br />
The amount of time that the inputs are allowed to be in an inconsistent state before an<br />
instruction fault is generated. The inconsistent state depends on the Input Type.<br />
Equivalent: Inconsistent state is when:<br />
• Channel A = 0 and Channel B = 1, or<br />
• Channel A = 1 and Channel B = 0<br />
Restart Type List<br />
Complementary: Inconsistent state is when:<br />
• Channel A = 0 and Channel B = 0, or<br />
• Channel A = 1 and Channel B = 1<br />
The valid range is 5...3000 ms.<br />
This input configures Output 1 for either manual or automatic restart.<br />
Manual A transition of the Reset input from OFF (0) to ON (1), while all of the<br />
Output 1 enabling conditions are met, is required to energize Output 1.<br />
Automatic Output 1 is energized 50 ms after all of the enabling conditions are met.<br />
ATT<strong>EN</strong>TION: Automatic restart may only be used in application situations<br />
!<br />
where you can prove that no unsafe conditions can occur as a result of its<br />
use, or the reset function is being performed elsewhere in the safety circuit<br />
(for example, output function).<br />
Cold Start Type List This parameter specifies the Output 1 behavior when applying controller power or mode<br />
change to Run.<br />
Manual Output 1 is not energized when the Input Status becomes valid or when the<br />
Input Status fault is cleared. (The device must be tested before Output 1<br />
can be energized.)<br />
Automatic Output 1 is energized immediately when the Input Status becomes valid or<br />
when the Input Status fault is cleared and both inputs are in their active<br />
state.<br />
Publication <strong>1756</strong>-<strong>RM095C</strong>-<strong>EN</strong>-P - July 2008 55
Chapter 1 General <strong>Safety</strong> <strong>Application</strong> <strong>Instruction</strong>s<br />
Dual-channel Input Stop with Test <strong>Instruction</strong>: Inputs<br />
The following table explains instruction inputs. The inputs may be<br />
field device signals from input devices or derived from user logic.<br />
Name Data Type Description<br />
Channel A Boolean This input is one of the two safety inputs to the instruction.<br />
Channel B Boolean This input is one of the two safety inputs to the instruction.<br />
Test Request Boolean This signal forces a functional test to occur.<br />
ON (1) -> OFF (0): Triggers a functional test. Output 1 is de-energized and the Test Command<br />
output is energized, prompting you to perform a functional test.<br />
Input Status Boolean<br />
The functional test is complete and the test Test Command output is de-energized when<br />
Channel A and Channel B go to the safe state.<br />
If instruction inputs are from a safety I/O module, this is the input status from the I/O module<br />
or modules (Input Status or Combined Status). If instruction inputs are derived from internal<br />
logic, it is the application programmer’s responsibility to determine the conditions.<br />
Reset<br />
ON (1): The inputs to this instruction are valid.<br />
OFF (0): The inputs to this instruction are invalid.<br />
(1) Boolean If Restart Type = Manual, this input is used to energize Output 1 once Channel A and Channel<br />
B are both in the active state.<br />
If Restart Type = Automatic, this input is used to energize Output 1.<br />
This input clears instruction and circuit faults provided the fault condition is not present.<br />
OFF (0) -> ON (1): The Fault Present and Fault Code outputs are reset.<br />
(1) ISO 13849-1 stipulates instruction reset functions must occur on falling edge signals. To comply with ISO 13849-1<br />
requirements, add this logic immediately before this instruction. Rename the “Reset_Signal” tag in this example<br />
to your reset signal tagname. Then use the OSF instruction Output Bit tag as the instruction’s reset source.<br />
56 Publication <strong>1756</strong>-<strong>RM095C</strong>-<strong>EN</strong>-P - July 2008
Dual-channel Input Stop with Test <strong>Instruction</strong>: Outputs<br />
General <strong>Safety</strong> <strong>Application</strong> <strong>Instruction</strong>s Chapter 1<br />
The following table explains instruction outputs. The outputs may be<br />
external tags (safety output modules) or internal tags for use in other<br />
logic routines.<br />
Name Data Type Description<br />
Output 1 (O1) Boolean This output is energized when the input conditions are satisfied.<br />
Test Command (TC) Boolean<br />
The output becomes de-energized when:<br />
• either Channel A or Channel B transitions to the safe state.<br />
• the Input Status input is OFF (0).<br />
• a functional test is requested [Test Request->OFF (0)].<br />
This output is energized when a functional test must be carried out.<br />
Fault Present (FP) Boolean<br />
This parameter is not safety-related.<br />
ON (1): A fault is present in the instruction.<br />
OFF (0): This instruction is operating normally.<br />
Fault Code Integer This output indicates the type of fault that occurred. See the DCST – Fault Codes on page 60<br />
for a list of fault codes.<br />
Diagnostic Code Integer<br />
This parameter is not safety-related.<br />
This output indicates the diagnostic status of the instruction. See the DCSTL – Diagnostic<br />
Codes on page 60 for a list of diagnostic codes.<br />
This parameter is not safety-related.<br />
IMPORTANT<br />
Do not write to any instruction output tag under any<br />
circumstances.<br />
Publication <strong>1756</strong>-<strong>RM095C</strong>-<strong>EN</strong>-P - July 2008 57
Chapter 1 General <strong>Safety</strong> <strong>Application</strong> <strong>Instruction</strong>s<br />
DCST – Functional Test Operation (Manual Restart)<br />
The timing diagram illustrates a manual function test being performed<br />
on a safety device, for example, a safety gate, with the instruction<br />
configured for manual restart. At (A), a manual functional test is<br />
requested because the Test Request input transitions from ON (1) to<br />
OFF (0). This immediately de-energizes Output 1 and energizes the<br />
Test Command output prompting you to test the device. At (B), the<br />
functional test is complete, so the Test Command output is<br />
de-energized. At (C), Output 1 is energized again when a reset is<br />
triggered.<br />
Channel A<br />
Channel B<br />
Reset<br />
Test Request<br />
Test Command<br />
Output 1<br />
1<br />
0<br />
1<br />
0<br />
1<br />
0<br />
1<br />
0<br />
1<br />
0<br />
1<br />
0<br />
A B C<br />
Input Type = Equivalent - Active High<br />
Restart Type = Manual<br />
Cold Start Type = Manual<br />
Discrepancy Time = 250 ms<br />
If the Input Status input is not shown, it is assumed that the input status is valid (ON = 1) for the<br />
entire timing diagram.<br />
58 Publication <strong>1756</strong>-<strong>RM095C</strong>-<strong>EN</strong>-P - July 2008
General <strong>Safety</strong> <strong>Application</strong> <strong>Instruction</strong>s Chapter 1<br />
DCST – Functional Test Operation (Automatic Restart)<br />
The timing diagram illustrates a manual function test being performed<br />
with Restart Type equal to Automatic. At (A), Output 1 is de-energized<br />
because the Test Request transitions from ON (1) to OFF (0). The Test<br />
Command output is also energized at this point. At (B), the Test<br />
Command output is de-energized because the functional test is<br />
complete. At (C), Output 1 is automatically energized 50 ms after the<br />
safety inputs enter the active state because the Restart Type is<br />
Automatic.<br />
Channel A<br />
Channel B<br />
Test Request<br />
Test Command<br />
Output 1<br />
1<br />
0<br />
1<br />
0<br />
1<br />
0<br />
1<br />
0<br />
1<br />
0<br />
A<br />
Input Type = Equivalent - Active High<br />
Restart Type = Automatic<br />
Cold Start Type = Automatic<br />
Discrepancy Time = 250 ms<br />
B C<br />
DCST – False Rung State Behavior<br />
When the instruction is executed on a false rung, all instruction<br />
outputs are de-energized.<br />
Publication <strong>1756</strong>-<strong>RM095C</strong>-<strong>EN</strong>-P - July 2008 59<br />
50 ms<br />
If the Input Status input is not shown, it is assumed that the input status is valid (ON = 1) for the<br />
entire timing diagram.<br />
There is always a 50 ms delay before energizing Output 1 when it is configured to be energized<br />
automatically (Restart Type = Automatic).
Chapter 1 General <strong>Safety</strong> <strong>Application</strong> <strong>Instruction</strong>s<br />
DCST – Fault Codes<br />
Fault Code Description Corrective Action<br />
00H No fault. None.<br />
20H The Input Status input transitioned from ON (1) to OFF (0) • Check the I/O module connection or the internal logic<br />
while the instruction was executing.<br />
used to source input status.<br />
• Reset the fault.<br />
4000H Channel A and Channel B were in an inconsistent state for • Check the wiring.<br />
4001H<br />
longer than the Discrepancy Time. At the time of the fault,<br />
Channel A was in the active state. Channel B was in the safe<br />
state.<br />
Channel A and Channel B were in an inconsistent state for<br />
longer than the Discrepancy Time. At the time of the fault,<br />
Channel A was in the safe state. Channel B was in the active<br />
state.<br />
• Perform a functional test of the device (bring Channel<br />
A and Channel B to the safe state).<br />
• Reset the fault.<br />
4002H Channel A went to the safe state and back to the active state<br />
while Channel B remained active.<br />
4003H Channel B went to the safe state and back to the active state<br />
while Channel A remained active.<br />
DCST – Diagnostic Codes<br />
Diagnostic Code Description Corrective Action<br />
00H No fault. None.<br />
05H The Reset input is held ON (1). <strong>Set</strong> the Reset input to OFF (0).<br />
20H The Input Status input was OFF (0) when the Check the I/O module connection or the internal logic<br />
instruction started.<br />
used to source input status.<br />
4000H The device was not functionally tested at Perform a functional test of the device (put Channel A and<br />
start-up.<br />
Channel B in a safe state).<br />
4001H The device was not functionally tested after a • Check the wiring.<br />
fault occurred.<br />
• Perform a functional test of the device (bring Channel<br />
A and Channel B to the safe state).<br />
4030H Waiting for the manual functional test to occur. Perform a functional test of the device (bring Channel A<br />
and Channel B to the safe state).<br />
60 Publication <strong>1756</strong>-<strong>RM095C</strong>-<strong>EN</strong>-P - July 2008
DCST – Wiring and Programming Example<br />
General <strong>Safety</strong> <strong>Application</strong> <strong>Instruction</strong>s Chapter 1<br />
This example complies with <strong>EN</strong>954-1, Category 4 operation. The<br />
standard control portion of the application is not shown.<br />
Wiring Diagram<br />
24V DC<br />
24V Ground<br />
<strong>Safety</strong> Gate<br />
Stop<br />
This programming diagram shows the instruction with inputs and<br />
outputs.<br />
Publication <strong>1756</strong>-<strong>RM095C</strong>-<strong>EN</strong>-P - July 2008 61<br />
DeviceNet<br />
1<br />
V<br />
G<br />
11<br />
3 13 4 14<br />
24<br />
I0 T0 I1 T1<br />
I11<br />
1791-DS-IB12<br />
Module 1<br />
T2<br />
25<br />
Momentary<br />
Push Button<br />
(reset)<br />
Test Prompt<br />
Lamp
Chapter 1 General <strong>Safety</strong> <strong>Application</strong> <strong>Instruction</strong>s<br />
Programming Diagram<br />
DCST<br />
MainGate<br />
Equivalent Active High Input Type<br />
Output 1<br />
TBD ms<br />
Discrepancy Time<br />
Manual Restart Type Test Command<br />
Manual<br />
Coldstart Type<br />
Module1:I.Pt00Data<br />
Module1:I.Pt01Data<br />
See Note 1<br />
Module1:I.Combined Status<br />
Module1:I.Pt11Data<br />
Ladder Logic<br />
Channel A<br />
Channel B<br />
Test Request<br />
Input Status<br />
62 Publication <strong>1756</strong>-<strong>RM095C</strong>-<strong>EN</strong>-P - July 2008<br />
Reset<br />
Fault Present<br />
See Note 2<br />
Module1:O.Test02Data<br />
Note 1:This is an internal Boolean tag which has its value determined by other parts of the user application not<br />
shown in this example. The falling edge (0->1) of the Test Request input forces a test to be executed (safe<br />
state must be observed). Connecting this input to the output that enables the hazard forces a test to be<br />
executed every time the hazard is stopped.<br />
Note 2: This is an internal Boolean tag used by other parts of the user application not shown in this example.<br />
Key: Color code represents data or value typically used.<br />
Tag-mapped Variable<br />
Standard Output<br />
<strong>Safety</strong> Input <strong>Safety</strong> Output<br />
Configuration Constant/Value<br />
Internal <strong>Safety</strong> Variable<br />
DCST<br />
Dual Channel Input Stop With Test<br />
DCST MainGate<br />
<strong>Safety</strong> Function SAFETY GATE<br />
Input Type EQUIVAL<strong>EN</strong>T - ACTIVE HIGH<br />
Discrepancy Time (Msec) 500<br />
Restart Type MANUAL<br />
Cold Start Type MANUAL<br />
Channel A Module1:I.Pt00Data<br />
1<br />
Channel B Module1:I.Pt01Data<br />
1<br />
Test Request SeeNote1<br />
0<br />
Input Status Module1:I.CombinedStatus<br />
1<br />
Reset Module1:I.Pt11Data<br />
0<br />
O1<br />
TC<br />
MainGate.TC Module1:O.Test02Data<br />
Note 1:This is an internal Boolean tag which has its value determined by other parts of the user application not<br />
shown in this example. The falling edge (0->1) of the Test Request input forces a test to be executed (safe<br />
state must be observed). Connecting this input to the output that enables the hazard forces a test to be<br />
executed every time the hazard is stopped.<br />
FP
General <strong>Safety</strong> <strong>Application</strong> <strong>Instruction</strong>s Chapter 1<br />
RSLogix 5000 software is used to configure the input and output<br />
parameters of the Guard I/O module, as illustrated.<br />
Module Definition<br />
Rockwell Automation suggests using Exact Match, as shown.<br />
However, setting Electronic Keying to Compatible Match is allowed.<br />
Module Input Configuration<br />
Publication <strong>1756</strong>-<strong>RM095C</strong>-<strong>EN</strong>-P - July 2008 63
Chapter 1 General <strong>Safety</strong> <strong>Application</strong> <strong>Instruction</strong>s<br />
Module Test Output Configuration<br />
64 Publication <strong>1756</strong>-<strong>RM095C</strong>-<strong>EN</strong>-P - July 2008
Dual-channel Input Stop<br />
with Test and Lock (DCSTL)<br />
• BG-certified<br />
•<br />
General <strong>Safety</strong> <strong>Application</strong> <strong>Instruction</strong>s Chapter 1<br />
The Dual-channel Input Stop with Test and Lock instruction monitors<br />
dual-input safety devices whose main function is to stop safely, for<br />
example, an E-stop, light curtain, or safety gate. This instruction can<br />
only energize Output 1 when both safety inputs, Channel A and<br />
Channel B, are in the active state as determined by the Input type<br />
parameter, and the correct reset actions are carried out.<br />
In addition, this instruction has the ability to monitor a locked<br />
feedback signal from a safety device and issue a lock request to a<br />
safety device, for example a safety gate with guard locking. The<br />
Unlock Request input is used to request an electromagnetic lock or<br />
unlock. However, the hazard protected by this instruction must be<br />
stopped for the instruction to issue an unlock command. The Lock<br />
Feedback input is used to determine whether or not the safety device<br />
is currently locked. To energize Output 1, the Lock Feedback input<br />
must be ON (1) in addition to the requirements of the DCST<br />
instruction.<br />
The operation timing diagrams from the Dual-channel Input Stop<br />
(DCS) instruction and the Dual-channel Input Stop Test (DCST)<br />
instruction are applicable to this instruction as well.<br />
DCSTL operation diagrams, beginning on page 69, highlight the<br />
features of the lock-related parameters such as Unlock Request, Lock<br />
Feedback, Hazard Stopped, and Unlock Command.<br />
Publication <strong>1756</strong>-<strong>RM095C</strong>-<strong>EN</strong>-P - July 2008 65
Chapter 1 General <strong>Safety</strong> <strong>Application</strong> <strong>Instruction</strong>s<br />
DCSTL – <strong>Instruction</strong> Parameters<br />
IMPORTANT<br />
Dual-channel Input Stop with Test and Lock <strong>Instruction</strong>: Configuration Parameters<br />
Do not use the same tag name for more than one instruction in<br />
the same program. Do not write to any instruction output tag<br />
under any circumstances.<br />
The following table provides the parameters that are used to configure<br />
the instruction. These parameters cannot be changed at runtime.<br />
Parameter Data Type Description<br />
<strong>Safety</strong> Function List This parameter provides a text name for how this instruction is being used. Choices include slide lock,<br />
safety gate and user-defined.<br />
Input Type List<br />
Note: Does not affect instruction behavior. This is for information/documentation purposes only.<br />
This parameter selects input channel behavior.<br />
Discrepancy Time<br />
(ms)<br />
Equivalent - Active High: Inputs are in the active state when Channel A and Channel B inputs are 1.<br />
Complementary: Inputs are in the active state when Channel A is 1 and Channel B is 0.<br />
Integer The amount of time that inputs are allowed to be in an inconsistent state before an instruction fault is<br />
generated. The inconsistent state depends on the Input Type.<br />
Equivalent: Inconsistent state is when:<br />
• Channel A = 0 and Channel B = 1, or<br />
• Channel A = 1 and Channel B = 0<br />
Restart Type List<br />
Complementary: Inconsistent state is when:<br />
• Channel A = 0 and Channel B = 0, or<br />
• Channel A = 1 and Channel B = 1<br />
The valid range is 5...3000 ms.<br />
This input configures Output 1 for either manual or automatic restart.<br />
Manual A transition of the Reset input from OFF (0) to ON (1), while all of the Output 1<br />
enabling conditions are met, is required to energize Output 1.<br />
Automatic Output 1 is energized 50 ms after all of the enabling conditions are met.<br />
ATT<strong>EN</strong>TION: Automatic restart may only be used in application situations where you<br />
!<br />
can prove that no unsafe conditions can occur as a result of its use, or the reset<br />
function is being performed elsewhere in the safety circuit (for example, output<br />
function).<br />
Cold Start Type List This parameter specifies the Output 1 behavior when applying controller power or mode change to<br />
Run.<br />
Manual Output 1 is not be energized when the Input Status becomes valid or when the Input<br />
Status fault is cleared. (The device must be tested before Output 1 can be energized.)<br />
Automatic Output 1 is energized immediately when the Input Status becomes valid or when the<br />
Input Status fault is cleared and both inputs are in their active state.<br />
66 Publication <strong>1756</strong>-<strong>RM095C</strong>-<strong>EN</strong>-P - July 2008
Dual-channel Input Stop with Test and Lock <strong>Instruction</strong>: Inputs<br />
General <strong>Safety</strong> <strong>Application</strong> <strong>Instruction</strong>s Chapter 1<br />
The following table explains instruction inputs. The inputs may be<br />
field device signals from input devices or derived from user logic.<br />
Name Data Type Description<br />
Channel A Boolean This input is one of the two safety inputs to the instruction.<br />
Channel B Boolean This input is one of the two safety inputs to the instruction.<br />
Test Request Boolean This signal forces a functional test to occur. See the Test Type parameter for more<br />
information.<br />
ON (1) -> OFF (0): Triggers a functional test. Output 1 is de-energized and the Test Command<br />
output is energized, prompting you to perform a functional test.<br />
Unlock Request Boolean<br />
IMPORTANT: Do not request a test when a hazard is present (Hazard Stopped = 0) because<br />
the machine will stop and cause a fault in this instruction.<br />
This input is used to request a lock and unlock of electromechanical locking devices.<br />
OFF (0): Lock is requested (the Unlock command is de-energized).<br />
ON (1): Unlock is requested if the machine hazard is stopped. The Unlock command is<br />
energized if the Hazard Stopped input equals ON (1).<br />
Lock Feedback Boolean<br />
This signal must also be used before locking and unlocking manual locks. Otherwise, a fault<br />
can occur because of invalid sequencing.<br />
This is the current state of the locking device. This input must be ON (1) in order to energize<br />
Output 1.<br />
Hazard Stopped Boolean<br />
OFF (0): The safety monitoring device is currently is not locked.<br />
ON (1): The safety monitoring device is currently locked.<br />
This is the hazard condition feedback signal. This input must be ON (1) in order for the<br />
instruction to issue an unlock command (energize the Unlock Command output).<br />
Input Status Boolean<br />
OFF (0): The Unlock Command output cannot be energized.<br />
ON (1): The Unlock Command output can be energized.<br />
If instruction inputs are from a safety I/O module, this is the input status from the I/O module<br />
or modules (Input Status or Combined Status). If instruction inputs are derived from internal<br />
logic, it is the application programmer’s responsibility to determine the conditions.<br />
Reset<br />
ON (1): The inputs to this instruction are valid.<br />
OFF (0): The inputs to this instruction are invalid.<br />
(1) Boolean If Restart Type = Manual, this input is used to energize Output 1 once Channel A and Channel<br />
B are both in the active state.<br />
If Restart Type = Automatic, this input is not used to energize Output 1.<br />
This input clears instruction and circuit faults provided the fault condition is not present.<br />
OFF (0) -> ON (1): The Fault Present and Fault Code outputs are reset.<br />
(1) ISO 13849-1 stipulates instruction reset functions must occur on falling edge signals. To comply with ISO 13849-1<br />
requirements, add this logic immediately before this instruction. Rename the “Reset_Signal” tag in this example<br />
to your reset signal tagname. Then use the OSF instruction Output Bit tag as the instruction’s reset source.<br />
Publication <strong>1756</strong>-<strong>RM095C</strong>-<strong>EN</strong>-P - July 2008 67
Chapter 1 General <strong>Safety</strong> <strong>Application</strong> <strong>Instruction</strong>s<br />
Dual-channel Input Stop with Test and Lock <strong>Instruction</strong>: Outputs<br />
The following table explains instruction outputs. The outputs may be<br />
external tags (safety output modules) or internal tags for use in other<br />
logic routines.<br />
Name Data Type Description<br />
Output 1 (O1) Boolean This output is energized when the input conditions are satisfied.<br />
Test Command (TC) Boolean<br />
The output becomes de-energized when:<br />
• either Channel A or Channel B transitions to the safe state.<br />
• the Input Status input is OFF (0).<br />
• a functional test is requested, that is Test Request -> OFF (0).<br />
• the Lock Feedback signal turns OFF (0).<br />
• an unlock is requested and the hazard stops, that is Unlock Request -> ON (1) and Hazard<br />
Stopped -> ON (1).<br />
This output is energized when a functional test must be carried out.<br />
Unlock Command (ULC) Boolean<br />
This parameter is not safety-related.<br />
This is an unlock signal for an electromechanical locking device or to prompt for manual<br />
unlock.<br />
Fault Present (FP) Boolean ON (1): A fault is present in the instruction.<br />
OFF (0): This instruction is operating normally.<br />
Fault Code Integer This output indicates the type of fault that occurred. See the DCSTL – Fault Codes on page 73<br />
for a list of fault codes.<br />
Diagnostic Code Integer<br />
This parameter is not safety-related.<br />
This output indicates the diagnostic status of the instruction. See the DCSTL – Diagnostic<br />
Codes on page 74 for a list of diagnostic codes.<br />
This parameter is not safety-related.<br />
IMPORTANT<br />
Do not write to any instruction output tag under any<br />
circumstances.<br />
68 Publication <strong>1756</strong>-<strong>RM095C</strong>-<strong>EN</strong>-P - July 2008
DCSTL – Start-up Operation (Manual Cold Start)<br />
General <strong>Safety</strong> <strong>Application</strong> <strong>Instruction</strong>s Chapter 1<br />
The timing diagram illustrates Output 1 being energized when the<br />
Cold Start Type is Manual. At (A), the gate is closed and requested to<br />
lock. At (B), the gate is considered locked when the Lock Feedback<br />
input transitions from OFF (0) to ON (1). At (C), Output 1 is energized<br />
when a reset is triggered. At (D), an unlock is requested when the<br />
Unlock Request signal transitions from OFF (0) to ON (1). At (E), the<br />
Unlock Command output is not energized until the Hazard Stopped<br />
input transitions from OFF (0) to ON (1). Output 1 is also<br />
de-energized at this point. At (F), Output 1 is energized again when<br />
the gate is opened, closed, and locked, and a reset is triggered.<br />
The devices being monitored in these timing diagrams are assumed to<br />
be a safety gate with lock.<br />
1<br />
Channel A<br />
0<br />
1<br />
Channel B<br />
0<br />
1<br />
Reset<br />
0<br />
1<br />
Unlock Request<br />
0<br />
1<br />
Lock Feedback<br />
0<br />
1<br />
Hazard Stopped<br />
0<br />
1<br />
Unlock Command<br />
0<br />
1<br />
Output 1<br />
0<br />
A B C<br />
Input Type = Equivalent - Active High<br />
Restart Type = Manual<br />
Cold Start Type = Manual<br />
Discrepancy Time = 250 ms<br />
Publication <strong>1756</strong>-<strong>RM095C</strong>-<strong>EN</strong>-P - July 2008 69<br />
D E<br />
If the Input Status input is not shown, it is assumed that the input status is valid (ON = 1) for the<br />
entire timing diagram.<br />
F
Chapter 1 General <strong>Safety</strong> <strong>Application</strong> <strong>Instruction</strong>s<br />
DCSTL – Start-up Operation (Automatic Cold Start)<br />
The timing diagram illustrates start-up operation when the Cold Start<br />
Type is Automatic. At (A), Output 1 is immediately energized when<br />
power is first applied because the gate is closed and locked, and the<br />
Cold Start Type is Automatic. At (B), an unlock is requested when the<br />
Unlock Request signal transitions from OFF (0) to ON (1). At (C), the<br />
Unlock Command output is not energized until the Hazard Stopped<br />
input transitions from OFF (0) to ON (1). Output 1 is also<br />
de-energized at this point. At (D), Output 1 is energized when the<br />
gate is opened, closed, and locked, and a reset is triggered.<br />
The devices being monitored in these timing diagrams are assumed to<br />
be a safety gate with lock.<br />
1<br />
Channel A<br />
0<br />
1<br />
Channel B<br />
0<br />
1<br />
Reset<br />
0<br />
1<br />
Unlock Request<br />
0<br />
1<br />
Lock Feedback<br />
0<br />
1<br />
Hazard Stopped<br />
0<br />
1<br />
Unlock Command<br />
0<br />
1<br />
Output 1<br />
0<br />
A B C<br />
Input Type = Equivalent - Active High<br />
Restart Type = Manual<br />
Cold Start Type = Automatic<br />
Discrepancy Time = 250 ms<br />
If the Input Status input is not shown, it is assumed that the input status is valid (ON = 1) for the<br />
entire timing diagram.<br />
70 Publication <strong>1756</strong>-<strong>RM095C</strong>-<strong>EN</strong>-P - July 2008<br />
D
DCSTL – Device Not Tested After Unlock Fault<br />
General <strong>Safety</strong> <strong>Application</strong> <strong>Instruction</strong>s Chapter 1<br />
The timing diagram illustrates how a gate must be tested each time<br />
after it is unlocked if the Cold Start Type is Manual. At (A), Output 1 is<br />
energized when a reset is triggered. At (B), a fault is generated when<br />
the device is unlocked and re-locked without the gate being opened.<br />
At (C), the fault is cleared when a reset is triggered. Output 1 does not<br />
become energized because a functional test has not be performed on<br />
the gate.<br />
The devices being monitored in these timing diagrams are assumed to<br />
be a safety gate with lock.<br />
1<br />
Channel A<br />
0<br />
Channel B<br />
1<br />
0<br />
1<br />
Reset<br />
0<br />
Unlock Request<br />
1<br />
0<br />
1<br />
Lock Feedback<br />
0<br />
Hazard Stopped<br />
1<br />
0<br />
Fault Present<br />
1<br />
0<br />
Unlock Command<br />
1<br />
0<br />
1<br />
Output 1<br />
0<br />
A B<br />
Input Type = Equivalent - Active High<br />
Restart Type = Manual<br />
Cold Start Type = Manual<br />
Discrepancy Time = 250 ms<br />
If the Input Status input is not shown, it is assumed that the input status is valid (ON = 1) for the<br />
entire timing diagram.<br />
Publication <strong>1756</strong>-<strong>RM095C</strong>-<strong>EN</strong>-P - July 2008 71<br />
C
Chapter 1 General <strong>Safety</strong> <strong>Application</strong> <strong>Instruction</strong>s<br />
DCSTL – Functional Test after Fault Operation<br />
The timing diagram illustrates how the gate must be functionally<br />
tested after a fault occurs. At (A), Output 1 is energized when a reset<br />
is triggered with the gate closed and locked. At (B), a fault occurs<br />
because the gate is unlocked because the Unlock request never<br />
transitioned from OFF (0) to ON (1). At (C), the fault is reset when the<br />
reset is triggered, but Output 1 cannot be energized because the gate<br />
was not functionally tested after the fault occurred. At (D), the gate<br />
has been functionally tested and the gate is opened, unlocked, and<br />
the hazard has stopped, but Output 1 cannot be energized because<br />
the gate is not locked. At (E), Output 1 is energized when a reset is<br />
triggered with the gate now locked.<br />
The devices being monitored in these timing diagrams are assumed to<br />
be a safety gate with lock.<br />
1<br />
Channel A<br />
0<br />
1<br />
Channel B<br />
0<br />
1<br />
Reset<br />
0<br />
1<br />
Unlock Request<br />
0<br />
1<br />
Lock Feedback<br />
0<br />
1<br />
Hazard Stopped<br />
0<br />
1<br />
Fault Present<br />
0<br />
1<br />
Unlock Command<br />
0<br />
1<br />
Output 1<br />
0<br />
B C<br />
72 Publication <strong>1756</strong>-<strong>RM095C</strong>-<strong>EN</strong>-P - July 2008<br />
A<br />
D E<br />
Input Type = Equivalent - Active High<br />
Restart Type = Manual<br />
Cold Start Type = Manual<br />
Discrepancy Time = 250 ms<br />
If the Input Status input is not shown, it is assumed that the input status is valid (ON = 1) for the<br />
entire timing diagram.
DCSTL – False Rung State Behavior<br />
General <strong>Safety</strong> <strong>Application</strong> <strong>Instruction</strong>s Chapter 1<br />
When the instruction is executed on a false rung, all instruction<br />
outputs are de-energized.<br />
DCSTL – Fault Codes<br />
Fault Code Description Corrective Action<br />
00H No fault. None.<br />
20H The Input Status input transitioned from ON (1) to OFF (0) • Check the I/O module connection or the internal logic<br />
while the instruction was executing.<br />
used to source input status.<br />
• Reset the fault.<br />
4000H Channel A and Channel B were in an inconsistent state for • Check the wiring.<br />
4001H<br />
longer than the Discrepancy Time. At the time of the fault,<br />
Channel A was in the active state. Channel B was in the safe<br />
state.<br />
Channel A and Channel B were in an inconsistent state for<br />
longer than the Discrepancy Time. At the time of the fault,<br />
Channel A was in the safe state. Channel B was in the active<br />
state.<br />
• Perform a functional test of the device (bring Channel<br />
A and Channel B to the safe state).<br />
• Reset the fault.<br />
4002H Channel A went to the safe state and back to the active state<br />
while Channel B remained active.<br />
4003H Channel B went to the safe state and back to the active state<br />
while Channel A remained active.<br />
4040H The device is locked in a non-active state. For example, a gate • Check the wiring.<br />
is open and locked.<br />
• Make sure the device is unlocked.<br />
• Reset the fault.<br />
4041H The device was not functionally tested after being unlocked. • Unlock the device.<br />
• Put the device in the safe state, for example, open<br />
gate.<br />
• Reset the fault.<br />
Publication <strong>1756</strong>-<strong>RM095C</strong>-<strong>EN</strong>-P - July 2008 73
Chapter 1 General <strong>Safety</strong> <strong>Application</strong> <strong>Instruction</strong>s<br />
Fault Code Description Corrective Action<br />
4042H The Lock Feedback input turned ON (1) without request. For<br />
example, the device became locked, but lock was not<br />
requested.<br />
Unlock Request input = 1<br />
4043H The Lock Feedback input turned OFF (0) without request. For<br />
example, the device became unlocked, but unlock was not<br />
requested.<br />
Unlock Request input = 0<br />
4044H The Hazard Stopped input was OFF (0) and Output 1 was not<br />
energized.<br />
4045H The Lock Feedback input turned OFF (0) when the hazard was<br />
present. For example, the device became unlocked, and the<br />
Hazard Stopped input was OFF (0).<br />
DCSTL – Diagnostic Codes<br />
• Check the wiring.<br />
• Check the mechanical lock components.<br />
• Unlock the device.<br />
• Put the device in the safe state, for example, open<br />
gate.<br />
• Reset the fault.<br />
• Make sure the hazard has stopped.<br />
• Check the wiring.<br />
• Make sure that the hazard protected by this device<br />
cannot become active without Output 1 being ON (1).<br />
• Reset the fault.<br />
• Make sure the hazard has stopped.<br />
• Check the wiring.<br />
• Make sure that the device cannot become unlocked<br />
while the hazard is running.<br />
• Reset the fault.<br />
Diagnostic Code Description Corrective Action<br />
00H No fault. None.<br />
05H The Reset input is held ON (1). <strong>Set</strong> the Reset input to OFF (0).<br />
20H The Input Status input was OFF (0) when the Check the I/O module connection or the internal logic<br />
instruction started.<br />
used to source input status.<br />
4000H The device was not functionally tested at Perform a functional test of the device (bring Channel A<br />
start-up.<br />
and Channel B to the safe state).<br />
4001H The device was not functionally tested after a • Check the wiring.<br />
fault occurred.<br />
• Perform a functional test of the device (bring Channel<br />
A and Channel B to the safe state with the device<br />
unlocked).<br />
4030H Waiting for the manual functional test to occur. Perform a functional test of the device (bring Channel A<br />
and Channel B to the safe state).<br />
4040H The device is unlocked. Output 1 cannot be • Reset the Unlock Request input to 0 or manually lock<br />
energized until the device is locked.<br />
the device.<br />
• Check the wiring of the Lock Feedback input.<br />
4041H Waiting for the device to lock. The Unlock • If the device has a manual lock, make sure that it has<br />
Request input has been set to 0, but the Lock been locked.<br />
Feedback input has not yet indicated that the<br />
device is unlocked.<br />
• Check the wiring of the Lock Feedback input.<br />
74 Publication <strong>1756</strong>-<strong>RM095C</strong>-<strong>EN</strong>-P - July 2008
Diagnostic Code Description Corrective Action<br />
4042H Waiting for the device to unlock. The Unlock<br />
Request input has been set to 1, but the Lock<br />
Feedback input has not yet indicated that the<br />
device is unlocked.<br />
4043H Waiting for the hazard to stop. The Unlock<br />
Request input has been set to 1, but the Unlock<br />
Command cannot be issued until the Hazard<br />
Stopped input transitions to 1.<br />
4044H The device is not functionally tested after it<br />
was unlocked.<br />
DCSTL – Wiring and Programming Example<br />
General <strong>Safety</strong> <strong>Application</strong> <strong>Instruction</strong>s Chapter 1<br />
This example complies with <strong>EN</strong>954-1, Category 4 operation. The<br />
standard control portion of the application is not shown.<br />
Wiring Diagram<br />
24V DC<br />
<strong>Safety</strong> Gate<br />
(MaintenanceGate)<br />
24V Ground<br />
A1<br />
A2<br />
• If the device has a manual lock, make sure that it has<br />
been unlocked.<br />
• Check the wiring of the Lock Feedback input.<br />
• Make sure that any machine hazard has completely<br />
stopped.<br />
• Check the wiring of the Hazard Stopped input.<br />
Perform a functional test of the device (put Channel A and<br />
Channel B in a safe state).<br />
Publication <strong>1756</strong>-<strong>RM095C</strong>-<strong>EN</strong>-P - July 2008 75<br />
42 54<br />
53<br />
22<br />
34<br />
11 21 33<br />
DeviceNet<br />
1<br />
V<br />
G<br />
11<br />
5<br />
I2<br />
3 4 14 13 15 23<br />
24<br />
I0 I1 T1 T0 T0 O0<br />
I11<br />
1791-DS-IB8XOB8<br />
Module 1<br />
T2<br />
25<br />
Momentary<br />
Push Button<br />
(reset)<br />
Test Prompt<br />
Lamp
Chapter 1 General <strong>Safety</strong> <strong>Application</strong> <strong>Instruction</strong>s<br />
This programming diagram shows the instruction with inputs and<br />
outputs.<br />
Programming Diagram<br />
DCSTL<br />
MaintenanceGate<br />
Equivalent Active High<br />
TBD ms<br />
Manual<br />
Manual<br />
Input Type<br />
Output 1<br />
Discrepancy Time<br />
Restart Type Test Command<br />
Coldstart Type Unlock Command<br />
See Note 3<br />
Module1:O.Test02Data<br />
Module1:O.Pt00Data<br />
Module1:I.Pt00Data<br />
Module1:I.Pt01Data<br />
See Note 1<br />
See Note 2<br />
Module1:I.Pt02Data<br />
MotionStopped 2<br />
Module1:I.Combined Status<br />
Module1:I.Pt11Data<br />
Channel A<br />
Channel B<br />
Test Request<br />
Unlock Request<br />
Lock Feedback<br />
Hazard Stopped<br />
Input Status<br />
76 Publication <strong>1756</strong>-<strong>RM095C</strong>-<strong>EN</strong>-P - July 2008<br />
Reset<br />
Fault Present<br />
Note 1:This is an internal Boolean tag which has its value determined by other parts of the user application not<br />
shown in this example. The falling edge (0->1) of the Test Request input forces a test to be executed<br />
(safe state must be observed). Connecting this input to the output that enables the hazard forces a test<br />
to be executed every time the hazard is stopped.<br />
Note 2: This is an internal Boolean tag which has its value determined by other parts of the user application not<br />
shown in this example.<br />
Note 3: This is an internal Boolean tag used by other parts of the user application not shown in this example.<br />
Key: Color code represents data or value typically used.<br />
Tag-mapped Variable<br />
Standard Output<br />
<strong>Safety</strong> Input <strong>Safety</strong> Output<br />
Configuration Constant/Value<br />
Internal <strong>Safety</strong> Variable
Ladder Logic<br />
General <strong>Safety</strong> <strong>Application</strong> <strong>Instruction</strong>s Chapter 1<br />
RSLogix 5000 software is used to configure the input and output<br />
parameters of the Guard I/O module, as illustrated.<br />
Module Definition<br />
DCSTL<br />
Dual Channel Input Stop With Test And L...<br />
DCSTL MaintenanceGate<br />
<strong>Safety</strong> Function SAFETY GATE<br />
Input Type EQUIVAL<strong>EN</strong>T - ACTIVE HIGH<br />
Discrepancy Time (Msec) 500<br />
Restart Type AUTOMATIC<br />
Cold Start Type MANUAL<br />
Channel A Module3:I.Pt00Data<br />
0<br />
Channel B Module3:I.Pt01Data<br />
0<br />
Test Request SeeNote1<br />
0<br />
Unlock Request SeeNote2<br />
0<br />
Lock Feedback Module3:I.Pt02Data<br />
0<br />
Hazard Stopped MotionStopped<br />
0<br />
Input Status Module3:I.InputStatus<br />
0<br />
Reset Module3:I.Pt07Data<br />
0<br />
Rockwell Automation suggests using Exact Match, as shown.<br />
However, setting Electronic Keying to Compatible Match is allowed.<br />
Publication <strong>1756</strong>-<strong>RM095C</strong>-<strong>EN</strong>-P - July 2008 77<br />
O1<br />
TC<br />
ULC<br />
FP<br />
MaintenanceGate.TC Module3:O.Test02Data<br />
MaintenanceGate.ULC Module3:O.Pt00Data<br />
Note 1:This is an internal Boolean tag which has its value determined by other parts of the user application<br />
not shown in this example. The falling edge (0->1) of the Test Request input forces a test to be<br />
executed (safe state must be observed). Connecting this input to the output that enables the hazard<br />
forces a test to be executed every time the hazard is stopped.<br />
Note 2: This is an internal Boolean tag which has its value determined by other parts of the user application<br />
not shown in this example.
Chapter 1 General <strong>Safety</strong> <strong>Application</strong> <strong>Instruction</strong>s<br />
Module Input Configuration<br />
Module Test Output Configuration<br />
78 Publication <strong>1756</strong>-<strong>RM095C</strong>-<strong>EN</strong>-P - July 2008
Module Output Configuration<br />
General <strong>Safety</strong> <strong>Application</strong> <strong>Instruction</strong>s Chapter 1<br />
Publication <strong>1756</strong>-<strong>RM095C</strong>-<strong>EN</strong>-P - July 2008 79
Chapter 1 General <strong>Safety</strong> <strong>Application</strong> <strong>Instruction</strong>s<br />
Dual-channel Input Stop<br />
with Test and Mute<br />
(DCSTM)<br />
•<br />
The Dual-channel Input Stop with Test and Mute instruction monitors<br />
dual-input safety devices whose main function is to stop safely, for<br />
example, an E-stop, light curtain, or safety gate. This instruction can<br />
only energize Output 1 when both safety inputs, Channel A and<br />
Channel B, are in the active state as determined by the Input type<br />
parameter, and the correct reset actions are carried out.<br />
In addition, this instruction has the ability to mute a safety device such<br />
as a light curtain. When muting is enabled, a safety device sensing<br />
field can be broken, where Channel A and Channel B can go to the<br />
safe state without de-energizing Output 1. The Muting Lamp Status<br />
input is used to monitor the status of the Muting Lamp output. If this<br />
input is ever OFF (0), a fault is generated.<br />
ATT<strong>EN</strong>TION<br />
When muting a safety device, the device is no longer protecting<br />
the hazard, so some other protection must be in place.<br />
The timing diagrams from the Dual-channel Input Stop (DCS)<br />
instruction and the Dual-channel Input Stop Test (DCST) instruction<br />
are applicable to this instruction as well.<br />
DCSTM operation diagrams, beginning on page 85, highlight the<br />
features of the mute-related parameters such as Mute, Muting Lamp<br />
Status, and Muting Lamp.<br />
80 Publication <strong>1756</strong>-<strong>RM095C</strong>-<strong>EN</strong>-P - July 2008
DCSTM – <strong>Instruction</strong> Description<br />
IMPORTANT<br />
Dual-channel Input Stop with Test and Mute <strong>Instruction</strong>: Configuration Parameters<br />
General <strong>Safety</strong> <strong>Application</strong> <strong>Instruction</strong>s Chapter 1<br />
Do not use the same tag name for more than one instruction in<br />
the same program. Do not write to any instruction output tag<br />
under any circumstances.<br />
The following table provides the parameters that are used to configure<br />
the instruction. These parameters cannot be changed at runtime.<br />
Parameter Data Type Description<br />
<strong>Safety</strong> Function List This parameter provides a text name for how this instruction is being used. Choices include<br />
area scanner, safety mat, light curtain, and user-defined.<br />
Input Type List<br />
Note: Does not affect instruction behavior. This is for information/documentation purposes<br />
only.<br />
This parameter selects input channel behavior.<br />
Discrepancy Time (ms) Integer<br />
Equivalent - Active High: The inputs are in the active state when Channel A and Channel B<br />
inputs are 1.<br />
Complementary: The inputs are in the active state when Channel A is 1 and Channel B is 0.<br />
The amount of time that the inputs are allowed to be in an inconsistent state before an<br />
instruction fault is generated. The inconsistent state depends on the Input Type.<br />
Equivalent: Inconsistent state is when:<br />
• Channel A = 0 and Channel B = 1, or<br />
• Channel A = 1 and Channel B = 0<br />
Restart Type List<br />
Complementary: Inconsistent state is when:<br />
• Channel A = 0 and Channel B = 0, or<br />
• Channel A = 1 and Channel B = 1<br />
The valid range is 5...3000 ms.<br />
This input configures Output 1 for either manual or automatic restart.<br />
Manual A transition of the Reset input from OFF (0) to ON (1), while all of the<br />
Output 1 enabling conditions are met, is required to energize Output 1.<br />
Automatic Output 1 is energized 50 ms after all of the enabling conditions are met.<br />
ATT<strong>EN</strong>TION: Automatic restart may only be used in application situations<br />
!<br />
where you can prove that no unsafe conditions can occur as a result of its<br />
use, or the reset function is being performed elsewhere in the safety circuit<br />
(for example, output function).<br />
Publication <strong>1756</strong>-<strong>RM095C</strong>-<strong>EN</strong>-P - July 2008 81
Chapter 1 General <strong>Safety</strong> <strong>Application</strong> <strong>Instruction</strong>s<br />
Dual-channel Input Stop with Test and Mute <strong>Instruction</strong>: Configuration Parameters<br />
Parameter Data Type Description<br />
Cold Start Type List This parameter specifies the Output 1 behavior when applying controller power or mode<br />
change to Run.<br />
Manual Output 1 is not be energized when the Input Status becomes valid or when<br />
the Input Status fault is cleared. (The device must be tested before Output 1<br />
can be energized.)<br />
Automatic Output 1 is energized immediately when the Input Status becomes valid or<br />
when the Input Status fault is cleared and both inputs are in their active<br />
state.<br />
Test Type List The parameter defines which type of test occurs when the Test Request input transitions<br />
from ON (1) to OFF (0).<br />
None Turns the testing feature off.<br />
Manual Output 1 is de-energized immediately when Test Request input transitions<br />
from ON (1) to OFF (0). The Test Command output is energized until a<br />
functional test is carried out, such as an open and close safety gate, break<br />
and clear light curtain, and reset actions are carried out depending on the<br />
setting of the Restart Type parameter.<br />
Active Output 1 remains energized when the Test Request input transitions from<br />
ON (1) to OFF (0) and the Test Command output is energized which should<br />
force an automatic test of the safety device. For example, a light curtain<br />
that has test capability. If the Channel A and Channel B outputs correctly<br />
transition to the safe state and back to the active state before Test Time<br />
expires, the Test Command output is de-energized and the safety device<br />
continues normal operation. If the safety inputs do not correctly transition<br />
before Test Time expires, Output 1 is de-energized immediately and a fault<br />
is generated.<br />
Test Time Integer The maximum allowed time for an active test to complete. If the test does not complete<br />
within this time, a fault is generated. Refer to the Test Type parameter for more information.<br />
IMPORTANT: This time cannot exceed 150 ms for type-2 light curtains as specified by<br />
<strong>EN</strong>-61496-1.<br />
The valid range is 5...1000 ms.<br />
82 Publication <strong>1756</strong>-<strong>RM095C</strong>-<strong>EN</strong>-P - July 2008
Dual-channel Input Stop with Test and Mute <strong>Instruction</strong>: Inputs<br />
General <strong>Safety</strong> <strong>Application</strong> <strong>Instruction</strong>s Chapter 1<br />
The following table explains instruction inputs. The inputs may be<br />
field device signals from input devices or derived from user logic.<br />
Name Data Type Description<br />
Channel A Boolean This input is one of the two safety inputs to the instruction.<br />
Channel B Boolean This input is one of the two safety inputs to the instruction.<br />
Test Request Boolean This signal forces a functional test to occur. See the Test Type parameter for more<br />
information.<br />
Mute Boolean<br />
ON (1) -> OFF (0): Triggers a functional test.<br />
This input is used to mute the safety device.<br />
Muting Lamp Status Boolean<br />
OFF (0): Mute is not activated.<br />
ON (1): Mute is activated. The Muting Lamp output is energized and Output 1 will not be<br />
de-energized when the safety device is tripped (Channel A or Channel B enters the safe<br />
state).<br />
This is the status of the muting lamp. If this status is not valid, Output 1 is de-energized<br />
immediately and a fault is generated.<br />
Input Status Boolean<br />
OFF (0): The Muting Lamp Status is invalid. A fault is generated.<br />
ON (1): The Muting Lamp Status is valid.<br />
If instruction inputs are from a safety I/O module, this is the input status from the I/O module<br />
or modules (Input Status or Combined Status). If instruction inputs are derived from internal<br />
logic, it is the application programmer’s responsibility to determine the conditions.<br />
Reset<br />
ON (1): The inputs to this instruction are valid.<br />
OFF (0): The inputs to this instruction are invalid.<br />
(1) Boolean If Restart Type = Manual, this input is used to energize Output 1 once Channel A and Channel<br />
B are both in the active state.<br />
If Restart Type = Automatic, this input is not used to energize Output 1.<br />
This input clears instruction and circuit faults provided the fault condition is not present.<br />
OFF (0) -> ON (1): the Fault Present and Fault Code outputs are reset.<br />
(1) ISO 13849-1 stipulates instruction reset functions must occur on falling edge signals. To comply with ISO 13849-1<br />
requirements, add this logic immediately before this instruction. Rename the “Reset_Signal” tag in this example<br />
to your reset signal tagname. Then use the OSF instruction Output Bit tag as the instruction’s reset source.<br />
Publication <strong>1756</strong>-<strong>RM095C</strong>-<strong>EN</strong>-P - July 2008 83
Chapter 1 General <strong>Safety</strong> <strong>Application</strong> <strong>Instruction</strong>s<br />
Dual-channel Input Stop with Test and Mute <strong>Instruction</strong>: Outputs<br />
The following table explains instruction outputs. The outputs may be<br />
external tags (safety output modules) or internal tags for use in other<br />
logic routines.<br />
Name Data Type Description<br />
Output 1 (O1) Boolean This output is energized when the input conditions are satisfied.<br />
Test Command (TC) Boolean<br />
The output becomes de-energized when:<br />
• either Channel A or Channel B transitions to the safe state.<br />
• the Input Status input is OFF (0).<br />
• a manual test is requested (Test Request turns OFF (0) when Test Type = Manual).<br />
• an Active Test fault occurs (the Active Test does not complete with Active Test Time).<br />
• the Mute input transitions from ON (1) to OFF (0) when Channel A or Channel B is in the<br />
safe state.<br />
• the Muting Lamp Status input is OFF (0).<br />
If Test Type = Manual, this output is energized when a manual functional test must be carried<br />
out.<br />
If Test Type = Active, this output is energized to notify a safety device, such as light curtain,<br />
that an automatic test should be carried out.<br />
Muting Lamp (ML) Boolean This output is intended to drive a muting lamp. (1) The status of the muting lamp should be fed<br />
into the Muting Lamp Status input.<br />
Safe State (SS) Boolean<br />
ON (1): Muting is currently active. The Muting Lamp is turned ON (1).<br />
OFF (0): Muting is not currently active.<br />
This output turns ON (1) when the inputs are in a safe state regardless of whether the<br />
instruction is muted or not.<br />
Fault Present (FP) Boolean<br />
ON (1): The inputs are currently in the safe state.<br />
OFF (0): The inputs are not currently in the safe state.<br />
ON (1): A fault is present in the instruction.<br />
OFF (0): This instruction is operating normally.<br />
Fault Code Integer This output indicates the type of fault that occurred. See the DCSTM – Fault Codes on page<br />
87 for a list of fault codes.<br />
Diagnostic Code Integer<br />
This parameter is not safety-related.<br />
This output indicates the diagnostic status of the instruction. See the DCSTM – Diagnostic<br />
Codes on page 88 for a list of diagnostic codes.<br />
This parameter is not safety-related.<br />
(1) Guard I/O module test outputs, configured for muting, can be used for this purpose.<br />
IMPORTANT<br />
Do not write to any instruction output tag under any<br />
circumstances.<br />
84 Publication <strong>1756</strong>-<strong>RM095C</strong>-<strong>EN</strong>-P - July 2008
DCSTM – Normal Operation<br />
General <strong>Safety</strong> <strong>Application</strong> <strong>Instruction</strong>s Chapter 1<br />
The timing diagram illustrates the normal muting behavior. At (A), the<br />
Muting Lamp output is energized when the Mute input turns ON (1).<br />
At (B), Output 1 is not de-energized because the instruction is<br />
currently muted. At (C), muting is turned OFF (0) but Output 1<br />
remains energized because the safety inputs are now in the active<br />
state. At (D), Output 1 is de-energized because safety inputs transition<br />
to the safe state and muting is no longer turned ON (1). At (E), muting<br />
is activated again, but does not energize Output 1 because the Mute<br />
signal is never allowed to energize Output 1. At (F), Output 1 is<br />
energized 50 ms after the safety inputs enter the active state. At (G),<br />
Output 1 is de-energized when muting is disabled and the safety<br />
inputs are in the safe state.<br />
1<br />
Channel A<br />
0<br />
1<br />
Channel B<br />
0<br />
1<br />
Mute<br />
0<br />
1<br />
Muting Lamp Status<br />
0<br />
1<br />
Muting Lamp<br />
0<br />
1<br />
Output 1<br />
0<br />
A B C<br />
Publication <strong>1756</strong>-<strong>RM095C</strong>-<strong>EN</strong>-P - July 2008 85<br />
50 ms<br />
D E F G<br />
Input Type = Equivalent - Active High<br />
Restart Type = Automatic<br />
Cold Start Type = Automatic<br />
Discrepancy Time = 250 ms<br />
Test Type = Manual<br />
Test Time = Not Applicable<br />
If the Input Status input is not shown, it is assumed that the input status is valid (ON = 1) for the<br />
entire timing diagram.<br />
There is always a 50 ms delay before energizing Output 1 when it is configured to be energized<br />
automatically (Restart Type = Automatic).
Chapter 1 General <strong>Safety</strong> <strong>Application</strong> <strong>Instruction</strong>s<br />
DCSTM – Muting Lamp Status Fault Operation<br />
The timing diagram illustrates the Muting Lamp Status fault. At (A), the<br />
safety inputs enter the safe state, but Output 1 remains energized<br />
because the instruction is muted. At (B), the Muting Lamp Status input<br />
transitions to an invalid state. This immediately de-energizes Output 1<br />
and the Muting Lamp output and generates a fault. At (C), the fault<br />
cannot be reset because the Muting Lamp Status is still invalid. At (D),<br />
the fault is cleared because a reset is triggered and the Muting Lamp<br />
Status is now valid. This also energizes Output 1 because the safety<br />
inputs are in the active state.<br />
1<br />
Channel A<br />
0<br />
1<br />
Channel B<br />
0<br />
1<br />
Reset<br />
0<br />
1<br />
Mute<br />
0<br />
1<br />
Muting Lamp Status<br />
0<br />
1<br />
Muting Lamp<br />
0<br />
1<br />
Fault Present<br />
0<br />
1<br />
Output 1<br />
0<br />
A<br />
Input Type = Equivalent - Active High<br />
Restart Type = Manual<br />
Cold Start Type = Automatic<br />
Discrepancy Time = 250 ms<br />
Test Type = Manual<br />
Test Time = Not Applicable<br />
B C D<br />
If the Input Status input is not shown, it is assumed that the input status is valid (ON = 1) for the<br />
entire timing diagram.<br />
86 Publication <strong>1756</strong>-<strong>RM095C</strong>-<strong>EN</strong>-P - July 2008
DCSTM – False Rung State Behavior<br />
General <strong>Safety</strong> <strong>Application</strong> <strong>Instruction</strong>s Chapter 1<br />
When the instruction is executed on a false rung, all instruction<br />
outputs are de-energized.<br />
DCSTM – Fault Codes<br />
Fault Code Description Corrective Action<br />
00H No fault. None.<br />
01H The Muting Lamp Status transitioned to an invalid state while • Check the status of the Mute input.<br />
the instruction was running.<br />
• Reset the fault.<br />
20H The Input Status input transitioned from ON (1) to OFF (0) • Check the I/O module connection or the internal logic<br />
while the instruction was executing.<br />
used to source input status.<br />
• Reset the fault.<br />
4000H Channel A and Channel B were in an inconsistent state for • Check the wiring.<br />
4001H<br />
longer than the Discrepancy Time. At the time of the fault,<br />
Channel A was in the active state. Channel B was in the safe<br />
state.<br />
Channel A and Channel B were in an inconsistent state for<br />
longer than the Discrepancy Time. At the time of the fault,<br />
Channel A was in the safe state. Channel B was in the active<br />
state.<br />
• Perform a functional test of the device (bring Channel<br />
A and Channel B to the safe state).<br />
• Reset the fault.<br />
4002H Channel A went to the safe state and back to the active state<br />
while Channel B remained active.<br />
4003H Channel B went to the safe state and back to the active state<br />
while Channel A remained active.<br />
4030H The Active test did not complete within the Test Time. • Check the device.<br />
• Make sure the test feature is working properly.<br />
• Reset the fault.<br />
Publication <strong>1756</strong>-<strong>RM095C</strong>-<strong>EN</strong>-P - July 2008 87
Chapter 1 General <strong>Safety</strong> <strong>Application</strong> <strong>Instruction</strong>s<br />
DCSTM – Diagnostic Codes<br />
Diagnostic Code Description Corrective Action<br />
00H No fault. None.<br />
05H The Reset input is held ON (1). <strong>Set</strong> the Reset input to OFF (0).<br />
20H The Input Status input was OFF (0) when the Check the I/O module connection or the internal logic<br />
instruction started.<br />
used to source input status.<br />
4000H The device was not functionally tested at Perform a functional test of the device (bring Channel A<br />
start-up.<br />
and Channel B to the safe state).<br />
4001H The device was not functionally tested after a • Check the wiring.<br />
fault occurred.<br />
• Perform a functional test of the device (bring Channel<br />
A and Channel B to the safe state).<br />
4030H Waiting for the manual functional test to occur. Perform a functional test of the device (bring Channel A<br />
and Channel B to the safe state).<br />
4031H The Active test is in progress. Information only.<br />
DCSTM – Wiring and Programming Example<br />
This example complies with <strong>EN</strong>954-1, Category 4 operation. The<br />
standard control portion of the application is not shown.<br />
In this example, the safety function of the Two-hand Run Station lets<br />
the light curtain safety function be muted when both buttons are<br />
pressed. This assumes that all of the user-responsible clauses in<br />
<strong>EN</strong> 574 are met.<br />
This example also uses the inverted output of the Two-hand Run<br />
Station to drive the Test Request input of the Dual-channel Input Stop<br />
with Test and Mute instruction (DCSTM). This causes the light curtain<br />
and its associated input points and wiring to be tested every time both<br />
buttons on the Two-hand Run Station are pressed.<br />
88 Publication <strong>1756</strong>-<strong>RM095C</strong>-<strong>EN</strong>-P - July 2008
24V DC<br />
24V Ground<br />
+24V DC<br />
Test<br />
0V DC<br />
1<br />
2<br />
4<br />
3<br />
Light Curtain<br />
1<br />
2<br />
3<br />
4<br />
5<br />
6<br />
7<br />
8<br />
Wiring Diagram<br />
Aux Out<br />
+24V DC<br />
Ground<br />
EDM<br />
OSSD 2<br />
OSSD 1<br />
0V DC<br />
Start/Restart<br />
DeviceNet<br />
1<br />
V<br />
G<br />
11<br />
General <strong>Safety</strong> <strong>Application</strong> <strong>Instruction</strong>s Chapter 1<br />
Publication <strong>1756</strong>-<strong>RM095C</strong>-<strong>EN</strong>-P - July 2008 89<br />
4<br />
I1<br />
3<br />
I0<br />
T2<br />
25<br />
5<br />
I2<br />
1791-DS-IB12<br />
6<br />
I3<br />
Two-hand Run Station<br />
15<br />
T0<br />
Module 1<br />
17<br />
T0<br />
T3<br />
28<br />
7<br />
I4<br />
8<br />
I5<br />
Muting Lamp<br />
Momentary<br />
Push Button<br />
(reset)<br />
16<br />
T1<br />
18<br />
T1<br />
24<br />
I11
Chapter 1 General <strong>Safety</strong> <strong>Application</strong> <strong>Instruction</strong>s<br />
TBS ms<br />
See Note 1<br />
0<br />
Module1:I.Pt02Data<br />
Module1:I.Pt03Data<br />
Module1:I.Pt04Data<br />
Module1:I.Pt05Data<br />
Module1:I.Combined Status<br />
Module1:I.Pt11Data<br />
THRSe<br />
Discrepancy Time<br />
Enable<br />
Disconnected<br />
Right Button Normally Open<br />
Right Button Normally Closed<br />
Left Button Normally Open<br />
Left Button Normally Closed<br />
Input Status<br />
Reset<br />
This programming diagram shows the DCSTM instruction used with<br />
the THRSe instruction.<br />
Programming Diagram<br />
Output 1<br />
Station Bypassed<br />
Buttons Released<br />
Fault Present<br />
DCSTM<br />
Equivalent Active High Input Type Output 1<br />
TBD ms<br />
Discrepancy Time<br />
Coldstart Type<br />
OperatorStationLightCurtain<br />
See Note 2<br />
Manual<br />
Manual<br />
Restart Type Test Command<br />
Muting Lamp<br />
Module1:O.Test02Data<br />
Module1:O.Test03Data<br />
Active<br />
TBD ms<br />
Test Type <strong>Safety</strong> State<br />
Module1:I.Pt00Data<br />
Module1:I.Pt01Data<br />
Module1:MutingStatus<br />
Channel A<br />
Channel B<br />
Test Request<br />
Mute<br />
Muting Lamp Status<br />
Input Status<br />
90 Publication <strong>1756</strong>-<strong>RM095C</strong>-<strong>EN</strong>-P - July 2008<br />
Reset<br />
Fault Present<br />
Note 1: This is an internal Boolean tag which has its value determined by other parts of the user application not<br />
shown in this example.<br />
Note 2: This is an internal Boolean tag used by other parts of the user application not shown in this example.<br />
Key: Color code represents data or value typically used.<br />
Tag-mapped Variable<br />
Standard Output<br />
<strong>Safety</strong> Input <strong>Safety</strong> Output<br />
Configuration Constant/Value<br />
Internal <strong>Safety</strong> Variable
Ladder Logic<br />
General <strong>Safety</strong> <strong>Application</strong> <strong>Instruction</strong>s Chapter 1<br />
THRSe<br />
Two Hand Run Station Enhanced<br />
THRSe OperatorStationPalmButtons<br />
Discrepancy Time (Msec) 500<br />
Enable SeeNote1<br />
0<br />
Disconnected ALWAYS_CONNECTED<br />
0<br />
Right Button Normally Open Module1:I.Pt02Data<br />
0<br />
Right Button Normally Closed Module1:I.Pt03Data<br />
1<br />
Left Button Normally Open Module1:I.Pt04Data<br />
0<br />
Left Button Normally Closed Module1:I.Pt05Data<br />
0<br />
Input Status Module1:I.CombinedStatus<br />
1<br />
Reset Module1:I.Pt11Data<br />
0<br />
OperatorStationPalmButtons.O1 OperatorStationLightCurtain.TestRequest<br />
/<br />
DCSTM<br />
Dual Channel Input Stop With Test And Mute<br />
DCSTM OperatorStationLightCurtain<br />
<strong>Safety</strong> Function LIGHT CURTAIN<br />
Input Type EQUIVAL<strong>EN</strong>T - ACTIVE HIGH<br />
Discrepancy Time (Msec) 500<br />
Restart Type MANUAL<br />
Cold Start Type MANUAL<br />
Test Type ACTIVE<br />
Test Time (Msec) 150<br />
Channel A Module1:I.Pt00Data<br />
1<br />
Channel B Module1:I.Pt01Data<br />
1<br />
Test Request Module1:I.Pt02Data<br />
0<br />
Mute OperatorStationPalmButtons.O1<br />
0<br />
Muting Lamp Status Module1:I.MutingStatus<br />
1<br />
Input Status Module1:I.CombinedStatus<br />
1<br />
Reset Module1:I.Pt11Data<br />
0<br />
OperatorStationLightCurtain.TC Module1:O.Test02Data<br />
OperatorStationLightCurtain.ML Module1:O.Test03Data<br />
Note 1: This is an internal Boolean tag which has its value determined by other parts of the user application<br />
not shown in this example.<br />
Publication <strong>1756</strong>-<strong>RM095C</strong>-<strong>EN</strong>-P - July 2008 91<br />
O1<br />
BR<br />
SB<br />
FP<br />
O1<br />
TC<br />
ML<br />
SS<br />
FP
Chapter 1 General <strong>Safety</strong> <strong>Application</strong> <strong>Instruction</strong>s<br />
RSLogix 5000 software is used to configure the input and output<br />
parameters of the Guard I/O module, as illustrated.<br />
Module Definition<br />
Rockwell Automation suggests using Exact Match, as shown.<br />
However, setting Electronic Keying to Compatible Match is allowed.<br />
Module Input Configuration<br />
92 Publication <strong>1756</strong>-<strong>RM095C</strong>-<strong>EN</strong>-P - July 2008
Module Test Output Configuration<br />
General <strong>Safety</strong> <strong>Application</strong> <strong>Instruction</strong>s Chapter 1<br />
Publication <strong>1756</strong>-<strong>RM095C</strong>-<strong>EN</strong>-P - July 2008 93
Chapter 1 General <strong>Safety</strong> <strong>Application</strong> <strong>Instruction</strong>s<br />
<strong>Safety</strong> Mat (SMAT)<br />
•<br />
The <strong>Safety</strong> Mat instruction indicates, through Output 1, whether or not<br />
the safety mat is occupied.<br />
<strong>Safety</strong> mats typically consist of two conductive plates held apart by<br />
nonconductive separators. Each conductive plate, Channel A and<br />
Channel B of the safety mat, are alternately sourced by the safety-mat<br />
instruction’s Source A and Source B outputs. Output A and Output B<br />
of the safety mat are routed to the safety mat instruction’s Channel A<br />
and Channel B inputs.<br />
SMAT – <strong>Instruction</strong> Parameters<br />
IMPORTANT<br />
Do not use the same tag name for more than one instruction in<br />
the same program. Do not write to any instruction output tag<br />
under any circumstances.<br />
94 Publication <strong>1756</strong>-<strong>RM095C</strong>-<strong>EN</strong>-P - July 2008
<strong>Safety</strong> Mat <strong>Instruction</strong>: Configuration Parameters<br />
General <strong>Safety</strong> <strong>Application</strong> <strong>Instruction</strong>s Chapter 1<br />
The following table provides the parameters that are used to configure<br />
the instruction.<br />
Parameter Data Type Description<br />
Restart Type List Configures Output 1 for either manual or automatic restart.<br />
Manual A transition of the Reset input from OFF (0) to ON (1), while all of the Output 1<br />
enabling conditions are met, is required to energize Output 1.<br />
Automatic Output 1 is energized 50 ms after all of the enabling conditions are met.<br />
ATT<strong>EN</strong>TION: Automatic restart may only be used in application situations<br />
!<br />
where you can prove that no unsafe conditions can occur as a result of its<br />
use, or the reset function is being performed elsewhere in the safety circuit<br />
(for example, output function).<br />
Short Circuit Detect Delay Integer This parameter is the time (5...250 ms) that the instruction uses to determine the difference<br />
Time<br />
between a short circuit and someone stepping on the safety mat.<br />
<strong>Safety</strong> Mat <strong>Instruction</strong>: Inputs<br />
When using this instruction with 1791DS I/O modules, the short-circuit detection-delay time<br />
has to be greater than the associated module’s input-error latch time. The module’s<br />
input-error latch time holds the test output fault generated by the two channels being<br />
shorted together for the configured amount of time. Output 1 goes to the safe state as soon<br />
as possible (task period and input filter dependent), only the declaration of a fault is delayed<br />
by this time. It has no effect on the safety reaction time.<br />
The following table explains instruction outputs. The outputs are<br />
typically used to select different modes of application operation by<br />
enabling other instructions.<br />
Name Data Type Description<br />
Channel A Boolean This input is sourced by the Channel A output of the safety mat.<br />
Channel B Boolean This input is sourced by the Channel B output of the safety mat.<br />
Input Status Boolean If instruction inputs are from a safety I/O module, this is the input status from the I/O module<br />
or modules (Input Status or Combined Status). If instruction inputs are derived from internal<br />
logic, it is the application programmer’s responsibility to determine the conditions.<br />
Reset<br />
ON (1): The inputs to this instruction are valid.<br />
OFF (0): The inputs to this instruction are invalid.<br />
(1) Boolean If the Restart Type = Manual, this input is used to energize Output 1.<br />
This input clears instruction and circuit faults provided the fault condition is not present.<br />
OFF (0) -> ON (1): The Fault Present and Fault Code outputs are reset.<br />
(1) ISO 13849-1 stipulates instruction reset functions must occur on falling edge signals. To comply with ISO 13849-1<br />
requirements, add this logic immediately before this instruction. Rename the “Reset_Signal” tag in this example<br />
to your reset signal tagname. Then use the OSF instruction Output Bit tag as the instruction’s reset source.<br />
Publication <strong>1756</strong>-<strong>RM095C</strong>-<strong>EN</strong>-P - July 2008 95
Chapter 1 General <strong>Safety</strong> <strong>Application</strong> <strong>Instruction</strong>s<br />
<strong>Safety</strong> Mat <strong>Instruction</strong>: Outputs<br />
The following table provides the outputs to the instruction. In many<br />
applications, the output tags may represent the state of actual field<br />
devices. They may also be internal tags used to represent machine<br />
state information for use with other instructions.<br />
Name Data Type Description<br />
Output 1 (O1) Boolean This output is energized when all of the input conditions are satisfied.<br />
Source A (SRCA) Boolean<br />
The output becomes de-energized when:<br />
• an instruction detects an open or a short circuit condition.<br />
• the normal operation of the instruction causes Output 1 to be de-energized.<br />
This output is used to source the Channel A input of the safety mat.<br />
Source B (SRCB) Boolean This output is used to source the Channel B input of the safety mat.<br />
Fault Code Integer This output indicates the type of fault that occurred. See the SMAT – Fault Codes on page<br />
102 for a list of fault codes.<br />
Diagnostic Code Integer<br />
This parameter is not safety-related.<br />
This output indicates the diagnostic status of the instruction. See the SMAT – Diagnostic<br />
Codes on page 102 for a list of diagnostic codes.<br />
Fault Present (FP) Boolean<br />
This parameter is not safety-related.<br />
ON (1): A fault is present in the instruction.<br />
OFF (0): This instruction is operating normally.<br />
IMPORTANT<br />
Do not write to any instruction output tag under any<br />
circumstances.<br />
SMAT – Circuit Verification Test<br />
The <strong>Safety</strong> Mat instruction monitors the Channel A and Channel B<br />
<strong>Safety</strong> Mat inputs. Before Output 1 can be energized, a verification of<br />
the safety mat circuit must be completed, verifying that the Source A<br />
and Source B output to Channel A and Channel B input connections<br />
are good. This is referred to as the circuit verification test (CVT) and is<br />
identified by the shaded areas in the timing diagrams. Output 1 can be<br />
energized when the CVT test is successful and the proper restart-type<br />
conditions are met.<br />
96 Publication <strong>1756</strong>-<strong>RM095C</strong>-<strong>EN</strong>-P - July 2008
SMAT – Manual Restart Operation<br />
General <strong>Safety</strong> <strong>Application</strong> <strong>Instruction</strong>s Chapter 1<br />
The timing diagram illustrates the instruction being configured for<br />
manual restart. At (A), Output 1 is energized when the Reset input<br />
transitions from OFF (0) to ON (1) after the circuit verification test<br />
(CVT).<br />
1<br />
Channel A<br />
1<br />
Channel B<br />
0<br />
1<br />
Reset<br />
0<br />
1<br />
Source A<br />
0<br />
1<br />
Source B<br />
0<br />
1<br />
Output 1<br />
0<br />
The shaded area is the CVT.<br />
Publication <strong>1756</strong>-<strong>RM095C</strong>-<strong>EN</strong>-P - July 2008 97<br />
0<br />
A
Chapter 1 General <strong>Safety</strong> <strong>Application</strong> <strong>Instruction</strong>s<br />
SMAT – Automatic Restart Operation<br />
The timing diagram illustrates the instruction being configured for<br />
automatic restart. At (A), Output 1 is energized 50 ms after the circuit<br />
verification test (CVT).<br />
1<br />
Channel A<br />
0<br />
1<br />
Channel B<br />
0<br />
1<br />
Reset<br />
0<br />
1<br />
Source A<br />
0<br />
1<br />
Source B<br />
0<br />
1<br />
Output 1<br />
0<br />
The shaded area is the CVT.<br />
98 Publication <strong>1756</strong>-<strong>RM095C</strong>-<strong>EN</strong>-P - July 2008<br />
A<br />
50 ms
<strong>Safety</strong> Mat Occupied Operation<br />
General <strong>Safety</strong> <strong>Application</strong> <strong>Instruction</strong>s Chapter 1<br />
The timing diagram illustrates Output 1 being de-energized when the<br />
safety mat becomes occupied. At (A), the safety mat is considered<br />
occupied and Output 1 is de-energized when the Channel A and<br />
Channel B inputs are both ON (1). At (B), the Channel A and Channel<br />
B inputs follow the Source A output for as long as the safety mat is<br />
occupied.<br />
Channel A<br />
Channel B<br />
1<br />
Output 1<br />
0<br />
Publication <strong>1756</strong>-<strong>RM095C</strong>-<strong>EN</strong>-P - July 2008 99<br />
Reset<br />
Source A<br />
Source B<br />
1<br />
0<br />
1<br />
0<br />
1<br />
0<br />
1<br />
0<br />
1<br />
0<br />
A B
Chapter 1 General <strong>Safety</strong> <strong>Application</strong> <strong>Instruction</strong>s<br />
<strong>Safety</strong> Mat Unoccupied Operation<br />
The timing diagram illustrates the safety mat being unoccupied and<br />
the <strong>Safety</strong> Mat instruction is initializing. At (A), the Channel A and<br />
Channel B inputs begin tracking the Source A and Source B outputs.<br />
Output 1 can then be energized based on the configured Restart Type<br />
and after the circuit verification test (CVT).<br />
Channel A<br />
Channel B<br />
100 Publication <strong>1756</strong>-<strong>RM095C</strong>-<strong>EN</strong>-P - July 2008<br />
Reset<br />
Source A<br />
Source B<br />
Output 1<br />
The shaded area is the CVT.<br />
1<br />
0<br />
1<br />
0<br />
1<br />
0<br />
1<br />
0<br />
1<br />
0<br />
1<br />
0<br />
A
SMAT – Fault Detection Operation<br />
General <strong>Safety</strong> <strong>Application</strong> <strong>Instruction</strong>s Chapter 1<br />
This instruction detects source output to channel input open circuits<br />
and short circuits. A short circuit between Channel A and Channel B<br />
appears to the instruction as though the mat is occupied, where<br />
Output 1 is de-energized.<br />
The timing diagram illustrates the safety mat being occupied and the<br />
connection between Source A and Channel A is opened. The restart<br />
type is configured for Manual. At (A), the circuit is opened and the<br />
Channel A input stops following the Source A output. Output 1 is<br />
de-energized and the short-circuit detect delay timer is started. At (B),<br />
the timer expires and a fault is generated. At (C), the opened circuit is<br />
corrected and the fault is reset when an OFF (0) to ON (1) transition is<br />
detected on the Reset input. At (D), the <strong>Safety</strong> Mat instruction<br />
completes the circuit verification test (CVT), and an OFF (0) to ON (1)<br />
transition is detected on the Reset input, energizing Output 1.<br />
1<br />
Channel A<br />
0<br />
1<br />
Channel B<br />
0<br />
1<br />
Reset<br />
0<br />
1<br />
Source A<br />
0<br />
1<br />
Source B<br />
0<br />
1<br />
Output 1<br />
0<br />
1<br />
Fault Present<br />
0<br />
t = Short Circuit Detect Delay Time<br />
The shaded area is the CVT.<br />
SMAT – False Rung State Behavior<br />
A B C D<br />
When the instruction is executed on a false rung, all instruction<br />
outputs are de-energized.<br />
Publication <strong>1756</strong>-<strong>RM095C</strong>-<strong>EN</strong>-P - July 2008 101<br />
> t
Chapter 1 General <strong>Safety</strong> <strong>Application</strong> <strong>Instruction</strong>s<br />
SMAT – Fault Codes<br />
Fault Code Description Corrective Action<br />
00H No fault. None.<br />
20H The Input Status input transitioned from ON (1) to OFF (0) • Check the I/O module connection.<br />
while the instruction was executing.<br />
• Reset the fault.<br />
8000H Channel A is shorted to power. • Correct the short or open circuit.<br />
8001H Channel B is shorted to power.<br />
• Reset the fault.<br />
8002H Channels A and B are shorted to power.<br />
8003H Channel A is shorted to power and Channel B is either shorted<br />
to ground or open.<br />
8004H Channel A is either shorted to ground or is open.<br />
8005H Channel A is either shorted to ground or is open and Channel<br />
B is shorted to power.<br />
8006H Channel B is either shorted to ground or open.<br />
SMAT – Diagnostic Codes<br />
Diagnostic Code Description Corrective Action<br />
00H No fault. None.<br />
05H The Reset input is held ON (1). <strong>Set</strong> the Reset input to OFF (0).<br />
20H The Input Status input was OFF (0) when the<br />
instruction started.<br />
Check the I/O module connection.<br />
102 Publication <strong>1756</strong>-<strong>RM095C</strong>-<strong>EN</strong>-P - July 2008
SMAT – Wiring and Programming Example<br />
General <strong>Safety</strong> <strong>Application</strong> <strong>Instruction</strong>s Chapter 1<br />
The standard control portion of the application is not shown.<br />
Wiring Diagram<br />
24V DC<br />
24V Ground<br />
DeviceNet<br />
1<br />
V0<br />
G0<br />
11<br />
This programming diagram shows the instruction with inputs and<br />
outputs.<br />
Programming Diagram<br />
Manual<br />
TBD ms<br />
Module 1:I.Pt00Data<br />
Module 1:I.Pt01Data<br />
Module 1:I.CombinedStatus<br />
Module 1:I.Pt11Data<br />
Publication <strong>1756</strong>-<strong>RM095C</strong>-<strong>EN</strong>-P - July 2008 103<br />
3<br />
I0<br />
4<br />
I1<br />
1791-DS-IB12<br />
Input Status<br />
Reset<br />
<strong>Safety</strong> Mat<br />
28<br />
T3<br />
Module 1<br />
Operator<strong>Safety</strong>Mat<br />
SMAT<br />
Restart Type<br />
Output 1<br />
Short Circuit Time Delay<br />
Source A<br />
Channel A<br />
Source B<br />
Channel B<br />
Fault Present<br />
25<br />
T2<br />
See Note 1<br />
Momentary<br />
Push Button<br />
(reset)<br />
Module 1:O.Test02Data<br />
Module 1:O.Test03Data<br />
Note 1: This is an internal Boolean tag used by other parts of the user application not shown in this example.<br />
Key: Color code represents data or value typically used.<br />
Tag-mapped Variable<br />
Standard Output<br />
<strong>Safety</strong> Input <strong>Safety</strong> Output<br />
Configuration Constant/Value<br />
Internal <strong>Safety</strong> Variable<br />
24<br />
I11
Chapter 1 General <strong>Safety</strong> <strong>Application</strong> <strong>Instruction</strong>s<br />
Ladder Logic<br />
RSLogix 5000 software is used to configure the input and output<br />
parameters of the Guard I/O module, as illustrated.<br />
Module Definition<br />
SMAT<br />
<strong>Safety</strong> Mat<br />
SMAT Operator<strong>Safety</strong>Mat<br />
Restart Type MANUAL<br />
Short Circuit Detect Delay Time (Msec) 500<br />
Channel A Module1:I.Pt00Data<br />
1<br />
Channel B Module1:I.Pt01Data<br />
1<br />
Input Status Module1:I.CombinedStatus<br />
1<br />
Reset Module1:I.Pt11Data<br />
0<br />
Rockwell Automation suggests using Exact Match, as shown.<br />
However, setting Electronic Keying to Compatible Match is allowed.<br />
104 Publication <strong>1756</strong>-<strong>RM095C</strong>-<strong>EN</strong>-P - July 2008<br />
O1<br />
SRCA<br />
SRCB<br />
FP<br />
Operator<strong>Safety</strong>Mat.SRCA Module1:O.Test02Data<br />
Operator<strong>Safety</strong>Mat.SRCB Module1:O.Test03Data
Module Input Configuration<br />
Module Output Configuration<br />
General <strong>Safety</strong> <strong>Application</strong> <strong>Instruction</strong>s Chapter 1<br />
Publication <strong>1756</strong>-<strong>RM095C</strong>-<strong>EN</strong>-P - July 2008 105
Chapter 1 General <strong>Safety</strong> <strong>Application</strong> <strong>Instruction</strong>s<br />
Two-hand Run Station –<br />
Enhanced (THRSe)<br />
• BG-certified<br />
•<br />
This instruction monitors the inputs of a Two-hand Run Station. Each<br />
run station button has two inputs; one normally-closed (N.C.) contact<br />
and one normally-open (N.O.) contact. To energize Output 1, the<br />
instruction must be enabled and connected with no faults present.<br />
Then, both buttons must be pressed within 500 ms of one another.<br />
IMPORTANT<br />
The right and left buttons of the Two-hand Run Station must be<br />
pressed within 500 ms of one another to energize Output 1. To<br />
make sure this situation can be properly detected, the safety<br />
task period cannot exceed 40 ms and the input device’s<br />
requested packet interval (RPI) cannot exceed 20 ms.<br />
Refer to the <strong>GuardLogix</strong> Controllers User Manual, publication<br />
<strong>1756</strong>-UM020 and the <strong>GuardLogix</strong> Controller Systems <strong>Safety</strong><br />
Reference Manual, publication <strong>1756</strong>-RM093, for more<br />
information on the safety task period and the RPI.<br />
The Buttons Released output turns ON (1) whenever the Two-hand<br />
Run Station is connected and enabled, no faults are present, and both<br />
the right and left buttons are in the released (safe) state. In this case,<br />
all four contacts are in the safe state.<br />
The Two-hand Run Station may be disconnected when not in use. To<br />
properly disconnect the Two-hand Run Station, the Disconnected<br />
input must be ON (1) and all button inputs must be OFF (0). When<br />
the Two-hand Run Station is disconnected, the Station Bypassed<br />
output turns ON (1).<br />
106 Publication <strong>1756</strong>-<strong>RM095C</strong>-<strong>EN</strong>-P - July 2008
THRSe – <strong>Instruction</strong> Parameters<br />
IMPORTANT<br />
Two-hand Run Station – Enhanced <strong>Instruction</strong>: Configuration Parameter<br />
General <strong>Safety</strong> <strong>Application</strong> <strong>Instruction</strong>s Chapter 1<br />
Do not use the same tag name for more than one instruction in<br />
the same program. Do not write to any instruction output tag<br />
under any circumstances.<br />
The following table provides the parameter used to configure the<br />
instruction. This parameter cannot be changed at runtime.<br />
Parameter Data Type Description<br />
Discrepancy Time Integer The amount of time that the instruction lets the normally-open and normally-closed button<br />
contacts be inconsistent before generating a fault.<br />
Two-hand Run Station – Enhanced <strong>Instruction</strong>: Inputs<br />
The inconsistent state occurs when the normally-open contact and the normally-closed<br />
contact have the same logical value; that is, both are ON (1) or both are OFF (0).<br />
The valid range is 100…3000 ms.<br />
The following table explains the instruction inputs.<br />
Parameter Data Type Description<br />
Enable Boolean ON (1): The device is enabled. Output 1 is energized when both buttons are pressed within<br />
500 ms of one another.<br />
OFF (0): The device is disabled. Output 1 stays de-energized.<br />
Disconnected Boolean This input indicates whether the run station is disconnected. When this input is ON (1) and all<br />
of the button inputs (Right Button Normally Open, Right Button Normally Closed, Left Button<br />
Normally Open, Left Button Normally Closed) are OFF (0), the Station Bypassed output turns<br />
ON (1).<br />
Right Button Normally<br />
Open<br />
Right Button Normally<br />
Closed<br />
Left Button Normally<br />
Open<br />
Left Button Normally<br />
Closed<br />
ON (1): The run station is disconnected. Output 1 cannot be energized.<br />
OFF (0): The run station is not disconnected. Output 1 may be energized.<br />
Boolean This is the normally-open contact for the right button.<br />
Boolean This is the normally-closed contact for the right button.<br />
Boolean This is the normally-open contact for the left button.<br />
Boolean This is the normally-closed contact for the left button.<br />
Publication <strong>1756</strong>-<strong>RM095C</strong>-<strong>EN</strong>-P - July 2008 107
Chapter 1 General <strong>Safety</strong> <strong>Application</strong> <strong>Instruction</strong>s<br />
Two-hand Run Station – Enhanced <strong>Instruction</strong>: Inputs<br />
Parameter Data Type Description<br />
Input Status Boolean If instruction inputs are from a safety I/O module, this is the input status from the I/O module<br />
or modules (Input Status or Combined Status). If instruction inputs are derived from internal<br />
logic, it is the application programmer’s responsibility to determine the conditions.<br />
Reset<br />
ON (1): The inputs to this instruction are valid.<br />
OFF (0): The inputs to this instruction are invalid.<br />
(1) Boolean This input clears instruction and circuit faults provided the fault condition is not present.<br />
OFF (0) -> ON (1): The Fault Present and Fault Code outputs are reset.<br />
(1) ISO 13849-1 stipulates instruction reset functions must occur on falling edge signals. To comply with ISO 13849-1<br />
requirements, add this logic immediately before this instruction. Rename the “Reset_Signal” tag in this example<br />
to your reset signal tagname. Then use the OSF instruction Output Bit tag as the instruction’s reset source.<br />
Two-hand Run Station – Enhanced <strong>Instruction</strong>: Outputs<br />
The following table explains the instruction outputs.<br />
Parameter Data Type Description<br />
Output 1 (O1) Boolean This output is energized when the run station is enabled and connected, and both buttons are<br />
pressed within 500 ms of one another.<br />
Buttons Released (BR) Boolean<br />
Output 1 is de-energized when one or more of the following occurs:<br />
• The right or the left button is released, or any one of the four contacts transitions to the<br />
safe state.<br />
• The Input Status input turns OFF (0), which indicates the inputs have become invalid.<br />
• The Enable input turns OFF (0).<br />
• The Disconnected input turns ON (1).<br />
This output is ON (1) when both buttons are released, the run station is connected and<br />
enabled, and no faults are present.<br />
Station Bypassed (SB) Boolean This output is ON (1) when the run station has been properly disconnected and no faults are<br />
present. See Disconnecting the Two-hand Run Station on page 109.<br />
Fault Present (FP) Boolean ON (1): A fault is present in the instruction.<br />
OFF (0): The instruction is operating normally.<br />
Fault Code Integer This output indicates the type of fault that occurred. See the THRSe – Fault Codes on page<br />
117 for the list of fault codes.<br />
Diagnostic Code Integer<br />
This parameter is not safety-related.<br />
This output indicates the diagnostic status of the instruction. See the THRSe – Diagnostic<br />
Codes on page 118 for a list of diagnostic codes.<br />
This parameter is not safety-related.<br />
IMPORTANT<br />
Do not write to any instruction output tag under any<br />
circumstances.<br />
108 Publication <strong>1756</strong>-<strong>RM095C</strong>-<strong>EN</strong>-P - July 2008
Disconnecting the Two-hand Run Station<br />
General <strong>Safety</strong> <strong>Application</strong> <strong>Instruction</strong>s Chapter 1<br />
To energize the Station Bypassed Output (disconnect the Two-hand<br />
Run Station), the Disconnected input must be ON (1), and all the<br />
button inputs must be OFF (0).<br />
If a fault occurs while disconnecting the Two-hand Run Station, trigger<br />
a reset after the inputs are in the correct state.<br />
Connecting the Two-hand Run Station<br />
To de-energize the Station Bypassed Output (connect the Two-hand<br />
Run Station), the Disconnected input must be OFF (0), and the button<br />
inputs must be in the released safe state.<br />
If a fault occurs while connecting the Two-hand Run Station, trigger a<br />
reset after the inputs are in the correct state.<br />
THRSe – Normal Operation<br />
As shown in the timing diagram, the Buttons Released output turns<br />
ON (1) whenever both buttons are released, the run station is<br />
connected and enabled, and no faults are present.<br />
Before (A), the left and right buttons are both pressed, but Output 1<br />
has not yet been energized because the Enable input is OFF (0).<br />
When the Enable input transitions from OFF (0) to ON (1) at (A),<br />
Output 1 is not energized because the buttons must be pressed while<br />
the Enable input is ON (1). At (B), the right button is pressed but the<br />
left button is still released, which turns OFF (0) the Buttons Released<br />
output. At (C), both buttons have been pressed within 500 ms of one<br />
another, which energizes Output 1 after a 50 ms delay. Output 1 is<br />
de-energized when the left button is released at (D). Output 1 is<br />
energized 50 ms after both buttons are pressed at (E). Lastly, at (F),<br />
Output 1 is de-energized because the Enable input turns OFF (0).<br />
Publication <strong>1756</strong>-<strong>RM095C</strong>-<strong>EN</strong>-P - July 2008 109
Chapter 1 General <strong>Safety</strong> <strong>Application</strong> <strong>Instruction</strong>s<br />
Normal Operation Timing Diagram<br />
Enable<br />
Disconnected<br />
Right Button Normally Open<br />
Right Button Normally Closed<br />
Left Button Normally Open<br />
Left Button Normally Closed<br />
110 Publication <strong>1756</strong>-<strong>RM095C</strong>-<strong>EN</strong>-P - July 2008<br />
1<br />
0<br />
1<br />
0<br />
1<br />
0<br />
1<br />
0<br />
1<br />
0<br />
1<br />
Input Status<br />
0<br />
Fault Present<br />
Buttons Released<br />
Station Bypassed<br />
Output 1<br />
Discrepancy Time = 250 ms<br />
1<br />
0<br />
1<br />
0<br />
1<br />
0<br />
1<br />
0<br />
1<br />
0<br />
A<br />
50 ms 50 ms<br />
B C D E F
General <strong>Safety</strong> <strong>Application</strong> <strong>Instruction</strong>s Chapter 1<br />
THRSe – Button Held Down Diagnostic Operation<br />
Output 1 cannot be energized when the right and left buttons are not<br />
pressed within 500 ms of one another.<br />
At (A), the right button is pressed while the left button remains<br />
released. At (B), the buttons have been in an inconsistent state for 500<br />
ms, which generates a diagnostic signal that requires both buttons be<br />
released before Output 1 can be energized again. At (C), the left<br />
button is pressed, but Output 1 is not energized because both buttons<br />
have not been released after the right button was held down longer<br />
than 500 ms. Both buttons are released, which clears the diagnostic<br />
signal at (D). Output 1 is energized after a 50 ms delay when both<br />
buttons are pressed within 500 ms of one another at (E).<br />
1<br />
Right Button Normally Open<br />
0<br />
1<br />
Right Button Normally Closed<br />
0<br />
1<br />
Left Button Normally Open<br />
0<br />
1<br />
Left Button Normally Closed<br />
0<br />
1<br />
Fault Present<br />
0<br />
1<br />
Buttons Released<br />
0<br />
1<br />
Station Bypassed<br />
0<br />
1<br />
Output 1<br />
0<br />
Discrepancy Time = 250 ms<br />
A B C D E<br />
For simplicity, the Enable and Input Status inputs are not shown and are assumed to be ON (1).<br />
Similarly, the Disconnected input is assumed to be OFF (0).<br />
Publication <strong>1756</strong>-<strong>RM095C</strong>-<strong>EN</strong>-P - July 2008 111<br />
50 ms<br />
500 ms<br />
50 ms
Chapter 1 General <strong>Safety</strong> <strong>Application</strong> <strong>Instruction</strong>s<br />
THRSe – Button Glitch Diagnostic Operation<br />
When one button is released while the other button remains pressed,<br />
both buttons must be released to the safe state before Output 1 can be<br />
energized again.<br />
At (A), Output 1 is de-energized because the right button is released.<br />
At (B), the right button is pressed, but the left button remained<br />
released since (A), generating a diagnostic signal that requires both<br />
buttons to be released before Output 1 can be energized again. Both<br />
buttons are released at (C), which clears the diagnostic signal. At (D),<br />
Output 1 is energized after a 50 ms delay when both buttons are<br />
pressed within 500 ms of one another.<br />
1<br />
Right Button Normally Open<br />
0<br />
1<br />
Right Button Normally Closed<br />
0<br />
1<br />
Left Button Normally Open<br />
0<br />
1<br />
Left Button Normally Closed<br />
0<br />
1<br />
Fault Present<br />
0<br />
1<br />
Buttons Released<br />
0<br />
1<br />
Station Bypassed<br />
0<br />
1<br />
Output 1<br />
0<br />
Discrepancy Time = 250 ms<br />
A B C D<br />
For simplicity, the Enable and Input Status inputs are not shown and are assumed to be ON (1).<br />
Similarly, the Disconnected input is assumed to be OFF (0).<br />
112 Publication <strong>1756</strong>-<strong>RM095C</strong>-<strong>EN</strong>-P - July 2008<br />
50 ms<br />
50 ms
General <strong>Safety</strong> <strong>Application</strong> <strong>Instruction</strong>s Chapter 1<br />
THRSe – Button Discrepancy Fault (Channel-to-channel)<br />
Operation<br />
A discrepancy fault occurs when the two channels of one button are<br />
in an inconsistent state for more than the configured Discrepancy<br />
Time (250 ms in this example).<br />
At (A), the right button is pressed, but only the normally-open contact<br />
of the left button turns ON (1) while the normally-closed contact<br />
remains OFF (0). After the Left Button Normally Open and the Left<br />
Button Normally Closed inputs have been inconsistent for 250 ms, the<br />
fault occurs at (B). At (C), the fault is cleared by a Reset. Lastly, at (D),<br />
Output 1 is energized 50 ms after both buttons are pressed.<br />
Publication <strong>1756</strong>-<strong>RM095C</strong>-<strong>EN</strong>-P - July 2008 113
Chapter 1 General <strong>Safety</strong> <strong>Application</strong> <strong>Instruction</strong>s<br />
Button Discrepancy Fault Operation Timing Diagram<br />
1<br />
Right Button Normally Open<br />
0<br />
1<br />
Right Button Normally Closed<br />
0<br />
1<br />
Left Button Normally Open<br />
0<br />
1<br />
Left Button Normally Closed<br />
0<br />
1<br />
Reset<br />
0<br />
1<br />
Fault Present<br />
0<br />
1<br />
Buttons Released<br />
0<br />
1<br />
Station Bypassed<br />
0<br />
1<br />
Output 1<br />
0<br />
Discrepancy Time = 250 ms<br />
A B C D<br />
For simplicity, the Enable and Input Status inputs are not shown and are assumed to be ON (1).<br />
Similarly, the Disconnected input is assumed to be OFF (0).<br />
114 Publication <strong>1756</strong>-<strong>RM095C</strong>-<strong>EN</strong>-P - July 2008<br />
50ms<br />
250ms<br />
50ms
General <strong>Safety</strong> <strong>Application</strong> <strong>Instruction</strong>s Chapter 1<br />
THRSe – Run Station Disconnected (Station Bypassed) Operation<br />
When the run station is properly disconnected, Output 1 cannot be<br />
energized. The Station Bypassed output is energized whenever the<br />
run station is properly disconnected.<br />
At (A), Output 1 is energized 50 ms after both buttons are pressed. At<br />
(B), Output 1 is de-energized and a fault occurs when the<br />
Disconnected input turns ON (1). To clear the fault, both buttons must<br />
be released and a reset triggered at (C). The Station Bypassed output<br />
turns ON (1). At (D), the Station Bypassed output turns OFF (0) and a<br />
fault occurs when the Right Button Normally Open input turns ON (1)<br />
while the Disconnected input is ON (1). At (E), the fault is cleared and<br />
the Station Bypassed output is turned ON (1) when a reset is triggered<br />
with the Disconnected input ON (1) and all button inputs OFF (0).<br />
Lastly, at (F), the Enable input transitions from ON (1) to OFF (0) to<br />
ON (1), but has no effect on the Station Bypassed output, which<br />
remains ON (1).<br />
Publication <strong>1756</strong>-<strong>RM095C</strong>-<strong>EN</strong>-P - July 2008 115
Chapter 1 General <strong>Safety</strong> <strong>Application</strong> <strong>Instruction</strong>s<br />
Run Station Disconnected Timing Diagram<br />
1<br />
Enable<br />
0<br />
1<br />
Disconnected<br />
0<br />
1<br />
Right Button Normally Open<br />
0<br />
1<br />
Right Button Normally Closed<br />
0<br />
1<br />
Left Button Normally Open<br />
0<br />
1<br />
Left Button Normally Closed<br />
0<br />
1<br />
Reset<br />
0<br />
1<br />
Fault Present<br />
0<br />
1<br />
Buttons Released<br />
0<br />
1<br />
Station Bypassed<br />
0<br />
1<br />
Output 1<br />
0<br />
Discrepancy Time = 250 ms A B C D E F<br />
For simplicity, the Input Status input is not shown and is assumed to be ON (1), which<br />
indicates the inputs are valid.<br />
THRSe – False Rung State Behavior<br />
When the instruction is executed on a false rung, all instruction<br />
outputs are de-energized.<br />
116 Publication <strong>1756</strong>-<strong>RM095C</strong>-<strong>EN</strong>-P - July 2008<br />
50 ms
THRSe – Fault Codes<br />
General <strong>Safety</strong> <strong>Application</strong> <strong>Instruction</strong>s Chapter 1<br />
Fault Code Description Corrective Action<br />
00H No fault. None.<br />
20H The Input Status input transitioned from ON (1) to OFF (0) while the • Check the I/O module connection.<br />
instruction was executing.<br />
• Reset the fault.<br />
7001H The right button contacts were in an inconsistent state for longer • Check the wiring.<br />
7002H<br />
than the Discrepancy Time. At the time of the fault, the Right Button<br />
Normally Open was ON (1) and the Right Button Normally Closed<br />
was OFF (0).<br />
The right button contacts were in an inconsistent state for longer<br />
than the Discrepancy Time. At the time of the fault, the Right Button<br />
Normally Closed was ON (1) and the Right Button Normally Open<br />
was OFF (0).<br />
• Bring the right button contacts to a consistent<br />
state.<br />
• Reset the fault.<br />
7003H The left button contacts were in an inconsistent state for longer • Check the wiring.<br />
7004H<br />
than the Discrepancy Time. At the time of the fault, the Left Button<br />
Normally Open was ON (1) and the Left Button Normally Closed was<br />
OFF (0).<br />
The left button contacts were in an inconsistent state for longer<br />
than the Discrepancy Time. At the time of the fault, the Left Button<br />
Normally Closed was ON (1) and the Left Button Normally Open was<br />
OFF (0).<br />
• Bring the left button contacts to a consistent<br />
state.<br />
• Reset the fault.<br />
7005H The Right Button Normally Open input transitioned from ON (1) to • Check the wiring.<br />
OFF (0) to ON (1) while the Right Button Normally Closed input<br />
remained ON (1).<br />
• Release the right button, bringing both contacts<br />
to the OFF (0) state.<br />
7006H The Right Button Normally Closed input transitioned from ON (1) to<br />
OFF (0) to ON (1) while the Right Button Normally Open input<br />
remained ON (1).<br />
• Reset the fault.<br />
7007H The Left Button Normally Open input transitioned from ON (1) to OFF • Check the wiring.<br />
(0) to ON (1) while the Left Button Normally Closed input remained<br />
ON (1).<br />
• Release the left button, bringing both contacts<br />
to the OFF (0) state.<br />
7008H The Left Button Normally Closed input transitioned from ON (1) to<br />
OFF (0) to ON (1) while the Left Button Normally Open input<br />
remained ON (1).<br />
• Reset the fault.<br />
7030H The Disconnected input was ON (1), but all of the button inputs • To disconnect the Two-hand Run Station, set all<br />
were not OFF (0).<br />
button inputs to OFF (0) and reset the fault.<br />
• To connect the run station, set the Disconnected<br />
input to OFF (0) and reset the fault.<br />
7031H The button inputs were disconnected for longer than the<br />
• To disconnect the Two-hand Run Station, set the<br />
Discrepancy Time, but the Disconnected input was OFF (0).<br />
Disconnected input to ON (1) and reset the fault.<br />
• To connect the Two-hand Run Station, set all<br />
button inputs to their normal state and reset the<br />
fault.<br />
Publication <strong>1756</strong>-<strong>RM095C</strong>-<strong>EN</strong>-P - July 2008 117
Chapter 1 General <strong>Safety</strong> <strong>Application</strong> <strong>Instruction</strong>s<br />
THRSe – Diagnostic Codes<br />
Diagnostic Code Description Corrective Action<br />
00H No fault. None.<br />
20H The Input Status was OFF (0) when the<br />
instruction started.<br />
Check the I/O module connection.<br />
7001H The device is not in the safe state for start-up. Release both buttons to OFF (0).<br />
7002H The right button is held down. The left and right<br />
buttons have been in an inconsistent state for<br />
longer than 500 ms.<br />
Release both buttons to OFF (0).<br />
7003H The left button is held down. The left and right<br />
buttons have been in an inconsistent state for<br />
longer than 500 ms.<br />
Release both buttons to OFF (0).<br />
7004H The right button was released and then pressed<br />
while the left button remained pressed.<br />
Release both buttons to OFF (0).<br />
7005H The left button was released and then pressed<br />
while the right button remained pressed.<br />
Release both buttons to OFF (0).<br />
7060H The run station is not enabled. Enable or disconnect the run station.<br />
7061H The run station is bypassed. No action required.<br />
118 Publication <strong>1756</strong>-<strong>RM095C</strong>-<strong>EN</strong>-P - July 2008
24V DC<br />
24V Ground<br />
DeviceNet<br />
1<br />
V<br />
G<br />
11<br />
THRSe – Wiring and Programming Example<br />
General <strong>Safety</strong> <strong>Application</strong> <strong>Instruction</strong>s Chapter 1<br />
This example complies with <strong>EN</strong>954-1 Category 4 operation. The<br />
standard control portion of the application is not shown. Two<br />
two-hand run stations are shown connected to a 1791DS-IB12<br />
module.<br />
3<br />
I0<br />
I7<br />
8<br />
Wiring Diagram<br />
4<br />
I1<br />
I6<br />
7<br />
15<br />
T0<br />
T0<br />
19<br />
RunStand1<br />
Publication <strong>1756</strong>-<strong>RM095C</strong>-<strong>EN</strong>-P - July 2008 119<br />
13<br />
T0<br />
1791DS-IB12 Module 1<br />
T0<br />
31<br />
RunStand2<br />
5<br />
I2<br />
I9<br />
22<br />
6<br />
I3<br />
I8<br />
21<br />
16<br />
T1<br />
T1<br />
18<br />
14<br />
T1<br />
T1<br />
20<br />
Momentary<br />
Push Button<br />
(reset)<br />
Dummy Plug<br />
7<br />
I4<br />
I10<br />
23<br />
17<br />
T0<br />
T0<br />
33<br />
Dummy Plug<br />
24<br />
I11
Chapter 1 General <strong>Safety</strong> <strong>Application</strong> <strong>Instruction</strong>s<br />
500 ms<br />
1<br />
Module1:I.Pt04Data<br />
Module1:I.Pt00Data<br />
Module1:I.Pt01Data<br />
Module1:I.Pt02Data<br />
Module1:I.Pt03Data<br />
Module1:I.CombinedStatus<br />
Module1:I.Pt11Data<br />
500 ms<br />
1<br />
Module1:I.Pt10Data<br />
Module1:I.Pt06Data<br />
Module1:I.Pt07Data<br />
Module1:I.Pt08Data<br />
Module1:I.Pt09Data<br />
RunStand1<br />
THRSe<br />
Discrepancy Time Output 1<br />
Station Bypassed<br />
Enable<br />
Disconnected Buttons Released<br />
Right Button Normally Open<br />
Right Button Normally Closed<br />
Left Button Normally Open<br />
Left Button Normally Closed<br />
Input Status<br />
Reset<br />
THRSe<br />
Discrepancy Time<br />
This programming diagram logically illustrates the use of two THRSe<br />
instructions. If one of the Two-hand Run Station’s buttons is released,<br />
the output is de-energized and the other Two-hand Run Station’s<br />
buttons must also be released before the output can be energized<br />
again.<br />
Programming Diagram<br />
Fault Present<br />
Enable<br />
Station Bypassed<br />
Disconnected Buttons Released<br />
Right Button Normally Open<br />
Right Button Normally Closed<br />
Left Button Normally Open<br />
Left Button Normally Closed<br />
Input Status<br />
Reset<br />
RunStand2<br />
Output 1<br />
Fault Present<br />
NOTE 1: This is an internal Boolean tag that has its value determined by other parts of the user application not shown in this example.<br />
>=1<br />
>=1<br />
120 Publication <strong>1756</strong>-<strong>RM095C</strong>-<strong>EN</strong>-P - July 2008<br />
&<br />
&<br />
S<br />
R<br />
Q<br />
Q<br />
ButtonsReleased<br />
Key: Color code represents data or value typically used.<br />
Tag-mapped Variable<br />
Standard Output<br />
<strong>Safety</strong> Input <strong>Safety</strong> Output<br />
Configuration Constant/Value<br />
>=1<br />
Internal <strong>Safety</strong> Variable<br />
&<br />
RunStationStart
Ladder Logic<br />
General <strong>Safety</strong> <strong>Application</strong> <strong>Instruction</strong>s Chapter 1<br />
RSLogix 5000 software is used to configure the input and test output<br />
parameters of the Guard I/O module, as illustrated.<br />
Module Definition<br />
RunStand1.BR RunStand2.BR<br />
ButtonsReleased<br />
RunStationStart<br />
RunStand2.SB<br />
THRSe<br />
Two Hand Run Station Enhanced<br />
THRSe RunStand1<br />
Discrepancy Time (Msec) 500<br />
Enable ALWAYS_<strong>EN</strong>ABLED<br />
1<br />
Disconnected Module1:I.Pt04Data<br />
0<br />
Right Button Normally Open Module1:I.Pt00Data<br />
1<br />
Right Button Normally Closed Module1:I.Pt01Data<br />
1<br />
Left Button Normally Open Module1:I.Pt02Data<br />
0<br />
Left Button Normally Closed Module1:I.Pt03Data<br />
1<br />
Input Status Module1:I.CombinedStatus<br />
1<br />
Reset Module1:I.Pt11Data<br />
0<br />
THRSe<br />
Two Hand Run Station Enhanced<br />
THRSe RunStand2<br />
Discrepancy Time (Msec) 500<br />
Enable ALWAYS_<strong>EN</strong>ABLED<br />
1<br />
Disconnected Module1:I.Pt10Data<br />
0<br />
Right Button Normally Open Module1:I.Pt06Data<br />
0<br />
Right Button Normally Closed Module1:I.Pt07Data<br />
1<br />
Left Button Normally Open Module1:I.Pt08Data<br />
0<br />
Left Button Normally Closed Module1:I.Pt09Data<br />
1<br />
Input Status Module1:I.CombinedStatus<br />
1<br />
Reset Module1:I.Pt11Data<br />
0<br />
RunStand1.O1 RunStand2.O1<br />
RunStand2.SB<br />
Rockwell Automation suggests using Exact Match, as shown.<br />
However, setting Electronic Keying to Compatible Match is allowed.<br />
Publication <strong>1756</strong>-<strong>RM095C</strong>-<strong>EN</strong>-P - July 2008 121<br />
O1<br />
BR<br />
SB<br />
FP<br />
O1<br />
BR<br />
SB<br />
FP<br />
ButtonsReleased<br />
L<br />
RunStationStart<br />
ButtonsReleased<br />
U
Chapter 1 General <strong>Safety</strong> <strong>Application</strong> <strong>Instruction</strong>s<br />
Module Input Configuration<br />
Module Test Output Configuration<br />
122 Publication <strong>1756</strong>-<strong>RM095C</strong>-<strong>EN</strong>-P - July 2008
Configurable Redundant<br />
Output (CROUT)<br />
• BG-certified<br />
•<br />
General <strong>Safety</strong> <strong>Application</strong> <strong>Instruction</strong>s Chapter 1<br />
The Configurable Redundant Output instruction controls and monitors<br />
redundant outputs. The reaction time for output feedback is<br />
configurable. The instruction supports positive and negative feedback<br />
signals.<br />
CROUT – <strong>Instruction</strong> Parameters<br />
IMPORTANT<br />
Configurable Redundant Output <strong>Instruction</strong>: Configuration Parameters<br />
Parameter Data Type Description<br />
Feedback<br />
Type<br />
Feedback<br />
Reaction<br />
Time<br />
Do not use the same tag name for more than one instruction in<br />
the same program. Do not write to any instruction output tag<br />
under any circumstances.<br />
The following table provides the parameters that are used to configure<br />
the instruction. These parameters cannot be changed at runtime.<br />
List This parameter defines the feedback ON and OFF states.<br />
Positive ON (1): Feedbacks ON / Outputs ON<br />
OFF (0): Feedbacks OFF / Outputs OFF<br />
Negative ON (1): Feedbacks OFF / Outputs ON<br />
OFF (0): Feedbacks ON / Outputs OFF<br />
Integer This parameter specifies the amount of time that the instruction waits for Feedback 1 and Feedback 2 to<br />
reflect the state of Output 1 and Output 2 as specified by the configured Feedback Type.<br />
The valid range is 5…1000 ms.<br />
Publication <strong>1756</strong>-<strong>RM095C</strong>-<strong>EN</strong>-P - July 2008 123
Chapter 1 General <strong>Safety</strong> <strong>Application</strong> <strong>Instruction</strong>s<br />
Configurable Redundant Output <strong>Instruction</strong>: Inputs<br />
The following table explains the instruction inputs.<br />
Parameter Data Type Description<br />
Actuate Boolean This input controls the energizing and de-energizing of Output 1 and Output 2.<br />
ON (1): Output 1 and Output 2 are energized if no faults exist.<br />
OFF (0): Output 1 and Output 2 are de-energized.<br />
Feedback 1 Boolean This input is constantly monitored to make sure that it reflects the state of Output 1. When Output 1<br />
transitions, this input must detect the transition within the Feedback Reaction Time.<br />
Feedback 2 Boolean This input is constantly monitored to make sure that it reflects the state of Output 2. When Output 2<br />
transitions, this input must detect the transition within the Feedback Reaction Time.<br />
Input Status Boolean If instruction inputs are from a safety I/O module, this is the input status from the I/O module or<br />
modules (Input Status or Combined Status). If instruction inputs are derived from internal logic, it is the<br />
application programmer’s responsibility to determine the conditions.<br />
Output Status Boolean<br />
ON (1): The inputs to this instruction are valid.<br />
OFF (0): The inputs to this instruction are invalid.<br />
The output status of the I/O module or modules used for Output 1 and Output 2 signals.<br />
ON (1): The I/O connection and the I/O module are operational.<br />
OFF (0): The module is faulted or the connection to the module has been lost.<br />
Reset (1) Boolean This input clears instruction and circuit faults provided the fault condition is not present.<br />
OFF (0) -> ON (1): The Fault Present and Fault Code outputs are reset.<br />
(1) ISO 13849-1 stipulates instruction reset functions must occur on falling edge signals. To comply with ISO 13849-1<br />
requirements, add this logic immediately before this instruction. Rename the “Reset_Signal” tag in this example<br />
to your reset signal tagname. Then use the OSF instruction Output Bit tag as the instruction’s reset source.<br />
Configurable Redundant Output <strong>Instruction</strong>: Outputs<br />
The following table explains the instruction outputs.<br />
Parameter Data Type Description<br />
Output 1 (O1) Boolean This output is typically used to control channel A of the output device. Output 1 is de-energized when 1<br />
or more of the following occurs:<br />
Output 2 (O2) Boolean<br />
• A feedback fault occurs.<br />
• Input Status or Output Status inputs become invalid (OFF = 0).<br />
• The Actuate input turns OFF (0).<br />
This output is typically used to control channel B of the output device. Output 2 is de-energized when 1<br />
or more of the following occurs:<br />
• A feedback fault occurs.<br />
• Input Status or Output Status inputs become invalid (OFF = 0).<br />
• The Actuate input turns OFF (0).<br />
124 Publication <strong>1756</strong>-<strong>RM095C</strong>-<strong>EN</strong>-P - July 2008
Configurable Redundant Output <strong>Instruction</strong>: Outputs<br />
Fault Present<br />
(FP)<br />
Boolean ON (1): A fault is present in the instruction.<br />
OFF (0): The instruction is operating normally.<br />
CROUT – Normal Operation<br />
General <strong>Safety</strong> <strong>Application</strong> <strong>Instruction</strong>s Chapter 1<br />
Fault Code Integer This output indicates the type of fault that occurred. See the CROUT – Fault Code on page 127 for the<br />
list of fault codes.<br />
Diagnostic<br />
Code<br />
This parameter is not safety-related.<br />
Integer This output indicates the diagnostic status of the instruction. See the CROUT – Diagnostic Codes on<br />
page 128 for a list of diagnostic codes.<br />
This parameter is not safety-related.<br />
IMPORTANT<br />
Do not write to any instruction output tag under any<br />
circumstances.<br />
This timing diagram shows normal operation of this instruction to<br />
control dual channel outputs when the Feedback Type is Positive.<br />
Outputs 1 and 2 are energized at (A) when the Actuate input turns<br />
ON (1). Both feedback inputs react before the Feedback Reaction<br />
timer has expired, so Output 1 and Output 2 remain energized in<br />
steady state at (B). Outputs 1 and 2 are de-energized at (C) when the<br />
Actuate input turns OFF (0). At (D), both feedback inputs react before<br />
the Feedback Reaction timer has expired, so Output 1 and Output 2<br />
remain de-energized in steady state.<br />
1<br />
Actuate<br />
0<br />
1<br />
Feedback 1<br />
0<br />
1<br />
Feedback 2<br />
0<br />
1<br />
Output 1<br />
0<br />
1<br />
Output 2<br />
0<br />
Feedback<br />
Reaction Time<br />
A B C D<br />
Input Status and Output Status inputs (not shown) are assumed to be<br />
valid (ON = 1).<br />
Publication <strong>1756</strong>-<strong>RM095C</strong>-<strong>EN</strong>-P - July 2008 125
Chapter 1 General <strong>Safety</strong> <strong>Application</strong> <strong>Instruction</strong>s<br />
CROUT – Feedback Fault<br />
A feedback fault can occur when either Feedback 1 or Feedback 2<br />
fails to correctly reflect the state of Output 1 and Output 2. The<br />
Feedback Type is configured as Positive in this diagram example.<br />
Output 1 and Output 2 are energized at (A), but at (B), Feedback 2<br />
has not turned ON (1) before the Feedback Reaction timer expires,<br />
generating a feedback fault. The fault cannot be cleared at (C),<br />
because Feedback 1 and Feedback 2 do not yet reflect the state of<br />
Output 1 and Output 2. The fault is cleared at (D) when the Reset<br />
input turns ON (1) and both Feedback 1 and Feedback 2 are OFF (0),<br />
correctly reflecting the state of Output 1 and Output 2.<br />
1<br />
Actuate<br />
0<br />
1<br />
Feedback 1<br />
0<br />
1<br />
Feedback 2<br />
0<br />
1<br />
Reset<br />
0<br />
1<br />
Fault Present<br />
0<br />
1<br />
Output 1<br />
0<br />
1<br />
Output 2<br />
0<br />
CROUT – False Rung State Behavior<br />
Feedback<br />
Reaction Time<br />
A B C<br />
Input Status and Output Status inputs (not shown) are assumed to be<br />
valid (ON = 1).<br />
When the instruction is executed on a false rung, all instruction<br />
outputs are de-energized.<br />
126 Publication <strong>1756</strong>-<strong>RM095C</strong>-<strong>EN</strong>-P - July 2008<br />
D
CROUT – Fault Code<br />
General <strong>Safety</strong> <strong>Application</strong> <strong>Instruction</strong>s Chapter 1<br />
Fault Code Description Corrective Action<br />
00H No fault. None.<br />
20H The Input Status input transitioned from ON (1) to OFF (0) • Check the I/O module connection.<br />
while the instruction was executing.<br />
• Reset the fault.<br />
21H The Output Status input transitioned from ON (1) to OFF (0) • Check the I/O module connection.<br />
while the instruction was executing.<br />
• Reset the fault.<br />
5000H Feedback 1 and Feedback 2 turned OFF (0) unexpectedly. • Check the feedback signals.<br />
• Reset the fault.<br />
5001H Feedback 1 turned OFF (0) unexpectedly. • Check the Feedback 1 signal.<br />
• Reset the fault.<br />
5002H Feedback 2 turned OFF (0) unexpectedly. • Check the Feedback 2 signal.<br />
• Reset the fault.<br />
5003H Feedback 1 and Feedback 2 turned ON (1) unexpectedly. • Check the feedback signals.<br />
• Reset the fault.<br />
5004H Feedback 1 turned ON (1) unexpectedly. • Check the Feedback 1 signal.<br />
• Reset the fault.<br />
5005H Feedback 2 turned ON (1) unexpectedly. • Check the Feedback 2 signal.<br />
• Reset the fault.<br />
5006H Feedback 1 and Feedback 2 did not turn ON (1) within the • Check the feedback signals or adjust the Feedback<br />
Feedback Reaction Time.<br />
Reaction Time.<br />
• Reset the fault.<br />
5007H Feedback 1 did not turn ON (1) within the Feedback Reaction • Check the Feedback 1 signal or adjust the Feedback<br />
Time.<br />
Reaction Time.<br />
• Reset the fault.<br />
5008H Feedback 2 did not turn ON (1) within the Feedback Reaction • Check the Feedback 2 signal or adjust the Feedback<br />
Time.<br />
Reaction Time.<br />
• Reset the fault.<br />
5009H Feedback 1 and Feedback 2 did not turn OFF (0) within the • Check the feedback signals or adjust the Feedback<br />
Feedback Reaction Time.<br />
Reaction Time.<br />
• Reset the fault.<br />
500AH Feedback 1 did not turn OFF (0) within the Feedback Reaction • Check the Feedback 1 signal or adjust the Feedback<br />
Time.<br />
Reaction Time.<br />
• Reset the fault.<br />
500BH Feedback 2 did not turn OFF (0) within the Feedback Reaction • Check the Feedback 2 signal or adjust the Feedback<br />
Time.<br />
Reaction Time.<br />
• Reset the fault.<br />
Publication <strong>1756</strong>-<strong>RM095C</strong>-<strong>EN</strong>-P - July 2008 127
Chapter 1 General <strong>Safety</strong> <strong>Application</strong> <strong>Instruction</strong>s<br />
CROUT – Diagnostic Codes<br />
Diagnostic Code Description Corrective Action<br />
00H No fault. None.<br />
20H The Input Status was OFF (0) when the<br />
instruction started.<br />
Check the I/O module connection.<br />
21H The Output Status input transitioned from ON<br />
(1) to OFF (0) while the instruction was<br />
executing.<br />
Check the I/O module connection.<br />
5001H The Actuate input is held ON (1). <strong>Set</strong> the Actuate input to OFF (0).<br />
CROUT – Wiring and Programming Example<br />
This example complies with <strong>EN</strong>954-1 Category 4 operation. The<br />
standard control portion of the application is not shown.<br />
This wiring diagram shows how to use the Configurable Redundant<br />
Output instruction with a 1791DS-IB8XOB8 module for motor control.<br />
The application includes a momentary push button for reset.<br />
128 Publication <strong>1756</strong>-<strong>RM095C</strong>-<strong>EN</strong>-P - July 2008
24V DC<br />
24V Ground<br />
Wiring Diagram<br />
DeviceNet<br />
1<br />
V0<br />
G0<br />
11<br />
21<br />
V1<br />
G1<br />
31<br />
13<br />
T0<br />
3<br />
I0<br />
General <strong>Safety</strong> <strong>Application</strong> <strong>Instruction</strong>s Chapter 1<br />
Publication <strong>1756</strong>-<strong>RM095C</strong>-<strong>EN</strong>-P - July 2008 129<br />
14<br />
T1<br />
O0<br />
23<br />
4<br />
I1<br />
O1<br />
24<br />
K1 K2<br />
K1<br />
K2<br />
1791DS-IB8XOB8 Module 1<br />
Fuses<br />
L1 L2 L3<br />
Fuses<br />
Momentary<br />
Push Button<br />
(reset)<br />
Contact Protection<br />
(for example, thermal cut-out<br />
or suppression)<br />
10<br />
I07
Chapter 1 General <strong>Safety</strong> <strong>Application</strong> <strong>Instruction</strong>s<br />
Negative<br />
TBD ms<br />
See Note 1<br />
Module1:I.Pt00Data<br />
Module1:I.Pt01Data<br />
Module1:I.InputStatus<br />
Module1:I.OutputStatus<br />
Module1:I.Pt07Data<br />
This programming diagram logically illustrates the instruction with<br />
inputs and outputs.<br />
Programming Diagram<br />
CROUT<br />
Feedback Type<br />
Feedback Reaction Time<br />
Actuate<br />
Feedback 1<br />
Feedback 2<br />
Input Status<br />
Output Status<br />
Reset<br />
Ladder Logic<br />
MotorControl<br />
Output 1<br />
Output 2<br />
Fault Present<br />
Module1:O.Pt00Data<br />
Module1:O.Pt01Data<br />
NOTE 1: This is an internal Boolean tag that has its value determined by other parts of the user application not shown in this example.<br />
Key: Color code represents data or value typically used.<br />
Tag-mapped Variable<br />
Standard Output<br />
<strong>Safety</strong> Input <strong>Safety</strong> Output<br />
Configuration Constant/Value<br />
Internal <strong>Safety</strong> Variable<br />
CROUT<br />
Configurable Redundant Output<br />
CROUT MotorControl<br />
Feedback Type NEGATIVE<br />
Feedback Reaction Time (Msec) 250<br />
Actuate SeeNote1<br />
0<br />
Feedback 1 Module3:I.Pt00Data<br />
0<br />
Feedback 2 Module3:I.Pt01Data<br />
0<br />
Input Status Module3:I.InputStatus<br />
0<br />
Output Status Module3:I.OutputStatus<br />
0<br />
Reset Module3:I.Pt07Data<br />
0<br />
MotorControl.O1 Module3:O.Pt00Data<br />
MotorControl.O2 Module3:O.Pt01Data<br />
NOTE 1: This is an internal Boolean tag that has its value determined by other parts of the<br />
user application not shown in this example.<br />
130 Publication <strong>1756</strong>-<strong>RM095C</strong>-<strong>EN</strong>-P - July 2008<br />
O1<br />
O2<br />
FP
General <strong>Safety</strong> <strong>Application</strong> <strong>Instruction</strong>s Chapter 1<br />
RSLogix 5000 software is used to configure the input and output<br />
parameters of the Guard I/O module, as illustrated.<br />
Module Definition<br />
Rockwell Automation suggests using Exact Match, as shown.<br />
However, setting Electronic Keying to Compatible Match is allowed.<br />
Module Input Configuration<br />
Publication <strong>1756</strong>-<strong>RM095C</strong>-<strong>EN</strong>-P - July 2008 131
Chapter 1 General <strong>Safety</strong> <strong>Application</strong> <strong>Instruction</strong>s<br />
Module Test Output Configuration<br />
Module Output Configuration<br />
132 Publication <strong>1756</strong>-<strong>RM095C</strong>-<strong>EN</strong>-P - July 2008
Two-sensor Asymmetrical<br />
Muting (TSAM)<br />
•<br />
General <strong>Safety</strong> <strong>Application</strong> <strong>Instruction</strong>s Chapter 1<br />
This instruction provides a temporary, automatic disabling of the<br />
protective function of a light curtain, allowing material to be<br />
transported though the light curtain sensing field without stopping the<br />
machine. Muting sensors differentiate between materials and<br />
personnel, and must act together along with the light curtain, in a<br />
specific switching sequence when the appropriate material passes the<br />
sensing field.<br />
Publication <strong>1756</strong>-<strong>RM095C</strong>-<strong>EN</strong>-P - July 2008 133
Chapter 1 General <strong>Safety</strong> <strong>Application</strong> <strong>Instruction</strong>s<br />
Two-sensor Asymmetrical Muting uses two muting sensors arranged<br />
asymmetrically on either side of the light curtain. Their sensors<br />
intersect just behind the light curtain in the center of the protected<br />
opening.<br />
Two-sensor Asymmetrical Muting <strong>Application</strong><br />
ATT<strong>EN</strong>TION<br />
TSAM – <strong>Instruction</strong> Parameters<br />
IMPORTANT<br />
Material<br />
The muting sensors must be arranged so a person cannot<br />
activate the muting sensors in the same switching sequence as<br />
the material and enter the area when a hazardous condition<br />
exists. Sensor setup must take into account material size,<br />
shape, and speed. Additional guarding may also be necessary.<br />
Specific guarding requirements should be identified through a<br />
hazard or risk assessment of your application.<br />
Do not use the same tag name for more than one instruction in<br />
the same program. Do not write to any instruction output tag<br />
under any circumstances.<br />
The following table provides the parameters that are used to configure<br />
the instruction. The parameters cannot be changed at runtime.<br />
134 Publication <strong>1756</strong>-<strong>RM095C</strong>-<strong>EN</strong>-P - July 2008<br />
Sensor<br />
2<br />
Sensor<br />
1<br />
Muting Lamp
Two-sensor Asymmetrical Muting <strong>Instruction</strong>: Configuration Parameters<br />
General <strong>Safety</strong> <strong>Application</strong> <strong>Instruction</strong>s Chapter 1<br />
Parameter Data Type Description<br />
Restart Type List Configures Output 1 for either manual or automatic restart.<br />
Manual A transition of the Reset input from OFF (0) to ON (1), while all of the Output 1<br />
enabling conditions are met, is required to energize Output 1.<br />
Automatic Output 1 is energized 50 ms after all of the enabling conditions are met.<br />
ATT<strong>EN</strong>TION: Automatic restart may only be used in application situations<br />
where you can prove that no unsafe conditions can occur as a result of its use.<br />
S1-S2 Time Integer The maximum amount of time allowed between clearing or blocking of the muting sensor<br />
inputs (Sensor 1 and Sensor 2) before generating a fault.<br />
S2-LC Time Integer<br />
The valid range is 5…180,000 ms. <strong>Set</strong>ting this input to 0 disables the S1-S2 timer.<br />
The maximum amount of time allowed between clearing or blocking of the Sensor 2 muting<br />
sensor and the Light Curtain before generating a fault.<br />
Maximum Mute Time Integer<br />
The valid range is 5…180,000 ms. <strong>Set</strong>ting this input to 0 disables the S2-LC timer.<br />
The maximum amount of time during which the instruction lets the protective function of the<br />
light curtain be disabled before generating a fault.<br />
Maximum Override<br />
Time<br />
!<br />
The valid range is 0…3600 s. <strong>Set</strong>ting this input to 0 disables the Maximum Mute timer.<br />
Integer The maximum amount of time that the instruction lets the override feature energize the<br />
Output 1 output.<br />
The valid range is 0…30 s. <strong>Set</strong>ting this input to 0 disables the Maximum Override timer.<br />
Publication <strong>1756</strong>-<strong>RM095C</strong>-<strong>EN</strong>-P - July 2008 135
Chapter 1 General <strong>Safety</strong> <strong>Application</strong> <strong>Instruction</strong>s<br />
Two-sensor Asymmetrical Muting <strong>Instruction</strong>: Inputs<br />
The following table explains the instruction inputs.<br />
Parameters Data Type Description<br />
Light Curtain Boolean An input channel with OFF (0) as its safe state, this input represents the current state of the<br />
physical light curtain. You are responsible for properly conditioning this input. Typically this is<br />
accomplished using Dual-channel Input Stop instruction controlling a light curtain.<br />
Sensor 1 Boolean<br />
ON (1): The light curtain is clear.<br />
OFF (0): The light curtain is blocked.<br />
One of two muting sensors, Sensor 1 must be the first sensor to be blocked and the last to be<br />
cleared in the muting sequence.<br />
Sensor 2 Boolean<br />
ON (1): Sensor 1 is clear.<br />
OFF (0): Sensor 1 is blocked.<br />
One of two muting sensors, Sensor 2 must be the second sensor to be blocked and the first to be<br />
cleared in the muting sequence.<br />
Enable Mute Boolean<br />
ON (1): Sensor 2 is clear.<br />
OFF (0): Sensor 2 is blocked.<br />
This input allows the protective function of the light curtain to be disabled (muted) when the<br />
correct muting sequence occurs.<br />
Override Boolean<br />
ON (1): The protective function of the light curtain is disabled when the correct muting sequence<br />
occurs.<br />
OFF (0): The protective function of the light curtain is always enabled.<br />
This input allows a temporary bypass of the muting instruction’s function. Output 1 is energized<br />
regardless of the status of the Input Status input or the existence of faults.<br />
OFF (0): Override function is disabled.<br />
OFF (0) -> ON (1): Output 1 is energized regardless of the status of the Input Status input or the<br />
existence of faults. Output 1 remains energized while the Override input remains ON (1) or until the<br />
Maximum Override timer expires.<br />
!<br />
ATT<strong>EN</strong>TION: Activation of the override function requires the use of a hold-to-run<br />
device where the operator can see the point of hazard, that is, the light curtain<br />
sensing field.<br />
Input Status Boolean If the instruction inputs are from a safety I/O module, this is the input status from the I/O module or<br />
modules (Input Status or Combined Status). If the instruction inputs are derived from internal logic,<br />
it is the application programmer’s responsibility to determine the conditions.<br />
ON (1): The inputs to this instruction are valid.<br />
OFF (0): The inputs to this instruction are invalid.<br />
136 Publication <strong>1756</strong>-<strong>RM095C</strong>-<strong>EN</strong>-P - July 2008
Two-sensor Asymmetrical Muting <strong>Instruction</strong>: Inputs<br />
Parameters Data Type Description<br />
Muting Lamp Status Boolean This input represents the status of the muting lamp.<br />
General <strong>Safety</strong> <strong>Application</strong> <strong>Instruction</strong>s Chapter 1<br />
Reset<br />
ON (1): The muting lamp is operating properly. The light curtain’s protective function is disabled<br />
(muted) after the correct muting sequence is followed.<br />
OFF (0): The muting lamp is defective or missing. The light curtain’s protective function is always<br />
enabled.<br />
(1) Boolean This input clears instruction and circuit faults provided the fault condition is not present.<br />
OFF (0) -> ON (1): The Fault Present and Fault Code outputs are reset.<br />
Output 1 is energized when the Restart Type is manual. Output 1 is not energized at the same time<br />
faults are cleared.<br />
(1) ISO 13849-1 stipulates instruction reset functions must occur on falling edge signals. To comply with ISO 13849-1<br />
requirements, add this logic immediately before this instruction. Rename the “Reset_Signal” tag in this example<br />
to your reset signal tagname. Then use the OSF instruction Output Bit tag as the instruction’s reset source.<br />
Two-sensor Asymmetrical Muting <strong>Instruction</strong>: Outputs<br />
The following table explains the instruction outputs.<br />
Parameter Data Type Description<br />
Output 1 (O1) Boolean ON (1): The light curtain sensing field is not obstructed, the light curtain is being muted, or the light<br />
curtain is being overridden.<br />
Muting Lamp (ML) Boolean This output indicates the status of the light curtain’s protective function.<br />
Clear Area (CA) Boolean<br />
ON (1): The light curtain’s protective function is disabled.<br />
OFF (0): The light curtain’s protective function is enabled.<br />
This output indicates when the light curtain sensing field must be cleared (all muting sensors and<br />
the light curtain are ON) before processing can continue.<br />
Fault Code Integer<br />
ON (1): The light curtain sensing field must be cleared.<br />
This output indicates the type of fault that occurred. See the TSAM – Fault Codes on page 144 for<br />
the list of fault codes.<br />
Diagnostic Code Integer<br />
This parameter is not safety-related.<br />
This output indicates the diagnostic status of the instruction. See the TSAM – Diagnostic Codes on<br />
page 147 for a list of diagnostic codes.<br />
Fault Present (FP) Boolean<br />
This parameter is not safety-related.<br />
ON (1): A fault is present in the instruction.<br />
OFF (0): The instruction is operating normally.<br />
IMPORTANT<br />
Do not write to any instruction output tag under any<br />
circumstances.<br />
Publication <strong>1756</strong>-<strong>RM095C</strong>-<strong>EN</strong>-P - July 2008 137
Chapter 1 General <strong>Safety</strong> <strong>Application</strong> <strong>Instruction</strong>s<br />
TSAM – Normal Operation<br />
One sequence of muting sensor and light-curtain input transitions lets<br />
the protective function of the light curtain be disabled (muted). That<br />
sequence must start with both of the muting sensors and the light<br />
curtain in their ON (1) state. This indicates that the light-curtain<br />
sensing field is clear of all personnel and material.<br />
At (A), the Sensors and the Light Curtain are cleared and the Output 1<br />
output is energized when the Reset input turns ON (1). At (B), the<br />
material blocks Sensor 1, starting the S1-S2 timer. At (C), the material<br />
blocks Sensor 2 within the S1-S2 Time period, so the S1-S2 timer<br />
stops. The S2-LC and Maximum Mute timers start. The Muting Lamp<br />
output turns ON (1), indicating that muting is enabled. At (D), the<br />
material blocks the Light Curtain within the S2-LC Time period, so the<br />
S2-LC timer stops. From (D) to (E), Output 1 remains energized while<br />
the material passes through the Light Curtain. At (E), the material<br />
clears the Light Curtain, starting the LC-S2 timer. At (F), the material<br />
clears Sensor 2 within the S2-LC and Maximum Mute time periods, so<br />
both timers stop. The S2-S1 timer starts and the Muting Lamp output<br />
turns OFF (0), indicating that muting is disabled. At (G), the material<br />
clears Sensor 1, stopping the S2-S1 timer.<br />
138 Publication <strong>1756</strong>-<strong>RM095C</strong>-<strong>EN</strong>-P - July 2008
Normal Operation Timing Diagram<br />
1<br />
Enable Mute<br />
0<br />
1<br />
Sensor 1<br />
0<br />
1<br />
Sensor 2<br />
0<br />
1<br />
Light Curtain<br />
0<br />
1<br />
Reset<br />
0<br />
Muting Lamp<br />
Status<br />
1<br />
0<br />
1<br />
Output 1<br />
0<br />
1<br />
Muting Lamp<br />
0<br />
General <strong>Safety</strong> <strong>Application</strong> <strong>Instruction</strong>s Chapter 1<br />
A B C D E F G<br />
t1: S1-S2 Time t2: S2-LC Time<br />
t3: Maximum Mute Time Restart Type = Manual<br />
Publication <strong>1756</strong>-<strong>RM095C</strong>-<strong>EN</strong>-P - July 2008 139<br />
≤ t1<br />
≤ t2 ≤ t2<br />
≤ t3<br />
≤ t1
Chapter 1 General <strong>Safety</strong> <strong>Application</strong> <strong>Instruction</strong>s<br />
TSAM – Invalid Sequence<br />
Any input sequence other than the normal operation sequence results<br />
in Output 1 being de-energized.<br />
At (A), Output 1 is energized just as in a normal sequence of<br />
operation. At (B), Sensor 1 and Sensor 2 are simultaneously blocked,<br />
causing Output 1 to be de-energized and the Fault Present and Clear<br />
Area outputs to turn ON (1). The override feature can be used to clear<br />
the material from the light curtain sensing field and de-energize the<br />
Clear Area output.<br />
1<br />
Enable Mute<br />
0<br />
1<br />
Sensor 1<br />
0<br />
1<br />
Sensor 2<br />
0<br />
1<br />
Light Curtain<br />
0<br />
1<br />
Reset<br />
0<br />
Muting Lamp<br />
Status<br />
1<br />
0<br />
1<br />
Clear Area<br />
0<br />
1<br />
Output 1<br />
0<br />
1<br />
Fault Present<br />
0<br />
A B<br />
Restart Type = Manual<br />
140 Publication <strong>1756</strong>-<strong>RM095C</strong>-<strong>EN</strong>-P - July 2008
TSAM – Tolerated Sequence<br />
General <strong>Safety</strong> <strong>Application</strong> <strong>Instruction</strong>s Chapter 1<br />
The Two-sensor Asymmetrical Muting (TSAM) instruction tolerates<br />
application dynamics that might cause an input to oscillate due to<br />
over-travel or load vibration.<br />
At (A), Output 1 is energized just as in a normal sequence of<br />
operation. At (B), Sensor 1 turns OFF (0), starting the S1-S2 timer.<br />
Sensor 1 turns ON (1) at (C), stopping the S1-S2 timer. At (D), the<br />
material completely blocks Sensor 1, turning it OFF (0), and the<br />
normal muting sequence continues. A sensor may glitch, as illustrated<br />
from (B) to (C), as a result of over-travel or load vibration. As long as<br />
the final input sequence is valid, the instruction lets the muting<br />
function occur.<br />
1<br />
Enable Mute<br />
0<br />
Sensor 1<br />
1<br />
0<br />
1<br />
Sensor 2<br />
0<br />
Light Curtain<br />
Reset<br />
Muting Lamp<br />
Status<br />
1<br />
0<br />
1<br />
0<br />
1<br />
0<br />
1<br />
Output 1<br />
0<br />
1<br />
Muting Lamp<br />
0<br />
A B C D<br />
Publication <strong>1756</strong>-<strong>RM095C</strong>-<strong>EN</strong>-P - July 2008 141<br />
≤ t1<br />
≤ t2 ≤ t2<br />
≤ t3<br />
t1: S1-S2 Time t2: S2-LC Time<br />
t3: Maximum Mute Time Restart Type = Manual<br />
≤ t1
Chapter 1 General <strong>Safety</strong> <strong>Application</strong> <strong>Instruction</strong>s<br />
TSAM – Dangerous Portion of Cycle<br />
The Enable Mute input enables or disables the protective function of<br />
the light curtain. When the Enable Mute input is OFF (0), the<br />
protective function of the light curtain is enabled and material may not<br />
pass through the light curtain sensing field.<br />
At (A), Output 1 is energized just as in a normal sequence of<br />
operation. At (B), the material blocks Sensor 1, turning it OFF (0) and<br />
starting the S1-S2 timer. At (C), the material blocks Sensor 2 within the<br />
S1-S2 time period so the S1-S2 timer stops and the S2-LC timer starts.<br />
Because the Enable Mute input is OFF (0), muting is disabled and the<br />
Muting Lamp output remains OFF (0). The material blocks the Light<br />
Curtain at (D), and Output 1 is de-energized.<br />
Enable Mute<br />
Sensor 1<br />
Sensor 2<br />
Light Curtain<br />
Reset<br />
Muting Lamp<br />
Status<br />
Output 1<br />
Muting Lamp<br />
1<br />
0<br />
1<br />
0<br />
1<br />
0<br />
1<br />
0<br />
1<br />
0<br />
1<br />
0<br />
1<br />
0<br />
1<br />
0<br />
A B C D<br />
t1: S1-S2 Time t2: S2-LC Time<br />
Restart Type = Manual<br />
142 Publication <strong>1756</strong>-<strong>RM095C</strong>-<strong>EN</strong>-P - July 2008<br />
≤ t1<br />
≤ t2
TSAM – Override Operation<br />
General <strong>Safety</strong> <strong>Application</strong> <strong>Instruction</strong>s Chapter 1<br />
The override feature lets an operator manually energize Output 1 so<br />
that material can be cleared from the sensing field.<br />
ATT<strong>EN</strong>TION<br />
The Override function may be used only with a hold-to-run<br />
device where the operator can see the point of hazard, that is,<br />
the light curtain sensing field.<br />
At (A), the Override input turns ON (1). Output 1 is energized and the<br />
Maximum Override timer starts. At (B), the material clears Sensor 1<br />
and the Clear Area output is turned OFF (0). At (C), the Override<br />
input turns OFF (0) within the Maximum Override time period.<br />
Output 1 is de-energized and the Maximum Override timer stops.<br />
1<br />
Override<br />
0<br />
1<br />
Enable Mute<br />
0<br />
1<br />
Sensor 1<br />
0<br />
1<br />
Sensor 2<br />
0<br />
1<br />
Light Curtain<br />
0<br />
1<br />
Reset<br />
0<br />
Muting Lamp<br />
Status<br />
1<br />
0<br />
1<br />
Clear Area<br />
0<br />
1<br />
Output 1<br />
0<br />
A B C<br />
t1: Maximum Override Time Restart Type = Manual<br />
Publication <strong>1756</strong>-<strong>RM095C</strong>-<strong>EN</strong>-P - July 2008 143<br />
≤ t1
Chapter 1 General <strong>Safety</strong> <strong>Application</strong> <strong>Instruction</strong>s<br />
General Fault Codes<br />
TSAM – False Rung State Behavior<br />
When the instruction is executed on a false rung, all instruction<br />
outputs are de-energized.<br />
TSAM – Fault Codes<br />
Fault Code Description Corrective Action<br />
00H No fault. None.<br />
20H The Input Status input went from ON (1) to OFF (0) while • Check the I/O module connection or the internal logic used<br />
the instruction was executing.<br />
to source input status.<br />
• Reset the fault.<br />
Illegal Input Faults<br />
Fault Code Description Corrective Action<br />
9600H An illegal input pattern was detected. Sensor 1 and the<br />
Light Curtain are blocked and Sensor 2 is cleared.<br />
Sensor 2 should also be blocked.<br />
• Check the Sensor 2 circuit.<br />
• Reset the fault.<br />
S1 S2 LC<br />
0 1 0<br />
9601H An illegal input pattern was detected. Sensor 2 and the<br />
Light Curtain are blocked and Sensor 1 is cleared.<br />
S1 S2 LC<br />
1 0 0<br />
9602H An illegal input pattern was detected. Sensor 2 is blocked<br />
when Sensor 1 and the Light Curtain are cleared.<br />
S1 S2 LC<br />
1 0 1<br />
9603H An illegal input pattern was detected. Sensor 1 and<br />
Sensor 2 are cleared and the Light Curtain is blocked.<br />
S1 S2 LC<br />
1 1 0<br />
Sensor 1 should also be blocked.<br />
• Check the Sensor 1 circuit.<br />
• Reset the fault.<br />
Sensor 2 should also be clear. Sensor 1 should be the first to<br />
be blocked.<br />
• Check the Sensor 2 circuit and the alignment of Sensors 1<br />
and 2.<br />
• Reset the fault.<br />
The Light Curtain should not be blocked when Sensors 1 and 2<br />
are clear.<br />
• Check the Light Curtain circuit.<br />
• Reset the fault.<br />
144 Publication <strong>1756</strong>-<strong>RM095C</strong>-<strong>EN</strong>-P - July 2008
Sequencing Faults<br />
Fault<br />
Code<br />
Normal and Tolerated Muting Sequences<br />
An illegal muting sequence is a legal input<br />
combination that deviates from the normal or<br />
tolerated sequences.<br />
Description Fault<br />
Code<br />
9500H An illegal muting sequence was detected when Sensor 1<br />
(S1) and Sensor 2 (S2) are simultaneously blocked in<br />
step 1.<br />
9502H An illegal muting sequence was detected when Sensor 2<br />
and the Light Curtain are simultaneously blocked in<br />
step 2.<br />
9504H An illegal muting sequence was detected when Sensor 1,<br />
Sensor 2, and the Light Curtain are simultaneously<br />
cleared in step 4.<br />
General <strong>Safety</strong> <strong>Application</strong> <strong>Instruction</strong>s Chapter 1<br />
S1 S2 LC Step<br />
1 1 1 1<br />
0 1 1 2<br />
0 0 1 3<br />
0 0 0 4<br />
0 0 1 5<br />
0 1 1 6<br />
1 1 1 1<br />
Publication <strong>1756</strong>-<strong>RM095C</strong>-<strong>EN</strong>-P - July 2008 145<br />
Normal<br />
Tolerated<br />
Illegal<br />
Description<br />
9501H An illegal muting sequence was detected when Sensor 1,<br />
Sensor 2, and the Light Curtain (LC) are simultaneously<br />
blocked in step 1.<br />
S1 S2 LC Step S1 S2 LC<br />
1 1 1 1<br />
1 1 1 1<br />
0 0 1<br />
S1 S2 LC Step<br />
1 1 1 1<br />
0 1 1 2<br />
0 0 0<br />
0 0 0<br />
Step<br />
9503H An illegal muting sequence was detected when Sensor 1<br />
and Sensor 2 are simultaneously cleared in step 3.<br />
S1 S2 LC<br />
1 1 1 1<br />
0 1 1 2<br />
0 0 1 3<br />
1 1 1<br />
Step<br />
9505H An illegal muting sequence was detected when Sensor 2<br />
and the Light Curtain are simultaneously cleared in<br />
step 4.<br />
S1 S2 LC Step S1 S2 LC<br />
1 1 1 1<br />
1 1 1 1<br />
0 1 1 2<br />
0 0 1 3<br />
0 0 0 4<br />
1 1 1<br />
0 1 1 2<br />
0 0 1 3<br />
0 0 0 4<br />
0 1 1<br />
Step
Chapter 1 General <strong>Safety</strong> <strong>Application</strong> <strong>Instruction</strong>s<br />
Sequencing Faults<br />
Fault<br />
Code<br />
Description Fault<br />
Code<br />
9506H An illegal muting sequence was detected when Sensor 1<br />
and Sensor 2 are simultaneously cleared in step 5.<br />
S1 S2 LC Step<br />
1 1 1 1<br />
0 1 1 2<br />
0 0 1 3<br />
0 0 0 4<br />
0 0 1 5<br />
1 1 1<br />
9508H An illegal muting sequence was detected after the<br />
sequence transitions from step 5 to step 6 to step 5 (a<br />
tolerated sequence) when Sensor 1 and Sensor 2 are<br />
cleared.<br />
S1 S2 LC Step<br />
1 1 1 1<br />
0 1 1 2<br />
0 0 1 3<br />
0 0 0 4<br />
0 0 1 5<br />
0 1 1 6<br />
0 0 1 5<br />
1<br />
1<br />
1<br />
Description<br />
9507H An illegal muting sequence was detected when Sensor 2<br />
and the Light Curtain are simultaneously blocked in<br />
step 6.<br />
S1 S2 LC Step<br />
1 1 1 1<br />
0 1 1 2<br />
0 0 1 3<br />
0 0 0 4<br />
0 0 1 5<br />
0 1 1 6<br />
0 0 0<br />
9509H An illegal muting sequence was detected after the<br />
sequence transitions from step 5 to step 6 to step 5 (a<br />
tolerated sequence) when the Light Curtain is blocked.<br />
S1 S2 LC<br />
1 1 1 1<br />
0 1 1 2<br />
0 0 1 3<br />
0 0 0 4<br />
0 0 1 5<br />
0 1 1 6<br />
0 0 1 5<br />
To correct an invalid sequence fault, check the alignment of the<br />
sensors with regard to the material being moved and the system<br />
timing and then reset the fault.<br />
146 Publication <strong>1756</strong>-<strong>RM095C</strong>-<strong>EN</strong>-P - July 2008<br />
0<br />
0<br />
0<br />
Step
Timer Faults<br />
Fault Code Description Corrective Action<br />
9000H The Light Curtain was muted for longer than the configured<br />
Maximum Mute Time.<br />
9410H Too much time elapsed between Sensor 1 and Sensor 2 being<br />
blocked.<br />
9411H Too much time elapsed between Sensor 2 and the Light<br />
Curtain being blocked.<br />
9412H Too much time elapsed between the Light Curtain and<br />
Sensor 2 being cleared.<br />
9413H Too much time elapsed between Sensor 2 and Sensor 1 being<br />
cleared.<br />
TSAM – Diagnostic Codes<br />
General <strong>Safety</strong> <strong>Application</strong> <strong>Instruction</strong>s Chapter 1<br />
The Maximum Mute Time parameter may be set too short<br />
or there may be a problem with the sensors.<br />
The S1-S2 Time parameter may be set too short or there<br />
may be a problem with Sensor 2.<br />
The S2-LC Time parameter may be set too short or there<br />
may be a problem with Sensor 2.<br />
The S2-LC Time parameter may be set too short or there<br />
may be a problem with Sensor 2.<br />
The S1-S2 Time parameter may be set too short or there<br />
may be a problem with Sensor 2.<br />
Diagnostic Code Description Corrective Action<br />
00H No fault. None.<br />
01H The Muting Lamp Status input is OFF (0). • Check the muting lamp and replace it, if necessary.<br />
• If a muting lamp is not required, set the Muting Lamp<br />
Status input to ON (1).<br />
05H The Reset input is held ON (1). <strong>Set</strong> the Reset input to OFF (0).<br />
20H The Input Status input was OFF (0) when the Check the I/O module connection or the internal logic<br />
instruction started.<br />
used to source input status.<br />
Publication <strong>1756</strong>-<strong>RM095C</strong>-<strong>EN</strong>-P - July 2008 147
Chapter 1 General <strong>Safety</strong> <strong>Application</strong> <strong>Instruction</strong>s<br />
24V DC<br />
24V Ground<br />
+ 24V DC<br />
0V DC<br />
Light Curtain<br />
+ 24V DC<br />
OSSD 1<br />
OSSD 2<br />
0V DC<br />
TSAM – Wiring and Programming Example<br />
This example complies with <strong>EN</strong>954-1 Category 4 operation. The<br />
standard control portion of the application is not shown.<br />
This wiring diagram shows how to wire a light curtain and two muting<br />
sensors to a 1791DS-IB12 module to illustrate the use of the<br />
Two-sensor Asymmetrical Muting instruction. The application includes<br />
a hold-to-run switch and a momentary push button for reset.<br />
Wiring Diagram<br />
DeviceNet<br />
1<br />
V<br />
G<br />
11<br />
Muting<br />
Sensors<br />
3 4 5 6 20 19 9 10<br />
24<br />
I0 I1 I2 I3<br />
T1 T0 I6 I7<br />
I11<br />
1791DS-IB12 Module 1<br />
148 Publication <strong>1756</strong>-<strong>RM095C</strong>-<strong>EN</strong>-P - July 2008<br />
T2<br />
25<br />
Clear Area<br />
Lamp<br />
T3<br />
28<br />
Muting<br />
Lamp<br />
Momentary<br />
Push Button<br />
(reset)<br />
Hold-to-run<br />
Key Switch
Equivalent Active High<br />
TBD ms<br />
Automatic<br />
Automatic<br />
Module1:I.Pt00Data<br />
Module1:I.Pt01Data<br />
Module1:I.CombinedStatus<br />
Module1:I.Pt11Data<br />
Module1:I.Pt02Data<br />
Module1:I.Pt03Data<br />
Module1:I.MutingStatus<br />
Equivalent Active High<br />
TBD ms<br />
1<br />
Module1:I.Pt06Data<br />
Module1:I.Pt07Data<br />
Light Curtain1<br />
DCS<br />
Input Type Output 1<br />
Discrepancy Time<br />
Restart Type<br />
Coldstart Type<br />
Channel A<br />
Channel B<br />
Input Status<br />
Reset Fault Present<br />
General <strong>Safety</strong> <strong>Application</strong> <strong>Instruction</strong>s Chapter 1<br />
The programming diagram logically illustrates how the Two-sensor<br />
Asymmetrical Muting instruction is typically used with a DCI Stop<br />
(light curtain) and DCI Start (hold-to-run switch) instruction.<br />
Programming Diagram<br />
DCSRT<br />
HoldToRunKeySwitch<br />
Input Type<br />
Output 1<br />
Discrepancy Time<br />
Enable<br />
Channel A<br />
Channel B<br />
Input Status<br />
Reset<br />
Fault Present<br />
Manual<br />
TBD ms<br />
TBD ms<br />
TBD ms<br />
TBD ms<br />
See Note 1<br />
TSAM<br />
TwoSensorAsymmetricalMutingFunction<br />
Restart Type Output 1<br />
S1-S2 Time Muting Lamp<br />
S2-LC Time Clear Area<br />
Maximum Mute Time<br />
Maximum Override Time<br />
See Note 2<br />
Module1:O.Test03Data<br />
Module1:O.Test02Data<br />
Light Curtain<br />
Sensor 1<br />
Sensor 2<br />
Enable Mute<br />
Override<br />
Input Status<br />
Muting Lamp Status<br />
Reset Fault Present<br />
Note 1:This is an internal Boolean tag representing the non-hazardous portion of the machine cycle. Its value is determined by other parts of the user application not shown<br />
in this example. When the protected hazard is present, this tag value should be False (0). When the protected hazard is NOT present, this tag value should be True (1).<br />
When the value of this tag is True (1), the muting instruction allows the light curtain to become muted only if the proper input sequence is detected. When the value<br />
of this tag is False (0), the muting instruction does not allow the light curtain to become muted, even if the proper input sequence is detected.<br />
Note 2:This is an internal Boolean tag used by other parts of the user application not shown in this example.<br />
Key: Color code represents data or value typically used.<br />
Tag-mapped Variable<br />
Standard Output<br />
<strong>Safety</strong> Input <strong>Safety</strong> Output<br />
Configuration Constant/Value<br />
Internal <strong>Safety</strong> Variable<br />
Publication <strong>1756</strong>-<strong>RM095C</strong>-<strong>EN</strong>-P - July 2008 149
Chapter 1 General <strong>Safety</strong> <strong>Application</strong> <strong>Instruction</strong>s<br />
Ladder Logic<br />
DCS<br />
Dual Channel Input Stop<br />
DCS LightCurtain1<br />
<strong>Safety</strong> Function LIGHT CURTAIN<br />
Input Type EQUIVAL<strong>EN</strong>T - ACTIVE HIGH<br />
Discrepancy Time (Msec) 500<br />
Restart Type AUTOMATIC<br />
Cold Start Type AUTOMATIC<br />
Channel A Module1:I.Pt00Data<br />
1<br />
Channel B Module1:I.Pt01Data<br />
1<br />
Input Status Module1:I.CombinedStatus<br />
1<br />
Reset Module1:I.Pt11Data<br />
0<br />
DCSRT<br />
Dual Channel Input Start<br />
DCSRT HoldToRunKeySwitch<br />
<strong>Safety</strong> Function USER DEFINED<br />
Input Type EQUIVAL<strong>EN</strong>T - ACTIVE HIGH<br />
Discrepancy Time (Msec) 500<br />
Enable ALWAYS_<strong>EN</strong>ABLED<br />
1<br />
Channel A Module1:I.Pt06Data<br />
0<br />
Channel B Module1:I.Pt07Data<br />
1<br />
Input Status Module1:I.CombinedStatus<br />
1<br />
Reset Module1:I.Pt11Data<br />
0<br />
TSAM<br />
Two Sensor Asymmetrical Muting<br />
TSAM TwoSensorAsymmetricalMutingFunction<br />
Restart Type MANUAL<br />
S1-S2 Time (Msec) 5000<br />
S2-LC Time (Msec) 5000<br />
Maximum Mute Time (Sec) 20<br />
Maximum Override Time (Sec) 10<br />
Light Curtain LightCurtain1.O1<br />
0<br />
Sensor 1 Module1:I.Pt02Data<br />
0<br />
Sensor 2 Module1:I.Pt03Data<br />
1<br />
Enable Mute SeeNote1<br />
0<br />
Override HoldToRunKeySwitch.O1<br />
0<br />
Input Status Module1:I.CombinedStatus<br />
1<br />
Muting Lamp Status Module1:I.MutingStatus<br />
1<br />
Reset Module1:I.Pt11Data<br />
0<br />
TwoSensorAsymmetricalMutingFunction.ML Module1:O.Test03Data<br />
TwoSensorAsymmetricalMutingFunction.CA Module1:O.Test02Data<br />
Note 1:This is an internal Boolean tag representing the non-hazardous portion of the machine cycle. Its value is<br />
determined by other parts of the user application not shown in this example. When the protected hazard is<br />
present, this tag value should be False (0). When the protected hazard is NOT present, this tag value should<br />
True (1). When the value of this tag is True (1), the muting instruction allows the light curtain to become mu<br />
only if the proper input sequence is detected. When the value of this tag is False (0), the muting instruction<br />
does not allow the light curtain to become muted, even if the proper input sequence is detected.<br />
150 Publication <strong>1756</strong>-<strong>RM095C</strong>-<strong>EN</strong>-P - July 2008<br />
O1<br />
FP<br />
O1<br />
FP<br />
O1<br />
ML<br />
CA<br />
FP
General <strong>Safety</strong> <strong>Application</strong> <strong>Instruction</strong>s Chapter 1<br />
RSLogix 5000 software is used to configure the input and output<br />
parameters of the Guard I/O module, as illustrated.<br />
When defining the module, selecting Combined Status-Muting lets the<br />
muting lamp be monitored. Choosing Test for Output Data lets safety<br />
logic control Test Output 3 to drive the Muting Lamp and Test Output<br />
2 to drive the Clear Area lamp.<br />
Module Definition<br />
Rockwell Automation suggests using Exact Match, as shown.<br />
However, setting Electronic Keying to Compatible Match is allowed.<br />
The safety inputs that interface with the Light Curtain (Points 1 and 2)<br />
are not pulse-tested because the Light Curtain pulse-tests its own<br />
signals.<br />
Module Input Configuration<br />
Publication <strong>1756</strong>-<strong>RM095C</strong>-<strong>EN</strong>-P - July 2008 151
Chapter 1 General <strong>Safety</strong> <strong>Application</strong> <strong>Instruction</strong>s<br />
Configuring Test Output 3 for Muting Lamp causes the I/O module to<br />
monitor the lamp connected to this output.<br />
Module Test Output Configuration<br />
152 Publication <strong>1756</strong>-<strong>RM095C</strong>-<strong>EN</strong>-P - July 2008
Two-sensor Symmetrical<br />
Muting (TSSM)<br />
•<br />
General <strong>Safety</strong> <strong>Application</strong> <strong>Instruction</strong>s Chapter 1<br />
This instruction provides a temporary, automatic disabling of the<br />
protective function of a light curtain, allowing material to be<br />
transported though the light curtain sensing field without stopping the<br />
machine. Muting sensors differentiate between materials and<br />
personnel, and must act together along with the light curtain, in a<br />
specific switching sequence when the appropriate material passes the<br />
sensing field.<br />
Publication <strong>1756</strong>-<strong>RM095C</strong>-<strong>EN</strong>-P - July 2008 153
Chapter 1 General <strong>Safety</strong> <strong>Application</strong> <strong>Instruction</strong>s<br />
Two-sensor Symmetrical Muting uses two muting sensors arranged<br />
symmetrically on either side of the light curtain. Their sensors intersect<br />
at or just behind the light curtain in the center of the protected<br />
opening.<br />
Two-sensor Symmetrical Muting <strong>Application</strong><br />
ATT<strong>EN</strong>TION<br />
The muting sensors must be arranged so a person cannot<br />
activate the muting sensors in the same switching sequence as<br />
the material and enter the area when a hazardous condition<br />
exists. Sensor setup must take into account material size, shape,<br />
and speed. Additional guarding may also be necessary.<br />
Specific guarding requirements should be identified through a<br />
hazard or risk assessment of your application.<br />
TSSM – <strong>Instruction</strong> Parameters<br />
IMPORTANT<br />
Two-sensor Symmetrical Muting <strong>Instruction</strong>: Configuration Parameters<br />
Do not use the same tag name for more than one instruction in<br />
the same program. Do not write to any instruction output tag<br />
under any circumstances.<br />
The following table provides the parameters used to configure the<br />
instruction. The parameters cannot be changed at runtime.<br />
154 Publication <strong>1756</strong>-<strong>RM095C</strong>-<strong>EN</strong>-P - July 2008<br />
Sensor<br />
1<br />
Sensor<br />
2<br />
Material<br />
Muting Lamp<br />
Parameter Data Type Description<br />
Restart Type List Configures Output 1 for either manual or automatic restart.<br />
Manual A transition of the Reset input from OFF (0) to ON (1), while all of the Output 1<br />
enabling conditions are met, is required to energize Output 1.<br />
Automatic Output 1 is energized 50 ms after all of the enabling conditions are met.<br />
!<br />
ATT<strong>EN</strong>TION: Automatic restart may only be used in application situations<br />
where you can prove that no unsafe conditions can occur as a result of its use.
Two-sensor Symmetrical Muting <strong>Instruction</strong>: Configuration Parameters<br />
Parameter Data Type Description<br />
The following table explains the instruction inputs.<br />
General <strong>Safety</strong> <strong>Application</strong> <strong>Instruction</strong>s Chapter 1<br />
S1S2 Discrepancy Time Integer The maximum amount of time the muting sensors (Sensor 1 and Sensor 2) may be<br />
inconsistent before a fault occurs.<br />
S1S2-LC Minimum Time Integer<br />
The valid range is 5…180,000 ms.<br />
When material is entering the light curtain sensing field, this time specifies how long to wait<br />
before the material is allowed to block the Light Curtain after Sensor 1 and Sensor 2 have<br />
been blocked. When material is exiting the light curtain sensing field, this time specifies how<br />
long to wait before the material is allowed to clear Sensor 1 and Sensor 2 after clearing the<br />
Light Curtain. If the S1S2-LC Minimum Time is exceeded, a fault occurs.<br />
S1S2-LC Maximum Time Integer<br />
The valid range is 5…180,000 ms.<br />
When material is entering the light curtain sensing field, this time specifies the maximum<br />
time to wait for the material to block the Light Curtain after Sensor 1 and Sensor 2 have been<br />
blocked. When material is exiting the light curtain sensing field, this time specifies the<br />
maximum time to wait for the material to clear Sensor 1 and Sensor 2 after clearing the Light<br />
Curtain. If the S1S2-LC Maximum Time is exceeded, a fault occurs.<br />
Maximum Mute Time Integer<br />
The valid range is 5…180,000 ms.<br />
The maximum amount of time during which the instruction lets the protective function of the<br />
light curtain be disabled before generating a fault.<br />
Maximum Override Time Time<br />
The valid range is 0…3600 s. <strong>Set</strong>ting this input to 0 disables the Maximum Mute timer.<br />
The maximum amount of time that the instruction lets the override feature energize the<br />
Output 1 output.<br />
Two-sensor Symmetrical Muting <strong>Instruction</strong>: Inputs<br />
The valid range is 0…30 s. <strong>Set</strong>ting this input to 0 disables the Maximum Override timer.<br />
Parameter Data Type Description<br />
Light Curtain Boolean An input channel with OFF (0) as its safe state, this input represents the current state of the<br />
physical light curtain. You are responsible for properly conditioning this input. Typically this is<br />
accomplished using Dual-channel Input Stop instruction controlling a light curtain.<br />
Sensor 1 Boolean<br />
ON (1): The light curtain is clear.<br />
OFF (0): The light curtain is blocked.<br />
One of two muting sensors, Sensor 1 must be blocked or cleared within the S1S2<br />
Discrepancy Time of Sensor 2 being blocked or cleared.<br />
Sensor 2 Boolean<br />
ON (1): Sensor 1 is clear.<br />
OFF (0): Sensor 1 is blocked.<br />
One of two muting sensors, Sensor 2 must be blocked or cleared within the S1S2<br />
Discrepancy Time of Sensor 1 being blocked or cleared.<br />
ON (1): Sensor 2 is clear.<br />
OFF (0): Sensor 2 is blocked.<br />
Publication <strong>1756</strong>-<strong>RM095C</strong>-<strong>EN</strong>-P - July 2008 155
Chapter 1 General <strong>Safety</strong> <strong>Application</strong> <strong>Instruction</strong>s<br />
Two-sensor Symmetrical Muting <strong>Instruction</strong>: Inputs<br />
Parameter Data Type Description<br />
Enable Mute Boolean This input allows the protective function of the light curtain to be disabled (muted) when the<br />
correct muting sequence occurs.<br />
Override Boolean<br />
ON (1): The protective function of the light curtain is disabled when the correct muting<br />
sequence occurs.<br />
OFF (0): The protective function of the light curtain is always enabled.<br />
This input allows a temporary bypass of the muting instruction’s function.<br />
OFF (0): Override function is disabled.<br />
OFF (0) -> ON (1): Output 1 is energized regardless of the status of the Input Status input or<br />
the existence of faults. Output 1 remains energized while the Override input remains ON (1)<br />
or until the Maximum Override timer expires.<br />
!<br />
ATT<strong>EN</strong>TION: Activation of the override function requires the use of a<br />
hold-to-run device where the operator can see the point of hazard, that is, the<br />
light curtain sensing field.<br />
Input Status Boolean If the instruction inputs are from a safety I/O module, this is the input status from the I/O<br />
module or modules (Input Status or Combined Status). If the instruction inputs are derived<br />
from internal logic, it is the application programmer’s responsibility to determine the<br />
conditions.<br />
Muting Lamp Status Boolean<br />
ON (1): The inputs to this instruction are valid.<br />
OFF (0): The inputs to this instruction are invalid.<br />
This input represents the status of the muting lamp.<br />
Reset<br />
ON (1): The muting lamp is operating properly. The light curtain’s protective function is<br />
disabled (muted) after the correct muting sequence is followed.<br />
OFF (0): The muting lamp is defective or missing. The light curtain’s protective function is<br />
always enabled.<br />
(1) Boolean This input clears instruction and circuit faults provided the fault condition is not present.<br />
OFF (0) -> ON (1): The Fault Present and Fault Code outputs are reset.<br />
Output 1 is energized when the Restart Type is manual. Output 1 is not energized at the same<br />
time faults are cleared.<br />
(1) ISO 13849-1 stipulates instruction reset functions must occur on falling edge signals. To comply with ISO 13849-1<br />
requirements, add this logic immediately before this instruction. Rename the “Reset_Signal” tag in this example<br />
to your reset signal tagname. Then use the OSF instruction Output Bit tag as the instruction’s reset source.<br />
156 Publication <strong>1756</strong>-<strong>RM095C</strong>-<strong>EN</strong>-P - July 2008
General <strong>Safety</strong> <strong>Application</strong> <strong>Instruction</strong>s Chapter 1<br />
The following table explains the instruction outputs.<br />
Two-sensor Symmetrical Muting <strong>Instruction</strong>: Outputs<br />
Parameter Data Type Description<br />
Output 1 (O1) Boolean ON (1): The light curtain sensing field is not obstructed, the light curtain is being muted, or<br />
the light curtain is being overridden.<br />
Muting Lamp (ML) Boolean This output indicates the status of the light curtain’s protective function.<br />
Clear Area (CA) Boolean<br />
ON (1): The light curtain’s protective function is disabled.<br />
OFF (0): The light curtain’s protective function is enabled.<br />
This output indicates when the light curtain sensing field must be cleared (all muting sensors<br />
and the light curtain are ON) before processing can continue.<br />
Fault Code Integer<br />
ON (1): The light curtain sensing field must be cleared.<br />
This output indicates the type of fault that occurred. See the TSSM – Fault Codes on page<br />
164 for the list of fault codes.<br />
Diagnostic Code Integer<br />
This parameter is not safety-related.<br />
This output indicates the diagnostic status of the instruction. See the TSSM – Diagnostic<br />
Codes on page 167 for a list of diagnostic codes.<br />
Fault Present (FP) Boolean<br />
This parameter is not safety-related.<br />
ON (1): A fault is present in the instruction.<br />
OFF (0): The instruction is operating normally.<br />
IMPORTANT<br />
Do not write to any instruction output tag under any<br />
circumstances.<br />
Publication <strong>1756</strong>-<strong>RM095C</strong>-<strong>EN</strong>-P - July 2008 157
Chapter 1 General <strong>Safety</strong> <strong>Application</strong> <strong>Instruction</strong>s<br />
TSSM – Normal Operation<br />
One sequence of muting sensor and light-curtain input transitions lets<br />
the protective function of the light curtain be disabled (muted). That<br />
sequence must start with both of the muting sensors (S1, S2) and the<br />
light curtain in their ON (1) state. This indicates that the light-curtain<br />
sensing field is clear of all personnel and material.<br />
At (A), the Sensors and the Light Curtain are cleared and the Output 1<br />
output is energized when the Reset input turns ON (1). The material<br />
blocks Sensor 1 at (B), starting the S1S2 Discrepancy timer. At (C), the<br />
material blocks Sensor 2, stopping the S1S2 Discrepancy timer and<br />
starting the S1S2-LC Minimum, the S1S2-LC Maximum, and the<br />
Maximum Mute timers. At (D), the S1S2-LC Minimum time period<br />
expires, starting the Maximum Mute timer and turning the Muting<br />
Lamp output ON (1). At (E), the material blocks the Light Curtain<br />
within the S1S2-LC Maximum time period, stopping the S1S2-LC<br />
Maximum timer. From (E) to (F), Output 1 remains energized while<br />
the material passes through the Light Curtain. At (F), the material<br />
clears the Light Curtain and the S1S2-LC Minimum timer starts. At (G),<br />
the S1S2-LC Minimum time period expires. The Muting Lamp output<br />
turns OFF (0) and the Maximum Mute timer is stopped, indicating that<br />
muting is disabled. The material clears Sensor 2 at (H), starting the<br />
S1S2 Discrepancy timer. At (I), the material clears Sensor 1 within the<br />
S1S2-LC Maximum time period, stopping the S1S2 Discrepancy timer.<br />
158 Publication <strong>1756</strong>-<strong>RM095C</strong>-<strong>EN</strong>-P - July 2008
Normal Operation Timing Diagram<br />
1<br />
Enable Mute<br />
0<br />
1<br />
Sensor 1<br />
0<br />
1<br />
Sensor 2<br />
0<br />
1<br />
Light Curtain<br />
0<br />
1<br />
Reset<br />
0<br />
Muting Lamp<br />
Status<br />
1<br />
0<br />
1<br />
Output 1<br />
0<br />
1<br />
Muting Lamp<br />
0<br />
General <strong>Safety</strong> <strong>Application</strong> <strong>Instruction</strong>s Chapter 1<br />
≤ t1 ≤ t1<br />
> t2 > t2<br />
≤ t3 ≤ t3<br />
A B C D E<br />
F G H I<br />
t1: S1S2 Discrepancy Time t2: S1S2-LC Minimum Time<br />
t3: S1S2-LC Maximum Time<br />
Restart Type = Manual<br />
t4: Maximum Mute Time<br />
Publication <strong>1756</strong>-<strong>RM095C</strong>-<strong>EN</strong>-P - July 2008 159<br />
≤ t4
Chapter 1 General <strong>Safety</strong> <strong>Application</strong> <strong>Instruction</strong>s<br />
TSSM – Invalid Sequence<br />
Any input sequence other than the normal operation sequence results<br />
in Output 1 being de-energized.<br />
At (A), Output 1 is energized just as in a normal sequence of<br />
operation. At (B), the material blocks Sensor 1, starting the S1S2<br />
Discrepancy timer. The material blocks Sensor 2 at (C), stopping the<br />
S1S2 Discrepancy timer, starting the S1S2-LC Minimum timer and the<br />
S1S2 Maximum timer. At (D), the Light Curtain is blocked during the<br />
S1S2-LC Minimum Time period, causing Output 1 to be de-energized.<br />
The S1S2-LC Maximum timer stops.<br />
1<br />
Enable Mute<br />
0<br />
1<br />
Sensor 1<br />
0<br />
1<br />
Sensor 2<br />
0<br />
1<br />
Light Curtain<br />
0<br />
1<br />
Reset<br />
0<br />
Muting Lamp<br />
Status<br />
1<br />
0<br />
1<br />
Output 1<br />
0<br />
1<br />
Muting Lamp<br />
0<br />
160 Publication <strong>1756</strong>-<strong>RM095C</strong>-<strong>EN</strong>-P - July 2008<br />
< t1<br />
< t2<br />
t3<br />
A B C D<br />
t1: S1S2 Discrepancy Time t2: S1S2-LC Minimum Time<br />
t3: S1S2-LC Maximum Time Restart Type = Manual
TSSM – Tolerated Sequence<br />
General <strong>Safety</strong> <strong>Application</strong> <strong>Instruction</strong>s Chapter 1<br />
The Two-sensor Symmetrical Muting (TSSM) instruction tolerates<br />
application dynamics that might cause an input to oscillate due to<br />
over-travel or load vibration.<br />
At (A), Output 1 is energized just as in a normal sequence of<br />
operation. At (B), Sensor 2 turns OFF (0), starting the S1S2<br />
Discrepancy timer. Sensor 2 turns ON (1) at (C), stopping the S1S2<br />
Discrepancy timer. At (D), the material completely blocks Sensor 2,<br />
turning it OFF (0), and the normal muting sequence continues. A<br />
sensor may glitch, as illustrated from (B) to (C), as a result of<br />
over-travel or load vibration. As long as the final input sequence is<br />
valid, the instruction lets the muting function occur.<br />
1<br />
Enable Mute<br />
0<br />
1<br />
Sensor 1<br />
0<br />
1<br />
Sensor 2<br />
0<br />
1<br />
Light Curtain<br />
0<br />
1<br />
Reset<br />
0<br />
Muting Lamp<br />
Status<br />
1<br />
0<br />
1<br />
Output 1<br />
0<br />
1<br />
Muting Lamp<br />
0<br />
t1<br />
Publication <strong>1756</strong>-<strong>RM095C</strong>-<strong>EN</strong>-P - July 2008 161<br />
≤ t1<br />
> t2<br />
≤ t4<br />
> t2<br />
≤ t3 ≤ t3<br />
≤ t1<br />
A B C D<br />
t1: S1S2 Discrepancy Time t2: S1S2-LC Minimum Time<br />
t3: S1S2-LC Maximum Time t4: Maximum Mute Time<br />
Restart Type = Manual
Chapter 1 General <strong>Safety</strong> <strong>Application</strong> <strong>Instruction</strong>s<br />
TSSM – Dangerous Portion of Cycle<br />
The Enable Mute input enables or disables the protective function of<br />
the light curtain. When the Enable Mute input is OFF (0), the<br />
protective function of the light curtain is enabled and material may not<br />
pass through the light curtain sensing field.<br />
At (A), Output 1 is energized just as in a normal sequence of<br />
operation. At (B), the material blocks Sensor 1 and Sensor 2, turning<br />
them OFF (0) and starting the S1S2-LC Minimum, the S1S2-LC<br />
Maximum, and the Maximum Mute timers. Because the Enable Mute<br />
input is OFF (0), muting is disabled and the Muting Lamp output<br />
remains OFF (0). At (C), the S1S2-LC Minimum time period expires.<br />
The material blocks the Light Curtain at (D), and Output 1 is<br />
de-energized.<br />
1<br />
Enable Mute<br />
0<br />
1<br />
Sensor 1<br />
0<br />
1<br />
Sensor 2<br />
0<br />
1<br />
Light Curtain<br />
0<br />
1<br />
Reset<br />
0<br />
Muting Lamp<br />
Status<br />
1<br />
0<br />
1<br />
Output 1<br />
0<br />
1<br />
Muting Lamp<br />
0<br />
A B C D<br />
t1: S1S2-LC Minimum Time t2: S1S2-LC Maximum Time<br />
t3: Maximum Mute Time Restart Type = Manual<br />
162 Publication <strong>1756</strong>-<strong>RM095C</strong>-<strong>EN</strong>-P - July 2008<br />
> t1<br />
t2<br />
t3
TSSM – Override Operation<br />
General <strong>Safety</strong> <strong>Application</strong> <strong>Instruction</strong>s Chapter 1<br />
The override feature lets an operator manually energize Output 1 so<br />
that material can be cleared from the light curtain sensing field.<br />
ATT<strong>EN</strong>TION<br />
The Override function may be used only with a hold-to-run<br />
device where the operator can see the point of hazard, that is,<br />
the light curtain sensing field.<br />
At (A), the Override input turns ON (1). Output 1 is energized and the<br />
Maximum Override timer starts. At (B), the material clears Sensor 1<br />
and the Clear Area output turns OFF (0). At (C), the Override input<br />
turns OFF (0) within the Maximum Override time period. Output 1 is<br />
de-energized and the Maximum Override timer stops.<br />
1<br />
Override<br />
0<br />
1<br />
Enable Mute<br />
0<br />
1<br />
Sensor 1<br />
0<br />
1<br />
Sensor 2<br />
0<br />
1<br />
Light Curtain<br />
0<br />
1<br />
Reset<br />
0<br />
1<br />
Muting Lamp<br />
Status 0<br />
1<br />
Clear Area<br />
0<br />
1<br />
Output 1<br />
0<br />
Publication <strong>1756</strong>-<strong>RM095C</strong>-<strong>EN</strong>-P - July 2008 163<br />
≤ t1<br />
A B C<br />
t1: Maximum Override Time Restart Type = Manual
Chapter 1 General <strong>Safety</strong> <strong>Application</strong> <strong>Instruction</strong>s<br />
General Fault Codes<br />
TSSM – False Rung State Behavior<br />
When the instruction is executed on a false rung, all instruction<br />
outputs are de-energized.<br />
TSSM – Fault Codes<br />
Fault Code Description Corrective Action<br />
00H None. None.<br />
20H The Input Status input went from ON (1) to OFF (0) while the • Check the I/O module connection or the internal logic<br />
instruction was executing.<br />
used to source input status.<br />
• Reset the fault.<br />
Illegal Input Faults<br />
Fault Code Description Corrective Action<br />
9A00H An illegal input pattern was detected. Sensor 1 and the Light<br />
Curtain are blocked and Sensor 2 is cleared.<br />
Sensor 2 should also be blocked.<br />
• Check the Sensor 2 circuit.<br />
• Reset the fault.<br />
S1 S2 LC<br />
0 1 0<br />
9A01H An illegal input pattern was detected. Sensor 2 and the Light<br />
Curtain are blocked and Sensor 1 is cleared.<br />
S1 S2 LC<br />
1 0 0<br />
9A02H An illegal input pattern was detected. Sensor 1 and Sensor 2<br />
are cleared and the Light Curtain is blocked.<br />
S1 S2 LC<br />
1 1 0<br />
Sensor 1 should also be blocked.<br />
• Check the Sensor 1 circuit.<br />
• Reset the fault.<br />
The Light Curtain should not be blocked when Sensors 1<br />
and 2 are clear.<br />
• Check the Light Curtain circuit.<br />
• Reset the fault.<br />
164 Publication <strong>1756</strong>-<strong>RM095C</strong>-<strong>EN</strong>-P - July 2008
Invalid Sequence Faults<br />
Fault<br />
Code<br />
Normal and Tolerated Muting Sequences<br />
An illegal muting sequence is a legal input<br />
combination that deviates from the normal or<br />
tolerated sequences.<br />
General <strong>Safety</strong> <strong>Application</strong> <strong>Instruction</strong>s Chapter 1<br />
S1 S2 LC Step<br />
1 1 1 1<br />
0 0 1 2<br />
INC 1 3<br />
0 0 0 4<br />
0 0 1 5<br />
1 1 1<br />
Publication <strong>1756</strong>-<strong>RM095C</strong>-<strong>EN</strong>-P - July 2008 165<br />
Normal<br />
Tolerated<br />
Illegal<br />
INC = Inconsistent state where Sensor 1 and<br />
Sensor 2 are not both ON (1) or both OFF (0).<br />
Description Fault<br />
Code<br />
9900H An illegal muting sequence was detected when Sensor<br />
1, Sensor 2, and the Light Curtain are simultaneously<br />
blocked in step 1.<br />
9902H An illegal muting sequence was detected after the<br />
S1S2-LC Minimum Time expires and Sensor 1 and<br />
Sensor 2 are simultaneously cleared in step 2.<br />
Description<br />
9901H An illegal muting sequence was detected while the<br />
S1S2-LC Minimum timer is timing and the Light Curtain<br />
becomes blocked in step 2.<br />
S1 S2 LC Step S1 S2 LC Step<br />
1 1 1 1<br />
1 1 1 1<br />
0 0 0<br />
0 0 1 2<br />
0 0 0<br />
9903H An illegal muting sequence was detected when Sensor 1,<br />
Sensor 2, and the Light Curtain are simultaneously cleared<br />
in step 3.<br />
S1 S2 LC Step S1 S2 LC<br />
1 1 1 1<br />
1 1 1 1<br />
0 0 1 2<br />
1 1 1<br />
0 0 1 2<br />
0 0 0<br />
1 1 1<br />
3<br />
6<br />
Step
Chapter 1 General <strong>Safety</strong> <strong>Application</strong> <strong>Instruction</strong>s<br />
Invalid Sequence Faults<br />
Fault<br />
Code<br />
Description Fault<br />
Code<br />
9904H An illegal muting sequence was detected when Sensor<br />
1 and Sensor 2 became inconsistent while the Light<br />
Curtain was blocked in step 4.<br />
9906H An illegal muting sequence was detected while the<br />
LC-S1S2 Minimum timer is timing and Sensor 1 and<br />
Sensor 2 become inconsistent in step 4.<br />
Timer Faults<br />
S1 S2 LC<br />
1 1 1 1<br />
0 0 1 2<br />
0 0 0<br />
INC 0<br />
3<br />
S1 S2 LC<br />
1 1 1 1<br />
0 0 1 2<br />
0 0 0<br />
0 0 1<br />
INC 1<br />
Description<br />
9905H An illegal muting sequence was detected while the<br />
LC-S1S2 Minimum timer is timing and Sensor 1 and Sensor<br />
2 are cleared in step 4.<br />
Step<br />
Step S1 S2 LC<br />
1 1 1 1<br />
Step<br />
3<br />
4<br />
0 0 1 2<br />
0 0 0<br />
0 0 1<br />
1 1 1<br />
9907H An illegal muting sequence was detected while the S1S2<br />
Discrepancy timer is timing in step 2 (a tolerated sequence)<br />
when Sensor 1, Sensor 2, and the light curtain are<br />
simultaneously blocked.<br />
To correct an invalid sequence fault, check the alignment of the<br />
sensors with regard to the material being moved and the system<br />
timing and then reset the fault.<br />
Fault Code Description Corrective Action<br />
9000H The Light Curtain was muted for longer than the<br />
configured Maximum Mute Time.<br />
9810H Too much time elapsed between Sensor 1 and Sensor 2<br />
becoming consistent.<br />
166 Publication <strong>1756</strong>-<strong>RM095C</strong>-<strong>EN</strong>-P - July 2008<br />
3<br />
4<br />
S1 S2 LC Step<br />
1 1 1 1<br />
INC 1<br />
0 0 0<br />
The Maximum Mute Time parameter may be set too short or<br />
there may be a problem with the sensors.<br />
The S1S2 Discrepancy Time parameter may be set too short<br />
or there may be a problem with the sensors.<br />
9811H Too much time elapsed between Sensor 1 and Sensor 2<br />
being blocked and the Light Curtain being blocked. The S1S2-LC Maximum Time parameter may be set too short<br />
or there may be a problem with the sensors.<br />
9812H Too much time elapsed between the Light Curtain being<br />
cleared and Sensor 1 or Sensor 2 being cleared.<br />
2
TSSM – Diagnostic Codes<br />
TSSM – Wiring and Programming Example<br />
General <strong>Safety</strong> <strong>Application</strong> <strong>Instruction</strong>s Chapter 1<br />
Diagnostic Code Description Corrective Action<br />
00H No fault. None.<br />
01H The Muting Lamp Status input is OFF (0). • Check the muting lamp and replace it, if necessary.<br />
• If a muting lamp is not required, set the Muting Lamp<br />
Status input to ON (1).<br />
05H The Reset input is held ON (1). <strong>Set</strong> the Reset input to OFF (0).<br />
20H The Input Status input was OFF (0) when the • Check the I/O module connection or the logic used to<br />
instruction started.<br />
source input status.<br />
24V DC<br />
24V Ground<br />
+ 24V DC<br />
0V DC<br />
Light Curtain<br />
+ 24V DC<br />
OSSD 1<br />
OSSD 2<br />
0V DC<br />
This example complies with <strong>EN</strong>954-1 Category 4 operation. The<br />
standard control portion of the application is not shown.<br />
This wiring diagram shows how to wire a light curtain and two muting<br />
sensors to a 1791DS-IB12 module to illustrate the use of the<br />
Two-sensor Symmetrical Muting instruction.<br />
Wiring Diagram<br />
DeviceNet<br />
1<br />
V<br />
G<br />
11<br />
Muting<br />
Sensors<br />
3 4 5 6 20 19 9 10<br />
24<br />
I0 I1 I2 I3<br />
T1 T0 I6 I7<br />
I11<br />
1791DS-IB12 Module 1<br />
Publication <strong>1756</strong>-<strong>RM095C</strong>-<strong>EN</strong>-P - July 2008 167<br />
T2<br />
25<br />
Clear Area<br />
Lamp<br />
T3<br />
28<br />
Muting<br />
Lamp<br />
Momentary<br />
Push Button<br />
(reset)<br />
Hold-to-run<br />
Key Switch
Chapter 1 General <strong>Safety</strong> <strong>Application</strong> <strong>Instruction</strong>s<br />
Equivalent Active High<br />
TBD ms<br />
Automatic<br />
Automatic<br />
Module1:I.Pt00Data<br />
Module1:I.Pt01Data<br />
Module1:I.CombinedStatus<br />
Module1:I.Pt11Data<br />
Module1:I.Pt02Data<br />
Module1:I.Pt03Data<br />
Module1:I.MutingStatus<br />
Equivalent Active High<br />
TBD ms<br />
1<br />
Module1:I.Pt06Data<br />
Module1:I.Pt07Data<br />
Light Curtain1<br />
DCS<br />
Input Type Output 1<br />
Discrepancy Time<br />
Restart Type<br />
Coldstart Type<br />
Channel A<br />
Channel B<br />
Input Status<br />
Reset Fault Present<br />
This programming diagram logically illustrates how the Two-sensor<br />
Symmetrical Muting instruction is typically used with a DCI Stop (light<br />
curtain) and DCI Start (hold-to-run switch) instruction.<br />
Programming Diagram<br />
DCSRT<br />
HoldToRunKeySwitch<br />
Input Type<br />
Output 1<br />
Discrepancy Time<br />
Enable<br />
Channel A<br />
Channel B<br />
Input Status<br />
Reset<br />
Manual<br />
TBD ms<br />
TBD ms<br />
TBD ms<br />
TBD ms<br />
TBD ms<br />
Fault Present<br />
See Note 1<br />
Note 1:This is an internal Boolean tag representing the non-hazardous portion of the machine cycle. Its value is determined by other parts of the user application not shown<br />
in this example. When the protected hazard is present, this tag value should be False (0). When the protected hazard is NOT present, this tag value should be True (1).<br />
When the value of this tag is True (1), the muting instruction allows the light curtain to become muted only if the proper input sequence is detected. When the value<br />
of this tag is False (0), the muting instruction does not allow the light curtain to become muted, even if the proper input sequence is detected.<br />
Note 2:This is an internal Boolean tag used by other parts of the user application not shown in this example.<br />
Configuration Constant/Value<br />
TwoSensorSymmetricalMutingFunction<br />
TSSM<br />
Restart Type<br />
Output 1 See Note 2<br />
S1-S2 Discrepancy Time Muting Lamp Module1:O.Test03Data<br />
S1, S2-LC Minimum Time<br />
S1, S2-LC Maximum Time<br />
Maximum Mute Time<br />
Maximum Override Time<br />
Clear Area Module1:O.Test02Data<br />
Light Curtain<br />
Sensor 1<br />
Sensor 2<br />
Enable Mute<br />
Override<br />
Input Status<br />
Muting Lamp Status<br />
Reset Fault Present<br />
Key: Color code represents data or value typically used.<br />
Tag-mapped Variable<br />
Standard Output<br />
<strong>Safety</strong> Input <strong>Safety</strong> Output<br />
Internal <strong>Safety</strong> Variable<br />
168 Publication <strong>1756</strong>-<strong>RM095C</strong>-<strong>EN</strong>-P - July 2008
Ladder Logic<br />
General <strong>Safety</strong> <strong>Application</strong> <strong>Instruction</strong>s Chapter 1<br />
DCS<br />
Dual Channel Input Stop<br />
DCS LightCurtain1<br />
<strong>Safety</strong> Function LIGHT CURTAIN<br />
Input Type EQUIVAL<strong>EN</strong>T - ACTIVE HIGH<br />
Discrepancy Time (Msec) 500<br />
Restart Type AUTOMATIC<br />
Cold Start Type AUTOMATIC<br />
Channel A Module1:I.Pt00Data<br />
1<br />
Channel B Module1:I.Pt01Data<br />
1<br />
Input Status Module1:I.CombinedStatus<br />
1<br />
Reset Module1:I.Pt11Data<br />
0<br />
DCSRT<br />
Dual Channel Input Start<br />
DCSRT HoldToRunKeySwitch<br />
<strong>Safety</strong> Function USER DEFINED<br />
Input Type EQUIVAL<strong>EN</strong>T - ACTIVE HIGH<br />
Discrepancy Time (Msec) 500<br />
Enable ALWAYS_<strong>EN</strong>ABLED<br />
1<br />
Channel A Module1:I.Pt06Data<br />
0<br />
Channel B Module1:I.Pt07Data<br />
1<br />
Input Status Module1:I.CombinedStatus<br />
1<br />
Reset Module1:I.Pt11Data<br />
0<br />
TSSM<br />
Two Sensor Symmetrical Muting<br />
TSSM TwoSensorSymmetricalMutingFunction<br />
Restart Type MANUAL<br />
S1-S2 Discrepancy Time (Msec) 1000<br />
S1,S2-LC Minimum Time (Msec) 5000<br />
S1,S2-LC Maximum Time (Msec) 8000<br />
Maximum Mute Time (Sec) 20<br />
Maximum Override Time (Sec) 10<br />
Light Curtain LightCurtain1.O1<br />
0<br />
Sensor 1 Module1:I.Pt02Data<br />
0<br />
Sensor 2 Module1:I.Pt03Data<br />
1<br />
Enable Mute SeeNote1<br />
0<br />
Override HoldToRunKeySwitch.O1<br />
0<br />
Input Status Module1:I.CombinedStatus<br />
1<br />
Muting Lamp Status Module1:I.MutingStatus<br />
1<br />
Reset Module1:I.Pt11Data<br />
0<br />
TwoSensorSymmetricalMutingFunction.ML Module1:O.Test03Data<br />
TwoSensorSymmetricalMutingFunction.CA Module1:O.Test02Data<br />
Note 1:This is an internal Boolean tag representing the non-hazardous portion of the machine cycle. Its value is<br />
determined by other parts of the user application not shown in this example. When the protected hazard is<br />
present, this tag value should be False (0). When the protected hazard is NOT present, this tag value should<br />
be True (1). When the value of this tag is True (1), the muting instruction allows the light curtain to become<br />
muted only if the proper input sequence is detected. When the value of this tag is False (0), the muting<br />
instruction does not allow the light curtain to become muted, even if the proper input sequence is detected.<br />
Publication <strong>1756</strong>-<strong>RM095C</strong>-<strong>EN</strong>-P - July 2008 169<br />
O1<br />
FP<br />
O1<br />
FP<br />
O1<br />
ML<br />
CA<br />
FP
Chapter 1 General <strong>Safety</strong> <strong>Application</strong> <strong>Instruction</strong>s<br />
RSLogix 5000 software is used to configure the input and output<br />
parameters of the Guard I/O module, as illustrated.<br />
When defining the module, setting the Input Status to Combined<br />
Status-Muting provides the smallest input packet possible and lets the<br />
muting lamp status be monitored. Choosing Test for Output Data lets<br />
safety logic control Test Output 3 to drive the Muting Lamp and Test<br />
Output 2 to drive the Clear Area Lamp.<br />
Module Definition<br />
Rockwell Automation suggests using Exact Match, as shown.<br />
However, setting Electronic Keying to Compatible Match is allowed.<br />
The safety inputs that interface with the Light Curtain (Points 1 and 2)<br />
are not pulse-tested because the Light Curtain pulse-tests its own<br />
signals.<br />
Module Input Configuration<br />
170 Publication <strong>1756</strong>-<strong>RM095C</strong>-<strong>EN</strong>-P - July 2008
General <strong>Safety</strong> <strong>Application</strong> <strong>Instruction</strong>s Chapter 1<br />
Configuring Test Output 3 for Muting Lamp causes the I/O module to<br />
monitor the lamp connected to this output.<br />
Module Test Output Configuration<br />
Publication <strong>1756</strong>-<strong>RM095C</strong>-<strong>EN</strong>-P - July 2008 171
Chapter 1 General <strong>Safety</strong> <strong>Application</strong> <strong>Instruction</strong>s<br />
Four-sensor Bidirectional<br />
Muting (FSBM)<br />
•<br />
This instruction provides a temporary, automatic disabling of the<br />
protective function of a light curtain, allowing material to be<br />
transported though the light curtain sensing field without stopping the<br />
machine. Muting sensors differentiate between materials and<br />
personnel and must act together along with the light curtain, in a<br />
specific switching sequence when the appropriate material passes the<br />
sensing field.<br />
The Direction input sets the expected direction from which the<br />
material passes through the sensing field. Once this direction is<br />
established, and providing the proper sequencing of the sensors and<br />
light curtain is maintained, bidirectional movement of the material is<br />
permitted.<br />
172 Publication <strong>1756</strong>-<strong>RM095C</strong>-<strong>EN</strong>-P - July 2008
General <strong>Safety</strong> <strong>Application</strong> <strong>Instruction</strong>s Chapter 1<br />
Four-sensor Bidirectional Muting uses four muting sensors arranged<br />
sequentially before and after the light curtain’s center of the protected<br />
opening.<br />
Four-sensor Bidirectional Muting <strong>Application</strong><br />
Material<br />
ATT<strong>EN</strong>TION<br />
Sensor<br />
1<br />
FSBM – <strong>Instruction</strong> Parameters<br />
IMPORTANT<br />
Publication <strong>1756</strong>-<strong>RM095C</strong>-<strong>EN</strong>-P - July 2008 173<br />
Sensor<br />
2<br />
Sensor<br />
3<br />
Muting Lamp<br />
Sensor<br />
4<br />
The muting sensors must be arranged so a person cannot<br />
activate the muting sensors in the same switching sequence as<br />
the material and enter the area when a hazardous condition<br />
exists. Sensor setup must take into account material size,<br />
shape, and speed. Additional guarding may also be necessary.<br />
Specific guarding requirements should be identified through a<br />
hazard or risk assessment of your application.<br />
Do not use the same tag name for more than one instruction in<br />
the same program. Do not write to any instruction output tag<br />
under any circumstances.
Chapter 1 General <strong>Safety</strong> <strong>Application</strong> <strong>Instruction</strong>s<br />
Four-sensor Bidirectional Muting <strong>Instruction</strong>: Configuration Parameters<br />
The following table provides the parameters used to configure the<br />
instruction. The parameters cannot be changed at runtime.<br />
Parameter Data Type Description<br />
Restart Type List Configures Output 1 for either manual or automatic restart.<br />
Manual A transition of the Reset input from OFF (0) to ON (1), while all of the Output 1<br />
enabling conditions are met, is required to energize Output 1.<br />
Automatic Output 1 is energized 50 ms after all of the enabling conditions are met.<br />
ATT<strong>EN</strong>TION: Automatic restart may only be used in application situations where<br />
you can prove that no unsafe conditions can occur as a result of its use.<br />
S1-S2 Time Time The maximum amount of time allowed between Sensor 1 being blocked and Sensor 2 being blocked<br />
before a fault occurs.<br />
S2-LC Time Time<br />
The valid range is 5…180,000 ms. <strong>Set</strong>ting this input to 0 disables the S1-S2 timer.<br />
The maximum amount of time allowed between Sensor 2 being blocked and the Light Curtain being<br />
cleared before a fault occurs.<br />
LC-S3 Time Time<br />
The valid range is 5…180,000 ms. <strong>Set</strong>ting this input to 0 disables the S2-LC timer.<br />
The maximum amount of time allowed between Sensor 3 being blocked and the Light Curtain being<br />
blocked before a fault occurs.<br />
S3-S4 Time Time<br />
The valid range is 5…180,000 ms. <strong>Set</strong>ting this input to 0 disables the LC-S3 timer.<br />
The maximum amount of time allowed between Sensor 3 being blocked and Sensor 4 being blocked<br />
before a fault occurs.<br />
Maximum Mute<br />
Time<br />
Maximum Override<br />
Time<br />
!<br />
The valid range is 5…180,000 ms. <strong>Set</strong>ting this input to 0 disables the S3-S4 timer.<br />
Time The maximum amount of time during which the instruction lets the protective function of the light<br />
curtain be disabled before generating a fault.<br />
The valid range is 0…3600 s. <strong>Set</strong>ting this input to 0 disables the Maximum Mute timer.<br />
Time The maximum amount of time that the instruction lets the override feature energize the Output 1<br />
output.<br />
The valid range is 0…30 s. <strong>Set</strong>ting this input to 0 disables the Maximum Override timer.<br />
174 Publication <strong>1756</strong>-<strong>RM095C</strong>-<strong>EN</strong>-P - July 2008
Four-sensor Bidirectional Muting <strong>Instruction</strong>: Inputs<br />
The following table explains the instruction inputs.<br />
Parameters Data Type Description<br />
Direction Boolean This input specifies the sequencing direction.<br />
General <strong>Safety</strong> <strong>Application</strong> <strong>Instruction</strong>s Chapter 1<br />
Light Curtain Boolean<br />
ON (1): Forward. The muting sequence begins with the blocking of Sensor 1.<br />
OFF (0): Reverse. The muting sequence begins with the blocking of Sensor 4.<br />
An input channel with OFF (0) as its safe state, this input represents the current state of the<br />
physical light curtain. You are responsible for properly conditioning this input. Typically this is<br />
accomplished using Dual-channel Input Stop instruction controlling a light curtain.<br />
Sensor 1 Boolean<br />
ON (1): The light curtain is clear.<br />
OFF (0): The light curtain is blocked.<br />
One of four muting sensors. When material is moving in the forward direction, it is the first sensor<br />
to be blocked and cleared. When material is moving in the reverse direction, it is the fourth to be<br />
blocked and cleared.<br />
Sensor 2 Boolean<br />
ON (1): Sensor 1 is clear.<br />
OFF (0): Sensor 1 is blocked.<br />
One of four muting sensors. When material is moving in the forward direction, it is the second<br />
sensor to be blocked and cleared. When material is moving in the reverse direction, it is third to be<br />
blocked and cleared.<br />
Sensor 3 Boolean<br />
ON (1): Sensor 2 is clear.<br />
OFF (0): Sensor 2 is blocked.<br />
One of four muting sensors. When material is moving in the forward direction, it is the third sensor<br />
to be blocked and cleared. When material is moving in the reverse direction, it is second to be<br />
blocked and cleared.<br />
Sensor 4 Boolean<br />
ON (1): Sensor 3 is clear.<br />
OFF (0): Sensor 3 is blocked.<br />
One of four muting sensors. When material is moving in the forward direction, it is the fourth sensor<br />
to be blocked and cleared. When material is moving in the reverse direction, it is first to be blocked<br />
and cleared.<br />
Enable Mute Boolean<br />
ON (1): Sensor 4 is clear.<br />
OFF (0): Sensor 4 is blocked.<br />
This input allows the protective function of the light curtain to be disabled (muted) when the correct<br />
muting sequence occurs.<br />
ON (1): The protective function of the light curtain is disabled when the correct muting sequence<br />
occurs.<br />
OFF (0): The protective function of the light curtain is always enabled.<br />
Publication <strong>1756</strong>-<strong>RM095C</strong>-<strong>EN</strong>-P - July 2008 175
Chapter 1 General <strong>Safety</strong> <strong>Application</strong> <strong>Instruction</strong>s<br />
Four-sensor Bidirectional Muting <strong>Instruction</strong>: Inputs<br />
Parameters Data Type Description<br />
Override Boolean This input allows a temporary bypass of the muting instruction’s function. Output 1 is energized<br />
regardless of the status of the Input Status input or the existence of faults.<br />
OFF (0): Override function is disabled.<br />
OFF (0) -> ON (1): Output 1 is energized regardless of the status of the Input Status input or the<br />
existence of faults. Output 1 remains energized while the Override input remains ON (1) or until the<br />
Maximum Override timer expires.<br />
!<br />
ATT<strong>EN</strong>TION: Activation of the override function requires the use of a hold-to-run<br />
device where the operator can see the point of hazard, that is, the light curtain sensing<br />
field.<br />
Input Status Boolean If the instruction inputs are from a safety I/O module, this is the input status from the I/O module or<br />
modules (Input Status or Combined Status). If the instruction inputs are derived from internal logic,<br />
it is the application programmer’s responsibility to determine the conditions.<br />
Muting Lamp<br />
Status<br />
ON (1): The inputs to this instruction are valid.<br />
OFF (0): The inputs to this instruction are invalid.<br />
Boolean This input represents the status of the muting lamp.<br />
ON (1): The muting lamp is operating properly. The light curtain’s protective function is disabled<br />
(muted) after the correct muting sequence is followed.<br />
OFF (0): The muting lamp is defective or missing. The light curtain’s protective function is always<br />
enabled.<br />
Reset (1) Boolean This input clears instruction and circuit faults provided the fault condition is not present.<br />
OFF (0) -> ON (1): The Fault Present and Fault Code outputs are reset.<br />
Output 1 is energized when the Restart Type is manual. Output 1 is not energized at the same time<br />
faults are cleared.<br />
(1) ISO 13849-1 stipulates instruction reset functions must occur on falling edge signals. To comply with ISO 13849-1<br />
requirements, add this logic immediately before this instruction. Rename the “Reset_Signal” tag in this example<br />
to your reset signal tagname. Then use the OSF instruction Output Bit tag as the instruction’s reset source.<br />
The following table explains the instruction outputs.<br />
Four-sensor Bidirectional Muting <strong>Instruction</strong>: Outputs<br />
Parameter Data Type Description<br />
Output 1 (O1) Boolean ON (1): The light curtain sensing field is not obstructed, the light curtain is being muted, or the<br />
light curtain is being overridden.<br />
Muting Lamp (ML) Boolean This output indicates the status of the light curtain’s protective function.<br />
Clear Area (CA) Boolean<br />
ON (1): The light curtain’s protective function is disabled.<br />
OFF (0): The light curtain’s protective function is enabled.<br />
This output indicates when the light curtain sensing field must be cleared (all muting sensors<br />
and the light curtain are ON) before processing can continue.<br />
ON (1): The light curtain sensing field must be cleared.<br />
176 Publication <strong>1756</strong>-<strong>RM095C</strong>-<strong>EN</strong>-P - July 2008
Four-sensor Bidirectional Muting <strong>Instruction</strong>: Outputs<br />
Parameter Data Type Description<br />
FSBM – Normal Operation<br />
General <strong>Safety</strong> <strong>Application</strong> <strong>Instruction</strong>s Chapter 1<br />
Diagnostic Code Integer This output indicates the diagnostic status of the instruction. See the TSSM – Diagnostic Codes<br />
on page 167 for a list of diagnostic codes.<br />
Fault Code Integer<br />
This parameter is not safety-related.<br />
This output indicates the type of fault that occurred. See the TSSM – Fault Codes on page 164<br />
for the list of fault codes.<br />
Fault Present (FP) Boolean<br />
This parameter is not safety-related.<br />
ON (1): A fault is present in the instruction.<br />
OFF (0): The instruction is operating normally.<br />
IMPORTANT<br />
Do not write to any instruction output tag under any<br />
circumstances.<br />
One forward direction and one reverse direction sequence of muting<br />
sensor and light-curtain input transitions let the protective function of<br />
the light curtain be disabled (muted). Both sequences start with the<br />
four muting sensors and the light curtain in their ON (1) state. This<br />
indicates that the light-curtain sensing field is clear of all personnel<br />
and material.<br />
At (A), when Sensors 1 through 4 and the Light Curtain are clear, the<br />
Output 1 output is energized when the Reset input turns ON (1). At<br />
(B), material blocks Sensor 1, starting the S1-S2 timer. At (C), the<br />
material blocks Sensor 2, stopping the S1-S2 timer. The S2-LC and<br />
Maximum Mute timers start. The Muting Lamp turns ON (1), indicating<br />
that muting is enabled. At (D), the material blocks the Light Curtain,<br />
stopping the S2-LC timer and starting the LC-S3 timer. At (E), the<br />
material blocks Sensor 3, stopping the LC-S3 timer and starting the<br />
S3-S4 timer. At (F), the material blocks Sensor 4, stopping the S3-S4<br />
timer. The material is blocking all of the Sensors and the Light Curtain.<br />
From (G) through (K), the material clears the sensors and the Light<br />
Curtain in the same order in which they were blocked, starting and<br />
stopping the timers, until the material clears all of the sensors and the<br />
Light Curtain.<br />
Publication <strong>1756</strong>-<strong>RM095C</strong>-<strong>EN</strong>-P - July 2008 177
Chapter 1 General <strong>Safety</strong> <strong>Application</strong> <strong>Instruction</strong>s<br />
The first timing diagram shows this sequence as described for the<br />
forward direction. The second diagram shows this sequence in reverse<br />
direction.<br />
Normal Operation, Forward Direction<br />
1<br />
Direction<br />
0<br />
1<br />
Enable Mute<br />
0<br />
1<br />
Sensor 1<br />
0<br />
1<br />
Sensor 2<br />
0<br />
1<br />
Light Curtain<br />
0<br />
1<br />
Sensor 3<br />
0<br />
1<br />
Sensor 4<br />
0<br />
1<br />
Reset<br />
0<br />
Muting Lamp<br />
1<br />
Status0<br />
1<br />
Muting Lamp<br />
0<br />
1<br />
Output 1<br />
0<br />
A B C D E F G H I J K<br />
t1: S1-S2 Time t2: S2-LC Time t3: LC-S3 Time<br />
t4: S3-S4 Time t5: Maximum Mute Time<br />
Restart Type = Manual<br />
178 Publication <strong>1756</strong>-<strong>RM095C</strong>-<strong>EN</strong>-P - July 2008<br />
≤ t1<br />
≤ t2<br />
≤ t3<br />
≤ t4<br />
≤ t5<br />
≤ t1<br />
≤ t2<br />
≤ t3<br />
≤ t4
Normal Operation, Reverse Direction<br />
1<br />
Direction<br />
0<br />
1<br />
Enable Mute<br />
0<br />
1<br />
Sensor 1<br />
0<br />
1<br />
Sensor 2<br />
0<br />
1<br />
Light Curtain<br />
0<br />
1<br />
Sensor 3<br />
0<br />
1<br />
Sensor 4<br />
0<br />
1<br />
Reset<br />
0<br />
Muting Lamp<br />
1<br />
Status 0<br />
1<br />
Muting Lamp<br />
0<br />
1<br />
Output 1<br />
0<br />
General <strong>Safety</strong> <strong>Application</strong> <strong>Instruction</strong>s Chapter 1<br />
Publication <strong>1756</strong>-<strong>RM095C</strong>-<strong>EN</strong>-P - July 2008 179<br />
< t4<br />
< t3<br />
< t2<br />
< t1 < t1<br />
A B C D E F G H I J K<br />
t1: S1-S2 Time t2: S2-LC Time<br />
t3: LC-S3 Time t4: S3-S4 Time<br />
t5: Maximum Mute Time<br />
Restart Type = Manual<br />
< t5<br />
< t4<br />
< t3<br />
< t2
Chapter 1 General <strong>Safety</strong> <strong>Application</strong> <strong>Instruction</strong>s<br />
FSBM – Invalid Sequence<br />
Any input sequence other than the normal operation sequence results<br />
in Output 1 being de-energized.<br />
At (A), Output 1 is energized just as in a normal sequence of<br />
operation. At (B), the material blocks Sensor 1, starting the<br />
S1-S2 timer. At (C), the material simultaneously blocks Sensor 2 and<br />
the Light Curtain, stopping the S1-S2 timer. Output 1 is de-energized<br />
and the Clear Area and Fault Present outputs turn ON (1). The<br />
override feature can be used to clear the material from the sensing<br />
field and turn the Clear Area output OFF (0).<br />
1<br />
Direction<br />
0<br />
1<br />
Enable Mute<br />
0<br />
1<br />
Sensor 1<br />
0<br />
1<br />
Sensor 2<br />
0<br />
1<br />
Light Curtain<br />
0<br />
1<br />
Sensor 3<br />
0<br />
1<br />
Sensor 4<br />
0<br />
1<br />
Reset<br />
0<br />
Muting Lamp<br />
Status<br />
1<br />
0<br />
1<br />
Fault Present<br />
0<br />
1<br />
Clear Area<br />
0<br />
1<br />
Output 1<br />
0<br />
180 Publication <strong>1756</strong>-<strong>RM095C</strong>-<strong>EN</strong>-P - July 2008<br />
FSBM – Tolerated Sequence<br />
General <strong>Safety</strong> <strong>Application</strong> <strong>Instruction</strong>s Chapter 1<br />
The Four-sensor Bidirectional Muting (FSBM) instruction tolerates<br />
application dynamics that might cause an input to oscillate due to<br />
over-travel or load vibration.<br />
At (A), Output 1 is energized just as in a normal sequence of<br />
operation. At (B), Sensor 1 turns OFF (0), starting the S1-S2 timer.<br />
Sensor 1 turns ON (1) at (C), stopping the S1-S2 timer. At (D), the<br />
material completely blocks Sensor 1, turning it OFF (0), and the<br />
normal muting sequence continues. A sensor may glitch, as illustrated<br />
from (B) to (C), as a result of over-travel or load vibration. As long as<br />
the final input sequence is valid, the instruction lets the muting<br />
function occur.<br />
1<br />
Direction<br />
0<br />
1<br />
Enable Mute<br />
0<br />
1<br />
Sensor 1<br />
0<br />
1<br />
Sensor 2<br />
0<br />
1<br />
Light Curtain<br />
0<br />
1<br />
Sensor 3<br />
0<br />
1<br />
Sensor 4<br />
0<br />
1<br />
Reset<br />
0<br />
Muting Lamp 1<br />
Status<br />
0<br />
1<br />
Muting Lamp<br />
0<br />
1<br />
Output 1<br />
0<br />
< t1 < t1<br />
< t3 < t3<br />
< t4 < t4<br />
Publication <strong>1756</strong>-<strong>RM095C</strong>-<strong>EN</strong>-P - July 2008 181<br />
< t2<br />
A B C D<br />
t1: S1-S2 Time t2: S2-LC Time t3: LC-S3 Time<br />
t4: S3-S4 Time t5: Maximum Mute Time Restart Type = Manual<br />
< t5<br />
< t2
Chapter 1 General <strong>Safety</strong> <strong>Application</strong> <strong>Instruction</strong>s<br />
FSBM – Dangerous Portion of Cycle<br />
The Enable Mute input enables or disables the protective function of<br />
the light curtain. When the Enable Mute input is OFF (0), the<br />
protective function of the light curtain is enabled and material may not<br />
pass through the light curtain sensing field.<br />
At (A), Output 1 is energized just as in a normal sequence of<br />
operation. At (B), the material blocks Sensor 1, starting the S1-S2<br />
timer. At (C), the material blocks Sensor 2, stopping the S1-S2 timer<br />
and starting the S2-LC timer. Because the Enable Mute input is<br />
OFF (0), muting is disabled and the Muting Lamp output remains OFF<br />
(0). The material blocks the Light Curtain at (D), stopping the S2-LC<br />
timer. Output 1 is de-energized because the Enable Mute input is OFF<br />
(0).<br />
1<br />
Direction<br />
0<br />
1<br />
Enable Mute<br />
0<br />
1<br />
Sensor 1<br />
0<br />
1<br />
Sensor 2<br />
0<br />
1<br />
Light Curtain<br />
0<br />
1<br />
Sensor 3<br />
0<br />
1<br />
Sensor 4<br />
0<br />
1<br />
Reset<br />
0<br />
Muting Lamp<br />
Status<br />
1<br />
0<br />
1<br />
Muting Lamp<br />
0<br />
1<br />
Output 1<br />
0<br />
FSBM – Override Operation<br />
General <strong>Safety</strong> <strong>Application</strong> <strong>Instruction</strong>s Chapter 1<br />
The override feature that lets an operator manually energize Output 1<br />
so that material can be cleared from the light curtain sensing field.<br />
ATT<strong>EN</strong>TION<br />
The Override function may be used only with a hold-to-run<br />
device where the operator can see the point of hazard, that is,<br />
the light curtain sensing field.<br />
At (A), the Override input turns ON (1). Output 1 is energized and the<br />
Maximum Override timer starts. At (B), the material clears Sensor 3<br />
and Sensor 4 and the Clear Area output turns OFF (0). At (C), the<br />
Override input turns OFF (0) within the Maximum Override time<br />
period. Output 1 is de-energized and the Maximum Override timer<br />
stops.<br />
Publication <strong>1756</strong>-<strong>RM095C</strong>-<strong>EN</strong>-P - July 2008 183
Chapter 1 General <strong>Safety</strong> <strong>Application</strong> <strong>Instruction</strong>s<br />
1<br />
Override<br />
0<br />
1<br />
Direction<br />
0<br />
1<br />
Enable Mute<br />
0<br />
1<br />
Sensor 1<br />
0<br />
1<br />
Sensor 2<br />
0<br />
1<br />
Light Curtain<br />
0<br />
1<br />
Sensor 3<br />
0<br />
1<br />
Sensor 4<br />
0<br />
1<br />
Reset<br />
0<br />
Muting Lamp<br />
Status<br />
1<br />
0<br />
1<br />
Clear Area<br />
0<br />
1<br />
Output 1<br />
0<br />
A B<br />
C<br />
t1: Maximum Override Time Restart Type = Manual<br />
FSBM – False Rung State Behavior<br />
When the instruction is executed on a false rung, all instruction<br />
outputs are de-energized.<br />
184 Publication <strong>1756</strong>-<strong>RM095C</strong>-<strong>EN</strong>-P - July 2008<br />
≤ t1
General Fault Codes<br />
FSBM – Fault Codes<br />
General <strong>Safety</strong> <strong>Application</strong> <strong>Instruction</strong>s Chapter 1<br />
Fault Code Description Corrective Action<br />
00H No fault. None.<br />
20H The Input Status input went from ON (1) to OFF (0) while the • Check the I/O module connection or the logic<br />
instruction was executing.<br />
used to source input status.<br />
• Reset the fault.<br />
Illegal Input Faults<br />
Fault Code Description<br />
9200H The Light Curtain, Sensors 1, 2, and 4 are blocked, while Sensor 3 is clear.<br />
9201H Sensors 1, 2, 3, and 4 are blocked and the Light Curtain is clear.<br />
9202H Sensors 1, 2, and 3 are blocked and the Light Curtain and Sensor 4 are clear.<br />
9203H Sensors 1, 2, and 4 are blocked and the Light Curtain and Sensor 3 are clear.<br />
9204H Sensors 1, 3, and 4 and the Light Curtain are blocked and Sensor 2 is clear.<br />
9205H Sensors 1, 3, and the Light Curtain are blocked and sensors 2 and 4 are clear.<br />
9206H Sensors 1, 4 and the Light Curtain are blocked and Sensors 2 and 3 are clear.<br />
9207H Sensor 1 and the Light Curtain are blocked and Sensors 2, 3, and 4 are clear.<br />
9208H Sensor 2 and the Light Curtain are blocked and Sensors 1, 3, and 4 are clear.<br />
9209H Sensors 1 and 3 are blocked and Sensors 2 and 4 and the Light Curtain are clear.<br />
920AH Sensors 1 and 4 are blocked and Sensors 2 and 3 and the Light Curtain are clear.<br />
S1 S2 LC<br />
0 0 0<br />
S1 S2 LC<br />
0 0 1<br />
S1 S2 LC<br />
0 0 1<br />
S1 S2 LC<br />
0 0 1<br />
S1 S2 LC<br />
0 1 0<br />
S1 S2 LC<br />
0 1 0<br />
S1 S2 LC<br />
0 1 0<br />
S1 S2 LC<br />
0 1 0<br />
S1 S2 LC<br />
0 1 1<br />
S1 S2 LC<br />
0 1 1<br />
S1 S2 LC<br />
0 1 1<br />
Publication <strong>1756</strong>-<strong>RM095C</strong>-<strong>EN</strong>-P - July 2008 185<br />
S3<br />
1<br />
S3<br />
0<br />
S3<br />
0<br />
S3<br />
1<br />
S3<br />
0<br />
S3<br />
0<br />
S3<br />
1<br />
S3<br />
1<br />
S3<br />
0<br />
S3<br />
0<br />
S3<br />
1<br />
S4<br />
0<br />
S4<br />
0<br />
S4<br />
1<br />
S4<br />
0<br />
S4<br />
0<br />
S4<br />
1<br />
S4<br />
0<br />
S4<br />
1<br />
S4<br />
0<br />
S4<br />
1<br />
S4<br />
0
Chapter 1 General <strong>Safety</strong> <strong>Application</strong> <strong>Instruction</strong>s<br />
Illegal Input Faults<br />
Fault Code Description<br />
920BH Sensors 2 and 3 and the Light Curtain are blocked and Sensors 1 and 4 are clear.<br />
920CH Sensors 2 and 4 and the Light Curtain are blocked and Sensors 1 and 3 are clear.<br />
920DH Sensor 2 and the Light Curtain are blocked and Sensors 1, 3, and 4 are clear.<br />
920EH Sensors 2, 3, and 4 are blocked and Sensor 1 and the Light Curtain are clear.<br />
920FH Sensors 2 and 3 are blocked and Sensors 1 and 4 and the Light Curtain are clear.<br />
9210H Sensors 2 and 4 are blocked and Sensors 1 and 3 and the Light Curtain are clear.<br />
9211H Sensor 2 is blocked and Sensors 1, 3, and 4 and the Light Curtain are clear.<br />
9212H Sensor 3 and the Light Curtain are blocked and Sensors 1, 2, and 4 are clear.<br />
9213H Sensor 4 and the Light Curtain are blocked and Sensors 1, 2, and 3 are clear.<br />
9214H The Light Curtain is blocked and Sensors 1, 2, 3, and 4 are clear.<br />
9215H Sensor 3 is blocked and Sensors 1, 2, and 4 and the Light Curtain are clear.<br />
To recover from an illegal input fault:<br />
S1 S2 LC<br />
1 0 0<br />
S1 S2 LC<br />
1 0 0<br />
S1 S2 LC<br />
1 0 0<br />
S1 S2 LC<br />
1 0 1<br />
S1 S2 LC<br />
1 0 1<br />
S1 S2 LC<br />
1 0 1<br />
S1 S2 LC<br />
1 0 1<br />
S1 S2 LC<br />
1 1 0<br />
S1 S2 LC<br />
1 1 0<br />
S1 S2 LC<br />
1 1 0<br />
S1 S2 LC<br />
1 1 1<br />
• Check that the sensors and the light curtain are properly aligned,<br />
are applied to the appropriate instruction inputs, and are not<br />
being improperly blocked.<br />
• Reset the fault.<br />
186 Publication <strong>1756</strong>-<strong>RM095C</strong>-<strong>EN</strong>-P - July 2008<br />
S3<br />
0<br />
S3<br />
1<br />
S3<br />
1<br />
S3<br />
0<br />
S3<br />
0<br />
S3<br />
1<br />
S3<br />
1<br />
S3<br />
0<br />
S3<br />
1<br />
S3<br />
1<br />
S3<br />
0<br />
S4<br />
1<br />
S4<br />
0<br />
S4<br />
1<br />
S4<br />
0<br />
S4<br />
1<br />
S4<br />
0<br />
S4<br />
1<br />
S4<br />
1<br />
S4<br />
0<br />
S4<br />
1<br />
S4<br />
1
Invalid Sequence Faults<br />
Fault<br />
Code<br />
Description Fault<br />
Code<br />
Normal and Tolerated Muting Sequences<br />
Normal<br />
Tolerated<br />
Illegal<br />
An illegal muting<br />
sequence is a legal input<br />
combination that<br />
deviates from the normal<br />
or tolerated sequences.<br />
S1 S2 LC<br />
General <strong>Safety</strong> <strong>Application</strong> <strong>Instruction</strong>s Chapter 1<br />
Publication <strong>1756</strong>-<strong>RM095C</strong>-<strong>EN</strong>-P - July 2008 187<br />
1<br />
1<br />
1<br />
0 1 1<br />
0 0 1<br />
0 0 0<br />
0 0 0<br />
0 0 0<br />
1 0 0<br />
1 1 0<br />
1 1 1<br />
1 1 1<br />
S3<br />
1<br />
1<br />
1<br />
1<br />
0<br />
0<br />
0<br />
0<br />
0<br />
1<br />
S4<br />
1 1 1 1 1 10<br />
1<br />
1<br />
1<br />
1<br />
1<br />
0<br />
0<br />
0<br />
0<br />
0<br />
Step<br />
Description Fault<br />
Code<br />
0<br />
1<br />
2<br />
3<br />
4<br />
5<br />
6<br />
7<br />
8<br />
9<br />
Description<br />
An illegal muting sequence was detected in step 0 when the Sensors and the Light Curtain transitioned to one of the following invalid<br />
sequence states.<br />
9100H S1 S2 LC S3 S4 Step 9101H S1 S2 LC S3 S4 Step 9102H S1 S2 LC S3 S4 Step<br />
9103H S1 S2 LC S3 S4 Step 9104H S1 S2 LC S3 S4<br />
9105H<br />
9106H<br />
1<br />
1<br />
1<br />
0 0 1<br />
1<br />
1<br />
1<br />
0 0 0<br />
S1 S2 LC<br />
1<br />
1<br />
1<br />
1 1 1<br />
1<br />
1<br />
1<br />
0<br />
S3<br />
1<br />
0<br />
1<br />
1<br />
1<br />
0<br />
S4<br />
1<br />
0<br />
0<br />
0<br />
Step<br />
0<br />
1<br />
1<br />
1<br />
0 0 0<br />
1<br />
1<br />
1<br />
1 0 0<br />
1<br />
1<br />
1<br />
0<br />
1<br />
1<br />
1<br />
0<br />
0<br />
0<br />
1<br />
1<br />
1<br />
0 0 0<br />
Step S1 S2 LC<br />
1<br />
1<br />
1<br />
1 1 0<br />
1<br />
0<br />
S3<br />
1<br />
0<br />
1<br />
1<br />
S4<br />
1<br />
0<br />
0<br />
Step<br />
0
Chapter 1 General <strong>Safety</strong> <strong>Application</strong> <strong>Instruction</strong>s<br />
Invalid Sequence Faults<br />
Fault<br />
Code<br />
An illegal muting sequence was detected in step 1 when the Sensors and the Light Curtain transitioned to one of the following invalid<br />
sequence states.<br />
9110H 9111H 9112H<br />
S1 S2 LC S3 S4 Step S1 S2 LC S3 S4 Step S1 S2 LC S3 S4 Step<br />
9113H 9114H 9115H<br />
S1 S2 LC S3 S4 Step S1 S2 LC S3 S4<br />
9116H<br />
An illegal muting sequence was detected in step 2 when the Sensors and the Light Curtain transitioned to one of the following invalid<br />
sequence states.<br />
9120H S1 S2 LC S3 S4 Step 9121H S1 S2 LC S3 S4 Step 9122H S1 S2 LC S3 S4 Step<br />
9123H S1 S2 LC S3 S4<br />
9124H S1 LC S3 S4<br />
9125H<br />
9126H<br />
Description Fault<br />
Code<br />
1<br />
1<br />
1<br />
0 1 1<br />
0 0 0<br />
1<br />
1<br />
1<br />
0 1 1<br />
1 0 0<br />
S1 S2 LC<br />
1<br />
1<br />
1<br />
0 1 1<br />
1 1 1<br />
1<br />
1<br />
1<br />
0 1 1<br />
0 0 1<br />
1 1 1<br />
1<br />
1<br />
1<br />
0 1 1<br />
0 0 1<br />
1 0 0<br />
S1 S2 LC<br />
1<br />
1<br />
1<br />
0 1 1<br />
0 0 1<br />
1 1 1<br />
1<br />
1<br />
1<br />
1<br />
1<br />
0<br />
S3<br />
1<br />
1<br />
1<br />
1<br />
1<br />
1<br />
1<br />
1<br />
1<br />
1<br />
0<br />
S3<br />
1<br />
1<br />
1<br />
1<br />
1<br />
1<br />
1<br />
1<br />
1<br />
0<br />
S4<br />
1<br />
1<br />
0<br />
1<br />
1<br />
1<br />
1<br />
1<br />
1<br />
1<br />
0<br />
S4<br />
1<br />
1<br />
1<br />
0<br />
0<br />
1<br />
0<br />
1<br />
Step<br />
0<br />
1<br />
0<br />
1<br />
2<br />
Description Fault<br />
Code<br />
1<br />
1<br />
1<br />
0 1 1<br />
0 0 0<br />
1<br />
1<br />
1<br />
0 1 1<br />
1 1 0<br />
1<br />
1<br />
1<br />
0 1 1<br />
0 0 1<br />
0 0 0<br />
Step S2<br />
0<br />
1<br />
2<br />
Step<br />
0<br />
1<br />
2<br />
1<br />
1<br />
1<br />
0 1 1<br />
0 0 1<br />
1 1 0<br />
Description<br />
188 Publication <strong>1756</strong>-<strong>RM095C</strong>-<strong>EN</strong>-P - July 2008<br />
1<br />
1<br />
0<br />
1<br />
1<br />
0<br />
1<br />
1<br />
1<br />
0<br />
1<br />
1<br />
1<br />
0<br />
1<br />
1<br />
1<br />
1<br />
1<br />
0<br />
1<br />
1<br />
1<br />
1<br />
1<br />
1<br />
1<br />
0<br />
0<br />
1<br />
0<br />
1<br />
1<br />
1<br />
1<br />
0 1 1<br />
0 0 0<br />
Step S1 S2 LC<br />
0<br />
1<br />
2<br />
0<br />
1<br />
2<br />
1<br />
1<br />
1<br />
0 1 1<br />
1 1 1<br />
1<br />
1<br />
1<br />
0 1 1<br />
0 0 1<br />
0 0 0<br />
Step S1 S2 LC<br />
1<br />
1<br />
1<br />
0 1 1<br />
0 0 1<br />
1 1 1<br />
1<br />
1<br />
0<br />
S3<br />
1<br />
1<br />
0<br />
1<br />
1<br />
1<br />
0<br />
S3<br />
1<br />
1<br />
1<br />
0<br />
1<br />
1<br />
0<br />
S4<br />
1<br />
1<br />
0<br />
1<br />
1<br />
1<br />
0<br />
S4<br />
1<br />
1<br />
1<br />
0<br />
0<br />
1<br />
Step<br />
0<br />
1<br />
0<br />
1<br />
2<br />
Step<br />
0<br />
1<br />
2
Invalid Sequence Faults<br />
Fault<br />
Code<br />
General <strong>Safety</strong> <strong>Application</strong> <strong>Instruction</strong>s Chapter 1<br />
An illegal muting sequence was detected in step 3 when the Sensors and the Light Curtain transitioned to one of the following invalid<br />
sequence states.<br />
9130H S1 S2 LC S3 S4 Step 9131H S1 S2 LC S3 S4 Step 9132H S1 S2 LC S3 S4 Step<br />
9133H S1 S2 LC S3 S4<br />
9134H S1 LC S3 S4<br />
9135H<br />
9136H<br />
Description Fault<br />
Code<br />
1<br />
1<br />
1<br />
0 1 1<br />
0 0 1<br />
0 0 0<br />
1 1 1<br />
1<br />
1<br />
1<br />
0 1 1<br />
0 0 1<br />
0 0 0<br />
1 0 0<br />
S1 S2 LC<br />
1<br />
1<br />
1<br />
0 1 1<br />
0 0 1<br />
0 0 0<br />
1 1 1<br />
1<br />
1<br />
1<br />
1<br />
1<br />
1<br />
1<br />
1<br />
1<br />
0<br />
S3<br />
1<br />
1<br />
1<br />
1<br />
1<br />
1<br />
1<br />
1<br />
1<br />
1<br />
1<br />
1<br />
1<br />
1<br />
0<br />
S4<br />
1<br />
1<br />
1<br />
1<br />
0<br />
0<br />
1<br />
2<br />
3<br />
0<br />
1<br />
2<br />
3<br />
Description Fault<br />
Code<br />
1<br />
1<br />
1<br />
0 1 1<br />
0 0 1<br />
0 0 0<br />
0 1 1<br />
Step S2<br />
Step<br />
0<br />
1<br />
2<br />
3<br />
1<br />
1<br />
1<br />
0 1 1<br />
0 0 1<br />
0 0 0<br />
1 1 0<br />
Description<br />
Publication <strong>1756</strong>-<strong>RM095C</strong>-<strong>EN</strong>-P - July 2008 189<br />
1<br />
1<br />
1<br />
1<br />
1<br />
1<br />
1<br />
1<br />
1<br />
0<br />
1<br />
1<br />
1<br />
1<br />
1<br />
1<br />
1<br />
1<br />
1<br />
0<br />
0<br />
1<br />
2<br />
3<br />
0<br />
1<br />
2<br />
3<br />
1<br />
1<br />
1<br />
0 1 1<br />
0 0 1<br />
0 0 0<br />
0 0 0<br />
Step S1 S2 LC<br />
1<br />
1<br />
1<br />
0 1 1<br />
0 0 1<br />
0 0 0<br />
1 1 1<br />
1<br />
1<br />
1<br />
1<br />
0<br />
S3<br />
1<br />
1<br />
1<br />
1<br />
0<br />
1<br />
1<br />
1<br />
1<br />
0<br />
S4<br />
1<br />
1<br />
1<br />
1<br />
0<br />
0<br />
1<br />
2<br />
3<br />
Step<br />
0<br />
1<br />
2<br />
3
Chapter 1 General <strong>Safety</strong> <strong>Application</strong> <strong>Instruction</strong>s<br />
Invalid Sequence Faults<br />
Fault<br />
Code<br />
An illegal muting sequence was detected in step 4 when the Sensors and the Light Curtain transitioned to one of the following invalid<br />
sequence states.<br />
9140H S1 S2 LC S3 S4 Step 9141H S1 S2 LC S3 S4 Step 9142H S1 S2 LC S3 S4 Step<br />
9143H S1 S2 LC S3 S4 Step 9144H S1 S2 LC S3 S4<br />
9145H<br />
9146H<br />
Description Fault<br />
Code<br />
1<br />
1<br />
1<br />
0 1 1<br />
0 0 1<br />
0 0 0<br />
0 0 0<br />
1 1 1<br />
1<br />
1<br />
1<br />
0 1 1<br />
0 0 1<br />
0 0 0<br />
0 0 0<br />
1 0 0<br />
S1 S2 LC<br />
1<br />
1<br />
1<br />
0 1 1<br />
0 0 1<br />
0 0 0<br />
0 0 0<br />
1 1 1<br />
1<br />
1<br />
1<br />
1<br />
0<br />
1<br />
1<br />
1<br />
1<br />
1<br />
0<br />
0<br />
S3<br />
1<br />
1<br />
1<br />
1<br />
0<br />
1<br />
1<br />
1<br />
1<br />
1<br />
1<br />
1<br />
1<br />
1<br />
1<br />
1<br />
1<br />
0<br />
S4<br />
1<br />
1<br />
1<br />
1<br />
1<br />
0<br />
0<br />
1<br />
2<br />
3<br />
4<br />
0<br />
1<br />
2<br />
3<br />
4<br />
Step<br />
0<br />
1<br />
2<br />
3<br />
4<br />
Description Fault<br />
Code<br />
1<br />
1<br />
1<br />
0 1 1<br />
0 0 1<br />
0 0 0<br />
0 0 0<br />
0 1 1<br />
1<br />
1<br />
1<br />
0 1 1<br />
0 0 1<br />
0 0 0<br />
0 0 0<br />
1 1 0<br />
Description<br />
190 Publication <strong>1756</strong>-<strong>RM095C</strong>-<strong>EN</strong>-P - July 2008<br />
1<br />
1<br />
1<br />
1<br />
0<br />
1<br />
1<br />
1<br />
1<br />
1<br />
0<br />
0<br />
1<br />
1<br />
1<br />
1<br />
1<br />
1<br />
1<br />
1<br />
1<br />
1<br />
1<br />
0<br />
0<br />
1<br />
2<br />
3<br />
4<br />
0<br />
1<br />
2<br />
3<br />
4<br />
1<br />
1<br />
1<br />
0 1 1<br />
0 0 1<br />
0 0 0<br />
0 0 0<br />
0 0 1<br />
Step S1 S2 LC<br />
1<br />
1<br />
1<br />
0 1 1<br />
0 0 1<br />
0 0 0<br />
0 0 0<br />
1 1 1<br />
1<br />
1<br />
1<br />
1<br />
0<br />
1<br />
S3<br />
1<br />
1<br />
1<br />
1<br />
0<br />
0<br />
1<br />
1<br />
1<br />
1<br />
1<br />
1<br />
S4<br />
1<br />
1<br />
1<br />
1<br />
1<br />
0<br />
0<br />
1<br />
2<br />
3<br />
4<br />
Step<br />
0<br />
1<br />
2<br />
3<br />
4
Invalid Sequence Faults<br />
Fault<br />
Code<br />
General <strong>Safety</strong> <strong>Application</strong> <strong>Instruction</strong>s Chapter 1<br />
An illegal muting sequence was detected in step 5 when the Sensors and the Light Curtain transitioned to one of the following invalid<br />
sequence states.<br />
9150H S1 S2 LC S3 S4<br />
9151H S1 LC S3 S4 Step 9152H S1 S2 LC S3 S4 Step<br />
9153H S1 S2 LC S3 S4 Step 9154H 9155H<br />
S1 S2 LC S3 S4<br />
9156H<br />
Description Fault<br />
Code<br />
1<br />
1<br />
1<br />
0 1 1<br />
0 0 1<br />
0 0 0<br />
0 0 0<br />
0 0 0<br />
1<br />
1<br />
1<br />
1<br />
0<br />
0<br />
1<br />
1<br />
1<br />
1<br />
1<br />
0<br />
1 1 1 1 1<br />
1<br />
1<br />
1<br />
0 1 1<br />
0 0 1<br />
0 0 0<br />
0 0 0<br />
0 0 0<br />
1<br />
1<br />
1<br />
1<br />
0<br />
0<br />
1<br />
1<br />
1<br />
1<br />
1<br />
0<br />
0 0 0 1 1<br />
S1 S2 LC<br />
1<br />
1<br />
1<br />
0 1 1<br />
0 0 1<br />
0 0 0<br />
0 0 0<br />
0 0 0<br />
S3<br />
1<br />
1<br />
1<br />
1<br />
0<br />
0<br />
S4<br />
1<br />
1<br />
1<br />
1<br />
1<br />
0<br />
1 1 1 1 0<br />
Step S2<br />
0<br />
1<br />
2<br />
3<br />
4<br />
5<br />
0<br />
1<br />
2<br />
3<br />
4<br />
5<br />
Step<br />
0<br />
1<br />
2<br />
3<br />
4<br />
5<br />
Description Fault<br />
Code<br />
1<br />
1<br />
1<br />
0 1 1<br />
0 0 1<br />
0 0 0<br />
0 0 0<br />
0 0 0<br />
Description<br />
Publication <strong>1756</strong>-<strong>RM095C</strong>-<strong>EN</strong>-P - July 2008 191<br />
1<br />
1<br />
1<br />
1<br />
0<br />
0<br />
1<br />
1<br />
1<br />
1<br />
1<br />
0<br />
0 1 1 1 1<br />
1<br />
1<br />
1<br />
0 1 1<br />
0 0 1<br />
0 0 0<br />
0 0 0<br />
0 0 0<br />
1<br />
1<br />
1<br />
1<br />
0<br />
0<br />
1<br />
1<br />
1<br />
1<br />
1<br />
0<br />
1 1 0 0 0<br />
0<br />
1<br />
2<br />
3<br />
4<br />
5<br />
0<br />
1<br />
2<br />
3<br />
4<br />
5<br />
1<br />
1<br />
1<br />
0 1 1<br />
0 0 1<br />
0 0 0<br />
0 0 0<br />
0 0 0<br />
1<br />
1<br />
1<br />
1<br />
0<br />
0<br />
1<br />
1<br />
1<br />
1<br />
1<br />
0<br />
0 0 1 1 1<br />
Step S1 S2 LC<br />
1<br />
1<br />
1<br />
0 1 1<br />
0 0 1<br />
0 0 0<br />
0 0 0<br />
0 0 0<br />
S3<br />
1<br />
1<br />
1<br />
1<br />
0<br />
0<br />
S4<br />
1<br />
1<br />
1<br />
1<br />
1<br />
0<br />
1 1 1 0 0<br />
0<br />
1<br />
2<br />
3<br />
4<br />
5<br />
Step<br />
0<br />
1<br />
2<br />
3<br />
4<br />
5
Chapter 1 General <strong>Safety</strong> <strong>Application</strong> <strong>Instruction</strong>s<br />
Invalid Sequence Faults<br />
Fault<br />
Code<br />
An illegal muting sequence was detected in step 6 when the Sensors and the Light Curtain transitioned to one of the following invalid<br />
sequence states.<br />
9160H S1 S2 LC S3 S4 Step 9161H S1 S2 LC S3 S4 Step 9162H S1 S2 LC S3 S4 Step<br />
9163H S1 S2 LC S3 S4 Step 9164H S1 S2 LC S3 S4<br />
9165H<br />
9166H<br />
Description Fault<br />
Code<br />
1<br />
1<br />
1<br />
0 1 1<br />
0 0 1<br />
0 0 0<br />
0 0 0<br />
0 0 0<br />
1 0 0<br />
1 1 1<br />
1<br />
1<br />
1<br />
0 1 1<br />
0 0 1<br />
0 0 0<br />
0 0 0<br />
0 0 0<br />
1 0 0<br />
0 0 0<br />
S1 S2 LC<br />
1<br />
1<br />
1<br />
0 1 1<br />
0 0 1<br />
0 0 0<br />
0 0 0<br />
0 0 0<br />
1 0 0<br />
1 1 1<br />
1<br />
1<br />
1<br />
1<br />
0<br />
0<br />
0<br />
1<br />
1<br />
1<br />
1<br />
1<br />
0<br />
0<br />
0<br />
1<br />
S3<br />
1<br />
1<br />
1<br />
1<br />
0<br />
0<br />
0<br />
1<br />
1<br />
1<br />
1<br />
1<br />
1<br />
0<br />
0<br />
1<br />
1<br />
1<br />
1<br />
1<br />
1<br />
0<br />
0<br />
1<br />
S4<br />
1<br />
1<br />
1<br />
1<br />
1<br />
0<br />
0<br />
0<br />
0<br />
1<br />
2<br />
3<br />
4<br />
5<br />
6<br />
0<br />
1<br />
2<br />
3<br />
4<br />
5<br />
6<br />
Step<br />
0<br />
1<br />
2<br />
3<br />
4<br />
5<br />
6<br />
Description Fault<br />
Code<br />
1<br />
1<br />
1<br />
0 1 1<br />
0 0 1<br />
0 0 0<br />
0 0 0<br />
0 0 0<br />
1 0 0<br />
0 1 1<br />
1<br />
1<br />
1<br />
0 1 1<br />
0 0 1<br />
0 0 0<br />
0 0 0<br />
0 0 0<br />
1 0 0<br />
0 0 0<br />
Description<br />
192 Publication <strong>1756</strong>-<strong>RM095C</strong>-<strong>EN</strong>-P - July 2008<br />
1<br />
1<br />
1<br />
1<br />
0<br />
0<br />
0<br />
1<br />
1<br />
1<br />
1<br />
1<br />
0<br />
0<br />
0<br />
0<br />
1<br />
1<br />
1<br />
1<br />
1<br />
0<br />
0<br />
1<br />
1<br />
1<br />
1<br />
1<br />
1<br />
0<br />
0<br />
1<br />
0<br />
1<br />
2<br />
3<br />
4<br />
5<br />
6<br />
0<br />
1<br />
2<br />
3<br />
4<br />
5<br />
6<br />
1<br />
1<br />
1<br />
0 1 1<br />
0 0 1<br />
0 0 0<br />
0 0 0<br />
0 0 0<br />
1 0 0<br />
0 0 1<br />
Step S1 S2 LC<br />
1<br />
1<br />
1<br />
0 1 1<br />
0 0 1<br />
0 0 0<br />
0 0 0<br />
0 0 0<br />
1 0 0<br />
1 1 1<br />
1<br />
1<br />
1<br />
1<br />
0<br />
0<br />
0<br />
1<br />
S3<br />
1<br />
1<br />
1<br />
1<br />
0<br />
0<br />
0<br />
0<br />
1<br />
1<br />
1<br />
1<br />
1<br />
0<br />
0<br />
1<br />
S4<br />
1<br />
1<br />
1<br />
1<br />
1<br />
0<br />
0<br />
0<br />
0<br />
1<br />
2<br />
3<br />
4<br />
5<br />
6<br />
Step<br />
0<br />
1<br />
2<br />
3<br />
4<br />
5<br />
6
Invalid Sequence Faults<br />
Fault<br />
Code<br />
General <strong>Safety</strong> <strong>Application</strong> <strong>Instruction</strong>s Chapter 1<br />
An illegal muting sequence was detected in step 7 when the Sensors and the Light Curtain transitioned to one of the following invalid<br />
sequence states.<br />
9170H S1 S2 LC S3 S4 Step 9171H S1 S2 LC S3 S4 Step 9172H S1 S2 LC S3 S4<br />
9173H S1 S2 LC S3 S4 Step 9174H S1 S2 LC S3 S4<br />
9175H<br />
9176H<br />
Description Fault<br />
Code<br />
1<br />
1<br />
1<br />
0 1 1<br />
0 0 1<br />
0 0 0<br />
0 0 0<br />
0 0 0<br />
1 0 0<br />
1 1 0<br />
1 1 1<br />
1<br />
1<br />
1<br />
0 1 1<br />
0 0 1<br />
0 0 0<br />
0 0 0<br />
0 0 0<br />
1 0 0<br />
1 1 0<br />
0 0 0<br />
S1 S2 LC<br />
1<br />
1<br />
1<br />
0 1 1<br />
0 0 1<br />
0 0 0<br />
0 0 0<br />
0 0 0<br />
1 0 0<br />
1 1 0<br />
1 1 1<br />
1<br />
1<br />
1<br />
1<br />
0<br />
0<br />
0<br />
0<br />
1<br />
1<br />
1<br />
1<br />
1<br />
0<br />
0<br />
0<br />
0<br />
1<br />
S3<br />
1<br />
1<br />
1<br />
1<br />
0<br />
0<br />
0<br />
0<br />
1<br />
1<br />
1<br />
1<br />
1<br />
1<br />
0<br />
0<br />
0<br />
1<br />
1<br />
1<br />
1<br />
1<br />
1<br />
0<br />
0<br />
0<br />
1<br />
S4<br />
1<br />
1<br />
1<br />
1<br />
1<br />
0<br />
0<br />
0<br />
0<br />
0<br />
1<br />
2<br />
3<br />
4<br />
5<br />
6<br />
7<br />
0<br />
1<br />
2<br />
3<br />
4<br />
5<br />
6<br />
7<br />
Step<br />
0<br />
1<br />
2<br />
3<br />
4<br />
5<br />
6<br />
7<br />
Description Fault<br />
Code<br />
1<br />
1<br />
1<br />
0 1 1<br />
0 0 1<br />
0 0 0<br />
0 0 0<br />
0 0 0<br />
1 0 0<br />
1 1 0<br />
0 1 1<br />
1<br />
1<br />
1<br />
0 1 1<br />
0 0 1<br />
0 0 0<br />
0 0 0<br />
0 0 0<br />
1 0 0<br />
1 1 0<br />
0 0 0<br />
Description<br />
Publication <strong>1756</strong>-<strong>RM095C</strong>-<strong>EN</strong>-P - July 2008 193<br />
1<br />
1<br />
1<br />
1<br />
0<br />
0<br />
0<br />
0<br />
1<br />
1<br />
1<br />
1<br />
1<br />
0<br />
0<br />
0<br />
0<br />
0<br />
1<br />
1<br />
1<br />
1<br />
1<br />
0<br />
0<br />
0<br />
1<br />
1<br />
1<br />
1<br />
1<br />
1<br />
0<br />
0<br />
0<br />
1<br />
0<br />
1<br />
2<br />
3<br />
4<br />
5<br />
6<br />
7<br />
0<br />
1<br />
2<br />
3<br />
4<br />
5<br />
6<br />
7<br />
1<br />
1<br />
1<br />
0 1 1<br />
0 0 1<br />
0 0 0<br />
0 0 0<br />
0 0 0<br />
1 0 0<br />
1 1 0<br />
0 0 1<br />
Step S1 S2 LC<br />
1<br />
1<br />
1<br />
0 1 1<br />
0 0 1<br />
0 0 0<br />
0 0 0<br />
0 0 0<br />
1 0 0<br />
1 1 0<br />
0 0 0<br />
1<br />
1<br />
1<br />
1<br />
0<br />
0<br />
0<br />
0<br />
1<br />
S3<br />
1<br />
1<br />
1<br />
1<br />
0<br />
0<br />
0<br />
0<br />
0<br />
1<br />
1<br />
1<br />
1<br />
1<br />
0<br />
0<br />
0<br />
1<br />
S4<br />
1<br />
1<br />
1<br />
1<br />
1<br />
0<br />
0<br />
0<br />
0<br />
Step<br />
0<br />
1<br />
2<br />
3<br />
4<br />
5<br />
6<br />
7<br />
Step<br />
0<br />
1<br />
2<br />
3<br />
4<br />
5<br />
6<br />
7
Chapter 1 General <strong>Safety</strong> <strong>Application</strong> <strong>Instruction</strong>s<br />
Invalid Sequence Faults<br />
Fault<br />
Code<br />
An illegal muting sequence was detected in step 8 when the Sensors and the Light Curtain transitioned to one of the following invalid<br />
sequence states.<br />
9180H S1 S2 LC S3 S4 Step 9181H S1 S2 LC S3 S4<br />
9182H S1 LC S3 S4 Step<br />
9183H S1 S2 LC S3 S4 Step 9184H S1 S2 LC S3 S4<br />
9185H<br />
9186H<br />
Description Fault<br />
Code<br />
1<br />
1<br />
1<br />
0 1 1<br />
0 0 1<br />
0 0 0<br />
0 0 0<br />
0 0 0<br />
1 0 0<br />
1 1 0<br />
1 1 1<br />
1 1 1<br />
1<br />
1<br />
1<br />
0 1 1<br />
0 0 1<br />
0 0 0<br />
0 0 0<br />
0 0 0<br />
1 0 0<br />
1 1 0<br />
1 1 1<br />
0 0 0<br />
S1 S2 LC<br />
1<br />
1<br />
1<br />
0 1 1<br />
0 0 1<br />
0 0 0<br />
0 0 0<br />
0 0 0<br />
1 0 0<br />
1 1 0<br />
1 1 1<br />
1 0 0<br />
1<br />
1<br />
1<br />
1<br />
0<br />
0<br />
0<br />
0<br />
0<br />
1<br />
1<br />
1<br />
1<br />
1<br />
0<br />
0<br />
0<br />
0<br />
0<br />
1<br />
S3<br />
1<br />
1<br />
1<br />
1<br />
0<br />
0<br />
0<br />
0<br />
0<br />
0<br />
1<br />
1<br />
1<br />
1<br />
1<br />
0<br />
0<br />
0<br />
0<br />
1<br />
1<br />
1<br />
1<br />
1<br />
1<br />
0<br />
0<br />
0<br />
0<br />
1<br />
S4<br />
1<br />
1<br />
1<br />
1<br />
1<br />
0<br />
0<br />
0<br />
0<br />
0<br />
0<br />
1<br />
2<br />
3<br />
4<br />
5<br />
6<br />
7<br />
8<br />
0<br />
1<br />
2<br />
3<br />
4<br />
5<br />
6<br />
7<br />
8<br />
Step<br />
0<br />
1<br />
2<br />
3<br />
4<br />
5<br />
6<br />
7<br />
8<br />
Description Fault<br />
Code<br />
1<br />
1<br />
1<br />
0 1 1<br />
0 0 1<br />
0 0 0<br />
0 0 0<br />
0 0 0<br />
1 0 0<br />
1 1 0<br />
1 1 1<br />
0 1 1<br />
1<br />
1<br />
1<br />
0 1 1<br />
0 0 1<br />
0 0 0<br />
0 0 0<br />
0 0 0<br />
1 0 0<br />
1 1 0<br />
1 1 1<br />
0 0 0<br />
Description<br />
194 Publication <strong>1756</strong>-<strong>RM095C</strong>-<strong>EN</strong>-P - July 2008<br />
1<br />
1<br />
1<br />
1<br />
0<br />
0<br />
0<br />
0<br />
0<br />
1<br />
1<br />
1<br />
1<br />
1<br />
0<br />
0<br />
0<br />
0<br />
0<br />
0<br />
1<br />
1<br />
1<br />
1<br />
1<br />
0<br />
0<br />
0<br />
0<br />
1<br />
1<br />
1<br />
1<br />
1<br />
1<br />
0<br />
0<br />
0<br />
0<br />
1<br />
Step S2<br />
0<br />
1<br />
2<br />
3<br />
4<br />
5<br />
6<br />
7<br />
8<br />
0<br />
1<br />
2<br />
3<br />
4<br />
5<br />
6<br />
7<br />
8<br />
1<br />
1<br />
1<br />
0 1 1<br />
0 0 1<br />
0 0 0<br />
0 0 0<br />
0 0 0<br />
1 0 0<br />
1 1 0<br />
1 1 1<br />
0 0 1<br />
Step S1 S2 LC<br />
1<br />
1<br />
1<br />
0 1 1<br />
0 0 1<br />
0 0 0<br />
0 0 0<br />
0 0 0<br />
1 0 0<br />
1 1 0<br />
1 1 1<br />
0 0 0<br />
1<br />
1<br />
1<br />
1<br />
0<br />
0<br />
0<br />
0<br />
0<br />
1<br />
S3<br />
1<br />
1<br />
1<br />
1<br />
0<br />
0<br />
0<br />
0<br />
0<br />
0<br />
1<br />
1<br />
1<br />
1<br />
1<br />
0<br />
0<br />
0<br />
0<br />
1<br />
S4<br />
1<br />
1<br />
1<br />
1<br />
1<br />
0<br />
0<br />
0<br />
0<br />
0<br />
0<br />
1<br />
2<br />
3<br />
4<br />
5<br />
6<br />
7<br />
8<br />
Step<br />
0<br />
1<br />
2<br />
3<br />
4<br />
5<br />
6<br />
7<br />
8
Invalid Sequence Faults<br />
Fault<br />
Code<br />
Description Fault<br />
Code<br />
Description Fault<br />
Code<br />
General <strong>Safety</strong> <strong>Application</strong> <strong>Instruction</strong>s Chapter 1<br />
An illegal muting sequence was detected in step 9 when the Sensors and the Light Curtain transitioned to one of the following invalid<br />
sequence states.<br />
9190H S1 S2 LC S3 S4 Step 9191H S1 S2 LC S3 S4 Step 9192H S1 S2 LC S3 S4 Step<br />
1<br />
1<br />
1<br />
0 1 1<br />
0 0 1<br />
0 0 0<br />
0 0 0<br />
0 0 0<br />
1 0 0<br />
1 1 0<br />
1 1 1<br />
1 1 1<br />
1<br />
1<br />
1<br />
1<br />
0<br />
0<br />
0<br />
0<br />
0<br />
1<br />
1<br />
1<br />
1<br />
1<br />
1<br />
0<br />
0<br />
0<br />
0<br />
0<br />
0 1 1 1 1<br />
0<br />
1<br />
2<br />
3<br />
4<br />
5<br />
6<br />
7<br />
8<br />
9<br />
9193H S1 S2 LC S3 S4 Step 9194H S1 S2 LC S3 S4<br />
9195H<br />
1<br />
1<br />
1<br />
0 1 1<br />
0 0 1<br />
0 0 0<br />
0 0 0<br />
0 0 0<br />
1 0 0<br />
1 1 0<br />
1 1 1<br />
1 1 1<br />
1<br />
1<br />
1<br />
1<br />
0<br />
0<br />
0<br />
0<br />
0<br />
1<br />
1<br />
1<br />
1<br />
1<br />
1<br />
0<br />
0<br />
0<br />
0<br />
0<br />
0 0 0 0 1<br />
0<br />
1<br />
2<br />
3<br />
4<br />
5<br />
6<br />
7<br />
8<br />
9<br />
1<br />
1<br />
1<br />
0 1 1<br />
0 0 1<br />
0 0 0<br />
0 0 0<br />
0 0 0<br />
1 0 0<br />
1 1 0<br />
1 1 1<br />
1 1 1<br />
Description<br />
Publication <strong>1756</strong>-<strong>RM095C</strong>-<strong>EN</strong>-P - July 2008 195<br />
1<br />
1<br />
1<br />
1<br />
0<br />
0<br />
0<br />
0<br />
0<br />
1<br />
1<br />
1<br />
1<br />
1<br />
1<br />
0<br />
0<br />
0<br />
0<br />
0<br />
0 0 1 1 1<br />
1<br />
1<br />
1<br />
0 1 1<br />
0 0 1<br />
0 0 0<br />
0 0 0<br />
0 0 0<br />
1 0 0<br />
1 1 0<br />
1 1 1<br />
1 1 1<br />
1<br />
1<br />
1<br />
1<br />
0<br />
0<br />
0<br />
0<br />
0<br />
1<br />
1<br />
1<br />
1<br />
1<br />
1<br />
0<br />
0<br />
0<br />
0<br />
0<br />
0 0 0 0 0<br />
0<br />
1<br />
2<br />
3<br />
4<br />
5<br />
6<br />
7<br />
8<br />
9<br />
0<br />
1<br />
2<br />
3<br />
4<br />
5<br />
9<br />
1<br />
1<br />
1<br />
0 1 1<br />
0 0 1<br />
0 0 0<br />
0 0 0<br />
0 0 0<br />
1 0 0<br />
1 1 0<br />
1 1 1<br />
1 1 1<br />
1<br />
1<br />
1<br />
1<br />
0<br />
0<br />
0<br />
0<br />
0<br />
1<br />
1<br />
1<br />
1<br />
1<br />
1<br />
0<br />
0<br />
0<br />
0<br />
0<br />
0 0 0 1 1<br />
Step S1 S2 LC<br />
6<br />
7<br />
8<br />
1<br />
1<br />
1<br />
0 1 1<br />
0 0 1<br />
0 0 0<br />
0 0 0<br />
0 0 0<br />
1 0 0<br />
1 1 0<br />
1 1 1<br />
1 1 1<br />
S3<br />
1<br />
1<br />
1<br />
1<br />
0<br />
0<br />
0<br />
0<br />
0<br />
1<br />
S4<br />
1<br />
1<br />
1<br />
1<br />
1<br />
0<br />
0<br />
0<br />
0<br />
0<br />
1 0 0 0 0<br />
0<br />
1<br />
2<br />
3<br />
4<br />
5<br />
6<br />
7<br />
8<br />
9<br />
Step<br />
0<br />
1<br />
2<br />
3<br />
4<br />
5<br />
6<br />
7<br />
8<br />
9
Chapter 1 General <strong>Safety</strong> <strong>Application</strong> <strong>Instruction</strong>s<br />
Invalid Sequence Faults<br />
Fault<br />
Code<br />
9196H<br />
Description Fault<br />
Code<br />
S1 S2 LC<br />
1<br />
1<br />
1<br />
0 1 1<br />
0 0 1<br />
0 0 0<br />
0 0 0<br />
0 0 0<br />
1 0 0<br />
1 1 0<br />
1 1 1<br />
1 1 1<br />
S3<br />
1<br />
1<br />
1<br />
1<br />
0<br />
0<br />
0<br />
0<br />
0<br />
1<br />
S4<br />
1<br />
1<br />
1<br />
1<br />
1<br />
0<br />
0<br />
0<br />
0<br />
0<br />
1 1 0 0 0<br />
Step<br />
0<br />
1<br />
2<br />
3<br />
4<br />
5<br />
6<br />
7<br />
8<br />
9<br />
Description Fault<br />
Code<br />
Description<br />
An illegal muting sequence was detected when Sensor 1 or Sensor 4 transitioned to one of the following invalid sequence states. The first<br />
sensor blocked does not correspond to the value of the Direction input.<br />
91A0H 91A1H<br />
S1 S2 LC S3 S4 Step S1 S2 LC S3 S4 Step<br />
Timer Faults<br />
1<br />
1<br />
1<br />
1 1 1<br />
1<br />
1<br />
1<br />
0<br />
0<br />
1<br />
1<br />
1<br />
0 1 1<br />
Fault Code Description Corrective Action<br />
9000H The Light Curtain was muted for longer than<br />
the configured Maximum Mute Time.<br />
9010H Too much time elapsed between Sensor 1<br />
and Sensor 2 being blocked.<br />
9011H Too much time elapsed between Sensor 2<br />
and the Light Curtain being blocked.<br />
9012H Too much time elapsed between the Light<br />
Curtain and Sensor 3 being cleared.<br />
9013H Too much time elapsed between Sensor 3<br />
and Sensor 4 being cleared.<br />
To recover from invalid sequence faults 9100H…9196H, check the<br />
alignment of the sensors with regard to the material being moved and<br />
the system timing and then reset the fault.<br />
To recover from invalid sequence faults 91A0H and 91A1H, check the<br />
value of the Direction input parameter with respect to the movement<br />
of the material and reset the fault.<br />
196 Publication <strong>1756</strong>-<strong>RM095C</strong>-<strong>EN</strong>-P - July 2008<br />
1<br />
1<br />
1<br />
1<br />
0<br />
The Maximum Mute Time parameter may be set too short or there may be<br />
a problem with the sensors.<br />
The S1-S2 Time parameter may be set too short or there may be a problem<br />
with Sensor 2 (forward direction) or Sensor 1 (reverse direction).<br />
The S2-LC Time parameter may be set too short or there may be a problem<br />
with the Light Curtain (forward direction) or Sensor 2 (reverse direction).<br />
The LC-S3 Time parameter may be set too short or there may be a problem<br />
with Sensor 3 (forward direction) or the Light Curtain (reverse direction).<br />
The S3-S4 Time parameter may be set to short or there may be a problem<br />
with Sensor 4 (forward direction) or Sensor 3 (reverse direction).
FSBM – Diagnostic Codes<br />
FSBM – Wiring and Programming Example<br />
General <strong>Safety</strong> <strong>Application</strong> <strong>Instruction</strong>s Chapter 1<br />
Diagnostic Code Description Corrective Action<br />
00H No fault. None.<br />
01H The Muting Lamp Status input is OFF (0). • Check the muting lamp and replace it, if necessary.<br />
• If a muting lamp is not required, set the Muting Lamp<br />
Status input to ON (1).<br />
05H The Reset input is held ON (1). <strong>Set</strong> the Reset input to OFF (0).<br />
20H The Input Status input was OFF (0) when the • Check the I/O module connection or the logic used to<br />
instruction started.<br />
source input status.<br />
24V DC<br />
24V Ground<br />
+ 24V DC<br />
0V DC<br />
Light Curtain<br />
This example complies with <strong>EN</strong>954-1 Category 4 operation. The<br />
standard control portion of the application is not shown.<br />
This wiring diagram shows how to wire a light curtain and four<br />
muting sensors to a 1791DS-IB12 module to illustrate the use of the<br />
Four-Sensor Bidirectional Muting instruction. The application includes<br />
a hold-to-run switch and a momentary push button for reset.<br />
+ 24V DC<br />
OSSD 1<br />
OSSD 2<br />
0V DC<br />
Wiring Diagram<br />
DeviceNet<br />
1<br />
V<br />
G<br />
11<br />
Muting<br />
Sensors<br />
3 4 5 6 7 8 20 19 9 10<br />
24<br />
I0 I1 I2 I3 I4 I5 T1 T0 I6 I7<br />
I11<br />
1791DS-IB12 Module 1<br />
Publication <strong>1756</strong>-<strong>RM095C</strong>-<strong>EN</strong>-P - July 2008 197<br />
T2<br />
25<br />
Clear Area<br />
Lamp<br />
T3<br />
28<br />
Muting<br />
Lamp<br />
Momentary<br />
Push Button<br />
(reset)<br />
Hold-to-run<br />
Key Switch
Chapter 1 General <strong>Safety</strong> <strong>Application</strong> <strong>Instruction</strong>s<br />
Equivalent - Active High<br />
TBD ms<br />
Automatic<br />
Automatic<br />
Module1:I.Pt00Data<br />
Module1:I.Pt01Data<br />
Module1:I.CombinedStatus<br />
Module1:I.Pt11Data<br />
Muting Sensors<br />
Module1:I.Pt02Data<br />
Module1:I.Pt03Data<br />
Module1:I.Pt04Data<br />
Module1:I.Pt05Data<br />
Module1:I.MutingStatus<br />
Equivalent - Active High<br />
TBD ms<br />
1<br />
Module1:I.Pt06Data<br />
Module1:I.Pt07Data<br />
Light Curtain<br />
DCS<br />
Input Type Output 1<br />
Discrepancy Time<br />
Restart Type<br />
Coldstart Type<br />
Channel A<br />
Channel B<br />
Input Status<br />
Reset Fault Present<br />
This programming diagram logically illustrates how the Four-Sensor<br />
Bidirectional Muting instruction is typically used with a DCI Stop (light<br />
curtain) and DCI Start (hold-to-run switch) instruction.<br />
Programming Diagram<br />
DCSRT<br />
HoldToRunKeySwitch<br />
Input Type<br />
Output 1<br />
Discrepancy Time Test Command<br />
Enable<br />
Channel A<br />
Channel B<br />
Input Status<br />
Reset<br />
Fault Present<br />
Manual<br />
TBD ms<br />
TBD ms<br />
TBD ms<br />
TBD ms<br />
TBD ms<br />
TBD ms<br />
See Note 1<br />
See Note 2<br />
FSBM<br />
FourSensorBiDirectionalMutingFunction<br />
Restart Type<br />
S1-S2 Time<br />
S2-LC Time<br />
LC-S3 Time<br />
S3-S4 Time<br />
Output 1<br />
Muting Lamp<br />
Clear Area<br />
See Note 3<br />
Module1:O.Test03Data<br />
Module1:O.Test02Data<br />
Maximum Mute Time<br />
Maximum Override Time<br />
Direction<br />
Light Curtain<br />
Sensor 1<br />
Sensor 2<br />
Sensor 3<br />
Sensor 4<br />
Enable Mute<br />
Override<br />
Input Status<br />
Muting Lamp Status<br />
Reset Fault Present<br />
Note 1:This is an internal Boolean tag representing the direction of travel. Its value is determined by other parts of the user application not shown in this example. If the<br />
direction is Forward (0) the sensors sequence will be S1, S2, LC, S3, S4. If the direction is Reverse (1), the sensor sequence will be S4, S3, LC, S2, S1.<br />
Note 2:This is an internal Boolean tag representing the non-hazardous portion of the machine cycle. Its value is determined by other parts of the user application not shown<br />
in this example. When the protected hazard is present, this tag value should be False (0). When the protected hazard is NOT present, this tag value should be True (1).<br />
When the value of this tag is True (1), the muting instruction allows the light curtain to become muted only if the proper input sequence is detected. When the value<br />
of this tag is False (0), the muting instruction does not allow the light curtain to become muted, even if the proper input sequence is detected.<br />
Note 3: This is an internal Boolean tag used by other parts of the user application not shown in this example.<br />
Key: Color code represents data or value typically used.<br />
Tag-mapped Variable<br />
Standard Output<br />
<strong>Safety</strong> Input <strong>Safety</strong> Output<br />
Configuration Constant/Value<br />
Internal <strong>Safety</strong> Variable<br />
198 Publication <strong>1756</strong>-<strong>RM095C</strong>-<strong>EN</strong>-P - July 2008
Note 1:This is an internal Boolean tag representing the<br />
direction of travel. Its value is determined by other<br />
parts of the user application not shown in this<br />
example. If the direction is Forward (0) the sensors<br />
sequence will be S1, S2, LC, S3, S4. If the direction<br />
is Reverse (1), the sensor sequence will be S4, S3,<br />
LC, S2, S1.<br />
Note 2:This is an internal Boolean tag representing the<br />
non-hazardous portion of the machine cycle. Its<br />
value is determined by other parts of the user<br />
application not shown in this example. When the<br />
protected hazard is present, this tag value should<br />
be False (0). When the protected hazard is NOT<br />
present, this tag value should be True (1). When<br />
the value of this tag is True (1), the muting<br />
instruction allows the light curtain to become<br />
muted only if the proper input sequence is<br />
detected. When the value of this tag is False (0),<br />
the muting instruction does not allow the light<br />
curtain to become muted, even if the proper input<br />
sequence is detected.<br />
Ladder Logic<br />
General <strong>Safety</strong> <strong>Application</strong> <strong>Instruction</strong>s Chapter 1<br />
DCS<br />
Dual Channel Input Stop<br />
DCS LightCurtain1<br />
<strong>Safety</strong> Function LIGHT CURTAIN<br />
Input Type EQUIVAL<strong>EN</strong>T - ACTIVE HIGH<br />
Discrepancy Time (Msec) 500<br />
Restart Type AUTOMATIC<br />
Cold Start Type AUTOMATIC<br />
Channel A Module1:I.Pt00Data<br />
1<br />
Channel B Module1:I.Pt01Data<br />
1<br />
Input Status Module1:I.CombinedStatus<br />
1<br />
Reset Module1:I.Pt11Data<br />
0<br />
DCSRT<br />
Dual Channel Input Start<br />
DCSRT HoldToRunKeySwitch<br />
<strong>Safety</strong> Function USER DEFINED<br />
Input Type EQUIVAL<strong>EN</strong>T - ACTIVE HIGH<br />
Discrepancy Time (Msec) 500<br />
Enable ALWAYS_<strong>EN</strong>ABLED<br />
1<br />
Channel A Module1:I.Pt06Data<br />
0<br />
Channel B Module1:I.Pt07Data<br />
1<br />
Input Status Module1:I.CombinedStatus<br />
1<br />
Reset Module1:I.Pt11Data<br />
0<br />
FSBM<br />
Four Sensor Bi-Directional Muting<br />
FSBM FourSensorBiDirectionalMutingFunction<br />
Restart Type MANUAL<br />
S1-S2 Time (Msec) 3000<br />
S2-LC Time (Msec) 3000<br />
LC-S3 Time (Msec) 3000<br />
S3-S4 Time (Msec) 3000<br />
Maximum Mute Time (Sec) 20<br />
Maximum Override Time (Sec) 5<br />
Direction SeeNote1<br />
0<br />
Light Curtain LightCurtain1.O1<br />
0<br />
Sensor 1 Module1:I.Pt02Data<br />
0<br />
Sensor 2 Module1:I.Pt03Data<br />
1<br />
Sensor 3 Module1:I.CombinedStatus<br />
1<br />
Sensor 4 Module1:I.MutingStatus<br />
1<br />
Enable Mute SeeNote2<br />
0<br />
Override HoldToRunKeySwitch.O1<br />
0<br />
Input Status Module1:I.CombinedStatus<br />
1<br />
Muting Lamp Status Module1:I.MutingStatus<br />
1<br />
Reset Module1:I.Pt11Data<br />
0<br />
FourSensorBiDirectionalMutingFunction.ML Module1:O.Test03Data<br />
FourSensorBiDirectionalMutingFunction.CA Module1:O.Test02Data<br />
Publication <strong>1756</strong>-<strong>RM095C</strong>-<strong>EN</strong>-P - July 2008 199<br />
O1<br />
FP<br />
O1<br />
FP<br />
O1<br />
ML<br />
CA<br />
FP
Chapter 1 General <strong>Safety</strong> <strong>Application</strong> <strong>Instruction</strong>s<br />
RSLogix 5000 software is used to configure the input and output<br />
parameters of the Guard I/O module, as illustrated.<br />
When defining the module, setting the Input Status to Combined<br />
Status-Muting provides the smallest input packet possible and lets the<br />
muting lamp status be monitored. Choosing Test for Output Data lets<br />
safety logic control Test Output 3 to drive the Muting Lamp and Test<br />
Output 2 to drive the Clear Area Lamp.<br />
Module Definition<br />
Rockwell Automation suggests using Exact Match, as shown.<br />
However, setting Electronic Keying to Compatible Match is allowed.<br />
The safety inputs that interface with the Light Curtain (Points 1 and 2)<br />
are not pulse-tested because the Light Curtain pulse-tests its own<br />
signals.<br />
Module Input Configuration<br />
200 Publication <strong>1756</strong>-<strong>RM095C</strong>-<strong>EN</strong>-P - July 2008
General <strong>Safety</strong> <strong>Application</strong> <strong>Instruction</strong>s Chapter 1<br />
Configuring Test Output 3 for Muting Lamp causes the I/O module to<br />
monitor the lamp connected to this output.<br />
Module Test Output Configuration<br />
Publication <strong>1756</strong>-<strong>RM095C</strong>-<strong>EN</strong>-P - July 2008 201
Chapter 1 General <strong>Safety</strong> <strong>Application</strong> <strong>Instruction</strong>s<br />
202 Publication <strong>1756</strong>-<strong>RM095C</strong>-<strong>EN</strong>-P - July 2008
Introduction<br />
Metal Form <strong>Instruction</strong>s<br />
Topic Page<br />
Clutch Brake Inch Mode (CBIM) 204<br />
Clutch Brake Single Stroke Mode (CBSSM) 214<br />
Clutch Brake Continuous Mode (CBCM) 225<br />
Crankshaft Position Monitor (CPM) 241<br />
Camshaft Monitor (CSM) 252<br />
Clutch Brake Wiring and Programming Example 265<br />
Eight-position Mode Selector (EPMS) 273<br />
Auxiliary Valve Control (AVC) 283<br />
Main Valve Control (MVC) 296<br />
Maintenance Manual Valve Control (MMVC) 307<br />
Chapter 2<br />
203Publication <strong>1756</strong>-<strong>RM095C</strong>-<strong>EN</strong>-P - July 2008 203
Chapter 2 Metal Form <strong>Instruction</strong>s<br />
Clutch Brake Inch Mode<br />
(CBIM)<br />
• BG-certified<br />
•<br />
The Clutch Brake Inch Mode instruction is used in press applications<br />
where minor slide adjustments are required, for example, during press<br />
set up. During inch-mode operation, the flywheel is driven at a very<br />
low speed by either the main motor or another drive mechanism.<br />
ATT<strong>EN</strong>TION<br />
Per Section 5.4.1.3 of <strong>EN</strong>692-2005: “In the event of an<br />
intervention of a safety system (interlocking guard, ESPE using<br />
the AOPD), separate manual reset functions are required to<br />
restore the normal intended operation. Reset controls shall be<br />
within viewing distance of the danger zone, but out of reach<br />
from the danger zone. The reset functions shall fulfill at least a<br />
single system with monitoring (S & M).”<br />
Do not use automatic acknowledgement when access within<br />
the danger zone can go undetected. This instruction, configured<br />
for automatic acknowledgment, must be used in combination<br />
with other instructions, at least one of which must fulfill the<br />
manual reset requirement.<br />
204 Publication <strong>1756</strong>-<strong>RM095C</strong>-<strong>EN</strong>-P - July 2008
ATT<strong>EN</strong>TION<br />
(1) where x = 1…8<br />
ATT<strong>EN</strong>TION<br />
Metal Form <strong>Instruction</strong>s Chapter 2<br />
This instruction is specified with the intent that the Slide Zone<br />
input is sourced only by the Slide Zone output of the Crankshaft<br />
Position Monitor (CPM) instruction or application logic that<br />
satisfies the Slide Zone requirements listed in the Clutch Brake<br />
Inch Mode <strong>Instruction</strong>: Inputs table on page 206.<br />
This instruction is specified with the intent that the Enable input<br />
is sourced only by an Ox output (1) of the Eight Position Mode<br />
Selector (EPMS) instruction that is not already sourcing the<br />
Enable input of another Clutch Brake Inch Mode (CBIM), Clutch<br />
Brake Single Stroke Mode (CBSSM), or Clutch Brake Continuous<br />
Mode (CBCM) instruction.<br />
Per Section 5.5.2 of <strong>EN</strong>692-2005; facilities shall be provided to<br />
allow the movement of the slide during tool-setting,<br />
maintenance and lubrication to be carried out with guards and<br />
protective devices in position and operational (see 5.3.2).<br />
Where this is not practicable, at least one of the following<br />
facilities shall be provided:<br />
a. rotation of the crankshaft by hand, with power isolated.<br />
b. slow speed (equal or less than 10 mm/s) and hold-to-run<br />
control device.<br />
c. two-hand control device in accordance with 5.5.9 and<br />
arranged so that it cannot be used for production, for<br />
example, when the cycle stops at least three times during<br />
one revolution of the crankshaft.<br />
d. using the inching device.<br />
The Inch Time parameter can be configured to fulfill the requirements<br />
of stopping 3 times during a press cycle as specified in 5.5.2 c of<br />
<strong>EN</strong>692-2005.<br />
Publication <strong>1756</strong>-<strong>RM095C</strong>-<strong>EN</strong>-P - July 2008 205
Chapter 2 Metal Form <strong>Instruction</strong>s<br />
CBIM – <strong>Instruction</strong> Parameters<br />
IMPORTANT<br />
Clutch Brake Inch Mode <strong>Instruction</strong>: Configuration Parameters<br />
Do not use the same tag name for more than one instruction in<br />
the same program. Do not write to any instruction output tag<br />
under any circumstances.<br />
The following table provides the parameters used to configure the<br />
instruction. These parameters cannot be changed at runtime.<br />
Parameter Data Type Description<br />
Ack Type List This parameter specifies how to acknowledge a <strong>Safety</strong> Enable OFF (0) to ON (1) transition. This<br />
acknowledgment must be made before Output 1 can be energized.<br />
Automatic The acknowledgement is made automatically when the <strong>Safety</strong> Enable input transitions<br />
from OFF (0) to ON (1).<br />
Manual The acknowledgment is made when <strong>Safety</strong> Enable Ack transitions from OFF (0) to ON (1)<br />
after the <strong>Safety</strong> Enable input transitions from OFF (0) to ON (1).<br />
Inch Time Integer This parameter selects the amount of time Output 1 is allowed to remain energized while the Start input is<br />
ON (1). Output 1 is de-energized when the Start input transitions from ON (1) to OFF (0) while the timer is<br />
timing. The valid range is 0…5000 ms. A value of 0 disables the timer.<br />
The following table explains the instruction inputs.<br />
Clutch Brake Inch Mode <strong>Instruction</strong>: Inputs<br />
Parameter Data Type Description<br />
Enable Boolean This input is the signal to activate this instruction; for example, by an Eight Position Mode Selector (EPMS) Ox<br />
output, where x = 1…8.<br />
ON (1): The instruction is selected and operational.<br />
OFF (0): The instruction is not operating. All instruction outputs are de-energized.<br />
<strong>Safety</strong><br />
Enable<br />
Boolean This input represents the status of safety-related permissive devices such as E-stops, light curtains, or safety<br />
gates.<br />
ON (1): Permissive devices are actively guarding the danger zone. Permits the energizing of Output 1.<br />
OFF (0): Permissive devices are in a state that doesn’t allow Output 1 to be energized.<br />
Standard Boolean Indicates the state of non safety-related permissive devices.<br />
Enable<br />
ON (1): Permits the energizing of Output 1.<br />
OFF (0): Prevents the energizing of Output 1.<br />
This parameter is not safety-related.<br />
Start Boolean Input to start press movement.<br />
ON (1): Energize Output 1 if all input conditions have been met.<br />
OFF (0): Output 1 is de-energized.<br />
Press In Boolean This input is typically sourced by Output 1 of the Camshaft Monitor (CSM) instruction or by user application<br />
Motion<br />
logic. Feedback from the press safety valve needs to be included in the building of this signal.<br />
ON (1): Indicates that the press is moving.<br />
OFF (0): Indicates that the press is stopped.<br />
206 Publication <strong>1756</strong>-<strong>RM095C</strong>-<strong>EN</strong>-P - July 2008
Clutch Brake Inch Mode <strong>Instruction</strong>: Inputs<br />
Parameter Data Type Description<br />
The following table explains the instruction outputs.<br />
Metal Form <strong>Instruction</strong>s Chapter 2<br />
Slide Zone Integer This input represents the position of the slide and the position information status. It is sourced by the<br />
Crankshaft Position Monitor (CPM) instruction's Slide Zone output or user application logic that provides the<br />
following bit-mapped information.<br />
Bit 0: Status<br />
OFF (0) - The Slide Zone information is invalid. Prevents the energizing of Output 1 on an initial start or<br />
immediately stops the press.<br />
ON (1) - Slide Zone information is valid.<br />
Bits 1 and 2: Slide Zone<br />
The following table lists how Bits 0…2 are used to represent the valid slide zones.<br />
Bit 2 Bit 1 Bit 0 Slide Zone Decimal Value<br />
0 0 1 Down 1<br />
0 1 1 Up 3<br />
1 0 1 Top 5<br />
Motion<br />
Monitor<br />
Fault<br />
<strong>Safety</strong><br />
Enable Ack<br />
Bits 3…31: Unused; <strong>Set</strong> to 0.<br />
Boolean Stops the press immediately when a press motion problem has been detected. This input is sourced by the<br />
Fault Present output of the Camshaft Monitor (CSM) instruction or application logic that performs motion<br />
diagnostics.<br />
ON (1): Indicates that press motion is valid. Permits Output 1 to be energized.<br />
OFF (0): Indicates that a press motion problem exists. Prevents Output 1 from being energized or immediately<br />
de-energizes Output 1.<br />
Boolean This input is required when the configured Ack Type is Manual.<br />
OFF (0)->ON (1): Acknowledges that the <strong>Safety</strong> Enable input has transitioned from OFF (0) to ON (1).<br />
Clutch Brake Inch Mode <strong>Instruction</strong>: Outputs<br />
Parameter Data Type Description<br />
Output 1<br />
(O1)<br />
Diagnostic<br />
Code<br />
Boolean Output used to source the Actuate input of the Main Valve Control instruction.<br />
ON (1): The output is energized.<br />
OFF (0): The output is de-energized.<br />
See CBIM – Energizing Output 1 on page 208 and CBIM – De-energizing Output 1 on page 210 for details.<br />
Integer This output indicates the diagnostic status of the instruction. See the CBIM – Diagnostic Codes on page 212<br />
for a list of diagnostic codes.<br />
This parameter is not safety-related.<br />
IMPORTANT<br />
Do not write to any instruction output tag under any<br />
circumstances.<br />
Publication <strong>1756</strong>-<strong>RM095C</strong>-<strong>EN</strong>-P - July 2008 207
Chapter 2 Metal Form <strong>Instruction</strong>s<br />
CBIM – Energizing Output 1<br />
Output 1 is energized only when the Start input transitions from<br />
OFF (0) to ON (1) and all of these conditions are met:<br />
• The Enable input is ON (1).<br />
• The <strong>Safety</strong> Enable input has been acknowledged.<br />
• The Standard Enable input is ON (1).<br />
• The Motion Monitor Fault input is ON (1).<br />
• The Press In Motion input is OFF (0).<br />
• The <strong>Safety</strong> Enable Ack input is OFF (0).<br />
IMPORTANT<br />
ATT<strong>EN</strong>TION<br />
ATT<strong>EN</strong>TION<br />
If the Ack Type is Manual, an acknowledgement of the <strong>Safety</strong><br />
Enable input is required when the Enable input transitions from<br />
OFF (0) to ON (1) and before the Start input turns ON (0).<br />
When the configured Ack Type is Automatic, Output 1 is<br />
energized when the <strong>Safety</strong> Enable, Standard Enable, Press In<br />
Motion, and Motion Monitor Fault inputs return to the active or<br />
valid state at the same time the Start input transitions from<br />
OFF (0) to ON (1).<br />
The cam switches that determine slide position are monitored<br />
by the CPM instruction. This instruction uses the Slide Zone<br />
output of the CPM instruction as a representation of the cam<br />
switches that determine slide position.<br />
208 Publication <strong>1756</strong>-<strong>RM095C</strong>-<strong>EN</strong>-P - July 2008
Metal Form <strong>Instruction</strong>s Chapter 2<br />
This diagram demonstrates the acknowledgement of the <strong>Safety</strong> Enable<br />
input, at (A). Output 1 is energized when the Start input transitions<br />
from OFF (0) to ON (1) at (B) and all input conditions have been met.<br />
The safety enable acknowledgment only needs to be made once<br />
while the <strong>Safety</strong> Enable input is ON (1) when the configured Ack<br />
Type is Manual.<br />
Energizing Output 1<br />
1<br />
Enable<br />
0<br />
1<br />
<strong>Safety</strong> Enable<br />
0<br />
1<br />
Standard Enable<br />
0<br />
Publication <strong>1756</strong>-<strong>RM095C</strong>-<strong>EN</strong>-P - July 2008 209<br />
1<br />
Start<br />
0<br />
1<br />
Press In Motion<br />
0<br />
1<br />
Motion Monitor Fault<br />
0<br />
Slide Zone<br />
1<br />
<strong>Safety</strong> Enable Ack<br />
0<br />
1<br />
Output 1<br />
0<br />
A<br />
Any Zone<br />
B
Chapter 2 Metal Form <strong>Instruction</strong>s<br />
CBIM – De-energizing Output 1<br />
Once energized, Output 1 is de-energized when one or more of the<br />
following occurs:<br />
• The Enable input transitions from ON (1) to OFF (0).<br />
• The Start input transitions from ON (1) to OFF (0).<br />
• The <strong>Safety</strong> Enable input transitions from ON (1) to OFF (0).<br />
• The Standard Enable input transitions from ON (1) to OFF (0).<br />
• The slide moves to the Top zone.<br />
• The Inch timer expires.<br />
• The Monitor Motion Fault input transitions from ON (1) to<br />
OFF (0).<br />
The Press In Motion input is not checked to de-energize Output 1. It is<br />
only checked to energize Output 1.<br />
210 Publication <strong>1756</strong>-<strong>RM095C</strong>-<strong>EN</strong>-P - July 2008
Metal Form <strong>Instruction</strong>s Chapter 2<br />
This diagram demonstrates the de-energizing of Output 1 when the<br />
<strong>Safety</strong> Enable input transitions from ON (1) to OFF (0) at (A). An<br />
acknowledgement of the <strong>Safety</strong> Enable input is required when the<br />
<strong>Safety</strong> Enable input transitions from OFF (0) to ON (1) at (B) before<br />
Output 1 can be re-energized.<br />
De-energizing Output 1<br />
1<br />
Enable<br />
0<br />
1<br />
<strong>Safety</strong> Enable<br />
0<br />
1<br />
Standard Enable<br />
0<br />
CBIM – False Rung State Behavior<br />
When the instruction is executed on a false rung, all instruction<br />
outputs are de-energized.<br />
Publication <strong>1756</strong>-<strong>RM095C</strong>-<strong>EN</strong>-P - July 2008 211<br />
1<br />
Start<br />
0<br />
1<br />
Press In Motion<br />
0<br />
1<br />
Motion Monitor Fault<br />
0<br />
Slide Zone<br />
1<br />
<strong>Safety</strong> Enable Ack<br />
0<br />
1<br />
Output 1<br />
0<br />
Any Zone<br />
A<br />
B
Chapter 2 Metal Form <strong>Instruction</strong>s<br />
Clutch Brake Inch Mode Diagnostic Codes<br />
CBIM – Diagnostic Codes<br />
Diagnostics 2001H…2009H are detected when attempting to start<br />
press movement by energizing Output 1. Diagnostics 2021H…202AH<br />
are used to diagnose the reason for stopping press movement by<br />
de-energizing Output 1.<br />
Diagnostic<br />
Code<br />
Description Corrective Action<br />
0000H No fault. None.<br />
2000H Not used by this instruction.<br />
2001H Output 1 failed to energize when the Start input turned ON (1) due to the<br />
Press In Motion input being ON (1).<br />
2002H Output 1 failed to energize when the Start input turned ON (1) prior to the<br />
acknowledgement of the <strong>Safety</strong> Enable input.<br />
2003H Output 1 failed to energize when the Start input turned ON (1) due to the<br />
Standard Enable input being OFF (0).<br />
2008H Output 1 failed to energize when the Start input turned ON (1) due to the<br />
Motion Monitor Fault input being OFF (0).<br />
2009H Manual Ack<br />
Type<br />
Automatic<br />
Ack Type<br />
Output 1 failed to energize when the Start input turned<br />
ON (1) due to the <strong>Safety</strong> Enable Ack input being ON (1).<br />
N/A<br />
• Wait for the press to come to a complete<br />
stop before initiating press movement.<br />
• Verify that the device monitoring press<br />
movement is working correctly.<br />
• Verify that only one mode of operation is<br />
selected.<br />
This diagnostic is cleared when the Press In<br />
Motion input turns OFF (0).<br />
• Verify that the active opto-electronic<br />
protective devices (AOPDs) and<br />
electro-sensitive protective equipment<br />
(ESPEs) used to source the <strong>Safety</strong> Enable<br />
input are protecting their respective<br />
areas.<br />
• Then, to clear the diagnostic for manual<br />
Ack Types, acknowledge the <strong>Safety</strong><br />
Enable input by turning the <strong>Safety</strong><br />
Enable Ack input ON (1).<br />
• For automatic Ack Types, this diagnostic<br />
is cleared when the <strong>Safety</strong> Enable input<br />
turns ON (1).<br />
Verify that the devices used to source the<br />
Standard Enable input are functioning<br />
properly. This diagnostic is cleared when the<br />
Standard Enable input is ON (1).<br />
Check the Camshaft Monitor (CSM)<br />
instruction or the application logic used to<br />
monitor press movement.<br />
This diagnostic is cleared when the motion<br />
monitor functions are properly monitoring<br />
motion and the Motion Monitor Fault input<br />
is ON (1).<br />
Turn the <strong>Safety</strong> Enable Ack input OFF (0).<br />
This diagnostic is cleared when the <strong>Safety</strong><br />
Enable Ack input turns OFF (0).<br />
212 Publication <strong>1756</strong>-<strong>RM095C</strong>-<strong>EN</strong>-P - July 2008
Clutch Brake Inch Mode Diagnostic Codes<br />
Diagnostic<br />
Code<br />
2021H Output 1 is de-energized due to the Motion Monitor Fault input turning<br />
OFF (0).<br />
Metal Form <strong>Instruction</strong>s Chapter 2<br />
Check the Camshaft Monitor (CSM)<br />
instruction or the application logic used to<br />
monitor press movement.<br />
This diagnostic is cleared at the next<br />
attempt to begin press movement.<br />
2022H Not used by this instruction.<br />
2023H Output 1 is de-energized due to the <strong>Safety</strong> Enable input turning OFF (0). Verify that the AOPDs and ESPEs used to<br />
source the <strong>Safety</strong> Enable input are<br />
protecting their respective areas.<br />
2024H Output 1 is de-energized due to the Standard Enable input turning OFF (0).<br />
This diagnostic is cleared at the next<br />
attempt to begin press movement.<br />
Verify that the devices and application logic<br />
used to source the Standard Enable input<br />
are functioning properly.<br />
2025H Output 1 is de-energized due to the Start input turning OFF (0).<br />
This diagnostic is cleared at the next<br />
attempt to begin press movement.<br />
Output 1 is de-energized when the Start<br />
input turns OFF (0) regardless of slide zone.<br />
2026H Output 1 is de-energized because the Inch Mode timer timed out.<br />
This diagnostic is cleared at the next<br />
attempt to begin press movement.<br />
Output 1 is always de-energized when Inch<br />
Mode timer times out. Verify that the Inch<br />
Time parameter value is correct for your<br />
application.<br />
2027H<br />
Description Corrective Action<br />
This diagnostic is cleared at the next<br />
attempt to begin press movement.<br />
2028H<br />
2029H<br />
Not used by this instruction.<br />
202AH Output 1 is de-energized due to the slide entering the Top zone. Output 1 is always de-energized when the<br />
slide enters the Top zone.<br />
This diagnostic is cleared at the next<br />
attempt to begin press movement.<br />
Publication <strong>1756</strong>-<strong>RM095C</strong>-<strong>EN</strong>-P - July 2008 213
Chapter 2 Metal Form <strong>Instruction</strong>s<br />
Clutch Brake Single Stroke<br />
Mode (CBSSM)<br />
• BG-certified<br />
•<br />
The Clutch Brake Single Stroke Mode instruction is used in<br />
single-cycle press applications.<br />
ATT<strong>EN</strong>TION<br />
Per Section 5.4.1.3 of <strong>EN</strong>692-2005: “In the event of an<br />
intervention of a safety system (interlocking guard, ESPE using<br />
the AOPD), separate manual reset functions are required to<br />
restore the normal intended operation. Reset controls shall be<br />
within viewing distance of the danger zone, but out of reach<br />
from the danger zone. The reset functions shall fulfill at least a<br />
single system with monitoring (S & M).”<br />
Do not use automatic acknowledgement when access within<br />
the danger zone can go undetected. This instruction, configured<br />
for automatic acknowledgment, must be used in combination<br />
with other instructions, at least one of which must fulfill the<br />
manual reset requirement.<br />
214 Publication <strong>1756</strong>-<strong>RM095C</strong>-<strong>EN</strong>-P - July 2008
ATT<strong>EN</strong>TION<br />
(1) where x = 1…8<br />
CBSSM – <strong>Instruction</strong> Parameters<br />
IMPORTANT<br />
Clutch Brake Single Stroke Mode <strong>Instruction</strong>: Configuration Parameters<br />
Metal Form <strong>Instruction</strong>s Chapter 2<br />
This instruction is specified with the intent that the Slide Zone<br />
input is sourced only by the Slide Zone output of the Crankshaft<br />
Position Monitor (CPM) instruction or application logic that<br />
satisfies the Slide Zone requirements listed in the Clutch Brake<br />
Single Stroke Mode <strong>Instruction</strong>: Inputs table on page 216.<br />
This instruction is specified with the intent that the Enable<br />
input is sourced only by an Ox output (1) of the Eight Position<br />
Mode Selector (EPMS) instruction that is not already sourcing<br />
the Enable input of another Clutch Brake Inch Mode (CBIM),<br />
Clutch Brake Single Stroke Mode (CBSSM), or Clutch Brake<br />
Continuous Mode (CBCM) instruction.<br />
Do not use the same tag name for more than one instruction in<br />
the same program. Do not write to any instruction output tag<br />
under any circumstances.<br />
The following table provides the parameters used to configure the<br />
instruction. These parameters cannot be changed at runtime.<br />
Parameter Data Type Description<br />
Ack Type List This parameter specifies how to acknowledge a <strong>Safety</strong> Enable OFF (0) to ON (1) transition. This<br />
acknowledgment must be made before Output 1 can be energized.<br />
Automatic The acknowledgement is made automatically when the <strong>Safety</strong> Enable input transitions<br />
from OFF (0) to ON (1).<br />
Manual The acknowledgment is made when <strong>Safety</strong> Enable Ack transitions from OFF (0) to ON (1)<br />
after the <strong>Safety</strong> Enable input transitions from OFF (0) to ON (1).<br />
Takeover<br />
Mode<br />
List This parameter determines where the press is stopped when the <strong>Safety</strong> Enable and/or Start input<br />
transitions from ON (1)to OFF (0) while the slide is in the Up zone.<br />
IMPORTANT: When using this instruction with Takeover Mode Enabled, safety devices that are<br />
continuously active, such as E-stops, must directly drive the Enable parameter of the CBSSM instruction.<br />
The application developer is responsible for determining the safety devices that are not continously active,<br />
such as certain light curtains, two-hand run stations, and others, which may be used to drive the <strong>Safety</strong><br />
Enable parameter and can be muted during press upstoke.<br />
Enabled The press is stopped when the slide enters the Top zone.<br />
Disable The press is stopped immediately.<br />
Publication <strong>1756</strong>-<strong>RM095C</strong>-<strong>EN</strong>-P - July 2008 215
Chapter 2 Metal Form <strong>Instruction</strong>s<br />
Clutch Brake Single Stroke Mode <strong>Instruction</strong>: Inputs<br />
The following table explains the instruction inputs.<br />
Parameter Data Type Description<br />
Enable Boolean This input is the signal to activate this instruction; for example, by an Eight Position Mode Selector (EPMS) Ox<br />
output, where x = 1…8.<br />
ON (1): The instruction is selected and operational.<br />
OFF (0): The instruction is not operating. All instruction outputs are de-energized.<br />
<strong>Safety</strong><br />
Enable<br />
Boolean This input represents the status of safety-related permissive devices such as E-stops, light curtains or safety<br />
gates.<br />
ON (1): Permissive devices are actively guarding the danger zone. Permits the energizing of Output 1.<br />
OFF (0): Permissive devices are in a state that doesn’t allow Output 1 to be energized.<br />
Standard Boolean Indicates the state of non safety-related permissive devices.<br />
Enable<br />
ON (1): Permits the energizing of Output 1.<br />
OFF (0): Prevents the energizing of Output 1.<br />
This parameter is not safety-related.<br />
Start Boolean Input to start press movement.<br />
ON (1): Energize Output 1 if all input conditions have been met.<br />
OFF (0): Output 1 is de-energized.<br />
Press In Boolean This input is typically sourced by Output 1 of the Camshaft Monitor (CSM) instruction or by user application<br />
Motion<br />
logic. Feedback from the press safety valve needs to be included in the building of this signal.<br />
ON (1): Indicates that the press is moving.<br />
OFF (0): Indicates that the press is stopped.<br />
Slide Zone Integer This input represents the position of the slide and the position information status. It is sourced by the<br />
Crankshaft Position Monitor (CPM) instruction's Slide Zone output or user application logic that provides the<br />
following bit-mapped information.<br />
Bit 0: Status<br />
OFF (0) - The Slide Zone information is invalid. Prevents the energizing of Output 1 on an initial start or<br />
immediately stops the press.<br />
ON (1) - Slide Zone information is valid.<br />
Bits 1 and 2: Slide Zone<br />
The following table lists how Bits 0…2 are used to represent the valid slide zones.<br />
Bit 2 Bit 1 Bit 0 Slide Zone Decimal Value<br />
0 0 1 Down 1<br />
0 1 1 Up 3<br />
1 0 1 Top 5<br />
Bits 3…31: Unused; <strong>Set</strong> to 0.<br />
216 Publication <strong>1756</strong>-<strong>RM095C</strong>-<strong>EN</strong>-P - July 2008
Clutch Brake Single Stroke Mode <strong>Instruction</strong>: Inputs<br />
Parameter Data Type Description<br />
Motion<br />
Monitor<br />
Fault<br />
<strong>Safety</strong><br />
Enable Ack<br />
The following table explains the instruction outputs.<br />
Clutch Brake Single Stroke Mode <strong>Instruction</strong>: Outputs<br />
Metal Form <strong>Instruction</strong>s Chapter 2<br />
Boolean Stops the press immediately when a press motion problem has been detected. This input is sourced by the<br />
Fault Present output of the Camshaft Monitor (CSM) instruction or application logic that performs motion<br />
diagnostics.<br />
ON (1): Indicates that press motion is valid. Permits Output 1 to be energized.<br />
OFF (0): Indicates that a press motion problem exists. Prevents Output 1 from being energized or immediately<br />
de-energizes Output 1.<br />
Boolean This input is required when the configured Ack Type is Manual.<br />
OFF (0)->ON (1): Acknowledges that the <strong>Safety</strong> Enable input has transitioned from OFF (0) to ON (1).<br />
Parameter Data Type Description<br />
Output 1<br />
(O1)<br />
Diagnostic<br />
Code<br />
Boolean Output used to source the Actuate input of the Main Valve Control (MVC) instruction.<br />
ON (1): The output is energized.<br />
OFF (0): The output is de-energized.<br />
See CBSSM – Energizing Output 1 and CBSSM – De-energizing Output 1 on page 220 for details.<br />
Integer See the CBSSM – Diagnostic Codes on page 222.<br />
This parameter is not safety-related.<br />
IMPORTANT<br />
Do not write to any instruction output tag under any<br />
circumstances.<br />
Publication <strong>1756</strong>-<strong>RM095C</strong>-<strong>EN</strong>-P - July 2008 217
Chapter 2 Metal Form <strong>Instruction</strong>s<br />
CBSSM – Energizing Output 1<br />
Output 1 is energized only when the Start input transitions from<br />
OFF (0) to ON (1) and all of these conditions are met:<br />
• The Enable input is ON (1).<br />
• The <strong>Safety</strong> Enable input has been acknowledged.<br />
• The Standard Enable input is ON (1).<br />
• The Slide Zone input represents the Top zone.<br />
• The Motion Monitor Fault input is ON (1).<br />
• The Press In Motion input is OFF (0).<br />
• The <strong>Safety</strong> Enable Ack input is OFF (0).<br />
IMPORTANT<br />
ATT<strong>EN</strong>TION<br />
ATT<strong>EN</strong>TION<br />
ATT<strong>EN</strong>TION<br />
If the Ack Type is Manual, an acknowledgement of the <strong>Safety</strong><br />
Enable input is required when the Enable input transitions from<br />
OFF (0) to ON (1) and before the Start input turns ON (0).<br />
When the configured Ack Type is Automatic, Output 1 is<br />
energized when the <strong>Safety</strong> Enable, Standard Enable, Press In<br />
Motion, and Motion Monitor Fault inputs return to the active or<br />
valid state at the same time the Start input transitions from<br />
OFF (0) to ON (1).<br />
Output 1 can be re-energized when the Slide Zone input is Down,<br />
providing that:<br />
• Output 1 had been initially energized when the Slide Zone<br />
input was Top, and<br />
• Output 1 was de-energized because the Start input turned<br />
OFF (0).<br />
Any other reason for Output 1 being de-energized requires that<br />
the slide be inched back to the Top position.<br />
The cam switches that determine slide position are monitored<br />
by the CPM instruction. This instruction uses the Slide Zone<br />
output of the CPM instruction as a representation of the cam<br />
switches that determine slide position.<br />
218 Publication <strong>1756</strong>-<strong>RM095C</strong>-<strong>EN</strong>-P - July 2008
Metal Form <strong>Instruction</strong>s Chapter 2<br />
This diagram illustrates the acknowledgement of the <strong>Safety</strong> Enable<br />
input (A) and the energizing of Output 1 when the Start input<br />
transitions from OFF (0) to ON (1) at (B) and all input conditions are<br />
met. The <strong>Safety</strong> Enable acknowledgement needs to be made only<br />
once while the <strong>Safety</strong> Enable input is ON (1) and the configured Ack<br />
Type is Manual.<br />
Energizing Output 1<br />
Publication <strong>1756</strong>-<strong>RM095C</strong>-<strong>EN</strong>-P - July 2008 219<br />
Enable<br />
<strong>Safety</strong> Enable<br />
Standard Enable<br />
Start<br />
Press In Motion<br />
Motion Monitor Fault<br />
Slide Zone<br />
<strong>Safety</strong> Enable Ack<br />
Output 1<br />
Zone: T = Top D = Down U = Up<br />
1<br />
0<br />
1<br />
0<br />
1<br />
0<br />
1<br />
0<br />
1<br />
0<br />
1<br />
0<br />
1<br />
0<br />
1<br />
0<br />
A<br />
T D<br />
B
Chapter 2 Metal Form <strong>Instruction</strong>s<br />
CBSSM – De-energizing Output 1<br />
Once energized, Output 1 is de-energized when one or more of the<br />
following occurs:<br />
• The Enable input transitions from ON (1) to OFF (0).<br />
• The Start input transitions from ON (1) to OFF (0).<br />
When this transition occurs while the slide is in the Up zone and<br />
the Takeover Mode is Enabled, Output 1 is de-energized when<br />
the slide enters the Top zone. Otherwise, when the Takeover<br />
Mode is Disabled, Output 1 is de-energized immediately. Output<br />
1 is also de-energized immediately when this transition occurs<br />
while the slide is in the Top or Down zones.<br />
• The <strong>Safety</strong> Enable input transitions from ON (1) to OFF (0).<br />
When this transition occurs while the slide is in the Up zone and<br />
Takeover Mode is enabled, Output 1 is de-energized when the<br />
slide enters the Top zone. Otherwise, when the Takeover Mode<br />
is disabled, Output 1 is de-energized immediately. Output 1 is<br />
also de-energized immediately when this transition occurs while<br />
the slide is in the Top or Down zones.<br />
• The Standard Enable input transitions from ON (1) to OFF (0).<br />
When this transition occurs while the slide is in the Up zone,<br />
Output 1 is de-energized when the slide enters the Top zone.<br />
Otherwise, Output 1 is de-energized immediately.<br />
• The Slide Zone input value becomes invalid.<br />
• The slide transitions to the Top zone.<br />
• The Monitor Motion Fault input transitions from ON (1) to<br />
OFF (0).<br />
• The direction of the press appears to be running in reverse.<br />
• The Press In Motion input is OFF (0) when the slide transitions<br />
from Top to Down.<br />
• The Press in Motion input transitions from ON (1) to OFF (0).<br />
220 Publication <strong>1756</strong>-<strong>RM095C</strong>-<strong>EN</strong>-P - July 2008
Metal Form <strong>Instruction</strong>s Chapter 2<br />
This diagram shows the de-energizing of Output 1 when the <strong>Safety</strong><br />
Enable input transitions from ON (1) to OFF (0) at (A). An<br />
acknowledgement of the <strong>Safety</strong> Enable input is required when the<br />
<strong>Safety</strong> Enable input transitions from OFF (0) to ON (1) at (B) before<br />
Output 1 can be re-energized.<br />
De-energizing Output 1<br />
CBSSM – False Rung State Behavior<br />
When the instruction is executed on a false rung, all instruction<br />
outputs are de-energized.<br />
Publication <strong>1756</strong>-<strong>RM095C</strong>-<strong>EN</strong>-P - July 2008 221<br />
Enable<br />
<strong>Safety</strong> Enable<br />
Standard Enable<br />
Start<br />
Press In Motion<br />
Motion Monitor Fault<br />
Slide Zone<br />
<strong>Safety</strong> Enable Ack<br />
Output 1<br />
Zone: T = Top D = Down U = Up<br />
1<br />
0<br />
1<br />
0<br />
1<br />
0<br />
1<br />
0<br />
1<br />
0<br />
1<br />
0<br />
1<br />
0<br />
1<br />
0<br />
T<br />
A<br />
D<br />
B
Chapter 2 Metal Form <strong>Instruction</strong>s<br />
Clutch Brake Single Stroke Mode Diagnostic Codes<br />
CBSSM – Diagnostic Codes<br />
Diagnostics 2000H…200AH are detected when attempting to start<br />
press movement by energizing Output 1. Diagnostics 2020H…202D<br />
are used to diagnose the reason for stopping press movement by<br />
de-energizing Output 1.<br />
Diagnostic<br />
Code<br />
Description Corrective Action<br />
0000H No fault. None.<br />
2000H Output 1 failed to energized when the Start input turned ON (1), due to an<br />
invalid Slide Zone input value.<br />
2001H Output 1 failed to energize when the Start input turned ON (1) due to the<br />
Press In Motion input being ON (1).<br />
2002H Output 1 failed to energize when the Start input turned ON (1) prior to the<br />
acknowledgement of the <strong>Safety</strong> Enable input.<br />
2003H Output 1 failed to energize when the Start input turned ON (1) due to the<br />
Standard Enable input being OFF (0).<br />
2008H Output 1 failed to energize when the Start input turned ON (1) due to the<br />
Motion Monitor Fault input being OFF (0).<br />
Check the Crankshaft Position Monitor<br />
(CPM) instruction or the application logic<br />
used to source this input. This diagnostic is<br />
cleared when a valid Slide Zone is<br />
established.<br />
• Wait for the press to come to a complete<br />
stop before initiating press movement.<br />
• Verify that the device monitoring press<br />
movement is working correctly.<br />
• Verify that only one mode of operation is<br />
selected.<br />
This diagnostic is cleared when the Press In<br />
Motion input turns OFF (0).<br />
• Verify that the active opto-electronic<br />
protective devices (AOPDs) and<br />
electro-sensitive protective equipment<br />
(ESPEs) used to source the <strong>Safety</strong> Enable<br />
input are protecting their respective<br />
areas.<br />
• Then, to clear the diagnostic for manual<br />
Ack Types, acknowledge the <strong>Safety</strong><br />
Enable input by turning the <strong>Safety</strong><br />
Enable Ack input ON (1).<br />
• For automatic Ack Types, this diagnostic<br />
is cleared when the <strong>Safety</strong> Enable input<br />
turns ON (1).<br />
Verify that the devices used to source the<br />
Standard Enable input are functioning<br />
properly. This diagnostic is cleared when the<br />
Standard Enable input is ON (1).<br />
Check the Camshaft Monitor (CSM)<br />
instruction or the application logic used to<br />
monitor press movement.<br />
This diagnostic is cleared when the motion<br />
monitor functions are properly monitoring<br />
motion and the Motion Monitor Fault input<br />
is ON (1).<br />
222 Publication <strong>1756</strong>-<strong>RM095C</strong>-<strong>EN</strong>-P - July 2008
Clutch Brake Single Stroke Mode Diagnostic Codes<br />
Diagnostic<br />
Code<br />
2009H Manual Ack<br />
Type<br />
Description Corrective Action<br />
Output 1 failed to energize when the Start input turned<br />
ON (1) due to the <strong>Safety</strong> Enable Ack input being ON (1).<br />
Automatic N/A<br />
Ack Type<br />
200AH Output 1 failed to energize when the Start input turned ON (1) due to the<br />
slide being in the Up or Down zone.<br />
2020H Output 1 is de-energized due to the Slide Zone input value becoming<br />
invalid.<br />
2021H Output 1 is de-energized due to the Motion Monitor Fault input turning<br />
OFF (0).<br />
2022H Output 1 is de-energized due to the detection of press movement in the<br />
reverse direction.<br />
2023H Output 1 is de-energized due to the <strong>Safety</strong> Enable input turning OFF (0)<br />
while the slide was in the Top or Down zone.<br />
2024H Output 1 is de-energized due to the Standard Enable input turning OFF (0)<br />
while the slice was in the Top or Down zones.<br />
2025H Output 1 is de-energized due to the Start input turning OFF (0) while the<br />
slide was in the Top or Down zones.<br />
2026H Not used by this instruction.<br />
Metal Form <strong>Instruction</strong>s Chapter 2<br />
Turn the <strong>Safety</strong> Enable Ack input OFF (0).<br />
This diagnostic is cleared when the <strong>Safety</strong><br />
Enable Ack input turns OFF (0).<br />
The slide must be in the Top zone to initiate<br />
press movement.<br />
This diagnostic is cleared when the slide is<br />
inched back to the Top zone.<br />
Check the Crankshaft Position Monitor<br />
(CPM) instruction or the application logic<br />
used to source this input.<br />
This diagnostic is cleared at the next<br />
attempt to begin press movement.<br />
Check the Camshaft Monitor (CSM)<br />
instruction or the application logic used to<br />
monitor press movement.<br />
This diagnostic is cleared at the next<br />
attempt to begin press movement.<br />
Verify the direction of the press.<br />
This diagnostic is cleared at the next<br />
attempt to begin press movement.<br />
Verify that the AOPDs and ESPEs used to<br />
source the <strong>Safety</strong> Enable input are<br />
protecting their respective areas.<br />
This diagnostic is cleared at the next<br />
attempt to begin press movement.<br />
Verify that the devices and application logic<br />
used to source the Standard Enable input<br />
are functioning properly.<br />
This diagnostic is cleared at the next<br />
attempt to begin press movement.<br />
Output 1 is always de-energized when the<br />
Start input turns OFF (0) while the slide is in<br />
the Top or Down zones.<br />
This diagnostic is cleared at the next<br />
attempt to begin press movement.<br />
Publication <strong>1756</strong>-<strong>RM095C</strong>-<strong>EN</strong>-P - July 2008 223
Chapter 2 Metal Form <strong>Instruction</strong>s<br />
Clutch Brake Single Stroke Mode Diagnostic Codes<br />
Diagnostic<br />
Code<br />
Description Corrective Action<br />
2027H Output 1 is de-energized immediately when the <strong>Safety</strong> Enable input turned<br />
OFF (0) while the slide was in the Up zone and the Takeover Mode is<br />
Disabled.<br />
2028H Output 1 is de-energized when the slide entered the Top zone due to the<br />
Standard Enable input turning OFF (0) while the slide was in the Up zone.<br />
2029H Output 1 is de-energized immediately when the Start input turned OFF (0)<br />
while the slide was in the Up zone and the Takeover Mode is Disabled.<br />
Verify that the AOPDs and ESPEs used to<br />
source the <strong>Safety</strong> Enable input are<br />
protecting their respective areas.<br />
This diagnostic is cleared at the next<br />
attempt to begin press movement.<br />
Verify that the devices and application logic<br />
used to source the Standard enable input<br />
are functioning properly.<br />
This diagnostic is cleared at the next<br />
attempt to begin press movement.<br />
This diagnostic is cleared at the next<br />
attempt to begin press movement.<br />
202AH Output 1 is de-energized due to the slide entering the Top zone. Output 1 is always de-energized when the<br />
slide enters the Top zone.<br />
202BH Output 1 is de-energized due to the Press In Motion input remaining OFF (0)<br />
when the slide entered the Down zone or the Press In Motion input<br />
transitioned from ON (1) to OFF (0).<br />
202CH Output 1 is de-energized when the slide entered the Top zone and the<br />
<strong>Safety</strong> Enable input turned OFF (0) while the slide was in the Up zone, when<br />
the Takeover Mode is Enabled.<br />
202DH Output 1 is de-energized when the slide entered the Top zone and the Start<br />
input turned OFF (0) while the slide was in the Up zone when the Takeover<br />
Mode is Enabled.<br />
This diagnostic is cleared at the next<br />
attempt to begin press movement.<br />
Check the Camshaft Monitor (CSM)<br />
instruction or the application logic used to<br />
monitor press movement.<br />
This diagnostic is cleared at the next<br />
attempt to begin press movement.<br />
Verify that the AOPDs and ESPEs used to<br />
source the <strong>Safety</strong> Enable input are<br />
protecting their respective areas.<br />
This diagnostic is cleared at the next<br />
attempt to begin press movement.<br />
This diagnostic is cleared at the next<br />
attempt to begin press movement.<br />
224 Publication <strong>1756</strong>-<strong>RM095C</strong>-<strong>EN</strong>-P - July 2008
Clutch Brake Continuous<br />
Mode (CBCM)<br />
• BG-certified<br />
•<br />
Metal Form <strong>Instruction</strong>s Chapter 2<br />
The Clutch Brake Continuous Mode instruction is used in press<br />
applications where continuous operation is desired.<br />
ATT<strong>EN</strong>TION<br />
Per Section 5.4.1.3 of <strong>EN</strong>692-2005: “In the event of an<br />
intervention of a safety system (interlocking guard, ESPE using<br />
the AOPD), separate manual reset functions are required to<br />
restore the normal intended operation. Reset controls shall be<br />
within viewing distance of the danger zone, but out of reach<br />
from the danger zone. The reset functions shall fulfill at least a<br />
single system with monitoring (S & M).”<br />
Do not use automatic acknowledgement when access within<br />
the danger zone can go undetected. This instruction, configured<br />
for automatic acknowledgment, must be used in combination<br />
with other instructions, at least one of which must fulfill the<br />
manual reset requirement.<br />
Publication <strong>1756</strong>-<strong>RM095C</strong>-<strong>EN</strong>-P - July 2008 225
Chapter 2 Metal Form <strong>Instruction</strong>s<br />
ATT<strong>EN</strong>TION<br />
(1) where x = 1…8<br />
This instruction is specified with the intent that the Slide Zone<br />
input is sourced only by the Slide Zone output of the Crankshaft<br />
Position Monitor (CPM) instruction or application logic that<br />
satisfies the Slide Zone requirements listed in the Clutch Brake<br />
Continuous Mode <strong>Instruction</strong>: Inputs table on page 227.<br />
This instruction is specified with the intent that the Enable<br />
input is sourced only by an Ox output (1) of the Eight Position<br />
Mode Selector (EPMS) instruction that is not already sourcing<br />
the Enable input of another Clutch Brake Inch Mode (CBIM),<br />
Clutch Brake Single Stroke Mode (CBSSM), or Clutch Brake<br />
Continuous Mode (CBCM) instruction.<br />
The Mode parameter specifies how continuous operation is attained.<br />
An arming sequence is required for these modes: Immediate with<br />
Arming, Half Stroke with Arming, or Stroke-and-a-Half with Arming.<br />
The arming sequence requires that the Start input transitions from OFF<br />
(0) to ON (1) within five seconds of the Arm Continuous input<br />
transitioning from OFF (0) to ON (1). When the arming sequence<br />
requirements have been satisfied and the Start input has remained<br />
ON (1) as specified by the configured Mode, the press begins to<br />
operates continuously.<br />
An arming sequence is not required with Immediate mode<br />
configurations. In Immediate mode, the press begins to operate<br />
continuously when the Start input transitions from OFF (0) to ON (1).<br />
CBCM – <strong>Instruction</strong> Parameters<br />
IMPORTANT<br />
Do not use the same tag name for more than one instruction in<br />
the same program. Do not write to any instruction output tag<br />
under any circumstances.<br />
226 Publication <strong>1756</strong>-<strong>RM095C</strong>-<strong>EN</strong>-P - July 2008
Clutch Brake Continuous Mode <strong>Instruction</strong>: Configuration Parameters<br />
Metal Form <strong>Instruction</strong>s Chapter 2<br />
The following table provides the parameters used to configure the<br />
instruction. These parameters cannot be changed at runtime.<br />
Parameter Data Type Description<br />
Ack Type List Defines how instruction acknowledgement operates.<br />
Automatic Acknowledgement is made automatically when the <strong>Safety</strong> Enable input transitions<br />
from OFF (0) to ON (1).<br />
Manual Acknowledgment is made when <strong>Safety</strong> Enable Ack transitions from OFF (0) to<br />
ON (1) and the <strong>Safety</strong> Enable input is ON (1).<br />
Mode List This parameter configures the different continuous modes of operation.<br />
Immediate The press begins to operate continuously when the Start input transitions from<br />
OFF (0) to ON (1).<br />
Immediate with After completion of the arming sequence the continuous mode is entered<br />
Arming<br />
immediately.<br />
Half Stroke with After completion of the arming sequence the Start input signal must remain ON (1)<br />
Arming<br />
until the first upstroke zone is reached.<br />
Stroke-and-a-Half After completion of the arming sequence, the Start input signal must remain ON (1)<br />
with Arming until the slide completes a full rotation and the second upstroke zone is reached.<br />
Takeover List This parameter determines when the stop occurs if the <strong>Safety</strong> Enable input transitions from ON (1) to<br />
Mode<br />
OFF (0) while the slide is in the Up zone.<br />
Enabled The press is stopped when the slide enters the Top zone.<br />
Disabled The press is stopped immediately.<br />
Clutch Brake Continuous Mode <strong>Instruction</strong>: Inputs<br />
The following table explains the instruction inputs.<br />
Parameter Data Type Description<br />
Enable Boolean This input is the signal to activate this instruction; for example, by an Eight Position Mode Selector (EPMS) Ox<br />
output, where x = 1…8.<br />
ON (1): The instruction is selected and operational.<br />
OFF (0): The instruction is not operating. All instruction outputs are de-energized.<br />
<strong>Safety</strong><br />
Enable<br />
Standard<br />
Enable<br />
Boolean This input represents the status of safety-related permissive devices such as E-stops, light curtains or safety<br />
gates.<br />
ON (1): Permissive devices are actively guarding the danger zone. Permits the energizing of Output 1.<br />
OFF (0): Permissive devices are in a state that doesn’t allow Output 1 to be energized.<br />
Boolean Indicates the state of non safety-related permissive devices.<br />
ON (1): Permits the energizing of Output 1.<br />
OFF (0): Prevents the energizing of Output 1.<br />
This parameter is not safety-related.<br />
Publication <strong>1756</strong>-<strong>RM095C</strong>-<strong>EN</strong>-P - July 2008 227
Chapter 2 Metal Form <strong>Instruction</strong>s<br />
Clutch Brake Continuous Mode <strong>Instruction</strong>: Inputs<br />
Parameter Data Type Description<br />
Arm<br />
Continuous<br />
Boolean Enables arming for the Immediate with Arming, Half Stroke with Arming, and Stroke-and-a-half with Arming<br />
modes only.<br />
ON (1): Enables arming. The arming sequence ends when the Start input transitions from OFF (0) to ON (1)<br />
within 5 seconds.<br />
Start Boolean Input to start press movement.<br />
ON (1): Energize Output 1 if all input conditions have been met.<br />
OFF (0): Output 1 remains energized based on the configured continuous mode. Output 1 is de-energized if the<br />
continuous mode requirements are not met. See Mode parameter on page 227 for more information.<br />
Stop At Top Boolean This input is the request to stop press movement when the Top zone is reached.<br />
OFF (0): Prevents the energizing of Output 1. De-energize Output 1 the next time the slide enters the Top zone<br />
Press In Boolean This input is typically sourced by Output 1 of the Camshaft Monitor (CSM) instruction or by user application<br />
Motion<br />
logic. Feedback from the press safety valve needs to be included in the building of this signal.<br />
ON (1): Indicates that the press is moving.<br />
OFF (0): Indicates that the press is stopped.<br />
Slide Zone Integer This input represents the position of the slide and the position information status. It is sourced by the<br />
Crankshaft Position Monitor (CPM) instruction's Slide Zone output or user application logic that provides the<br />
following bit-mapped information.<br />
Bit 0: Status<br />
OFF (0) - The Slide Zone information is invalid. Prevents the energizing of Output 1 on an initial start or<br />
immediately stops the press.<br />
ON (1) - Slide Zone information is valid.<br />
Bits 1 and 2: Slide Zone<br />
The following table lists how Bits 0…2 are used to represent the valid slide zones.<br />
Bit 2 Bit 1 Bit 0 Slide Zone Decimal Value<br />
0 0 1 Down 1<br />
0 1 1 Up 3<br />
1 0 1 Top 5<br />
Motion<br />
Monitor<br />
Fault<br />
<strong>Safety</strong><br />
Enable Ack<br />
Bits 3…31: Unused; <strong>Set</strong> to 0.<br />
Boolean Stops the press immediately when a press motion problem has been detected. This input is sourced by the<br />
Fault Present output of the Camshaft Monitor (CSM) instruction or application logic that performs motion<br />
diagnostics.<br />
ON (1): Indicates that press motion is valid. Permits Output 1 to be energized.<br />
OFF (0): Indicates that a press motion problem exists. Prevents Output 1 from being energized or immediately<br />
de-energizes Output 1.<br />
Boolean This input is required when the configured Ack Type is Manual.<br />
OFF (0)->ON (1): Acknowledges that the <strong>Safety</strong> Enable input has transitioned from OFF (0) to ON (1).<br />
228 Publication <strong>1756</strong>-<strong>RM095C</strong>-<strong>EN</strong>-P - July 2008
Clutch Brake Continuous Mode <strong>Instruction</strong>: Outputs<br />
Parameter Data Type Description<br />
Output 1<br />
(O1)<br />
Continuous<br />
Armed (CA)<br />
Diagnostic<br />
Code<br />
The following table explains the instruction outputs.<br />
Metal Form <strong>Instruction</strong>s Chapter 2<br />
Boolean Output used to source the Actuate input of the Main Valve Control (MVC) instruction.<br />
ON (1): The output is energized.<br />
OFF (0): The output is de-energized.<br />
See CBCM – Energizing Output 1 on page 230 and CBCM – De-energizing Output 1 on page 235.<br />
Boolean This output is used when the instruction is configured for Immediate with Arming, Half Stroke with Arming<br />
and Stroke-and-a-half with Arming modes.<br />
ON (1): The arming sequence is in progress.<br />
OFF (0): Waiting to be armed.<br />
This parameter is not safety-related.<br />
Integer See the CBCM – Diagnostic Codes on page 237.<br />
This parameter is not safety-related.<br />
IMPORTANT<br />
Do not write to any instruction output tag under any<br />
circumstances.<br />
Publication <strong>1756</strong>-<strong>RM095C</strong>-<strong>EN</strong>-P - July 2008 229
Chapter 2 Metal Form <strong>Instruction</strong>s<br />
CBCM – Energizing Output 1<br />
Output 1 is energized when the Start input transitions from OFF (0) to<br />
ON (1) and all of these conditions are met:<br />
• The arming sequence, if configured, is complete.<br />
• The Enable input is ON (1).<br />
• The <strong>Safety</strong> Enable input has been acknowledged.<br />
• The Standard Enable input is ON (1).<br />
• The Slide Zone input represents the Top zone.<br />
• The Motion Monitor Fault input is ON (1).<br />
• The Press In Motion input is OFF (0).<br />
• The <strong>Safety</strong> Enable Ack input is OFF (0).<br />
• The Stop At Top input is ON (1).<br />
IMPORTANT<br />
ATT<strong>EN</strong>TION<br />
ATT<strong>EN</strong>TION<br />
ATT<strong>EN</strong>TION<br />
If the Ack Type is Manual, an acknowledgement of the <strong>Safety</strong><br />
Enable input is required when the Enable input transitions from<br />
OFF (0) to ON (1) and before the Start or Arm Continuous input<br />
turns ON (0).<br />
When the configured Mode is Immediate and the Ack Type is<br />
Automatic, Output 1 energizes when the <strong>Safety</strong> Enable,<br />
Standard Enable, Slide Zone, Press In Motion, and Motion<br />
Monitor Fault inputs return to the active, or valid state at the<br />
same time the Start input transitions from OFF (0) to ON (1).<br />
When the configured Mode is Immediate with Arming, Half<br />
Stroke with Arming, or Stroke-and-a-half with Arming and the<br />
Ack Type is Automatic, the five-second arming time starts when<br />
the <strong>Safety</strong> Enable, Standard Enable, Slide Zone, Press In<br />
Motion, and Monitor Motion Fault inputs return to the ON (1),<br />
active, or valid state at the same time the Arm Continuous input<br />
transitions from OFF (0) to ON (1).<br />
The cam switches that determine slide position are monitored<br />
by the CPM instruction. This instruction uses the Slide Zone<br />
output of the CPM instruction as a representation of the cam<br />
switches that determine slide position.<br />
230 Publication <strong>1756</strong>-<strong>RM095C</strong>-<strong>EN</strong>-P - July 2008
CBCM – Immediate Mode<br />
Metal Form <strong>Instruction</strong>s Chapter 2<br />
This diagram shows the acknowledgement of the <strong>Safety</strong> Enable input,<br />
at (A), and the energizing of Output 1 when the Mode is configured as<br />
Immediate. Output 1 is energized when the Start input transitions from<br />
OFF (0) to ON (1) at (B) and all input conditions are being met.<br />
Output 1 remains energized when the Start input turns OFF (0) at (C).<br />
Zone: T = Top D = Down<br />
1<br />
Enable<br />
0<br />
1<br />
<strong>Safety</strong> Enable<br />
0<br />
1<br />
Standard Enable<br />
0<br />
1<br />
Arm Continuous<br />
0<br />
Publication <strong>1756</strong>-<strong>RM095C</strong>-<strong>EN</strong>-P - July 2008 231<br />
1<br />
Start<br />
0<br />
1<br />
Stop At Top<br />
0<br />
1<br />
Press In Motion<br />
0<br />
Slide Zone<br />
1<br />
Motion Monitor Fault<br />
0<br />
1<br />
<strong>Safety</strong> Enable Ack<br />
0<br />
1<br />
Output 1<br />
0<br />
1<br />
Continuous Armed<br />
0<br />
A<br />
T<br />
B<br />
C<br />
D
Chapter 2 Metal Form <strong>Instruction</strong>s<br />
CBCM – Immediate with Arming Mode<br />
This diagram shows the acknowledgement of the <strong>Safety</strong> Enable input,<br />
at (A), and the energizing of Output 1 when the Mode is configured as<br />
Immediate with Arming. The five-second arming timer starts when the<br />
Arm Continuous input transitions from OFF (0) to ON (1) at (B) and<br />
all input conditions are being met. Within five seconds, Output 1 is<br />
energized when the Start input transitions from OFF (0) to ON (1) at<br />
(C) and all input conditions are being met. Output 1 remains<br />
energized when the Start input turns OFF (0) at (D).<br />
Zone: T = Top D = Down<br />
1<br />
Enable<br />
0<br />
1<br />
<strong>Safety</strong> Enable<br />
0<br />
1<br />
Standard Enable<br />
0<br />
1<br />
Arm Continuous<br />
0<br />
1<br />
Start<br />
0<br />
1<br />
Stop At Top<br />
0<br />
1<br />
Press In Motion<br />
0<br />
Slide Zone<br />
1<br />
Motion Monitor Fault<br />
0<br />
1<br />
<strong>Safety</strong> Enable Ack<br />
0<br />
1<br />
Output 1<br />
0<br />
1<br />
Continuous Armed<br />
0<br />
232 Publication <strong>1756</strong>-<strong>RM095C</strong>-<strong>EN</strong>-P - July 2008<br />
A B<br />
T D<br />
C D
CBCM – Half Stroke with Arming Mode<br />
Metal Form <strong>Instruction</strong>s Chapter 2<br />
This diagram shows the acknowledgement of the <strong>Safety</strong> Enable input,<br />
at (A), and the energizing of Output 1 when the Mode is configured as<br />
Half Stroke with Arming. The five-second arming timer starts when<br />
the Arm Continuous input transitions from OFF (0) to ON (1) at (B)<br />
and all input conditions are being met. Within five seconds, Output 1<br />
is energized when the Start input transitions from OFF (0) to ON (1) at<br />
(C) and all input conditions are being met. Output 1 remains<br />
energized when the Start input turns OFF (0) after the slide has<br />
transitioned a half-stroke at (D).<br />
1<br />
Enable<br />
0<br />
1<br />
<strong>Safety</strong> Enable<br />
0<br />
1<br />
Standard Enable<br />
0<br />
1<br />
Arm Continuous<br />
0<br />
1<br />
Start<br />
0<br />
1<br />
Stop At Top<br />
0<br />
1<br />
Press In Motion<br />
0<br />
Slide Zone<br />
1<br />
Motion Monitor Fault<br />
0<br />
1<br />
<strong>Safety</strong> Enable Ack<br />
0<br />
1<br />
Output 1<br />
0<br />
1<br />
Continuous Armed<br />
0<br />
Zone: T = Top D = Down U = Up<br />
Publication <strong>1756</strong>-<strong>RM095C</strong>-<strong>EN</strong>-P - July 2008 233<br />
A B<br />
T D U<br />
C D
Chapter 2 Metal Form <strong>Instruction</strong>s<br />
CBCM – Stroke-and-a-half with Arming Mode<br />
This diagram shows the acknowledgement of the <strong>Safety</strong> Enable input,<br />
at (A), and the energizing of Output 1 when the Mode is configured as<br />
Stroke-and-a-half with Arming. The 5-second arming timer starts when<br />
the Arm Continuous input transitions from OFF (0) to ON (1) at (B)<br />
and all input conditions are being met. Within 5 seconds, Output 1 is<br />
energized when the Start input transitions from OFF (0) to ON (1) at<br />
(C) and all input conditions are being met. Output 1 remains<br />
energized when the Start input turns OFF (0) after the slide has<br />
transitioned a stroke-and-a-half at (D).<br />
Zone: T = Top D = Down U = Up<br />
Enable<br />
1<br />
0<br />
1<br />
<strong>Safety</strong> Enable<br />
0<br />
1<br />
Standard Enable<br />
0<br />
1<br />
Arm Continuous<br />
0<br />
1<br />
Start<br />
0<br />
1<br />
Stop At Top<br />
0<br />
1<br />
Press In Motion<br />
0<br />
Slide Zone<br />
1<br />
Motion Monitor Fault<br />
0<br />
1<br />
<strong>Safety</strong> Enable Ack<br />
0<br />
1<br />
Output 1<br />
0<br />
1<br />
Continuous Armed<br />
0<br />
234 Publication <strong>1756</strong>-<strong>RM095C</strong>-<strong>EN</strong>-P - July 2008<br />
A B<br />
T D U T D U<br />
C D
CBCM – De-energizing Output 1<br />
Metal Form <strong>Instruction</strong>s Chapter 2<br />
Once energized, Output 1 is de-energized when one or more of the<br />
following occurs:<br />
• The Enable input transitions from ON (1) to OFF (0).<br />
• The Start input transitions from ON (1) to OFF (0) prior to<br />
entering the continuous operation.<br />
When this transition occurs while the slide is in the Up zone,<br />
Output 1 is de-energized when the slide enters the Top zone.<br />
Otherwise, Output 1 is de-energized immediately.<br />
• The <strong>Safety</strong> Enable input transitions from ON (1) to OFF (0).<br />
When this transition occurs while the slide is in the Up zone and<br />
Takeover Mode is enabled, Output 1 is de-energized when the<br />
slide enters the Top zone. Otherwise, when Takeover Mode is<br />
disabled, Output 1 is de-energized immediately. Output 1 is also<br />
de-energized immediately when this transition occurs while the<br />
slide is in the Top or Down zones.<br />
• The Standard Enable input transitions from ON (1) to OFF (0).<br />
When this transition occurs while the slide is in the Up zone,<br />
Output 1 is de-energized when the slide enters the Top zone.<br />
Otherwise, Output 1 is de-energized immediately.<br />
• The Slide Zone input value becomes invalid.<br />
• The Monitor Motion Fault input transitions from ON (1) to<br />
OFF (0).<br />
• The direction of the press appears to be running in reverse.<br />
• The Press In Motion input is OFF (0) when the slide goes from<br />
Top to Down.<br />
• The Stop At Top input transitions from ON (1) to OFF (0) and<br />
the slide enters the Top zone.<br />
• The Press in Motion input transitions from ON (1) to OFF (0).<br />
Publication <strong>1756</strong>-<strong>RM095C</strong>-<strong>EN</strong>-P - July 2008 235
Chapter 2 Metal Form <strong>Instruction</strong>s<br />
CBCM – <strong>Safety</strong> Enable and Takeover Mode<br />
This diagram shows Output 1 being de-energized when the slide<br />
enters the Top zone at (B). Output 1 is de-energized because the<br />
<strong>Safety</strong> Enable input has transitioned from ON (1) to OFF (0) during<br />
the Up zone, at (A), with Takeover Mode enabled. Before Output 1<br />
can be re-energized, an acknowledgement of the <strong>Safety</strong> Enable input<br />
is required when the <strong>Safety</strong> Enable input transitions from OFF (0) to<br />
ON (1) at (C).<br />
Zone: T = Top D = Down U = Up<br />
236 Publication <strong>1756</strong>-<strong>RM095C</strong>-<strong>EN</strong>-P - July 2008<br />
Enable<br />
<strong>Safety</strong> Enable<br />
1<br />
0<br />
1<br />
0<br />
1<br />
Standard Enable<br />
0<br />
1<br />
Arm Continuous<br />
0<br />
Start<br />
Stop At Top<br />
Press In Motion<br />
Slide Zone<br />
Motion Monitor Fault<br />
<strong>Safety</strong> Enable Ack<br />
Output 1<br />
Continuous Armed<br />
1<br />
0<br />
1<br />
0<br />
1<br />
0<br />
1<br />
0<br />
1<br />
0<br />
1<br />
0<br />
1<br />
0<br />
U<br />
A B<br />
C<br />
T
Clutch Brake Continuous Mode Diagnostic Codes<br />
CBCM – False Rung State Behavior<br />
Metal Form <strong>Instruction</strong>s Chapter 2<br />
When the instruction is executed on a false rung, all instruction<br />
outputs are de-energized.<br />
CBCM – Diagnostic Codes<br />
Diagnostics 2000H…200AH are detected when attempting to start<br />
press movement by energizing Output 1. Diagnostics 2020H…202D<br />
are used to diagnose the reason for stopping press movement by<br />
de-energizing Output 1.<br />
Diagnostic<br />
Code<br />
Description Corrective Action<br />
0000H No fault. None.<br />
2000H Immediate<br />
Mode<br />
Arming<br />
Modes<br />
2001H Immediate<br />
Mode<br />
Arming<br />
Modes<br />
2002H Immediate<br />
Mode<br />
Arming<br />
Modes<br />
Output 1 failed to energized when the Start input turned ON<br />
(1), due to an invalid Slide Zone input value.<br />
• The five-second arming timer failed to start when the<br />
Arm Continuous input turned ON (1) due to an invalid<br />
Slide Zone input value.<br />
• During the five-second arming period, the Slide Zone<br />
input value became invalid.<br />
Output 1 failed to energize when the Start input turned ON<br />
(1) due to the Press In Motion input being ON (1).<br />
• The five-second timer failed to start when the Arm<br />
Continuous input turned ON (1) due to the Press In<br />
Motion input being ON (1).<br />
• During the five-second arming period, the Press In<br />
Motion input turned ON (1).<br />
• When the configured Ack Type is Manual, Output 1 failed<br />
to energize when the Start input turned ON (1) prior to<br />
the acknowledgement of the <strong>Safety</strong> Enable input.<br />
• When the configured Ack Type is Automatic, Output 1<br />
failed to energize when the Start input turned ON (1) and<br />
the <strong>Safety</strong> Enable input was OFF (0).<br />
• When the configured Ack Type is Manual, the<br />
five-second timer failed to start when the Arm<br />
Continuous input turned ON (1) prior to the<br />
acknowledgement of the <strong>Safety</strong> Enable input.<br />
• When the configured Ack Type is Automatic, the<br />
five-second arming timer failed to start when the Arm<br />
Continuous input and the <strong>Safety</strong> Enable inputs are<br />
OFF (0).<br />
• During the five-second arming period, the <strong>Safety</strong> Enable<br />
input turned OFF (0).<br />
Check the Crankshaft Position Monitor<br />
(CPM) instruction or the application logic<br />
used to source this input. This diagnostic is<br />
cleared when a valid Slide Zone is<br />
established.<br />
• Wait for the press to come to a complete<br />
stop before initiating press movement.<br />
• Verify that the device monitoring press<br />
movement is working correctly.<br />
• Verify that only one mode of operation is<br />
selected.<br />
• Verify that the AOPDs and ESPEs used to<br />
source the <strong>Safety</strong> Enable input are<br />
protecting their respective areas.<br />
• Then, to clear the diagnostic for manual<br />
Ack Types, acknowledge the <strong>Safety</strong><br />
Enable input by turning the <strong>Safety</strong><br />
Enable Ack input ON (1).<br />
• For automatic Ack Types, this diagnostic<br />
is cleared when the <strong>Safety</strong> Enable input<br />
turns ON (1).<br />
Publication <strong>1756</strong>-<strong>RM095C</strong>-<strong>EN</strong>-P - July 2008 237
Chapter 2 Metal Form <strong>Instruction</strong>s<br />
Clutch Brake Continuous Mode Diagnostic Codes<br />
Diagnostic<br />
Code<br />
2003H Immediate<br />
Mode<br />
Arming<br />
Modes<br />
2004H Immediate<br />
Mode<br />
Arming<br />
Modes<br />
2005H Immediate<br />
Mode<br />
Arming<br />
Modes<br />
2006H Immediate<br />
Mode<br />
Arming<br />
Modes<br />
2007H Immediate<br />
Mode<br />
Arming<br />
Modes<br />
2008H Immediate<br />
Mode<br />
Arming<br />
Modes<br />
2009H Immediate<br />
Mode<br />
Description Corrective Action<br />
Arming<br />
Modes<br />
Output 1 failed to energize when the Start input turned ON<br />
(1) due to the Standard Enable input being OFF (0).<br />
• The five-second timer failed to start when the Arm<br />
Continuous input turned ON (1) due to the Standard<br />
Enable input being OFF (0).<br />
• During the five-second arming period, the Standard<br />
Enable input turned OFF (0).<br />
Verify that the devices used to source the<br />
Standard Enable input are functioning<br />
properly.<br />
This diagnostic is cleared when the<br />
Standard Enable input is ON (1).<br />
N/A Turn the Start input OFF (0) and turn the Arm<br />
Continuous input ON (1) to clear this<br />
The Start input was ON (1) when the Arm Continuous input<br />
turned ON (1).<br />
diagnostic.<br />
N/A Turn the Arm Continuous input ON (1) to<br />
restart the arming timer and clear this<br />
The Start input did not turn ON (1) within five seconds of the<br />
Arm Continuous input turning ON (1).<br />
diagnostic.<br />
N/A The Arm Continuous input must turn ON (1)<br />
before the Start input does. Turn the Start<br />
The Start input turned ON (1) before the Arm Continuous<br />
input turned ON (1).<br />
Output 1 failed to energize when the Start input turned<br />
ON (1) due to the Stop At Top input being OFF (0).<br />
• The five-second timer failed to start when the Arm<br />
Continuous input turned ON (1) due to the Stop At Top<br />
input being OFF (0).<br />
• During the five-second arming period, the Stop At Top<br />
input turned OFF (0).<br />
Output 1 failed to energize when the Start input turned<br />
ON (1) due to the Motion Monitor Fault input being OFF (0).<br />
• The five-second timer failed to start when the Arm<br />
Continuous input turned ON (1) due to the Motion<br />
Monitor Fault input being OFF (0).<br />
• During the five-second arming period, the Motion<br />
Monitor Fault input turned OFF (0).<br />
Output 1 failed to energize when the Start input turned<br />
ON (1) due to the <strong>Safety</strong> Enable Ack input being ON (1).<br />
• The five-second timer failed to start when the Arm<br />
Continuous input turned ON (1) due to the <strong>Safety</strong> Enable<br />
Ack input being OFF (0).<br />
• During the five-second arming period, the <strong>Safety</strong> Enable<br />
Ack input turned OFF (0).<br />
input OFF (0) and turn the Arm Continuos<br />
input ON (1) to clear this diagnostic.<br />
Turn the Stop At Top input OFF (0) and turn<br />
the Arm Continuos input ON (1) to clear this<br />
diagnostic.<br />
Check the Camshaft Monitor instruction or<br />
the application logic used to monitor press<br />
movement.<br />
This diagnostic is cleared when the motion<br />
monitor functions are properly monitoring<br />
motion and this Motion Monitor Fault input<br />
is ON (1).<br />
Turn the <strong>Safety</strong> Enable Ack input OFF (0).<br />
This diagnostic is cleared when the <strong>Safety</strong><br />
Enable Ack input turns OFF (0).<br />
238 Publication <strong>1756</strong>-<strong>RM095C</strong>-<strong>EN</strong>-P - July 2008
Clutch Brake Continuous Mode Diagnostic Codes<br />
Diagnostic<br />
Code<br />
200AH Immediate<br />
Mode<br />
Description Corrective Action<br />
Arming<br />
Modes<br />
Output 1 failed to energize when the Start input turned<br />
ON (1) due to the slide being in the Down or Up zone.<br />
• The five-second timer failed to start when the Arm<br />
Continuous input turned ON (1) due to the slide being in<br />
the Down or Up zone.<br />
• During the five-second arming period, the slide moved to<br />
the Down or Up zone.<br />
2020H Output 1 is de-energized due to the Slide Zone input value becoming<br />
invalid.<br />
2021H Output 1 is de-energized due to the Motion Monitor Fault input turning<br />
OFF (0).<br />
2022H Output 1 is de-energized due to the detection of press movement in the<br />
reverse direction.<br />
2023H Output 1 is de-energized due to the <strong>Safety</strong> Enable input turning OFF (0)<br />
while the slide was in the Top or Down zone.<br />
2024H Output 1 is de-energized due to the Standard Enable input turning OFF (0)<br />
while the slide was in the Top or Down zones.<br />
Metal Form <strong>Instruction</strong>s Chapter 2<br />
The slide must be in the Top zone when<br />
press movement is initiated.<br />
This diagnostic is cleared when the slide is<br />
inched back to the Top zone.<br />
Check the Crankshaft Position Monitor<br />
(CPM) instruction or the application logic<br />
used to source this input.<br />
This diagnostic is cleared at the next<br />
attempt to begin press movement.<br />
Check the Camshaft Monitor (CSM)<br />
instruction or the application logic used to<br />
monitor press movement.<br />
This diagnostic is cleared at the next<br />
attempt to begin press movement.<br />
Verify the direction of the press.<br />
This diagnostic is cleared at the next<br />
attempt to begin press movement.<br />
Verify that the AOPDs and ESPEs used to<br />
source the <strong>Safety</strong> Enable input are<br />
protecting their respective areas.<br />
This diagnostic is cleared at the next<br />
attempt to begin press movement.<br />
Verify that the devices and application logic<br />
used to source the Standard Enable input<br />
are functioning properly.<br />
This diagnostic is cleared at the next<br />
attempt to begin press movement.<br />
2025H Immediate N/A Output 1 is always de-energized when the<br />
Immediate<br />
with Arming<br />
Half Stroke<br />
with Arming<br />
Mode<br />
Stroke-and-a<br />
-half with<br />
Arming<br />
Mode<br />
2026H Not used by this instruction.<br />
Output 1 is de-energized due to the Start input turning<br />
OFF (0) while the slide was in the Top or Down zones prior to<br />
entering continuous operation.<br />
Start input turns OFF (0) while the slide is in<br />
the Top or Down zones.<br />
This diagnostic is cleared at the next<br />
attempt to begin press movement.<br />
Publication <strong>1756</strong>-<strong>RM095C</strong>-<strong>EN</strong>-P - July 2008 239
Chapter 2 Metal Form <strong>Instruction</strong>s<br />
Clutch Brake Continuous Mode Diagnostic Codes<br />
Diagnostic<br />
Code<br />
Description Corrective Action<br />
2027H Output 1 is de-energized immediately when the <strong>Safety</strong> Enable input turned<br />
OFF (0) while the slide was in the Up zone and the Takeover Mode is<br />
Disabled.<br />
2028H Output 1 is de-energized when the slide entered the Top zone due to the<br />
Standard Enable input turning OFF (0) while the slide was in the Up zone.<br />
2029H Output 1 is de-energized immediately when the Start input turned OFF (0)<br />
while the slide was in the Up zone prior to entering continuous operation,<br />
with a Takeover Mode of Disabled.<br />
202AH Output 1 is de-energized due to the slide entering the Top zone after a stop<br />
request has been made.<br />
202BH Output 1 is de-energized due to the Press In Motion input remaining OFF (0)<br />
when the slide entered the Down zone or the Press In Motion input<br />
transitioned from ON (1) to OFF (0).<br />
202CH Output 1 de-energized when the slide entered the Top zone and the <strong>Safety</strong><br />
Enable input turned OFF (0) while the slide was in the Up zone, with<br />
Takeover Mode enabled.<br />
202DH Output 1 de-energized when the slide entered the Top zone and the Start<br />
input turned OFF (0) while the slide was in the Up zone prior to entering<br />
continuous operation, with Takeover Mode enabled.<br />
Verify that the AOPDs and ESPEs used to<br />
source the <strong>Safety</strong> Enable input are<br />
protecting their respective areas.<br />
This diagnostic is cleared at the next<br />
attempt to begin press movement.<br />
Verify that the devices and application logic<br />
used to source the Standard Enable input<br />
are functioning properly.<br />
This diagnostic is cleared at the next<br />
attempt to begin press movement.<br />
This diagnostic is cleared at the next<br />
attempt to begin press movement.<br />
This diagnostic is cleared at the next<br />
attempt to begin press movement.<br />
Check the Camshaft Monitor (CSM)<br />
instruction or the application logic used to<br />
monitor press movement.<br />
This diagnostic is cleared at the next<br />
attempt to begin press movement.<br />
Verify that the AOPDs and ESPEs used to<br />
source the <strong>Safety</strong> Enable input are<br />
protecting their respective areas.<br />
This diagnostic is cleared at the next<br />
attempt to begin press movement.<br />
This diagnostic is cleared at the next<br />
attempt to begin press movement.<br />
240 Publication <strong>1756</strong>-<strong>RM095C</strong>-<strong>EN</strong>-P - July 2008
Crankshaft Position<br />
Monitor (CPM)<br />
• BG-certified<br />
•<br />
Metal Form <strong>Instruction</strong>s Chapter 2<br />
The Crankshaft Position Monitor instruction is used to determine the<br />
slide position of the press by monitoring the Brake (BCAM), Dynamic<br />
(DCAM), and Takeover (TCAM) cams and representing the position as<br />
Top, Down, or Up by using the Slide Zone output. Also, the Top<br />
Zone, Down Zone, and Up Zone Boolean outputs are provided for<br />
monitoring and diagnostic purposes.<br />
ATT<strong>EN</strong>TION<br />
This instruction is specified with the intent that the Slide Zone<br />
output is used to source the Slide Zone input of the Clutch Brake<br />
Inch Mode (CBIM), Clutch Brake Single Stroke (CBSSM), Clutch<br />
Brake Continuous Mode (CBCM), and Camshaft Monitor (CSM)<br />
instructions.<br />
Publication <strong>1756</strong>-<strong>RM095C</strong>-<strong>EN</strong>-P - July 2008 241
Chapter 2 Metal Form <strong>Instruction</strong>s<br />
Normal stopping of a press begins when the slide enters the Top<br />
zone. A successful stop occurs when the press stops in the Top zone.<br />
During normal stopping, the speed of the press may cause the press<br />
to stop in the Down zone. This is called an overrun. To minimize this,<br />
the DCAM can be enabled to generate an early Top zone, allowing the<br />
press to begin stopping early.<br />
WARNING<br />
ATT<strong>EN</strong>TION<br />
CPM – <strong>Instruction</strong> Parameters<br />
IMPORTANT<br />
When required, the DCAM should only be enabled for normal<br />
stopping based on the speed of the press. Do not adjust the<br />
DCAM to account for deteriorating brake performance.<br />
Reversing the press should only be performed during set up<br />
mode by using the Clutch Brake Inch Mode (CBIM) instruction.<br />
Reversing the press is only permitted for moving the slide from<br />
the Down zone to the Top zone where the CBIM instruction<br />
automatically stops the press at Top. A fault occurs when<br />
reverse movement continues into the Up zone.<br />
Do not use the same tag name for more than one instruction in<br />
the same program. Do not write to any instruction output tag<br />
under any circumstances.<br />
242 Publication <strong>1756</strong>-<strong>RM095C</strong>-<strong>EN</strong>-P - July 2008
Crankshaft Position Monitor <strong>Instruction</strong>: Configuration Parameter<br />
Metal Form <strong>Instruction</strong>s Chapter 2<br />
The following table provides the parameter used to configure the<br />
instruction. This parameter cannot be changed at runtime.<br />
Parameter Data Type Description<br />
Cam Profile Boolean This parameter determines the cam profile used to generate the Slide Zone values.<br />
A - See CPM – Cam Profiles on page 246 and CPM – Normal Operation with Cam Profile A on page 248.<br />
B - See CPM – Cam Profiles on page 246 and CPM – Normal Operation with Cam Profile B on page 249.<br />
Crankshaft Position Monitor <strong>Instruction</strong>: Inputs<br />
The following table explains the instruction inputs. The inputs may be<br />
field device signals from input devices or derived from user logic.<br />
Parameter Data Type Description<br />
Enable Boolean This signal is used to enable the Crankshaft Position Monitor (CPM) instruction.<br />
ON (1): The instruction outputs are enabled.<br />
OFF (0): The instruction outputs are disabled.<br />
Brake Cam Boolean This input is sourced by the cam monitoring device (hard cam) or application logic (soft cam).<br />
(BCAM)<br />
Cam Profile A This input specifies the overrun point and the Top zone when dynamic stopping is<br />
disabled.<br />
OFF (0) -> ON (1): While the press is running and dynamic stopping is disabled, this<br />
transition signals the end of the Up zone and the start of the Top zone.<br />
ON (1) -> OFF (0): While the press is stopping, this transition causes the Camshaft<br />
Monitor instruction to generate a brake fault.<br />
Cam Profile B This input specifies the overrun point and the zone where immediate braking of the<br />
press is allowed.<br />
OFF (0) - No effect.<br />
OFF (0) -> ON (1): When detected while the press is stopping, this transition causes<br />
the Camshaft Monitor (CSM) instruction to generate a brake fault. While the press is<br />
running, this transition signals the end of the Top zone and start of the Down zone.<br />
ON (1) -> OFF (0): While the press is running, this transition must occur after the OFF<br />
(0) to ON (1) transition of the Takeover cam (TCAM).<br />
Takeover Cam Boolean This input is sourced by the cam monitoring device (hard cam) or application logic (soft cam).<br />
(TCAM)<br />
Cam Profile A This input is used to indicate the start of the Up zone.<br />
OFF (0) -> ON (1): This transition signals the start of the end of the Down zone and the<br />
start of the Up zone.<br />
ON (1) -> OFF (0: When dynamic stopping is enabled, this transition has no effect<br />
unless the dynamic stop signal has yet to occur. When this happens, this transition<br />
signals the end of the Up zone and start of the Top zone.<br />
Cam Profile B This input is used to indicate the start of the Up zone.<br />
OFF(0): The press is considered to be in the Down zone when the Brake cam (BCAM) is<br />
ON (1).<br />
OFF (0) -> ON (1): This transition signals the start of the Up zone and the end of the<br />
Down zone and must occur before the ON (1) to OFF (0) transition of the BCAM.<br />
ON (1) -> OFF (0): When dynamic stopping is not enabled, this transition signals the<br />
end of the upstroke and the start of the Top zone. When dynamic stopping is enabled,<br />
this transition has no effect unless the dynamic stop signal has yet to occur. In this<br />
case, the dynamic stopping enable behavior is performed.<br />
Publication <strong>1756</strong>-<strong>RM095C</strong>-<strong>EN</strong>-P - July 2008 243
Chapter 2 Metal Form <strong>Instruction</strong>s<br />
Crankshaft Position Monitor <strong>Instruction</strong>: Inputs<br />
Parameter Data Type Description<br />
Dynamic Cam<br />
(DCAM)<br />
Boolean This input is used to generate an early top signal for fast-running presses. This input is sourced by a<br />
cam monitoring device (hard cam) or application logic (soft cam).<br />
This parameter is not safety-related.<br />
Cam Profile A When dynamic stopping is not required, this input should be sourced by the inverse of<br />
the Brake Cam (BCAM).<br />
OFF (0) -> ON (1): Dynamic stopping is enabled when this transition occurs at or after<br />
the ON (1) to OFF (0) transition of the BCAM.<br />
ON (1) -> OFF (0): This transition signals the end of upstroke and the start of the Top<br />
zone when it occurs before the OFF (0) to ON (1) transition of the Takeover cam<br />
(TCAM).<br />
Cam Profile B When dynamic stopping is not required, this input should be sourced by the Takeover<br />
Cam (TCAM).<br />
OFF (0) -> ON (1): Dynamic stopping is enabled when this transition occurs at or after<br />
the OFF (0) to ON (1) transition of the TCAM.<br />
ON (1) -> OFF (0): This transition signals the end of Up zone and the start of the Top<br />
zone when it occurs at or before the ON (1) to OFF (0) transition of the TCAM.<br />
Input Status Boolean This input represents the combined status of the cam monitoring functions in addition to the I/O module<br />
status.<br />
ON: Inputs are valid. The Slide Zone status bit is set to 1.<br />
OFF: Inputs are invalid. All outputs are set to their de-energized or OFF (0) state. The Slide Zone status<br />
bit is set to 0.<br />
Reverse Boolean Reversing the press should only be performed during set up mode by using the Clutch Brake Inch<br />
Mode (CBIM) instruction. Reversing the press is only permitted to move the slide from the Down zone to<br />
the Top zone where the Clutch Brake Inch Mode (CBIM) instruction automatically stops the press. A<br />
fault is generated when reverse movement is continued into the Up zone.<br />
OFF (0): Reverse operation is disabled.<br />
ON (1): When the slide is in the Down zone, this instruction lets the press move toward the Top zone. A<br />
fault is generated if this input is ON (1) when the slide is in the Up zone.<br />
Press Motion<br />
Status<br />
Boolean This input represents the motion status of the press and is sourced by Output 1 of the Main Valve<br />
Control (MVC) instruction or other valve control application logic.<br />
OFF (0): The press has stopped or a stop request has been issued.<br />
ON (1): The press is running or a start request has been issued.<br />
IMPORTANT: When the press has been requested to stop at Top, overrun monitoring is enabled when<br />
the slide transitions from the Up to the Top zone. An overrun fault occurs when the slide continues to<br />
move into the Down zone.<br />
Reset (1) Boolean This input clears the instruction faults provided the fault condition is not present.<br />
OFF (0) -> ON (1): The Fault Present and Fault Code outputs are reset.<br />
(1) ISO 13849-1 stipulates instruction reset functions must occur on falling edge signals. To comply with ISO 13849-1<br />
requirements, add this logic immediately before this instruction. Rename the “Reset_Signal” tag in this example<br />
to your reset signal tagname. Then use the OSF instruction Output Bit tag as the instruction’s reset source.<br />
244 Publication <strong>1756</strong>-<strong>RM095C</strong>-<strong>EN</strong>-P - July 2008
Crankshaft Position Monitor <strong>Instruction</strong>: Outputs<br />
Metal Form <strong>Instruction</strong>s Chapter 2<br />
The following table explains the instruction outputs. The outputs may<br />
be field device signals or derived from user logic.<br />
Parameter Data Type Description<br />
Slide Zone Integer This input represents the position of the slide based on the cam profile selected. This output is used to<br />
source the Slide Zone input of the Clutch Brake Inch Mode (CBIM), Clutch Brake Single Stroke<br />
Mode (CBSSM), Clutch Brake Continuous Mode (CBCM), and Camshaft Monitor (CSM) instructions.<br />
This is a bit-mapped value where:<br />
Bit 0: Status<br />
OFF (0) - The Slide Zone information is invalid. Prevents the energizing of Output 1 on an initial start<br />
or immediately de-energized Output 1.<br />
ON (1) - Slide Zone information is valid.<br />
Bits 1 and 2: Slide Zone<br />
The following table lists how Bits 0…2 are used to represent the valid slide zones.<br />
Bit 2 Bit 1 Bit 0 Slide Zone Decimal Value<br />
0 0 1 Down 1<br />
0 1 1 Up 3<br />
1 0 1 Top 5<br />
Top Zone (TZ) Boolean<br />
Bits 3…31: Unused; <strong>Set</strong> to 0.<br />
This information bit indicates when the slide is in the Top zone.<br />
Down Zone<br />
(DZ)<br />
Boolean This information bit indicates when the slide is in the Down zone.<br />
Up Zone (UZ) Boolean This information bit indicates when the slide is in the Up zone.<br />
Diagnostic Integer This output indicates the diagnostic status of the instruction. See the CPM – Diagnostic Codes on page<br />
Code<br />
251 for a list of diagnostic codes.<br />
Fault Code Integer<br />
This parameter is not safety-related.<br />
This output indicates the type of fault that occurred. See the CPM – Fault Codes on page 250 for a list<br />
of fault codes.<br />
Fault Present<br />
(FP)<br />
This parameter is not safety-related.<br />
Boolean ON (1): A fault is present in the instruction.<br />
OFF (0): The instruction is operating normally.<br />
IMPORTANT<br />
Do not write to any instruction output tag under any<br />
circumstances.<br />
Publication <strong>1756</strong>-<strong>RM095C</strong>-<strong>EN</strong>-P - July 2008 245
Chapter 2 Metal Form <strong>Instruction</strong>s<br />
CPM – Cam Profiles<br />
This instruction supports two cam profiles, A or B, selected by using<br />
the Cam Profile configurable parameter. The main difference between<br />
Cam Profiles A and B is the configuration of the Brake Cam (BCAM).<br />
In profile A, the BCAM is configured to represent the Top zone and in<br />
profile B, it is configured to represent the Down zone. The Takeover<br />
Cam (TCAM) in both profiles is configured to represent the Up zone.<br />
These profile diagrams illustrate the relationships of the cams when<br />
the Dynamic Cam (DCAM) is enabled.<br />
When enabled, the DCAM is configured the same way, with the ON<br />
(1) to OFF (0) transition during the Up zone generating the early Top<br />
zone. Depending upon the speed of the press, this transition can be<br />
configured to occur anytime during the Up zone. However, when the<br />
DCAM is disabled, it must be configured as follows:<br />
• Profile A – The DCAM must be sourced by the inverse of the<br />
BCAM input source.<br />
• Profile B – The DCAM must be sourced by the TCAM input<br />
source.<br />
246 Publication <strong>1756</strong>-<strong>RM095C</strong>-<strong>EN</strong>-P - July 2008
TCAM<br />
Cam Profiles<br />
Profile A Profile B<br />
Up<br />
BCAM<br />
Top<br />
Down<br />
DCAM DCAM<br />
ATT<strong>EN</strong>TION<br />
ATT<strong>EN</strong>TION<br />
ATT<strong>EN</strong>TION<br />
Metal Form <strong>Instruction</strong>s Chapter 2<br />
Publication <strong>1756</strong>-<strong>RM095C</strong>-<strong>EN</strong>-P - July 2008 247<br />
TCAM<br />
Top<br />
Down<br />
Range during which the DCAM is allowed to turn ON (1)<br />
Up<br />
BCAM<br />
Cam angles are not shown in these cam profiles. The cam<br />
angles should be selected by qualified personnel.<br />
When the Cam Profile is configured for A and dynamic stopping<br />
is disabled, the Dynamic Cam (DCAM) input must be sourced<br />
inverse of the Brake Cam (BCAM) input source.<br />
When the Cam Profile is configured for B and dynamic stopping<br />
is disabled, the Dynamic Cam (DCAM) input must be sourced by<br />
the Takeover Cam (TCAM) input source.
Chapter 2 Metal Form <strong>Instruction</strong>s<br />
Cam Profile<br />
1<br />
Takeover Cam (TCAM)<br />
0<br />
1<br />
Dynamic Cam (DCAM)<br />
0<br />
1<br />
Brake Cam (BCAM)<br />
0<br />
1<br />
Reverse<br />
0<br />
1<br />
Top Zone<br />
0<br />
1<br />
Down Zone<br />
0<br />
1<br />
Up Zone<br />
0<br />
Slide Zone<br />
CPM – Normal Operation with Cam Profile A<br />
The following example describes normal operation when Cam<br />
Profile A is selected and the press is moving in the forward direction.<br />
The press starts with the slide at Top with the Takeover cam<br />
input (TCAM) OFF (0) and the Brake cam input (BCAM) ON (1) at (A)<br />
The Slide Zone is set to Top. As the press moves, the BCAM input<br />
transitions from ON (1) to OFF (0) at (B) and the Slide Zone changes<br />
from Top to Down. As the press continues moving, the TCAM input<br />
transitions from OFF (0) to ON (1) at (C) and the Slide Zone changes<br />
from Down to Up. Further press movement causes the Slide Zone<br />
output to change from Up to Top at different points depending on the<br />
Dynamic cam input (DCAM) configuration.<br />
When the DCAM is enabled, the Slide Zone changes from Up to Top<br />
when the DCAM input transitions from ON (1) to OFF (0) while the<br />
TCAM input is ON (1) at (D). When the DCAM is disabled, the Slide<br />
Zone changes from Up to Top when the BCAM input transitions from<br />
OFF (0) to ON (1) at (D).<br />
T D U T<br />
A<br />
Cam Profile<br />
1<br />
Takeover Cam (TCAM)<br />
0<br />
1<br />
Dynamic Cam (DCAM)<br />
0<br />
1<br />
Brake Cam (BCAM)<br />
0<br />
1<br />
Reverse<br />
0<br />
1<br />
Top Zone<br />
0<br />
1<br />
Down Zone<br />
0<br />
1<br />
Up Zone<br />
0<br />
Slide Zone<br />
T D U T<br />
A B C D A B C D<br />
Zone: T = Top D = Down U = Up<br />
Dynamic Cam Enabled<br />
Dynamic Cam Disabled<br />
248 Publication <strong>1756</strong>-<strong>RM095C</strong>-<strong>EN</strong>-P - July 2008<br />
A
Cam Profile<br />
1<br />
Takeover Cam (TCAM)<br />
0<br />
1<br />
Dynamic Cam (DCAM)<br />
0<br />
1<br />
Brake Cam (BCAM)<br />
0<br />
1<br />
Reverse<br />
0<br />
1<br />
Top Zone<br />
0<br />
1<br />
Down Zone<br />
0<br />
1<br />
Up Zone<br />
0<br />
Slide Zone<br />
CPM – Normal Operation with Cam Profile B<br />
Metal Form <strong>Instruction</strong>s Chapter 2<br />
The following example describes normal operation when Cam Profile<br />
B is selected and the press is moving in the forward direction. The<br />
press starts with slide at Top with Takeover cam input (TCAM) and<br />
Brake cam input (BCAM) OFF (0) at (A) and Slide Zone set to Top. As<br />
the press moves, the BCAM input transitions from OFF (0) to ON (1) at<br />
(B) and the Slide Zone changes from Top to Down. As the press<br />
continues moving, the TCAM input transitions from OFF (0) to ON (1)<br />
at (C) and Slide Zone changes from Down to Up. Further press<br />
movement causes the Slide Zone output to change from Up to Top at<br />
different points depending on the Dynamic cam input (DCAM)<br />
configuration.<br />
When the DCAM is enabled, the Slide Zone output changes from Up<br />
to Top when the DCAM input transitions from ON (1) to OFF (0)<br />
while the TCAM input is ON (1) and the BCAM input is OFF (0) at<br />
(D). When the DCAM is disabled, the Slide Zone output changes from<br />
Up to Top when the TCAM input transitions ON (1) to OFF (0) at (D).<br />
B<br />
T D U T<br />
Cam Profile<br />
Takeover Cam (TCAM)<br />
Dynamic Cam (DCAM)<br />
Brake Cam (BCAM)<br />
Reverse<br />
Top Zone<br />
Down Zone<br />
Publication <strong>1756</strong>-<strong>RM095C</strong>-<strong>EN</strong>-P - July 2008 249<br />
1<br />
0<br />
1<br />
0<br />
1<br />
0<br />
1<br />
0<br />
1<br />
0<br />
1<br />
0<br />
1<br />
Up Zone<br />
0<br />
Slide Zone<br />
B<br />
T D U T<br />
A B C D A B C D<br />
Zone: T = Top D = Down U = Up<br />
Dynamic Cam Enabled<br />
Dynamic Cam Disabled
Chapter 2 Metal Form <strong>Instruction</strong>s<br />
CPM – False Rung State Behavior<br />
When the instruction is executed on a false rung, all instruction<br />
outputs are de-energized.<br />
CPM – Fault Codes<br />
Fault Code Description Corrective Action<br />
00H No fault. None.<br />
20H The Input Status input transitioned from ON (1) to OFF (0) while • Check the I/O module connection or the internal<br />
the instruction was executing.<br />
logic used to source input status.<br />
• Reset the fault.<br />
1000H While the press was moving forward, slide movement from the • Check the cams or the scan rate.<br />
Top zone to the Up zone was detected<br />
• Reset the fault.<br />
1001H While the press was moving forward, slide movement from the<br />
Down zone to the Top zone was detected.<br />
1002H While the press was moving forward, slide movement from the Up<br />
zone to the Down zone was detected.<br />
1003H While the press was moving forward, slide movement from the Up<br />
zone to the Down zone was detected.<br />
1004H Slide movement from the Top zone to the Down zone was<br />
detected while the press was reversing. Reverse movement is<br />
only permitted toward the Top zone.<br />
1005H Slide movement from the Down zone to the Up zone was detected<br />
while the press was reversing. Forward movement of the press is<br />
not permitted when Reverse is enabled.<br />
1006H The Dynamic cam (DCAM) may be stuck OFF (0). • Check the DCAM.<br />
1007H The Dynamic cam (DCAM) may be stuck ON (1).<br />
• Reset the fault.<br />
1008H Cam Profile A The DCAM turned OFF (0) while the slide was in<br />
the Down zone.<br />
Cam Profile B N/A<br />
1009H Cam Profile A The Takeover cam (TCAM) may be stuck ON (0). • Check the TCAM.<br />
Cam Profile B N/A<br />
• Reset the fault.<br />
100AH Cam Profile A N/A • Check the BCAM.<br />
Cam Profile B The Brake cam (BCAM) may be stuck ON (0). • Reset the fault.<br />
1020H A request to reverse the press was made while the slide was in • <strong>Set</strong> the Reverse input to OFF (0).<br />
the Up zone.<br />
• Reset the fault.<br />
1040H A slide overrun fault occurred. • Check the brake linings for wear.<br />
• Check the cam settings for proper alignment.<br />
• Reset the fault.<br />
250 Publication <strong>1756</strong>-<strong>RM095C</strong>-<strong>EN</strong>-P - July 2008
CPM – Diagnostic Codes<br />
Metal Form <strong>Instruction</strong>s Chapter 2<br />
Diagnostic Code Description Corrective Action<br />
00H No fault. None.<br />
20H The Input Status input was OFF (0) when the • Check the I/O module connection or the Camshaft<br />
instruction started.<br />
Monitor (CSM) instruction used to source input status.<br />
• <strong>Set</strong> the Input Status input to ON (1), if the inputs are<br />
not being sourced by a safety I/O module.<br />
Publication <strong>1756</strong>-<strong>RM095C</strong>-<strong>EN</strong>-P - July 2008 251
Chapter 2 Metal Form <strong>Instruction</strong>s<br />
Camshaft Monitor (CSM)<br />
• BG-certified<br />
•<br />
This instruction monitors the starting, stopping, and running<br />
operations of a camshaft.<br />
Possible sources for the Channel A and Channel B inputs to the<br />
instruction could include proximity switches, resolvers, gray code<br />
encoders, or any device that can produce a series of pulses when the<br />
camshaft is moving.<br />
Starting and stopping diagnostics are based on the configurable<br />
Mechanical Delay Time parameter. A fault is generated whenever the<br />
Mechanical Delay Time is exceeded during a starting or stopping<br />
operation.<br />
CSM – <strong>Instruction</strong> Parameters<br />
IMPORTANT<br />
Do not use the same tag name for more than one instruction in<br />
the same program. Do not write to any instruction output tag<br />
under any circumstances.<br />
252 Publication <strong>1756</strong>-<strong>RM095C</strong>-<strong>EN</strong>-P - July 2008
Camshaft Monitor <strong>Instruction</strong>: Inputs<br />
Parameter Data Type Description<br />
Mechanical Delay<br />
Time<br />
Metal Form <strong>Instruction</strong>s Chapter 2<br />
The following table explains the instruction inputs. The inputs may be<br />
field device signals from input devices or derived from user logic.<br />
Integer In a starting operation, this parameter determines the amount of time the instruction waits for the<br />
Channel A and Channel B inputs to indicate motion after the Motion Request input has<br />
transitioned from OFF (0) to ON (1) before generating a Start Time Exceeded fault.<br />
In a stopping operation, this parameter determines the amount of time the instruction waits for the<br />
Channel A or Channel B input to indicate a loss of motion after the Motion Request input has<br />
transitioned from ON (1) to OFF (0) before generating a Stop Time Exceeded fault.<br />
Max Pulse Period Integer<br />
The valid range is 300…2000 ms.<br />
This parameter defines the maximum time allowed between the rising and falling edges in the<br />
input pulse train before motion is considered to be stopped.<br />
Motion Request Boolean<br />
The valid range is 50…2000 ms.<br />
This input indicates if motion is being requested. It is sourced by Output 1 of the Clutch Brake Inch<br />
Mode (CBIM), Clutch Brake Single Stroke Mode (CBSSM), or Clutch Brake Continuous Mode<br />
(CBCM) instruction.<br />
Channel A Boolean<br />
ON (1): The camshaft is being commanded to move and motion is expected.<br />
OFF (0): Camshaft motion is not requested.<br />
A pulse train at this input indicates that the camshaft is moving.<br />
Channel B Boolean A pulse train at this input indicates that the camshaft is moving.<br />
Input Status Boolean If instruction inputs are from a safety I/O module, this is the input status from the I/O module or<br />
modules (Input Status or Combined Status). If instruction inputs are derived from internal logic, it is<br />
the application programmer’s responsibility to determine the conditions.<br />
Reset<br />
ON (1): The inputs to this instruction are valid.<br />
OFF (0): The inputs to this instruction are invalid.<br />
(1) Boolean This input clears the instruction faults provided the fault condition is not present.<br />
OFF (0) -> ON (1): The Fault Present and Fault Code outputs are reset.<br />
(1) ISO 13849-1 stipulates instruction reset functions must occur on falling edge signals. To comply with ISO 13849-1<br />
requirements, add this logic immediately before this instruction. Rename the “Reset_Signal” tag in this example<br />
to your reset signal tagname. Then use the OSF instruction Output Bit tag as the instruction’s reset source.<br />
Publication <strong>1756</strong>-<strong>RM095C</strong>-<strong>EN</strong>-P - July 2008 253
Chapter 2 Metal Form <strong>Instruction</strong>s<br />
Camshaft Monitor <strong>Instruction</strong>: Outputs<br />
The following table explains the instruction outputs. The outputs may<br />
be field device signals or derived from user logic.<br />
Parameter Data Type Description<br />
Output 1 (O1) Boolean This output indicates whether the camshaft is in motion. It is used to source the Motion Monitor<br />
Fault input of the Clutch Brake Inch Mode (CBIM), Clutch Brake Single Stroke Mode (CBSSM), or<br />
Clutch Brake Continuous Mode (CBCM) instruction.<br />
Fault Present (FP) Boolean<br />
ON (1): The camshaft is moving.<br />
OFF (0): The camshaft is stopped.<br />
ON (1): A fault is present in the instruction.<br />
OFF (0): The instruction is operating normally.<br />
Fault Code Integer This output indicates the type of fault that occurred. See the CSM – Fault Codes on page 263 for<br />
the list of possible fault codes.<br />
Diagnostic Code Integer<br />
This parameter is not safety-related.<br />
This output indicates the diagnostic status of the instruction. See the CSM – Diagnostic Codes on<br />
page 264 for a list of possible diagnostic codes.<br />
Measured Start Time Integer<br />
This parameter is not safety-related.<br />
The time, in milliseconds, that it took the camshaft to start moving. This is the difference in time<br />
from when the Motion Request input turns ON (1) to the time at which both Channel A and Channel<br />
B inputs indicate motion.<br />
Measured Stop Time Integer<br />
This parameter is not safety-related.<br />
The time, in milliseconds, that it took the camshaft to stop moving. This is the difference in time<br />
from when the Motion Request input turns OFF (0) to the time at which either the Channel A or<br />
Channel B input stopped indicating motion.<br />
This parameter is not safety-related.<br />
IMPORTANT<br />
Do not write to any instruction output tag under any<br />
circumstances.<br />
254 Publication <strong>1756</strong>-<strong>RM095C</strong>-<strong>EN</strong>-P - July 2008
CSM – Input Pulse Conversion<br />
Metal Form <strong>Instruction</strong>s Chapter 2<br />
The Channel A and Channel B input signals are a pulse train from an<br />
encoder, resolver, or proximity switch. When pulses are detected<br />
within the configured Max Pulse Period, motion is indicated.<br />
The pulse trains are conditioned to provide level input signals to the<br />
instruction logic to derive a signal that is ON (1) when there is motion<br />
and OFF (0) when there is no motion. The conversion of each<br />
channel is independent of the other.<br />
Shown here for Channel A, the signal turns ON (1) at the first pulse<br />
edge seen at the Channel A input at (A). The derived signal remains<br />
ON (1) as long as the elapsed time between pulses does not exceed<br />
the configured Max Pulse Period. If no edges are detected for more<br />
than the Max Pulse Period, the derived level signal turns OFF (0) at<br />
(B).<br />
1<br />
Channel A<br />
Pulse Input<br />
0<br />
Channel A 1<br />
Level Input<br />
(Derived) 0<br />
A B<br />
Publication <strong>1756</strong>-<strong>RM095C</strong>-<strong>EN</strong>-P - July 2008 255<br />
Max<br />
Pulse<br />
Period
Chapter 2 Metal Form <strong>Instruction</strong>s<br />
CSM – Normal Operation<br />
The Motion Request input transitions from OFF (0) to ON (1) at (A),<br />
indicating that the camshaft is being commanded to move. Output 1<br />
turns ON (1) at (B), when pulses are detected on both Channel A and<br />
Channel B within the configured Mechanical Delay Time. After the<br />
Motion Request input turns OFF (0) at (C), indicating that the camshaft<br />
is being commanded to stop, Output 1 turns OFF (0) at (D) since<br />
pulses are no longer present on both channels. Pulses must stop on<br />
either Channel A or Channel B within the configured Mechanical<br />
Delay Time to prevent a Stop Time Exceeded fault.<br />
1<br />
Motion Request<br />
0<br />
1<br />
Channel A<br />
0<br />
1<br />
Channel B<br />
0<br />
1<br />
Input Status<br />
0<br />
1<br />
Reset<br />
0<br />
1<br />
Fault Present<br />
0<br />
1<br />
Output 1<br />
0<br />
A B<br />
256 Publication <strong>1756</strong>-<strong>RM095C</strong>-<strong>EN</strong>-P - July 2008<br />
C D
CSM – Uncommanded Motion Fault<br />
Metal Form <strong>Instruction</strong>s Chapter 2<br />
An Uncommanded Motion Fault occurs when the Motion Request<br />
input is OFF (0) but pulses on the Channel A and Channel B inputs<br />
indicate motion.<br />
The Motion Request input is OFF (0), indicating that motion is not<br />
being commanded. When pulses are detected on only one channel at<br />
(A), no fault occurs. When pulses are detected on both Channel A and<br />
Channel B at (B), a fault is generated indicating Uncommanded<br />
Motion. Output 1 tracks the presence of pulses on both Channel A<br />
and Channel B turning ON (1) at (B) and OFF (0) at (C). When no<br />
pulses are detected on either channel and the Motion Request input is<br />
OFF (0), indicating that motion is no longer requested, the fault is<br />
cleared on the next OFF (0) to ON (1) transition of the Reset input at<br />
(D).<br />
1<br />
Motion Request<br />
0<br />
1<br />
Channel A<br />
0<br />
1<br />
Channel B<br />
0<br />
1<br />
Input Status<br />
0<br />
1<br />
Reset<br />
0<br />
1<br />
Fault Present<br />
0<br />
1<br />
Output 1<br />
0<br />
A B C D<br />
Publication <strong>1756</strong>-<strong>RM095C</strong>-<strong>EN</strong>-P - July 2008 257
Chapter 2 Metal Form <strong>Instruction</strong>s<br />
CSM – Start Time Exceeded Fault<br />
At (A), the Motion Request input turns ON (1), indicating that motion<br />
is being requested. The Fault Present output turns ON (1) when the<br />
configured Mechanical Delay Time expires at (B), prior to pulses<br />
being detected on both Channel A and Channel B. When pulses are<br />
present on both inputs at (C), Output 1 turns ON (1) even though the<br />
fault condition is present. When either Channel A or Channel B are no<br />
longer indicating motion at (D), Output 1 turns OFF (0). When both<br />
channels are not indicating motion (no pulses) and the Motion<br />
Request input is also OFF (0) at (E), a subsequent OFF (0) to ON (1)<br />
transition of the Reset input resets the fault condition at (F).<br />
1<br />
Motion Request<br />
0<br />
1<br />
Channel A<br />
0<br />
1<br />
Channel B<br />
0<br />
1<br />
Input Status<br />
0<br />
1<br />
Reset<br />
0<br />
1<br />
Fault Present<br />
0<br />
1<br />
Output 1<br />
0<br />
A B C D E<br />
258 Publication <strong>1756</strong>-<strong>RM095C</strong>-<strong>EN</strong>-P - July 2008<br />
Delay<br />
Time<br />
F
CSM – Stop Time Exceeded Fault<br />
Metal Form <strong>Instruction</strong>s Chapter 2<br />
At (A), the Motion Request input turns OFF (0), indicating that motion<br />
is being commanded to stop. At (B), the Fault Present output turns<br />
ON (1) when the configured Mechanical Delay Time expires before<br />
pulses stop on either Channel A or Channel B. Output 1 transitions<br />
from ON (1) to OFF (0) when pulses stop occurring on either Channel<br />
A or Channel B at (C). When both Channel A and Channel B stop<br />
indicating motion and the Motion Request input is also OFF (0) at (D),<br />
a subsequent OFF (0) to ON (1) transition of the Reset input resets the<br />
fault condition at (E).<br />
1<br />
Motion Request<br />
0<br />
1<br />
Channel A<br />
0<br />
1<br />
Channel B<br />
0<br />
1<br />
Input Status<br />
0<br />
1<br />
Reset<br />
0<br />
1<br />
Fault Present<br />
0<br />
1<br />
Output 1<br />
0<br />
A B C D E<br />
Publication <strong>1756</strong>-<strong>RM095C</strong>-<strong>EN</strong>-P - July 2008 259<br />
Delay<br />
Time
Chapter 2 Metal Form <strong>Instruction</strong>s<br />
CSM – Loss of Motion Fault (Case 1)<br />
The Motion Request input turns ON (1), and at (A) the Channel A and<br />
Channel B inputs both indicate motion within the configured<br />
Mechanical Delay Time. Once the Mechanical Delay Time has expired<br />
at (B), a subsequent loss of pulses on either Channel A or Channel B<br />
results in the Fault Present output turning ON (1), indicating a Loss of<br />
Motion fault at (C). Output 1 also turns OFF (0) at (C). When both<br />
Channel A and Channel B are no longer indicating motion at (D) and<br />
the Motion Request input is also OFF (0), a subsequent OFF (0) to<br />
ON (1) transition of the Reset input resets the fault condition, at (E).<br />
1<br />
Motion Request<br />
0<br />
1<br />
Channel A<br />
0<br />
1<br />
Channel B<br />
0<br />
1<br />
Input Status<br />
0<br />
1<br />
Reset<br />
0<br />
1<br />
Fault Present<br />
0<br />
1<br />
Output 1<br />
0<br />
A B C D E<br />
260 Publication <strong>1756</strong>-<strong>RM095C</strong>-<strong>EN</strong>-P - July 2008<br />
Delay<br />
Time
CSM – Loss of Motion Fault (Case 2)<br />
Metal Form <strong>Instruction</strong>s Chapter 2<br />
The Motion Request input turns ON (1), and at (A) the Channel A and<br />
Channel B inputs both indicate motion within the configured<br />
Mechanical Delay Time. A loss of pulses on either Channel A or<br />
Channel B, at (B), before the Mechanical Delay Time expires, results<br />
Output 1 turning OFF (0). When the Mechanical Delay Time expires at<br />
(C), the Fault Present output turns ON (1), indicating a Loss of Motion<br />
fault. When both Channel A and Channel B are no longer indicating<br />
motion at (D) and the Motion Request input is also OFF (0), a<br />
subsequent OFF (0) to ON (1) transition of the Reset input resets the<br />
fault condition, at (E).<br />
1<br />
Motion Request<br />
0<br />
1<br />
Channel A<br />
0<br />
1<br />
Channel B<br />
0<br />
1<br />
Input Status<br />
0<br />
1<br />
Reset<br />
0<br />
1<br />
Fault Present<br />
0<br />
1<br />
Output 1<br />
0<br />
A B C<br />
D E<br />
Publication <strong>1756</strong>-<strong>RM095C</strong>-<strong>EN</strong>-P - July 2008 261<br />
Delay<br />
Time
Chapter 2 Metal Form <strong>Instruction</strong>s<br />
CSM – Input Status Fault<br />
At (A), the Motion Request input turns ON (1), indicating that motion<br />
is being commanded. Both Channel A and Channel B inputs indicate<br />
motion by detecting pulses within the configured Mechanical Delay<br />
Time. Output 1 turns ON (1) at (B). When the Input Status input turns<br />
OFF (0) at (C), an Input Status Fault occurs and the Fault Present<br />
output turns ON (1). Output 1 also turns OFF (0) at (C). Output 1 is<br />
always OFF (0) when the Input Status input is OFF (0). When both<br />
Channel A and Channel B no longer indicate motion at (D), the<br />
Motion Request input is also OFF (0), and the Input Status input has<br />
returned to ON (1), a subsequent OFF (0) to ON (1) transition of the<br />
Reset input resets the fault condition, at (E).<br />
1<br />
Motion Request<br />
0<br />
Channel A<br />
1<br />
0<br />
Channel B<br />
1<br />
0<br />
1<br />
Input Status<br />
0<br />
1<br />
Reset<br />
0<br />
1<br />
Fault Present<br />
0<br />
1<br />
Output 1<br />
0<br />
CSM – False Rung State Behavior<br />
A B C D E<br />
When the instruction is executed on a false rung, all instruction<br />
outputs are de-energized.<br />
262 Publication <strong>1756</strong>-<strong>RM095C</strong>-<strong>EN</strong>-P - July 2008
CSM – Fault Codes<br />
Metal Form <strong>Instruction</strong>s Chapter 2<br />
Fault Code Description Corrective Action<br />
0000H No faults. None.<br />
0020H An input status error occurred. The Input Status input • Check the I/O module connection.<br />
transitioned from ON (1) to OFF (0).<br />
• Reset the fault.<br />
6000H Uncommanded Motion occurred. The Motion Request input is • Check the devices driving the Channel A and<br />
OFF (0) but both input channels indicate the camshaft is Channel B inputs and the associated wiring.<br />
moving.<br />
• Make sure the camshaft is stopped by inspecting it<br />
visually.<br />
• Reset the fault.<br />
6001H Start time was exceeded. The measured time to start the • Re-evaluate the Mechanical Delay Time value.<br />
camshaft exceeded the configured Mechanical Delay Time. • Make sure camshaft mechanical linkages, brakes, and<br />
motion sensors are functioning.<br />
• Visually check that motion has stopped.<br />
• Reset the fault.<br />
6002H Stop time was exceeded. The measured time to stop the • Re-evaluate the Mechanical Delay Time value.<br />
camshaft exceeded the configured Mechanical Delay Time. • Make sure mechanical linkages, brakes, and motion<br />
sensors are functioning.<br />
• Visually check that motion has stopped.<br />
• Reset the fault.<br />
6003H Loss of Motion occurred at Channel A. The Motion Request • Check the device driving the Channel A input and the<br />
input is ON (1), but the Channel A input stopped indicating associated wiring.<br />
motion.<br />
• Make sure the camshaft is stopped by inspecting it<br />
visually.<br />
• Reset the fault.<br />
6004H Loss of Motion occurred at Channel B. The Motion Request • Check the device driving the Channel B input and the<br />
input is ON (1), but the Channel B input stopped indicating associated wiring.<br />
motion.<br />
• Make sure the camshaft is stopped by inspecting it<br />
visually.<br />
• Reset the fault.<br />
6005H The Motion Request input turned ON (1) before all inputs • Check the I/O module connection.<br />
were in their safe state, OFF (0).<br />
• Make sure the camshaft is stopped by inspecting it<br />
visually.<br />
• Make sure all motion sensors are operating properly.<br />
• Reset the fault.<br />
Publication <strong>1756</strong>-<strong>RM095C</strong>-<strong>EN</strong>-P - July 2008 263
Chapter 2 Metal Form <strong>Instruction</strong>s<br />
CSM – Diagnostic Codes<br />
Diagnostic Code Description Corrective Action<br />
0000H None. None.<br />
0020H The Input Status input is OFF (0) when the<br />
instruction first executed.<br />
Check the I/O module connection.<br />
6000H The Channel A and Channel B inputs are both • Check the devices driving the Channel A and Channel B<br />
indicating motion (pulses present) when the inputs and the associated wiring.<br />
instruction first executed.<br />
• Visually check that motion has stopped.<br />
6001H The Channel A input is indicating motion (pulses • Check the device driving the Channel A input and the<br />
present), when the instruction first executed. associated wiring.<br />
• Visually check that motion has stopped.<br />
6002H The Channel B input is indicating motion (pulses • Check the device driving the Channel B input and the<br />
present), when the instruction first executed. associated wiring.<br />
• Visually check that motion has stopped.<br />
264 Publication <strong>1756</strong>-<strong>RM095C</strong>-<strong>EN</strong>-P - July 2008
Clutch Brake Wiring and<br />
Programming Example<br />
Metal Form <strong>Instruction</strong>s Chapter 2<br />
The example on the following pages illustrates the use of some of the<br />
Metal Form instructions in a press safety application, including the<br />
three Clutch Brake instructions (CBIM, CBSSM, and CBCM), the<br />
Camshaft Motion Monitor (CSM), and the Crankshaft Position Monitor<br />
(CPM).<br />
Wiring Diagram<br />
24V DC<br />
DeviceNet<br />
1<br />
V<br />
G<br />
11<br />
13<br />
T0<br />
24V Ground<br />
Brake Cam Takeover Cam<br />
3<br />
I0<br />
1791-DS-IB12<br />
Publication <strong>1756</strong>-<strong>RM095C</strong>-<strong>EN</strong>-P - July 2008 265<br />
14<br />
T1<br />
T2<br />
25<br />
4<br />
I1<br />
Module 1<br />
5<br />
I2<br />
Arm Continuous<br />
Prompt Lamp<br />
28<br />
T3<br />
6<br />
I3<br />
Momentary<br />
Push Button<br />
(reset)<br />
Motion Monitor Proximity Sensors<br />
29<br />
T3<br />
24<br />
I11
Chapter 2 Metal Form <strong>Instruction</strong>s<br />
RunStationStart1<br />
ValvesOK 1<br />
Level1Safeties1<br />
Level2Safeties 1<br />
Level3Safeties1<br />
MainValveActuated 1<br />
DynamicCamAngle1 1<br />
EncoderRegister 1<br />
DynamicCamAngle2 1<br />
Module 1:I.CombinedStatus<br />
Module 1:I.Pt11Data<br />
StartDelayTime<br />
StopDelayTime<br />
&<br />
LIM<br />
Low Limit<br />
Test<br />
High Limit<br />
SafetiesOK 2<br />
I0<br />
Out<br />
I1<br />
Programming Diagram<br />
A<br />
1<br />
Module 1:I.Pt00Data<br />
Module 1:I.Pt01Data<br />
ReversePress 1<br />
80 ms<br />
Module 1:I.Pt02Data<br />
Module 1:I.Pt03Data<br />
CPM<br />
Cam Profile<br />
Enable<br />
Press Motion Status<br />
Brake Cam<br />
Takeover Cam<br />
Dynamic Cam<br />
Input Status<br />
Reverse<br />
CrankPosition<br />
Slide Zone<br />
Fault Present<br />
CrankPosition.DZ 2<br />
266 Publication <strong>1756</strong>-<strong>RM095C</strong>-<strong>EN</strong>-P - July 2008<br />
Reset<br />
Top Zone<br />
Down Zone<br />
Up Zone<br />
MotionMonitor<br />
CSM<br />
Mechanical Delay Time Output 1<br />
Max Pulse Period<br />
Motion Request<br />
Channel A<br />
Channel B<br />
Input Status<br />
Reset<br />
Fault Present<br />
Key: Color code represents data or value typically used.<br />
Tag-mapped Variable<br />
Standard Output<br />
<strong>Safety</strong> Input <strong>Safety</strong> Output<br />
Configuration Constant/Value<br />
Internal <strong>Safety</strong> Variable<br />
&<br />
&<br />
MotionStopped 2<br />
MotionMonitor_IS 2<br />
A<br />
B<br />
C<br />
D<br />
E<br />
F<br />
G
A<br />
B<br />
C<br />
D<br />
E<br />
F<br />
G<br />
Programming Diagram (continued)<br />
Manual<br />
5000 ms<br />
InchModeSelected 1<br />
EnableInchMode1<br />
1<br />
Manual<br />
Disabled<br />
SingleStrokeSelected1<br />
EnableSingleStrokeMode1<br />
Manual<br />
Immediate With Arming<br />
Disabled<br />
ContinuousModeSelected1<br />
EnableContinuousMode1<br />
ArmContinuousInput1<br />
StopPressInput1<br />
CBIM<br />
Ack Type<br />
Inch Time<br />
Enable<br />
<strong>Safety</strong> Enable<br />
Standard Enable<br />
Start<br />
Press In Motion<br />
Slide Zone<br />
Motion Monitor Fault<br />
<strong>Safety</strong> Enable Ack<br />
InchMode<br />
Metal Form <strong>Instruction</strong>s Chapter 2<br />
Publication <strong>1756</strong>-<strong>RM095C</strong>-<strong>EN</strong>-P - July 2008 267<br />
Output 1<br />
CBSSM<br />
SingleStrokeMode<br />
Ack Type<br />
Output 1<br />
Inch Time<br />
Enable<br />
<strong>Safety</strong> Enable<br />
Standard Enable<br />
Start<br />
Press In Motion<br />
Slide Zone<br />
Motion Monitor Fault<br />
<strong>Safety</strong> Enable Ack<br />
ContinuousMode<br />
CBCM<br />
Ack Type<br />
Output 1<br />
Mode<br />
Takeover Mode Continuous Armed<br />
Enable<br />
<strong>Safety</strong> Enable<br />
Standard Enable<br />
Arm Continuous<br />
Start<br />
Stop At Top<br />
Press In Motion<br />
Slide Zone<br />
Motion Monitor Fault<br />
<strong>Safety</strong> Enable Ack<br />
>=1<br />
PressRun 2<br />
ArmContinuousPrompt<br />
Note 1: This is an internal Boolean tag which has its value<br />
determined by other parts of the user application not<br />
shown in this example.<br />
Note 2: This is an internal Boolean tag used by other parts of the<br />
user application not shown in this example.
Chapter 2 Metal Form <strong>Instruction</strong>s<br />
Ladder Logic<br />
LIM<br />
Limit Test (CIRC)<br />
CrankPosition.DynamicCam<br />
Low Limit DynamicCamAngle1<br />
95<br />
Test EncoderRegister<br />
0<br />
High Limit DynamicCamAngle2<br />
320<br />
CPM<br />
Crankshaft Position Monitor<br />
CPM CrankPosition TZ<br />
Cam Profile A<br />
Enable ALWAYS_<strong>EN</strong>ABLED<br />
1<br />
DZ<br />
Brake Cam Module1:I.Pt00Data<br />
1<br />
UZ<br />
Takeover Cam Module1:I.Pt01Data<br />
1<br />
FP<br />
Dynamic Cam CrankPosition.DynamicCam<br />
0<br />
Input Status Module1:I.CombinedStatus<br />
1<br />
Reverse ReversePress<br />
0<br />
Press Motion Status MainValveActuated<br />
<br />
0<br />
Reset Module1:I.Pt11Data<br />
0<br />
MotionMonitor.O1<br />
/<br />
MotionMonitor.O1<br />
MOV<br />
Move<br />
Source StartDelayTime<br />
750<br />
Dest MotionMonitor.MechanicalDelayTime<br />
0<br />
MOV<br />
Move<br />
Source StopDelayTime<br />
1000<br />
Dest MotionMonitor.MechanicalDelayTime<br />
0<br />
CSM<br />
Camshaft Monitor<br />
CSM MotionMonitor<br />
Mechanical Delay Time (Msec) MotionMonitor.MechanicalDelayTime<br />
Max Pulse Period (Msec) 80<br />
Motion Request MainValveActuated<br />
<br />
0<br />
Channel A Module1:I.Pt02Data<br />
0<br />
Channel B Module1:I.Pt03Data<br />
1<br />
Input Status Module1:I.CombinedStatus<br />
1<br />
Reset Module1:I.Pt11Data<br />
0<br />
MotionMonitor.FP MotionMonitor_IS<br />
/<br />
268 Publication <strong>1756</strong>-<strong>RM095C</strong>-<strong>EN</strong>-P - July 2008<br />
O1<br />
FP
Ladder Logic Continued<br />
MotionMonitor.O1<br />
/<br />
MotionMonitor.O1<br />
Metal Form <strong>Instruction</strong>s Chapter 2<br />
CPM<br />
Crankshaft Position Monitor<br />
CPM CrankPosition<br />
Cam Profile A<br />
Enable ALWAYS_<strong>EN</strong>ABLED<br />
1<br />
Brake Cam Module1:I.Pt00Data<br />
1<br />
Takeover Cam Module1:I.Pt01Data<br />
1<br />
Dynamic Cam CrankPosition.DynamicCam<br />
0<br />
Input Status Module1:I.CombinedStatus<br />
1<br />
Reverse ReversePress<br />
0<br />
Press Motion Status MainValveActuated<br />
<br />
0<br />
Reset Module1:I.Pt11Data<br />
0<br />
MOV<br />
Move<br />
Source StartDelayTime<br />
750<br />
Dest MotionMonitor.MechanicalDelayTime<br />
0<br />
MOV<br />
Move<br />
Source StopDelayTime<br />
1000<br />
Dest MotionMonitor.MechanicalDelayTime<br />
0<br />
CSM<br />
Camshaft Monitor<br />
CSM MotionMonitor<br />
Mechanical Delay Time (Msec) MotionMonitor.MechanicalDelayTime<br />
Max Pulse Period (Msec) 80<br />
Motion Request MainValveActuated<br />
<br />
0<br />
Channel A Module1:I.Pt02Data<br />
0<br />
Channel B Module1:I.Pt03Data<br />
1<br />
Input Status Module1:I.CombinedStatus<br />
1<br />
Reset Module1:I.Pt11Data<br />
0<br />
MotionMonitor.FP MotionMonitor_IS<br />
/<br />
Publication <strong>1756</strong>-<strong>RM095C</strong>-<strong>EN</strong>-P - July 2008 269<br />
O1<br />
FP<br />
SafetiesOK ValvesOK InchMode.<strong>Safety</strong>Enable<br />
CBIM<br />
Clutch Brake Inch Mode<br />
CBIM InchMode<br />
Ack Type MANUAL<br />
Inch Time (Msec) 5000<br />
Enable InchModeSelected<br />
0<br />
<strong>Safety</strong> Enable InchMode.<strong>Safety</strong>Enable<br />
1<br />
Standard Enable EnableInchMode<br />
0<br />
Start RunStationStart<br />
0<br />
Press In Motion MotionMonitor.O1<br />
0<br />
Motion Monitor Fault ALWAYS_OK<br />
1<br />
Slide Zone CrankPosition.SlideZone<br />
5 (TOP)<br />
<strong>Safety</strong> Enable Ack Module1:I.Pt11Data<br />
0<br />
O1<br />
TZ<br />
DZ<br />
UZ<br />
FP
Chapter 2 Metal Form <strong>Instruction</strong>s<br />
Ladder Logic Continued<br />
SafetiesOK ValvesOK<br />
SafetiesOK ValvesOK<br />
CrankPosition.FP SingleStrokeMode.<strong>Safety</strong>Enable<br />
/<br />
CBSSM<br />
Clutch Brake Single Stroke Mode<br />
CBSSM SingleStrokeMode<br />
Ack Type MANUAL<br />
Takeover Mode DISABLED<br />
Enable SingleStrokeSelected<br />
0<br />
<strong>Safety</strong> Enable SingleStrokeMode.<strong>Safety</strong>Enable<br />
1<br />
Standard Enable EnableSingleStrokeMode<br />
0<br />
Start RunStationStart<br />
0<br />
Press In Motion MotionMonitor.O1<br />
0<br />
Motion Monitor Fault MotionMonitor_IS<br />
1<br />
Slide Zone CrankPosition.SlideZone<br />
5 (TOP)<br />
<strong>Safety</strong> Enable Ack Module1:I.Pt11Data<br />
0<br />
270 Publication <strong>1756</strong>-<strong>RM095C</strong>-<strong>EN</strong>-P - July 2008<br />
O1<br />
CrankPosition.FP ContinuousMode.<strong>Safety</strong>Enable<br />
/<br />
CBCM<br />
Clutch Brake Continuous Mode<br />
CBCM ContinuousMode<br />
Ack Type MANUAL<br />
Mode IMMEDIATE WITH ARMING<br />
Takeover Mode DISABLED<br />
Enable ContinuousModeSelected<br />
0<br />
<strong>Safety</strong> Enable ContinuousMode.<strong>Safety</strong>Enable<br />
1<br />
Standard Enable EnableContinuousMode<br />
0<br />
Arm Continuous ArmContinuousInput<br />
0<br />
Start RunStationStart<br />
0<br />
Stop At Top StopPressInput<br />
0<br />
Press In Motion MotionMonitor.O1<br />
0<br />
Motion Monitor Fault MotionMonitor_IS<br />
1<br />
Slide Zone CrankPosition.SlideZone<br />
5 (TOP)<br />
<strong>Safety</strong> Enable Ack Module1:I.Pt11Data<br />
0<br />
ContinuousMode.CA ArmContinuousPrompt<br />
InchMode.O1<br />
SingleStrokeMode.O1<br />
ContinuousMode.O1<br />
O1<br />
CA<br />
PressRun
Metal Form <strong>Instruction</strong>s Chapter 2<br />
RSLogix 5000 software is used to configure the input and test output<br />
parameters of the Guard I/O module, as illustrated.<br />
Module Definition<br />
Rockwell Automation suggests using Exact Match, as shown.<br />
However, setting Electronic Keying to Compatible Match is allowed.<br />
Module Input Configuration<br />
Publication <strong>1756</strong>-<strong>RM095C</strong>-<strong>EN</strong>-P - July 2008 271
Chapter 2 Metal Form <strong>Instruction</strong>s<br />
Module Test Output Configuration<br />
272 Publication <strong>1756</strong>-<strong>RM095C</strong>-<strong>EN</strong>-P - July 2008
Eight-position Mode<br />
Selector (EPMS)<br />
• BG-certified<br />
•<br />
Metal Form <strong>Instruction</strong>s Chapter 2<br />
The Eight-position Mode Selector (EPMS) instruction’s main function is<br />
to energize one of it’s eight outputs when the associated input goes<br />
active. Only one output may be energized at a time.<br />
A fault is generated when a no input active condition exists for more<br />
than 250 ms, or a multiple input active condition exists. The fault is<br />
cleared by applying an OFF (0) to ON (1) transition on the Reset<br />
input, but only after the fault condition is corrected.<br />
This instruction supports a Lock input. Updating the outputs is<br />
prohibited when the Lock input is set to ON (1). Attempting to update<br />
the outputs while the Lock input is ON (1) results in the generation of<br />
a diagnostic code and outputs are de-energized (no mode).<br />
ATT<strong>EN</strong>TION<br />
This instruction is specified to operate with Break before Make<br />
types of inputs.<br />
Publication <strong>1756</strong>-<strong>RM095C</strong>-<strong>EN</strong>-P - July 2008 273
Chapter 2 Metal Form <strong>Instruction</strong>s<br />
Eight-position Mode Selector <strong>Instruction</strong>: Inputs<br />
EPMS – <strong>Instruction</strong> Parameters<br />
IMPORTANT<br />
Do not use the same tag name for more than one instruction in<br />
the same program. Do not write to any instruction output tag<br />
under any circumstances.<br />
The following table explains instruction inputs. The inputs may be<br />
field device signals from input devices or derived from user logic.<br />
Name Data Type Description<br />
Input 1 Boolean ON (1): Input ON (1)<br />
OFF (0): Input OFF (0)<br />
Input 2 Boolean ON (1): Input ON (1)<br />
OFF (0): Input OFF (0)<br />
Input 3 Boolean ON (1): Input ON (1)<br />
OFF (0): Input OFF (0)<br />
Input 4 Boolean ON (1): Input ON (1)<br />
OFF (0): Input OFF (0)<br />
Input 5 Boolean ON (1): Input ON (1)<br />
OFF (0): Input OFF (0)<br />
Input 6 Boolean ON (1): Input ON (1)<br />
OFF (0): Input OFF (0)<br />
Input 7 Boolean ON (1): Input ON (1)<br />
OFF (0): Input OFF (0)<br />
Input 8 Boolean ON (1): Input ON (1)<br />
OFF (0): Input OFF (0)<br />
Input Status Boolean If instruction inputs are from a safety I/O module, this is the input status from the I/O module<br />
or modules (Input Status or Combined Status). If instruction inputs are derived from internal<br />
logic, it is the application programmer’s responsibility to determine the conditions.<br />
Lock Boolean<br />
ON (1): The inputs to this instruction are valid.<br />
OFF (0): The inputs to this instruction are invalid.<br />
ON (1): The instruction is locked. Any changes in the input states result in all outputs being<br />
de-energized. A diagnostic is generated.<br />
OFF (0): The instruction is unlocked. Valid input changes are accepted.<br />
Reset (1) Boolean This input clears instruction faults provided the fault condition is not present.<br />
OFF (0) -> ON (1): The Fault Present and Fault Code outputs are reset.<br />
(1) ISO 13849-1 stipulates instruction reset functions must occur on falling edge signals. To comply with ISO 13849-1<br />
requirements, add this logic immediately before this instruction. Rename the “Reset_Signal” tag in this example<br />
to your reset signal tagname. Then use the OSF instruction Output Bit tag as the instruction’s reset source.<br />
274 Publication <strong>1756</strong>-<strong>RM095C</strong>-<strong>EN</strong>-P - July 2008
Eight-position Mode Selector <strong>Instruction</strong>: Outputs<br />
Metal Form <strong>Instruction</strong>s Chapter 2<br />
The following table explains instruction outputs. The outputs are<br />
typically used to select different modes of application operation by<br />
enabling other instructions (Output 1 for mode 1, and so on).<br />
Name Data Type Description<br />
Output 1 (O1) Boolean ON (1): Output ON (1)<br />
OFF (0): Output OFF (0)<br />
Output 2 (O2) Boolean ON (1): Output ON (1)<br />
OFF (0): Output OFF (0)<br />
Output 3 (O3) Boolean ON (1): Output ON (1)<br />
OFF (0): Output OFF (0)<br />
Output 4 (O4) Boolean ON (1): Output ON (1)<br />
OFF (0): Output OFF (0)<br />
Output 5 (O5) Boolean ON (1): Output ON (1)<br />
OFF (0): Output OFF (0)<br />
Output 6 (O6) Boolean ON (1): Output ON (1)<br />
OFF (0): Output OFF (0)<br />
Output 7 (O7) Boolean ON (1): Output ON (1)<br />
OFF (0): Output OFF (0)<br />
Output 8 (O8) Boolean ON (1): Output ON (1)<br />
OFF (0): Output OFF (0)<br />
Fault Present (FP) Boolean ON (1): A fault is present in the instruction.<br />
OFF (0): This instruction is operating normally.<br />
Diagnostic Code Integer This output indicates the diagnostic status of the instruction. See the EPMS – Diagnostic<br />
Codes on page 278 for a list of diagnostic codes.<br />
Fault Code Integer<br />
This parameter is not safety-related.<br />
This output indicates the type of fault that occurred. See the EPMS – Fault Codes on page<br />
278 for a list of fault codes.<br />
This parameter is not safety-related.<br />
IMPORTANT<br />
Do not write to any instruction output tag under any<br />
circumstances.<br />
Publication <strong>1756</strong>-<strong>RM095C</strong>-<strong>EN</strong>-P - July 2008 275
Chapter 2 Metal Form <strong>Instruction</strong>s<br />
EPMS – Lock Input OFF (0)<br />
The timing diagram illustrates the Lock input OFF (0). At (A), a no<br />
inputs condition exists. At (B), a single input, Input x, transitions from<br />
OFF (0) to ON (1) within 250 ms and the corresponding output,<br />
Output x, turns ON (1). At (C), a no inputs condition is created when<br />
the single input, Input x, transitions from ON (1) to OFF (0). At (D), a<br />
single input, Input y, then transitions to ON (1) within 250 ms and the<br />
corresponding output, Output y, turns ON (1).<br />
Input x<br />
Input y<br />
276 Publication <strong>1756</strong>-<strong>RM095C</strong>-<strong>EN</strong>-P - July 2008<br />
Lock<br />
Output x<br />
Output y<br />
Fault Present<br />
1<br />
0<br />
1<br />
0<br />
1<br />
0<br />
1<br />
0<br />
1<br />
0<br />
1<br />
0<br />
A B C<br />
D
EPMS – Lock Input ON (1)<br />
Metal Form <strong>Instruction</strong>s Chapter 2<br />
The timing diagram illustrates the Lock input ON (1). At (A), a no<br />
inputs condition exists. At (B), a single input, Input x, transitions from<br />
OFF (0) to ON (1) within 250 ms and the corresponding output,<br />
Output x, turns ON (1). At (C), the instruction becomes locked when<br />
the Lock input transitions from OFF (0) to ON (1). At (D), an attempt<br />
is made to change the mode when the single input, Input x,<br />
transitions from ON (1) to OFF (0), creating a no inputs condition. At<br />
(E), a single input, Input y, transitions from OFF (0) to ON (1) within<br />
250 ms, generating a diagnostic code indicating that an attempt was<br />
made to change the mode while locked. The output, Output x,<br />
transitions from ON (1) to OFF (0). At (F), the Lock input transitions<br />
from ON (1) to OFF (0) while the single input, Input y, is ON (1), the<br />
corresponding output, Output y, is turned ON (1) and the diagnostic<br />
code is cleared.<br />
Input x<br />
Input y<br />
EPMS – False Rung State Behavior<br />
When the instruction is executed on a false rung, all instruction<br />
outputs are de-energized.<br />
Publication <strong>1756</strong>-<strong>RM095C</strong>-<strong>EN</strong>-P - July 2008 277<br />
Lock<br />
Output x<br />
Output y<br />
1<br />
0<br />
1<br />
0<br />
1<br />
0<br />
1<br />
0<br />
1<br />
0<br />
1<br />
Fault Present<br />
0<br />
A B C D E F
Chapter 2 Metal Form <strong>Instruction</strong>s<br />
EPMS – Fault Codes<br />
Fault Code Description Corrective Action<br />
00H No fault. None.<br />
20H The Input Status input transitioned from ON (1) to OFF (0) • Check the <strong>Safety</strong> I/O module connections or the<br />
while the instruction was executing.<br />
internal logic used to source input status.<br />
• Reset the fault.<br />
3000H A multiple selection input was detected. • Check the mode selection inputs.<br />
• Reset the fault.<br />
3001H A no selection input condition existed for more than 250 ms. • Check the timing of the mode selection inputs to see if<br />
they are within 250 ms.<br />
• Reset the fault.<br />
EPMS – Diagnostic Codes<br />
Diagnostic Code Description Corrective Action<br />
00H No fault. None.<br />
20H The Input Status input was OFF (0) when the • Check the <strong>Safety</strong> I/O module connections or the<br />
instruction was started.<br />
internal logic used to source the input status.<br />
• <strong>Set</strong> the I/O status to 1 (if the inputs are not being<br />
sourced by the <strong>Safety</strong> I/O).<br />
3000H Input data changed while the Lock input was<br />
ON (1).<br />
Only update inputs when the Lock input is OFF (0).<br />
278 Publication <strong>1756</strong>-<strong>RM095C</strong>-<strong>EN</strong>-P - July 2008
EPMS – Wiring and Programming Example<br />
Metal Form <strong>Instruction</strong>s Chapter 2<br />
The standard control portion of the application is not shown.<br />
Wiring Diagram<br />
24V DC<br />
24V Ground<br />
DeviceNet<br />
1<br />
V0<br />
G0<br />
11<br />
Publication <strong>1756</strong>-<strong>RM095C</strong>-<strong>EN</strong>-P - July 2008 279<br />
1<br />
3<br />
I0<br />
2<br />
4<br />
I1<br />
1791-DS-IB12<br />
Selector Switch<br />
3 4<br />
5<br />
I2<br />
6<br />
I3<br />
5<br />
7<br />
I4<br />
13<br />
T0<br />
Module 1<br />
18<br />
T1<br />
Selector Switch Position<br />
1 - No Mode 2- Inch Mode<br />
3 - Single Stroke Mode 4 - Continuous Mode<br />
5 - Maintenance Mode<br />
Momentary<br />
Push Button<br />
(reset)<br />
8<br />
I5<br />
Key<br />
Switch<br />
24<br />
I11
Chapter 2 Metal Form <strong>Instruction</strong>s<br />
This programming diagram shows the instruction with inputs and<br />
outputs.<br />
Programming Diagram<br />
Module 1:I.Pt00Data<br />
Module 1:I.Pt01Data<br />
Module 1:I.Pt02Data<br />
Module 1:I.Pt03Data<br />
Module 1:I.Pt04Data<br />
0<br />
0<br />
0<br />
Module 1:I.CombinedStatus<br />
Module 1:I.Pt05Data<br />
Module 1:I.Pt11Data<br />
Note 1: This is an internal Boolean tag used by other parts of the user application not shown in this example.<br />
Ladder Logic<br />
EPMS<br />
Input 1<br />
Input 2<br />
Input 3<br />
Input 4<br />
Input 5<br />
Input 6<br />
Input 7<br />
Input 8<br />
Input Status<br />
NoModeSelected1<br />
InchModeSelected1<br />
SingleStrokeSelected 1<br />
ContinuousModeSelected 1<br />
MaintenanceModeSelected 1<br />
280 Publication <strong>1756</strong>-<strong>RM095C</strong>-<strong>EN</strong>-P - July 2008<br />
Lock<br />
Reset<br />
<strong>Safety</strong> Input <strong>Safety</strong> Output<br />
Configuration Constant/Value<br />
ModeSelector<br />
Output 1<br />
Output 2<br />
Output 3<br />
Output 4<br />
Output 5<br />
Output 6<br />
Output 7<br />
Output 8<br />
Fault Present<br />
Key: Color code represents data or value typically used.<br />
Tag-mapped Variable<br />
Standard Output<br />
Internal <strong>Safety</strong> Variable<br />
EPMS<br />
Eight Position Mode Selector<br />
EPMS ModeSelector<br />
Input 1 Module1:I.Pt00Data<br />
1<br />
Input 2 Module1:I.Pt01Data<br />
1<br />
Input 3 Module1:I.Pt02Data<br />
0<br />
Input 4 Module1:I.Pt03Data<br />
1<br />
Input 5 Module1:I.Pt04Data<br />
0<br />
Input 6 0<br />
Input 7 0<br />
Input 8 0<br />
Input Status Module1:I.CombinedStatus<br />
1<br />
Lock Module1:I.Pt05Data<br />
0<br />
Reset Module1:I.Pt11Data<br />
0<br />
O1<br />
O2<br />
O3<br />
O4<br />
O5<br />
O6<br />
O7<br />
O8<br />
FP
Metal Form <strong>Instruction</strong>s Chapter 2<br />
RSLogix 5000 software is used to configure the input and test output<br />
parameters of the Guard I/O module, as illustrated.<br />
Module Definition<br />
Rockwell Automation suggests using Exact Match, as shown.<br />
However, setting Electronic Keying to Compatible Match is allowed.<br />
Module Input Configuration<br />
Publication <strong>1756</strong>-<strong>RM095C</strong>-<strong>EN</strong>-P - July 2008 281
Chapter 2 Metal Form <strong>Instruction</strong>s<br />
Module Output Configuration<br />
282 Publication <strong>1756</strong>-<strong>RM095C</strong>-<strong>EN</strong>-P - July 2008
Auxiliary Valve Control<br />
(AVC)<br />
•<br />
Metal Form <strong>Instruction</strong>s Chapter 2<br />
The Auxiliary Valve Control (AVC) instruction controls an auxiliary<br />
valve that is used in conjunction with the main clutch or brake valves<br />
of a press. This instruction is used when a delay is desired between<br />
the enabling or disabling of the main clutch or brake valves and an<br />
auxiliary valve (for example, a soft clutch or brake application). The<br />
clutch or brake can then be engaged in a two-step sequence<br />
providing pressure relief for smoother starting or stopping of the<br />
press. One AVC instruction is required for each function that is to be<br />
carried out. For example, if a delay is needed when starting and<br />
stopping a press, one AVC instruction controls the start delay and<br />
another AVC instruction controls the stop delay.<br />
The timing of the auxiliary valve reaction is configurable. Also, the<br />
instruction can be set up to handle different valve types and positive<br />
or negative feedback signals.<br />
ATT<strong>EN</strong>TION<br />
It is not desirable at all times to allow the auxiliary valve<br />
reaction to be delayed. For example, in a press safety<br />
application, soft braking during the press downstroke is not<br />
allowed. For this reason, delays can be temporarily disabled by<br />
turning the Delay Enable input OFF (0).<br />
Publication <strong>1756</strong>-<strong>RM095C</strong>-<strong>EN</strong>-P - July 2008 283
Chapter 2 Metal Form <strong>Instruction</strong>s<br />
AVC – <strong>Instruction</strong> Parameters<br />
IMPORTANT<br />
Auxiliary Valve Control <strong>Instruction</strong>: Configuration Parameters<br />
Do not use the same tag name for more than one instruction in<br />
the same program. Do not write to any instruction output tag<br />
under any circumstances.<br />
The following table provides the parameters used to configure the<br />
instruction. These parameters cannot be changed at runtime.<br />
Parameter Data Type Description<br />
Feedback Type List This parameter defines feedback OFF and ON states for positive and negative feedback.<br />
Positive OFF (0): Output 1 OFF, Feedback 1 OFF.<br />
ON (1): Output 1 ON, Feedback 1 ON.<br />
Negative OFF (0): Output 1 OFF, Feedback 1 ON.<br />
ON (1): Output 1 ON, Feedback 1 OFF.<br />
Feedback Reaction Integer This parameter specifies the amount of time that the instruction waits for the Feedback 1 input<br />
Time<br />
to reflect the state of Output 1 as defined by the Feedback Type parameter.<br />
The valid range is 5…1000 ms<br />
Delay Type List This parameter specifies where the auxiliary valve delay is to occur. See the timing diagrams<br />
on pages 286…289 for details.<br />
ON (1): The delay occurs when the Actuate input transitions from OFF (0) to ON (1).<br />
OFF (0): The delay occurs when the Actuate input transitions from ON (1) to OFF (0).<br />
Delay Time Integer This parameter defines the time delay.<br />
The valid range is 5…2000 ms.<br />
Output Follows List This parameter specifies how the auxiliary valve reacts to the Actuate input. See the timing<br />
Actuate<br />
diagrams on pages 286…289 for details.<br />
True: Output 1 changes state following the Actuate input.<br />
False: Output 1 changes state opposite to the Actuate input.<br />
Auxiliary Valve Control <strong>Instruction</strong>: Inputs<br />
The following table explains the instruction inputs. The inputs may be<br />
field device signals from input devices or derived from user logic.<br />
Parameter Data Type Description<br />
Actuate Boolean This is the signal to actuate the valve. A change in state on this input causes Output 1 (the<br />
auxiliary valve) to react depending on the how the instruction is configured. See the timing<br />
diagrams on pages 286…289 for more information.<br />
ON (1): Output 1 energizes as specified by the Delay Type and Output Follows Actuate inputs.<br />
OFF (0): Output 1 de-energizes as specified by the Delay Type and Output Follows Actuate<br />
inputs.<br />
284 Publication <strong>1756</strong>-<strong>RM095C</strong>-<strong>EN</strong>-P - July 2008
Auxiliary Valve Control <strong>Instruction</strong>: Inputs<br />
Metal Form <strong>Instruction</strong>s Chapter 2<br />
Delay Enable Boolean This input indicates whether auxiliary valve delays are currently enabled. It can be used to<br />
temporarily disable auxiliary valve delays. If a delay of the auxiliary valve is not desired during<br />
any part of press operation, this input can be set to OFF (0).<br />
ON (1): Delays are currently allowed.<br />
OFF (0): Delays are not currently allowed and the auxiliary valve will react immediately.<br />
Feedback 1 Boolean This input is constantly monitored to make sure that it reflects Output 1. When Output 1<br />
transitions, this input must react within the configured Feedback Reaction Time.<br />
Input Status Boolean If instruction inputs are from a safety I/O module, this is the input status from the I/O module<br />
or modules (Input Status or Combined Status). If instruction inputs are derived from internal<br />
logic, it is the application programmer’s responsibility to determine the conditions.<br />
Output Status Boolean<br />
ON (1): The inputs to this instruction are valid.<br />
OFF (0): The inputs to this instruction are invalid.<br />
This input indicates the output status of the I/O module connected to this instruction.<br />
ON (1): The output module is operating properly.<br />
OFF (0): The output module is faulted or offline. <strong>Instruction</strong> outputs are set their safe state.<br />
Reset (1) Boolean This input clears the instruction faults provided the fault condition is not present.<br />
ON (1): The Fault Present and Fault Code outputs are reset.<br />
(1) ISO 13849-1 stipulates instruction reset functions must occur on falling edge signals. To comply with ISO 13849-1<br />
requirements, add this logic immediately before this instruction. Rename the “Reset_Signal” tag in this example<br />
to your reset signal tagname. Then use the OSF instruction Output Bit tag as the instruction’s reset source.<br />
Auxiliary Valve Control <strong>Instruction</strong>: Outputs<br />
The following table explains the instruction outputs. The outputs may<br />
be field device signals or derived from user logic.<br />
Name Data Type Description<br />
Output 1 (O1) Boolean This output is used to control an auxiliary valve. Output 1 is de-energized when:<br />
• a valve feedback fault occurs as described on page 289.<br />
• Input Status or Output Status inputs turn OFF (0).<br />
• the normal operation of the instruction causes Output 1 to be de-energized as described in<br />
the timing diagrams on pages 286…288.<br />
Fault Present (FP) Boolean ON (1): A fault is present in the instruction.<br />
OFF (0): The instruction is operating normally.<br />
Fault Code Integer This output indicates the type of fault that occurred. See the AVC – Fault Codes on page 290<br />
for a list of fault codes.<br />
Diagnostic Code Integer<br />
This parameter is not safety-related.<br />
This output indicates the diagnostic status of the instruction. See the AVC – Diagnostic Codes<br />
on page 290 for a list of diagnostic codes.<br />
This parameter is not safety-related.<br />
IMPORTANT<br />
Do not write to any instruction output tag under any<br />
circumstances.<br />
Publication <strong>1756</strong>-<strong>RM095C</strong>-<strong>EN</strong>-P - July 2008 285
Chapter 2 Metal Form <strong>Instruction</strong>s<br />
Normal Auxiliary Valve Reaction (Delay Type = On)<br />
This example shows a typical soft clutch setup where the auxiliary<br />
valve instruction is configured for an On-delay. When Actuate<br />
transitions from OFF (0) to ON (1) at (A), the delay timer starts if the<br />
Delay Enable input is ON (0). If the Output Follows Actuate input is<br />
True, Output 1 energizes once the delay period is over at (B). If the<br />
Output Follows Actuate input is False, Output 1 is energized only<br />
during the delay period. When the Actuate input transitions from<br />
ON (1) to OFF (0), Output 1 follows it and is de-energized<br />
immediately if the Output Follows Actuate input is True.<br />
1<br />
Actuate<br />
0<br />
1<br />
Output 1<br />
0<br />
A B C<br />
Input Status, Output Status, and Delay Enable (not shown) = ON (1)<br />
Actuate<br />
Delay Type = ON (1)<br />
Output Follows Actuate = True (1)<br />
1<br />
Output 1<br />
Delay Time<br />
0<br />
A B C<br />
Input Status, Output Status, and Delay Enable (not shown) = ON (1)<br />
In a soft clutch application, the time period from (A) to (B) indicates<br />
the ‘soft’ part of the clutch engagement where there is pressure relief<br />
through the auxiliary valve. During this period, the main clutch valve<br />
is choked yielding a smoother clutch engagement.<br />
286 Publication <strong>1756</strong>-<strong>RM095C</strong>-<strong>EN</strong>-P - July 2008<br />
1<br />
0<br />
Delay Time<br />
Delay Type = ON (1)<br />
Output Follows Actuate = False (0)
Normal Auxiliary Valve Reaction (Delay Type = Off)<br />
Metal Form <strong>Instruction</strong>s Chapter 2<br />
This example shows a typical brake setup where the auxiliary valve<br />
instruction is configured for an Off-delay. When the Acutate input<br />
transitions from OFF (0) to ON (1) at (A), Output 1 energizes<br />
immediately if the Output Follows Acutate input is True. When the<br />
Actuate input transitions from ON (1) to OFF (0) at (B), the delay<br />
timer starts if the Delay Enabled input is ON (1). If the Output Follows<br />
Actuate input is True, Output 1 remains energized until the delay<br />
period ends at (C). Output 1 is then de-energized. If the Output<br />
Follows Actuate input is False, Output 1 is energized only during the<br />
delay period.<br />
1<br />
Actuate<br />
0<br />
1<br />
Output 1<br />
0<br />
A<br />
B C<br />
Input Status, Output Status, and Delay Enable (not shown) = ON (1)<br />
1<br />
Actuate<br />
0<br />
Delay Type = OFF (0)<br />
Output Follows Actuate = True (1)<br />
Delay Time<br />
Delay Type = OFF (0)<br />
Output Follows Actuate = False (0)<br />
1<br />
Output 1<br />
0<br />
Delay Time<br />
A<br />
B C<br />
Input Status, Output Status, and Delay Enable (not shown) = ON (1)<br />
In a soft brake application, the time period from (B) to (C) indicates<br />
the ‘soft’ part of the brake engagement, where there is pressure relief<br />
from the auxiliary valve. During this period, the brake valve is<br />
choked, yielding a smoother brake engagement.<br />
Publication <strong>1756</strong>-<strong>RM095C</strong>-<strong>EN</strong>-P - July 2008 287
Chapter 2 Metal Form <strong>Instruction</strong>s<br />
Immediate Auxiliary Valve Reaction (Delay Type = On)<br />
This example shows the Delay Enable input changing from ON (1) to<br />
OFF (0) during the On-delay phase. When the Actuate input<br />
transitions from OFF (0) to ON (1) at (A), the delay timer starts. Then,<br />
the Delay Enable input transitions from ON (1) to OFF (0) before the<br />
delay timer expires and Output 1 is immediately energized at (B).<br />
Delay Type = ON (1)<br />
Output Follows Actuate (not shown) = True (1)<br />
1<br />
Actuate<br />
0<br />
1<br />
Delay Enable<br />
0<br />
1<br />
Output 1<br />
0<br />
Delay Time<br />
A B<br />
Input Status and Output Status (not shown) = ON (1)<br />
Immediate Auxiliary Valve Reaction (Delay Type = Off)<br />
This example shows the Delay Enable input changing from ON (1) to<br />
OFF (0) during the Off-delay phase. When the Actuate input<br />
transitions from ON (1) to OFF (0) at (A), the delay timer starts. Then,<br />
the Delay Enable input transitions from ON (1) to OFF (0) before the<br />
delay timer expires and Output 1 is immediately de-energized at (B).<br />
Delay Type = OFF (0)<br />
Output Follows Actuate (not shown) = True (1)<br />
1<br />
Actuate<br />
0<br />
1<br />
Delay Enable<br />
0<br />
1<br />
Output 1<br />
0<br />
Delay Time<br />
Input Status and Output Status (not shown) = ON (0)<br />
288 Publication <strong>1756</strong>-<strong>RM095C</strong>-<strong>EN</strong>-P - July 2008<br />
A B
Auxiliary Valve Feedback Fault<br />
Metal Form <strong>Instruction</strong>s Chapter 2<br />
This timing diagram shows an example of a Feedback fault where the<br />
auxiliary valve did not react within the specified time with<br />
Delay Type = ON (1), Output Follows Acutate = True, and Feedback<br />
Type = Positive. When the Actuate input transitions from OFF (0) to<br />
ON (1) at (A), the delay timer begins. After the delay timer expires at<br />
(B), Output 1 is energized. At (C), the Feedback 1 input has not<br />
reacted within the specified Feedback Reaction Time, causing a fault.<br />
Output 1 is de-energized.<br />
The Fault Present output is cleared at (D) because the Reset output<br />
has been asserted and the Feedback 1 input is in the correct state.<br />
However, Output 1 cannot be energized again until (E), when the<br />
Actuate input turns OFF (0).<br />
1<br />
Actuate<br />
0<br />
1<br />
Delay Enable<br />
0<br />
1<br />
Feedback 1<br />
0<br />
1<br />
Reset<br />
0<br />
1<br />
Fault Present<br />
0<br />
1<br />
Output 1<br />
0<br />
Feedback<br />
Reaction Time<br />
AVC – False Rung State Behavior<br />
Delay Time<br />
A B C D E<br />
Output Follows Actuate (not shown) = True<br />
Delay Type = ON (1)<br />
Feedback type = Positive<br />
Input Status and Output Status (not shown) = ON (1)<br />
When the instruction is executed on a false rung, all instruction<br />
outputs are de-energized.<br />
Publication <strong>1756</strong>-<strong>RM095C</strong>-<strong>EN</strong>-P - July 2008 289
Chapter 2 Metal Form <strong>Instruction</strong>s<br />
AVC – Fault Codes<br />
Fault Code Description Corrective Action<br />
00H No fault. None.<br />
20H The Input Status input transitioned from ON (1) to OFF (0) while the • Check the I/O module connection.<br />
instruction was executing.<br />
• Reset the fault.<br />
21H The Output Status input transitioned from ON (1) to OFF (0) while • Check the I/O module connection.<br />
the instruction was executing.<br />
• Reset the fault.<br />
5020H Feedback is inconsistent with the valve output. • Check the feedback signal.<br />
• Reset the fault.<br />
5021H Feedback did not turn ON (1) when Output 1 transitioned from • Check the feedback signal.<br />
OFF (0) to ON (1).<br />
• Adjust the Feedback Reaction Time, if<br />
5022H Feedback did not turn OFF when Output 1 transitioned from ON (1) necessary.<br />
to OFF (0).<br />
• Reset the fault.<br />
AVC – Diagnostic Codes<br />
Diagnostic Code Description Corrective Action<br />
00H No fault. None.<br />
20H The Input Status was OFF (0) when the<br />
instruction started.<br />
Check the I/O module connection.<br />
21H The Output Status input was OFF (0) when the<br />
instruction started.<br />
Check the I/O module connection.<br />
5000H The Actuate input is held ON (1). <strong>Set</strong> the Actuate input to OFF (0).<br />
290 Publication <strong>1756</strong>-<strong>RM095C</strong>-<strong>EN</strong>-P - July 2008
24V DC<br />
24V Ground<br />
AVC – Wiring and Programming Example<br />
Metal Form <strong>Instruction</strong>s Chapter 2<br />
The standard control portion of the application is not shown.<br />
Wiring Diagram<br />
DeviceNet<br />
1<br />
V0<br />
G0<br />
11<br />
21<br />
V1<br />
G1<br />
31<br />
3<br />
I0<br />
S1 S2 S3 S4<br />
O0<br />
23<br />
Publication <strong>1756</strong>-<strong>RM095C</strong>-<strong>EN</strong>-P - July 2008 291<br />
13<br />
T0<br />
4<br />
I1<br />
O1<br />
24<br />
S1 S2<br />
14<br />
T1<br />
5<br />
I2<br />
1791DS-IB8XOB8 Module 1<br />
O2<br />
25<br />
15<br />
T0<br />
6<br />
I3<br />
O3<br />
26<br />
S3 S4<br />
Momentary<br />
Push Button<br />
(reset)<br />
16<br />
T1<br />
10<br />
I7
Chapter 2 Metal Form <strong>Instruction</strong>s<br />
Press Run<br />
Module1:I.InputStatus<br />
Module1:I.OutputStatus<br />
Module1:I.Pt07Data<br />
CrankshaftPosition.DZ<br />
SoftBrakeEnable 1<br />
1<br />
1<br />
&<br />
This programming diagram shows the Auxiliary Valve Control (AVC)<br />
instruction used with a Main Valve Control (MVC) instruction.<br />
Programming Diagram<br />
Negative<br />
500 ms<br />
Module1:I.Pt00Data<br />
Module1:I.Pt01Data<br />
Negative<br />
500 ms<br />
ON<br />
50 ms<br />
TRUE<br />
SoftClutchEnable<br />
Module1:I.Pt02Data<br />
Negative<br />
500 ms<br />
OFF<br />
50 ms<br />
FALSE<br />
Module1:I.Pt03Data<br />
MVC<br />
Feedback Type<br />
Feedback Reaction Time<br />
Actuate<br />
Feedback 1<br />
Feedback 2<br />
Input Status<br />
Output Status<br />
Reset<br />
MainValve<br />
Output 1<br />
Output 2<br />
Fault Present<br />
AVC<br />
SoftClutchValve<br />
Feedback Type Output 1<br />
Feedback Reaction Time<br />
Delay Type<br />
Delay Time<br />
Output Follows Actuate<br />
Acutate<br />
Delay Enable<br />
Feedback 1<br />
Input Status<br />
Output Status<br />
Reset Fault Present<br />
SoftBrakeValve<br />
AVC<br />
Feedback Type Output 1<br />
Feedback Reaction Time<br />
Delay Type<br />
Delay Time<br />
Output Follows Actuate<br />
Acutate<br />
Delay Enable<br />
Feedback 1<br />
Input Status<br />
Output Status<br />
Reset Fault Present<br />
MainValveActuated<br />
NOTE 1: This is an internal Boolean tag that has its value determined by other parts of the user application not shown in this example.<br />
NOTE 2: This is an internal Boolean tag used by other parts of the user application and not shown in this example.<br />
Key: Color code represents data or value typically used.<br />
Tag-mapped Variable<br />
Standard Output<br />
<strong>Safety</strong> Input <strong>Safety</strong> Output<br />
Configuration Constant/Value<br />
Internal <strong>Safety</strong> Variable<br />
292 Publication <strong>1756</strong>-<strong>RM095C</strong>-<strong>EN</strong>-P - July 2008<br />
>=1<br />
Module1:O.Pt00Data<br />
Module1:O.Pt01Data<br />
ValvesOK<br />
Module1:O.Pt02Data<br />
Module1:O.Pt03Data<br />
2<br />
2
Ladder Logic<br />
MVC<br />
Main Valve Control<br />
MVC MainValve<br />
Feedback Type NEGATIVE<br />
Feedback Reaction Time (Msec) 500<br />
Actuate PressRun<br />
0<br />
Feedback 1 Module3:I.Pt00Data<br />
0<br />
Feedback 2 Module3:I.Pt01Data<br />
0<br />
Input Status Module3:I.InputStatus<br />
0<br />
Output Status Module3:I.OutputStatus<br />
0<br />
Reset Module3:I.Pt07Data<br />
0<br />
Metal Form <strong>Instruction</strong>s Chapter 2<br />
MainValve.O1 Module3:O.Pt00Data<br />
MainValve.O2 Module3:O.Pt01Data<br />
MainValve.FP ValvesOK<br />
/<br />
MainValve.FP<br />
/<br />
SoftBrakeEnable<br />
AVC<br />
Auxiliary Valve Control<br />
AVC SoftClutchValve<br />
Feedback Type NEGATIVE<br />
Feedback Reaction Time (Msec) 500<br />
Delay Type ON<br />
Delay Time (Msec) 50<br />
Output Follows Actuate TRUE<br />
Actuate PressRun<br />
0<br />
Delay Enable SoftClutchEnable<br />
0<br />
Feedback 1 Module3:I.Pt02Data<br />
0<br />
Input Status Module3:I.InputStatus<br />
0<br />
Output Status Module3:I.OutputStatus<br />
0<br />
Reset Module3:I.Pt07Data<br />
0<br />
SoftClutchValve.O1 Module3:O.Pt02Data<br />
Publication <strong>1756</strong>-<strong>RM095C</strong>-<strong>EN</strong>-P - July 2008 293<br />
O1<br />
O2<br />
FP<br />
O1<br />
FP<br />
CrankPosition.DZ SoftBrakeValve.DelayEnable<br />
/<br />
AVC<br />
Auxiliary Valve Control<br />
AVC SoftBrakeValve<br />
Feedback Type NEGATIVE<br />
Feedback Reaction Time (Msec) 500<br />
Delay Type OFF<br />
Delay Time (Msec) 50<br />
Output Follows Actuate FALSE<br />
Actuate PressRun<br />
0<br />
Delay Enable SoftBrakeValve.DelayEnable<br />
0<br />
Feedback 1 Module3:I.Pt02Data<br />
0<br />
Input Status Module3:I.InputStatus<br />
0<br />
Output Status Module3:I.OutputStatus<br />
0<br />
Reset Module3:I.Pt07Data<br />
0<br />
SoftBrakeValve.O1 Module3:O.Pt03Data<br />
SoftClutchValve.FP<br />
/<br />
O1<br />
FP<br />
SoftBrakeValve.FP ValvesOK<br />
/
Chapter 2 Metal Form <strong>Instruction</strong>s<br />
RSLogix 5000 software is used to configure the input and test output<br />
parameters of the Guard I/O module, as illustrated.<br />
Module Definition<br />
Rockwell Automation suggests using Exact Match, as shown.<br />
However, setting Electronic Keying to Compatible Match is allowed.<br />
Module Input Configuration<br />
294 Publication <strong>1756</strong>-<strong>RM095C</strong>-<strong>EN</strong>-P - July 2008
Module Test Output Configuration<br />
Module Output Configuration<br />
Metal Form <strong>Instruction</strong>s Chapter 2<br />
Publication <strong>1756</strong>-<strong>RM095C</strong>-<strong>EN</strong>-P - July 2008 295
Chapter 2 Metal Form <strong>Instruction</strong>s<br />
Main Valve Control (MVC)<br />
• BG-certified<br />
•<br />
The Main Valve Control (MVC) instruction is used to control and<br />
monitor the main clutch or brake valve. This instruction supports<br />
valves with various reaction times and positive or negative feedback<br />
signals. Single-channel valves are supported by combining Output 1<br />
and Output 2 to control the valve and combining Feedback 1 and<br />
Feedback 2 for monitoring.<br />
MVC – <strong>Instruction</strong> Parameters<br />
IMPORTANT<br />
Do not use the same tag name for more than one instruction in<br />
the same program. Do not write to any instruction output tag<br />
under any circumstances.<br />
296 Publication <strong>1756</strong>-<strong>RM095C</strong>-<strong>EN</strong>-P - July 2008
Main Valve Control <strong>Instruction</strong>: Configuration Parameters<br />
Metal Form <strong>Instruction</strong>s Chapter 2<br />
The following table provides the parameters used to configure the<br />
instruction. These parameters cannot be changed at runtime.<br />
Parameter Data Type Description<br />
Feedback Type List This parameter defines feedback OFF and ON states for positive and negative feedback<br />
signals.<br />
Positive OFF (0): Feedbacks OFF / Outputs OFF.<br />
ON (1): Feedbacks ON / Outputs ON.<br />
Negative OFF (0): Feedbacks ON / Outputs OFF.<br />
ON (1): Feedbacks OFF / Outputs ON.<br />
Feedback Reaction<br />
Time<br />
Main Valve Control <strong>Instruction</strong>: Inputs<br />
Integer This parameter specifies the amount of time that the instruction waits for the Feedback 1 and<br />
Feedback 2 inputs to reflect the state of Output 1 and Output 2 as defined by the Feedback<br />
Type parameter.<br />
The valid range is 5…1000 ms.<br />
The following table explains the instruction inputs. The inputs may be<br />
field device signals from input devices or derived from user logic.<br />
Parameter Data Type Description<br />
Actuate Boolean This input energizes or de-energizes Output 1 and Output 2.<br />
OFF (0) -> ON (1): Output 1 and Output 2 are energized if no faults exist.<br />
ON (1) -> OFF (0): Output 1 and Output 2 are de-energized.<br />
Feedback 1 Boolean These inputs are constantly monitored to make sure that they reflect the state of Output 1 and<br />
Feedback 2 Boolean<br />
Output 2. When Output 1 and Output 2 transition, these inputs must react within the Feedback<br />
Reaction Time.<br />
Input Status Boolean If instruction inputs are from a safety I/O module, this is the input status from the I/O module or<br />
modules (Input Status or Combined Status). If instruction inputs are derived from internal logic,<br />
it is the application programmer’s responsibility to determine the conditions.<br />
Output Status Boolean<br />
ON (1): The inputs to this instruction are valid.<br />
OFF (0): The inputs to this instruction are invalid.<br />
This input indicates the output status of the I/O module or modules used by this instruction.<br />
ON (1): The output module is operating properly.<br />
OFF (0): The output module is faulted. <strong>Instruction</strong> outputs are set their de-energized (safe)<br />
state.<br />
Reset (1) Boolean This input clears the instruction faults provided the fault condition is not present.<br />
ON (1): The Fault Present and Fault Code outputs are reset.<br />
(1) ISO 13849-1 stipulates instruction reset functions must occur on falling edge signals. To comply with ISO 13849-1<br />
requirements, add this logic immediately before this instruction. Rename the “Reset_Signal” tag in this example<br />
to your reset signal tagname. Then use the OSF instruction Output Bit tag as the instruction’s reset source.<br />
Publication <strong>1756</strong>-<strong>RM095C</strong>-<strong>EN</strong>-P - July 2008 297
Chapter 2 Metal Form <strong>Instruction</strong>s<br />
Main Valve Control <strong>Instruction</strong>: Outputs<br />
The following table explains the instruction outputs. The outputs may<br />
be field device signals or derived from user logic.<br />
Parameter Data Type Description<br />
Output 1 (O1) Boolean A redundant pair, these outputs are used to control a press clutch or brake valve. The outputs<br />
Output 2 (O2) Boolean<br />
are de-energized when:<br />
• a feedback fault occurs as described on page 300.<br />
• Input Status or Output Status inputs turn OFF (0).<br />
• the normal operation of the instruction causes Output 1 and Output 2 to be de-energized as<br />
described in the timing diagram on page 299.<br />
Fault Present (FP) Boolean ON (1): A fault is present in the instruction.<br />
OFF (0): The instruction is operating normally.<br />
Fault Code Integer This output indicates the type of fault that occurred. See the MVC – Fault Codes on page 301<br />
for a list of fault codes.<br />
Diagnostic Code Integer<br />
This parameter is not safety-related.<br />
This output indicates the diagnostic status of the instruction. See the MVC – Diagnostic Codes<br />
on page 302 for a list of diagnostic codes.<br />
This parameter is not safety-related.<br />
IMPORTANT<br />
Do not write to any instruction output tag under any<br />
circumstances.<br />
298 Publication <strong>1756</strong>-<strong>RM095C</strong>-<strong>EN</strong>-P - July 2008
MVC – Normal Operation<br />
Metal Form <strong>Instruction</strong>s Chapter 2<br />
This timing diagram shows normal operation of this instruction to<br />
control a press clutch or brake valve with Feedback Type = Positive.<br />
Outputs 1 and 2 are energized when the Actuate input transitions from<br />
OFF (0) to ON (1) at (A). Both feedback inputs react before the<br />
Feedback Reaction Time expires, so the outputs remain energized in<br />
steady state at (B). Outputs 1 and 2 are de-energized at (C) when the<br />
Actuate input transitions from ON (1) to OFF (0). Both of the feedback<br />
inputs react before the Feedback Reaction Time expires so the outputs<br />
remain de-energized in steady state at (D).<br />
1<br />
Actuate<br />
0<br />
1<br />
Feedback 1<br />
0<br />
1<br />
Feedback 2<br />
0<br />
1<br />
Output 1<br />
0<br />
1<br />
Output 2<br />
0<br />
Feedback<br />
Reaction Time<br />
A B C D<br />
Feedback Type (not shown) = Positive<br />
Input Status and Output Status (not shown) = ON (1)<br />
Publication <strong>1756</strong>-<strong>RM095C</strong>-<strong>EN</strong>-P - July 2008 299
Chapter 2 Metal Form <strong>Instruction</strong>s<br />
MVC – Feedback Fault<br />
This timing diagram is an example of how a feedback fault can occur<br />
when either of the Feedback inputs fail to correctly reflect the state of<br />
Outputs 1 and 2 with Feedback Type = Positive. Outputs 1 and 2 are<br />
energized at (A), but at (B), Feedback 2 has not transitioned from OFF<br />
(0) to ON (1) before the Feedback Reaction Time has expired,<br />
generating a Feedback fault. The fault cannot be cleared at (C)<br />
because the Feedbacks 1 and 2 do not yet reflect the state of Outputs<br />
1 and 2. The fault is cleared when an OFF (0) to ON (1) transition is<br />
detected on the Reset input and both Feedback inputs are OFF (0),<br />
correctly reflecting the state of Outputs 1 and 2 at (D).<br />
1<br />
Actuate<br />
0<br />
1<br />
Feedback 1<br />
0<br />
1<br />
Feedback 2<br />
0<br />
1<br />
Reset<br />
0<br />
1<br />
Fault Present<br />
0<br />
1<br />
Output 1<br />
0<br />
1<br />
Output 2<br />
0<br />
A<br />
Feedback Type (not shown) = Positive<br />
B C<br />
Input Status and Output Status (not shown) = ON (1)<br />
MVC – False Rung State Behavior<br />
Feedback<br />
Reaction Time<br />
When the instruction is executed on a false rung, all instruction<br />
outputs are de-energized.<br />
300 Publication <strong>1756</strong>-<strong>RM095C</strong>-<strong>EN</strong>-P - July 2008<br />
D
MVC – Fault Codes<br />
Metal Form <strong>Instruction</strong>s Chapter 2<br />
Fault Code Description Corrective Action<br />
00H No fault. None.<br />
20H The Input Status input transitioned from ON (1) to OFF (0) while the • Check the I/O module connection.<br />
instruction was executing.<br />
• Reset the fault.<br />
21H The Output Status input transitioned from ON (1) to OFF (0) while • Check the I/O module connection.<br />
the instruction was executing.<br />
• Reset the fault.<br />
5000H Feedback 1 and Feedback 2 turned OFF (0) unexpectedly. • Check the feedback signals.<br />
• Reset the fault.<br />
5001H Feedback 1 turned OFF (0) unexpectedly. • Check the Feedback 1 signal.<br />
• Reset the fault<br />
5002H Feedback 2 turned OFF (0) unexpectedly. • Check the Feedback 2 signal.<br />
• Reset the fault.<br />
5003H Feedback 1 and Feedback 2 turned ON (1) unexpectedly. • Check the feedback signals.<br />
• Reset the fault.<br />
5004H Feedback 1 turned ON (1) unexpectedly. • Check the Feedback 1 signal.<br />
• Reset the fault.<br />
5005H Feedback 2 turned ON (1) unexpectedly. • Check the Feedback 2 signal<br />
• Reset the fault.<br />
5006H Feedback 1 and Feedback 2 did not turn ON (1) within the • Check the feedback signals.<br />
configured Feedback Reaction Time.<br />
• Adjust the Feedback Reaction Time, if<br />
necessary.<br />
• Reset the fault.<br />
5007H Feedback 1 did not turn ON (1) within the configured Feedback • Check the Feedback 1 signal.<br />
Reaction Time.<br />
• Adjust the Feedback Reaction Time, if<br />
necessary.<br />
• Reset the fault.<br />
5008H Feedback 2 did not turn ON (1) within the configured Feedback • Check the Feedback 2 signal.<br />
Reaction Time.<br />
• Adjust the Feedback Reaction Time, if<br />
necessary.<br />
• Reset the fault.<br />
Publication <strong>1756</strong>-<strong>RM095C</strong>-<strong>EN</strong>-P - July 2008 301
Chapter 2 Metal Form <strong>Instruction</strong>s<br />
Fault Code Description Corrective Action<br />
5009H Feedback 1 and Feedback 2 did not turn OFF (0) within the<br />
configured Feedback Reaction Time.<br />
500AH Feedback 1 did not turn OFF (0) within the configured Feedback<br />
Reaction Time.<br />
500BH Feedback 2 did not turn OFF (0) within the configured Feedback<br />
Reaction Time.<br />
MVC – Diagnostic Codes<br />
• Check the feedback signals.<br />
• Adjust the Feedback Reaction Time, if<br />
necessary.<br />
• Reset the fault.<br />
• Check the Feedback 1 signal.<br />
• Adjust the Feedback Reaction Time, if<br />
necessary.<br />
• Reset the fault.<br />
• Check the Feedback 2 signal.<br />
• Adjust the Feedback Reaction Time, if<br />
necessary.<br />
• Reset the fault.<br />
Diagnostic Code Description Corrective Action<br />
00H No fault. None.<br />
20H The Input Status was OFF (0) when the<br />
instruction started.<br />
Check the I/O module connection.<br />
21H The Output Status input transitioned from<br />
ON (1) to OFF (0) while the instruction was<br />
executing.<br />
Check the I/O module connection.<br />
5000H The Actuate input is held ON (1). <strong>Set</strong> the Actuate input to OFF (0).<br />
302 Publication <strong>1756</strong>-<strong>RM095C</strong>-<strong>EN</strong>-P - July 2008
Negative<br />
500 ms<br />
MVC – Wiring and Programming Example<br />
Metal Form <strong>Instruction</strong>s Chapter 2<br />
The standard control portion of the application is not shown.<br />
Wiring Diagram<br />
1<br />
V0<br />
G0<br />
11<br />
This programming diagram shows the Main Valve Control (MVC)<br />
instruction with inputs and outputs.<br />
Programming Diagram<br />
1<br />
Press Run<br />
Module1:I.Pt00Data<br />
Module1:I.Pt01Data<br />
24V DC<br />
24V Ground<br />
Module1:I.InputStatus<br />
Module1:I.OutputStatus<br />
Module1:I.Pt07Data<br />
DeviceNet<br />
Publication <strong>1756</strong>-<strong>RM095C</strong>-<strong>EN</strong>-P - July 2008 303<br />
21<br />
V1<br />
G1<br />
31<br />
3<br />
I0<br />
S1 S2<br />
O0<br />
23<br />
13<br />
T0<br />
4<br />
I1<br />
O1<br />
24<br />
S1 S2<br />
14<br />
T1<br />
1791DS-IB8XOB8 Module 1<br />
MVC<br />
MainValve<br />
Feedback Type<br />
Output 1<br />
Feedback Reaction Time Output 2<br />
Actuate<br />
Feedback 1<br />
Feedback 2<br />
Input Status<br />
Output Status<br />
Reset<br />
Fault Present<br />
Momentary<br />
Push Button<br />
(reset)<br />
10<br />
I7<br />
MainValveActuated<br />
Module1:O.Pt00Data<br />
Module1:O.Pt01Data<br />
ValvesOK<br />
NOTE 1: This is an internal Boolean tag that has its value determined by other parts of the user application not shown in this example.<br />
NOTE 2: This is an internal Boolean tag used by other parts of the user application and not shown in this example.<br />
Key: Color code represents data or value typically used.<br />
Tag-mapped Variable<br />
Standard Output<br />
<strong>Safety</strong> Input <strong>Safety</strong> Output<br />
Configuration Constant/Value<br />
Internal <strong>Safety</strong> Variable<br />
2
Chapter 2 Metal Form <strong>Instruction</strong>s<br />
Ladder Logic<br />
RSLogix 5000 software is used to configure the input and test output<br />
parameters of the Guard I/O module, as illustrated.<br />
Module Definition<br />
MVC<br />
Main Valve Control<br />
MVC MainValve<br />
Feedback Type NEGATIVE<br />
Feedback Reaction Time (Msec) 500<br />
Actuate ManualValveControl.O1<br />
0<br />
Feedback 1 Module3:I.Pt00Data<br />
0<br />
Feedback 2 Module3:I.Pt01Data<br />
0<br />
Input Status Module3:I.InputStatus<br />
0<br />
Output Status Module3:I.OutputStatus<br />
0<br />
Reset Module3:I.Pt07Data<br />
0<br />
MainValve.O1 Module3:O.Pt00Data<br />
Rockwell Automation suggests using Exact Match, as shown.<br />
However, setting Electronic Keying to Compatible Match is allowed.<br />
304 Publication <strong>1756</strong>-<strong>RM095C</strong>-<strong>EN</strong>-P - July 2008<br />
O1<br />
O2<br />
FP<br />
MainValve.O2 Module3:O.Pt01Data
Module Input Configuration<br />
Module Test Output Configuration<br />
Metal Form <strong>Instruction</strong>s Chapter 2<br />
Publication <strong>1756</strong>-<strong>RM095C</strong>-<strong>EN</strong>-P - July 2008 305
Chapter 2 Metal Form <strong>Instruction</strong>s<br />
Module Output Configuration<br />
306 Publication <strong>1756</strong>-<strong>RM095C</strong>-<strong>EN</strong>-P - July 2008
Maintenance Manual Valve<br />
Control (MMVC)<br />
• BG-certified<br />
•<br />
Metal Form <strong>Instruction</strong>s Chapter 2<br />
The Maintenance Manual Valve Control (MMVC) instruction is<br />
intended to manually drive a press valve during a maintenance<br />
operation. Manual drive of the valve is permitted when the instruction<br />
is enabled and in the permissive state. The permissive state means all<br />
of these conditions have been met:<br />
• A key switch is enabled.<br />
• The flywheel is stopped.<br />
• The slide is at bottom-dead-center (BDC).<br />
• The <strong>Safety</strong> Enable input is ON (1).<br />
One instruction is required for each valve that needs to be manually<br />
controlled.<br />
This instruction should only be enabled during a maintenance<br />
ATT<strong>EN</strong>TION<br />
operation and should never be used during press operation.<br />
ATT<strong>EN</strong>TION<br />
ATT<strong>EN</strong>TION<br />
Besides sourcing the Bottom and Flywheel Stopped inputs, you<br />
must perform a visual inspection to make sure the press is at<br />
bottom-dead-center (BDC) and that the flywheel is not in<br />
motion before activating the keyswitch and enabling the valve.<br />
The Keyswitch Enable input must only be activated with a<br />
supervised key switch.<br />
Publication <strong>1756</strong>-<strong>RM095C</strong>-<strong>EN</strong>-P - July 2008 307
Chapter 2 Metal Form <strong>Instruction</strong>s<br />
MMVC – <strong>Instruction</strong> Parameters<br />
IMPORTANT<br />
Maintenance Manual Valve Control <strong>Instruction</strong>: Inputs<br />
Do not use the same tag name for more than one instruction in<br />
the same program. Do not write to any instruction output tag<br />
under any circumstances.<br />
The following table explains the instruction inputs. The inputs may be<br />
field device signals from input devices or derived from user logic.<br />
Parameter Data Type Description<br />
Enable Boolean This input is the instruction enable from mode switch. This instruction should be enabled in<br />
maintenance mode only.<br />
ON (1): The instruction is enabled. Output 1 can be energized after the Actuate input transitions<br />
from OFF (0) to ON (1) when the instruction is in the permissive state.<br />
OFF (0): The instruction is not enabled. Output 1 cannot be energized.<br />
Keyswitch Boolean This is the supervised keyswitch input for the instruction.<br />
ON: The instruction is activated.<br />
OFF: The instruction is not activated. Output 1 cannot be energized.<br />
Bottom Boolean This input indicates slide position.<br />
ON (1): The slide is at bottom-dead-center (BDC).<br />
OFF (0): The slide is not at BDC. Output 1 cannot be energized.<br />
Flywheel Stopped Boolean This input indicates whether or not the flywheel is stopped. This input must be ON (1) to allow<br />
manual valve control.<br />
ON (1): The flywheel is stopped.<br />
OFF (0): The flywheel is not stopped.<br />
<strong>Safety</strong> Enable Boolean This input represents the status of safety-related permissive devices such as E-stops, light<br />
curtains or safety gates. This input is optional on this instruction for extra protection if required<br />
for a particular application.<br />
ON (1): Indicates that permissive devices are actively guarding the danger zone and permits the<br />
energizing of Output 1.<br />
OFF (0): Indicates that permissive devices are no longer protecting the danger zone and<br />
prevents the energizing of Output 1.<br />
Actuate Boolean This input is the signal to manually actuate the valve, energizing or de-energizing Output 1.<br />
OFF (0) -> ON (1): Output 1 is energized if the instruction is enabled, the Keyswitch input is<br />
activated, and no faults exist.<br />
ON (1) -> OFF (0): Output 1 is de-energized.<br />
308 Publication <strong>1756</strong>-<strong>RM095C</strong>-<strong>EN</strong>-P - July 2008
Maintenance Manual Valve Control <strong>Instruction</strong>: Inputs<br />
Parameter Data Type Description<br />
Metal Form <strong>Instruction</strong>s Chapter 2<br />
Input Status Boolean If instruction inputs are from a safety I/O module, this is the input status from the I/O module or<br />
modules (Input Status or Combined Status). If instruction inputs are derived from internal logic,<br />
it is the application programmer’s responsibility to determine the conditions.<br />
Output Status Boolean<br />
ON (1): The inputs to this instruction are valid.<br />
OFF (0): The inputs to this instruction are invalid.<br />
This input indicates the output status of the I/O module connected to this instruction.<br />
ON (1): The output module is operating properly.<br />
OFF (0): The output module is faulted or offline. <strong>Instruction</strong> outputs are set their safe state.<br />
Reset (1) Boolean This input clears instruction faults provided the fault condition is not present.<br />
ON (1): The Fault Present and Fault Code outputs are reset.<br />
(1) ISO 13849-1 stipulates instruction reset functions must occur on falling edge signals. To comply with ISO 13849-1<br />
requirements, add this logic immediately before this instruction. Rename the “Reset_Signal” tag in this example<br />
to your reset signal tagname. Then use the OSF instruction Output Bit tag as the instruction’s reset source.<br />
Maintenance Manual Valve Control <strong>Instruction</strong>: Outputs<br />
The following table explains the instruction outputs. The outputs may<br />
be field device signals or derived from user logic.<br />
Parameter Data Type Description<br />
Output 1 (O1) Boolean This output manually controls a valve. The output is de-energized when:<br />
• the Enable input transitions from ON (1) to OFF (0).<br />
• the Keyswitch input transitions from ON (1) to OFF (0).<br />
• the Bottom input transitions from ON (1) to OFF (0), indicating the slide has left<br />
bottom-dead-center.<br />
• the Flywheel Stopped input transitions from ON (1) to OFF (0), indicating flywheel motion.<br />
• the <strong>Safety</strong> Enable input transitions from ON (1) to OFF (0).<br />
• the Input Status or Output Status inputs have turned OFF (0).<br />
• the Actuate input transitions from ON (1) to OFF (0).<br />
Fault Present (FP) Boolean ON (1): A fault is present in the instruction.<br />
OFF (0): The instruction is operating normally.<br />
Fault Code Integer This output indicates the type of fault that occurred. See the MMVC – Fault Codes on page 313<br />
for a list of fault codes.<br />
Diagnostic Code Integer<br />
This parameter is not safety-related.<br />
This output indicates the diagnostic status of the instruction. See the MMVC – Diagnostic<br />
Codes on page 313 for a list of diagnostic codes.<br />
This parameter is not safety-related.<br />
IMPORTANT<br />
Do not write to any instruction output tag under any<br />
circumstances.<br />
Publication <strong>1756</strong>-<strong>RM095C</strong>-<strong>EN</strong>-P - July 2008 309
Chapter 2 Metal Form <strong>Instruction</strong>s<br />
MMVC – Normal Operation<br />
This timing diagram shows normal operation of this instruction to<br />
manually drive a valve. The instruction enters the permissive state at<br />
(A) because the instruction has been enabled, bottom-dead-center<br />
(BDC) has been achieved, the flywheel is stopped, and the <strong>Safety</strong><br />
Enable input is ON (1). Output 1 is energized at (B) because a rising<br />
edge is detected on the Actuate input, manually energizing the valve.<br />
Output 1 is de-energized at (C) because the Actuate input is turned<br />
OFF (0). Output 1 is energized again when another rising edge is<br />
detected on the Actuate input at (D). Output 1 is de-energized at (E)<br />
because the Enable input turns OFF (0), resetting the instruction.<br />
Finally, Output 1 is energized at (F) once the instruction is back in a<br />
permissive state and a rising edge is detected on the Actuate input.<br />
None of the conditions in this example results in a fault.<br />
1<br />
Enable<br />
0<br />
1<br />
Keyswitch<br />
0<br />
1<br />
Bottom<br />
0<br />
1<br />
Flywheel Stopped<br />
0<br />
1<br />
<strong>Safety</strong> Enable<br />
0<br />
1<br />
Actuate<br />
0<br />
1<br />
Output 1<br />
0<br />
A B C D E F<br />
Input Status and Output Status (not shown) = ON (1)<br />
310 Publication <strong>1756</strong>-<strong>RM095C</strong>-<strong>EN</strong>-P - July 2008
MMVC – Actuate in Non-permissive State<br />
Metal Form <strong>Instruction</strong>s Chapter 2<br />
This timing diagram shows conditions that do not allow Output 1 to<br />
be energized because the instruction is not in a permissive state when<br />
the Actuate input transitions from OFF (0) to ON (1). Output 1 is not<br />
energized at (A) because the instruction is not enabled when the<br />
Actuate input transitions from OFF (0) to ON (1). The instruction is<br />
enabled, but faults immediately when the Actuate input transitions<br />
from OFF to ON because the <strong>Safety</strong> Enable input is OFF (0) at (B).<br />
The fault cannot be cleared because the fault condition still exists<br />
at (C). Finally, the fault is cleared at (D) when the Reset input<br />
transitions from OFF (0) to ON (1) because the <strong>Safety</strong> Enable input is<br />
now ON (1). Output 1 can now be energized when the Actuate input<br />
transitions from OFF (0) to ON (1).<br />
1<br />
Enable<br />
0<br />
1<br />
Keyswitch<br />
0<br />
1<br />
Bottom<br />
0<br />
1<br />
Flywheel Stopped<br />
0<br />
1<br />
<strong>Safety</strong> Enable<br />
0<br />
1<br />
Actuate<br />
0<br />
1<br />
Reset<br />
0<br />
1<br />
Fault Present<br />
0<br />
1<br />
Output 1<br />
0<br />
A B C D<br />
Input Status and Output Status (not shown) = ON (1)<br />
Publication <strong>1756</strong>-<strong>RM095C</strong>-<strong>EN</strong>-P - July 2008 311
Chapter 2 Metal Form <strong>Instruction</strong>s<br />
MMVC – Fault After Output 1 Energized<br />
Output 1 is energized at (A) after the Actuate input transitions from<br />
OFF (0) to ON (1) when the instruction is in the permissive state. The<br />
instruction faults at (B) because the slide is no longer at<br />
bottom-dead-center (BDC). The fault is cleared at (C) when the Reset<br />
input transitions from OFF (0) to ON (1) and the slide has returned to<br />
BDC. Another fault is generated at (D) when the Actuate input<br />
transitions from OFF (0) to ON (1) and the flywheel is not stopped.<br />
1<br />
Enable<br />
0<br />
1<br />
Keyswitch<br />
0<br />
1<br />
Bottom<br />
0<br />
1<br />
Flywheel Stopped<br />
0<br />
1<br />
<strong>Safety</strong> Enable<br />
0<br />
1<br />
Actuate<br />
0<br />
1<br />
Reset<br />
0<br />
1<br />
Fault Present<br />
0<br />
1<br />
Output 1<br />
0<br />
A B C D<br />
Input Status and Output Status (not shown) = ON (1)<br />
MMVC – False Rung State Behavior<br />
When the instruction is executed on a false rung, all instruction<br />
outputs are de-energized.<br />
312 Publication <strong>1756</strong>-<strong>RM095C</strong>-<strong>EN</strong>-P - July 2008
MMVC – Fault Codes<br />
MMVC – Diagnostic Codes<br />
Metal Form <strong>Instruction</strong>s Chapter 2<br />
Fault Code Description Corrective Action<br />
00H No fault. None.<br />
20H The Input Status input transitioned from ON (1) to OFF (0) while the • Check the I/O module connection.<br />
instruction was executing.<br />
• Reset the fault.<br />
21H The Output Status input transitioned from ON (1) to OFF (0) while • Check the I/O module connection.<br />
the instruction was executing.<br />
• Reset the fault.<br />
5040H The slide was not at bottom-dead-center (BDC) when the valve was • Visually check to make sure the slide is at<br />
enabled.<br />
bottom.<br />
• Check the Bottom input signal.<br />
• Reset the fault.<br />
5041H Flywheel motion was detected when the valve was enabled. • Visually check to make sure that the flywheel is<br />
not in motion.<br />
• Check the Flywheel Stopped input signal.<br />
• Reset the fault.<br />
5042H <strong>Safety</strong> Enable was OFF (0) when the valve was enabled. • Visually check that the permissive inputs tied to<br />
the <strong>Safety</strong> Enable input are functioning properly.<br />
• Check the <strong>Safety</strong> Enabled input signal.<br />
• Reset the fault.<br />
5043H The Keyswitch input was OFF (0) when the valve was enabled. • Turn the keyswitch on.<br />
• Check the Keyswitch input signal.<br />
• Reset the fault.<br />
Diagnostic Code Description Corrective Action<br />
00H No fault. None.<br />
20H The Input Status was OFF (0) when the<br />
instruction started.<br />
Check the I/O module connection.<br />
21H The Output Status input transitioned from ON<br />
(1) to OFF (0) while the instruction was<br />
executing.<br />
Check the I/O module connection.<br />
5000H The Actuate input is held ON (1). <strong>Set</strong> the Actuate input to OFF (0).<br />
5040H The slide was not at bottom-dead-center (BDC). • Visually make sure that the slide is at bottom.<br />
• Check the Bottom input signal.<br />
Publication <strong>1756</strong>-<strong>RM095C</strong>-<strong>EN</strong>-P - July 2008 313
Chapter 2 Metal Form <strong>Instruction</strong>s<br />
Diagnostic Code Description Corrective Action<br />
5041H Flywheel motion detected. • Visually make sure that the flywheel is not in motion.<br />
• Check the Flywheel Stopped input signal.<br />
5042H The <strong>Safety</strong> Enable signal is OFF (0). • Visually make sure that the permissive inputs tied to<br />
the <strong>Safety</strong> Enable signal are operating properly.<br />
• Check the <strong>Safety</strong> Enable input signal.<br />
5043H The keyswitch is disabled. Enable the Keyswitch input.<br />
24V DC<br />
DeviceNet<br />
1<br />
V0<br />
G0<br />
11<br />
21<br />
V1<br />
G1<br />
31<br />
24V Ground<br />
3<br />
I0<br />
S1 S2<br />
O0<br />
23<br />
13<br />
T0<br />
4<br />
I1<br />
14<br />
T1<br />
O1<br />
24<br />
S1 S2<br />
5<br />
I2<br />
1791DS-IB8XOB8 Module 1<br />
MMVC – Wiring and Programming Example<br />
This application example complies with <strong>EN</strong>954-1, Category 4<br />
operation. The standard control portion of the application is not<br />
shown.<br />
Wiring Diagram<br />
Momentary Push Button<br />
(reset)<br />
6<br />
I3<br />
16<br />
T1<br />
15<br />
T0<br />
314 Publication <strong>1756</strong>-<strong>RM095C</strong>-<strong>EN</strong>-P - July 2008<br />
17<br />
T0<br />
BDC Cam Safe Speed<br />
Monitor<br />
Zero Speed<br />
7<br />
I4<br />
8<br />
I5<br />
19<br />
T0<br />
9<br />
I6<br />
Momentary<br />
Push Button<br />
(reset)<br />
Key Switch<br />
10<br />
I7
Level1Safeties<br />
Level2Safeties<br />
Module1:I.Pt06Data<br />
Module1:I.InputStatus<br />
Module1:I.OutputStatus<br />
Module1:I.Pt07Data<br />
&<br />
Equivalent Active High<br />
500 ms<br />
Module1:I.Pt02Data<br />
Module1:I.Pt03Data<br />
Metal Form <strong>Instruction</strong>s Chapter 2<br />
This programming diagram shows the MMVC instruction used with a<br />
Dual-channel Input Start (DCSRT) instruction and a Main Valve<br />
Control (MVC) instruction.<br />
Programming Diagram<br />
MaintenanceModeSelected<br />
Module1:I.Pt04Data<br />
Module1:I.Pt05Data<br />
MaintenanceStart<br />
DCSRT<br />
Input Type Output 1<br />
Discrepancy Time<br />
Enable<br />
Channel A<br />
Channel B<br />
Input Status<br />
Reset<br />
Fault Present<br />
ManualValveControl<br />
MMVC<br />
Enable Output 1<br />
Keyswitch<br />
Bottom<br />
Flywheel Stopped<br />
<strong>Safety</strong> Enable<br />
Actuate<br />
Input Status<br />
Output Status<br />
Publication <strong>1756</strong>-<strong>RM095C</strong>-<strong>EN</strong>-P - July 2008 315<br />
Reset<br />
Negative<br />
500 ms<br />
Fault Present<br />
Module1:I.Pt00Data<br />
Module1:I.Pt01Data<br />
Key: Color code represents data or value typically used.<br />
Tag-mapped Variable<br />
Standard Output<br />
<strong>Safety</strong> Input <strong>Safety</strong> Output<br />
Configuration Constant/Value<br />
MVC<br />
Enable Output 1<br />
Feedback Output 2<br />
Reaction Time<br />
Actuate<br />
Feedback 1<br />
Feedback 2<br />
Input Status<br />
Output Status<br />
Internal <strong>Safety</strong> Variable<br />
Reset Fault Present<br />
Module1:O.Pt000Data<br />
Module1:O.Pt001Data
Chapter 2 Metal Form <strong>Instruction</strong>s<br />
Ladder Logic<br />
DCSRT<br />
Dual Channel Input Start<br />
DCSRT MaintenanceStart<br />
<strong>Safety</strong> Function START BUTTON<br />
Input Type EQUIVAL<strong>EN</strong>T - ACTIVE HIGH<br />
Discrepancy Time (Msec) 500<br />
Enable Module3:I.Pt06Data<br />
0<br />
Channel A Module3:I.Pt02Data<br />
0<br />
Channel B Module3:I.Pt03Data<br />
0<br />
Input Status Module3:I.InputStatus<br />
0<br />
Reset Module3:I.Pt07Data<br />
0<br />
Level1SafetiesOK Level2SafetiesOK ManualValveControl.<strong>Safety</strong>Enable<br />
MMVC<br />
Maintenance Manual Valve Control<br />
MMVC ManualValveControl<br />
Enable MaintenanceModeSelected<br />
0<br />
Keyswitch Module3:I.Pt06Data<br />
0<br />
Bottom Module3:I.Pt04Data<br />
0<br />
Flywheel Stopped Module3:I.Pt04Data<br />
0<br />
<strong>Safety</strong> Enable ManualValveControl.<strong>Safety</strong>Enable<br />
0<br />
Actuate MaintenanceStart.O1<br />
0<br />
Input Status Module3:I.InputStatus<br />
0<br />
Output Status Module3:I.OutputStatus<br />
0<br />
Reset Module3:I.Pt07Data<br />
0<br />
MVC<br />
Main Valve Control<br />
MVC MainValve<br />
Feedback Type NEGATIVE<br />
Feedback Reaction Time (Msec) 500<br />
Actuate ManualValveControl.O1<br />
0<br />
Feedback 1 Module3:I.Pt00Data<br />
0<br />
Feedback 2 Module3:I.Pt01Data<br />
0<br />
Input Status Module3:I.InputStatus<br />
0<br />
Output Status Module3:I.OutputStatus<br />
0<br />
Reset Module3:I.Pt07Data<br />
0<br />
MainValve.O1 Module3:O.Pt00Data<br />
316 Publication <strong>1756</strong>-<strong>RM095C</strong>-<strong>EN</strong>-P - July 2008<br />
O1<br />
FP<br />
O1<br />
FP<br />
O1<br />
O2<br />
FP<br />
MainValve.O2 Module3:O.Pt01Data
Metal Form <strong>Instruction</strong>s Chapter 2<br />
RSLogix 5000 software is used to configure the input and test output<br />
parameters of the Guard I/O module, as illustrated.<br />
Module Definition<br />
Rockwell Automation suggests using Exact Match, as shown.<br />
However, setting Electronic Keying to Compatible Match is allowed.<br />
Module Input Configuration<br />
Publication <strong>1756</strong>-<strong>RM095C</strong>-<strong>EN</strong>-P - July 2008 317
Chapter 2 Metal Form <strong>Instruction</strong>s<br />
Module Test Output Configuration<br />
Module Output Configuration<br />
318 Publication <strong>1756</strong>-<strong>RM095C</strong>-<strong>EN</strong>-P - July 2008
Introduction<br />
General Information<br />
Appendix A<br />
RSLogix 5000 Software, Version 14 and Later,<br />
<strong>Safety</strong> <strong>Application</strong> <strong>Instruction</strong>s<br />
Topic Page<br />
General Information 319<br />
Diverse Input (DIN) <strong>Instruction</strong> 326<br />
Redundant Input (RIN) <strong>Instruction</strong> 335<br />
Emergency Stop (ESTOP) <strong>Instruction</strong> 344<br />
Enable Pendant (<strong>EN</strong>P<strong>EN</strong>) <strong>Instruction</strong> 353<br />
Light Curtain (LC) <strong>Instruction</strong> 362<br />
Five-position Mode Selector (FPMS) <strong>Instruction</strong> 375<br />
Redundant Output with Continuous Feedback Monitoring (ROUT) 379<br />
Two-hand Run Station (THRS) <strong>Instruction</strong> 387<br />
This chapter provides general information about using the safety<br />
application instructions within a safety system that has a controller<br />
and I/O modules.<br />
De-energize to Trip System<br />
The <strong>GuardLogix</strong> <strong>Safety</strong> controller is part of a de-energize to trip<br />
system. This means that all of its outputs are set to zero when a fault is<br />
detected.<br />
In addition, the <strong>GuardLogix</strong> <strong>Safety</strong> controller automatically sets any<br />
input values associated with faulty input modules to zero. As a result,<br />
any inputs being monitored by one of the diverse input instructions<br />
(DIN or THRS) should have the normally-closed input conditioned by<br />
logic such as that shown in Example Ladder Logic for <strong>Instruction</strong>s that<br />
Use Diverse Inputs figure.<br />
Publication <strong>1756</strong>-<strong>RM095C</strong>-<strong>EN</strong>-P - July 2008 319
Appendix A RSLogix 5000 Software, Version 14 and Later, <strong>Safety</strong> <strong>Application</strong> <strong>Instruction</strong>s<br />
Example Ladder Logic for <strong>Instruction</strong>s that Use Diverse Inputs<br />
Input Module<br />
Connection Faulted<br />
Normally Closed Input<br />
Status<br />
The exact ladder logic depends on your specific system requirements,<br />
and the functionality of the <strong>Safety</strong> input module. The result, however,<br />
should be the same: to create a Safe state of one for the<br />
normally-closed input of the diverse input instructions. This example<br />
logic actually overrides the input value in the input tag.<br />
The normally-closed input of the diverse input instruction should be<br />
placed in a Safe state whenever the connection to the input module is<br />
lost, or the normally-closed input point is faulted.<br />
The input value should remain intact to represent the actual state of<br />
the field device when there is a connection and the normally-closed<br />
input point is not faulted.<br />
Failure to implement this type of logic does not create an unsafe<br />
condition, but it does result in the instruction latching an Inputs<br />
Inconsistent fault, requiring a clear fault operation to be performed.<br />
System Dependencies<br />
The safety application instructions depend on the safety I/O modules,<br />
controller operating system, and the ladder logic to perform portions<br />
of the safety functions.<br />
Input and Output Line Conditioning<br />
Normally Closed Input<br />
Data<br />
<strong>Safety</strong> I/O modules provide pulse test and monitoring capabilities. If<br />
the module detects a failure, it sets the offending input or output to<br />
the Safe state and reports the failure to the controller.<br />
320 Publication <strong>1756</strong>-<strong>RM095C</strong>-<strong>EN</strong>-P - July 2008<br />
L
RSLogix 5000 Software, Version 14 and Later, <strong>Safety</strong> <strong>Application</strong> <strong>Instruction</strong>s Appendix A<br />
The failure indication is made via the input or output point status, and<br />
is maintained for a configurable amount of time, or until the failure is<br />
repaired, whichever comes last.<br />
IMPORTANT<br />
For more information on <strong>Safety</strong> I/O modules, refer to the DeviceNet<br />
<strong>Safety</strong> I/O User Manual, publication 1791DS-UM001.<br />
I/O Module Connection Status<br />
A CIP <strong>Safety</strong> system provides connection status for each I/O device in<br />
the safety system. If an input connection failure is detected, the<br />
operating system sets all associated inputs to the de-energized (Safe)<br />
state, and reports the failure to the ladder logic. If an output<br />
connection failure is detected, the operating system can only report<br />
the failure to the ladder logic.<br />
IMPORTANT<br />
How to Latch and Reset Faulted I/O<br />
Ladder logic must be included in the application program to<br />
latch these I/O point failures and verify proper restart behavior.<br />
The diagrams in Example Ladder Logic to Latch and Reset an Input<br />
and Example Ladder Logic to Latch and Reset an Output provide<br />
examples of the ladder logic required to latch and reset an I/O<br />
module connection or point failure. Example Ladder Logic to Latch<br />
and Reset an Input shows the ladder logic for an input point, Example<br />
Ladder Logic to Latch and Reset an Output shows the ladder logic for<br />
an output point.<br />
IMPORTANT<br />
Ladder logic must be included in the application program to<br />
monitor and latch any connection failures and be sure of proper<br />
restart behavior.<br />
Both of these diagrams are examples, and are for illustrative<br />
purposes only. The suitability of this logic depends upon your<br />
specific system requirements.<br />
Publication <strong>1756</strong>-<strong>RM095C</strong>-<strong>EN</strong>-P - July 2008 321
Appendix A RSLogix 5000 Software, Version 14 and Later, <strong>Safety</strong> <strong>Application</strong> <strong>Instruction</strong>s<br />
Fault Reset<br />
Input Point<br />
Data<br />
Example Ladder Logic to Latch and Reset an Input<br />
Input Module<br />
Connection Faulted<br />
Input Point<br />
Status<br />
Fault Reset<br />
Oneshot<br />
ONS<br />
Input Faulted<br />
*** Internal Tag ***<br />
Input Module<br />
Connection Faulted<br />
Input Point<br />
Status<br />
Input Faulted<br />
*** Internal Tag ***<br />
Input Faulted<br />
*** Internal Tag ***<br />
The first rung latches an internal indication that either the module<br />
connection or the specific input point has failed.<br />
The second rung resets the internal indication, but only if the fault has<br />
been repaired, and only on the rising edge of the Fault Reset signal.<br />
This prevents the safety function from automatically restarting if the<br />
Fault Reset signal gets stuck on.<br />
The third rung shows the input point data used in combination with<br />
the internal fault indication to control an output.<br />
The output is internal data that may be used in combinational logic<br />
later to drive an actual output. If an actual output is used directly, it<br />
may or may not require logic similar to that shown in Example Ladder<br />
Logic to Latch and Reset an Output for latching and resetting output<br />
connection failures.<br />
The Fault Reset contact shown in these examples is typically activated<br />
as a result of operator action. The Fault Reset could be derived as a<br />
result of combinational logic or directly from an input point (in which<br />
case it may or may not require conditioning of its own).<br />
322 Publication <strong>1756</strong>-<strong>RM095C</strong>-<strong>EN</strong>-P - July 2008<br />
L<br />
U<br />
Output<br />
*** Internal Tag ***
Fault Reset<br />
RSLogix 5000 Software, Version 14 and Later, <strong>Safety</strong> <strong>Application</strong> <strong>Instruction</strong>s Appendix A<br />
Example Ladder Logic to Latch and Reset an Output<br />
Output Module<br />
Connection Faulted<br />
Output Point<br />
Status<br />
Fault Reset<br />
Oneshot<br />
ONS<br />
User-defined<br />
User defined logic<br />
logic<br />
to<br />
to<br />
activate activate output.<br />
output<br />
Output Module<br />
Connection Faulted<br />
The ladder logic in Example Ladder Logic to Latch and Reset an<br />
Output has the same latch and reset concept as that shown in<br />
Example Ladder Logic to Latch and Reset an Input.<br />
The first rung latches an internal indication that either the module<br />
connection or the specific output point has failed.<br />
The second rung resets the internal indication, but only if the fault has<br />
been repaired, and only on the rising edge of the Fault Reset signal.<br />
This prevents the safety function from automatically restarting if the<br />
Fault Reset signal gets stuck on.<br />
The third rung includes application-specific logic to drive the state of<br />
an output point. This logic is conditioned by the output faulted<br />
internal indicator.<br />
False Rung State Behavior<br />
Output Faulted<br />
*** Internal Tag ***<br />
Output Point<br />
Status<br />
Output Faulted<br />
*** Internal Tag ***<br />
Output Faulted<br />
*** Internal Tag ***<br />
The information provided in this manual regarding the <strong>GuardLogix</strong><br />
<strong>Safety</strong> application instructions depicts the True Rung State (Relay<br />
Ladder Logic) behavior of the instructions.<br />
The False Rung State behavior is exactly the same (internal state<br />
machines continue to run and change states based on the inputs)<br />
Publication <strong>1756</strong>-<strong>RM095C</strong>-<strong>EN</strong>-P - July 2008 323<br />
L<br />
U<br />
Output Point<br />
Data
Appendix A RSLogix 5000 Software, Version 14 and Later, <strong>Safety</strong> <strong>Application</strong> <strong>Instruction</strong>s<br />
Input Point Mapping<br />
except that all outputs, including prompts and fault indicators, are set<br />
to zero when the instructions are disabled or on a false rung.<br />
I/O Point Mapping<br />
This section contains information about I/O point mapping.<br />
Input<br />
The following table identifies the mapping between the <strong>Safety</strong> I/O<br />
modules input points and the controller tags when the <strong>Safety</strong> I/O<br />
module’s Input-Status module definition is configured for Point Status<br />
or Combined Status.<br />
Note that moduleName is the name you assign to the I/O module.<br />
I/O Module<br />
Controller Tag Reference<br />
Point<br />
Data Point Status Combined Status<br />
IN 0 moduleName:I.Pt00Data moduleName:I.Pt00InputStatus<br />
IN 1 moduleName:I.Pt01Data moduleName:I.Pt01InputStatus<br />
IN 2 moduleName:I.Pt02Data moduleName:I.Pt02InputStatus<br />
… … …<br />
IN n moduleName:I.PtnData moduleName:I.PtnInputStatus<br />
moduleName:I.InputStatus<br />
324 Publication <strong>1756</strong>-<strong>RM095C</strong>-<strong>EN</strong>-P - July 2008
Output Point Mapping<br />
Output<br />
RSLogix 5000 Software, Version 14 and Later, <strong>Safety</strong> <strong>Application</strong> <strong>Instruction</strong>s Appendix A<br />
The following table identifies the mapping between the <strong>Safety</strong> I/O<br />
modules output points and the controller tags when the <strong>Safety</strong> I/O<br />
module’s Output-Status module definition is configured for Point<br />
Status or Combined Status.<br />
Note that moduleName is the name you assign to the I/O module.<br />
I/O Module<br />
Controller Tag Reference<br />
Point<br />
Data Point Status Combined Status<br />
OUT 0 moduleName:O.Pt00Data moduleName:I.Pt00OutputStatus<br />
OUT 1 moduleName:O.Pt01Data moduleName:I.Pt01OutputStatus<br />
OUT 2 moduleName:O.Pt02Data moduleName:I.Pt02OutputStatus<br />
… … …<br />
OUT n moduleName:O.PtnData moduleName:I.PtnOutputStatus<br />
moduleName:I.OutputStatus<br />
Publication <strong>1756</strong>-<strong>RM095C</strong>-<strong>EN</strong>-P - July 2008 325
Appendix A RSLogix 5000 Software, Version 14 and Later, <strong>Safety</strong> <strong>Application</strong> <strong>Instruction</strong>s<br />
Diverse Input (DIN)<br />
<strong>Instruction</strong><br />
•<br />
Diverse Input (DIN) <strong>Instruction</strong> Input Parameters<br />
The basic purpose of the Diverse Input (DIN) instruction is to emulate<br />
the input functionality of a safety relay in a software-programmable<br />
environment that is intended for use in SIL3/CAT4 safety applications.<br />
<strong>Instruction</strong> Parameters<br />
This table explains the instruction inputs.<br />
Parameter Data Type Description Safe, Active, and<br />
Initial Values<br />
DIN Pre-defined<br />
Data Type<br />
This parameter is used to maintain instruction-specific information. Do<br />
not use the same pre-defined data-type tag name in more than one<br />
instruction.<br />
Reset Type Boolean The reset type determines whether the instruction is using Manual or<br />
Automatic reset for Output 1.<br />
Manual or Automatic<br />
Channel A Boolean Channel A Input (Normally Open). Safe = 0, Active = 1<br />
Channel B Boolean Channel B Input (Normally Closed). Safe = 1, Active = 0<br />
Circuit Reset Boolean Circuit Reset Input.<br />
Initial = 0, Reset = 1<br />
Manual Reset - <strong>Set</strong>s Output 1 after Channel A and Channel B transition<br />
from the Safe state to the Active state, and the Circuit Reset input<br />
transitions from zero to one.<br />
Automatic Reset - Visible, but not used.<br />
Fault Reset Boolean After fault conditions are corrected for the instruction, the fault outputs for<br />
the instruction are cleared when this input transitions from off to on.<br />
326 Publication <strong>1756</strong>-<strong>RM095C</strong>-<strong>EN</strong>-P - July 2008<br />
—<br />
Initial = 0, Reset = 1
Diverse Input (DIN) <strong>Instruction</strong> Output Parameters<br />
RSLogix 5000 Software, Version 14 and Later, <strong>Safety</strong> <strong>Application</strong> <strong>Instruction</strong>s Appendix A<br />
This table explains the instruction outputs.<br />
Parameter Data Type Description Safe, Active, and<br />
Initial Values<br />
Output 1 Boolean Output 1 is set to the Active state when input conditions are met. Safe = 0, Active = 1<br />
Cycle Inputs Boolean Cycle Inputs prompt for action. Before Output 1 is turned on, Channel A and<br />
Channel B inputs must be cycled through their Safe States at the same<br />
time before the circuit can be reset.<br />
Initial = 0, Prompt = 1<br />
Circuit Reset Held<br />
On<br />
This prompt is cleared when Channel A and Channel B transition to the<br />
Safe state.<br />
Boolean Manual Reset - The Circuit Reset Held On prompt is set when both input<br />
channels transition to the Active states, and the Circuit Reset input is<br />
already on.<br />
The Circuit Reset Held On prompt is cleared when the Circuit Reset input is<br />
turned off.<br />
Automatic Reset - Visible, but not used.<br />
Inputs Inconsistent Boolean This fault is set when Channel A and Channel B inputs are in inconsistent<br />
states (one Safe and one Active) for a period of time greater than the<br />
Inconsistent Time Period (listed below). This fault is cleared when Channel<br />
A and Channel B inputs return to consistent states (both Safe or both<br />
Active) and the Fault Reset input transitions from off to on.<br />
Inconsistent Time Period: 500 ms.<br />
Fault Present Boolean This is set whenever a fault is present in the instruction. Output 1 cannot<br />
enter the Active state when Fault Present is set. Fault Present is cleared<br />
when all faults are cleared and the Fault Reset input transitions from off to<br />
on.<br />
IMPORTANT<br />
Initial = 0, Prompt = 1<br />
Initial = 0, Fault = 1<br />
Initial = 0, Fault = 1<br />
Do not write to any instruction output tag under any<br />
circumstances.<br />
Publication <strong>1756</strong>-<strong>RM095C</strong>-<strong>EN</strong>-P - July 2008 327
Appendix A RSLogix 5000 Software, Version 14 and Later, <strong>Safety</strong> <strong>Application</strong> <strong>Instruction</strong>s<br />
1<br />
Channel A<br />
0<br />
1<br />
Channel B<br />
0<br />
1<br />
Circuit Reset<br />
0<br />
1<br />
Output 1<br />
0<br />
Manual Reset<br />
Normal Operation<br />
This instruction monitors the states of two input channels and turns<br />
on Output 1 when the following conditions are met:<br />
• When using Manual Reset: both inputs are in the Active state<br />
and the Circuit Reset input is transitioned from a zero to a one.<br />
• When using Automatic Reset: both inputs are in the Active state<br />
for 50 ms.<br />
This instruction turns Output 1 off when either one or both of the<br />
input channels returns to the Safe state.<br />
The Diverse Input (DIN) instruction has one input channel that is<br />
normally open and one that is normally-closed. This means that a zero<br />
on the normally open channel and a one on the normally-closed<br />
channel represents the Safe state and vice-versa for the Active state.<br />
See the De-energize to Trip System section on page 319 for<br />
information about how to condition the input data associated with the<br />
normally-closed channel.<br />
These normal operation state changes are shown in the following<br />
timing diagrams.<br />
1<br />
Channel A<br />
0<br />
1<br />
Channel B<br />
0<br />
1<br />
Output 1<br />
0<br />
Automatic Reset<br />
328 Publication <strong>1756</strong>-<strong>RM095C</strong>-<strong>EN</strong>-P - July 2008<br />
50 ms
RSLogix 5000 Software, Version 14 and Later, <strong>Safety</strong> <strong>Application</strong> <strong>Instruction</strong>s Appendix A<br />
Operation with Inconsistent Inputs<br />
This instruction generates a fault if the input channels are in<br />
inconsistent states (one Safe and one Active) for more than the<br />
specified period of time. The inconsistent time period is 500 ms (t1).<br />
This fault condition is enunciated via the Inputs Inconsistent and the<br />
Fault Present outputs. Output 1 cannot enter the Active state while the<br />
Fault Present output is active. The fault indication is cleared when the<br />
offending condition is remedied and the Fault Reset input is<br />
transitioned from zero to one.<br />
These state changes are shown in the following timing diagram.<br />
Inputs Inconsistent, Fault Present, and Fault Reset Operation<br />
1<br />
Channel A<br />
0<br />
1<br />
Channel B<br />
0<br />
1<br />
Output 1<br />
0<br />
1<br />
Inputs Inconsistent<br />
0<br />
1<br />
Fault Present<br />
0<br />
1<br />
Fault Reset<br />
0<br />
Publication <strong>1756</strong>-<strong>RM095C</strong>-<strong>EN</strong>-P - July 2008 329<br />
t1<br />
t1 = Inputs Inconsistent Time Period
Appendix A RSLogix 5000 Software, Version 14 and Later, <strong>Safety</strong> <strong>Application</strong> <strong>Instruction</strong>s<br />
Operation with Circuit Reset Held On - Manual Reset Only<br />
This instruction also sets the Circuit Reset Held On output prompt if<br />
the Circuit Reset input is set (1) when the input channels transition to<br />
the Active state.<br />
These state changes are shown in the following timing diagram.<br />
1<br />
Channel A<br />
0<br />
1<br />
Channel B<br />
0<br />
Circuit Reset1<br />
0<br />
1<br />
Output 1<br />
0<br />
Circuit Reset Held On1<br />
Cycle Inputs Operation<br />
If, while Output 1 is active, one of the input channels transitions from<br />
the Active state to the Safe state and back to the Active state before<br />
the other input channel transitions to the Safe state, the Cycle Inputs<br />
output prompt is set, and Output 1 cannot enter the Active state again<br />
until both input channels cycle through their Safe states.<br />
These state changes are shown in the following timing diagram.<br />
330 Publication <strong>1756</strong>-<strong>RM095C</strong>-<strong>EN</strong>-P - July 2008<br />
0<br />
1<br />
Channel A<br />
0<br />
1<br />
Channel B<br />
0<br />
1<br />
Output 1<br />
0<br />
1<br />
Cycle Inputs<br />
0
The inputs shown on this wiring<br />
diagram correspond to the inputs<br />
for the instruction.<br />
E1<br />
E1 - 24V Power Supply<br />
S1 - Diverse Input Switch<br />
S2 - Circuit Reset Switch<br />
S3 - Fault Reset Switch<br />
RSLogix 5000 Software, Version 14 and Later, <strong>Safety</strong> <strong>Application</strong> <strong>Instruction</strong>s Appendix A<br />
Diverse Input with Manual Reset Wiring Example<br />
The following wiring diagram is one example of how to wire a<br />
two-channel switch having diverse inputs to a 1791DS <strong>Safety</strong> I/O<br />
module to comply with <strong>EN</strong>954-1 Category 4.<br />
V<br />
G T0 T1<br />
S1<br />
IN 0 IN1 IN 2 IN3<br />
1791DS <strong>Safety</strong> Module<br />
Diverse Input with Manual Reset Programming Example<br />
The following programming example shows how the Diverse Input<br />
instruction with Manual Reset can be applied to the wiring diagram<br />
shown above.<br />
IN 0<br />
IN 1<br />
IN 2<br />
IN 3<br />
Publication <strong>1756</strong>-<strong>RM095C</strong>-<strong>EN</strong>-P - July 2008 331<br />
T2<br />
S2 S 3<br />
S1 as shown is in the Active state. IN0 - Normally Open, IN1 - Normally Closed.<br />
Diverse Input<br />
DIN<br />
DIN dinData Type<br />
Reset Type MANUAL<br />
Channel A<br />
moduleName:I.Pt00Data<br />
0<br />
Channel B<br />
Circuit Reset<br />
Fault Reset<br />
<strong>1756</strong>-L62S<br />
User Program<br />
moduleName:I.Pt01Data<br />
moduleName:I.Pt02Data<br />
0<br />
moduleName:I.Pt03Data<br />
0<br />
1<br />
O1<br />
CI<br />
CRHO<br />
II<br />
FP
Appendix A RSLogix 5000 Software, Version 14 and Later, <strong>Safety</strong> <strong>Application</strong> <strong>Instruction</strong>s<br />
<strong>EN</strong>954-1 Category 4 requires that inputs be independently pulse<br />
tested. RSLogix 5000 programming software is used to configure the<br />
following I/O module parameters for pulse testing.<br />
Input Configuration<br />
Input Point Type Point Mode Test Source<br />
0 (IN0) Single <strong>Safety</strong> Pulse Test 0 (T0)<br />
1 (IN1) Single <strong>Safety</strong> Pulse Test 1 (T1)<br />
2 (IN2) Single <strong>Safety</strong> None<br />
3 (IN3) Single <strong>Safety</strong> None<br />
Test Output<br />
Test Output<br />
Point<br />
Point Mode<br />
0 (T0) Pulse Test<br />
1 (T1) Pulse Test<br />
2 (T2) Power Supply<br />
3 (T3) Not Used<br />
332 Publication <strong>1756</strong>-<strong>RM095C</strong>-<strong>EN</strong>-P - July 2008
The inputs shown on this wiring<br />
diagram correspond to the inputs<br />
for the instruction.<br />
E1<br />
E1 - 24V Power Supply<br />
S1 - Diverse Input Switch<br />
S2 - Fault Reset Switch<br />
RSLogix 5000 Software, Version 14 and Later, <strong>Safety</strong> <strong>Application</strong> <strong>Instruction</strong>s Appendix A<br />
Diverse Input with Automatic Reset Wiring Example<br />
The following wiring diagram is one example of how to wire a<br />
two-channel switch having diverse inputs to a 1791DS <strong>Safety</strong> I/O<br />
module to comply with <strong>EN</strong>954-1 Category 4.<br />
ATT<strong>EN</strong>TION<br />
V<br />
G T0 T1<br />
S1<br />
Various safety standards (<strong>EN</strong> 60204, <strong>EN</strong> 954) require that when<br />
using the Automatic Circuit Reset feature, other measures must<br />
be implemented to ensure that an unexpected (or unintended)<br />
startup will not occur in the system or application.<br />
IN 0 IN1 IN 2<br />
1791DS <strong>Safety</strong> Module<br />
Publication <strong>1756</strong>-<strong>RM095C</strong>-<strong>EN</strong>-P - July 2008 333<br />
T2<br />
S1 as shown is in the Active state. IN0 - Normally Open, IN1 - Normally Closed.<br />
S2
Appendix A RSLogix 5000 Software, Version 14 and Later, <strong>Safety</strong> <strong>Application</strong> <strong>Instruction</strong>s<br />
Diverse Input with Automatic Reset Programming Example<br />
The following programming example shows how the Diverse Input<br />
instruction with Automatic Reset can be applied to the wiring diagram<br />
shown in Diverse Input with Automatic Reset Wiring Example on<br />
page 333.<br />
IN 0<br />
IN 1<br />
IN 2<br />
<strong>EN</strong>954-1 Category 4 requires that inputs be independently pulse<br />
tested. RSLogix 5000 programming software is used to configure the<br />
following I/O module parameters for pulse testing.<br />
Input Configuration<br />
Point Type Point Mode Test Source<br />
0 (IN0) Single <strong>Safety</strong> Pulse Test 0 (T0)<br />
1 (IN1) Single <strong>Safety</strong> Pulse Test 1 (T1)<br />
2 (IN2) Single <strong>Safety</strong> None<br />
Test Output<br />
Point Point Mode<br />
0 (T0) Pulse Test<br />
1 (T1) Pulse Test<br />
2 (T2) Power Supply<br />
Diverse Input<br />
334 Publication <strong>1756</strong>-<strong>RM095C</strong>-<strong>EN</strong>-P - July 2008<br />
DIN<br />
DIN dinData Type<br />
Reset Type AUTOMATIC<br />
Channel A<br />
moduleName:I.Pt00Data<br />
0<br />
Channel B<br />
Circuit Reset<br />
Fault Reset<br />
<strong>1756</strong>-L62S<br />
User Program<br />
moduleName:I.Pt01Data<br />
notUsedTag<br />
0<br />
moduleName:I.Pt02Data<br />
0<br />
1<br />
O1<br />
CI<br />
CRHO<br />
II<br />
FP
Redundant Input (RIN)<br />
<strong>Instruction</strong><br />
•<br />
Redundant Input (RIN) <strong>Instruction</strong> Input Parameters<br />
RSLogix 5000 Software, Version 14 and Later, <strong>Safety</strong> <strong>Application</strong> <strong>Instruction</strong>s Appendix A<br />
The basic purpose of the Redundant Input (RIN) instruction is to<br />
emulate the input functionality of a safety relay in a<br />
software-programmable environment that is intended for use in<br />
SIL3/CAT4 safety applications.<br />
<strong>Instruction</strong> Parameters<br />
This table explains the instruction inputs.<br />
Parameter Data Type Description Safe, Active, and<br />
Initial Values<br />
RIN Pre-defined<br />
Data Type<br />
This parameter is used to maintain instruction-specific information.<br />
Do not use the same pre-defined data-type tag name in more than<br />
one instruction.<br />
Reset Type Boolean The reset type determines whether the instruction is using Manual or<br />
Automatic reset for Output 1.<br />
Manual or Automatic<br />
Channel A Boolean Channel A Input (Normally Open). Safe = 0, Active = 1<br />
Channel B Boolean Channel B Input (Normally Open). Safe = 0, Active = 1<br />
Circuit Reset Boolean Circuit Reset Input.<br />
Initial = 0, Reset = 1<br />
Manual Reset - <strong>Set</strong>s Output 1 after Channel A and Channel B transition<br />
from the Safe state to the Active state, and the Circuit Reset input<br />
transitions from zero to one.<br />
Automatic Reset - Visible, but not used.<br />
Fault Reset Boolean After fault conditions are corrected for the instruction, the fault outputs for<br />
the instruction are cleared when this input transitions from off to on.<br />
Publication <strong>1756</strong>-<strong>RM095C</strong>-<strong>EN</strong>-P - July 2008 335<br />
—<br />
Initial = 0, Reset = 1
Appendix A RSLogix 5000 Software, Version 14 and Later, <strong>Safety</strong> <strong>Application</strong> <strong>Instruction</strong>s<br />
Redundant Input (RIN) <strong>Instruction</strong> Output Parameters<br />
This table explains the instruction outputs.<br />
Parameter Data Type Description Safe, Active, and<br />
Initial Values<br />
Output 1 Boolean Output 1 is set to the Active state when input conditions are met. Safe = 0, Active = 1<br />
Cycle Inputs Boolean Cycle Inputs prompt for action. Before Output 1 is turned on, Channel A and<br />
Channel B inputs must be cycled through their Safe States at the same<br />
time before the circuit can be reset.<br />
Initial = 0, Prompt = 1<br />
Circuit Reset Held<br />
On<br />
This prompt is cleared when Channel A and Channel B transition to the<br />
Safe state.<br />
Boolean Manual Reset - The Circuit Reset Held On prompt is set when both input<br />
channels transition to the Active states, and the Circuit Reset input is<br />
already on.<br />
The Circuit Reset Held On prompt is cleared when the Circuit Reset input is<br />
turned off.<br />
Automatic Reset - Visible, but not used.<br />
Inputs Inconsistent Boolean This fault is set when Channel A and Channel B inputs are in inconsistent<br />
states (one Safe and one Active) for a period of time greater than the<br />
Inconsistent Time Period (listed below). This fault is cleared when Channel<br />
A and Channel B inputs return to consistent states (both Safe or both<br />
Active) and the Fault Reset input transitions from off to on.<br />
Inconsistent Time Period: 500 ms.<br />
Fault Present Boolean This is set whenever a fault is present in the instruction. Output 1 cannot<br />
enter the Active state when Fault Present is set. Fault Present is cleared<br />
when all faults are cleared and the Fault Reset input transitions from off to<br />
on.<br />
IMPORTANT<br />
Initial = 0, Prompt = 1<br />
Initial = 0, Fault = 1<br />
Initial = 0, Fault = 1<br />
Do not write to any instruction output tag under any<br />
circumstances.<br />
336 Publication <strong>1756</strong>-<strong>RM095C</strong>-<strong>EN</strong>-P - July 2008
1<br />
Channel A<br />
0<br />
1<br />
Channel B<br />
0<br />
1<br />
Circuit Reset<br />
Circuit Reset<br />
0<br />
1<br />
Output Output 1 1<br />
0<br />
Manual Reset<br />
RSLogix 5000 Software, Version 14 and Later, <strong>Safety</strong> <strong>Application</strong> <strong>Instruction</strong>s Appendix A<br />
Normal Operation<br />
This instruction monitors the states of two input channels and turns<br />
on Output 1 when the following conditions are met:<br />
• When using Manual Reset: both inputs are in the Active state<br />
and the Circuit Reset input is transitioned from a zero to a one.<br />
• When using Automatic Reset: both inputs are in the Active state<br />
for 50 ms.<br />
This instruction turns Output 1 off when either one or both of the<br />
input channels return to the Safe state.<br />
Both input channels for the Redundant Input (RIN) instruction are<br />
normally open. This means zeros on both channels represent the Safe<br />
state, and ones on both channels represent the Active state.<br />
These normal operation state changes are shown in the following<br />
timing diagrams.<br />
Channel A 1<br />
0<br />
1<br />
Channel B<br />
0<br />
1<br />
Output 1 1<br />
0<br />
Publication <strong>1756</strong>-<strong>RM095C</strong>-<strong>EN</strong>-P - July 2008 337<br />
50 ms<br />
Automatic Reset
Appendix A RSLogix 5000 Software, Version 14 and Later, <strong>Safety</strong> <strong>Application</strong> <strong>Instruction</strong>s<br />
Operation with Inconsistent Inputs<br />
This instruction generates a fault if the input channels are in<br />
inconsistent states (one Safe and one Active) for more than the<br />
specified period of time. The inconsistent time period is 500 ms (t1).<br />
This fault condition is enunciated via the Inputs Inconsistent and the<br />
Fault Present outputs. Output 1 cannot enter the Active state while the<br />
Fault Present output is active. The fault indication is cleared when the<br />
offending condition is remedied and the Fault Reset input is<br />
transitioned from zero to one.<br />
These state changes are shown in the following timing diagram.<br />
Inputs Inconsistent, Fault Present, and Fault Reset Operation<br />
Channel A 1<br />
338 Publication <strong>1756</strong>-<strong>RM095C</strong>-<strong>EN</strong>-P - July 2008<br />
0<br />
1<br />
Channel B<br />
0<br />
1<br />
Output 1<br />
0<br />
1<br />
Inputs Inconsistent<br />
0<br />
1<br />
Fault Present<br />
0<br />
1<br />
Fault Reset<br />
0<br />
t1<br />
t1 = Inputs Inconsistent Time Period
RSLogix 5000 Software, Version 14 and Later, <strong>Safety</strong> <strong>Application</strong> <strong>Instruction</strong>s Appendix A<br />
Operation with Circuit Reset Held On - Manual Reset Only<br />
This instruction also sets the Circuit Reset Held On output prompt if<br />
the Circuit Reset input is set (1) when the input channels transition to<br />
the Active state.<br />
These state changes are shown in the following timing diagram.<br />
1<br />
Channel A<br />
0<br />
Channel B<br />
1<br />
0<br />
1<br />
Circuit Reset<br />
0<br />
1<br />
Output 1<br />
0<br />
1<br />
Circuit Reset Held On<br />
0<br />
Cycle Inputs Operation<br />
If, while Output 1 is active, one of the input channels transitions from<br />
the Active state to the Safe state and back to the Active state before<br />
the other input channel transitions to the Safe state, the Cycle Inputs<br />
output prompt is set, and Output 1 cannot enter the Active state again<br />
until both input channels cycle through their Safe states.<br />
These state changes are shown in the following timing diagram.<br />
Channel A<br />
1<br />
0<br />
Channel B 1<br />
0<br />
1<br />
Output 1<br />
0<br />
1<br />
Cycle Inputs<br />
0<br />
Publication <strong>1756</strong>-<strong>RM095C</strong>-<strong>EN</strong>-P - July 2008 339
Appendix A RSLogix 5000 Software, Version 14 and Later, <strong>Safety</strong> <strong>Application</strong> <strong>Instruction</strong>s<br />
The inputs shown on this wiring<br />
diagram correspond to the inputs<br />
for the instruction.<br />
E1<br />
E1 - 24V Power Supply<br />
S1 - Redundant Input Switch<br />
S2 - Circuit Reset Switch<br />
S3 - Fault Reset Switch<br />
Redundant Input with Manual Reset Wiring Example<br />
The following wiring diagram is one example of how to wire a<br />
two-channel switch having two normally-open contacts to a 1791DS<br />
<strong>Safety</strong> I/O module to comply with <strong>EN</strong>954-1 Category 4.<br />
V<br />
G T0 T1<br />
S1<br />
IN 0 IN1 IN 2 IN3<br />
Redundant Input with Manual Reset Programming Example<br />
The following programming example shows how the Redundant<br />
Input instruction with Manual Reset can be applied to the wiring<br />
diagram shown above.<br />
IN 0<br />
IN 1<br />
IN 2<br />
IN 3<br />
Redundant Input<br />
340 Publication <strong>1756</strong>-<strong>RM095C</strong>-<strong>EN</strong>-P - July 2008<br />
T2<br />
1791DS <strong>Safety</strong> Module<br />
S2 S 3<br />
<strong>1756</strong>-L62S<br />
User Program<br />
RIN<br />
RIN rinData Type<br />
Reset Type MANUAL<br />
Channel A<br />
moduleName:I.Pt00Data<br />
0<br />
Channel B<br />
moduleName:I.Pt01Data<br />
Circuit Reset<br />
Fault Reset<br />
1<br />
moduleName:I.Pt02Data<br />
0<br />
moduleName:I.Pt03Data<br />
0<br />
O1<br />
CI<br />
CRHO<br />
II<br />
FP
RSLogix 5000 Software, Version 14 and Later, <strong>Safety</strong> <strong>Application</strong> <strong>Instruction</strong>s Appendix A<br />
<strong>EN</strong>954-1 Category 4 requires that inputs be independently pulse<br />
tested. RSLogix 5000 programming software is used to configure the<br />
following I/O module parameters for pulse testing.<br />
Input Configuration<br />
Input Point Type Point Mode Test Source<br />
0 (IN0) Single <strong>Safety</strong> Pulse Test 0 (T0)<br />
1 (IN1) Single <strong>Safety</strong> Pulse Test 1 (T1)<br />
2 (IN2) Single <strong>Safety</strong> None<br />
3 (IN3) Single <strong>Safety</strong> None<br />
Test Output<br />
Test Output<br />
Point<br />
Point Mode<br />
0 (T0) Pulse Test<br />
1 (T1) Pulse Test<br />
2 (T2) Power Supply<br />
3 (T3) Not Used<br />
Publication <strong>1756</strong>-<strong>RM095C</strong>-<strong>EN</strong>-P - July 2008 341
Appendix A RSLogix 5000 Software, Version 14 and Later, <strong>Safety</strong> <strong>Application</strong> <strong>Instruction</strong>s<br />
The inputs shown on this wiring<br />
diagram correspond to the inputs<br />
for the instruction.<br />
E1<br />
E1 - 24V Power Supply<br />
S1 - Redundant Input Switch<br />
S2 - Fault Reset Switch<br />
Redundant Input with Automatic Reset Wiring Example<br />
The following wiring diagram shows one example of how to wire a<br />
two-channel switch having two normally-open contacts to a 1791DS<br />
<strong>Safety</strong> I/O module to comply with <strong>EN</strong>954-1 Category 4.<br />
ATT<strong>EN</strong>TION<br />
V<br />
G T0 T1<br />
S1<br />
Various safety standards (<strong>EN</strong> 60204, <strong>EN</strong> 954) require that when<br />
using the Automatic Circuit Reset feature, other measures must<br />
be implemented to ensure that an unexpected (or unintended)<br />
startup will not occur in the system or application.<br />
IN 0 IN1 IN 2<br />
342 Publication <strong>1756</strong>-<strong>RM095C</strong>-<strong>EN</strong>-P - July 2008<br />
T2<br />
S2<br />
1791DS <strong>Safety</strong> Module
RSLogix 5000 Software, Version 14 and Later, <strong>Safety</strong> <strong>Application</strong> <strong>Instruction</strong>s Appendix A<br />
Redundant Input with Automatic Reset Programming Example<br />
The following programming example shows how the Redundant<br />
Input instruction with Automatic Reset can be applied to the wiring<br />
diagram shown in Redundant Input with Automatic Reset Wiring<br />
Example on page 342.<br />
IN 0<br />
IN 1<br />
IN 2<br />
<strong>EN</strong>954-1 Category 4 requires that inputs be independently pulse<br />
tested. RSLogix 5000 programming software is used to configure the<br />
following I/O module parameters for pulse testing.<br />
Input Configuration<br />
Input Point Type Point Mode Test Source<br />
0 (IN0) Single <strong>Safety</strong> Pulse Test 0 (T0)<br />
1 (IN1) Single <strong>Safety</strong> Pulse Test 1 (T1)<br />
2 (IN2) Single <strong>Safety</strong> None<br />
Test Output<br />
Test Output<br />
Point<br />
Point Mode<br />
0 (T0) Pulse Test<br />
1 (T1) Pulse Test<br />
2 (T2) Power Supply<br />
Redundant Input<br />
<strong>1756</strong>-L62S<br />
User Program<br />
Publication <strong>1756</strong>-<strong>RM095C</strong>-<strong>EN</strong>-P - July 2008 343<br />
RIN<br />
RIN rinData Type<br />
Reset Type AUTOMATIC<br />
Channel A<br />
moduleName:I.Pt00Data<br />
0<br />
Channel B<br />
moduleName:I.Pt01Data<br />
Circuit Reset notUsedTag<br />
0<br />
Fault Reset<br />
moduleName:I.Pt02Data<br />
0<br />
1<br />
O1<br />
CI<br />
CRHO<br />
II<br />
FP
Appendix A RSLogix 5000 Software, Version 14 and Later, <strong>Safety</strong> <strong>Application</strong> <strong>Instruction</strong>s<br />
Emergency Stop (ESTOP)<br />
<strong>Instruction</strong><br />
•<br />
Emergency Stop (ESTOP) <strong>Instruction</strong> Input Parameters<br />
The basic purpose of the Emergency Stop (ESTOP) instruction is to<br />
emulate the input functionality of a safety relay in a<br />
software-programmable environment that is intended for use in<br />
SIL3/CAT4 safety applications.<br />
<strong>Instruction</strong> Parameters<br />
This table explains the instruction inputs.<br />
Parameter Data Type Description Safe, Active and<br />
Initial Values<br />
ESTOP Pre-defined<br />
Data Type<br />
This parameter is used to maintain instruction-specific information. Do<br />
not use the same pre-defined data-type tag name in more than one<br />
instruction.<br />
Reset Type Boolean The reset type determines whether the instruction is using Manual or<br />
Automatic reset for Output 1.<br />
Manual or Automatic<br />
Channel A Boolean Channel A Input (Normally Open). Safe = 0, Active = 1<br />
Channel B Boolean Channel B Input (Normally Open). Safe = 0, Active = 1<br />
Circuit Reset Boolean Circuit Reset Input.<br />
Initial = 0, Reset = 1<br />
Manual Reset - <strong>Set</strong>s Output 1 after Channel A and Channel B transition<br />
from the Safe state to the Active state, and the Circuit Reset input<br />
transitions from zero to one.<br />
Automatic Reset - Visible, but not used.<br />
Fault Reset Boolean After fault conditions are corrected for the instruction, the fault outputs for<br />
the instruction are cleared when this input transitions from off to on.<br />
344 Publication <strong>1756</strong>-<strong>RM095C</strong>-<strong>EN</strong>-P - July 2008<br />
—<br />
Initial = 0, Reset = 1
Emergency Stop (ESTOP) <strong>Instruction</strong> Output Parameters<br />
RSLogix 5000 Software, Version 14 and Later, <strong>Safety</strong> <strong>Application</strong> <strong>Instruction</strong>s Appendix A<br />
This table explains the instruction outputs.<br />
Parameter Data Type Description Safe, Active and<br />
Initial Values<br />
Output 1 Boolean Output 1 is set to the Active state when input conditions are met. Safe = 0, Active = 1<br />
Cycle Inputs Boolean Cycle Inputs prompt for action. Before Output 1 is turned on, Channel A and<br />
Channel B inputs must be cycled through their Safe States at the same<br />
time before the circuit can be reset.<br />
Initial = 0, Prompt = 1<br />
Circuit Reset Held<br />
On<br />
This prompt is cleared when Channel A and Channel B transition to the<br />
Safe state.<br />
Boolean Manual Reset - The Circuit Reset Held On prompt is set when both input<br />
channels transition to the Active states, and the Circuit Reset input is<br />
already on.<br />
The Circuit Reset Held On prompt is cleared when the Circuit Reset input is<br />
turned off.<br />
Automatic Reset - Visible, but not used.<br />
Inputs Inconsistent Boolean This fault is set when Channel A and Channel B inputs are in inconsistent<br />
states (one Safe and one Active) for a period of time greater than the<br />
Inconsistent Time Period (listed below). This fault is cleared when Channel<br />
A and Channel B inputs return to consistent states (both Safe or both<br />
Active) and the Fault Reset input transitions from off to on.<br />
Inconsistent Time Period: 500 ms.<br />
Fault Present Boolean This is set whenever a fault is present in the instruction. Output 1 cannot<br />
enter the Active state when Fault Present is set. Fault Present is cleared<br />
when all faults are cleared and the Fault Reset input transitions from off to<br />
on.<br />
IMPORTANT<br />
Initial = 0, Prompt = 1<br />
Initial = 0, Fault = 1<br />
Initial = 0, Fault = 1<br />
Do not write to any instruction output tag under any<br />
circumstances.<br />
Publication <strong>1756</strong>-<strong>RM095C</strong>-<strong>EN</strong>-P - July 2008 345
Appendix A RSLogix 5000 Software, Version 14 and Later, <strong>Safety</strong> <strong>Application</strong> <strong>Instruction</strong>s<br />
1<br />
Channel A<br />
0<br />
1<br />
Channel B<br />
0<br />
1<br />
Circuit Reset<br />
Circuit Reset<br />
0<br />
1<br />
Output Output 1 1<br />
0<br />
Manual Reset<br />
Normal Operation<br />
This instruction monitors the states of two input channels and turns<br />
on Output 1 when the following conditions are met:<br />
• When using Manual Reset: both inputs are in the Active state<br />
and the Circuit Reset input is transitioned from a zero to a one.<br />
• When using Automatic Reset: both inputs are in the Active state<br />
for 50 ms.<br />
This instruction turns Output 1 off when either one or both of the<br />
input channels returns to the Safe state.<br />
Both input channels for the Emergency Stop (ESTOP) instructions are<br />
normally open. This means zeros on both channels represent the Safe<br />
state, and ones on both channels represent the Active state.<br />
These normal operation state changes are shown in the following<br />
timing diagrams.<br />
Channel A 1<br />
0<br />
1<br />
Channel B<br />
0<br />
1<br />
Output 1 1<br />
0<br />
346 Publication <strong>1756</strong>-<strong>RM095C</strong>-<strong>EN</strong>-P - July 2008<br />
50 ms<br />
Automatic Reset
RSLogix 5000 Software, Version 14 and Later, <strong>Safety</strong> <strong>Application</strong> <strong>Instruction</strong>s Appendix A<br />
Operation with Inconsistent Inputs<br />
This instruction generates a fault if the input channels are in<br />
inconsistent states (one Safe and one Active) for more than the<br />
specified period of time. The inconsistent time period is 500 ms (t1).<br />
This fault condition is enunciated via the Inputs Inconsistent and the<br />
Fault Present outputs. Output 1 cannot enter the Active state while the<br />
Fault Present output is active. The fault indication is cleared when the<br />
offending condition is remedied and the Fault Reset input is<br />
transitioned from zero to one.<br />
These state changes are shown in the following timing diagram.<br />
Inputs Inconsistent, Fault Present, and Fault Reset Operation<br />
Channel A 1<br />
Publication <strong>1756</strong>-<strong>RM095C</strong>-<strong>EN</strong>-P - July 2008 347<br />
0<br />
1<br />
Channel B<br />
0<br />
1<br />
Output 1<br />
0<br />
1<br />
Inputs Inconsistent<br />
0<br />
1<br />
Fault Present<br />
0<br />
1<br />
Fault Reset<br />
0<br />
t1<br />
t1 = Inputs Inconsistent Time Period
Appendix A RSLogix 5000 Software, Version 14 and Later, <strong>Safety</strong> <strong>Application</strong> <strong>Instruction</strong>s<br />
Operation with Circuit Reset Held On - Manual Reset Only<br />
This instruction also sets the Circuit Reset Held On output prompt if<br />
the Circuit Reset input is set (1) when the input channels transition to<br />
the Active state.<br />
These state changes are shown in the following timing diagram.<br />
Cycle Inputs Operation<br />
1<br />
Channel A<br />
0<br />
Channel B<br />
1<br />
0<br />
1<br />
Circuit Reset<br />
0<br />
1<br />
Output 1<br />
0<br />
1<br />
Circuit Reset Held On<br />
0<br />
If, while Output 1 is active, one of the input channels transitions from<br />
the Active state to the Safe state and back to the Active state before<br />
the other input channel transitions to the Safe state, the Cycle Inputs<br />
output prompt is set, and Output 1 cannot enter the Active state again<br />
until both input channels cycle through their Safe states.<br />
These state changes are shown in the following timing diagram.<br />
Channel A<br />
1<br />
0<br />
Channel B 1<br />
0<br />
1<br />
Output 1<br />
0<br />
1<br />
Cycle Inputs<br />
0<br />
348 Publication <strong>1756</strong>-<strong>RM095C</strong>-<strong>EN</strong>-P - July 2008
The inputs shown on this wiring<br />
diagram correspond to the inputs<br />
for the instruction.<br />
E1<br />
E1 - 24V Power Supply<br />
S1 - Emergency Stop Switch<br />
S2 - Circuit Reset Switch<br />
S3 - Fault Reset Switch<br />
RSLogix 5000 Software, Version 14 and Later, <strong>Safety</strong> <strong>Application</strong> <strong>Instruction</strong>s Appendix A<br />
Emergency Stop with Manual Reset Wiring Example<br />
The following wiring diagram shows one example of how to wire a<br />
two-channel Emergency Stop switch having two normally-open<br />
contacts to a 1791DS <strong>Safety</strong> I/O module to comply with <strong>EN</strong>954-1<br />
Category 4.<br />
V<br />
G T0 T1<br />
S1<br />
IN 0 IN1 IN 2 IN3<br />
Emergency Stop with Manual Reset Programming Example<br />
The following programming example shows how the Emergency Stop<br />
instruction with Manual Reset can be applied to the wiring diagram<br />
shown above.<br />
IN 0<br />
IN 1<br />
IN 2<br />
IN 3<br />
Publication <strong>1756</strong>-<strong>RM095C</strong>-<strong>EN</strong>-P - July 2008 349<br />
T2<br />
ESTOP<br />
Emergency Stop<br />
1791DS <strong>Safety</strong> Module<br />
S2 S 3<br />
<strong>1756</strong>-L62S<br />
User Program<br />
E S T O P estopData Type<br />
Reset Type MANUAL<br />
Channel A<br />
moduleName:I.Pt00Data<br />
0<br />
Channel B<br />
Circuit Reset<br />
Fault Reset<br />
moduleName:I.Pt01Data<br />
moduleName:I.Pt02Data<br />
0<br />
moduleName:I.Pt03Data<br />
0<br />
1<br />
O1<br />
CI<br />
CRHO<br />
II<br />
FP
Appendix A RSLogix 5000 Software, Version 14 and Later, <strong>Safety</strong> <strong>Application</strong> <strong>Instruction</strong>s<br />
<strong>EN</strong>954-1 Category 4 requires that inputs be independently pulse<br />
tested. RSLogix 5000 programming software is used to configure the<br />
following I/O module parameters for pulse testing.<br />
Input Configuration<br />
Input Point Type Point Mode Test Source<br />
0 (IN0) Single <strong>Safety</strong> Pulse Test 0 (T0)<br />
1 (IN1) Single <strong>Safety</strong> Pulse Test 1 (T1)<br />
2 (IN2) Single <strong>Safety</strong> None<br />
3 (IN3) Single <strong>Safety</strong> None<br />
Test Output<br />
Test Output<br />
Point<br />
Point Mode<br />
0 (T0) Pulse Test<br />
1 (T1) Pulse Test<br />
2 (T2) Power Supply<br />
3 (T3) Not Used<br />
350 Publication <strong>1756</strong>-<strong>RM095C</strong>-<strong>EN</strong>-P - July 2008
The inputs shown on this wiring<br />
diagram correspond to the inputs<br />
for the instruction.<br />
E1<br />
E1 - 24V Power Supply<br />
S1 - Emergency Stop Switch<br />
S2 - Fault Reset Switch<br />
RSLogix 5000 Software, Version 14 and Later, <strong>Safety</strong> <strong>Application</strong> <strong>Instruction</strong>s Appendix A<br />
Emergency Stop with Automatic Reset Wiring Example<br />
The following wiring diagram shows one example of how to wire a<br />
two-channel Emergency Stop switch having two normally-open<br />
contacts to a 1791DS <strong>Safety</strong> I/O module to comply with <strong>EN</strong>954-1<br />
Category 4.<br />
ATT<strong>EN</strong>TION<br />
V<br />
G T0 T1<br />
S1<br />
Various safety standards (<strong>EN</strong> 60204, <strong>EN</strong> 954) require that when<br />
using the Automatic Circuit Reset feature, other measures must<br />
be implemented to ensure that an unexpected (or unintended)<br />
startup will not occur in the system or application.<br />
IN 0 IN1 IN 2<br />
Publication <strong>1756</strong>-<strong>RM095C</strong>-<strong>EN</strong>-P - July 2008 351<br />
T2<br />
S2<br />
1791DS <strong>Safety</strong> Module
Appendix A RSLogix 5000 Software, Version 14 and Later, <strong>Safety</strong> <strong>Application</strong> <strong>Instruction</strong>s<br />
Emergency Stop with Automatic Reset Programming Example<br />
The following programming example shows how the Emergency Stop<br />
instruction with Automatic Reset can be applied to the wiring diagram<br />
shown in Emergency Stop with Automatic Reset Wiring Example on<br />
page 351.<br />
IN 0<br />
IN 1<br />
IN 2<br />
<strong>EN</strong>954-1 Category 4 requires that inputs be independently pulse<br />
tested. RSLogix 5000 programming software is used to configure the<br />
following I/O module parameters for pulse testing.<br />
Input Configuration<br />
Input Point Type Point Mode Test Source<br />
0 (IN0) Single <strong>Safety</strong> Pulse Test 0 (T0)<br />
1 (IN1) Single <strong>Safety</strong> Pulse Test 1 (T1)<br />
2 (IN2) Single <strong>Safety</strong> None<br />
Test Output<br />
Test Output<br />
Point<br />
Point Mode<br />
0 (T0) Pulse Test<br />
1 (T1) Pulse Test<br />
2 (T2) Power Supply<br />
<strong>1756</strong>-L62S<br />
User Program<br />
ESTOP<br />
Emergency Stop<br />
E S T O P estopData Type<br />
Reset Type AUTOMATIC<br />
Channel A<br />
moduleName:I.Pt00Data<br />
0<br />
Circuit Reset notUsedTag<br />
0<br />
Fault Reset<br />
moduleName:I.Pt02Data<br />
0<br />
352 Publication <strong>1756</strong>-<strong>RM095C</strong>-<strong>EN</strong>-P - July 2008<br />
Channel B<br />
moduleName:I.Pt01Data<br />
1<br />
O1<br />
CI<br />
CRHO<br />
II<br />
FP
Enable Pendant (<strong>EN</strong>P<strong>EN</strong>)<br />
<strong>Instruction</strong><br />
•<br />
Enable Pendant (<strong>EN</strong>P<strong>EN</strong>) <strong>Instruction</strong>s Input Parameters<br />
RSLogix 5000 Software, Version 14 and Later, <strong>Safety</strong> <strong>Application</strong> <strong>Instruction</strong>s Appendix A<br />
The basic purpose of the Enable Pendant (<strong>EN</strong>P<strong>EN</strong>) instruction is to<br />
emulate the input functionality of a safety relay in a<br />
software-programmable environment that is intended for use in<br />
SIL3/CAT4 safety applications.<br />
<strong>Instruction</strong> Parameters<br />
This table explains the instruction inputs.<br />
Parameter Data Type Description Safe, Active, and<br />
Initial Values<br />
<strong>EN</strong>P<strong>EN</strong> Pre-defined<br />
Data Type<br />
This parameter is used to maintain instruction-specific information. Do<br />
not use the same pre-defined data-type tag name in more than one<br />
instruction.<br />
Reset Type Boolean The reset type determines whether the instruction is using Manual or<br />
Automatic reset for Output 1.<br />
Manual or Automatic<br />
Channel A Boolean Channel A Input (Normally Open). Safe = 0, Active = 1<br />
Channel B Boolean Channel B Input (Normally Open). Safe = 0, Active = 1<br />
Circuit Reset Boolean Circuit Reset Input.<br />
Initial = 0, Reset = 1<br />
Manual Reset - <strong>Set</strong>s Output 1 after Channel A and Channel B transition<br />
from the Safe state to the Active state, and the Circuit Reset input<br />
transitions from zero to one.<br />
Automatic Reset - Visible, but not used.<br />
Fault Reset Boolean After fault conditions are corrected for the instruction, the fault outputs for<br />
the instruction are cleared when this input transitions from off to on.<br />
Publication <strong>1756</strong>-<strong>RM095C</strong>-<strong>EN</strong>-P - July 2008 353<br />
—<br />
Initial = 0, Reset = 1
Appendix A RSLogix 5000 Software, Version 14 and Later, <strong>Safety</strong> <strong>Application</strong> <strong>Instruction</strong>s<br />
Enable Pendant (<strong>EN</strong>P<strong>EN</strong>) <strong>Instruction</strong>s Output Parameters<br />
This table explains the instruction outputs.<br />
Parameter Data Type Description Safe, Active, and<br />
Initial Values<br />
Output 1 Boolean Output 1 is set to the Active state when input conditions are met. Safe = 0, Active = 1<br />
Cycle Inputs Boolean Cycle Inputs prompt for action. Before Output 1 is turned on, Channel A<br />
and Channel B inputs must be cycled through their Safe States at the<br />
same time before the circuit can be reset.<br />
Initial = 0, Prompt = 1<br />
Circuit Reset Held<br />
On<br />
This prompt is cleared when Channel A and Channel B transition to the<br />
Safe state.<br />
Boolean Manual Reset - The Circuit Reset Held On prompt is set when both input<br />
channels transition to the Active states, and the Circuit Reset input is<br />
already on.<br />
The Circuit Reset Held On prompt is cleared when the Circuit Reset input<br />
is turned off.<br />
Automatic Reset - Visible, but not used.<br />
Inputs Inconsistent Boolean This fault is set when Channel A and Channel B inputs are in inconsistent<br />
states (one Safe and one Active) for a period of time greater than the<br />
Inconsistent Time Period (listed below). This fault is cleared when Channel<br />
A and Channel B inputs return to consistent states (both Safe or both<br />
Active) and the Fault Reset input transitions from off to on.<br />
Inconsistent Time Period: 3 seconds.<br />
Fault Present Boolean This is set whenever a fault is present in the instruction. Output 1 cannot<br />
enter the Active state when Fault Present is set. Fault Present is cleared<br />
when all faults are cleared and the Fault Reset input transitions from off<br />
to on.<br />
IMPORTANT<br />
Initial = 0, Prompt = 1<br />
Initial = 0, Fault = 1<br />
Initial = 0, Fault = 1<br />
Do not write to any instruction output tag under any<br />
circumstances.<br />
354 Publication <strong>1756</strong>-<strong>RM095C</strong>-<strong>EN</strong>-P - July 2008
1<br />
Channel A<br />
0<br />
1<br />
Channel B<br />
0<br />
1<br />
Circuit Reset<br />
Circuit Reset<br />
0<br />
1<br />
Output Output 1 1<br />
0<br />
Manual Reset<br />
RSLogix 5000 Software, Version 14 and Later, <strong>Safety</strong> <strong>Application</strong> <strong>Instruction</strong>s Appendix A<br />
Normal Operation<br />
This instruction monitors the states of two input channels and turns<br />
on Output 1 when the following conditions are met:<br />
• When using Manual Reset: both inputs are in the Active state<br />
and the Circuit Reset input is transitioned from a zero to a one.<br />
• When using Automatic Reset: both inputs are in the Active state<br />
for 50 ms.<br />
This instruction turns Output 1 off when either one or both of the<br />
input channels returns to the Safe state.<br />
Both input channels for the Enable Pendant (<strong>EN</strong>P<strong>EN</strong>) instruction are<br />
normally open. This means zeros on both channels represent the Safe<br />
state, and ones on both channels represent the Active state.<br />
These normal operation state changes are shown in the following<br />
timing diagrams.<br />
Channel A 1<br />
0<br />
1<br />
Channel B<br />
0<br />
1<br />
Output 1 1<br />
0<br />
Publication <strong>1756</strong>-<strong>RM095C</strong>-<strong>EN</strong>-P - July 2008 355<br />
50 ms<br />
Automatic Reset
Appendix A RSLogix 5000 Software, Version 14 and Later, <strong>Safety</strong> <strong>Application</strong> <strong>Instruction</strong>s<br />
Operation with Inconsistent Inputs<br />
This instruction generates a fault if the input channels are in<br />
inconsistent states (one Safe and one Active) for more than the<br />
specified period of time. The inconsistent time period is<br />
3 seconds (t1).<br />
This fault condition is enunciated via the Inputs Inconsistent and the<br />
Fault Present outputs. Output 1 cannot enter the Active state while the<br />
Fault Present output is active. The fault indication is cleared when the<br />
offending condition is remedied and the Fault Reset input is<br />
transitioned from zero to one.<br />
These state changes are shown in the following timing diagram.<br />
Inputs Inconsistent, Fault Present, and Fault Reset Operation<br />
Channel A 1<br />
356 Publication <strong>1756</strong>-<strong>RM095C</strong>-<strong>EN</strong>-P - July 2008<br />
0<br />
1<br />
Channel B<br />
0<br />
1<br />
Output 1<br />
0<br />
1<br />
Inputs Inconsistent<br />
0<br />
1<br />
Fault Present<br />
0<br />
1<br />
Fault Reset<br />
0<br />
t1<br />
t1 = Inputs Inconsistent Time Period
RSLogix 5000 Software, Version 14 and Later, <strong>Safety</strong> <strong>Application</strong> <strong>Instruction</strong>s Appendix A<br />
Operation with Circuit Reset Held On - Manual Reset Only<br />
This instruction also sets the Circuit Reset Held On output prompt if<br />
the Circuit Reset input is set (1) when the input channels transition to<br />
the Active state.<br />
These state changes are shown in the following timing diagram.<br />
1<br />
Channel A<br />
0<br />
Channel B<br />
1<br />
0<br />
1<br />
Circuit Reset<br />
0<br />
1<br />
Output 1<br />
0<br />
1<br />
Circuit Reset Held On<br />
0<br />
Cycle Inputs Operation<br />
If, while Output 1 is active, one of the input channels transitions from<br />
the Active state to the Safe state and back to the Active state before<br />
the other input channel transitions to the Safe state, the Cycle Inputs<br />
output prompt is set, and Output 1 cannot enter the Active state again<br />
until both input channels cycle through their Safe states.<br />
These state changes are shown in the following timing diagram.<br />
Channel A<br />
1<br />
0<br />
Channel B 1<br />
0<br />
1<br />
Output 1<br />
0<br />
1<br />
Cycle Inputs<br />
0<br />
Publication <strong>1756</strong>-<strong>RM095C</strong>-<strong>EN</strong>-P - July 2008 357
Appendix A RSLogix 5000 Software, Version 14 and Later, <strong>Safety</strong> <strong>Application</strong> <strong>Instruction</strong>s<br />
The inputs shown on this wiring<br />
diagram correspond to the inputs<br />
for the instruction.<br />
E1<br />
E1 - 24V Power Supply<br />
S1 - Enable Pendant Switch<br />
S2 - Circuit Reset Switch<br />
S3 - Fault Reset Switch<br />
Enable Pendant with Manual Reset Wiring Example<br />
The following wiring diagram is one example of how to wire a<br />
two-channel switch having two normally-open contacts to a 1791DS<br />
<strong>Safety</strong> I/O module to comply with <strong>EN</strong>954-1 Category 4.<br />
V<br />
G T0 T1<br />
S1<br />
IN 0 IN1 IN 2 IN3<br />
Enable Pendant with Manual Reset Programming Example<br />
The following programming example shows how the Enable Pendant<br />
instruction with Manual Reset can be applied to the wiring diagram<br />
shown above.<br />
IN 0<br />
IN 1<br />
IN 2<br />
IN 3<br />
358 Publication <strong>1756</strong>-<strong>RM095C</strong>-<strong>EN</strong>-P - July 2008<br />
T2<br />
<strong>EN</strong>P<strong>EN</strong><br />
Enable Pendant<br />
1791DS <strong>Safety</strong> Module<br />
S2 S 3<br />
<strong>1756</strong>-L62S<br />
User Program<br />
<strong>EN</strong>P<strong>EN</strong> enpenData Type<br />
Reset Type MANUAL<br />
Channel A<br />
moduleName:I.Pt00Data<br />
0<br />
Channel B<br />
moduleName:I.Pt01Data<br />
Circuit Reset<br />
Fault Reset<br />
moduleName:I.Pt02Data<br />
0<br />
moduleName:I.Pt03Data<br />
0<br />
1<br />
O1<br />
CI<br />
CRHO<br />
II<br />
FP
RSLogix 5000 Software, Version 14 and Later, <strong>Safety</strong> <strong>Application</strong> <strong>Instruction</strong>s Appendix A<br />
<strong>EN</strong>954-1 Category 4 requires that inputs be independently pulse<br />
tested. RSLogix 5000 programming software is used to configure the<br />
following I/O module parameters for pulse testing.<br />
Input Configuration<br />
Input Point Type Point Mode Test Source<br />
0 (IN0) Single <strong>Safety</strong> Pulse Test 0 (T0)<br />
1 (IN1) Single <strong>Safety</strong> Pulse Test 1 (T1)<br />
2 (IN2) Single <strong>Safety</strong> None<br />
3 (IN3) Single <strong>Safety</strong> None<br />
Test Output<br />
Test Output<br />
Point<br />
Point Mode<br />
0 (T0) Pulse Test<br />
1 (T1) Pulse Test<br />
2 (T2) Power Supply<br />
3 (T3) Not Used<br />
Publication <strong>1756</strong>-<strong>RM095C</strong>-<strong>EN</strong>-P - July 2008 359
Appendix A RSLogix 5000 Software, Version 14 and Later, <strong>Safety</strong> <strong>Application</strong> <strong>Instruction</strong>s<br />
The inputs shown on this wiring<br />
diagram correspond to the inputs<br />
for the instruction.<br />
E1<br />
E1 - 24V Power Supply<br />
S1 - Enable Pendant Switch<br />
S2 - Fault Reset Switch<br />
Enable Pendant with Automatic Reset Wiring Example<br />
The following wiring diagram is one example of how to wire a<br />
two-channel switch having two normally-open contacts to a 1791DS<br />
<strong>Safety</strong> I/O module to comply with <strong>EN</strong>954-1 Category 4.<br />
ATT<strong>EN</strong>TION<br />
V<br />
G T0 T1<br />
S1<br />
Various safety standards (<strong>EN</strong> 60204, <strong>EN</strong> 954) require that when<br />
using the Automatic Circuit Reset feature, other measures must<br />
be implemented to ensure that an unexpected (or unintended)<br />
startup will not occur in the system or application.<br />
IN 0 IN1 IN 2<br />
360 Publication <strong>1756</strong>-<strong>RM095C</strong>-<strong>EN</strong>-P - July 2008<br />
T2<br />
S2<br />
1791DS <strong>Safety</strong> Module
RSLogix 5000 Software, Version 14 and Later, <strong>Safety</strong> <strong>Application</strong> <strong>Instruction</strong>s Appendix A<br />
Enable Pendant with Automatic Reset Programming Example<br />
The following programming example shows how the Enable Pendant<br />
instruction with Automatic Reset can be applied to the wiring diagram<br />
shown in Enable Pendant with Automatic Reset Wiring Example on<br />
page 360.<br />
IN 0<br />
IN 1<br />
IN 2<br />
<strong>EN</strong>954-1 Category 4 requires that inputs be independently pulse<br />
tested. RSLogix 5000 programming software is used to configure the<br />
following I/O module parameters for pulse testing.<br />
Input Configuration<br />
Input Point Type Point Mode Test Source<br />
0 (IN0) Single <strong>Safety</strong> Pulse Test 0 (T0)<br />
1 (IN1) Single <strong>Safety</strong> Pulse Test 1 (T1)<br />
2 (IN2) Single <strong>Safety</strong> None<br />
Test Output<br />
Test Output<br />
Point<br />
Point Mode<br />
0 (T0) Pulse Test<br />
1 (T1) Pulse Test<br />
2 (T2) Power Supply<br />
<strong>1756</strong>-L62S<br />
User Program<br />
<strong>EN</strong>P<strong>EN</strong><br />
Enable Pendant<br />
<strong>EN</strong>P<strong>EN</strong> enpenData Type<br />
Reset Type AUTOMATIC<br />
Channel A<br />
moduleName:I.Pt00Data<br />
0<br />
Channel B<br />
moduleName:I.Pt01Data<br />
Circuit Reset notUsedTag<br />
Fault Reset<br />
0<br />
moduleName:I.Pt02Data<br />
0<br />
Publication <strong>1756</strong>-<strong>RM095C</strong>-<strong>EN</strong>-P - July 2008 361<br />
1<br />
O1<br />
CI<br />
CRHO<br />
II<br />
FP
Appendix A RSLogix 5000 Software, Version 14 and Later, <strong>Safety</strong> <strong>Application</strong> <strong>Instruction</strong>s<br />
Light Curtain (LC)<br />
<strong>Instruction</strong><br />
•<br />
The basic purpose of the Light Curtain (LC) instruction is to provide a<br />
manual and an automatic circuit-reset interface from a programmable<br />
controller to a light curtain used in SIL3/CAT4 safety applications.<br />
Many LC instructions pulse test their two outputs: OSSD1 and OSSD2.<br />
If these outputs are wired directly into <strong>GuardLogix</strong> controller inputs,<br />
the pulse test needs to be filtered. Otherwise, the <strong>GuardLogix</strong><br />
controller may mistake the LO pulse test for an LC blockage.<br />
Note that most LC instructions do provide controllers or relays that<br />
essentially filter out the pulse test and provide two dry contacts for<br />
OSSD1 and OSSD2. If using these devices, then OSSD1 and OSSD2<br />
can be wired directly to the <strong>GuardLogix</strong> controller.<br />
If you are not using the LC controller or relay, then the <strong>GuardLogix</strong><br />
controller must provide the pulse test filtering. There are two ways for<br />
the <strong>GuardLogix</strong> controller to filter this signal. The first is<br />
hardware-based digital input filters on the <strong>Safety</strong> input modules.<br />
For more information on <strong>Safety</strong> I/O modules, refer to the DeviceNet<br />
<strong>Safety</strong> I/O User Manual, publication 1791DS-UM001.<br />
The second is a software-based filter in the LC instruction.<br />
For information on the software-based filter, see Input Filter Time on<br />
page 369 of this manual.<br />
Of these two methods, the hardware filter is preferred. If the digital<br />
input filters the LO signals for longer than the LO pulse test width,<br />
then the hardware filter will filter out the pulse test. For example, if<br />
the LC instruction signals pulse LO for 100 µs during a pulse test, then<br />
the hardware must filter out LO signals that are 100 µs or longer. Note<br />
that the <strong>Safety</strong> DeviceNet I/O modules have a configurable filter of<br />
0…126 ms.<br />
362 Publication <strong>1756</strong>-<strong>RM095C</strong>-<strong>EN</strong>-P - July 2008
Light Curtain <strong>Instruction</strong> Input Parameters<br />
RSLogix 5000 Software, Version 14 and Later, <strong>Safety</strong> <strong>Application</strong> <strong>Instruction</strong>s Appendix A<br />
If the hardware filter cannot filter the pulse test, or you choose not to<br />
use the hardware filter, then the filtering must be done in the<br />
<strong>GuardLogix</strong> controller ladder logic. Software-based filters look at the<br />
input once every program cycle. Theoretically, every time the<br />
<strong>GuardLogix</strong> controller looks at OSSD1, it may be LO if the pulse test is<br />
occurring at that exact time. In other words, you may have to make<br />
your software filter long enough to scan OSSD1 multiple times before<br />
the filter times out, and OSSD1 is set logically LO.<br />
<strong>Set</strong>ting the software filter time higher than the <strong>GuardLogix</strong> controller’s<br />
<strong>Safety</strong> task period ensures that the input must be LO for three<br />
consecutive scans before the software filter times out. For example, if<br />
the <strong>GuardLogix</strong> controller’s <strong>Safety</strong> task period is 5 ms, a software filter<br />
time of 10 ms requires three LO scans. If the filter time is 15 ms, four<br />
LO scans are required. The downside of using a longer hardware or<br />
software filter is that this filter time must be directly added to the<br />
calculation of the LC safety reaction time.<br />
<strong>Instruction</strong> Parameters<br />
This table explains the instruction inputs.<br />
Parameter Data Type Description Safe, Active, and Initial Values<br />
LC Pre-defined<br />
Data Type<br />
This parameter is used to maintain instruction-specific<br />
information. Do not used the same pre-defined data-type<br />
tag name in more than one instruction.<br />
Reset Type Boolean The reset type determines whether the instruction is using<br />
Manual or Automatic reset for Output 1.<br />
Manual or Automatic<br />
Channel A Boolean Channel A Input. Safe = 0, Active = 1<br />
Channel B Boolean Channel B Input. Safe = 0, Active = 1<br />
Input Filter Time Time This is a selectable time, from 0…250 ms, used for filtering of<br />
the output pulse testing by the light curtain.<br />
Publication <strong>1756</strong>-<strong>RM095C</strong>-<strong>EN</strong>-P - July 2008 363<br />
—<br />
Initial = 0 ms<br />
Maximum = 250 ms<br />
Mute Light Curtain Boolean Permits muting of the light curtain when it is not being used. Initial = 0, Mute Light Curtain = 1<br />
Circuit Reset Boolean Circuit Reset Input.<br />
Initial = 0, Reset = 1<br />
Manual Reset - <strong>Set</strong>s Output 1 after Channel A and Channel B<br />
transition from the Safe state to the Active state, and the Circuit<br />
Reset input transitions from zero to one.<br />
Automatic Reset - Visible, but not used.<br />
Fault Reset Boolean After fault conditions are corrected for the instruction, the fault<br />
outputs for the instruction are cleared when this input<br />
transitions from off to on.<br />
Initial = 0, Reset = 1
Appendix A RSLogix 5000 Software, Version 14 and Later, <strong>Safety</strong> <strong>Application</strong> <strong>Instruction</strong>s<br />
Light Curtain <strong>Instruction</strong> Input Parameters<br />
This table explains the instruction outputs.<br />
Parameter Data Type Description Safe, Active, and Initial Values<br />
Output 1 Boolean Output 1 is set to the Active state when input conditions are<br />
met.<br />
Safe = 0, Active = 1<br />
Cycle Inputs Boolean Cycle Inputs prompts for action. Before Output 1 is turned on,<br />
Channel A and Channel B inputs must be cycled through their<br />
Safe States at the same time before the circuit can be reset.<br />
Initial = 0, Prompt = 1<br />
Circuit Reset Held<br />
On<br />
This prompt is cleared when Channel A and Channel B transition<br />
to the Safe state.<br />
Boolean Manual Reset - The Circuit Reset Held On prompt is set when<br />
both input channels transition to the Active states, and the<br />
Circuit Reset input is already on.<br />
The Circuit Reset Held On prompt is cleared when the Circuit<br />
Reset input is turned off.<br />
Automatic Reset - Visible, but not used.<br />
Initial = 0, Prompt = 1<br />
Light Curtain<br />
Blocked<br />
Boolean This indicates that the light curtain is blocked or has lost power. Initial = 0, Blocked = 1<br />
Light Curtain<br />
Muted<br />
Boolean This indicates that the light curtain is muted (not being used). Initial = 0, Muted = 1<br />
Inputs Inconsistent Boolean This fault is set when Channel A and Channel B inputs are in<br />
inconsistent states (one Safe and one Active) for a period of<br />
time greater than 500 ms. This fault is cleared when Channel A<br />
and Channel B inputs return to consistent states (both Safe or<br />
both Active) and the Fault Reset input transitions from off to on.<br />
Initial = 0, Fault = 1<br />
Fault Present Boolean This is on whenever a fault is present in the instruction. Output 1<br />
cannot enter the Active state when Fault Present is set. Fault<br />
Present is cleared when all faults are cleared and the Fault<br />
Reset input transitions from off to on.<br />
IMPORTANT<br />
Initial = 0, Fault = 1<br />
Do not write to any instruction output tag under any<br />
circumstances.<br />
364 Publication <strong>1756</strong>-<strong>RM095C</strong>-<strong>EN</strong>-P - July 2008
1<br />
Channel A<br />
0<br />
1<br />
Channel B<br />
0<br />
1<br />
Circuit Reset<br />
0<br />
1<br />
Output 1<br />
0<br />
1<br />
Light Curtain<br />
Blocked<br />
0<br />
Manual Reset<br />
RSLogix 5000 Software, Version 14 and Later, <strong>Safety</strong> <strong>Application</strong> <strong>Instruction</strong>s Appendix A<br />
Normal Operation<br />
This instruction monitors the states of two input channels and turns<br />
on output 1 when the following conditions are met:<br />
• When using Manual Reset: both inputs are in the Active state<br />
when the Circuit Reset input is transitioned from a zero to a one.<br />
• When using Automatic Reset: both inputs are in their Active state<br />
for 50 ms.<br />
The instruction turns output 1 off when either one or both of the input<br />
channels return to the Safe state.<br />
These normal operation state changes are shown in the following<br />
timing diagrams.<br />
1<br />
Channel A<br />
0<br />
1<br />
Channel B<br />
0<br />
1<br />
Output 1<br />
0<br />
Light Curtain 1<br />
Blocked<br />
0<br />
Light Curtain Muting Operation<br />
The one exception to the above Output 1 control is Light Curtain<br />
Muting that, when enabled, permits the inputs to leave the Active state<br />
and output 1 to remain on. The Light Curtain Muted output represents<br />
the value of the Mute Light Curtain input and indicates that the light<br />
curtain is not being used.<br />
This instruction also has a Light Curtain Blocked output that indicates<br />
when the input channels are not in the Active state (ones).<br />
Publication <strong>1756</strong>-<strong>RM095C</strong>-<strong>EN</strong>-P - July 2008 365<br />
50 ms<br />
Automatic Reset
Appendix A RSLogix 5000 Software, Version 14 and Later, <strong>Safety</strong> <strong>Application</strong> <strong>Instruction</strong>s<br />
These state changes are shown in the following timing diagrams.<br />
Light Curtain Muting Operation - Example 1<br />
Channel A<br />
(Input)<br />
Channel B<br />
(Input)<br />
Circuit Reset<br />
(Input)<br />
1<br />
0<br />
1<br />
0<br />
1<br />
0<br />
1<br />
Output 1<br />
0<br />
Mute Light<br />
Curtain (Input)<br />
Light Curtain<br />
Blocked (LCB)<br />
1<br />
0<br />
1<br />
0<br />
If the Mute Light Curtain input is not set properly, or the light curtain<br />
is blocked after the muting period is finished, the behavior of this<br />
instruction reverts back to the behavior defined earlier when no<br />
muting is present.<br />
Light Curtain Muting Operation - Example 2<br />
Channel A<br />
(Input)<br />
Channel B<br />
(Input)<br />
Circuit Reset<br />
(Input)<br />
Output 1<br />
Mute Light<br />
Curtain (Input)<br />
Light Curtain<br />
Blocked (LCB)<br />
366 Publication <strong>1756</strong>-<strong>RM095C</strong>-<strong>EN</strong>-P - July 2008<br />
1<br />
0<br />
1<br />
0<br />
1<br />
0<br />
1<br />
0<br />
1<br />
0<br />
1<br />
0
RSLogix 5000 Software, Version 14 and Later, <strong>Safety</strong> <strong>Application</strong> <strong>Instruction</strong>s Appendix A<br />
Inputs Inconsistent Operation<br />
This instruction generates a fault if the input channels are in<br />
inconsistent states (one Safe and one Active) for more than<br />
500 ms (t1). This fault condition is enunciated via the Inputs<br />
Inconsistent and the Fault Present outputs. Output 1 cannot enter the<br />
Active state while the Fault Present output is active. The fault<br />
indication is cleared when the offending condition is remedied and<br />
the Fault Reset input is transitioned from zero to one.<br />
These state changes are shown in the following timing diagram.<br />
Channel A<br />
Channel B<br />
Output 1<br />
Inputs<br />
Inconsistent<br />
Fault Present<br />
Fault Reset<br />
Light Curtain<br />
Blocked (LCB)<br />
1<br />
0<br />
1<br />
0<br />
1<br />
0<br />
1<br />
0<br />
1<br />
0<br />
1<br />
0<br />
1<br />
0<br />
Publication <strong>1756</strong>-<strong>RM095C</strong>-<strong>EN</strong>-P - July 2008 367<br />
t1<br />
t1 = Inputs Inconsistent Time Period
Appendix A RSLogix 5000 Software, Version 14 and Later, <strong>Safety</strong> <strong>Application</strong> <strong>Instruction</strong>s<br />
Circuit Reset Held On Operation - Manual Reset Mode Only<br />
This instruction also sets the Circuit Reset Held On output prompt if<br />
the Circuit Reset input is set (1) when the input channels transition to<br />
the Active state.<br />
These state changes are shown in the following timing diagram.<br />
Channel A 1<br />
0<br />
Channel B 1<br />
0<br />
Circuit Reset 1<br />
0<br />
1<br />
Output 1<br />
0<br />
Circuit Reset<br />
Held On<br />
Cycle Inputs Operation<br />
If, while Output 1 is active, one of the input channels transitions from<br />
the Active state to the Safe state and back to the Active state before<br />
the other input channel transitions to the Safe state, this instruction<br />
sets the Cycle Inputs output prompt, and Output 1 cannot enter the<br />
Active state again until both input channels cycle through their Safe<br />
states.<br />
These state changes are shown in the following timing diagram.<br />
368 Publication <strong>1756</strong>-<strong>RM095C</strong>-<strong>EN</strong>-P - July 2008<br />
1<br />
0<br />
Channel A<br />
Channel B<br />
1<br />
0<br />
1<br />
0<br />
1<br />
Output 1<br />
0<br />
Cycle Inputs<br />
1<br />
0
The inputs shown on this wiring<br />
diagram correspond to the inputs<br />
for the instruction.<br />
E1<br />
E1 - 24V Power Supply<br />
LCA - Light Curtain Output A<br />
LCB - Light Curtain Output B<br />
MDA - Dual-input Muting Device Channel A<br />
MDB - Dual-input Muting Device Channel B<br />
S1 - Circuit Reset Switch<br />
S2 - Fault Reset Switch<br />
V<br />
RSLogix 5000 Software, Version 14 and Later, <strong>Safety</strong> <strong>Application</strong> <strong>Instruction</strong>s Appendix A<br />
Input Filter Time<br />
When an input filter time (t1) is specified, then, for that length of time,<br />
an input channel is allowed to go to the Safe state while the other<br />
channel is in the Active state without Output 1 going to its Safe state.<br />
However, Output 1 will go to the Safe state when both input channels<br />
are in the Safe state at the same time.<br />
1<br />
Channel A<br />
0<br />
1<br />
Channel B<br />
0<br />
Light Curtain with Manual Reset Wiring Example<br />
The following wiring diagram is one example of how to wire a light<br />
curtain’s two normally-open outputs and two inputs required for<br />
muting to a 1791DS <strong>Safety</strong> I/O module to comply with <strong>EN</strong>954-1<br />
Category 4.<br />
LCA<br />
OSSD1<br />
Light Curtain<br />
OSSD2<br />
LCB<br />
G T0 T1<br />
Dual Input<br />
Muting Device<br />
Output 1<br />
MDA MDB<br />
Publication <strong>1756</strong>-<strong>RM095C</strong>-<strong>EN</strong>-P - July 2008 369<br />
1<br />
0<br />
t1 ≤ Input Filter Time<br />
IN 0 IN1 IN 2 IN3 IN 4 IN 5<br />
T2<br />
t1<br />
t1<br />
S1 S2<br />
1791DS <strong>Safety</strong> Module
Appendix A RSLogix 5000 Software, Version 14 and Later, <strong>Safety</strong> <strong>Application</strong> <strong>Instruction</strong>s<br />
IN 2<br />
IN 3<br />
IN 4<br />
IN 5<br />
IN 0<br />
IN 1<br />
IN 4<br />
IN 5<br />
Light Curtain with Manual Reset Programming Example<br />
The following programming example shows how the Light Curtain<br />
instruction with Manual Reset can be applied to the wiring diagram<br />
shown in Light Curtain with Manual Reset Wiring Example on page<br />
369.<br />
Redundant Input<br />
<strong>1756</strong>-L62S<br />
User Program<br />
370 Publication <strong>1756</strong>-<strong>RM095C</strong>-<strong>EN</strong>-P - July 2008<br />
RIN<br />
RIN rinData Type<br />
Reset Type MANUAL<br />
Channel A<br />
moduleName:I.Pt02Data<br />
0<br />
Channel B<br />
moduleName:I.Pt03Data<br />
Circuit Reset<br />
Fault Reset<br />
Light Curtain<br />
LC<br />
0<br />
moduleName:I.Pt04Data<br />
0<br />
moduleName:I.Pt05Data<br />
0<br />
LC lcData Type<br />
Reset Type MANUAL<br />
Channel A<br />
moduleName:I.Pt00Data<br />
0<br />
Channel B<br />
moduleName:I.Pt01Data<br />
Input Filter Time<br />
Mute Light Curtain<br />
Circuit Reset<br />
Fault Reset<br />
0<br />
20<br />
rinData Type.O1<br />
0<br />
moduleName:I.Pt04Data<br />
0<br />
moduleName:I.Pt05Data<br />
0<br />
O1<br />
CI<br />
CRHO<br />
II<br />
FP<br />
O1<br />
CI<br />
CRHO<br />
LCB<br />
LCM<br />
II<br />
FP
RSLogix 5000 Software, Version 14 and Later, <strong>Safety</strong> <strong>Application</strong> <strong>Instruction</strong>s Appendix A<br />
<strong>EN</strong>954-1 Category 4 requires that inputs be independently pulse<br />
tested. RSLogix 5000 programming software is used to configure the<br />
following I/O module parameters for pulse testing.<br />
Input Configuration<br />
Input Point Type Point Mode Test Source<br />
0 (IN0) Single <strong>Safety</strong> None<br />
1 (IN1) Single <strong>Safety</strong> None<br />
2 (IN2) Single <strong>Safety</strong> Pulse Test 0 (T0)<br />
3 (IN3) Single <strong>Safety</strong> Pulse Test 1 (T1)<br />
4 (IN4) Single <strong>Safety</strong> None<br />
5 (IN5) Single <strong>Safety</strong> None<br />
Test Output<br />
Test Output<br />
Point<br />
Point Mode<br />
0 (T0) Pulse Test<br />
1 (T1) Pulse Test<br />
2 (T2) Power Supply<br />
3 (T3) Not Used<br />
Publication <strong>1756</strong>-<strong>RM095C</strong>-<strong>EN</strong>-P - July 2008 371
Appendix A RSLogix 5000 Software, Version 14 and Later, <strong>Safety</strong> <strong>Application</strong> <strong>Instruction</strong>s<br />
The inputs shown on this wiring<br />
diagram correspond to the inputs<br />
for the instruction.<br />
E1<br />
E1 - 24V Power Supply<br />
LCA - Light Curtain Output A<br />
LCB - Light Curtain Output B<br />
MDA - Dual-input Muting Device Channel A<br />
MDB - Dual-input Muting Device Channel B<br />
S1 - Fault Reset Switch<br />
S2 - Redundant Input Circuit Reset Switch<br />
V<br />
Light Curtain with Automatic Reset Wiring Example<br />
The following wiring diagram is one example of how to wire a light<br />
curtain’s two normally-open outputs and two inputs required for<br />
muting to a 1791DS <strong>Safety</strong> I/O module to comply with <strong>EN</strong>954-1<br />
Category 4.<br />
ATT<strong>EN</strong>TION<br />
OSSD1<br />
LCA<br />
Light Curtain<br />
OSSD2<br />
LCB<br />
G T0 T1<br />
Dual Input<br />
Muting Device<br />
MDA MDB<br />
Various safety standards (<strong>EN</strong> 60204, <strong>EN</strong> 954) require that when<br />
using the Automatic Circuit Reset feature, other measures must<br />
be implemented to ensure that an unexpected (or unintended)<br />
startup will not occur in the system or application.<br />
IN 0 IN1 IN 2 IN3 IN 4 IN 5<br />
1791DS <strong>Safety</strong> Module<br />
372 Publication <strong>1756</strong>-<strong>RM095C</strong>-<strong>EN</strong>-P - July 2008<br />
T2<br />
S1 S2
IN 2<br />
IN 3<br />
IN 5<br />
IN 4<br />
IN 0<br />
IN 1<br />
IN 4<br />
RSLogix 5000 Software, Version 14 and Later, <strong>Safety</strong> <strong>Application</strong> <strong>Instruction</strong>s Appendix A<br />
Light Curtain with Automatic Reset Programming Example<br />
The following programming example shows how the Light Curtain<br />
instruction with Automatic Reset can be applied to the wiring diagram<br />
shown in Light Curtain with Automatic Reset Wiring Example on<br />
page 372.<br />
Redundant Input<br />
<strong>1756</strong>-L62S<br />
User Program<br />
Publication <strong>1756</strong>-<strong>RM095C</strong>-<strong>EN</strong>-P - July 2008 373<br />
RIN<br />
RIN rinData Type<br />
Reset Type MANUAL<br />
Channel A<br />
moduleName:I.Pt02Data<br />
0<br />
Channel B<br />
moduleName:I.Pt03Data<br />
Circuit Reset<br />
Fault Reset<br />
Light Curtain<br />
LC<br />
0<br />
moduleName:I.Pt05Data<br />
0<br />
moduleName:I.Pt04Data<br />
0<br />
LC lcData Type<br />
Reset Type AUTOMATIC<br />
Channel A<br />
moduleName:I.Pt00Data<br />
0<br />
Channel B<br />
moduleName:I.Pt01Data<br />
Input Filter Time<br />
Mute Light Curtain<br />
0<br />
20<br />
0<br />
Circuit Reset notUsedTag<br />
Fault Reset<br />
rinData Type.O1<br />
0<br />
moduleName:I.Pt04Data<br />
0<br />
O1<br />
CI<br />
CRHO<br />
II<br />
FP<br />
O1<br />
CI<br />
CRHO<br />
LCB<br />
LCM<br />
II<br />
FP
Appendix A RSLogix 5000 Software, Version 14 and Later, <strong>Safety</strong> <strong>Application</strong> <strong>Instruction</strong>s<br />
<strong>EN</strong>954-1 Category 4 requires that inputs be independently pulse<br />
tested. RSLogix 5000 programming software is used to configure the<br />
following I/O module parameters for pulse testing.<br />
Input Configuration<br />
Input Point Type Point Mode Test Source<br />
0 (IN0) Single <strong>Safety</strong> None<br />
1 (IN1) Single <strong>Safety</strong> None<br />
2 (IN2) Single <strong>Safety</strong> Pulse Test 0 (T0)<br />
3 (IN3) Single <strong>Safety</strong> Pulse Test 1 (T1)<br />
4 (IN4) Single <strong>Safety</strong> None<br />
5 (IN5) Single <strong>Safety</strong> None<br />
Test Output<br />
Test Output<br />
Point<br />
Point Mode<br />
0 (T0) Pulse Test<br />
1 (T1) Pulse Test<br />
2 (T2) Power Supply<br />
3 (T3) Not Used<br />
374 Publication <strong>1756</strong>-<strong>RM095C</strong>-<strong>EN</strong>-P - July 2008
Five-position Mode<br />
Selector (FPMS) <strong>Instruction</strong><br />
•<br />
RSLogix 5000 Software, Version 14 and Later, <strong>Safety</strong> <strong>Application</strong> <strong>Instruction</strong>s Appendix A<br />
The basic purpose of the Five-position Mode Selector (FPMS)<br />
instruction is to provide an interface from a programmable controller<br />
to a three-to-five-position selector switch used in SIL3/CAT4 safety<br />
applications.<br />
<strong>Instruction</strong> Parameters<br />
This table explains the instruction inputs.<br />
Five-position Mode Selector (FPMS) Switch <strong>Instruction</strong> Input Parameters<br />
Parameter Data Type Description Safe, Active, and Initial<br />
Values<br />
FPMS Pre-defined<br />
Data Type<br />
This parameter is used to maintain instruction-specific information.<br />
Do not use the same pre-defined data-type tag name in more<br />
than one instruction.<br />
Input 1 Boolean Mode 1 Selected Input. Safe = 0, Active = 1<br />
Input 2 Boolean Mode 2 Selected Input. Safe = 0, Active = 1<br />
Input 3 Boolean Mode 3 Selected Input. Safe = 0, Active = 1<br />
Input 4 Boolean Mode 4 Selected Input. Safe = 0, Active = 1<br />
Input 5 Boolean Mode 5 Selected Input. Safe = 0, Active = 1<br />
Fault Reset Boolean After fault conditions are corrected for the instruction, the Fault<br />
Present output for the instruction is cleared when this input<br />
transitions from OFF to ON.<br />
Initial = 0, Reset = 1<br />
Publication <strong>1756</strong>-<strong>RM095C</strong>-<strong>EN</strong>-P - July 2008 375<br />
—
Appendix A RSLogix 5000 Software, Version 14 and Later, <strong>Safety</strong> <strong>Application</strong> <strong>Instruction</strong>s<br />
This table explains the instruction outputs.<br />
Five-position Mode Selector (FPMS) Switch <strong>Instruction</strong> Output Parameters<br />
Parameter Data Type Description Safe, Active, and Initial<br />
Values<br />
Output 1 Boolean Output associated with Input 1. Safe = 0, Active = 1<br />
Output 2 Boolean Output associated with Input 2. Safe = 0, Active = 1<br />
Output 3 Boolean Output associated with Input 3. Safe = 0, Active = 1<br />
Output 4 Boolean Output associated with Input 4. Safe = 0, Active = 1<br />
Output 5 Boolean Output associated with Input 5. Safe = 0, Active = 1<br />
No Mode Boolean No Mode Selected Fault. Initial = 0, Fault = 1<br />
Multiple Modes<br />
Selected<br />
Boolean More than One Mode Selected Fault. Initial = 0, Fault = 1<br />
Fault Present Boolean This is set whenever a fault is present in the instruction. An Output<br />
cannot enter the Active state when Fault Present is set. Fault Present<br />
is cleared when all faults are cleared and the Fault Reset input<br />
transitions from OFF to ON.<br />
Initial = 0, Fault = 1<br />
IMPORTANT<br />
Operation<br />
Do not write to any instruction output tag under any<br />
circumstances.<br />
The Five-position Mode Selector instruction has five outputs that are<br />
associated with five inputs. Its main job is to enable one of the five<br />
outputs when its associated input goes active.<br />
It has two faults: one for more than one input active, and the other for<br />
no inputs active. These faults occur when the associated inputs<br />
conditions exist for more than 250 ms. During this 250 ms, if one of<br />
the fault conditions is detected, the outputs temporarily remain in<br />
their last state. If the fault condition is still present after the 250 ms,<br />
the Fault Present bit is set to one and the instruction's outputs are set<br />
to zero.<br />
Faults may be cleared by the rising edge of the Fault Reset signal, but<br />
only after the input fault condition has been cleared.<br />
376 Publication <strong>1756</strong>-<strong>RM095C</strong>-<strong>EN</strong>-P - July 2008
The inputs shown on this wiring<br />
diagram correspond to the inputs<br />
for the instruction.<br />
E1<br />
V<br />
G T0<br />
E1 - 24V Power Supply<br />
S1 - Five-position Selector Switch (shown with Position 1 selected)<br />
S2 - Fault Reset Switch<br />
S1<br />
RSLogix 5000 Software, Version 14 and Later, <strong>Safety</strong> <strong>Application</strong> <strong>Instruction</strong>s Appendix A<br />
Five-position Mode Selector Wiring Example<br />
The following wiring diagram is one example of how to wire a<br />
five-position selector switch to a 1791DS <strong>Safety</strong> I/O module to comply<br />
with <strong>EN</strong>954-1 Category 4.<br />
IN 0 IN1 IN 2 IN3<br />
1791DS <strong>Safety</strong> Module<br />
1 2 3 4 5<br />
IN 4 IN 5<br />
Publication <strong>1756</strong>-<strong>RM095C</strong>-<strong>EN</strong>-P - July 2008 377<br />
T1<br />
S2
Appendix A RSLogix 5000 Software, Version 14 and Later, <strong>Safety</strong> <strong>Application</strong> <strong>Instruction</strong>s<br />
Five-position Mode Selector Programming Example<br />
The following programming example shows how the Five-position<br />
Mode Selector (FPMS) instruction can be applied to the wiring<br />
diagram shown in Five-position Mode Selector Wiring Example on<br />
page 377.<br />
IN 0<br />
IN 1<br />
IN 2<br />
IN 3<br />
IN 4<br />
IN 5<br />
RSLogix 5000 programming software is used to configure the<br />
following I/O module parameters.<br />
Input Configuration<br />
Point Type Point Mode<br />
0 (IN0) Single <strong>Safety</strong><br />
1 (IN1) Single <strong>Safety</strong><br />
2 (IN2) Single <strong>Safety</strong><br />
3 (IN3) Single <strong>Safety</strong><br />
4 (IN4) Single <strong>Safety</strong><br />
5 (IN5) Single <strong>Safety</strong><br />
Output<br />
Point Point Mode<br />
0 Power Supply<br />
1 Power Supply<br />
2 Not Used<br />
3 Not Used<br />
<strong>1756</strong>-L62S<br />
User Program<br />
FPMS<br />
Five Position Mode Selector<br />
378 Publication <strong>1756</strong>-<strong>RM095C</strong>-<strong>EN</strong>-P - July 2008<br />
FPMS<br />
Input 1<br />
Input 2<br />
Input 3<br />
Input 4<br />
Input 5<br />
Fault Reset<br />
fpmsData Type<br />
moduleName:I.Pt00Data<br />
0<br />
moduleName:I.Pt01Data<br />
0<br />
moduleName:I.Pt02Data<br />
0<br />
moduleName:I.Pt03Data<br />
0<br />
moduleName:I.Pt04Data<br />
moduleName:I.Pt05Data<br />
0<br />
0<br />
O1<br />
O2<br />
O3<br />
O4<br />
O5<br />
NM<br />
MMS<br />
FP
Redundant Output with<br />
Continuous Feedback<br />
Monitoring (ROUT)<br />
•<br />
RSLogix 5000 Software, Version 14 and Later, <strong>Safety</strong> <strong>Application</strong> <strong>Instruction</strong>s Appendix A<br />
The basic purpose of the Redundant Output with Continuous<br />
Feedback Monitoring (ROUT) instruction is to emulate the output<br />
functionality of a safety relay in a software-programmable<br />
environment that is intended for use in SIL3/CAT4 safety applications.<br />
The Redundant Output with Continuous Feedback Monitoring<br />
(ROUT) instruction can be used in two ways.<br />
• Redundant Output with Negative Feedback (RONF)<br />
• Redundant Output with Positive Feedback (ROPF)<br />
<strong>Instruction</strong> Parameters<br />
This table explains the instruction inputs.<br />
Redundant Output with Continuous Feedback (ROUT) <strong>Instruction</strong> Parameters<br />
Parameter Data Type Description Safe, Active, and Initial<br />
Values<br />
ROUT Pre-defined<br />
Data Type<br />
This parameter is used to maintain instruction-specific information.<br />
Do not use the same pre-defined data-type tag name in more<br />
than one instruction.<br />
Feedback Type Boolean The feedback type determines whether the instruction is using<br />
negative or positive feedback.<br />
Publication <strong>1756</strong>-<strong>RM095C</strong>-<strong>EN</strong>-P - July 2008 379<br />
—<br />
Negative (RONF) or Positive<br />
(ROPF)<br />
Enable Boolean Input to Enable the Redundant Outputs. Safe = 0, Active = 1<br />
Feedback 1 Boolean Feedback from a device either directly or indirectly controlled by<br />
Output 1.<br />
RONF: Off = 1, On = 0<br />
ROPF: Off = 0, On = 1<br />
Feedback 2 Boolean Feedback from a device either directly or indirectly controlled by<br />
Output 2.<br />
RONF: Off = 1, On = 0<br />
ROPF: Off = 0, On = 1<br />
Fault Reset Boolean After fault conditions are corrected for the instruction, the Fault<br />
Present output for the instruction is cleared when this input<br />
transitions from off to on.<br />
Initial = 0, Reset = 1
Appendix A RSLogix 5000 Software, Version 14 and Later, <strong>Safety</strong> <strong>Application</strong> <strong>Instruction</strong>s<br />
This table explains the instruction outputs.<br />
Redundant Output with Continuous Feedback (ROUT) <strong>Instruction</strong> Output Parameters<br />
Parameter Data Type Description Safe, Active, and Initial<br />
Values<br />
Output 1 Boolean Output 1 of the redundant outputs. Safe = 0, Active = 1<br />
Output 2 Boolean Output 2 of the redundant outputs. Safe = 0, Active = 1<br />
Output 1 Feedback<br />
Failure<br />
Output 2 Feedback<br />
Failure<br />
Boolean Output 1 feedback is not indicating the correct state of Output 1<br />
within 250 ms.<br />
Boolean Output 2 feedback is not indicating the correct state of Output 2<br />
within 250 ms.<br />
Fault Present Boolean This is set whenever a fault is present in the instruction. Outputs<br />
cannot enter the Active state when Fault Present is set. Fault Present<br />
is cleared when all faults are cleared and the Fault Reset input<br />
transitions from off to on.<br />
IMPORTANT<br />
Operation<br />
Initial = 0, Fault = 1<br />
Initial = 0, Fault = 1<br />
Initial = 0, Fault = 1<br />
Do not write to any instruction output tag under any<br />
circumstances.<br />
This instruction monitors a single logical input and activates two field<br />
outputs when the logical input goes Active.<br />
Enable<br />
Output 1<br />
It also monitors a feedback channel for each field output and<br />
generates a fault if both channels do not, within a time limit, indicate<br />
the desired state of the associated outputs.<br />
380 Publication <strong>1756</strong>-<strong>RM095C</strong>-<strong>EN</strong>-P - July 2008<br />
1<br />
0<br />
1<br />
0<br />
1<br />
Output 2<br />
0
1<br />
Enable<br />
0<br />
1<br />
Output 1<br />
0<br />
1<br />
Feedback 1<br />
0<br />
Output 1<br />
Feedback Failure<br />
1<br />
0<br />
1<br />
Fault Reset<br />
0<br />
1<br />
Enable<br />
0<br />
1<br />
Output 1<br />
0<br />
1<br />
Feedback 1<br />
0<br />
Output 1<br />
Feedback Failure<br />
1<br />
0<br />
1<br />
Fault Reset<br />
0<br />
250 ms<br />
RSLogix 5000 Software, Version 14 and Later, <strong>Safety</strong> <strong>Application</strong> <strong>Instruction</strong>s Appendix A<br />
<strong>Instruction</strong> operation is illustrated in the following timing diagrams.<br />
Negative Feedback Examples<br />
1<br />
Enable<br />
0<br />
1<br />
Output 2<br />
0<br />
1<br />
Feedback 2<br />
0<br />
Output 2<br />
Feedback Failure<br />
250 ms<br />
1<br />
Feedback 2<br />
0<br />
Output 2 1<br />
Feedback Failure<br />
0<br />
250 ms<br />
Publication <strong>1756</strong>-<strong>RM095C</strong>-<strong>EN</strong>-P - July 2008 381<br />
1<br />
0<br />
1<br />
Fault Reset<br />
0<br />
1<br />
Enable<br />
0<br />
1<br />
Output 2<br />
0<br />
1<br />
Fault Reset<br />
0<br />
250 ms
Appendix A RSLogix 5000 Software, Version 14 and Later, <strong>Safety</strong> <strong>Application</strong> <strong>Instruction</strong>s<br />
1<br />
Enable<br />
0<br />
1<br />
Output 1<br />
0<br />
1<br />
Feedback 1<br />
0<br />
Output 1<br />
Feedback Failure<br />
1<br />
0<br />
1<br />
Fault Reset<br />
0<br />
1<br />
Enable<br />
0<br />
1<br />
Output 1<br />
0<br />
1<br />
Feedback 1<br />
0<br />
Output 1<br />
Feedback Failure<br />
1<br />
0<br />
1<br />
Fault Reset<br />
0<br />
Positive Feedback Examples<br />
1<br />
Enable<br />
0<br />
1<br />
Output 2<br />
0<br />
250 ms<br />
1<br />
Feedback 2<br />
0<br />
Output 2 1<br />
Feedback Failure<br />
0<br />
250 ms<br />
Fault Reset 1<br />
0<br />
1<br />
Enable<br />
0<br />
Output 2<br />
1<br />
0<br />
250 ms<br />
1<br />
Feedback 2<br />
0<br />
Output 2 1<br />
Feedback Failure<br />
0<br />
250 ms<br />
Fault Reset<br />
1<br />
0<br />
382 Publication <strong>1756</strong>-<strong>RM095C</strong>-<strong>EN</strong>-P - July 2008
The inputs shown on this wiring diagram<br />
correspond to the inputs for the instruction.<br />
E1<br />
E1 - 24V Power Supply<br />
PS - Power Source (application specific)<br />
K1 - Power Contact 1<br />
K2 - Power Contact 2<br />
K1a - Auxiliary Contact 1<br />
K2a - Auxiliary Contact 2<br />
S1 - Fault Reset Switch<br />
V<br />
V1<br />
G G1<br />
T0 T1<br />
K1 a<br />
RSLogix 5000 Software, Version 14 and Later, <strong>Safety</strong> <strong>Application</strong> <strong>Instruction</strong>s Appendix A<br />
Redundant Output with Negative Feedback Wiring Example<br />
The following wiring diagram is one example of how to wire two<br />
contactors and normally-open auxiliary contacts to a 1791DS <strong>Safety</strong><br />
I/O module to comply with <strong>EN</strong>954-1 Category 4.<br />
IN 0 IN1 IN 2 C 0<br />
K2a<br />
T2<br />
S1<br />
OUT<br />
0<br />
1791DS<br />
<strong>Safety</strong> Module<br />
(Relay Output)<br />
Redundant Output with Negative Feedback Programming<br />
Example<br />
The following programming example shows how the Redundant<br />
Output instruction with negative feedback can be applied to the<br />
wiring diagram shown in Redundant Output with Negative Feedback<br />
Wiring Example.<br />
Input from Another <strong>Safety</strong><br />
<strong>Instruction</strong> Output<br />
IN 0<br />
IN 1<br />
IN 2<br />
Publication <strong>1756</strong>-<strong>RM095C</strong>-<strong>EN</strong>-P - July 2008 383<br />
K1<br />
C1<br />
OUT<br />
1<br />
K2<br />
PS<br />
<strong>1756</strong>-L62S<br />
User Program<br />
ROUT<br />
Redundant Output<br />
ROUT routData Type<br />
Feedback Type POSITIVE<br />
Enable<br />
otherData Type.O1<br />
0<br />
Feedback 1<br />
moduleName:I.Pt00Data<br />
1<br />
Feedback 2<br />
moduleName:I.Pt01Data<br />
0<br />
Fault Reset<br />
moduleName:I.Pt02Data<br />
0<br />
routData Type.O1<br />
O1<br />
O2<br />
O1FF<br />
O2FF<br />
FP<br />
K1<br />
K2<br />
moduleName:O.Pt00Data<br />
routData Type.O2 moduleName:O.Pt01Data<br />
L1 L2 L3<br />
M<br />
K1a<br />
K2a
Appendix A RSLogix 5000 Software, Version 14 and Later, <strong>Safety</strong> <strong>Application</strong> <strong>Instruction</strong>s<br />
<strong>EN</strong>954-1 Category 4 requires that inputs be independently pulse<br />
tested. RSLogix 5000 programming software is used to configure the<br />
following I/O module parameters for pulse testing.<br />
Input Configuration<br />
Input Point Type Point Mode Test Source<br />
0 (IN0) Single <strong>Safety</strong> Pulse Test 0 (T0)<br />
1 (IN1) Single <strong>Safety</strong> Pulse Test 1 (T1)<br />
2 (IN2) Single <strong>Safety</strong> None<br />
Test Output<br />
Test Output<br />
Point<br />
Point Mode<br />
0 (T0) Pulse Test<br />
1 (T1) Pulse Test<br />
2 (T2) Power Supply<br />
3 (T3) Not Used<br />
Output Configuration<br />
Point Type Point Mode<br />
0 (OUT0) Single <strong>Safety</strong><br />
1 (OUT1) Single <strong>Safety</strong><br />
384 Publication <strong>1756</strong>-<strong>RM095C</strong>-<strong>EN</strong>-P - July 2008
The inputs shown on this wiring<br />
diagram correspond to the inputs for<br />
the instruction.<br />
E1<br />
V<br />
V1<br />
G G1<br />
T0 T1<br />
E1 - 24V Power Supply K1 a<br />
PS - Power Source (application specific)<br />
K1 - Power Contact 1<br />
K2 - Power Contact 2<br />
K1a - Auxiliary Contact 1<br />
K2a - Auxiliary Contact 2<br />
S1 - Fault Reset Switch<br />
RSLogix 5000 Software, Version 14 and Later, <strong>Safety</strong> <strong>Application</strong> <strong>Instruction</strong>s Appendix A<br />
Redundant Output with Positive Feedback Wiring Example<br />
The following wiring diagram is one example of how to wire two<br />
contactors and normally-open auxiliary contacts to a 1791DS <strong>Safety</strong><br />
I/O module to comply with <strong>EN</strong>954-1 Category 4.<br />
IN 0 IN1 IN 2 C 0<br />
K2 a<br />
S1<br />
T2<br />
OU T<br />
0<br />
K1<br />
1791DS<br />
<strong>Safety</strong> Module<br />
(Relay Output)<br />
Redundant Output with Positive Feedback Programming Example<br />
The following programming example shows how the Redundant<br />
Output instruction with positive feedback can be applied to the wiring<br />
diagram shown in Redundant Output with Positive Feedback Wiring<br />
Example.<br />
Input from Another <strong>Safety</strong><br />
<strong>Instruction</strong> Output<br />
Publication <strong>1756</strong>-<strong>RM095C</strong>-<strong>EN</strong>-P - July 2008 385<br />
IN 0<br />
IN 1<br />
IN 2<br />
C1<br />
OU T<br />
1<br />
K2<br />
PS<br />
<strong>1756</strong>-L62S<br />
User Program<br />
ROUT<br />
Redundant Output<br />
ROUT routData Type<br />
Feedback Type POSITIVE<br />
Enable<br />
otherData Type.O1<br />
0<br />
Feedback 1<br />
moduleName:I.Pt00Data<br />
1<br />
Feedback 2<br />
moduleName:I.Pt01Data<br />
0<br />
Fault Reset<br />
moduleName:I.Pt02Data<br />
0<br />
routData Type.O1<br />
K1<br />
K2<br />
L1 L2 L3<br />
M<br />
O1<br />
O2<br />
O1FF<br />
O2FF<br />
FP<br />
moduleName:O.Pt00Data<br />
routData Type.O2 moduleName:O.Pt01Data<br />
K1 a<br />
K2 a
Appendix A RSLogix 5000 Software, Version 14 and Later, <strong>Safety</strong> <strong>Application</strong> <strong>Instruction</strong>s<br />
<strong>EN</strong>954-1 Category 4 requires that inputs be independently pulse<br />
tested. RSLogix 5000 programming software is used to configure the<br />
following I/O module parameters for pulse testing.<br />
Input Configuration<br />
Input Point Type Point Mode Test Source<br />
0 (IN0) Single <strong>Safety</strong> Pulse Test 0 (T0)<br />
1 (IN1) Single <strong>Safety</strong> Pulse Test 1 (T1)<br />
2 (IN2) Single <strong>Safety</strong> None<br />
Test Output<br />
Test Output<br />
Point<br />
Point Mode<br />
0 (T0) Pulse Test<br />
1 (T1) Pulse Test<br />
2 (T2) Power Supply<br />
3 (T3) Not Used<br />
Output Configuration<br />
Point Type Point Mode<br />
0 (OUT0) Single <strong>Safety</strong><br />
1 (OUT1) Single <strong>Safety</strong><br />
386 Publication <strong>1756</strong>-<strong>RM095C</strong>-<strong>EN</strong>-P - July 2008
Two-hand Run Station<br />
(THRS) <strong>Instruction</strong><br />
•<br />
RSLogix 5000 Software, Version 14 and Later, <strong>Safety</strong> <strong>Application</strong> <strong>Instruction</strong>s Appendix A<br />
The basic purpose of the Two-hand Run Station (THRS) instruction is<br />
to provide a method to incorporate two diverse input buttons used as<br />
a single-operation start button into a software-programmable<br />
environment that is intended for use in SIL3/CAT4 safety applications.<br />
A run station can also be inserted or removed from controlling the<br />
process by using an Active Pin input in this instruction. The Two-hand<br />
Run Station with Active Pin instruction takes the four inputs (two from<br />
each button) and turns them into one signal for the rest of the<br />
application.<br />
Publication <strong>1756</strong>-<strong>RM095C</strong>-<strong>EN</strong>-P - July 2008 387
Appendix A RSLogix 5000 Software, Version 14 and Later, <strong>Safety</strong> <strong>Application</strong> <strong>Instruction</strong>s<br />
<strong>Instruction</strong> Parameters<br />
Two-hand Run Station (THRS) <strong>Instruction</strong> Input Parameters<br />
This table explains the instruction inputs.<br />
Parameter Data Type Description Safe, Active, and<br />
Initial Values<br />
THRS Pre-defined<br />
Data Type<br />
This parameter is used to maintain instruction-specific information. Do not<br />
use the same pre-defined data-type tag name in more than one<br />
instruction.<br />
Active Pin Type Boolean The Active Pin type determines whether or not the input and outputs<br />
specific to the Active Pin are processed.<br />
Active Pin Boolean Active Pin for run station.<br />
Active Pin Enabled - When set, the Buttons Pressed output can enter the<br />
Active state. When clear, the Buttons Pressed output remains off.<br />
Active Pin Disabled - Visible, but not used.<br />
388 Publication <strong>1756</strong>-<strong>RM095C</strong>-<strong>EN</strong>-P - July 2008<br />
—<br />
Enabled or Disabled<br />
Initial = 0, <strong>Set</strong> = 1<br />
Right Button<br />
Normally Open<br />
Boolean Right Button N.O. Contact Input. Safe = 0, Active = 1<br />
Right Button<br />
Normally Closed<br />
Boolean Right Button N.C. Contact Input. Safe = 1, Active = 0<br />
Left Button<br />
Normally Open<br />
Boolean Left Button N.O. Contact Input. Safe = 0, Active = 1<br />
Left Button<br />
Normally Closed<br />
Boolean Left Button N.C. Contact Input. Safe = 1, Active = 0<br />
Fault Reset Boolean Fault Reset Input.<br />
Initial = 0, Reset = 1<br />
Active Pin Enabled - When transitioned from off to on, and the fault cause<br />
has been cleared, the Right Button Fault, Left Button Fault, and Station<br />
Active Fault outputs are cleared.<br />
Active Pin Disabled - When transitioned from off to on, and the fault cause<br />
has been cleared, the Right Button Fault and Left Button Fault outputs are<br />
cleared.
Two-hand Run Station (THRS) <strong>Instruction</strong> Output Parameters<br />
RSLogix 5000 Software, Version 14 and Later, <strong>Safety</strong> <strong>Application</strong> <strong>Instruction</strong>s Appendix A<br />
This table explains the instruction outputs.<br />
Parameter Data Type Description Safe, Active, and<br />
Initial Values<br />
Buttons Pressed Boolean Output is enabled when the run station buttons are pressed and no faults<br />
are present.<br />
Safe = 0, Active = 1<br />
Station Active Boolean Output is enabled when the run station is active.<br />
Initial = 0, Active = 1<br />
Active Pin Enabled - <strong>Set</strong> indicates that the station is active. Cleared<br />
indicates that the station is inactive.<br />
Active Pin Disabled - Visible, but not used, always zero.<br />
Button Tiedown Boolean Indicates that both buttons were not pressed within 500 ms of each other.<br />
Cleared when both buttons are released.<br />
Cycle Buttons Boolean <strong>Set</strong> when the Button Tie-down indicator is set. Cleared when the Button<br />
Tie-down indicator is cleared.<br />
Station Active Fault Boolean Active Pin Enabled - Fault is set when the station is inactive.<br />
Active Pin Disabled - Visible, but not used, always zero.<br />
Right Button Fault Boolean There is a Right Button fault.<br />
Left Button Fault Boolean There is a Left Button fault.<br />
<strong>Set</strong> when the Right Button Normally Closed and the Right Button Normally<br />
Open inputs are not both energized or not both de-energized within 250 ms.<br />
<strong>Set</strong> when the Left Button Normally Closed and the Left Button Normally<br />
Open inputs are not both energized or not both de-energized within 250 ms.<br />
Fault Present Boolean One or more of the faults are present.<br />
Active Pin Enabled - <strong>Set</strong> when the Station Active Fault, Right Button Fault,<br />
or Left Button Fault outputs are set. Cleared when the Station Active Fault,<br />
Right Button Fault, and Left Button Fault outputs are cleared.<br />
Active Pin Disabled - <strong>Set</strong> when the Station Right Button Fault or Left Button<br />
Fault outputs are set. Cleared when the Right Button Fault and Left Button<br />
Fault outputs are cleared and the Fault Reset input transitions from off to<br />
on.<br />
IMPORTANT<br />
Initial = 0, Active = 1<br />
Initial = 0, Active = 1<br />
Initial = 0, Active = 1<br />
Initial = 0, Active = 1<br />
Initial = 0, Active = 1<br />
Initial = 0, Active = 1<br />
Do not write to any instruction output tag under any<br />
circumstances.<br />
Publication <strong>1756</strong>-<strong>RM095C</strong>-<strong>EN</strong>-P - July 2008 389
Appendix A RSLogix 5000 Software, Version 14 and Later, <strong>Safety</strong> <strong>Application</strong> <strong>Instruction</strong>s<br />
Normal Operation<br />
The Two-hand Run Station instruction takes the four inputs (two from<br />
each button) and turns them into one signal for the rest of the<br />
application.<br />
These normal-operation state changes are shown in the following<br />
timing diagram.<br />
Right Button<br />
Normally Open<br />
Right Button<br />
Normally Closed<br />
Left Button<br />
Normally Open<br />
Left Button<br />
Normally Closed<br />
See the De-energize to Trip System section on page 319 for<br />
information about how to condition the input data associated with the<br />
normally closed channel.<br />
390 Publication <strong>1756</strong>-<strong>RM095C</strong>-<strong>EN</strong>-P - July 2008<br />
1<br />
0<br />
1<br />
0<br />
1<br />
0<br />
1<br />
0<br />
1<br />
Buttons Pressed<br />
0
RSLogix 5000 Software, Version 14 and Later, <strong>Safety</strong> <strong>Application</strong> <strong>Instruction</strong>s Appendix A<br />
Button Tie-down Operation<br />
The Two-hand Run Station instruction also monitors the four inputs to<br />
make sure none of them fail or are intentionally defeated. If the<br />
buttons are not pressed within 500 ms (t1) of each other, this<br />
instruction generates a Button Tie-down condition and prevents the<br />
Buttons Pressed output from entering the Active state.<br />
These state changes are shown in the following timing diagram.<br />
Right Button<br />
Normally Open<br />
Right Button<br />
Normally Closed<br />
Left Button<br />
Normally Open<br />
Left Button<br />
Normally Closed<br />
Publication <strong>1756</strong>-<strong>RM095C</strong>-<strong>EN</strong>-P - July 2008 391<br />
1<br />
0<br />
1<br />
0<br />
1<br />
0<br />
1<br />
0<br />
1<br />
Button Tie-Down<br />
0<br />
1<br />
Buttons Pressed<br />
0<br />
t1
Appendix A RSLogix 5000 Software, Version 14 and Later, <strong>Safety</strong> <strong>Application</strong> <strong>Instruction</strong>s<br />
Cycle Buttons Operation<br />
If, while Buttons Pressed is active, one of the buttons transitions from<br />
the Active state to the Safe state and back to the Active state before<br />
the other button transitions to the Safe state, this instruction sets the<br />
Cycle Buttons output prompt, and prevents the Buttons Pressed<br />
output from entering the Active state again until both buttons cycle<br />
through their Safe states.<br />
These state changes are shown in the following timing diagram.<br />
Right Button<br />
Normally Open<br />
Right Button<br />
Normally Closed<br />
Left Button<br />
Normally Open<br />
Left Button<br />
Normally Closed<br />
392 Publication <strong>1756</strong>-<strong>RM095C</strong>-<strong>EN</strong>-P - July 2008<br />
1<br />
0<br />
1<br />
0<br />
1<br />
0<br />
1<br />
0<br />
1<br />
Cycle Buttons<br />
0<br />
Buttons Pressed<br />
1<br />
0
Left Button<br />
Normally Open<br />
Left Button<br />
Normally Closed<br />
Left Button Fault<br />
Fault Reset<br />
Right Button<br />
Normally Open<br />
Right Button<br />
Normally Closed<br />
1<br />
Right Button Fault<br />
0<br />
1<br />
0<br />
1<br />
0<br />
1<br />
0<br />
1<br />
0<br />
1<br />
0<br />
1<br />
0<br />
Fault Reset<br />
1<br />
0<br />
t1<br />
t1<br />
RSLogix 5000 Software, Version 14 and Later, <strong>Safety</strong> <strong>Application</strong> <strong>Instruction</strong>s Appendix A<br />
Button Fault Operation<br />
This instruction also monitors the individual inputs from each button.<br />
If the two contacts for one of the buttons are in opposite safety states<br />
for more than 250 ms (t1), the appropriate fault is set (Left Button<br />
Fault or Right Button Fault). The Fault Present output is also set.<br />
The Buttons Pressed output is set to the Safe state whenever one of<br />
these faults exists.<br />
These state changes are shown in the following timing diagrams.<br />
Left Button Fault Operation<br />
Right Button Fault Operation<br />
Publication <strong>1756</strong>-<strong>RM095C</strong>-<strong>EN</strong>-P - July 2008 393<br />
1<br />
0<br />
1<br />
0<br />
1<br />
0<br />
1<br />
0<br />
1<br />
0<br />
1<br />
0<br />
1<br />
0<br />
1<br />
0<br />
t1<br />
t1
Appendix A RSLogix 5000 Software, Version 14 and Later, <strong>Safety</strong> <strong>Application</strong> <strong>Instruction</strong>s<br />
The inputs shown on this<br />
wiring diagram correspond<br />
to the inputs for the<br />
instruction.<br />
E1<br />
E1 - 24V Power Supply<br />
RB - Right Button<br />
LB - Left Button<br />
S1 - Fault Reset Switch<br />
V<br />
Two-hand Run Station with Active Pin Disabled Wiring Example<br />
IMPORTANT<br />
G T0 T1<br />
RB<br />
The Two-hand Run Station is wired properly when the four<br />
run-button inputs are in the safe state when the run buttons are<br />
released.<br />
The following wiring diagram is one example of how to wire Right<br />
and Left Push Buttons to a 1791DS <strong>Safety</strong> I/O module to comply with<br />
<strong>EN</strong>954-1 Category 4. Each Push Button has two diverse input<br />
channels.<br />
IN 0 IN1 IN 2 IN3<br />
LB<br />
T2 T 3<br />
394 Publication <strong>1756</strong>-<strong>RM095C</strong>-<strong>EN</strong>-P - July 2008<br />
IN 4<br />
V<br />
S1<br />
1791DS <strong>Safety</strong> Module
RSLogix 5000 Software, Version 14 and Later, <strong>Safety</strong> <strong>Application</strong> <strong>Instruction</strong>s Appendix A<br />
Two-hand Run Station with Active Pin Disabled Programming<br />
Example<br />
The following programming example shows how the Two-hand Run<br />
Station without Active Pin instruction can be applied to the wiring<br />
diagram shown in Two-hand Run Station with Active Pin Disabled<br />
Wiring Example.<br />
IN 0<br />
IN 1<br />
IN 2<br />
IN 3<br />
IN 4<br />
<strong>1756</strong>-L62S<br />
User Program<br />
THRS<br />
Two Hand Run Station<br />
<strong>EN</strong>954-1 Category 4 requires that inputs be independently pulse<br />
tested. RSLogix 5000 programming software is used to configure the<br />
following I/O module parameters for pulse testing.<br />
Input Configuration<br />
Publication <strong>1756</strong>-<strong>RM095C</strong>-<strong>EN</strong>-P - July 2008 395<br />
THRS<br />
Active Pin Type<br />
Active Pin<br />
Right Button Normally Open<br />
Right Button Normally Closed<br />
Left Button Normally Open<br />
Left Button Normally Closed<br />
Fault Reset<br />
thrsDataType<br />
DISABLED<br />
notUsedTag<br />
0<br />
moduleName:I.Pt00Data<br />
0<br />
moduleName:I.Pt01Data<br />
1<br />
moduleName:I.Pt02Data<br />
0<br />
moduleName:I.Pt03Data<br />
1<br />
moduleName:I.Pt04Data<br />
Input Point Type Point Mode Test Source<br />
0 (IN0) Single <strong>Safety</strong> Pulse Test 0 (T0)<br />
1 (IN1) Single <strong>Safety</strong> Pulse Test 1 (T1)<br />
2 (IN2) Single <strong>Safety</strong> Pulse Test 2 (T2)<br />
3 (IN3) Single <strong>Safety</strong> Pulse Test 3 (T3)<br />
4 (IN4) Single <strong>Safety</strong> None<br />
0<br />
BP<br />
SA<br />
BT<br />
CB<br />
SA F<br />
RB F<br />
LB F<br />
FP
Appendix A RSLogix 5000 Software, Version 14 and Later, <strong>Safety</strong> <strong>Application</strong> <strong>Instruction</strong>s<br />
The inputs shown on this<br />
wiring diagram correspond<br />
to the inputs for the<br />
instruction.<br />
E1<br />
V<br />
E1 - 24V Power Supply<br />
RB - Right Button<br />
LB - Left Button<br />
S1 - Fault Reset Switch<br />
Test Output<br />
Test Output<br />
Point<br />
Point Mode<br />
0 (T0) Pulse Test<br />
1 (T1) Pulse Test<br />
2 (T2) Pulse Test<br />
3 (T3) Pulse Test<br />
Two-hand Run Station with Active Pin Enabled Wiring Examples<br />
IMPORTANT<br />
The Two-hand Run Station is wired properly when the four<br />
run-button inputs are in the safe state when the run buttons are<br />
released.<br />
The following wiring diagram is one example of how to wire Right<br />
and Left Push Buttons to a 1791DS <strong>Safety</strong> I/O module to comply with<br />
<strong>EN</strong>954-1 Category 4. Each Push Button has two diverse input<br />
channels.<br />
Two-hand Run Station with Active Pin Enabled Control Wiring Diagram<br />
(Active Pin High - Run Station Connected to System)<br />
G T0 T1<br />
RB<br />
IN 0 IN1 IN 2 IN3<br />
LB<br />
T2 T3<br />
IN 4 IN 5<br />
396 Publication <strong>1756</strong>-<strong>RM095C</strong>-<strong>EN</strong>-P - July 2008<br />
V<br />
S1<br />
1791DS<br />
<strong>Safety</strong> Module
The inputs shown on this<br />
wiring diagram correspond<br />
to the inputs for the<br />
instruction.<br />
E1<br />
V<br />
G<br />
E1 - 24V Power Supply<br />
S1 - Fault Reset Switch<br />
RSLogix 5000 Software, Version 14 and Later, <strong>Safety</strong> <strong>Application</strong> <strong>Instruction</strong>s Appendix A<br />
The following wiring diagram is one example of how to wire a<br />
Dummy Plug to a 1791DS <strong>Safety</strong> I/O module to comply with <strong>EN</strong>954-1<br />
Category 4. Each Push Button has two diverse input channels.<br />
Two-hand Run Station with Active Pin Enabled Control Wiring Diagram<br />
(Active Pin Low - Run Station Not Connected to System)<br />
IN 0 IN1 IN 2 IN3<br />
T0 T1 T2 T3 G<br />
V<br />
Dummy Plug<br />
IN 5 IN 4<br />
Two-hand Run Station with Active Pin Enabled Programming<br />
Example<br />
The following programming example shows how the Two-hand Run<br />
Station with Active Pin instruction can be applied to the wiring<br />
diagram shown in Two-hand Run Station with Active Pin Enabled<br />
Control Wiring Diagram (Active Pin High - Run Station Connected to<br />
System).<br />
Publication <strong>1756</strong>-<strong>RM095C</strong>-<strong>EN</strong>-P - July 2008 397<br />
S1<br />
1791DS<br />
<strong>Safety</strong><br />
Module
Appendix A RSLogix 5000 Software, Version 14 and Later, <strong>Safety</strong> <strong>Application</strong> <strong>Instruction</strong>s<br />
IN 5<br />
IN 0<br />
IN 1<br />
IN 2<br />
IN 3<br />
IN 4<br />
<strong>1756</strong>-L62S<br />
User Program<br />
THRS<br />
Two Hand Run Station<br />
<strong>EN</strong>954-1 Category 4 requires that inputs be independently pulse<br />
tested. RSLogix 5000 programming software is used to configure the<br />
following I/O module parameters for pulse testing.<br />
Input Configuration<br />
398 Publication <strong>1756</strong>-<strong>RM095C</strong>-<strong>EN</strong>-P - July 2008<br />
THRS<br />
Active Pin Type<br />
Active Pin<br />
Right Button Normally Open<br />
Right Button Normally Closed<br />
Left Button Normally Open<br />
Left Button Normally Closed<br />
Fault Reset<br />
thrsDataType<br />
<strong>EN</strong>ABLED<br />
moduleName:I.Pt05Data<br />
0<br />
moduleName:I.Pt00Data<br />
0<br />
moduleName:I.Pt01Data<br />
1<br />
moduleName:I.Pt02Data<br />
0<br />
moduleName:I.Pt03Data<br />
1<br />
moduleName:I.Pt04Data<br />
Input Point Type Point Mode Test Source<br />
0 (IN0) Single <strong>Safety</strong> Pulse Test 0 (T0)<br />
1 (IN1) Single <strong>Safety</strong> Pulse Test 1 (T1)<br />
2 (IN2) Single <strong>Safety</strong> Pulse Test 2 (T2)<br />
3 (IN3) Single <strong>Safety</strong> Pulse Test 3 (T3)<br />
4 (IN4) Single <strong>Safety</strong> None<br />
5 (IN5) Single <strong>Safety</strong> None<br />
Test Output<br />
Test Output<br />
Point<br />
Point Mode<br />
0 (T0) Pulse Test<br />
1 (T1) Pulse Test<br />
2 (T2) Pulse Test<br />
3 (T3) Pulse Test<br />
0<br />
BP<br />
SA<br />
BT<br />
CB<br />
SA F<br />
RB F<br />
LB F<br />
FP
Execution Times for <strong>Safety</strong> <strong>Application</strong><br />
<strong>Instruction</strong>s<br />
Appendix B<br />
This appendix lists execution times for the <strong>GuardLogix</strong> <strong>Safety</strong><br />
<strong>Application</strong> <strong>Instruction</strong>s. <strong>Instruction</strong>s were measured while enabled<br />
and operating on an enabled ladder logic rung.<br />
RSLogix 5000, Version 17 and Later, <strong>Safety</strong> <strong>Application</strong> <strong>Instruction</strong>s<br />
Mnemonic Name Execution Time<br />
CROUT Configurable Redundant Output<br />
Negative Feedback<br />
Positive Feedback<br />
12 μs<br />
14 μs<br />
DCS Dual Channel Input - Stop 24 μs<br />
DCST Dual Channel Input - Stop With Test 26 μs<br />
DCSTL Dual Channel Input - Stop With Test and Lock 36 μs<br />
DCSTM Dual Channel Input - Stop With Test and Mute 28 μs<br />
DCM Dual Channel Input - Monitor 14 μs<br />
DCSRT Dual Channel Input - Start 20 μs<br />
SMAT <strong>Safety</strong> Mat 16 μs<br />
THRSe Two-Hand Run Station – Enhanced 44 μs<br />
TSAM Two Sensor Asymmetrical Muting 30 μs<br />
TSSM Two Sensor Symmetrical Muting 30 μs<br />
FSBM Four Sensor Bidirectional Muting 34 μs<br />
RSLogix 5000, Version 17 and Later Metal Form <strong>Safety</strong> <strong>Application</strong> <strong>Instruction</strong>s<br />
Mnemonic Name Execution Time<br />
CBCM Clutch Brake Continuous Mode 28 μs<br />
CBIM Clutch Brake Inch Mode 18 μs<br />
CBSSM Clutch Brake Single Stoke Mode 20 μs<br />
CPM Crankshaft Position Monitor 24 μs<br />
CSM Camshaft Monitor 24 μs<br />
EPMS Eight-position Mode Selector 24 μs<br />
AVC Auxiliary Valve Control 20 μs<br />
MVC Main Valve Control 12 μs<br />
MMVC Maintenance Manual Valve Control 20 μs<br />
Publication <strong>1756</strong>-<strong>RM095C</strong>-<strong>EN</strong>-P - July 2008 399
Appendix B Execution Times for <strong>Safety</strong> <strong>Application</strong> <strong>Instruction</strong>s<br />
RSLogix 5000, Version 14 and Later, <strong>Safety</strong> <strong>Application</strong> <strong>Instruction</strong><br />
Mnemonic Name Execution Time<br />
<strong>EN</strong>P<strong>EN</strong> Enable Pendant<br />
Auto Reset<br />
Manual Reset<br />
8 μs<br />
10 μs<br />
ESTOP E-Stop 10 μs<br />
RIN Redundant Input 10 μs<br />
ROUT Redundant Output<br />
Negative Feedback 10 μs<br />
Positive Feedback 14 μs<br />
DIN Diverse Input<br />
Auto Reset<br />
Manual Reset<br />
12 μs<br />
16 μs<br />
FPMS 5-Position Mode Selector 12 μs<br />
THRS Two Handed Run Station<br />
Active Pin Enabled<br />
Active Pin Disabled<br />
16 μs<br />
14 μs<br />
LC Light Curtain 14 μs<br />
400 Publication <strong>1756</strong>-<strong>RM095C</strong>-<strong>EN</strong>-P - July 2008
A<br />
abbreviations 13<br />
active opto-electronic protective device<br />
13<br />
arming sequence 226, 228, 229, 230<br />
B<br />
BCAM<br />
See brake cam.<br />
BDC<br />
See bottom dead center.<br />
bottom dead center 13<br />
brake cam 13<br />
C<br />
cam angles 247<br />
cam profiles 246-??<br />
circuit verification test 13, 96, 97, 98, 100,<br />
101<br />
connect the run station 109<br />
controller tag reference 325<br />
CVT<br />
See circuit verification test.<br />
D<br />
DCAM<br />
See dynamic cam<br />
de-energize to trip 13, 319<br />
de-energize to trip system 319<br />
diagnostic codes<br />
AVC 290<br />
CBCM 237<br />
CBIM 212<br />
CBSSM 222<br />
CPM 251<br />
CROUT 128, 264<br />
DCM 34<br />
DCS 50<br />
DCSRT 24<br />
DCST 60<br />
DCSTL 74<br />
DCSTM 88<br />
EPMS 278<br />
FSBM 197<br />
MMVC 313<br />
MVC 302<br />
SMAT 102<br />
Index<br />
THRSe 118<br />
TSAM 147<br />
TSSM 167<br />
DIN<br />
automatic reset 333, 334<br />
cycle inputs operation 330<br />
instruction parameters 326<br />
operation with circuit reset held on -<br />
manual reset only 330<br />
programming example 331, 334<br />
wiring example 331, 333<br />
disconnect the run station 109<br />
diverse input with automatic reset<br />
wiring and programming 333,<br />
334<br />
dummy plug 397<br />
dynamic cam 13, 250<br />
dynamic stopping 247<br />
E<br />
electro-sensitive protective equipment<br />
13<br />
emergency stop instruction (ESTOP) 344<br />
emergency stop with manual reset<br />
wiring and programming 349<br />
<strong>EN</strong>692-2005 205<br />
enable pendant instruction (<strong>EN</strong>P<strong>EN</strong>) 353<br />
<strong>EN</strong>P<strong>EN</strong><br />
automatic reset 360, 361<br />
cycle inputs operation 357<br />
instructions parameters 353, 354<br />
manual reset 358<br />
normal operation 355<br />
operation with circuit reset held on -<br />
manual reset only 357<br />
operation with inconsistent inputs 356<br />
programming example 358, 361<br />
wiring example 358, 360, 361<br />
ESTOP<br />
cycle inputs operation 348<br />
instruction parameters 344, 345<br />
manual reset 349, 351, 352<br />
normal operation 346<br />
operation with circuit reset held on -<br />
manual reset only 348<br />
operation with inconsistent inputs 347<br />
programming example 349, 352<br />
wiring example 349<br />
execution times 399<br />
Publication <strong>1756</strong>-<strong>RM095C</strong>-<strong>EN</strong>-P - July 2008 401
Index<br />
F<br />
false rung state behavior 323<br />
fault codes<br />
AVC 290<br />
CPM 250<br />
CROUT 127, 263<br />
DCM 34<br />
DCS 50<br />
DCSRT 24<br />
DCST 60<br />
DCSTL 73<br />
DCSTM 87<br />
EPMS 278<br />
FSBM 185-196<br />
MMVC 313<br />
MVC 301<br />
SMAT 102<br />
THRSe 117<br />
TSAM 144-147<br />
TSSM 164-166<br />
forward direction 178<br />
FPMS<br />
instruction parameters 375, 376<br />
programming example 378<br />
wiring example 377, 378<br />
H<br />
how to latch and reset faulted I/O 321<br />
I<br />
I/O module connection status 321<br />
I/O point mapping 324<br />
illegal input faults<br />
TSAM 144<br />
TSSM 164<br />
input faults<br />
FSBM 185<br />
LC<br />
L<br />
automatic reset 372, 373<br />
circuit reset held on operation - manual<br />
reset mode only 368<br />
cycle inputs operation 368<br />
input filter time 369<br />
inputs inconsistent operation 367<br />
instruction parameters 363, 364<br />
light curtain muting operation 365<br />
manual reset 369, 370<br />
normal operation 365<br />
programming example 370, 373<br />
wiring example 369, 370, 372, 373<br />
light curtain muting operation 365<br />
light curtain with automatic reset wiring<br />
and programming 372, 373<br />
line conditioning 320<br />
O<br />
override<br />
FSBM 183<br />
TSAM 143<br />
TSSM 163<br />
P<br />
parameters<br />
AVC 284-285<br />
CBCM 227-229<br />
CBIM 206-207<br />
CBSSM 215-217<br />
CPM 243-245<br />
CROUT 123-124, ??-125<br />
CSM 253-254<br />
DCM 28-30<br />
DCS 38-40<br />
DCSRT 18-20<br />
DCST 55-57<br />
DCSTL 66-68<br />
DCSTM 81-84<br />
EPMS 274-275<br />
FSBM 174-177<br />
MMVC 308-309<br />
MVC 297-298<br />
SMAT 95-96<br />
THRSe 107-108<br />
TSAM 134-137<br />
TSSM 154-157<br />
permissive state 307, 308, 310, 311, 312<br />
programming example<br />
CROUT 130<br />
DIN 331, 334<br />
dual-channel input instructions 26, 36,<br />
52, 63, 77, 92<br />
<strong>EN</strong>P<strong>EN</strong> 358, 361<br />
EPMS 280<br />
ESTOP 349, 352<br />
FPMS 378<br />
FSBM 198<br />
LC 370, 373<br />
RIN 340, 343<br />
ROUT 383, 385<br />
SMAT 103<br />
402 Publication <strong>1756</strong>-<strong>RM095C</strong>-<strong>EN</strong>-P - July 2008
THRS 395, 397<br />
THRSe 120<br />
TSAM 149<br />
TSSM 168<br />
pulse conversion 255<br />
pulse test<br />
diverse input 332, 334<br />
emergency stop 350, 352<br />
enable pendant 361<br />
light curtain 371, 374<br />
redundant input 341, 343<br />
redundant output 384, 386<br />
two-hand run station 395, 398<br />
R<br />
redundant input with automatic reset<br />
wiring and programming 342<br />
redundant input with manual reset<br />
wiring and programming 340<br />
redundant output with negative<br />
feedback (RONF) 379<br />
redundant output with positive feedback<br />
(ROPF) 379<br />
redundant output with positive feedback<br />
wiring and programming 385<br />
related documentation 15<br />
reset<br />
safety information 204, 214, 225<br />
reverse direction 179<br />
reversing the press 242<br />
RIN<br />
automatic reset 342<br />
cycle inputs operation 339<br />
instruction parameters 335, 336<br />
manual reset 340<br />
normal operation 337<br />
operation with circuit reset held on -<br />
manual reset only 339<br />
operation with inconsistent inputs 338<br />
programming example 340, 343<br />
wiring example 340, 342<br />
RONF 382<br />
ROPF 381, 385<br />
ROUT<br />
instruction parameters 379, 380<br />
negative feedback examples 381<br />
positive feedback 385<br />
positive feedback examples 382<br />
programming example 383, 385<br />
wiring example 383, 385<br />
S<br />
sequence faults<br />
FSBM 187-196<br />
TSAM 145-146<br />
TSSM 165-166<br />
soft clutch 283, 286<br />
system dependencies 320<br />
Publication <strong>1756</strong>-<strong>RM095C</strong>-<strong>EN</strong>-P - July 2008 403<br />
Index<br />
T<br />
takeover cam 13, 250<br />
TCAM<br />
See takeover cam.<br />
terminology 13<br />
THRS<br />
active pin disabled 394, 395<br />
active pin enabled 396, 397<br />
button fault operation 393<br />
button tie-down operation 391<br />
cycle buttons operation 392<br />
dummy plug 397<br />
instruction parameters 388, 389<br />
normal operation 390<br />
programming example 395, 397<br />
wiring example 394, 396, 397<br />
timer faults<br />
FSBM 196<br />
TSAM 147<br />
TSSM 166<br />
tolerated sequence<br />
FSBM 181<br />
TSAM 141<br />
TSSM 161<br />
two-hand run station instruction (THRS)<br />
387<br />
two-hand run station with active pin<br />
enabled wiring and<br />
programming 396, 397
Index<br />
W<br />
wiring example<br />
AVC 291<br />
CROUT 128<br />
DIN 331, 333<br />
dual-channel input instructions 25, 35,<br />
51, 61, 75, 88<br />
<strong>EN</strong>P<strong>EN</strong> 358, 360, 361<br />
ESTOP 349, 351, 352<br />
FPMS 377, 378<br />
FSBM 197<br />
LC 369, 370, 372, 373<br />
RIN 340<br />
ROUT 383, 385<br />
THRS 394, 396, 397<br />
THRSe 119<br />
TSAM 148<br />
TSSM 167<br />
404 Publication <strong>1756</strong>-<strong>RM095C</strong>-<strong>EN</strong>-P - July 2008
Rockwell Automation<br />
Support<br />
Publication <strong>1756</strong>-<strong>RM095C</strong>-<strong>EN</strong>-P - July 2008 408<br />
Rockwell Automation provides technical information on the Web to assist<br />
you in using its products. At http://support.rockwellautomation.com, you can<br />
find technical manuals, a knowledge base of FAQs, technical and application<br />
notes, sample code and links to software service packs, and a MySupport<br />
feature that you can customize to make the best use of these tools.<br />
For an additional level of technical phone support for installation,<br />
configuration, and troubleshooting, we offer TechConnect support programs.<br />
For more information, contact your local distributor or Rockwell Automation<br />
representative, or visit http://support.rockwellautomation.com.<br />
Installation Assistance<br />
If you experience a problem within the first 24 hours of installation, please<br />
review the information that's contained in this manual. You can also contact a<br />
special Customer Support number for initial help in getting your product up<br />
and running.<br />
United States 1.440.646.3434<br />
Monday – Friday, 8am – 5pm EST<br />
Outside United<br />
States<br />
Please contact your local Rockwell Automation representative for any<br />
technical support issues.<br />
New Product Satisfaction Return<br />
Rockwell Automation tests all of its products to ensure that they are fully<br />
operational when shipped from the manufacturing facility. However, if your<br />
product is not functioning and needs to be returned, follow these<br />
procedures.<br />
United States Contact your distributor. You must provide a Customer Support case<br />
number (call the phone number above to obtain one) to your distributor<br />
in order to complete the return process.<br />
Outside United<br />
States<br />
Please contact your local Rockwell Automation representative for the<br />
return procedure.<br />
Supersedes Publication <strong>1756</strong>-RM095B-<strong>EN</strong>-P - July 2006 Copyright © 2008 Rockwell Automation, Inc. All rights reserved. Printed in the U.S.A.
<strong>GuardLogix</strong> <strong>Safety</strong> <strong>Application</strong> <strong>Instruction</strong> <strong>Set</strong> <strong>Safety</strong> Reference Manual