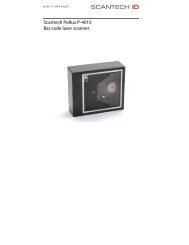
Scantech ID MICA M-9030 Laser Barcode Scanner - Champtek
Scantech ID MICA M-9030 Laser Barcode Scanner - Champtek
Scantech ID MICA M-9030 Laser Barcode Scanner - Champtek
- No tags were found...

Create successful ePaper yourself
Turn your PDF publications into a flip-book with our unique Google optimized e-Paper software.
Installation & User’s Manual<strong>Scantech</strong>-<strong>ID</strong> <strong>MICA</strong> M-<strong>9030</strong>
iiiTable of contentsPreface....................................................................................1Chapter 1 Product Safety .............................................................31.1 <strong>Laser</strong> safety .................................................................................... 41.2 Declaration of conformity ................................................................. 51.3 <strong>Scanner</strong> labeling .............................................................................. 6Chapter 2 Installation ..................................................................72.1 Unpacking....................................................................................... 82.2 Connecting...................................................................................... 92.3 Mounting....................................................................................... 102.4 Powering....................................................................................... 112.5 Initializing ...................................................................................... 12Chapter 3 Using Mica ................................................................ 153.1 Scanning barcodes ........................................................................ 163.2 Controlling..................................................................................... 173.3 Maintaining.................................................................................... 17Chapter 4 Applications............................................................... 19Appendices ............................................................................. 23A. Connector types and PIN definitions ................................................ 24B. Technical specifications ................................................................. 25C. Troubleshooting............................................................................. 27
Chapter 1Product Safety
Mica M-<strong>9030</strong> 51.2 DECLARATION OF CONFORMITY
6Product Safety1.3 SCANNER LABELINGThe product label and the laser safety label are on the back and the side of Mica asindicated in the illustration below. All labels are attached by the manufacturer andshould not be removed.The information about the serial and part numbers can be found on the productlabel. These official registration numbers are strictly related to the device. Thesupplier may ask for these numbers when the scanner needs servicing.
Chapter 2Installation
8Installation2.1 UNPACKINGYour package comes with the following items:Item NameDescription1 Scanning unit The main unit of the scanner2 Fit plate (optional) Use to mount Mica on your host system.3 EPE packing foam Use to protect package items.4 AC adapter setRequired if Mica cannot be directly poweredSee 2.4 Powering on page 11.5 Screws Use to fix Mica on your host system.6 USB cableUse to connect the scanner with your host system.See page 9 for other optional cables.7 Configuration Guide Use to configure Mica with barcodes.8 User’s Manual Provides installation and use instructions.NOTE• If anything is missing or appears to be damaged, immediately contact your dealer.• You can mount Mica without the fit plate, but the plate may be suitable for yourspecial mounting requirements. Contact your dealer for more information.• Store the original packaging box. Use it to transport Mica for future servicing.
Mica M-<strong>9030</strong> 9Exterior ViewCable capOpen to change theinterface cable.LED/Speaker capWindowCover locksSecure the window cover.NOTEMica beeps whenever data has been read correctly. Both frequencyand volume can be adjusted (see section 2.1.1 Speaker frequencyand 2.1.2 Speaker volume on the Configuration Guide).2.2 CONNECTINGInterface SelectionMica allows you to connect your host system using four different interface cables:RS232, Keyboard Wedge, USB, and Powered USB. On powering up, the scannersenses the type of the interface used and switches to the appropriate protocol.Interface CableRS232 (Product Number: 0114-SM01121)Connector typeSub-D 9-pinKeyboard Wedge (Product Number: 0114-SM02121)Standard PS2
10InstallationUSB (Product Number: 0114-SM04121)USB connectorPowered USB (Product Number: 0114-S804121)Powered USBconnectorGetting connectedTo connect Mica to your host system, follow the steps below:1. Open the cable cap of Mica.2. Connect the desired interface cable to Mica.3. Close the cable cap.4. Connect the interface cable to your host system.2.3 MOUNTINGTo mount Mica, follow the steps below:NOTEBefore fixing Mica to your host system, connect the desired interfacecable to Mica first (See section 2.2 Connecting).
Mica M-<strong>9030</strong> 11Standard package1. Place Mica on the inside of your hostsystem and mark the places for themounting holes. See Appendix forMica’s dimensions.2. Drill the mounting holes in your hostsystem.3. Fix Mica on the inside of your hostsystem with screws.Special package (with the fit plate)1. Fix the fit plate to Mica with screws.2. Attach Mica to the scanner stand ofyour host system.2.4 POWERINGMica is designed to use a single cable for both data transmission and power supply.This requires that your host system can provide sufficient power on its data port(RS232, KBW, or USB).Power injectorSome applicable Mica interface cables have a power injector to connect an externalpower supply in case the host system cannot supply sufficient power for thescanner.Power injector+5.2V AC adapterCablePower injectorRS232, Keyboard Wedge√Powered USB, USB ×
12InstallationNOTE• Though some cables have a power injector, this does not meanthat you must use a power supply.• For safety reasons, an automatic switch will disconnect thepower provided by the host system, as soon as a separatepower adapter is connected to the power injector.Changeable power plugsTo change the power plug suited to your area, follow the steps below:1. Press and hold the tab on the AC power adapter.2. Remove the changeable plug outwards.3. Replace with the desired power plug.2.5 INITIALIZINGWhen using Mica for the first time, you need to initialize the communicationparameters first. Follow the steps below to initialize:1. Ensure that the desired interface cable is connected to Mica and your hostsystem.2. Power up Mica.3. Initialize the communication parameters by scanning the programming barcode1.1 and 1.3 on the Configuration Guide.NOTEThe procedure is required only once. However, when changing thecable from one type to another, you need to perform theprocedure again.
Mica M-<strong>9030</strong> 13KBW modeIn KBW (Keyboard Wedge) mode, the scanner defaults to the International Keyboardlayout (ALT-method) for communication.NOTETo change the settings to national keyboards in KBW mode, referto section 3.4 on the Configuration Guide.RS232 modeIn RS232 mode, the default communication parameters are 9600,N,8,2. Using the<strong>Scantech</strong>-<strong>ID</strong> Configuration Guide, you may select one of the various presets, or seteach parameter by hand.USB modeIn USB mode, the scanner defaults to Keyboard Emulation Mode. Mica transmitsthe data in International Keyboard layout (ALT-method) for communication.NOTEThe Mica-USB must be directly connected to the host-USB port andnot through an (un-powered) USB hub.Other available USB communication selections are:• USB IBM fixed POS scanner• USB IBM handheld scanner emulation• USB COM port emulationNOTESee section 3.5 USB communication on the Configuration Guide formore information.
Chapter 3Using Mica
16Using Mica3.1 SCANNING BARCODESMica is an omni-directional presentation scanner featuring a 6 directional scan fieldwith a 24-line scan pattern. <strong>Barcode</strong> labels can easily be read by presenting themto the scanner.MicaNOTESince Mica is a presentation scanner, best results areobtained if the barcode is moved towards the scanner.Mica's scan volume is illustrated in the figure below. The optimal reading zone liesbetween 5 and 30 cm from the scanner window. The scan depth varies dependingon the size of the barcode.
Mica M-<strong>9030</strong> 173.2 CONTROLLINGMica can be controlled from the POS/PC system via the RS232 interface or viaUSB while using comport emulation. Control is achieved by transmitting single bytecommands to the scanner. The following commands are available:ASCII code Function Byte is also called05 Hex Power-up re-initialization ENQ or 0E Hex Enable (cancels disable) Shift Out or 0F Hex Disable Shift In or 12 Hex Sleep DC2 or 14 Hex Wake (cancels sleep) DC4 or NOTEMore commands are available upon request. Please contactyour dealer for more information.3.3 MAINTAININGMica requires little maintenance. Only occasional cleaning of the scanner window isnecessary to remove dirt and fingerprints. Cleaning can be performed duringoperation with a non-abrasive glass spray cleaner and a soft lint-free cloth.NOTEPlease contact your dealer for specific cleaning material.
Chapter 4Applications
20Applications<strong>MICA</strong> as a Core Module of your Application Solutions<strong>Barcode</strong>s have become a distinguishing mark of modern civilization. The familiarstripes are popping up almost everywhere in everyday life: libraries, retail stores,supermarkets, post offices, bill payment for services, law firms, shippingcompanies, enterprises, distributors, manufacturers, hospitals, etc.Retail Stores• Inventory management• Customer relationship management• Marketing management• Checkout managementEnterprise DistributionChannels• Supply Chain management• Marketing management<strong>MICA</strong>OEMApplicationHospitals• Indentifying patients, drugs, tests, andspecimens• Gathering, uploading, and updating EMR(Electronic Medical Records) at POC(Point-of-Care) or lab• Monitoring administration of medicationsby EMR• Supply chain/inventory managementService & InformationA wide variety of self-service kiosks:• Entrance passes for transportation systems,cinemas, theatres• Book, Music CD, VCD, DVD rental orvending for libraries and stores• Price checkers for supermarkets• Recycling or reverse vending solutions forbeverage containers• Bill payment solutions for service providersManufacturers• Materials management• Production management• Quality control• Supply Chain/Inventory managementThe benefits of bar coding are obvious: improved data accuracy and accessibilityenable a company to make correct decisions about future needs and actions.Consequently, profits are up.
Mica M-<strong>9030</strong> 21Case: Benefits of Bar Coding for Retail Stores• Building a competitive infrastructure• Synchronizing supply with demand• Creating high profitability• Trimming operational costsAlthough the applicable areas of barcode are extremely varied, the purpose is thesame: improving data/materials management and reducing operation costs. All ofthese require a high performance barcode scanning solution.In all barcode-based solutions, the core unit is the barcode scanning module. Micafeatures high integrability, flexibility, scanning, and decoding capability. Thecompact design allows it to be integrated easily into almost any host system withminimum space requirement. Possible applications are:• POS terminals• Mobile computers• Hand-held scanners• Healthcare solutions• Price checkers• Self-service kiosks, etc.Price checkerRetail SolutionKiosk SolutionIndustrial Solution
A. Connection Types and Pin DefinitionsB. Technical SpecificationsC. TroubleshootingAppendices
24AppendicesA. CONNECTOR TYPES AND PIN DEFINITIONSMica supports multiple interface: RS232, KBW (Keyboard Wedge), USB, andPowered USB. The various pin definitions for each type of interface are given below.IMPORTANTVarious interface cables are available depending on the kind ofhost system you are using. Contact your supplier foravailability. In case you need a special purpose cable, you canrefer to the information below.The Connector type of Mica: RJ-48, 10 pins.Pin Definition for multiple interfaceMultiple InterfaceRS-232KBWUSB/Powered USBPin Description Description Description Remark1 - - IF<strong>ID</strong> IF<strong>ID</strong>=Interface <strong>ID</strong>2 CTS PC-Clock -3 RxD PC-Data -4 TxD IF<strong>ID</strong>=Interface <strong>ID</strong>5 RTS KB-Clock -6 Ground Ground Ground Ground7 +5.2V +5.2V +5.2V8 D-Power D-Power D-Power9 -IF<strong>ID</strong>: connectto ‘6’D +5.2V, may be used topower scanner8-16V DC inputto power scanner*IF<strong>ID</strong>=Interface <strong>ID</strong>D + = USB data10 - D - D - = USB data*Mica only requires one single DC input.
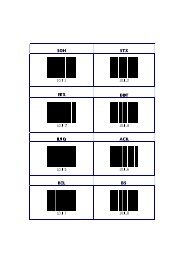
Mica M-<strong>9030</strong> 25B. TECHNICAL SPECIFICATIONSElectricalDC input to scannerPower output+5 V DC, 250 mA1.25 Watt @ +5 V DC<strong>Scanner</strong> CharacteristicsLight source650 nm visible laser diodeDepth of field Up to 300 mm @ 13 mill .33 PCS 90%Scan patternScan rateLight level6 direction scan field, 24 lines scan pattern2000 scans/secMax 4800 LUX<strong>Barcode</strong> types EAN/UPC/JAN + Add-on, ISBN, Code 128, EAN 128, Code 93,Code 39, Code 32, Codabar, Interleaved 2 of 5, MSI-Plessey, GS1DataBar compliance (symbol 1-9)Scan pattern @ 10 cm
26AppendicesPhysical CharacteristicsDepthWidthHeightWeightColor46 mm / 1.81 inch62 mm / 2.44 inch67 mm / 2.63 inch130 gBlack / Silver (optional)EnvironmentalOperating Temperature 0°C ~ 40°CStorage Temperature -10°C ~ 60°CHumidity20% ~ 95% RH(non-condensing dew)Safety<strong>Laser</strong> SafetyIEC 825-1 (1993) Class I, U.S. 21CFR1040 Class IIaElectrical Safety EN 60950EM CompatibilityRadio and TV Interference EN 55024/22, FCC Part 15 class B, CNS 13438Electro Static Discharge (ESD) IEC 801-2 (1991)
Mica M-<strong>9030</strong> 27C. TROUBLESHOOTINGThis section contains information on solving problems you may encounter whenusing the scanner. If troubles occur, take a moment to read the information in thissection. However, before referring to the diagnostic tips ensure that the scanner isinstalled as described in Chapter 2 and that all cables are properly connected.ProblemThe scanner is on but a barcodecannot be read.The scanner does not accept morethan two or three barcodes.A barcode is read by the scanner butnot accepted by the host system.Diagnostic Tips• The scanner window is dirty. Clean thescanner window as described in section3.3.• The presented barcode type is notenabled. Select the barcode type withthe Configuration Guide.• The scanner is disabled by the host.Refer to section 3.2.• The barcode type you presented to thescanner is not supported by Mica.• There is no proper handshaking with thehost system. Switch the host system onand check connection andcommunication settings.• The communication cable is notconnected to the serial port of your hostsystem. Refer to the manual of yourhost system to locate the serial port.• The communication settings of the hostand scanner do not match. Ensure thatthe setting values for both devices arethe same. For proper adjustmentvalues, refer to the Configuration Guide.• The communication cable does not suityour host system. Contact your supplierfor the correct communication cable.• The data format is not supported by thesoftware running on the host system.
28AppendicesUSB communication is not working.• In case of KB emulation you can selectvarious ‘keyboard languages’ or theuniversal ‘Alt-input-method’ (default). Youmay want to try programming barcodesfrom section 3.4 on the ConfigurationGuide.• In case of KB emulation in combinationwith the Alt-input method, check thatNum-Lock of your keyboard is on.• In MS-windows environment, verify withthe device manager that the H<strong>ID</strong> (HumanInterface Device) is installed for thescanner.• Check that the scanner and the hostsystem both expect the same USBprotocol (KB emulation, RS232emulation or IBM POS protocol). See theConfiguration Guide for setup codes andreset the scanner after making anychanges. When using a standard-USBcable, the scanner defaults to the USBKB emulation protocol with ALT-methodcharacter transmission. When usingUSB plus power cable (with the greenconnector), the scanner defaults to USB-IBM-POS protocol for tabletop scanners.These settings are restored afterprogramming “back to default” using theConfiguration Guide.
<strong>Scantech</strong>-<strong>ID</strong> BVNijverheidsweg-Noord 60-343812 PM AmersfoortThe NetherlandsPhone: +31 (0)33 469 84 00Fax: +31 (0)33 465 06 15E-mail:Internet:info@scantech-id.comwww.scantech-id.com