ToneLab Owner's Manual - Vox
ToneLab Owner's Manual - Vox
ToneLab Owner's Manual - Vox
- No tags were found...

Create successful ePaper yourself
Turn your PDF publications into a flip-book with our unique Google optimized e-Paper software.
CREATE YOUR OWN SOUNDS9. To create your own sounds, use the knobs and buttons of the amp and effectssections – just as you would expect!The controls of the amp section work basically the same as on your favoriteguitar amp. Simply turn the GAIN (1.3), TREBLE, MIDDLE, BASS, PRES-ENCE (1.5–1.8), and VR GAIN (1.4) (which corresponds to MASTER) knobsto get your desired sound. To get the most distortion, turn up the VR GAINknob. CH VOLUME (1.9) regulates the volume while preserving the overallsound, including the distortion produced by the Valve Reactor. When you usethe AMP TYPE (1.1) and CABINET TYPE selectors (1.2), it’s just as though adifferent guitar amp materialized right in front of you!HINT: If you want to hear the amp section with absolutely no effects, set thePEDAL selector to the “OFF” position to turn off the PEDAL section. Then holddown the TAP button (2.4) for at least one second to bypass the MODULATION,DELAY, and REVERB effects. (The effect LEDs that had been lit will start blinking.)HINT: P.33 lists recommended combinations of amp and cabinet models but othersare fine too.HINT: If you want to replicate the sound of the original amp, set [VR GAIN] to themaximum setting on vintage-type models that do not have a master volume control(i.e., AC15, AC15TB, AC30, AC30TB, UK BLUES, UK 68P, BLACK 2x12, TWEED1x12, and TWEED 4x10). For modern-type amps that have a master volume control,adjust [VR GAIN] in the same way that you would on the original amp. Whenthe [VR GAIN] setting is low, preamp-type distortion will occur. As you raise the [VRGAIN] setting, the pre-amp will begin loading the Valve Reactor to cause clipping,and the warmth and distortion of the Valve Reactor will be added.HINT: For an illustration, look at area 1 in the top panel diagram at the end of thismanual.10. <strong>ToneLab</strong> provides a PEDAL effect that is placed before the amp, and MODU-LATION, DELAY, and REVERB effects that are placed after the cabinet.If the MODULATION, DELAY, or REVERB effects are bypassed, press the TAPbutton (2.4) to activate them. For example if you want to use the MODULA-TION effect CHORUS, press the MODULATION TYPE button (2.3) severaltimes to make the CHORUS LED light. Notice that the TYPE button is lit. In thisstate, you can adjust the chorus settings by turning the three value knobs 1–3located at the right; these knobs will adjust the speed, amount of effect mixedinto your sound, and the depth of modulation. You can adjust the DELAY andREVERB effects in the same way. To set the delay time for the DELAY effect,press the TAP button (2.4) twice at the delay interval you want.HINT: Some effect settings may cause unwanted distortion. If this happens, lowerthe CH VOLUME (1.9).HINT: For an illustration, look at area 2 in the top panel diagram at the end of thismanual.If you want to keep your settings, you can either save the program asdescribed on p.20, or write down the settings on the “Program Sheet” providedat the back of this manual.vi
Table of ContentsPrecautions .................................................................................................. iiData Handling ............................................................................................. iiiQuick Start................................................................................................... ivIntroduction ................................................................................................. 1Welcome Aboard! ....................................................................................................1Main Features..........................................................................................................1Valve Reactor Technology.......................................................................................2An Overview of <strong>ToneLab</strong>..........................................................................................3A Guitarist’s Guided Panel Tour ................................................................. 5The Top Panel .........................................................................................................5Rear Panel.............................................................................................................11Setup........................................................................................................... 12Basic Connections .................................................................................................12Using <strong>ToneLab</strong> For Direct-Line Recording.............................................................13Using <strong>ToneLab</strong> For Live Performance ...................................................................14Using the Optional Foot Controller.........................................................................14Using <strong>ToneLab</strong> with a MIDI Device or Computer ...................................................14Selecting Programs or <strong>Manual</strong> Settings(Program Select Mode / <strong>Manual</strong> Mode) ................................................... 15Programs (Program Select Mode) .........................................................................15MANUAL MODE: What You See is What You Get!.................................................16Creating and Storing Your Own Program(s) ... & More........................... 17Creating Your own Program(s) ..............................................................................17Adjusting the Noise Reduction (UTILITY “NR SENS”)...........................................19Naming a Program (UTILITY “Program Name”) ....................................................19Storing a Program..................................................................................................20Restoring a Setting to its Original Value (Original Value) ......................................20Explanations of the Amp and Effect Types.............................................. 21A. AMP Models ......................................................................................................211. AC15...........................................................................................................232. AC15TB ......................................................................................................243. AC30...........................................................................................................254. AC30TB ......................................................................................................25vii
5. UK BLUES ..................................................................................................266. UK 68P .......................................................................................................267. UK ’80s .......................................................................................................278. UK ’90s .......................................................................................................279. UK MODERN (UK MODRN).......................................................................2710. RECTO .....................................................................................................2811. US HIGAIN (US HI-G) ..............................................................................2812. BOUTIQUE OD (BTQ OD) .......................................................................2813. BOUTIQUE CL (BTQ CL) .........................................................................2814. BLACK 2x12 (BLK 2X12)..........................................................................2915. TWEED 1x12 (TWD 1X12) .......................................................................2916. TWEED 4x10 (TWD 4X10) .......................................................................30B. CABINET Models ..............................................................................................311. TWEED 1x12 (TWD 1X12) .........................................................................312. TWEED 4x10 (TWD 4X10) .........................................................................313. BLACK 2x10 (BLK 2X10)............................................................................314. BLACK 2x12 (BLK 2X12)............................................................................315. VOX AC15 (AC15)......................................................................................326. VOX AC30 (AC30)......................................................................................327. VOX AD412 (AD412)..................................................................................328. UK H30 4x12 (UK H30) ..............................................................................329. UK T75 4x12 (UK T75) ...............................................................................3210. US V30 4x12 (US V30).............................................................................3211. OFF...........................................................................................................33WHAT GOES WITH WHAT? ..........................................................................33C. PEDAL Effects...................................................................................................341. OFF.............................................................................................................342. COMP .........................................................................................................343. ACOUSTIC .................................................................................................354. VOX WAH...................................................................................................355. AUTO WAH ................................................................................................356. U-VIBE........................................................................................................367. OCTAVE .....................................................................................................368. TREBLE BOOST (TREB BST) ...................................................................369. TUBE OD....................................................................................................3610. FAT OD.....................................................................................................3611. FUZZ.........................................................................................................36D. MOD (Modulation) Effects.................................................................................371. OFF.............................................................................................................372. CHORUS ....................................................................................................373. FLANGER...................................................................................................374. PHASER .....................................................................................................385. TREMOLO ..................................................................................................386. ROTARY.....................................................................................................38E. DELAY Effects...................................................................................................381. OFF.............................................................................................................392. DELAY ........................................................................................................393. TAPE ECHO (T ECHO) ..............................................................................394. MULTI HEAD (MULTI HD)..........................................................................39viii
F. REVERB Effects................................................................................................401. OFF.............................................................................................................402. SPRING ......................................................................................................403. ROOM.........................................................................................................404. PLATE ........................................................................................................40Tuner........................................................................................................... 41Tuning Procedure ..................................................................................................41Calibrating the Tuner .............................................................................................41Using the Optional Foot Controller.......................................................... 42Expression Pedal Settings (UTILITY “EXP ***” — “EXP INIT”) ...........................42Control via MIDI ......................................................................................... 45Connecting a MIDI Device or Computer ................................................................45Setting the MIDI Channel (GLOBAL “MIDI CH”)....................................................46Program Change (GLOBAL “PCHG OUT”) ...........................................................46Control Change (GLOBAL “CCHG I/O”) ................................................................47Parameter Change (GLOBAL “SYEX OUT”) .........................................................48Backing up and Restoring Program Data(GLOBAL “DUMP CUR,” DUMP ALL”) ..................................................................48Adjusting the Digital Output Level (GLOBAL “DOUT LVL”) ................... 50Restoring the Factory Preset Programs................................................... 51Troubleshooting ........................................................................................ 52MIDI Implementation Chart...................................................................... 54Specifications............................................................................................. 56Program list................................................................................................ 57Index ........................................................................................................... 63Top/Rear Panel............................................................... End of this manualTOP PANEL.................................................................................End of this manualBank/<strong>Manual</strong>/Write/Tuner/Channel Section..........................End of this manualREAR PANEL ..............................................................................End of this manualProgram Sheet ............................................................... End of this manualix
IntroductionWELCOME ABOARD!Many thanks for adding the VOX Valvetronix <strong>ToneLab</strong> to your sonic arsenal.We’re sure it’ll give you countless hours of great guitar tones that willfeel as good as they sound!To maximize your chances of enjoying a long and happy relationship withyour <strong>ToneLab</strong>, please read this manual at least once, and (as they say), “use theproduct as directed.” Keep the manual for future reference after you’ve read it;you’ll want to re-read it later at some point to pick up cool tips you may havemissed the first time around.MAIN FEATURES• <strong>ToneLab</strong> features Valve Reactor technology that switches between Class A andClass AB power amp circuits with an actual 12AX7 (ECC 83) miniature triodevalve (vacuum tube) to create the sound of an actual tube power amp, deliveringthe response and tone of classic amps.• <strong>ToneLab</strong> uses sophisticated modeling technology to create amp, cabinet, andeffect sounds. You can choose from sixteen amp types that include classic vintageamps and expensive high-end valve amps, and ten different cabinet types.By combining amp types and cabinet types you can create an amazing range ofsounds, some of which have never been heard before.• Since high-quality effects are built in, <strong>ToneLab</strong> is all you need to create a completelyfinished sound. Ten types of pedal effects are placed before the amp.And after the cabinet are placed five types of modulation effects, three types ofdelay effects, and three types of reverb effects. You can choose one type foreach effect plus Noise Reduction, and use them simultaneously.• You can store all of your own amp settings and effect model settings as a “program”in one of 96 program memories. <strong>ToneLab</strong> comes with 48 preset programsfor instant gratification.• <strong>Manual</strong> Mode lets you use <strong>ToneLab</strong> just like a conventional guitar amp. Thesound will be exactly as specified by the physical positions of the amp sectionknobs. In other words...what you see is what you get!• For convenient tuning, an Auto Chromatic Tuner is built-in.• If the optional VOX Valvetronix foot controller is connected, you can use it toswitch programs, turn effects on/off, or set the tap tempo for the delay time.Since the foot controller also lets you control the wah and volume pedals, it’s amust-have item for live performance.• <strong>ToneLab</strong> plays nicely with other equipment – it has a digital output jack and MIDIIN/OUT jacks.IntroductionPanel TourSetupProgram/<strong>Manual</strong>Creatingand Storing1
• <strong>ToneLab</strong> Sound Editor is an editor/librarian software that lets you visually edit<strong>ToneLab</strong>’s numerous parameters, and save and manage programs.To obtain the “<strong>ToneLab</strong> Sound Editor ,” please contact the VOX distributor inyour country or download the latest version from:“http://www.voxamps.co.uk” or “http://www.valvetronix.com/”To find your local Distributor go to:“http://www.voxamps.co.uk/dealers/worldwid.htm”VALVE REACTOR TECHNOLOGYTHE POWER (AMP) AND THE GLORY!Valve Reactor technology was first used on the VOX AD60/120VT Valvetronixamps.The Valve Reactor circuitry in <strong>ToneLab</strong> however has been tuned-up especiallyfor line recording.Since conventional modeling effects for line recording are not used directlywith a speaker, they do not include a power amp circuit, output transformer, orspeaker. In other words, they only have a preamp circuit.A real valve amp sound, however, is produced not just by the preamp, but also bythe tone and distortion of the power amp, and by the constant changes in impedancethat are created by the power amp driving the speakers. <strong>ToneLab</strong> containsan actual low-wattage valve power amp circuit, a virtual output transformer (patentapplied for) that uses solid-state components to simulate an output transformer,and a dummy speaker circuit that simulates the varying impedance of a realspeaker. This means that although it’s low-power, <strong>ToneLab</strong> has the same circuitstructure of an actual all-valve amp.While much of the tone creation and shaping carried out is done in the digitaldomain, its Valve Reactor power amp is 100% analogue. The resulting journeyyour guitar’s signal takes through the analogue world of the power stage plays amajor role in providing the all-important feel and tone of the original amps we modelled.The Valve Reactor power stage is, to all intents and purposes, a bona fide valve(tube) push-pull power amplifier, but in miniature. It utilizes a 12AX7 (ECC83)valve (a dual triode device - meaning “two valves in one”) and is equipped with anoutput transformer, just like a “real” valve amp.The power amp output of <strong>ToneLab</strong>’s Valve Reactor is designed to “read” the constantlychanging impedance curve of the dummy speaker circuit system and feedthis information back to the virtual output transformer – just like real valve amplifiersdo. This information permits the behavior of the valve stage of the amp to varywith the speaker load (impedance), which is another important part of “real world”valve tone.2
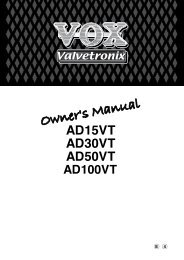
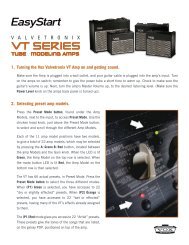
Apart from the vitalvalve tone this ingeniouspower amp design provides, italso allows us to replicatevarious “circuit characteristics”that are unique to the allvalvepower stages of theamps we’ve modelled. These“characteristics” include:Class A or Class AB operation,Presence and Resonance(low end) controlcircuitry (both found in thenegative feedback circuit thatsome, but not all, valve powerPREAMPFEEDBACKCIRCUIT(WITH OR W/OPRESENCE &RESONANCE)MODELDEPENDENTVOX VALVE REACTORPHASEINVERTERamps have) and power output. Being able to match such vital characteristics helpsensure that each and every one of our models is as tonally authentic as possible -as opposed to the usual “close but definitely no cigar” norm of digital modeling.And just so you know, this patented in USA power amp technology is unique toVOX Valvetronix.BIASBIAS12AX7(ECC83)12AX7(ECC83)12AX7 (DUAL TRIODE)PUSH–PULL OUTPUTCLASS A OR ABMODEL DEPENDENTOUTPUT TRANSFORMERREACTORAMPUSINGCONSTANTCURRENT &REACTIVEFEEDBACKDUMMYSPEAKERIntroductionPanel TourSetupProgram/<strong>Manual</strong>Creatingand StoringAN OVERVIEW OF <strong>ToneLab</strong>Let’s talk about how <strong>ToneLab</strong> is structured.SIGNAL ROUTEWhen you plug into <strong>ToneLab</strong> the signal passes through the following stages.You might want to glance at the explanations in “A Guitarist’s Guided PanelTour” (p.5) while you read this section.PEDALEFFECTSAMP MODELS16 TYPEGAINPRE AMPVR GAINVALVE REACTORPOWER AMPCLASS ACLASS ABCHVOLUMECABINETMODELS10 TYPEEFFECTSMODULATIONDELAYREVERBAMP/LINESWSTRUCTUREYou will perform or create sounds using one of <strong>ToneLab</strong>’s two modes; ProgramSelect mode or <strong>Manual</strong> mode.Additional functions are provided by UTILITY and GLOBAL modes (where youcan make settings for the optional foot controller and for MIDI), WRITE modewhere you can save your original programs, and TUNER mode which lets youtune your guitar. (To access these modes, just press the corresponding button.)3
Program Select mode:• Choose, play, and edit any of the 96 programs.<strong>Manual</strong> mode:• Use <strong>ToneLab</strong> just like a guitar amp, where the sound will be exactly as theknobs are set. As we said before...what you see is what you get!UTILITY:• Adjust the noise reduction (the higher the settings the more noise will besuppressed).• Name a program.• Choose the function that will be controlled by the expression pedal of theoptional foot controller.GLOBAL:• MIDI-related settings.• Adjust the digital output level.WRITE:• Save a program.TUNER:• Use the auto chromatic tuner to tune your guitar.But hey, talk is cheap and ultimately the proof of this particular pudding lies in theway <strong>ToneLab</strong> sounds and feels when you play it. So, let’s cut to the chase and getstarted. Grab your guitar, turn to “Quick Start” (p.iv), and prepare to experiencesome great sounds!4
A Guitarist’s Guided Panel TourHere we’re going to learn about the knobs, buttons, and jacks on <strong>ToneLab</strong>’stop and rear panel.To help make this manual as painless to use as possible, we’ve given it aninside back cover that folds out. And, when you fold it out you’ll see nice big picturesof the Top Panel, Rear Panel and more. Why did we do this? So you canhave pictures of both panels staring you in the face while you read about ‘em - thusavoiding the annoying “flicking between pages” that most manual’s require you todo because there’s only one picture of a panel and it’s never on the same pageyou’re reading! So, fold out that useful back cover and let’s go...THE TOP PANELIntroductionPanel TourSetupProgram/<strong>Manual</strong>Creatingand Storing1 AMP SECTIONThese control the settings for the amp.1.1 AMP TYPE SelectorThis allows you to select an amp type. The amp type you select will determinethe operation of the power amp (Class A or AB), the response of the tone controls,and the wiring of the circuitry, causing the controls to function just as youwould expect on the actual amp being modeled. The sixteen stunningly accurateamp models - each of which is based on an accepted all-tube classic –include the legendary VOX AC30TBX. (For details, see p.21.) As already mentionedin the intro to this manual, each model not only replicates the exact gainand tonal characteristics of the original amp’s preamp circuit, it also simulatesthe all-important power amp stage, in terms of both Class (A or AB) and negativefeedback circuit (or lack thereof).1.2 CABINET TYPE SelectorThis selects one of ten cabinet models that replicate the shape and size of thecabinet plus the type and number of its speakers. (For details, refer to p.31.)HINT: Notice that the AMP TYPE, CABINET TYPE, and PEDAL selectors have theinstantly recognizable “chicken-head” (pointer) knobs in the true VOX tradition.Preamp Controls1.3 GAIN ControlThis adjusts the preamp gain of the selected amp model.1.4 VR GAIN ControlThis adjusts the volume from the preamp to the Valve Reactor circuit. This settingwill affect the amount of distortion produced by the Valve Reactor. (Fordetails, refer to p.22.)NOTE: The amount of Valve Reactor distortion is also affected by the GAIN control.With some settings, you’ll notice less distortion.5
1.5 TREBLE Control1.6 MIDDLE Control1.7 BASS ControlThis trio of controls allows you to dial-in the exact amount of high, mid, and lowfrequencies. The manner in which each one of these controls behaves andinteracts with the others is dependent on the amp type selected.NOTE: In keeping with the originals, certain models will produce almost no soundwhen these three tone controls are turned all the way down (counterclockwise).NOTE: Not all of the original amps that we modeled have controls for Treble, Middleand Bass. In such cases, rather than simply leaving the non-existent control unemployed,we allow you to use all three to effectively increase the tonal range of theoriginal. For more details, see the explanation of each amp type starting on p.21.Power Amp Controls1.8 PRESENCE ControlThis control allows you to adjust the amount of Presence (high frequency“sparkle”) in your sound.If the original amp doesn’t have a Presence control, this will have a differentfunction.NOTE: Presence is a function of a power amp containing a negative feedback circuit,and not all the original amps we modeled contain one – for example, none ofthe four <strong>Vox</strong> amps we modeled (AC15, AC15TB, AC30 & AC30TB) feature a negativefeedback circuit. Furthermore, not all amps that have a negative feedback circuitnecessarily feature a Presence control. For example, the original BLACK 2x12– negative feedback in the power amp? Yes. Presence Control? Nope. Whenever amodeled amp didn’t have a Presence control, rather than have this knob do absolutelynothing, we used it to control something else. For more details on exactlywhat the PRESENCE control does on each model, see the explanation of eachamp type starting on p.21.1.9 CH VOLUME ControlThis knob allows you to adjust the overall volume of your <strong>ToneLab</strong>. You can usethis to adjust the volume while preserving the tonal character, including the distortioncreated by the Valve Reactor circuit.NOTE: Some effect settings may produce unwanted distortion. If this occurs, turndown the CH VOLUME.6
2 EFFECTS SECTIONThe PEDAL effects are connected in “front” of the amp, and allow you to add onepedal effect to your setup, if you wish. All ten (10) of the effects on offer here aremodels of classic stompbox effects and, therefore, are meant to be added to yourguitar’s signal before it hits the actual amp.Modulation, delay, and reverb are placed after the cabinet, which is the way it’sdone in a studio.HINT: The reason that modulation, delay, and reverb effects are invariably set upafter the amp rather than in front of the amp as a “stompbox” is simple. To mostpeople’s ears, they sound better and more realistic that way. Think about it –REVERB emulates the sound created by a room or a hall. So, logic dictates that ifwe’re going to add it to our sound, the closer to the end of the signal chain we put it,the more “real” and natural it’s going to sound. The same is true for DELAY and formany MODULATION effects too – their very nature dictates that they should beadded near the end of your signal path, not at its beginning.Also, if you’re using a crunch or high gain lead sound then it makes much moresense to add effects like ROTARY, ROOM (reverb) or DELAY to the signal after it’sbeen distorted, rather than before. I mean, does it make any sense to add an effectlike reverb and then mash the heck out of your signal (i.e., distort it)? Notreally...right!? Good, case closed. Now our little detour’s over – let’s get on with thefront panel tour...2.1 Effect Type LEDsThese show the type of effect you are using. (For the PEDAL effect, the LEDwill be lit unless the selector is set to OFF.) If an LED is dark, that effect is OFF.2.2 PEDAL SelectorThis lets you select one of the ten stompboxes on offer, or bypass the section.When you turn the PEDAL selector, the TYPE button will light, and you can usethe three value knobs 1–3 to adjust the parameters. If you don’t want to use apedal effect, select OFF. (For more information on each of the pedals modelshere, start on p.34.)2.3 TYPE ButtonsThese select the types of effects. You will also use these to select the effectthat value knobs 1–3 will edit.When you press a button once, it will light; now you can use value knobs 1–3to edit the parameters of that effect. By pressing an already-lit button onceagain, you can switch to a different effect type. If you don’t want to use aneffect, press the button repeatedly until all of the effect type LEDs for that effectare off.2.4 TAP Button (HOLD: EFFECT BYPASS)This button enables you to set the delay time by merely tapping your finger onit at the desired tempo (speed). Hitting the TAP button twice or more will set thedelay time. The button will blink at the time interval you tapped in.If you press and hold the TAP button for one second or longer, the three effectsModulation, Delay, and Reverb will be bypassed. (When bypassed, the effecttype LEDs that were lit will blink.)IntroductionPanel TourSetupProgram/<strong>Manual</strong>Creatingand Storing7
HINT: To set a precise delay time that matches a song’s tempo, tap your finger onthe TAP button in time with the song. If it’s slightly off, use the Fine Control to matchit perfectly.STEP ON IT! If the optional foot controller is connected, you can set the delay timeby tapping your foot.HINT: To defeat Bypass, press the TAP button once again.2.5 Value Knobs 1–3In Program Select mode and <strong>Manual</strong> mode, these knobs adjust the effect. Theknobs will edit the effect you selected by its TYPE button (i.e., the effect whosebutton is lit). For details on the parameters that these three knobs adjust, referto p.34 and following. (From the left, these knobs are called value knobs 1–3.)When you are making UTILITY or GLOBAL settings, you can use value knob 3to edit the value.NOTE: For some effect settings, undesired distortion may occur. If this happens,lower the CH VOLUME.3 BANK/MANUAL/WRITE/TUNER/CHANNEL SECTIONPhew, the “Bank/<strong>Manual</strong>/Write/Tuner/Channel Section?” What a mouthful! Don’tstress though – just because this area houses a few different things doesn’t meanit’s complicated. In fact, as you’re about to discover, it’s both logical and simple ...honest! This section is simply where you select and view programs, and see thenames and values of the amp and effect section parameters that are creating yoursound. This is also where you make UTILITY and GLOBAL settings.3.1 BANK DisplayThis displays the program bank.3.2 BANK/VALUE ▲, ▼ ButtonsIn Program Select mode, use these buttons to select one of the eight (8) programbanks. When making UTILITY or GLOBAL settings, use these buttons toedit parameters or values.If you press ▲ and ▼ simultaneously, you will enter <strong>Manual</strong> mode.3.3 CHANNEL SELECT/MENU & CURSOR 1/PREV, 2/NEXT, 3/√, 4/® ButtonsIn Program Select mode, use these buttons to select a channel within eachbank. When making UTILITY or GLOBAL settings, use these buttons to selecta menu or parameter.3.4 UTILITY ButtonThis lets you assign a name to a program, adjust the Noise Reduction and setup the optional foot controller.Press the UTILITY button to make the button light, and then use the 1/PREV or2/NEXT buttons to move through the menu items listed below.After selecting the desired menu item, use value knob 3 or the ▲, ▼ buttons tochange the value.8
NR SENS: Noise reduction (p.19)********: Program name (p.19)EXP : Expression target (p.42)EXP MIN: Expression target range (minimum value) (p.42)EXP MAX: Expression target range (maximum value) (p.42)EXP INIT: Initialization setting for the expression pedal (p.42)3.5 GLOBAL ButtonThis is where you adjust settings for MIDI or the digital output.Press the GLOBAL button to make it light, and then use the 1/PREV and 2/NEXT buttons (3.3) to move through the menu items listed below.After selecting the desired menu item, use value knob 3 or the ▲, ▼ buttons tochange the value. For some menu items, you will also use the 3/√ and 4/®buttons.MIDI CH: Set the MIDI channel (p.46)PCHG OUT: Output settings for program change messages(p.46)CCHG I/O: Output settings for control change messages (p.47)SYEX OUT: Output settings for system exclusive messages (p.48)DUMP CUR: Sends the current program data from the MIDI OUT jack (p.48)DUMP ALL: Sends all <strong>ToneLab</strong> data from the MIDI OUT jack (p.48)DOUT LVL: Digital output level (p.50)IntroductionPanel TourSetupProgram/<strong>Manual</strong>Creatingand Storing3.6 WRITE/ENTER ButtonThis button is used when you want to store a new program. (p.20)3.7 TUNER/CANCEL ButtonThis button turns the built-in chromatic tuner on/off.You will also use this to abort saving a program, or to cancel a GLOBAL orUTILITY operation.3.8 Name DisplayThis displays program names, effect names, and parameter names.3.9 Valve IconThis indicates the number and type of power valves (vacuum tubes used in thepower stage) in the original amp that is being modeled.3.10 Value DisplayThis indicates the value of the parameter.If the displayed parameter value matches the value before you edited it (i.e.,the value that is stored in the program), the ORIG (original value) icon willappear.If you have modified (edited) any parameter of the program, the EDIT icon willappear.9
REAR PANEL67POWER SUPPLY6.1 ~AC9VConnect the included AC/AC power supply here.6.2 STANDBY SwitchThis switches the unit between operating and standby conditions.MIDI7.1 MIDI OUT JackThis jack transmits MIDI data to control a connected external MIDI device.7.2 MIDI IN JackThis jack receives MIDI data to control <strong>ToneLab</strong> from a connected externalMIDI device.IntroductionPanel TourSetupProgram/<strong>Manual</strong>Creatingand Storing89PEDAL8.1 VOX BUS JackFor connecting an optional VOX Valvetronix Foot Controller pedal...a musthave item, as you’ll soon discover!NOTE: Don’t ever connect anything other than a compatable VOX foot controller tothis jack!OUTPUT9.1 AMP/LINE SwitchSet this switch for the device that the OUTPUT jack (or S/P DIF OUT jack) isconnected to. You should set this to the “LINE” position if the output jack is connectedto a mixer, recording device, if you are using headphones, or if <strong>ToneLab</strong>is connected to a power amp. Set this to the “AMP” position if <strong>ToneLab</strong> is connectedto a guitar amp.9.2 OUTPUT Jacks (L/MONO, R)These are analogue output jacks (balanced/unbalanced TRS). Connect the L/MONO jack if you are running in mono.9.3 LEVEL KnobThis adjusts the level of the OUTPUT jacks and PHONE jack.9.4 S/P DIF OUT Jack (Digital Output)This is an optical-type digital output jack in S/P DIF format (IEC60958, EIAJCP-1201). It digitally sends the same audio as the OUTPUT jacks at a samplingrate of 44.1 kHz. You can connect it to the input jack of a digital recorderor other digital audio device.NOTE: The LEVEL knob does not control the digital output level. Refer to “Adjustingthe digital output level,” p.50.11
SetupNOTE: You MUST turn off the power of all your equipment before you make connections.If you ignore this warning, you may damage your speaker system orexperience malfunctions!BASIC CONNECTIONS1. Use audio cables to connect the <strong>ToneLab</strong>’s OUTPUT L/MONO (9.2) to yourmixer/recorder or guitar amp. (p.13, 14)NOTE: If you’re making connections in mono, use the OUTPUT L/MONO jack.However to take the fullest advantage of <strong>ToneLab</strong>’s sound, we strongly recommendthat you use stereo connections.If you are using headphones, plug them into the PHONES jack (5.2).NOTE: Signal from the OUTPUT jack will still be heard even if headphones areplugged in.If you want to use an optical cable to connect <strong>ToneLab</strong> to a digital mixer orrecorder, connect the cable to the S/P DIF OUT jack (9.4). (p.13)2. If you connect <strong>ToneLab</strong> to a mixer or recorder, set the AMP/LINE switch (9.1)to “LINE.” If you connect it to a guitar amp, set the switch to “AMP.”3. Turn the LEVEL knob (9.3) located on the rear of <strong>ToneLab</strong> all the way towardthe left (as seen from the rear), setting the volume to 0.4. Connect the included AC/AC power supply to the rear panel AC9V power supplyjack (6.1), and then connect the plug to an AC outlet.5. Plug your guitar into the INPUT jack (5.1).6. First, turn down the volume of your amp or mixer so you don’t hear crackles orpops when the power is turned on! Then turn on the STANDBY switch (6.2) toturn on the power.7. Adjust the volume by using the controls of your amp or mixer, and <strong>ToneLab</strong>’srear panel LEVEL knob (9.3).To a mixer/recorderor guitar ampLINE/AMPTo a digitalmixer/recorderS/P DIF OUTDedicated foot controllerVOX BUSGuitarOUTPUTL/MONORTo a MIDI sequenceror computer~AC9VAC/AC powersupplyTo an ACoutletHeadphonesPHONES<strong>ToneLab</strong>Mono jackINPUT12
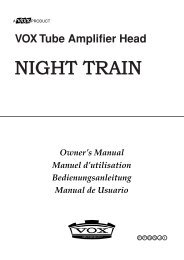
MIC1-10dBVMIC GAINU10 60+10dB -40dBTRIMMIC2BALBALORORUNBALUNBALLINE IN 1 LINE IN 2LOW CUTLOW CUT75Hz75Hz18dB/OCT18dB/OCTU+15U2EFX+15U-15 +15U-12 +12U-15+15L R1MUTEALT 3– 4AUX1MON/EFXEQHI12kHzMID2.5kHzLOW80HzPANdBdB1010SOLO55UU55101020203030404050506060-10dBVMIC GAINU10 60+10dB -40dBTRIMU+15U+15U-15 +15U-12 +12U-15+15L R2MUTEALT 3– 4AUX1MON/EFX2EFXEQHI12kHzMID2.5kHzLOW80HzMIC3BALORUNBALLINE IN 3LOW CUT75Hz18dB/OCT-10dBVMIC GAIN-15 +15U-12 +12U-15+15MID2.5kHzLOW80HzBALORUNBALLINE IN 4LOW CUT75Hz18dB/OCT-10dBVMIC GAINUU10 6010 60+10dB -40dB+10dB -40dBTRIMTRIMU AUX U AUX11MON/MON/EFXEFX+15+15UU2EFX2EFX+15+15U EQ U EQHIHI12kHz12kHz-15 +15U-12 +12U-15MIC4STEREO AUX RETURNS AUX SEND TAPE TAPE MAIN OUTSMIC5 MIC611 INPUT OUTPUTLLMICRO SERIES 1402-VLZ14-CHANNEL MIC/LINE MIXER22RRLEFT(1/MONO) RIGHT ALL BAL/UNBALBAL/UNBALBALBALORORMONOMONOMONOMONOUNBALUNBALLLLLLINE IN 5 LINE IN 6BALBALBALBALLOW CUTLOW CUTOROROROR75Hz75HzUNBALUNBALUNBALUNBAL18dB/OCT18dB/OCTRRRRUULEVELLEVELLEVELLEVEL+4+4+4+410 6010 60-10-10-10-10PHONES+10dB -40dB+10dB -40dBTRIMTRIM LINE IN 7-8 LINE IN 9-10 LINE IN 11-12 LINE IN 13-14U AUX U AUX UUAUXAUX U AUX U AUXUU111111MON/MON/MON/MON/MON/MON/EFXEFXEFXEFXEFXEFX1+15+15+15+15+15+15+10+20NORMALLEDUUUUUUAUX 1 MASTERU2222222 PREEFXEFXEFXEFXEFXEFX POSTAUX 1EFX TO+15+15+15+15+15+15SELECTMONITOR+20U EQ U EQ U EQ U EQ U EQ U EQ SOURCELEFT RIGHTHIHIHIHIHIHIMAIN+28 CLIP12kHz12kHz12kHz12kHz12kHz12kHzMIX+10-15 +15-15 +15-15 +15-15 +15-15 +15-15 +15UUUUUU+7ALTMIDMIDMIDMIDMIDMIDMID3-4+42.5kHz2.5kHz2.5kHz2.5kHz2.5kHz2.5kHz2.5kHz+2-12 +12-12 +12-12 +12-12 +12-12 +12-12 +12UUUUUUTAPE0-2LOWLOWLOWLOWLOWLOWLOW80Hz80Hz80Hz80Hz80Hz80Hz80Hz-4+15-15 +15-15 +15-15 +15-15 +15-15 +15-15 +15-7ASSIGNPANPANPANPANPANPANPAN TO MAIN MIX-10-20NORMAL(AFL)LEVEL SET(PFL)-300dB=0dBu-10dBVMIC GAIN-10dBVMIC GAINPANPANL RL RL RL RL RL RL RL RSOLOMODE345 6 7–8 9–10 11–12 13–14MUTEMUTEMUTEMUTEMUTEMUTEMUTEMUTEALT 3– 4ALT 3– 4ALT 3– 4ALT 3– 4ALT 3– 4ALT 3– 4ALT 3– 4ALT 3– 4PHANTOM POWERRUDE SOLO LIGHTCONTROLROOM / PHONES MAIN MIXdBdBdBdBdBdBdBdBdBdB10101010101010101010SOLO SOLOSOLOSOLO SOLOSOLOSOLOSOLOSOLO5555555555UUUUUUUUUU5555555555101010101010101010102020202020202020202030303030303030303030 3040404040404040404040 4050505050505050505050 5060606060606060606060 60AUXRETURNSNOTE: Since <strong>ToneLab</strong> uses an actual valve (vacuum tube), it will produce nosound for several seconds until the valve warms up. This isn’t a malfunction – it’sjust the nature of valves.USING <strong>ToneLab</strong> FOR DIRECT-LINE RECORDINGIntroductionPanel TourEXAMPLE OF ANALOGUE CONNECTIONS• When using <strong>ToneLab</strong> for analogue recording, set the rear panel AMP/LINEswitch (9.1) to the “LINE” position, and connect the OUTPUT L/MONO and Rjacks (9.2) to the channel input jacks of your mixer or recorder.HINT: If you’re using a mono connection, use the OUTPUT L/MONO jack.HINT: If you’re using stereo connections, pan the input channels of your mixer/recorder to the far left and right respectively.SetupProgram/<strong>Manual</strong>Creatingand StoringGuitarOUTPUTL/MONORLINE/AMPLINELINE IN 1PAN LTapeSendLINE IN 2PAN RTapeReturnHeadphones<strong>ToneLab</strong>Mono jackINPUTMixer/recorderPHONESEXAMPLE OF DIGITAL CONNECTIONS• When using <strong>ToneLab</strong> for digital recording, set the rear panel AMP/LINE switch(9.1) to the “LINE” position, and connect <strong>ToneLab</strong>’s S/P DIF OUT jack (9.4) tothe digital input jack (S/P DIF format IEC60958 EIAJ CP-1201) of your mixer orrecorder.NOTE: The volume of the S/P DIF OUT jack is adjusted by the GLOBAL setting“DOUT LVL.” See p.50 for details.GuitarS/P DIF OUTS/P DIF INHeadphones<strong>ToneLab</strong>Mono jackINPUTDigital mixer/recorderPHONES13
USING <strong>ToneLab</strong> FOR LIVE PERFORMANCEEXAMPLE OF CONNECTION TO A GUITAR AMP (Or Amps)• If you are connecting <strong>ToneLab</strong> to one or more guitar amps for use in a live performanceetc., set the rear panel AMP/LINE switch (9.1) to “AMP,” and connectthe OUTPUT L/MONO and R jacks (9.2) to the input jacks of your amp(s).HINT: If <strong>ToneLab</strong> is connected to a guitar amp first, set the tone controls to theircenter positions and adjust them until <strong>ToneLab</strong> sounds right through your amp. The“AMP” setting on <strong>ToneLab</strong> has been voiced to sound correct with guitar amps thathave a bright switch or a “bright” capacitor across the volume control. Set the rearpanel LEVEL knob so that the sound does not distort.(starting with a “clean” programon <strong>ToneLab</strong>).HINT: If you are connecting <strong>ToneLab</strong> to a guitar amp that has a jack allowing you toconnect directly before the power amp (such as Return or Main In), set the AMP/LINE switch to “LINE” and connect <strong>ToneLab</strong> to that jack. If you want to take advantageof the tonal character of that amp (and cabinet), you may want to turn<strong>ToneLab</strong>’s CABINET setting “OFF.”GuitarOUTPUTL/MONORLINE/AMPAMPMonojackINPUTMonojackINPUT<strong>ToneLab</strong>INPUTGuitar amp(s)USING THE OPTIONAL FOOT CONTROLLERThe optional VOX foot controller lets you use your foot to switch programs, controlthe volume, switch effects on/off, and control various values.• Connect the optional foot controller to <strong>ToneLab</strong>’s VOX BUS jack (8.1). Fordetails on connections and operation, refer to the owner’s manual included withthe controller.• You’ll need to specify the function that will be controlled by the expression pedalof the controller, and the range in which the value will change. Refer to p.42.USING <strong>ToneLab</strong> WITH A MIDI DEVICE OR COMPUTERBy using MIDI you can control <strong>ToneLab</strong> from a sequencer or control an externalMIDI device from <strong>ToneLab</strong>. You can also save <strong>ToneLab</strong> programs on a sequenceror MIDI data filer that is able to transmit and receive MIDI exclusive data, and thenload the program data back into <strong>ToneLab</strong> when desired.HINT: For details on MIDI connections refer to p.45.14
GETTING TO PROGRAM SELECT MODEHere’s how to get to Program Select Mode. When you enter Program Select Mode,the bank number (1–24) will appear in the bank display (3.1).If the bank display shows “ ” (<strong>Manual</strong> Mode)This means that <strong>ToneLab</strong> is in <strong>Manual</strong> Mode. Do one of the following actions toreturn to Program Select Mode.• Press any one of the channel select 1–4 buttons (3.3).• Simultaneously press the BANK ▲ and ▼ buttons (3.2).If any of the UTILITY (3.4), GLOBAL (3.5), WRITE (3.6), or TUNER (3.7) buttonsare lit or if the bank display is blinking (3.1)• Press the TUNER/CANCEL button (3.7). You will return to the mode youwere previously in.If <strong>Manual</strong> Mode is selected, get to Program Select Mode by doing any of theabove actions.MANUAL MODE: What You See is What You Get!When <strong>ToneLab</strong> is in MANUAL MODE it behaves like a “regular” amp – meaningthat the sound you hear is a direct reflection of all the knob settings of the ampsection.NOTE: Any changes you make in <strong>Manual</strong> Mode to the effect section and UTILITYparameters (other than “EXP INIT”) will be remembered. The next time you enter<strong>Manual</strong> Mode, those settings will be recalled.SWITCHING TO MANUAL MODEIn <strong>Manual</strong> Mode, the bank display (3.1) shows “ ”.If <strong>ToneLab</strong> is in Program Select Mode (the bank display shows a number).• Simultaneously press the BANK ▲ and ▼ buttons (3.2).If any of the UTILITY (3.4), GLOBAL (3.5), WRITE (3.6), or TUNER (3.7) buttonsare lit• Press the TUNER/CANCEL button (3.7). You will return to the mode youwere previously in.If <strong>ToneLab</strong> is in Program Select Mode, switch to <strong>Manual</strong> Mode as describedabove.16
Creating and Storing Your OwnProgram(s) ... & MoreThis is a cakewalk, honest! There are two ways you can go about doing this –by “tweaking an existing program” or by “starting from scratch.” Let’s tweakan existing program first.HINT: When you change the type or parameters in the amp or effect section, thedisplay will show the type name or parameter name, and its value (a).A short time after you make a change, the display will return to the program name(b), but the state of the TYPE buttons and the function of the value knobs will bepreserved.IntroductionPanel TourSetupProgram/<strong>Manual</strong>(a)(b)Creatingand StoringCREATING YOUR OWN PROGRAM(S)If you want to tweak an existing program, select one that’s close to the sound youwant, and start by adjusting the GAIN (1.3), TREBLE, MIDDLE, BASS (1.5–1.8),PRESENCE, and VR GAIN (1.4) (which is equivalent to the MASTER control). Youcan also use TYPE (2.3) to select the effect you want to adjust, and use valueknobs 1–3 to adjust the effect.For example, you might start with a certain preset that has a crunchy, modernrhythm sound that you like, and create a complimentary lead sound that is louder,has a bit more gain, more mids, Chorus and Tape Echo.Now here’s how to create your own program from scratch.1. Select any program, or choose <strong>Manual</strong> Mode. (p.15)HINT: It doesn’t matter which program you select, because we’re starting fromscratch.2. Set the PEDAL Selector (2.2) to “OFF.” If you want to use a pedal, we’ll add itlast.3. Hold down the TAP button (2.4) for at least one second so that MODULATION,DELAY, and REVERB are bypassed. (When bypassed, effect type LEDs thathad been lit will blink.)We’ll add modulation and other effects later.4. Using the AMP TYPE selector (1.1), choose the amp you want to use.HINT: For details on amp types, cabinet types, and effect types, refer to “Explanationsof the Amp and Effect Types” (p.21).17
5. Using the CABINET TYPE selector (1.2), choose the cabinet you want to use.HINT: For recommended combinations of amp and cabinet types, refer to p.33.6. Adjust the GAIN (1.3), TREBLE, MIDDLE, BASS, PRESENCE (1.5–1.8) andVR GAIN (1.4) to taste. CH VOLUME (1.9) adjusts the volume while preservingthe overall character of the distortion produced by the power stage.HINT: To get the most distortion, raise VR GAIN to a desired level.7. If you want to add modulation, delay, or reverb, press the TAP button (2.4) onceagain to defeat bypass.8. Now let’s try adjusting one of the effects. For example if you want to add tapeecho, press the DELAY TYPE button (2.3) to make the “TAPE ECHO” LED(2.1) light.To set the delay time, press the TAP button (2.4) twice at the desired tempo.Make sure that the DELAY TYPE button is lit. In this state, you can turn thethree value knobs 1–3 (2.5) located at the right to make fine adjustments to thetime, set the mix amount of the echo sound, and set the amount of feedbackfor the echo.You can adjust the MODULATION and REVERB effects in the same way.(However you can’t use TAP to make settings.)NOTE: Some effect settings may cause unwanted distortion. If so, lower the CHVOLUME (1.9).HINT: If you want to turn modulation, delay, or reverb off individually, simply pressits TYPE button (2.3) until the corresponding effect type LED goes dark.9. If you want to use a pedal effect, use the PEDAL selector (2.2) to select thedesired effect.10. Make sure that the PEDAL TYPE button (2.3) is lit, and turn value knobs 1–3(2.5) to make adjustments.HINT: Since you’ll probably find it easier to adjust the pedal effect if modulation,delay, or reverb are not being applied to the sound, press and hold the TAP button(2.4) for at least one second to bypass those effects. When you’re finished adjustingthe pedal effect, press the TAP button once again to disable bypass.11. When you’ve got a sound you like, store it!NOTE: If you switch to a different program (or to manual mode) or turn off thepower without saving, your settings will be lost!HINT: If noise bothers you, you can minimize it by adjusting the noise reduction(p.19). Also, it’s a good idea to assign a name to your program so that you can findit later when you want! The name is saved as part of a program’s settings.18
ADJUSTING THE NOISE REDUCTION (UTILITY “NR SENS”)Here’s how you can minimize any noise that might be heard during intervals whenyou’re not playing.NOTE: When using high Gain settings on amp types such as RECTO or USHIGAIN, NR is highly recommended! Why? Because high gain = noise (hiss)! Justlike on the originals!NOTE: The noise reduction setting is saved as part of each program. If you switchto a different program or to manual mode, or turn off the power without storing, yoursettings will be lost.1. Press the UTILITY button (3.4) to make the button light.2. The name display (3.8) will show “NR SENS” (noise reduction sensitivity). Ifanything else is selected, press the 1/PREV button (3.3) to make the displayshow NR SENS.3. Use value knob 3 (2.5) or the ▲, ▼ buttons (3.2) to adjust the noise reductionsetting. The value display (3.10) shows the depth of noise reduction. As thevalue increases (0.2, 0.4, …, 10.0), the effect will become stronger. With a settingof “OFF” there will be no noise reduction.NOTE: Depending on the guitar you are using, raising the noise reduction settingtoo high may cause the decay of some notes to be cut off.4. Press the TUNER/CANCEL button (3.7). You will return to the mode you werein.IntroductionPanel TourSetupProgram/<strong>Manual</strong>Creatingand StoringNAMING A PROGRAM (UTILITY “Program Name”)Here’s how you can name a program.NOTE: The program name is saved as part of each program. If you switch to a differentprogram, to manual mode, or turn off the power without saving, your settingswill be lost.1. Press the UTILITY button (3.4) to make the button light.2. Press the 1/PREV or 2/NEXT buttons (3.3) to make the name display (3.8)show the program name. The display will change each time you press a button.3. Use the 3/√, 4/® buttons (3.3) to move the cursor to the character you want tochange (the selected character will blink), and use value knob 3 or the ▲, ▼buttons (3.2) to change the character. You can use the following characters.4. Repeat step 3 to finish entering a name for your program.5. When you have finished entering a name, press the TUNER/CANCEL button(3.7) to return to the mode you were in.19
STORING A PROGRAMWhen your tweaking has resulted in a sound you’re happy with, store it!1. Press the WRITE button (3.6).The name display (3.8) shows “✳WRITE✳,” and the bank display (3.1) andCHANNEL SELECT 1–4 buttons (3.3) will blink.2. Use value knob 3 (2.5) or the ▲, ▼ buttons (3.2) to select the bank you want touse, and use the CHANNEL SELECT 1–4 buttons (3.3) to select the channel.For example if you want to store your program in 13-1 (bank 13, channel 1),you would use value knob 3 or the ▲, ▼ buttons to make the bank display (3.1)show “13,” and then press CHANNEL SELECT button 1 to make the buttonblink.3. Press the WRITE button (3.6) again and you’re done!The display will indicate “COMPLETE.” Your program is now stored, and you’llbe back in Program Select Mode.NOTE: The program is written over the previous contents of that bank/channellocation; in other words, the program in the number you selected in step 2 will beerased.NOTE: If you decide not to store your new program, just hit the TUNER/CANCELbutton (3.7) to abort this operation.NOTE: If you’re tweaking your sound in Program Select Mode, your tweaks will belost if you switch to a different program (or to manual mode) or turn off the powerwithout storing.If you’re tweaking your sound in <strong>Manual</strong> Mode, and switch to a different program orturn off the power without storing, the settings you made in the effect section andUTILITY parameters (e.g., noise reduction) will remember the values you set last;the next time you enter <strong>Manual</strong> Mode, these settings will be recalled. The settingsof the amp section will reflect the current positions of the selectors and knobs.RESTORING A SETTING TO ITS ORIGINAL VALUE(Original Value)The Original Value icon in the value display (3.10) gives you a way to find out theparameter values that are stored in a program.When you are using a knob or button to change the value of a parameter, theORIG (Original Value) icon will appear when the value you are adjusting matchesthe “original value” stored in the program.HINT: So, you’re flipping through the programs on your new <strong>ToneLab</strong>, and youcome across one you really like. It’s easy to find out exactly what settings aredialed in to get such an awesome tone – just use this original value display feature!20
Explanations of the Amp andEffect TypesThis section explains the sixteen amp models, ten cabinet models, ten pedaleffects, and five modulation, three delay, and three reverb effects.A. AMP MODELSWhich amps did we painstakingly model for our seductive selection of 16? Believeme when I say it wasn’t easy ‘cos, as I’m sure you know, there’s a plethora of greatsounding amps out there. After countless hours of soul searching, earnest discussions(not to mention the occasional friendly argument!), calls to tone-wise friends(some professional players, some not...but all blessed with great ears) plus, ofcourse, listening and playing, a top 16 list was finally drawn up. As you’re about todiscover, the ones we went with are not only the cream of the crop but also offerup the widest possible array of the greatest guitar tones known to man - from pristineclean to outrageous overdrive and all points in-between. First though, somestuff you should know...Controlling FactorsAs already touched on in this manual, although the top panel of your <strong>ToneLab</strong>houses controls for GAIN, VR GAIN, TREBLE, MIDDLE, BASS, PRESENCEand CH VOLUME, not all of the amps we’ve modelled have as many controls.In such cases, rather than leave you with knobs that do nothing (what on earthwould be the point of that!?), we’ve made full use of all six (6) <strong>ToneLab</strong> controlswithout compromising the accuracy of any of our models. This means you’ll beable to mimic the full tonal spectrum of each and every one of the originalswe’ve modelled...and then some, thanks to the extra flexibility and additionalcontrol the six <strong>ToneLab</strong> controls give you.For example, if an original amp doesn’t have a complete 3 band EQ networkthen we’ll set up the “missing” tone controls on our model to be “neutral” (i.e.as the original) when set it at 12 o’clock - thus giving you extra tonal flexibility inthose EQ areas, if you so wish. Just so you know, the amps we modelled thatdon’t have individual controls for Treble, Middle and Bass are:AMPAC15AC15TBAC30AC30TBTWEED 1x12ORGINAL TONE CONTROLSTop Cut & Bass Cut SwitchTreble & BassTop Cut onlyTreble, Bass and CutJust one, called Tone!REVERB DELAY MODULATION PEDAL CABINET AMP TYPE Amp/EffectTYPEAlso, as you’d probably expect, we do the same exact thing with the <strong>ToneLab</strong>’sPRESENCE control too - namely, if one isn’t present (bad pun, not intended!)21
on the original then PRESENCE will be an added control on our model. Thistime though, the “neutral” position is when the control is all the way off (turnedfully counterclockwise). The two models this applies to are BLACK 2x12 andTWEED 1x12.IMPORTANT NOTE: As you’ll discover when you read their descriptions, in thecase of the AC15, AC15TB, AC30 and AC30TB models, we’ve utilized the PRES-ENCE control to mimic the TOP CUT control - whether it was present on the originalor not.About the Gain and Volume knobsYour <strong>ToneLab</strong> is equipped with 3 programmable Gain or Volume type controls– GAIN, VR GAIN and CHANNEL VOLUME. These controls do specific jobs,and how these are set up, with each different model, will make dramatic differencesto your sound. As some of you will know, most vintage amps only haveone VOLUME control to set up the sound, whilst more modern amps usuallyhave two types of level controls – GAIN (or sometimes PREAMP VOLUME)that controls the input level of the preamp section, and MASTER VOLUME thatcontrols how much signal is (and how loud it is going to be) passed from thepreamp to the power amp. With many vintage amps there is no MASTER VOL-UME, the preamp feeds directly into the power amp without any type of control.The <strong>ToneLab</strong>’s controls are designed to cover all these points:<strong>ToneLab</strong> GAIN: On vintage type models that do not have a master volume (i.e.,AC15, AC15TB, AC30, AC30TB, UK BLUES, UK 68P, BLACK 2x12, TWEED1x12, TWEED 4x10), the GAIN control works like the VOLUME of the originalamp. On other model amps that do have a master volume, the GAIN controlworks like GAIN or PREAMP VOLUME.<strong>ToneLab</strong> VR GAIN: MASTER VOLUME that controls how much preamp signallevel is passed to the power amp, which in our case is the VALVE REACTORstage. (Your <strong>ToneLab</strong> works like a real amp.)<strong>ToneLab</strong> CH VOLUME: For want of a better way of putting it, this is like apower attenuator that you would add between the output of your amp and theinput of your speaker cabinet. This controls the level of the final mix and allowsyou to balance all your programmed amp sounds to each other.As in how the original amps work, we have made the relationship betweenpreamp and power amp work in the same way. Therefore to obtain trulyauthentic tones please use the VR GAIN control in the same way, i.e. with VIN-TAGE type models that do not have Master Volume control’s, turn the VR GAINcontrol up to maximum. With modern Master type amp models, use the VRGAIN as you would the Master Volume on the original – at low settings you willhear more of a preamp type distortion, on higher settings you will hear thepreamp start to push the Valve Reactor to clip and add its own distortion andwarmth.Lastly, if an original amp features a unique switch or control we make sure thatwe cover it! Such things will be revealed in the model descriptions that followshortly...22
Tube TalkUs Brits call ‘em valves while our US cousins call ‘em tubes...as the sayinggoes: England and America are merely two countries divided by a commonlanguage! Anyway, call ‘em what you will, these wondrous glass bottles lie atthe tonal heart of each of our 16 models. As all the amps we’ve modelled hailfrom one of the two countries just mentioned, in honour of their heritage, thedescriptions of all English amps will employ the words “valve” and “valves,”while the American ones will be tubular!QUESTION: What’s the difference between an ECC83 preamp valve and a12AX7 preamp tube?ANSWER: Nothing! They’re the same exact thing – namely the most popularpreamp tube in ampland. ECC83 is the British name, 12AX7 (a.k.a.7025) is the American. See, I told you we were two countries divided by acommon language!Power Amp AccuracyWhat happens in the power stage of any good tube amp is of paramountimportance to the way the amp sounds, feels and behaves. The way the poweramp operates (Class A or Class AB), the power tubes used (EL84s, EL34s,6L6s, 6V6s), the exact nature of the negative feedback loop circuitry (if oneeven exists) and how the power stage interacts (a relationship called damping)with the speaker(s) it is driving - all these things play a vital role in the creationof tone. That is why we have fitted your <strong>ToneLab</strong> with our patented ValveReactor Technology – a modelling breakthrough that is unique to VOX andinfuses our critically acclaimed Valvetronix range of amps with life and feel.This revolutionary technology emulates a tube power-amp by using real tubesin a real tube amp circuit and ensures that all the important bases inherent in atube amp are faithfully and accurately covered. For example: if you chooseamp model AC30TB - an amp with a Class A power stage, EL84 output tubesand no negative feedback, that’s exactly what your Valve Reactor power ampreconfigures itself to be.This all said, let’s take a look at each of our amp models...1. AC15This is modelled on Channel 2 of an amazing sounding 1962 VOX AC15, which ispart of our vast amp collection. This 1x12", 15 Watt, valve driven, dual channelcombo was unleashed on the market in 1958 and was the first ever VOX amplifier.The reason for it being named the AC15 is simple: AC stands for Amplifier Combination,while 15 indicates the Wattage. Thanks to its compactness, power, built intremolo/vibrato effects (on Channel 1 only) and tremendous tone, this combo wasa huge hit with the popular British guitar bands of the time, including several charttopping acts, the majority of whom were only too happy to endorse <strong>Vox</strong>.One of the biggest reasons for the unique, signature tone of this amp is thefact that it employs EL84 output valves in a Class A circuit with no negative feedback.This is also true of the other three VOX amps, we’ve modelled - the AC15TB,REVERB DELAY MODULATION PEDAL CABINET AMP TYPE Amp/EffectTYPE23
AC30 and AC30TB. In a nutshell, the result of this design is more power and moredistortion - the latter of which gets thick with second and third order harmonics thatbecome more and more prevalent as the amp is cranked. Thanks to our uniqueValve Reactor Technology the power stage of your <strong>ToneLab</strong> is automaticallyswitched to its “EL84s in a Class A circuit with no feedback” emulation wheneverAC15, or any of the other three <strong>Vox</strong> models, is chosen.Like most amps of its era, the AC15 is the very essence of simplicity. Infact, the Channel we modelled, Channel 2 (remember!?), only has three controls -Volume, Brilliance (really a bass cut) and Top Cut. When you select AC15, the<strong>ToneLab</strong>’s GAIN control mimics the original’s Volume control, while the PRES-ENCE control acts as the Top Cut.* FYI, the AC15’s Top Cut control affects thehigh frequencies in a very different way than a “regular” Treble control. Deft use ofit will help you dial in the exact amount of that instantly recognizable, world-famousVOX “sparkle.” The BASS control acts as the Bass Cut (Originally labelled Brilliance)with total variability instead of the Original two position switch.As for what the “extra” TREBLE and MIDDLE controls on our AC15 modeldo: as already mentioned earlier, they’re exactly that - “extra!” Set them at 12o’clock and they’re “neutral” (i.e. they mimic the exact tone of the original) or tweakthem for extra tonal flexibility.*CONTROL NOTE: The original AC15’s Top Cut control works in the opposite wayyou’d expect - it “cuts” when you turn it up! You’ll be glad to read that our model ofthe Top Cut control (the PRESENCE knob) works in a much more logical fashion -turn it up for more “sparkle,” turn it down for less.Original’s valve compliment: 1 x EF86, 3 x ECC83s, 1 x ECC82 in thepreamp, 1 x EZ81 rectifier, 2 x EL84s in the power amp.2. AC15TBWhile the AC15 was born in the late ’50s, the AC15TB is a modern-day child of the’90s which combines the sweet “n” desirable tonal characteristics of the AC15’slow Wattage power stage, with the increased tonal flexibility that the Top Boost(TB) channel of an AC30 has to offer. Then, to sweeten the pot even further, a 12"Celestion “Blue” speaker (what else?), Reverb and a Master Volume control werethrown in too. The result is a highly flexible 15 Watt, all-valve, 1x12 combo thatsuccessfully marries the pureness of great vintage VOX tone with modern features.The original has two tone controls - Treble and Bass. So, as is the norm,the <strong>ToneLab</strong>’s TREBLE and BASS controls mimic their namesakes while the MID-DLE (“neutral” at 12 o’clock) and PRESENCE add further tonal flexibility...shouldyou want it. To ensure maximum “<strong>Vox</strong>iness,” we’ve made sure that the PRESENCEcontrol behaves exactly like the “Top Cut” on the original AC15 - except in reverse(“off” = cut) to make it more logical, just like on our AC15 model.In trademark VOX fashion, our AC15TBX model oozes clean tones that“jangle” and “chime,” while its overdrives are smooth yet pulsating with desirableharmonic overtones. Enjoy!Original’s valve compliment: 5 x ECC83s in the preamp, 1 x 5Y3GT rectifier,2 x EL84s in the power amp.24
3. AC30As already stated, the VOX AC15 was a huge hit with the British guitar bands ofthe late ’50s. However, as the popularity of the AC15 using bands grew, so didtheir need for a more powerful amp. Sure, the AC15 was loud for a 15 Watt amp -darned loud in fact - but it was no match for 1,000 + screaming fans! Rememberfolks, back in the late ’50s/early ’60s, guitar amps weren’t being fed through the PA- that was reserved purely for vocals, the band’s back-line had to do the rest.Clearly VOX needed to come up with a louder amp and the company was only toohappy to rise to the challenge...The fruit of VOX’s labour was unveiled to the world in 1959 - the 30 Watt,2x12, AC30. Several top British bands graduated up to the AC30 instantly and,within months, one of them had scored a number one single with a stirring guitarinstrumental. Not surprisingly, pretty much every other UK act worth its salt immediatelyfollowed suit and the AC30 became the amp behind the so-called “BeatBoom” of the time. More importantly, it also became the driving force behind thenow legendary “British Invasion” - the name given to the huge wave of successthat several English bands enjoyed in America during the ’60s. This charge wasled by a quartet hailing from Liverpool who quickly became VOX’s most famousambassadors ever.We’ve modelled the sterling sounds of the AC30’s Normal channel as theydefinitely encapsulate those classic tones that defined the aforementioned Britishinvasion. Just like its smaller brother, the AC15, the AC30’s Normal channelboasts the bare minimum of knobs - Volume and Top Cut (modelled by GAIN andPRESENCE* respectively).*CONTROL NOTE: Once again, our PRESENCE control models the “Top Cut” onthe original AC30 exactly - except in reverse (“off” = cut) to make it more logical,just like on our AC15 model.Original’s valve compliment: 4 x ECC83s, 1 x ECC82 in the preamp, 1 xGZ34 rectifier, 4 x EL84s in the power amp.4. AC30TBEven though the AC30 was a runaway success, several artists expressed a desirefor the amp to have more tonal flexibility and a pinch of extra gain too. VOX reactedquickly and came up with some clever extra tone circuitry that featured an additionalECC83 valve and was called “Top Boost.”* When “Top Boost” was added toan AC30 it increased the gain of the combo’s Brilliant channel, and added twoextra EQ controls, giving the amp three tone controls -Treble, Bass and Cut. To sayit was an instant hit with the guitar playing public would be a gross understatement!In fact, its gutsy tone became an instantly recognisable signature sound ofmany major groups in the mid ’60s.NERDY HISTORICAL NOTE: VOX initially called this their “Brilliance Unit” but itquickly became known as “Top Boost.” When Top Boost was first introduced it wasonly available as a retrofit assembly. Even though this modification was not particularlydifficult to add, it was beyond most folk (hey, I don’t know about you, but messingaround with electricity is hardly my idea of fun!). Consequently, in 1964, TopBoost was fitted to the AC30 as standard.REVERB DELAY MODULATION PEDAL CABINET AMP TYPE Amp/EffectTYPE25
Once again, the PRESENCE control of our model acts as the original’s Cut(but in reverse: “off” = cut) while the GAIN, TREBLE and BASS mimic the original’sVolume, Treble and Bass controls. The MIDDLE is an “extra” with 12 o’clock beingits “neutral” position.Our AC30TB model produces clean sounds that are rich and jangly with asmooth yet detailed top end, and overdrives that have a glorious, throaty bark -just like those classic, “Class A” tones that have made the original a “must have” inany serious player’s amp collection.Original’s valve compliment: 5 x ECC83s & 1 x ECC82 in the preamp, 1 xGZ34 rectifier, 4 x EL84s in the power amp.5. UK BLUESOur UK BLUES model is based on the “High Treble” channel of an extremely rare,hand-wired head made in jolly old England in the early ’60s. Although the TWEED4x10 circuit was used as a basic template for this amp, several fundamentalchanges (e.g. different tubes, different transformers, a higher output impedanceand vastly different speakers in a closed-back cab), give UK BLUES its ownunique and highly desirable character. Indeed, when cranked-up this 30 Watt babyproduces a crunch that forever changed the sound of rock “n” roll - which is why itis still highly revered to this very day.Original’s valve compliment: 3 x ECC83s in the preamp, 1 x GZ34 rectifier, 2x KT66s in the power amp.6. UK 68PThis is based on the “High Treble” channel of a 1968, 50 Watt, all-valve head,boasting a Plexiglas front panel and four (4) inputs. The no-nonsense originaldoesn’t feature a Master Volume control so the best and, arguably, only way to setit up is to max out the volume and let rip! And, that’s exactly what everyone did -and still does!This amp was chosen because the tone was incredibly rich and warm, instantclassic heaven! As this amp has no master volume facility, the only, and greatest,way of using it to its full potential was to wind the volume up to maximum. In reallife this was pretty darn loud. Fortunately the <strong>ToneLab</strong> gives you full control in thequiet of your own studio.To achieve the same response as the original, remember to turn the VR Gain controlto maximum. The <strong>ToneLab</strong> works EXACTLY like the original. This goes for allnon-master type amp models.So, wind the GAIN control all the way up and immerse yourself in aninstantly recognizable, organic overdrive that responds beautifully to the subtledynamics of your playing and dominates “classic rock.” Rolling back your guitar’svolume control results in a unique and highly useable clean sound.Original’s valve compliment: 3 x ECC83s in the preamp, 2 x EL34s in thepower amp.26
7. UK ’80SThis is modelled on a 1983, all tube, single channel 100 Watt head that boasts aMaster Volume control - a wonderful feature that allows the user to dial in a decentcrunch tone without having to max out the amp’s volume. Invariably played with it’s(preamp) Gain control cranked to the max, this amp was responsible for the fat,roaring sound that dominated ’80s hard rock and heavy metal. Yes sir, from spandexclad Europeans who rocked like hurricanes, to American speed freaks whorode the lightning and reigned in blood, UK ’80s was the only amp of choice...and,for many, still is!Although UK ’80s became famous for it’s distinctive, cranium-crushingcrunch, it isn’t merely a “one trick pony” and neither is our model - just like the original,when you roll back your guitar’s volume knob you’ll get a bright, clean soundthat’s perfect for chord work and will cut through any mix like a hot knife throughbutter.Original’s valve compliment: 3 x ECC83s in the preamp, 4 x EL34s in thepower amp.8. UK ’90SThis model is based on the “lead” channel of a 100 Watt, dual channel head that iscapable of so much preamp distortion it houses a Gain control that goes all theway up to a Nigel Tufnel approved “20, dunnit!” This amp replaced UK ’80s andwas developed to satisfy the ever-evolving rock guitarists’ insatiable lust for moregain, features and flexibility. Was this amp popular? Judging by the fact it quicklybecame the “industry standard” for the decade in question, the answer is aresounding “yes!”Original’s valve compliment: 4 x ECC83s in the preamp, 4 x EL34s in thepower amp.9. UK MODERN (UK MODRN)This is modelled on the High Gain channel of a modern, all-tube 100 Watter that iseffectively a hybrid of the UK ’80s and UK ’90s amps. It combines the toneful highgain preamp stage and modern features of UK ’90s with the unmistakable, “snarling”punch and girth the UK ’80s power stage had to offer. The result is a highlyaggressive, tone-breathing monster capable of mondo-gain while retaining individualnote definition. With the GAIN control on full, UK MODERN allows lead lines tosoar into soulful feedback, while its low-end “chunk” remains tight and punchy.Wimps beware!Original’s valve compliment: 4 x ECC83s in the preamp, 4 x EL34s in thepower amp.REVERB DELAY MODULATION PEDAL CABINET AMP TYPE Amp/EffectTYPE27
10. RECTOThis bad boy is based on the “Modern High Gain” channel of a brutal, 100 Watt,armour-plated beast hailing from California. Its deep, dark, loose low-end, somewhat “fizzy” top and Monster-like gain has made this all-tuber a mainstay for manymodern, metal acts who either tune their guitars down as low as they can possiblygo, or wield 7-string axes.At low GAIN settings, RECTO produces a distinctive, bright clean soundbolstered by some rich, upper harmonics that add fullness and dimension. Thissaid, RECTO is definitely not recommended for Country “n” Western picking. But,if you play slamming, “nu-metal” that’s tuned lower than whale droppings, thenRECTO could well be the only way to go!Original’s tube compliment: 5 x 12AX7s in the preamp, 2 x 5U4G rectifiertubes, 4 x 6L6s in the power amp.11. US HIGAIN (US HI-G)This is modelled on the Overdrive Channel of an all-tube, 100 Watt head built in1991 and covered in snakeskin! This high gain, power house was designed by aguy who also builds and drives Hot Rod cars so it should come as no surprise thatthe originals controls all go to eleven - after all, “that’s one louder innit!” (© NigelTufnel!)US HIGAIN is capable of a powerful, heavily saturated sound that combinesan open low-end with compressed mids and highs. The result is a tone thatremains focused and well defined at even the most extreme gain settings. Theseattributes have made this head a favourite with several of the world’s leading players,and its versatility make it ideal for a wide variety of purposes and styles.Original’s tube compliment: 4 x 12AX7s in the preamp, 4 x 6L6s in thepower amp.12. BOUTIQUE OD (BTQ OD)For this one we modelled the Overdrive channel of a very rare, very expensive andvery respected 100 Watt head named the Overdrive Special. This custom-order,hand-wired beauty has a spectacular overdriven sound that’s perfect for sax-like,legato soloing. With its GAIN control wide-open, BOUTIQUE OD produces a stunningsustain which is very smooth and very soulful - can you say “woman tone!?”Original’s tube compliment: 3 x 12AX7s in the preamp, 4 x EL34s in thepower amp.13. BOUTIQUE CL (BTQ CL)For this amp type, we modelled the Clean channel of another very expensive,hand-wired, custom amp made by the same boutique builder as BOUTIQUE OD.We auditioned several top-shelf boutique amps for this model but this amp was theclear winner. Even though its garish, fuzzy red covering wasn’t to everyone’s taste,it’s beautiful clean sound was! Its beautifully rounded low-end, delightfully transientmid-range attack and sweet treble make it the perfect partner for single-coil pick-28
ups. It is also incredibly responsive and extremely sensitive to picking styles andpickup selection. And, as an added bonus, strummed chords just ring out andblossom.Original’s tube compliment: 3 x 12AX7s in the preamp, 4 x 6L6s in thepower amp.14. BLACK 2X12 (BLK 2X12)The dual channel, blackfaced beauty we modelled here is considered a “musthave”2x12 combo for country and blues players, and rightfully so - after all, its celebratedclean sound is very tight “n” twangy, with a deep, taut, piano-like bass.Pristine clean tones aside, BLACK 2x12 is also capable of producing thatclassic Chicago blues tone - especially with single coil pickups. In keeping with theoriginal, when pushed hard the bass on our model tends to crumble. So, to emulatethis classic, BLACK 2x12 overdrive, here’s what you dial in on your <strong>ToneLab</strong>:full GAIN and VR GAIN, not much BASS, full MIDDLE and set TREBLE to taste.Because the EQ network of BLACK 2x12 lies before the main gain stage of itspreamp y’see, pushing the mids in this way emphasizes the distortion in that frequencyrange and the result is a lovely, singing blues tone.As already mentioned elsewhere, the original amp doesn’t have a Presencecontrol but does have a Bright Switch. The PRESENCE control on your<strong>ToneLab</strong> emulates this switch when “off” and “on,” plus all points in-between!Original’s tube compliment: 4 x 12AX7s & 2 x 12AT7 (a.k.a. ECC81) in thepreamp, 4 x 6L6s in the power amp.TONAL HINT: BLACK 2x12 is the perfect partner for ACOUSTIC (Acoustic GuitarSimulator) in the Pedal section.15. TWEED 1X12 (TWD 1X12)The original we modelled here was born in Fullerton, California, in 1958, and cladin “tweed” - hence its name! Just like the AC15, this 18 Watt, 1x12, all-tube combois the very essence of simplicity. Aside from the obligatory Volume knob, it onlyhoused one other knob - a single Tone control creatively named (wait for it!) Tone!This Tone control is merely a treble cut and boost, and its behaviour can be mimickedby using the Valvetronix’s TREBLE, MIDDLE and BASS EQ network as follows:Original Tone control turned all the way down (off) = BASS on full; TREBLEand MIDDLE at 9 o’clock (PRESENCE “off”).Original Tone control turned up “full” (on 10) = TREBLE on full; MIDDLEand BASS at 9 o’clock (PRESENCE “off”).NOTE: As the original doesn’t have a Presence control, PRESENCE is “neutral”when “off,” but can be used to add “extra” sparkle and cut to the model if you sowish.In keeping with the original, the TWEED 1x12 produces an open, relatively uncolouredsound when clean, but starts to “snarl” beautifully when pushed into overdrive.Its highly desirable “snarl” is rich with harmonic content and cranking thisREVERB DELAY MODULATION PEDAL CABINET AMP TYPE Amp/EffectTYPE29
puppy up will produce those classic, old rockabilly and rock “n” roll sounds of the’50s and ’60s, at the drop of a 10 gallon hat - especially when a single coil pickupis used.Original’s tube compliment: 1 x 12AY7, 1 x 12AX7s in the preamp, 1 x5Y3GT rectifier, 2 x 6V6s in the power amp.16. TWEED 4X10 (TWD 4X10)The 4x10 combo we modelled here was built in 1959 and originally intended forbass guitar. This said, six-stringers were quick to embrace its smooth-yet-cuttingoverdrive which is perfect for R&B (rhythm “n” blues) guitar. TWEED 4x10 is alsovery sensitive and responsive to both picking strength and the volume setting onyour guitar. This means that by backing-off your axe’s volume when the amp iscranked, you can produce a beautifully clean and full tone. It also means thatdynamic picking control allows you to make notes or chords more distorted orclean than others, depending on how hard or how soft you pick ‘em.Another cool tonal quirk of TWEED 4x10 is the classic, vintage tube ampsag its GZ34 rectifier tube adds to your notes whenever the amp is driven reallyhard. “What is sag?” Do I hear you ask? Well, crank the Gain and VR GAIN controlson this model, dig in hard with your pick and you’ll soon find out! Can youhear how the note literally “sags” when you first hit it and then it opens up? That’ssag, geddit?TONAL NOTE: Just like on the original, the Middle and Treble control of TWEED4x10 are highly interactive and high settings of the Middle control automatically addtreble to your sound. As a result, you may want to turn down the Treble control as acounter measure. Conversely, low Middle settings reduce treble so you might wantto crank the Treble a little more in such instances.Original’s tube compliment: 1 x 12AY7, 2 x 12AX7s in the preamp, 1x GZ34rectifier, 2 x 5881s in the power amp.30
B. CABINET MODELSNow let’s look at the CABINET models:CABINET AND SPEAKER ACCURACYThere’s not much point in having incredibly accurate amp models if thespeaker cabinet models on offer aren’t of the same exacting standards. As youmay know, in real life, the output stage of a tube amp works in close harmonywith the varying impedance curve of the speaker(s) it is driving. This intimateand vital relationship plays a major role in producing the warm, punchy soundand pleasing feel that we all know and love. In a nutshell, modelling a speakercabinet is not just a case of frequency response, but is a combination of frequencyresponse, transient response (how a speaker reacts to the strength ofhow a note is played), and the all-important interaction of the amps output tothe speaker’s impedance curve. In addition, other vitally important factors thathave to be taken into account when modelling a cabinet are the actual physicaldimensions of the enclosure (cabinet), the unique tonality of said enclosure(which will be affected by both the type and thickness of the wood it is made of)and whether it boasts an open, semi-open or closed-back design. Special circuitryand unique modelling technology ensures that all of these factors arewell taken care of in the cabinet models built into your <strong>ToneLab</strong>.1. TWEED 1X12 (TWD 1X12)This speaker is the other half of our Tweed 1x12 Amp model. As the name suggestsit is a single 12" speaker, uses an Alnico magnet and made in the USA byone of the US’s revered names in vintage loudspeakers.2. TWEED 4X10 (TWD 4X10)Keeping with the US made Alnico magnet speakers, this cabinet partnered ourTWEED 4x10 modelled amp. It is an open backed cab using four 10" 8 Ohmspeakers, wired in parallel for a total of 2 Ohms impedance. Although originallyintended for bass guitar, this speaker rocks for many different styles.3. BLACK 2X10 (BLK 2X10)Although we did not model the amp that goes exactly with this cabinet, we lovedthe tone of this mid-60s Fullerton, California made open backed 2x10" ceramicmagnet (of US origin) 35 Watt combo. So here it is. Great for blues, jazz and country.As with all cabinet models it can be mixed and matched with any amp model toproduce some interesting tonal combinations. But for some recommended uses,please see the following charts.REVERB DELAY MODULATION PEDAL CABINET AMP TYPE Amp/EffectTYPE4. BLACK 2X12 (BLK 2X12)As you’ve probably guessed by now, this speaker system accompanied the ampthat was modelled for the BLACK 2x12 amp. Featuring two 12" Ceramic magnetspeakers, again made in USA in the mid ’60s. They are 8 Ohm units wired in parallelfor a 4 Ohm total load. These speakers have been featured on countless31
ecordings of many styles of music, but very predominantly Country and Bluesbased Rock.5. VOX AC15 (AC15)This is a 1x12" open backed combo using the famed VOX Blue Alnico speaker,manufactured by Celestion in Ipswich, England. The one we used was a modernre-issue that was housed in the VOX AC15TB combo. This speaker, which is 8Ohms impedance, 15 Watts power handling, is amazingly full-bodied for a 1x12open back cab, and, of course, helps bring the famous VOX chime to the forefront.6. VOX AC30 (AC30)Obviously, double the power – double the speakers. 2x12" VOX Blue Alnicos,wired in series for 16 Ohms, adds even more of that great VOX tone. This time wemodelled some great sounding originals from way back in the ’60s. As speakersget old their tone changes, so this configuration adds a different slant on howthese speakers sound.7. VOX AD412 (AD412)This cabinet is one of VOX’s latest products, and due to the fact we are extremelyproud of it, and that it is without a doubt an exceedingly great sounding cabinet,we just had to include it with our cabinet models. The cabinet itself features customdesigned Celestion speakers using Neodymium magnets, one of the first, ifnot the first, cabinet to use this technology. It also uses some special cabinetacoustic design technology that is also a first for VOX and 4x12s in general. Use itas a valid tonal option with any model, but especially the amp head models. Wethink you will like it!8. UK H30 4X12 (UK H30)This is an older, heavy-duty cabinet (with 30 Watt speakers, from the late ’60s)made by the same famous UK amp company as the UK T75 4x12. Many of thesecabinets have been used on countless classic rock recordings throughout thepast. Now you can get that great tone direct to tape.9. UK T75 4X12 (UK T75)This 4x12" model is of a famous, UK built, black box loaded with modern, 75 WattBritish speakers. Normally seen stacked, this is probably the biggest selling guitarcabinet ever and is eminently suitable for most rock styles. How could we notmodel it?!10. US V30 4X12 (US V30)This black beast of a cabinet hails from the same home in California as ourRECTO amp. It uses four UK made “Vintage” named speakers.It is renowned for its deep bass and high-end detail and is extremely popularamongst today’s “nu-metal” exponents. We think you know what we mean!32
11. OFFOK, this not a cabinet. The OFF position turns off the cabinet modelling area of the<strong>ToneLab</strong>, and allows the direct amp models to be sent directly to the outputs.When would you use this? When you are connecting directly to a guitar system(guitar amp input or power amp/speaker cab system).WHAT GOES WITH WHAT?Basically, with your <strong>ToneLab</strong> you can mix any amp model to any cabinetmodel, and create many varied tones. But to give you a starting point, here is alisting of historically correct matches:AMP MODELTWEED 1x12TWEED 4x10BLACK 2X12AC15AC15TBAC30AC30TBUK BLUESUK 68PUK 80’sUK 90’sUK MODERNUS HiGAINRECTOBOUTIQUE ODBOUTIQUE CLNHISTORICALLY CORRECT CABINET MODELTWEED 1x12TWEED 4x10BLACK 2x12VOX AC15VOX AC15VOX AC30VOX AC30UK H30UK H30UK T75UK T75UK T75 or US V30US V30 or UK T75US V30UK H30 is a good choiceUK H30 is a good choicePlease Note! The VOX AD412 is so new that there is no historical connection withany of the modelled amps (yet! as of March 2003).SOME RECOMMENDATIONSAs some of the manufacturers of the original amps that we modelled also usedsimilar amps with different speaker configurations to make other models, socan you with your <strong>ToneLab</strong> to approximate these other amps. For instance:Amp Model Cabinet Model Equivalent ModelBLACK 2x12 BLACK 2x10 Blackface Vibrolux type comboBLACK 2x12 TWEED 4x10 Blackface Super type comboTWEED 1x12 BLACK 2x10 Tweed SuperUK BLUES VOX AC30 Early BluesBreaker type comboVOX AC15 VOX AC30 VOX AC15 SupertwinREVERB DELAY MODULATION PEDAL CABINET AMP TYPE Amp/EffectTYPEPlease note that these amps will be approximations only as original power ratings,output transformers and speaker manufacturer and types, might havebeen different in the original products.33
Due to the flexibility of your <strong>ToneLab</strong>, mixing and matching all of the amp andcabinet models can be done with the turn of a switch, without any risk of blowingthe speakers up. Something that cannot be done in real life (unfortunately!).This capability can lead to some very interesting combinations, someuseful, perhaps some not, but only you can decide what is useful to you, asyour tone requirements are unique. Please feel free to explore all combinationsof amps and cabinets. That is the beauty of <strong>ToneLab</strong>.NOTE: Product names appearing in this manual are trademarks of their respectiveowners, which are not associated or affiliated with VOX in any way. Names anddescriptions of these products are provided only for the purpose of identifying specificproducts that were studied by VOX in the course of developing this product.C. PEDAL EFFECTSThe pedal effects are placed in front of the amp.PEDAL DRIVE: knob 1 TONE: knob 2 LEVEL: knob 3COMP “SENS” 1.0...10.0 “ATTACK” 1.0...10.0 “LEVEL” 0.0...10.0ACOUSTIC “BASS” 0.0...10.0 “BODY” 1.0...10.0 “TREBLE” 0.0...10.0VOX WAH “CLOSE” 1.0...10.0 “PEDAL” 0.0...10.0 “OPEN” 1.0...10.0AUTO WAH “SENS” 0.0...10.0 “ATTACK” 1.0...10.0 “POLARITY” uP, dnU-VIBE “SPEED” 1.00...10.00 “MIX” 0.0...10.0 “DEPTH” 0.0...10.0OCTAVE “1OCTAVE” 0.0...10.0 “DIRECT” 0.0...10.0 “2OCTAVE” 0.0...10.0TREBLE BOOST “DRIVE” 1.0...10.0 “TONE” 1.0...10.0 “LEVEL” 0.0...10.0TUBE OD “DRIVE” 1.0...10.0 “TONE” 1.0...10.0 “LEVEL” 0.0...10.0FAT OD “DRIVE” 1.0...10.0 “TONE” 1.0...10.0 “LEVEL” 0.0...10.0FUZZ “DRIVE” 1.0...10.0 “TONE” 1.0...10.0 “LEVEL” 0.0...10.01. OFFSelect this when you don’t want to use a PEDAL effect.2. COMPGotta play a clean passage that needs to be nice, smooth and even? Need a hairmore sustain on a lead line? Then, look no further; COMP is the pedal for you.Modelled on a compressor pedal that is hugely popular due to the percussiveclean sound it can produce - making it perfect for ’80s and ’90s pop and funkrhythm work. It can also add a singing, mellow sustain to lead lines - clean or dirty.[1] “SENS” 1.0...10.0 Adjusts the sensitivity of the compressor (i.e. when its“smoothing” effect kicks in). The amount of compression/sustainwill increase the more you turn this controlup.[2] “ATTACK” 1.0...10.0 Adjusts the strength of the attack.[3] “LEVEL” 0.0...10.0 Adjusts the output level.34
3. ACOUSTICWanna go “unplugged” without the hassle of switching guitars and amps? Enterthe acoustic guitar simulator - a clever effect that magically converts an electricguitar’s sound into that of an acoustic. It works best with a single coil (read: lowoutput) pickup in the neck position, especially when paired with the BLACK 2x12amp model.[1] “BASS” 0.0...10.0 Adjusts the bass.[2] “BODY” 1.0...10.0 Adjusts the body resonance. You’ll need to adjust theBASS along with this parameter to keep a balance.[3] “TREBLE” 0.0...10.0 Adjusts the treble.4. VOX WAHThis effect is modelled on the legendary VOX Wah pedal, the V847. Thanks to itsunique “throaty” tone, the V847 is the only Wah pedal many professionals will considerstepping on. When used wisely, this pedal can either make your guitar crylike a baby or howl like a man possessed![1] “CLOSE” 1.0...10.0 Adjusts the tone when the wah pedal is closed.[2] “PEDAL” 0.0...10.0 Mimics the “sweep” of the wah pedal — from open toclosed.[3] “OPEN” 1.0...10.0 Adjusts the tone when the wah pedal is open.USEFUL TONE HINT: A great tonal trick that’s employed by many guitarists,including some who are household names, is to find a “sweet spot” within the rangeof their Wah pedal and then leave it there. This is often called stuck-Wah (imaginethat!) and, when used tastefully, can be very effective as it produces a very distinctivesound that will cut through any mix. You can dial in a stuck-Wah “sweet spot”with your TONE control in a heartbeat. Try it, it’s cool...STEP ON IT! Yet another reason to buy the optional foot controller! Yep, you’veguessed it — you can use the pedal of the foot controller to control VOX WAH.5. AUTO WAHThe lazy man’s Wah pedal! Only kidding...this quirky but useful effect allows you tocreate an automatic “Wah” effect that varies with your picking dynamics (i.e. howhard or soft you hit the strings).[1] “SENS” 0.0...10.0 Adjusts the sensitivity of the effect.[2] “ATTACK” 1.0...10.0 Adjusts the Auto Wah’s response speed.[3] “POLARITY” uP(UP), dn(DOWN) Sets the direction in which the auto wahwill operate.REVERB DELAY MODULATION PEDAL CABINET AMP TYPE Amp/EffectTYPE35
6. U-VIBEModelled on the famous Univox Uni-Vibe - a phase/vibrato effect that wasdesigned to simulate a rotating speaker and produces a wonderfully seductive and“watery” tone. Interestingly enough, the guy responsible for this great pedal is alsoresponsible for the birth of the remarkable Valve Reactor Technology used in thepower amp of your <strong>ToneLab</strong>.[1] “SPEED” 1.00...10.00 [Hz] Adjusts the speed of the Uni-Vibe effect.[2] “MIX” 0.0...10.0 Adjusts the mixture of direct sound and vibrato.[3] “DEPTH” 0.0...10.0 Adjusts the depth of the Uni-Vibe effect.STEP ON IT! With the pedal of the optional foot selector (you’ve bought one bynow, right!?) you can control the speed of the vibrato.7. OCTAVEThis effect generates a note one octave lower than the one you’re playing, addingthickness and “weight” to single note lines.[1] “1OCTAVE” 0.0...10.0 Adjusts the mix level of the note one octave below.[2] “DIRECT” 0.0...10.0 Adjusts the level of the original note.[3] “2OCTAVE” 0.0...10.0 Adjusts the mix level of the note two octaves below.WARNING! Like all pedals of this type, OCTAVE only works with singlenotes...chords confuse the heck out of it! NOT a fault - that’s just the way thesepedals are...deal with it, dude!8. TREBLE BOOST (TREB BST)This pedal effect is modelled after a treble booster that was designed with the VOXAC30 specifically in mind. It is a great way of adding “teeth” to an overdrivensound.9. TUBE ODThis model is based on an overdrive pedal that’s housed in a garish, “seasickgreen” box and is considered an all-time classic due to the wonderfully warmtones it produces.10. FAT ODBased on a pedal named after one of the most disliked rodents to ever walk theplanet! The result is a smooth distortion rich in harmonics...nasty but nice.11. FUZZRetro, rude “n” raw...get the picture!? The name says it all.[1] “DRIVE” 1.0...10.0 Adjusts the amount of distortion (boost).[2] “TONE” 1.0...10.0 Adjusts the tone.[3] “LEVEL” 0.0...10.0 Adjusts the output level.36
D. MOD (Modulation) EFFECTSThis section enables you to add a modulation effect after the cabinet. You canchoose one of the five types of modulation effects. Here you can also assign externalcontrol over the SPEED control.(EX): This indicates a parameter that you can control from the expression pedalof the optional foot controller.(*): This indicates a parameter that you can set when using the Sound Editor.These parameters cannot be edited when using <strong>ToneLab</strong> alone.MOD SPEED: knob 1 MIX: knob 2 DEPTH: knob 3CHORUS “SPEED” 0.100...10.00 “MIX” 0.0...10.0 “DEPTH” 0.0...10.0FLANGER “SPEED” 0.100...10.00 “RESO” 0.0...10.0 “DEPTH” 0.0...10.0PHASER “SPEED” 0.100...10.00 “RESO” 0.0...10.0 “DEPTH” 0.0...10.0TREMOLO “SPEED” 1.00...10.00 “SPREAD” 0.0...10.0 “DEPTH” 0.0...10.0ROTARY “SPEED” 0.80...10.00 “TIME” 1.0...10.0 “DEPTH” 0.0...10.01. OFFSelect this if you don’t want to use a MOD effect.2. CHORUSThis models the rich sound of a standard analog chorus unit — in full stereo![1] “SPEED” 0.100...10.00 [Hz](EX) Adjusts the modulation speed.[2] “MIX” 0.0...10.0 Adjusts the mix amount of the effect sound.[3] “DEPTH” 0.0...10.0 Adjusts the modulation depth.(*) MANUAL 1.0...10.0 Adjusts the center frequency of the sweep.3. FLANGERA model of a truly classic analogue Flanger that “unchained” a highly influentialmodern guitarist who many hail as the “godfather of two handed tapping.”[1] “SPEED” 0.100...10.00 [Hz] Adjusts the modulation speed.[2] “RESO(RESONANCE)” 0.0...10.0 Adjusts the amount of resonance.[3] “DEPTH” 0.0...10.0 Adjusts the modulation depth.(*) MANUAL 1.0...10.0 (EX) Adjusts the center frequency of the sweep.When using the foot controller to control this, it is effective to set DEPTH to 0.If DEPTH is set to 10, MANUAL will not function — just like on the originalflanger.(*) MIX 0.0...10.0 Adjusts the mix amount of the effect sound.REVERB DELAY MODULATION PEDAL CABINET AMP TYPE Amp/EffectTYPE37
4. PHASERA model of a much respected and popular analogue phaser, housed in a bananayellow box![1] “SPEED” 0.100...10.00 [Hz](EX) Adjusts the modulation speed.[2] “RESO(RESONANCE)” 0.0...10.0 Adjusts the amount of resonance.[3] “DEPTH” 0.0...10.0 Adjusts the modulation depth.(*) MANUAL 1.0...10.0 Adjusts the center frequency of thesweep.5. TREMOLOThis effect is based on the highly acclaimed tremolo circuit found in a BLACK2x12.The SPREAD setting lets you create panning effects that are spread to leftand right.[1] “SPEED” 1.00...10.00 [Hz](EX) Adjusts the tremolo speed.[2] “SPREAD”0.0...10.0 Adjusts the left/right spaciousness.[3] “DEPTH” 0.0...10.0 Adjusts the tremolo depth.6. ROTARYThis models a stereo rotary speaker.When you adjust the SPEED control of the ROTARY effect (either via thefront panel or the optional foot controller) the effect takes awhile to reach the specifiedspeed - just like a real rotating speaker. Why? Because, in the real world, ittakes a second or two for the motor controlling the speaker rotation to speed up orslow down! (You can use TIME to adjust the length of this transition.)[1] “SPEED” 0.80...10.00 [Hz](EX) Adjusts the rotational speed of the speaker.[2] “TIME” 1.0...10.0 Adjusts the time required for the rotationalspeed to change.[3] “DEPTH” 0.0...10.0 Adjusts the modulation depth.E. DELAY EFFECTSHere you can make settings for a delay effect inserted after the cabinet. You canchoose one of three (3) distinctly different delay effects. In all three cases, themaximum delay time possible is two seconds.(EX): This indicates a parameter that you can control from the expression pedalof the optional foot controller.(*): This indicates a parameter that you can set when using the Sound Editor.These parameters cannot be edited when using <strong>ToneLab</strong> alone.DELAY FINE: knob 1 MIX: knob 2 FEEDBACK: knob 3DELAY/TAPE ECHO/MULTI HEAD “TIME” 0...2000 [ms] “MIX” 0.0...10 “FEEDBACK” 0.0...1038
1. OFFSelect this if you don’t want to use the delay effect.2. DELAYWhen this high quality digital delay effect is employed, the tone of each repeat isso good it is indistinguishable from the original note(s).3. TAPE ECHO (T ECHO)This is an incredibly accurate model of one of the most respected analogue tapeecho machines ever made. In the original the “echo” is produced by a playbackhead and the exact “delay time” is set by varying the motor speed. Many professionalsprefer these “lo-fi” units because of the warm, dark echoes they produce.4. MULTI HEAD (MULTI HD)This is a model of a tape echo unit boasting three playback heads. Here we usetwo out of the three for a classic sound. Furthermore, each of the two resulting“echoes” (one from each head) has its own feedback loop. The result? A complexand warm “multi-tap” echo effect.[1] “TIME” 0...2000 Makes a fine adjustment in a range of –64...+63[ms]relative to the current delay time.[2] “MIX” 0.0...10.0 Adjusts the mix amount of the delayed sound.[3] “FEEDBACK” 0.0...10.0 Adjusts the amount of feedback.WARNING! WARNING! If you crank up the FEEDBACK knob too much, an uncontrollable,cascading “runaway” of echoes will occur. So, use your ears and yourcommon sense when setting this!TAP 0...2000 Sets the delay time. Press the TAP button twice at thedesired interval.(*) TONE 1.0...10.0 (TAPE ECHO/MULTI HEAD) Adjusts the tone of thedelay.(*) MODE 1, 2, 3, 4, 5 (MULTI HEAD) Specifies the combination of headsthat will be used.1: Conventional echo.2: The delayed sound produces a rhythm of “ta-ta-ta (rest).”3: The delayed sound produces a rhythm of “ta (rest) ta-ta.”4: The delayed sound produces a rhythm of “ta-ta (rest) ta.”5: The delayed sound produces a rhythm of “ta-ta-ta-ta.”INPUT LEVEL: (EX) This is the input level of the delay controlled by theoptional foot controller.REVERB DELAY MODULATION PEDAL CABINET AMP TYPE Amp/EffectTYPE39
F. REVERB EFFECTSHere you can make settings for the reverb effect that is played after the cabinet.You can choose one of three types of reverb.(EX):This indicates a parameter that you can control from the expression pedalof the optional foot controller.REVERB LO DAMP: knob 1 MIX: knob 2 HI DAMP: knob 3SPRING/ROOM/PLATE “LO DAMP” 0.0...10.0 “MIX” 0.0...10.0 “HI DAMP” 0.0...10.01. OFFSelect this if you don’t want to use the reverb effect.2. SPRINGA model of the most popular spring reverb system used in guitar amps.3. ROOMEmulates the natural reverberation that takes place in a medium sized room/smallhall.4. PLATEAn unerringly accurate model of the plate reverb used in countless, professionalrecording studios.[1] “LO DAMP” 0.0...10.0 Adjusts the dampening of the low-frequency range.[2] “MIX” 0.0...10.0 Adjusts the mix amount of the reverb sound.[3] “HI DAMP” 0.0...10.0 Adjusts the dampening of the high-frequency range.INPUT LEVEL (EX) This is the input level of the reverb controlled by theoptional foot controller.40
TunerFor your convenience, <strong>ToneLab</strong> houses a built-in auto chromatic tuner thatcan be calibrated between 438 Hz and 445 Hz.TUNING PROCEDURE1. Simply press the TUNER button (3.7) and the auto chromatic tuner will be activated.2. When you play a note on your guitar, the nearest pitch and a tuning meter willappear in the name display (3.8).Note name#MeterPitch is flatPitch is sharp!Correct tuningThe note names are displayed as follows.C C# D D# E F F# G G# A A# BTuner3. Watch the meter, and tune your guitar.4. When you’re finished tuning, press the TUNER button once again to return tothe mode you were in.STEP ON IT! If the optional foot controller is connected, you can use it to activatethe tuner. In this case you’ll be able to tune with the output muted (Silent TuningMode). If you’re using silent tuning mode, defeating the tuner function will simultaneouslydefeat muting, and your sound will once again be heard. <strong>ToneLab</strong>’s tunerfunction will be defeated when you press any button other than the TAP button, oroperate the PEDAL selector.FootControllerMIDI/DIGITALFactorysettingsCALIBRATING THE TUNERThe built-in tuner is automatically calibrated to A = 440 Hz (a.k.a. “concert pitch”)every time you switch <strong>ToneLab</strong> on. If desired, you can recalibrate the tuner in therange of A = 438Hz to A = 445Hz. Here ís how you do it:• While the Tuner is active, the value display (3.10) shows the frequency of thereference pitch. Use value knob 3 (2.5) to set the desired frequency.IMPORTANT NOTE: When you turn on the amp’s power, the tuner automaticallycalibrates itself to A = 440Hz. So, if you’ve recalibrated the tuner please rememberthat your recalibration will be “lost” as soon as you switch the amp off.TroubleshootingSpec.ProgramList41
Using the Optional FootControllerThe optional VOX Valvetronix foot controller lets you control the followingfunctions.• Select programs using foot switches• Control the volume using the volume pedal• Control effect parameters using the expression pedal• Turn individual effects on/off using foot switches• Activate the tuner from a foot switch• Set the delay time using a foot switch (Tap)NOTE: For details on connecting and using the foot controller, refer to the owner’smanual for your foot controller.NOTE: When using the foot controller to switch programs, you are limited to fouradjacent banks, as follows.<strong>ToneLab</strong> VC-41-1–4-4 1-1–4-4 ← From the VC-4 you can select within the range enclosed5-1–8-4 1.-1–4.-4 by each frame (16 programs)9-1–12-4 1-1–4-413-1–16-4 1.-1–4.-417-1–20-4 1-1–4-421-1–24-4 1.-1–4.-4HINT: You can operate the foot controller to simultaneously control another MIDIdevice. For details, refer to “Control via MIDI” (p.45).EXPRESSION PEDAL SETTINGS(UTILITY “EXP ***” — “EXP INIT”)In order to use the expression pedal of the optional foot controller to control<strong>ToneLab</strong>, you need to make settings in <strong>ToneLab</strong> to specify which effect will be controlled,and how it will be controlled. You can make the following settings.“EXP ***” Expression target (the effect that will be controlled)“EXP MIN” Expression target range (minimum value)“EXP MAX” Expression target range (maximum value)“EXP INIT” Expression pedal control value initialization settingNOTE: When you change the setting of “EXP INIT,” the new setting is stored automatically.Settings other than “EXP INIT” are made individually for each program.These settings will be lost if you switch to another program or switch to <strong>Manual</strong>Mode without saving.42
1. Press the UTILITY button (3.4) to make the button light.2. Press the 1/PREV or 2/NEXT button (3.3) to make the name display (3.8) read“EXP ***”. The parameter will change each time you press a button.3. Use value knob 3 (2.5) or the ▲, ▼ buttons (3.2) to specify the target.“EXP ***” selects the expression target (i.e., the effect that will be controlled).The parameter that will be controlled will depend on the effect you select.Expression targetTypeParameter that iscontrolled“EXP ---” Control nothing ------ ------“EXP PDL” PEDAL effectVOX WAH“PEDAL” parameter of VOXWAHU-VIBE“SPEED” parameter of U-VIBE“EXP MOD” MODULATION effectOther than FLANGER “SPEED” parameterFLANGER“MANUAL” parameter“EXP DLY” DELAY effect All types Input level to DELAY effect“EXP REV” REVERB effect All typesInput level to REVERBeffectHINT: If you set the PEDAL effect type to “VOX WAH” or “U-VIBE,” the expressiontarget will automatically be set to “EXP PDL.” In this case if you set the PEDALeffect back to another type without performing any other operation, the target settingwill also automatically return to its previous setting.NOTE: If the target effect is OFF, nothing will be controlled. In the case of thePEDAL effect, nothing will be controlled except for “VOX WAH” or “U-VIBE.”4. To set the minimum (MIN) value for the foot controller, press the 2/NEXT button(3.3) to make the name display (3.8) show “EXP MIN.”5. Use value knob 3 (2.5) or the ▲, ▼ buttons (3.2) to specify the minimum valueof the target range.This determines the range in which the target parameter will vary when youoperate the expression pedal. “EXP MIN” sets the lower limit, and “EXP MAX”sets the upper limit.When you operate the expression pedal, the target parameter will changewithin the range that you specify here.6. To set the maximum (MAX) value for the foot controller, set “EXP MAX” asdescribed in steps 4 and 5.7. To set the initialization (INIT) value for the foot controller, press the 2/NEXTbutton (3.3) to make the name display (3.8) show “EXP INIT.”TunerFootControllerMIDI/DIGITALFactorysettingsTroubleshootingSpec.ProgramList43
8. Use value knob 3 (2.5) or the ▲, ▼ buttons (3.2) to specify how the expressionpedal control value will be initialized.“EXP INIT” specifies whether the control data (pedal position) of the expressionpedal will be maintained when you switch programs.If this is “OFF,” the parameter selected as the expression target will immediatelychange to the current position of the pedal at the moment you switch programs.If this is “On,” and you switch programs, the newly-selected program will soundjust as it did when it was saved (i.e., the control data will be initialized).NOTE: The “EXP INIT” setting is not saved for individual programs; it applies to allof the programs.NOTE: Even if this is “OFF,” the target parameter will not change if the expressionpedal has not been operated even once since the power was turned on.9. Press the TUNER/CANCEL button (3.7) to return to the mode you were in.44
Control via MIDIMIDI stands for Musical Instrument Digital Interface, and is a world-widestandard for exchanging various types of musical data between electronicmusical instruments and computers. When MIDI cables are used to connecttwo or more MIDI devices, performance data can be exchanged between thedevices, even if they were made by different manufacturers.<strong>ToneLab</strong> can use MIDI to communicate in the following ways with anotherMIDI device. You can:• Operate <strong>ToneLab</strong> or a connected optional foot controller to switch programs onan external MIDI device, or switch <strong>ToneLab</strong> programs from an external MIDIdevice. →“Program change”• Operate a connected optional foot controller to control an external MIDI device,or use an external MIDI device to control <strong>ToneLab</strong>’s volume or effects.→“Parameter change”• Use Sound Editor to edit parameters. →“Parameter change”• Backup (save) and restore (load) <strong>ToneLab</strong> program data. →“Backing up andrestoring program data”NOTE: In order to do the above things, you need to use a MIDI cable to connect<strong>ToneLab</strong> and your external MIDI device, and set the MIDI channels appropriately.→“Connecting a MIDI device or computer,” “Setting the MIDI channel”NOTE: When you change the settings described in this section, they will be savedautomatically. When you have finished making settings, simply press the TUNER/CANCEL button (3.7) to return to the mode you were in.NOTE: If your external MIDI device does not recognize certain types of MIDI message,those messages cannot be used for control. Check the “MIDI implementationchart” of <strong>ToneLab</strong> and of your external MIDI device.CONNECTING A MIDI DEVICE OR COMPUTERIf you want to use a connected foot controller to control an external MIDI devicefrom <strong>ToneLab</strong>, connect a MIDI cable from <strong>ToneLab</strong>’s MIDI OUT jack to the MIDI INjack of your external MIDI device.If you want to control <strong>ToneLab</strong> from a MIDI sequencer or other external MIDIdevice, connect a MIDI cable from your external MIDI device’s MIDI OUT jack to<strong>ToneLab</strong>’s MIDI IN jack.When you connect <strong>ToneLab</strong> with a MIDI sequencer or sound editor, data will normallybe sent in both directions, so you will need to connect MIDI cables from<strong>ToneLab</strong>’s MIDI OUT jack to the external MIDI device’s MIDI IN jack, and from theexternal MIDI device’s MIDI OUT jack to <strong>ToneLab</strong>’s MIDI IN jack.TunerFootControllerMIDI/DIGITALFactorysettingsTroubleshootingSpec.ProgramList45
MIDI interfaceMIDI OUTTo a MIDI sequencer/computerMIDI INMIDI OUTMIDI INDedicated foot controller<strong>ToneLab</strong>NOTE: You will need a MIDI interface in order to connect your computer with<strong>ToneLab</strong>.Some USB-MIDI interface devices may not be able to transmit/receive the<strong>ToneLab</strong>’s MIDI exclusive messages.SETTING THE MIDI CHANNEL (GLOBAL “MIDI CH”)In order to exchange data with an external MIDI device, <strong>ToneLab</strong>’s MIDI channelmust match the MIDI channel of your external MIDI device. Here’s how to set theMIDI channel.1. Press the GLOBAL button (3.5) to make the button light.2. The name display (3.8) will show “MIDI CH.” If a different parameter isselected, press the 1/PREV or 2/NEXT button (3.3) to change the display.3. Use the value knob 3 (2.5) or the ▲, ▼ buttons (3.2) to set <strong>ToneLab</strong>’s MIDIchannel.4. Set the MIDI channel of your connected external MIDI device.For details on how to set the MIDI channel of your external MIDI device, referto its owner’s manual.PROGRAM CHANGE (GLOBAL “PCHG OUT”)When you switch programs on <strong>ToneLab</strong> or on a connected foot controller, a programchange message is transmitted from the MIDI OUT jack, causing an externalMIDI device to switch programs. Similarly, when <strong>ToneLab</strong> receives a programchange message, its program will switch automatically. Here’s how you can specifywhether a program change message will be transmitted from the MIDI OUTjack when you switch programs on <strong>ToneLab</strong> or on a connected foot controller.NOTE: Program change numbers not used by <strong>ToneLab</strong> will be ignored. For detailson the range of program change numbers used by <strong>ToneLab</strong>, refer to “MIDI ImplementationChart” (p.54).NOTE: When <strong>ToneLab</strong> is in <strong>Manual</strong> Mode, it will ignore program change messages;programs will not be switched. In Program Select Mode, program changesare always received.1. Press the GLOBAL button (3.5) to make the button light.46
2. Press the 1/PREV or 2/NEXT button (3.3) to make the name display (3.8)show “PCHG OUT.”3. Specify whether program change messages will be transmitted. Use valueknob 3 (2.5) or the ▲, ▼ buttons (3.2) to make the desired setting.“OFF”: Program change messages will not be transmitted.“On”: Program change messages will be transmitted.CONTROL CHANGE (GLOBAL “CCHG I/O”)When you operate the EXPRESSION pedal, VOLUME pedal, or TAP switch of anoptional foot controller connected to <strong>ToneLab</strong>, control change messages will betransmitted. This means that functions for the corresponding control change numberson an external MIDI device can be controlled in realtime.Similarly, when <strong>ToneLab</strong> receives control change messages from an external MIDIdevice, it will be controlled in the same way as if its own foot controller were operated.For a list of the functions that can be controlled from an external MIDI device, referto step 4.Here you can specify whether <strong>ToneLab</strong> will transmit and receive control changemessages.1. Press the GLOBAL button (3.5) to make the button light.2. Press the 1/PREV or 2/NEXT button (3.3) to make the name display (3.8) read“CCHG I/O.”3. Specify whether all control change messages will be transmitted or received.Use value knob 3 (2.5) or the ▲, ▼ buttons (3.2) to make your choice.“On” allows transmitting and receiving. “OFF” disables transmitting and receiving.NOTE: If this setting is “OFF,” no control change messages will be transmitted orreceived even if you specify individual control change numbers in step 4.4. Use the 3/√ or 4/® buttons to select the controller for which you want to transmitor receive settings. The controllers will be selected in the following order.“EXP PDL”: EXPRESSION pedal control“VOL PDL”: VOLUME pedal control“TAP SW”: TAP switch on/off“PEDAL FX”: PEDAL effect on/off“MOD FX”: MODULATION effect on/off“DELAY FX”: DELAY effect on/off“REVRB FX”: REVERB effect on/off5. For each controller, specify whether <strong>ToneLab</strong> will transmit and receive controlchange messages. If you want <strong>ToneLab</strong> to transmit and receive messages fora controller, specify the control change number. Select a controller, and usevalue knob 3 (2.5) or the ▲, ▼ buttons (3.2) to make the desired setting.“OFF”: Control change messages will not be transmitted or received.TunerFootControllerMIDI/DIGITALFactorysettingsTroubleshootingSpec.ProgramList47
“CC00”–“CC95”: When you operate a controller, messages of the specifiedcontrol change number 00–95 will be transmitted. Similarly, <strong>ToneLab</strong> will becontrolled when it receives messages of the same control change numberfrom an external MIDI device.PARAMETER CHANGE (GLOBAL “SYEX OUT”)When you operate <strong>ToneLab</strong>’s knobs or buttons to edit the value of a parameter,system exclusive such as parameter changes are transmitted.If you want <strong>ToneLab</strong>’s parameters to be transmitted to an external device, turn the“SYEX OUT” setting “On.” Normally, you will turn “SYEX OUT” on when using theSound Editor.This setting specifies whether <strong>ToneLab</strong> will transmit parameter changes.1. Press the GLOBAL button (3.5) to make the button light.2. Press the 1/PREV or 2/NEXT button (3.3) to make the name display (3.8) read“SYEX OUT.”3. Specify whether parameter change messages will be transmitted. Use valueknob 3 (2.5) or the ▲, ▼ buttons (3.2) to make your choice.“OFF”: Parameter change messages will not be transmitted.“On”: Parameter change messages will be transmitted.NOTE: When <strong>ToneLab</strong> receives parameter changes or other system exclusivemessages, its parameters, modes, or program numbers will change — regardlessof the “SYEX OUT” setting.BACKING UP AND RESTORING PROGRAM DATA (GLOBAL“DUMP CUR,” DUMP ALL”)All of <strong>ToneLab</strong>’s data (including its programs) can be transmitted and received inthe form of system exclusive messages. Exchanging this type of data with anexternal device via system exclusive messages is known as a “data dump.” By performinga data dump, <strong>ToneLab</strong> programs you created can be backed up (saved)on an external device such as a MIDI data filer or a sequencer that is able to transmitand receive system exclusive messages. Then when necessary, you can retransmitthat data back to <strong>ToneLab</strong> to restore it. This provides a way for you toorganize large numbers of programs. You can also use this method to copy programdata between two connected <strong>ToneLab</strong>s.You can transfer program data in one of two ways; one program at a time, or allprograms at once. When you transmit all programs at once, all of <strong>ToneLab</strong>’s datawill also be transmitted, including <strong>Manual</strong> Mode settings and MIDI settings.NOTE: You can transmit data dumps regardless of the “SYEX OUT” setting. In fact,if you want to transfer program data between two <strong>ToneLab</strong>s, we recommend thatyou turn the “SYEX OUT” setting “OFF.” If “SYEX OUT” is “On,” operating the knobsor other controls may change the parameters of the other <strong>ToneLab</strong> in unintendedways.48
BACKING UP1. Connect <strong>ToneLab</strong>’s MIDI OUT to the MIDI IN of the device that will receive thedata dump.2. If you want to transmit only one program, use Program Select Mode to selectthe program you want to transmit. If you want to transmit the <strong>Manual</strong> Mode settings,select <strong>Manual</strong> Mode.3. Press the GLOBAL button (3.5) to make the button light.4. Press the 1/PREV or 2/NEXT switch (3.3) to make the name display (3.8) read“DUMP CUR” or “DUMP ALL.”“DUMP CUR” (Dump current program data): The data of the currently selectedprogram will be dumped. If you are editing the program (and have not yetsaved it), the current settings will be transmitted.“DUMP ALL” (Dump all data): All of the <strong>ToneLab</strong>’s data will be dumped.5. Put the receiving device in a state in which it can record the data dump.NOTE: For details, refer to the owner’s manual of the device that will receive thedata dump.6. Press <strong>ToneLab</strong>’s WRITE/ENTER button (3.6) to begin transmission. Whentransmission is completed, the display will indicate “COMPLETE,” and you willreturn to the screen of step 4. (While “DUMP ALL” is being transmitted, the displaywill indicate “SEND.”)NOTE: While data is being transmitted, do not touch the buttons or knobs of<strong>ToneLab</strong> or its foot controller, and never turn off the power.RESTORING1. Connect the transmitting device’s MIDI OUT to <strong>ToneLab</strong>’s MIDI IN.2. Set the transmitting MIDI device and <strong>ToneLab</strong> to the same MIDI channel. If<strong>ToneLab</strong> will be receiving data that was previously transmitted to the externalMIDI device, select the same MIDI channel as was used when transmitting.3. Transmit the data dump from the external device.While <strong>ToneLab</strong> is receiving all data, its display will indicate “RECEIVE.” Whenreception has been successfully completed, it will indicate “COMPLETE.” If anerror occurs, the display will indicate “ERROR”; in this case, try transmitting thedata again.NOTE: For details, refer to the owner’s manual of the device that will be transmittingthe data dump.NOTE: While data is being received, do not touch the buttons or knobs of <strong>ToneLab</strong>or its foot controller, and never turn off the power.4. If <strong>ToneLab</strong> received data for just one program in Program Select Mode, selectthe store-destination bank and channel, and store the program. (p.20)NOTE: The program data will not be written into <strong>ToneLab</strong>’s program memoryunless you store it.If you received data in <strong>Manual</strong> Mode, settings other than for the amp section will beoverwritten automatically, so you don’t need to store the settings yourself. (SinceTunerFootControllerMIDI/DIGITALFactorysettingsTroubleshootingSpec.ProgramList49
the settings of the amp section are determined by the physical positions of theselectors and controllers, they will not change.)HINT: If <strong>ToneLab</strong> received all data, all data other than the amp section settings of<strong>Manual</strong> Mode will be overwritten automatically. However if the data was received inProgram Select Mode, the data being edited (i.e., the edit buffer) will not bechanged.Adjusting the Digital OutputLevel (GLOBAL “DOUT LVL”)Here’s how to adjust the output volume of the DIGITAL OUT jack.1. Press the GLOBAL button (3.5) to make the button light.2. Press the 1/PREV or 2/NEXT button (3.3) to make the name display (3.8) read“DOUT LVL.”3. Adjust the digital output level from the DIGITAL OUT jack in a range of “–12”–“12” (dB). “0” is the normal level. Use value knob 3 (2.5) or the ▲, ▼ buttons(3.2) to make the desired setting.NOTE: If you raise the level above “0” (dB), the digital output may distort for someprograms.NOTE: The setting you change here is remembered automatically. When you havefinished making the setting, press the TUNER/CANCEL button (3.7) to return to themode you were in.50
Restoring the Factory PresetProgramsHere’s how you can restore <strong>ToneLab</strong>’s programs and all its other settings tothe state in which it was shipped from the factory.NOTE: This operation will permanently erase all the programs you’ve written ortweaked yourself. MIDI settings and settings you made in <strong>Manual</strong> Mode will also beerased. If there are any settings you want to keep, use Data Dump to back themup, or use a copy of the “Program Sheet” foldout at the end of this manual to makea note of your settings.1. While holding down the three buttons ▲, ▼ (3.2), and TUNER/CANCEL (3.7),press the STANDBY button to turn on the power.The bank display (3.1) “P” and the CHANNEL SELECT 1–4 buttons (3.3) willblink, and the name display (3.8) will ask “RELOAD?” Release the three buttonsyou were holding down.2. If at this point you decide that you really don’t want to execute this operation,you can press the TUNER/CANCEL button.3. Press the WRITE/ENTER button (3.6). The name display (3.8) will show“LOADING,” and the factory-set data will begin being reloaded.When reloading has been completed, the name display will indicate “COM-PLETE,” and <strong>ToneLab</strong> will automatically switch to Program Select Mode.NOTE: Never turn off the power while this reload operation is occurring.TunerFootControllerProgramListSpec.TroubleshootingFactorysettingsMIDI/DIGITAL51
TroubleshootingIf you suspect a malfunction, please check the following points first. If this doesnot resolve the problem, contact a nearby dealer.1. The amp isn’t powering up when the STANDBY switch is“on”• Is the AC/AC power supply connected to the rear panel ~AC9V jack?• Is the AC/AC power supply plugged into an AC outlet?• Is the STANDBY switched on?• Could the AC/AC power supply be damaged?2. There’s no sound• Is your guitar turned up?• Are both ends of your guitar cable plugged into the correct jacks?• Is your guitar cable working?• Could the rear panel OUTPUT LEVEL knob be turned down?• Using the ORIGINAL VALUE LED, check the settings of the GAIN, TREBLE,MIDDLE, BASS, VR VOLUME and CH VOLUME (on certain AMP TYPES, if theEQ controls are all turned down, there will be little or no sound coming from theamp due to the way the circuit of the original works). And, if a PEDAL is beingused, check the DRIVE and LEVEL settings.• Are you in MANUAL MODE? If yes, turn the following controls above their minimumsetting: PEDAL DRIVE & PEDAL LEVEL [3], GAIN, TREBLE, MIDDLE,BASS, VR GAIN & CH VOLUME.• Could you have activated Mute on a connected foot controller? Defeat the Mutefunction.3. There’s no sound from the OUTPUT or PHONES jacks whenyou use them.• Check that the LEVEL knob that adjusts their output isn’t turned all the waydown.4. No signal (or a distorted signal) is heard from the DIGITALOUT jack.• Could the GLOBAL “DOUT LVL” be set to a low or excessively high value?52
5. You can’t hear any MODULATION, DELAY or REVERB effectseven though they’re dialed in...• Are the effect LEDs lit?If an LED is dark, the corresponding effect is off. Press the TYPE button toselect an effect type.• Could the modulation “DEPTH” or the delay/reverb “MIX” be set to a low value?Press the TYPE button to select an effect and use the value knobs to adjust theappropriate parameters.• Could the effect be bypassed? Is the effect type LED blinking?If so, press the TAP button to cancel bypass. The effect type LED will stop blinkingand remain lit.6. You’re using the ACOUSTIC pedal effect and getting nastyhigh frequency distortion.• Could the Drive setting be excessively high?• Are you using a very high output humbucking pickup?Either turn down the volume of your guitar, or turn down the GAIN setting.7. The sound connected to your guitar amp is distorted, orsounds wrong.• Could the AMP/LINE switch be set to “LINE”?• Could LEVEL be raised excessively?ProgramListTunerFootControllerSpec.TroubleshootingFactorysettingsMIDI/DIGITAL53
MIDI Implementation Chart[VOX Valvetronix]Date : 2002. 12.20<strong>ToneLab</strong>MIDI Implementation ChartFunction Transmitted Recognized RemarksBasicChannelDefaultChangedMemorizedMode MemorizedMessagesAlteredNoteNumber: True VoiceVelocity Note OnNote OffAftertouchPolyphonic (Key)Monophonic (Channel)Pitch BendControlChange0–95Effect Control54
ProgramChange Variable RangeSystem ExclusiveSystemCommonSong PositionSong SelectTuneParameter ControlProgram Data DampSystemReal TimeClockCommandAuxMessagesLocal On/OffAll Notes OffActive SenseResetNotes*P: Transmitted if GLOBAL “PCHG OUT” is On.*C: Transmitted and received according to the setting of each controller if GLOBAL “CCHG I/O” is On.*E: Transmitted if GLOBAL “SYEX OUT” is On. (Responses to Request messages are always transmitted regardless of the “SYEX OUT” setting.)*1: In addition to messages specifically for this device, Device Inquiry is also supported.Mode 1: OMNI ON, POLY Mode 2: OMNI ON, MONO : YesMode 3: OMNI OFF, POLY Mode 4: OMNI OFF, MONO : NoConsult your local Korg distributor for more information on MIDI IMPLEMENTATION.ProgramListSpec.TroubleshootingFactorysettingsMIDI/DIGITALFootControllerTuner55
SpecificationsNUMBER OF AMP TYPES: 16NUMBER OF CABINET TYPES: 10NUMBER OF EFFECTSPEDAL TYPES: 10MODULATION TYPES: 5DELAY TYPES: 3REVERB TYPES: 3NOISE REDUCTION: 1NUMBER OF PROGRAMS: 96 (24 BANKS x 4 CHANNELS)AUDIO INPUTSINPUT x 1AUDIO OUTPUTSOUTPUT x 2 (balanced/unbalanced TRS)DIGITAL OUT x 1 (S/P DIF format: IEC60958, EIAJ CP-1201)PHONES x 1AMP/LINE switch, LEVEL knob (adjusts OUTPUT and PHONES)VALVE12AX7 (ECC83) x 1SIGNAL PROCESSINGA/D conversion: 20bitD/A conversion: 20bitSampling frequency: 44.1KHzTUNERTUNING RANGE: A0–C7 (27.5Hz–2093Hz)TUNER CALIBRATION: A = 438Hz–445HzOTHERVOX BUS x 1, MIDI IN x 1, MIDI OUT x 1, ~AC9V x 1, STANDBY switchPOWER CONSUMPTION: 18 WDIMENSIONS (W x D x H): 319 x 213 x 79 (mm)/ 12.56 x 8.39 x 3.11 (inches)WEIGHT: 2.5 Kg / 5.51 lbs.INCLUDED ITEMS: AC/AC power supply 9VAC 3.0AOPTIONS: VOX Valvetronix foot controller* Appearance and specifications of this product are subject to change withoutnotice.56
Program list1-1 BLIZZARDAMP CABINET TREBLE MIDDLE BASS PRESENCE GAIN VR GAIN CH VOLUMEUK MODERN UK H30 4x12 4.8 6.4 5 3.7 7.9 5 3.4PEDAL DRIVE TONE LEVEL MOD SPEED MIX DEPTH NROFF — — — CHORUS 0.27 3.3 1.3 7.6DELAY TIME MIX FEEDBACK REVERB LO DAMP MIX HI DAMPTAPE ECHO 440 4 4 ROOM 3 4.4 3.41-2 HYSTERIAAMP CABINET TREBLE MIDDLE BASS PRESENCE GAIN VR GAIN CH VOLUMEBLACK 2X12 BLACK 2X12 3.3 3.3 2.5 2 2.6 10 4PEDAL SENS ATTACK LEVEL MOD SPEED RESO DEPTH NRCOMP 1 4.4 6.4 FLANGER 0.12 0 7.5 2.4DELAY TIME MIX FEEDBACK REVERB LO DAMP MIX HI DAMPTAPE ECHO 501 3.3 2.9 ROOM 2.4 3.2 2.71-3 BIZKITAMP CABINET TREBLE MIDDLE BASS PRESENCE GAIN VR GAIN CH VOLUMERECT US V30 4X12 6.2 1 3.2 6.3 7.4 6.4 3.5PEDAL DRIVE TONE LEVEL MOD SPEED MIX DEPTH NROFF — — — OFF — — — 7.4DELAY TIME MIX FEEDBACK REVERB LO DAMP MIX HI DAMPOFF — — — SPRING 2.7 2.4 2.61-4 MAYTONEAMP CABINET TREBLE MIDDLE BASS PRESENCE GAIN VR GAIN CH VOLUMEAC30 VOX AC30 4.7 4.9 4.4 5.3 10 10 2PEDAL DRIVE TONE LEVEL MOD SPEED MIX DEPTH NRTREBLE BOOST 6.7 7.6 6.5 CHORUS 0.2 4.8 1.4 3.8DELAY TIME MIX FEEDBACK REVERB LO DAMP MIX HI DAMPOFF — — — OFF — — —2-1 CLN-EDGEAMP CABINET TREBLE MIDDLE BASS PRESENCE GAIN VR GAIN CH VOLUMEAC30 VOX AC30 7.1 5.2 4.6 4.8 2.1 10 7.7PEDAL SENS ATTACK LEVEL MOD SPEED MIX DEPTH NRCOMP 1.5 6.4 4.9 CHORUS 0.24 6.4 1.3 4DELAY TIME MIX FEEDBACK REVERB LO DAMP MIX HI DAMPMULTI HEAD 540 3.1 2.6 PLATE 1.6 1.2 22-2 AC15TREMAMP CABINET TREBLE MIDDLE BASS PRESENCE GAIN VR GAIN CH VOLUMEAC15 VOX AC15 6.3 3.3 6.6 10 4.2 10 4.8PEDAL DRIVE TONE LEVEL MOD SPEED SPREAD DEPTH NRTREBLE BOOST 4.4 10 10 TREMOLO 3.6 0 3.3 2.6DELAY TIME MIX FEEDBACK REVERB LO DAMP MIX HI DAMPOFF — — — SPRING 2.8 2.8 2.72-3 BEETLEAMP CABINET TREBLE MIDDLE BASS PRESENCE GAIN VR GAIN CH VOLUMEAC30TB VOX AC30 4.5 3.5 3.5 4.8 4.7 10 3PEDAL DRIVE TONE LEVEL MOD SPEED MIX DEPTH NROFF — — — OFF — — — 3.4DELAY TIME MIX FEEDBACK REVERB LO DAMP MIX HI DAMPTAPE ECHO 164 3.6 0 OFF — — —2-4 QUEEN FLAMP CABINET TREBLE MIDDLE BASS PRESENCE GAIN VR GAIN CH VOLUMEAC30 VOX AC30 4.8 4.7 7.9 4.5 6.1 10 2.2PEDAL DRIVE TONE LEVEL MOD SPEED RESO DEPTH NRTREBLE BOOST 5.9 9.2 8.1 FLANGER 0.115 0 7.4 2.6DELAY TIME MIX FEEDBACK REVERB LO DAMP MIX HI DAMPOFF — — — ROOM 2.5 5 4.4TunerFootControllerMIDI/DIGITALFactorysettingsTroubleshootingSpec.ProgramList57
3-1 THRASHAMP CABINET TREBLE MIDDLE BASS PRESENCE GAIN VR GAIN CH VOLUMEUK MODERN UK T75 4X12 5.6 0 10 3.6 9.3 4.4 5.5PEDAL DRIVE TONE LEVEL MOD SPEED MIX DEPTH NROFF — — — OFF — — — 8DELAY TIME MIX FEEDBACK REVERB LO DAMP MIX HI DAMPOFF — — — OFF — — —3-2 ANGUSAMP CABINET TREBLE MIDDLE BASS PRESENCE GAIN VR GAIN CH VOLUMEUK BLUES UK H30 4X12 3.6 6.7 7.9 3.6 10 10 1.4PEDAL DRIVE TONE LEVEL MOD SPEED MIX DEPTH NROFF — — — OFF — — — 3.4DELAY TIME MIX FEEDBACK REVERB LO DAMP MIX HI DAMPOFF — — — ROOM 6 1.5 7.13-3 VIABLEAMP CABINET TREBLE MIDDLE BASS PRESENCE GAIN VR GAIN CH VOLUMEUK ’90S UK T75 4X12 2.6 7.2 8.1 3.1 7.6 5 3.5PEDAL SENS ATTACK POLARITY MOD SPEED MIX DEPTH NRAUTO WAH 5 5 UP OFF — — — 3DELAY TIME MIX FEEDBACK REVERB LO DAMP MIX HI DAMPTAPE ECHO 527 3.7 2.7 SPRING 2.4 2.5 2.33-4 PRIESTAMP CABINET TREBLE MIDDLE BASS PRESENCE GAIN VR GAIN CH VOLUMEUK ’80S UK T75 4X12 4 5.3 10 2.8 10 10 2.2PEDAL DRIVE TONE LEVEL MOD SPEED MIX DEPTH NROFF — — — OFF — — — 5DELAY TIME MIX FEEDBACK REVERB LO DAMP MIX HI DAMPOFF — — — ROOM 2.9 2.8 2.74-1 NASHVILLAMP CABINET TREBLE MIDDLE BASS PRESENCE GAIN VR GAIN CH VOLUMETWEED 1X12 TWEED 1X12 3.7 2.6 5 4.3 3.3 10 6.1PEDAL SENS ATTACK LEVEL MOD SPEED MIX DEPTH NRCOMP 2 4.4 4 OFF — — — 3DELAY TIME MIX FEEDBACK REVERB LO DAMP MIX HI DAMPDELAY 160 4.8 0 PLATE 0.8 2.6 04-2 JIMIROTOAMP CABINET TREBLE MIDDLE BASS PRESENCE GAIN VR GAIN CH VOLUMEBLACK 2X12 BLACK 2X12 3.3 3.7 6.2 2.6 3.1 10 3.8PEDAL SPEED MIX DEPTH MOD SPEED MIX DEPTH NRU-VIBE 1 5 8.9 OFF — — — 3DELAY TIME MIX FEEDBACK REVERB LO DAMP MIX HI DAMPOFF — — — SPRING 4 1.5 1.24-3 X-FIREAMP CABINET TREBLE MIDDLE BASS PRESENCE GAIN VR GAIN CH VOLUMETWEED 4X10 TWEED 4X10 1.8 8.8 6.1 6.5 3.7 10 2.2PEDAL DRIVE TONE LEVEL MOD SPEED MIX DEPTH NRTUBE OD 6.7 5.8 8.6 OFF — — — 4DELAY TIME MIX FEEDBACK REVERB LO DAMP MIX HI DAMPTAPE ECHO 340 2.2 0 SPRING 4 2.2 2.14-4 CLN-TREMAMP CABINET TREBLE MIDDLE BASS PRESENCE GAIN VR GAIN CH VOLUMEBLACK 2X12 BLACK 2X10 4.4 4.4 4.4 1.3 3.7 10 6PEDAL DRIVE TONE LEVEL MOD SPEED SPREAD DEPTH NRCOMP 1.1 6.8 3.2 TREMOLO 4.2 0 3.2 4DELAY TIME MIX FEEDBACK REVERB LO DAMP MIX HI DAMPOFF — — — SPRING 5.6 2 3.458
5-1 DIRTAMP CABINET TREBLE MIDDLE BASS PRESENCE GAIN VR GAIN CH VOLUMERECTO US V30 4X12 5.3 5.6 5.2 3.4 7.7 4.7 4.4PEDAL DRIVE TONE LEVEL MOD SPEED MIX DEPTH NROFF — — — OFF — — — 6.4DELAY TIME MIX FEEDBACK REVERB LO DAMP MIX HI DAMPOFF — — — OFF — — —5-2 MR.CLEANAMP CABINET TREBLE MIDDLE BASS PRESENCE GAIN VR GAIN CH VOLUMEBOUTIQUE CL VOX AD412 4.5 2.9 7.6 3.1 3.4 10 2.7PEDAL DRIVE TONE LEVEL MOD SPEED MIX DEPTH NROFF — — — CHORUS 0.23 6.4 6.1 3DELAY TIME MIX FEEDBACK REVERB LO DAMP MIX HI DAMPOFF — — — SPRING 2 1.4 1.85-3 UNCHAINAMP CABINET TREBLE MIDDLE BASS PRESENCE GAIN VR GAIN CH VOLUMEUS HIGAIN UK T75 4X12 2.6 7.9 8.8 1.5 4.2 5.7 2.6PEDAL DRIVE TONE LEVEL MOD SPEED RESO DEPTH NRTUBE OD 6.1 8.1 4.8 FLANGER 0.145 0.6 7.1 8DELAY TIME MIX FEEDBACK REVERB LO DAMP MIX HI DAMPTAPE ECHO 250 4.4 2.8 ROOM 2.1 3.1 1.85-4 SLASHEDAMP CABINET TREBLE MIDDLE BASS PRESENCE GAIN VR GAIN CH VOLUMEBOUTIQUE OD UK H30 4X12 3.8 3.9 9.7 2.8 7.4 10 2.2PEDAL DRIVE TONE LEVEL MOD SPEED MIX DEPTH NRTUBE OD 7.8 5.2 4.7 OFF — — — 7DELAY TIME MIX FEEDBACK REVERB LO DAMP MIX HI DAMPTAPE ECHO 334 4.4 4.8 ROOM 4 2.5 5.26-1 SKYNYRDAMP CABINET TREBLE MIDDLE BASS PRESENCE GAIN VR GAIN CH VOLUMETWEED 1X12 TWEED 1X12 4.8 5.3 7.6 2.9 2.9 10 7.8PEDAL SENS ATTACK LEVEL MOD SPEED RESO DEPTH NRCOMP 1.3 4.4 3.9 PHASER 0.23 0 7.1 4DELAY TIME MIX FEEDBACK REVERB LO DAMP MIX HI DAMPOFF — — — SPRING 7.4 1.9 36-2 ZEPAMP CABINET TREBLE MIDDLE BASS PRESENCE GAIN VR GAIN CH VOLUMEUK68P UK H30 4X12 8.8 0.6 2.1 8.6 10 10 1.8PEDAL DRIVE TONE LEVEL MOD SPEED MIX DEPTH NROFF — — — OFF — — — 7DELAY TIME MIX FEEDBACK REVERB LO DAMP MIX HI DAMPOFF — — — ROOM 6.4 4 5.76-3 VULGARAMP CABINET TREBLE MIDDLE BASS PRESENCE GAIN VR GAIN CH VOLUMEUS HIGAIN VOX AD412 2.4 6.4 8.9 4.5 10 5.2 3.3PEDAL DRIVE TONE LEVEL MOD SPEED MIX DEPTH NRTREBLE BOOST 3.9 9.2 7.1 CHORUS 0.48 3.6 1.8 7.6DELAY TIME MIX FEEDBACK REVERB LO DAMP MIX HI DAMPOFF — — — OFF — — —6-4 BLUESAMP CABINET TREBLE MIDDLE BASS PRESENCE GAIN VR GAIN CH VOLUMEBOUTIQUE OD UK T75 4X12 4.6 4.5 6.3 2.6 3 8.1 3.3PEDAL DRIVE TONE LEVEL MOD SPEED MIX DEPTH NROFF — — — CHORUS 0.27 4.2 3.8 6.6DELAY TIME MIX FEEDBACK REVERB LO DAMP MIX HI DAMPOFF — — — PLATE 2.5 1.9 1.8TunerFootControllerMIDI/DIGITALFactorysettingsTroubleshootingSpec.ProgramList59
7-1 TASTY-FLAMP CABINET TREBLE MIDDLE BASS PRESENCE GAIN VR GAIN CH VOLUMETWEED 4X10 TWEED 4X10 3.7 9.7 8.4 1.8 2.2 10 7PEDAL DRIVE TONE LEVEL MOD SPEED RESO DEPTH NRCOMP 1.9 1 3.9 FLANGER 0.19 1.7 7.4 3DELAY TIME MIX FEEDBACK REVERB LO DAMP MIX HI DAMPOFF — — — PLATE 2.5 2.1 1.87-2 EC BADGEAMP CABINET TREBLE MIDDLE BASS PRESENCE GAIN VR GAIN CH VOLUMEUK 68P UK H30 4X12 2.8 1.8 6.7 1.7 2.3 10 5.3PEDAL DRIVE TONE LEVEL MOD SPEED TIME DEPTH NROFF — — — ROTARY 0.8 5 5 3DELAY TIME MIX FEEDBACK REVERB LO DAMP MIX HI DAMPOFF — — — SPRING 7.7 4.1 2.67-3 SABBATHAMP CABINET TREBLE MIDDLE BASS PRESENCE GAIN VR GAIN CH VOLUMEUS HIGAIN UK T75 4X12 3.2 0.3 8.9 2.7 10 10 2.9PEDAL DRIVE TONE LEVEL MOD SPEED MIX DEPTH NRTREBLE BOOST 4.1 9.2 7.1 OFF — — — 6.4DELAY TIME MIX FEEDBACK REVERB LO DAMP MIX HI DAMPOFF — — — OFF — — —7-4 CARLOSAMP CABINET TREBLE MIDDLE BASS PRESENCE GAIN VR GAIN CH VOLUMERECTO TWEED 1X12 4 3.1 8 4.4 6.3 10 2.2PEDAL DRIVE TONE LEVEL MOD SPEED MIX DEPTH NRTUBE OD 3.2 7.7 7.5 CHORUS 0.23 6.4 6.1 6.2DELAY TIME MIX FEEDBACK REVERB LO DAMP MIX HI DAMPOFF — — — PLATE 3.6 3.6 5.58-1 FUNKYAMP CABINET TREBLE MIDDLE BASS PRESENCE GAIN VR GAIN CH VOLUMEBLACK 2X12 BLACK2X10 3.6 6.7 6.4 1 2.6 10 7.7PEDAL SENS ATTACK LEVEL MOD SPEED RESO DEPTH NRCOMP 1 4.4 3.7 PHASER 0.96 1.4 7.1 3.8DELAY TIME MIX FEEDBACK REVERB LO DAMP MIX HI DAMPTAPE ECHO 244 4.4 0 PLATE 1.8 2 4.48-2 MR.SCARYAMP CABINET TREBLE MIDDLE BASS PRESENCE GAIN VR GAIN CH VOLUMEUS HIGAIN VOX AD412 5.3 4.8 6.8 1 7.6 4.5 4.6PEDAL DRIVE TONE LEVEL MOD SPEED MIX DEPTH NROFF — — — OFF — — — 6DELAY TIME MIX FEEDBACK REVERB LO DAMP MIX HI DAMPMULTI HEAD 339 4 1.7 ROOM 5.2 3.8 5.68-3 JIMIFUZZAMP CABINET TREBLE MIDDLE BASS PRESENCE GAIN VR GAIN CH VOLUMEUK 68P UK H30 4X12 6.5 4.4 3.3 10 6 10 1.6PEDAL DRIVE TONE LEVEL MOD SPEED RESO DEPTH NRFUZZ 4.1 10 7.5 PHASER 0.27 0 7.1 3.4DELAY TIME MIX FEEDBACK REVERB LO DAMP MIX HI DAMPOFF — — — PLATE 1.8 3.4 2.88-4 FOLKAMP CABINET TREBLE MIDDLE BASS PRESENCE GAIN VR GAIN CH VOLUMEBLACK 2X12 BLACK 2X12 3.7 4.8 5.3 4.4 2.8 8.2 8PEDAL BASS BODY TREBLE MOD SPEED MIX DEPTH NRACOUSTIC 5.2 8.6 3.7 CHORUS 0.14 7.9 2.1 2DELAY TIME MIX FEEDBACK REVERB LO DAMP MIX HI DAMPOFF — — — ROOM 7.7 6.1 5.360
9-1 OLDGUYAMP CABINET TREBLE MIDDLE BASS PRESENCE GAIN VR GAIN CH VOLUMETWEED 4X10 BLACK 2X10 3.5 5.9 2.8 6.6 1.8 10 7PEDAL DRIVE TONE LEVEL MOD SPEED MIX DEPTH NROFF — — — CHORUS 0.23 6.4 6.1 2DELAY TIME MIX FEEDBACK REVERB LO DAMP MIX HI DAMPOFF — — — SPRING 3.6 3.3 4.29-2 CRUNCH 1AMP CABINET TREBLE MIDDLE BASS PRESENCE GAIN VR GAIN CH VOLUMEAC30TB VOX AC30 4.9 5.9 2.3 5.2 6.5 10 3PEDAL DRIVE TONE LEVEL MOD SPEED MIX DEPTH NROFF — — — OFF — — — 3.6DELAY TIME MIX FEEDBACK REVERB LO DAMP MIX HI DAMPOFF — — — SPRING 3.6 3.3 4.29-3 CRUNCH 2AMP CABINET TREBLE MIDDLE BASS PRESENCE GAIN VR GAIN CH VOLUMEAC15TB VOX AC30 7.3 5.9 10 3.8 7.4 10 2.2PEDAL DRIVE TONE LEVEL MOD SPEED MIX DEPTH NROFF — — — CHORUS 0.23 6.4 6.1 3DELAY TIME MIX FEEDBACK REVERB LO DAMP MIX HI DAMPOFF — — — SPRING 3.6 3.3 4.29-4 SOLOAMP CABINET TREBLE MIDDLE BASS PRESENCE GAIN VR GAIN CH VOLUMEUK 68P UK H30 4X12 8.8 8.2 2.9 8.7 8.7 10 2PEDAL DRIVE TONE LEVEL MOD SPEED MIX DEPTH NRTUBE OD 5.3 10 7.5 OFF — — — 7.8DELAY TIME MIX FEEDBACK REVERB LO DAMP MIX HI DAMPTAPE ECHO 470 5.2 4.1 PLATE 3.6 3.3 4.210-1 VOXMANAMP CABINET TREBLE MIDDLE BASS PRESENCE GAIN VR GAIN CH VOLUMEAC30TB VOX AC30 7.2 6.7 6.1 10 6.2 7.8 2.4PEDAL DRIVE TONE LEVEL MOD SPEED MIX DEPTH NROFF — — — OFF — — — 3DELAY TIME MIX FEEDBACK REVERB LO DAMP MIX HI DAMPTAPE ECHO 250 3.3 3.2 PLATE 4.1 3.7 2.910-2 WET AC15AMP CABINET TREBLE MIDDLE BASS PRESENCE GAIN VR GAIN CH VOLUMEAC15 VOX AC15 10 0 6.6 10 4.6 7.9 2.6PEDAL DRIVE TONE LEVEL MOD SPEED RESO DEPTH NRTREBLE BOOST 10 5 8.2 FLANGER 0.26 3.1 0 2.8DELAY TIME MIX FEEDBACK REVERB LO DAMP MIX HI DAMPMULTI HEAD 351 3.8 2 OFF — — —10-3 HEAVENAMP CABINET TREBLE MIDDLE BASS PRESENCE GAIN VR GAIN CH VOLUMEBOUTIQUE CL VOX AD412 5.1 8.9 9.1 3.7 6.2 8.9 1.4PEDAL DRIVE TONE LEVEL MOD SPEED MIX DEPTH NROFF — — — CHORUS 0.13 4.8 3.3 2.4DELAY TIME MIX FEEDBACK REVERB LO DAMP MIX HI DAMPTAPE ECHO 400 4.2 5.2 PLATE 3.7 6 3.710-4 UK-USAMP CABINET TREBLE MIDDLE BASS PRESENCE GAIN VR GAIN CH VOLUMEUK 68P US V30 4X12 4.9 0 6.4 0 8 8.9 2.9PEDAL DRIVE TONE LEVEL MOD SPEED MIX DEPTH NRTUBE OD 10 5.1 3.5 OFF — — — 6DELAY TIME MIX FEEDBACK REVERB LO DAMP MIX HI DAMPTAPE ECHO 227 3.8 2.2 ROOM 7.4 4.2 3.2TunerFootControllerMIDI/DIGITALFactorysettingsTroubleshootingSpec.ProgramList61
11- 1 WILDMANAMP CABINET TREBLE MIDDLE BASS PRESENCE GAIN VR GAIN CH VOLUMEUK '80S US V30 4X12 0 2.1 8.1 6.3 9.2 7.7 3.7PEDAL DRIVE TONE LEVEL MOD SPEED MIX DEPTH NRTUBE OD 5.8 7.5 5.2 CHORUS 0.26 3.7 1.9 6.6DELAY TIME MIX FEEDBACK REVERB LO DAMP MIX HI DAMPTAPE ECHO 539 5.8 0.2 OFF — — —11-2 THEATERAMP CABINET TREBLE MIDDLE BASS PRESENCE GAIN VR GAIN CH VOLUMEBOUTIQUE CL VOX AD412 7.4 6.1 10 7.1 4.3 8 2.4PEDAL BASS BODY TREBLE MOD SPEED MIX DEPTH NRACOUSTIC 7.8 8.1 2.6 CHORUS 0.54 5 2.5 3.6DELAY TIME MIX FEEDBACK REVERB LO DAMP MIX HI DAMPDELAY 590 5.4 2.1 PLATE 6.2 7 611-3 JOSHUAAMP CABINET TREBLE MIDDLE BASS PRESENCE GAIN VR GAIN CH VOLUMEAC3OTB VOX AC30 7.7 5 7.4 6.3 6.9 7.9 2.6PEDAL DRIVE TONE LEVEL MOD SPEED MIX DEPTH NROFF — — — CHORUS 1.8 3.5 1.4 4.8DELAY TIME MIX FEEDBACK REVERB LO DAMP MIX HI DAMPTAPE ECHO 551 3.2 5.9 PLATE 2.6 3 511-4 POLICEAMP CABINET TREBLE MIDDLE BASS PRESENCE GAIN VR GAIN CH VOLUMEUK 68P UK H30 4X12 6.7 8.2 10 7 4.1 9.2 3PEDAL SENS ATTACK LEVEL MOD SPEED MIX DEPTH NRCOMP 3.6 2.5 3.8 CHORUS 0.2 6.4 4.6 6.8DELAY TIME MIX FEEDBACK REVERB LO DAMP MIX HI DAMPDELAY 860 2.5 1.1 PLATE 3.1 4 0.712-1 JOHNNY $AMP CABINET TREBLE MIDDLE BASS PRESENCE GAIN VR GAIN CH VOLUMETWEED 4X10 TWEED 4X10 5 4.9 8.1 7.1 2.4 8 6.1PEDAL BASS BODY TREBLE MOD SPEED MIX DEPTH NRACOUSTIC 5.6 8 3.6 OFF — — — 3DELAY TIME MIX FEEDBACK REVERB LO DAMP MIX HI DAMPOFF — — — SPRING 0 5.2 2.112-2 JAZZMANAMP CABINET TREBLE MIDDLE BASS PRESENCE GAIN VR GAIN CH VOLUMEBLACK 2X12 BLACK 2X12 1.3 6.1 9.2 0 3.6 7 6PEDAL DRIVE TONE LEVEL MOD SPEED MIX DEPTH NROFF — — — CHORUS 0.17 6.8 5.7 2DELAY TIME MIX FEEDBACK REVERB LO DAMP MIX HI DAMPOFF — — — ROOM 9.3 7.1 4.812-3 TEXTREMAMP CABINET TREBLE MIDDLE BASS PRESENCE GAIN VR GAIN CH VOLUMETWEED 1X12 TWEED 1X12 7 4.1 6.4 5.2 5.6 4 8PEDAL DRIVE TONE LEVEL MOD SPEED SPREAD DEPTH NROFF — — — TREMOLO 4 6.3 3.9 2.8DELAY TIME MIX FEEDBACK REVERB LO DAMP MIX HI DAMPOFF — — — SPRING 2.3 5 2.812-4 OCTAMANAMP CABINET TREBLE MIDDLE BASS PRESENCE GAIN VR GAIN CH VOLUMEBOUTIQUE OD BLACK 2X10 6.7 4.2 6.8 3.5 5 10 2.4PEDAL 1 OCTAVE DIRECT 2 OCTAVE MOD SPEED MIX DEPTH NROCTAVE 4.1 9.5 2.2 OFF — — — 7.6DELAY TIME MIX FEEDBACK REVERB LO DAMP MIX HI DAMPTAPE ECHO 1024 7.4 3 PLATE 3.6 3 4.162
IndexSymbols16Numerics1OCTAVE 362OCTAVE 36AAC15 23AC15TB 24AC30 25AC30TB 25ACOUSTIC 35AMP Models 21ATTACK 34, 35AUTO WAH 35BBacking Up 49BASS 21, 35BLACK 2x10(BLK 2X10) 31BLACK 2x12(BLK 2X12) 29, 31BODY 35BOUTIQUE CL(BTQ CL) 28BOUTIQUE OD(BTQ OD) 28BYPASS 7CCabinet 31CABINET Models 31Calibrating 41CC 48CCHG I/O 47CH VOLUME 6, 22CHORUS 37CLOSE 35COMP 34Connection 12, 45Control Change 47Creating Your Program17DDELAY 39DELAY Effects 38DELAY FX 47DEPTH 36, 37, 38Digital Output 50DIRECT 36DOUT LVL 50DRIVE 36DUMP ALL 49DUMP CUR 49EEDIT icon 9EXP 42EXP INIT 43EXP MAX 43EXP MIN 43EXP PDL 47Expression Pedal 42FFAT OD 36FEEDBACK 39FLANGER 37Foot Controller 42FUZZ 36GGAIN 22GLOBAL 9HHI DAMP 40How the original ampswork 22IINPUT LEVEL 39, 40LLEVEL 34, 36LO DAMP 40M<strong>Manual</strong> Mode 4, 16MASTER VOLUME 22MIDDLE 21MIDI 45MIDI CH 46MIDI Channel 46MIX 36, 37, 39, 40Mix any amp model toany cabinet model33MOD Effects 37MOD FX 47MULTI HEAD(MULTI HD) 39NName 19Noise Reduction 19NR SENS 19OOCTAVE 36OFF (CABINET) 33OFF (DELAY) 39OFF (MOD) 37OFF (PEDAL) 34OFF (REVERB) 40OPEN 35Orginal tone controls21ORIG icon 20Original Value 20PParameter Change 48PCHG OUT 46PEDAL 35PEDAL Effects 34PEDAL FX 47PHASER 38PLATE 40POLARITY 35PRESENCE 6, 21Program 15Program Change 46Program Select Mode4, 15Getting to 16RRECTO 28RELOAD? 51RESO 37, 38Restoring 49Restoring a Setting toits Original Value 20Restoring the FactoryPreset 51REVERB Effects 40REVRB FX 47ROOM 40ROTARY 38SSENS 34, 35Sound Editor 2, 48SPEED 36, 37, 38SPREAD 38SPRING 40Store 20SYEX OUT 48TTAP 7, 39TAP SW 47TAPE ECHO(T ECHO) 39TIME 38, 39TONE 36TREBLE 21, 35TREBLE BOOST(TREB BST) 36TREMOLO 38TUBE OD 36Tuner 41TWEED 1x12(TWD 1X12) 29, 31TWEED 4x10(TWD 4X10) 30, 31UUK ’80s 27UK ’90s 27UK 68P 26UK BLUES 26UK H30 4x12(UK H30) 32UK MODERN(UK MODRN) 27UK T75 4x12(UK T75) 32US HIGAIN(US HI-G) 28US V30 4x12(US V30) 32UTILITY 8U-VIBE 36VValve Reactor 2Valve window 10VOL PDL 47VOX AC15 (AC15) 32VOX AC30 (AC30) 32VOX AD412(AD412) 32VOX WAH 35VR GAIN 22WWRITE 20Referencedata63
TOP PANEL:2.1 2.544.13Bank/<strong>Manual</strong>/Write/Tuner/Channel Section3.1 3.92.223.83.103.53.63.72.42.313.2 3.43.35.21.1REAR PANEL:1.21.5 1.6 1.7 1.81.3 1.4 1.95.156 6.1 6.2 7 7.1 7.2 8 8.1 9.4 9.1 9.2 9.3 9
Program SheetThis sheet is for you to write down your favorite settings. When you come up with a soundyou like, write it down for future use. We suggest that you photocopy the program sheetbelow, and use the copies.Don’t forget to write down the DELAY TIME setting (use FINE [1] to check it) and theUTILITY settings.PROGRAM NAME:NR (NOISE REDUCTION): TAP TEMPO: NOTE:PROGRAM NAME:NR (NOISE REDUCTION): TAP TEMPO: NOTE:
<strong>Owner's</strong> <strong>Manual</strong>E 12003 VOX AMPLIFICATION LTD. Printed in China