
Create successful ePaper yourself
Turn your PDF publications into a flip-book with our unique Google optimized e-Paper software.
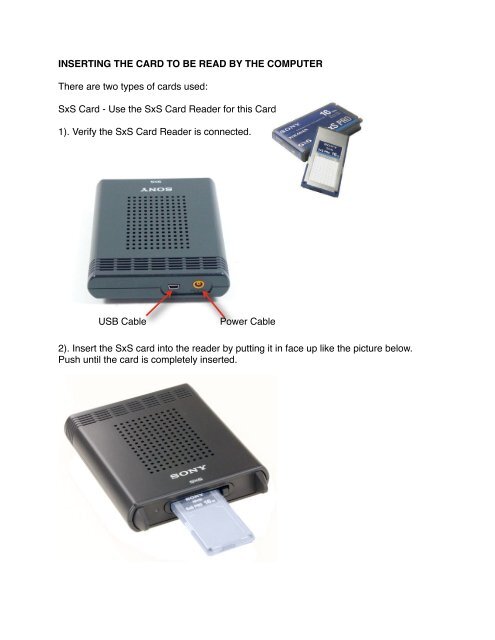
INSERTING THE CARD TO BE READ BY THE COMPUTERThere are two types of cards used:<strong>SxS</strong> <strong>Card</strong> - Use the <strong>SxS</strong> <strong>Card</strong> Reader for this <strong>Card</strong>1). Verify the <strong>SxS</strong> <strong>Card</strong> Reader is connected.USB CablePower Cable2). Insert the <strong>SxS</strong> card into the reader by putting it in face up like the picture below.Push until the card is completely inserted.
3). When ready to eject the card, push the button to the right of the card once to pop itout, then push it in again to eject the card.
The other type of card is a memory stick adapter. It looks like a <strong>SxS</strong> card with theexception that a Memory Stick is inserted into the back of the card. NOTE: These cardscannot be read in the <strong>SxS</strong> card reader.1.) Eject the memory card from the adapter by pushing on the back of the memory stickuntil it clicks, then let it slowly pop out.2.) Insert the Memory Stick into the “MS PRO/Duo/M2” slot in the card reader.
3.) If the card is not being read, verify the card reader is hooked up by inserting the USBCable into the left port (while looking directly at the back) of the card reader.
Copying your card media to the DroboIt is important to copy all of the material on your card to the Drobo first. This wayyou guarantee that your material is safe in the event of a drive loss. Thisprocedure will only work in the impact Lab.If you have not inserted your card, follow the procedures mentioned above.1.) Plug your Hard Drive into the computer using the Firewire 800 Cable. DO NOT USEANYTHING BUT THE FIREWIRE 800 CABLE.X2.) If you are using a portable drive you do not need to plug in the power. However, ifyou are using a full size drive you will.At this point, your card and drive should appear on your desktop (they might be nameddifferently).3.) Select the “Go” Menu up top and then select “Connect to Server...” If you do not seethe “Go” Menu, click on an empty part of the desktop first.
4.) Once the “Connect to Server” dialogue pops up, click on “Browse”.5.) Scroll and Double-Click on “Drobo-FS”.
6.) Double-Click on “526-Fall-2012”At this point the “526-Fall-2012” drive should appear on your desktop.7.) Find your Project and double-click. If you have not created a folder for your projectyet, do so.
8.) Create a new folder for the card using the following Syntax:MM-DD-YYYY Description of card09-01-2012 Interview with BobDO NOT USE SLASHES IN THE NAME. DASHES AND UNDERSCORES ARE OK.9.) Double-Click on your Memory <strong>Card</strong>.
10.) Drag the BPAV Folder into the new folder you just created on the Drobo.Copying will take about 1GB per minute.11.) Verify BPAV is in the proper folder.12.) Repeat from Step 8.) if you have more cards.
Importing Media into Final Cut Pro 7If you have already created a Project in Final Cut Pro, proceed to step 14, otherwisecontinue to Step 1.1.) Click on “Final Cut Pro” in the dock.2.) When the “Non-Writable Scratch Disks” window pops up click on “Reset ScratchDisks”.3.) Click “OK” past the next window.
4.) In the “Scratch Disks” window click on the top-most “Set...”.5.) Select your Hard Drive and then click “Choose”6.) Click “OK” then “Continue”.8.) Once FCP starts up, go to the “Final Cut Pro” Menu and select “Easy Setup...”.
9.) In “Format:” Select “HD”.10.) In the “Use:” box select “XDCAM EX 1080p30 VBR”. BE CAREFUL, MANYCHOICES LOOK ALIKE. VERIFY YOU ARE SELECTING THE CORRECT ONE.
11.) Click “Setup”.12.) Go to the “File” Menu and select “Save Project As...”.13.) Give the project a name, verify “Where:” is your hard drive and click “Save”.
14.) Open the “XDCAM Transfer” App from the “Applications” folder.15.) In the “Sony XDCAM Transfer Setup” window, click on “Choose...” by the “ImportLocation” and select the “Capture Scratch” folder on your Hard Drive then click“Choose” again and finally click “OK” back on the “Sony XDCAM Transfer Setup”window.
16.) Click “OK” past the “Installed Components” Dialogue.17.) Set the “Source” on the left side as your memory card.
18.) Click on any of your clips and then hit “command-A” on the keyboard to select themall. They will all turn Blue when selected.19.) Click “Import” on the bottom-right.20.) The clips will import one-by-one.
To see the overall progress click the “Activity” button in the upper-right corner.21.) When importing is finished, Click on the “XDCAM Transfer” window and select “QuitXDCAM Transfer”.
22.) After XDCAM Transfer has quit, Eject your card by dragging it to the trash or Right-Click on the card and select Eject.23.) Return to Final Cut Pro and in the “File” menu select “Import” -> “Files...”.24.) Navigate to the folder you imported your footage into (in this case “My Hard Drive -> Capture Scratch -> Untitled,” but yours may be different).25.) Select all the files and click “Choose”
26.) The files will appear in your project. SAVE YOUR PROJECT. It is highly advisablethat you name and organize your files at this point.27.) When you make your first edit, Final Cut Pro will ask if you wish to “Changesequence settings to match the clip settings?” Answer: Yes