Meditech Client Server - Physician - Fraser Health Authority
Meditech Client Server - Physician - Fraser Health Authority
Meditech Client Server - Physician - Fraser Health Authority
- No tags were found...

You also want an ePaper? Increase the reach of your titles
YUMPU automatically turns print PDFs into web optimized ePapers that Google loves.
<strong>Meditech</strong> <strong>Client</strong> <strong>Server</strong>Enterprise Medical Record (EMR)Patient Care User Manual<strong>Health</strong> Informatics – Acute Care & Clinical Support© <strong>Fraser</strong> <strong>Health</strong> <strong>Authority</strong>. All rights reserved.Last edited: February 2011.
Table of Contents**Click on topic below to go to specific section in manual** Slide #Introduction to EMR 3Patient Confidentiality 4Confidential Flag 6Critical Care Indicators 7Signing into <strong>Meditech</strong> <strong>Client</strong> <strong>Server</strong> 10Launching EMR 12Selecting a Patient Record 17Selecting Visits 24EMR/PCI Link 25Navigating EMR 2724 Hour Menu 33Vital Signs, Care Trends, Care Activity and History Menu 34Medications Menu 35Order History Menu 36Laboratory Menu 37Microbiology Menu 38Blood Bank Menu 39Pathology Menu 40Imaging Menu 41Other Reports Menu 42Summary Menu 43Viewing Advanced Directives 44EMR Updates 46
Enterprise Medical Record(EMR)• EMR gives care providers instant data retrieval of a patient’scomplete and current record. This information is viewed inconvenient panel displays which reveal meaningful groupings ofdata for efficient comparison.• Visit histories are available allowing clinicians to examine apatient’s complete medical history.• It provides fast access to a patient’s administrative data such asdemographics, insurance information and diagnostic information.• Results may be charted in easy-to interpret graphs that allow usersto pinpoint abnormalities and trends for quick decision making.• When viewing clinical results, the data in EMR may reveal the needfor modification of a patients current treatments/procedures.• EMR provides health care providers with timely and accurateinformation on their patients to assist them with their clinicaldecision making.Return to Table of Contents
Patient Confidentiality• According to <strong>Fraser</strong> <strong>Health</strong>’s policy on Confidentiality and Securityof Personal Information, “All personal information concerningpatients / residents / clients and employees / physicians /volunteers is confidential and is only to be used by individuals whorequire access to it in order to provide direct service to the personto whom the information belongs, to perform duties legislatedunder the Public <strong>Health</strong> Act or to follow up on a quality of carereview. Personal information required for any other reasonrequires the consent of the individual or must meet conditions setout in this policy.”• For additional information, please refer to the link below or theFHpulse.http://fhpulse/policies_guidelines/org_policies/Pages/default.aspxPolicy: Confidentiality and Security of Personal Information
Patient Confidentiality (con’t)• While using EMR, staff must ensure they do not compromisethe privacy of patient information.• Personal Information must be held in the strictest confidenceand should not be disclosed for purposes other than that forwhich it was collected and/or received.• Professional staff will protect personal information frominappropriate and/or inaccurate modification, unauthorizedaccess, use, disclosure, loss, theft, copying, or destruction by:a) Knowing when and with whom they are required to share;b) Following all procedures for requesting access and reportingbreaches, loss, theft, etc;c) Ensuring patient information is kept strictly confidential and is notdisclosed through neglect, inappropriate storage, or disposal;d) Ensuring secure disposal and destruction of paper; ande) Controlling access to offices and workspace.Return to Table of Contents
Confidential Flag• A Medical Record Access Warning flag will appear for patients markedas confidential.• These patients records are automatically audited.• The warning flag appears as follows:Return to Table of Contents
Critical Care Indicators• According to <strong>Fraser</strong> <strong>Health</strong>’s policy, Critical Care Indicators (CCI’s) “arecodes used to identify clients within the <strong>Fraser</strong> <strong>Health</strong> Electronic <strong>Health</strong>Record system who require special recognition because of the potentialharm they may pose to staff, clients and visitors. The potential harm mayarise from violent/aggressive behaviour or infectious disease.”• CCI’s s in <strong>Meditech</strong> <strong>Client</strong> <strong>Server</strong>:• ARO (Antibiotic Resistant Organism) – for clients with proven antibioticresistant bacteria (e.g. VRE, MRSA).• AVB (Aggressive/Violent Behaviour) – for clients who exhibit behaviourwhich threatens or potentially threatens the physical and/or emotionalwell being of self or others.• DNA (Do Not Acknowledge) – for clients who request that theirattendance at the facility not be acknowledged (FOIPPA), clients whopresent themselves as at risk from a third party with or without anexisting restraining order and for clients who are an inmate in thecorrectional system.
Critical Care Indicators (con’t)• Any staff member may add or remove an AVB or DNA CCI to apatient’s record after a complete assessment of the client’s behaviouror medical condition and, if necessary, consult with other members ofthe <strong>Health</strong> Care team. ARO CCI’s are handled by Infection Controlstaff.• Adding or removing an AVB or DNA CCI is via <strong>Meditech</strong> Order Entry.Category: <strong>Health</strong> Records Procedure: CCIThis will send a message to <strong>Health</strong> Records to request theaddition/removal of a CCI on the patient’s chart.• For additional information, please refer to link below or the FHpulse.http://fhpulse/policies_guidelines/org_policies/Pages/default.aspxPolicy: Critical Care Indicators• See next slide for an example of how a patient with CCI’s will appear inEMR.
Critical Care Indicators (con’t)Step 1: Click on“Summary” TabStep 2: Click on“Indicators”panel selectionbuttonStep 3: CCI’s are found in thetable next to “Precautions”Return to Table of Contents
Signing into <strong>Meditech</strong> <strong>Client</strong> <strong>Server</strong>• Double click on from your desktop.• Or click on “Start”, “MEDITECH” and “MEDITECH <strong>Client</strong> <strong>Server</strong>”Step 3: Click on“MEDITECH <strong>Client</strong> <strong>Server</strong>”Step 2: Click on “MEDITECH”Step 1: Click on “Start”
Signing into <strong>Meditech</strong> <strong>Client</strong> <strong>Server</strong>Step 1: Type in User Name and press Return to Table of ContentsStep 2: Type in password and press
Launching EMRChoose EMR from the Application Databases andpress or double click on EMR.
Launching EMRDouble click on “View Patient Record”
Launching EMRClicking on the EMR icon from the<strong>Meditech</strong> toolbar will also launch EMR
Launching EMR from Your Desktop• EMR can also be accessed by clicking on the “HUB_LIVE EMR”icon on the computer desktop.• This will allow for access to EMR only and not any of the other<strong>Meditech</strong> applications such as Order Entry (OE), Pharmacy(PHA), Emergency Department Module (EDM), etc.• To sign in, use the same user name and password as your<strong>Meditech</strong> user name and password.Return to Table of Contents
Selecting a Patient Record• EMR provides various ways to find a record.• A record can be selected by using the following menu options below:
Selecting a Patient Record –Provider Group Options• Provider Group Options - Admitted, Admitted LTC, EmergencyDept, Other, and Rounds Report are options used byproviders and provider groups to look up their patients.• Nursing staff will use the Any Location or Any Record menuoption to view patients.Provider Group OptionsRounds Report Option
Selecting a Patient Record –Recent Access Option1. The Recent Access menu option lists records viewed inthe last 14 days.2. Records appear in reverse chronological order by thedate last viewed, with most recently accessed record atthe top of the list.3. After viewing a record, to re-sort the list so the mostrecently viewed record appears at the top of the list,click on the Recent Access option again.
Selecting a Patient Record –Personal List OptionThe Personal List menu option alphabetically lists therecords on a personal list. Records need to bemanually added and/or removed from this list.
Selecting a Patient Record –Personal List OptionTo add/remove a patient from the Personal List, clickon the patient’s record and select “Add to personallist” or “Remove from personal list”.
Selecting a Patient Record –Any Location Option1. The Any Location menu option lists records for a specific location.2. Within this search, records are organized alphabetically.3. A record with an admitted status remains on this list until EMRreceives a discharge date.4. Other records remain on this list until 7 days after the service date.5. If the computer is associated with a location, the Location (a specificlocation) menu option appears (for example, Location ICU).6. If the computer is associated with more than one location, a menuoption for each location is listed.
Selecting a Patient Record –Any Record OptionThe Any Record menu option searches EMR fora specific record as identified by the searchcriteria.1. Select “Any Record” from the menu frame2. Enter in one or more of the required searchcriteria in the data frame3. Click on the button4. Choose the correct patient recordReturn to Table of Contents
Selecting VisitsThis screen displays visits by the most recent visit. Agreen dot indicates an active visit. The iconsrepresent the type of visit.By clicking on thebox to the left, youcan view that visit oryou can choose toview all the visitsconsolidated into asingle display.Return to Table of Contents
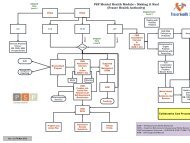
EMR/PCI Link1. If a patient has had visit(s) to any of the <strong>Fraser</strong> North Hospitals(Burnaby, Royal Columbian, Ridge Meadows, Eagle Ridge orQueens Park) prior to July 11, 2010, those visits will remain inPCI in the old <strong>Meditech</strong> Magic system.2. If the View PCI link is available, this indicates the patient has hadprevious visit(s) in PCI.3. Clicking on the View PCI link from your department menu willallow one to access PCI for the old record(s).Return to Table of Contents
EMR Visit Icon DescriptionsActive AdmittedAn inpatient visit in which the patient is still in the hospital.DischargedAn inpatient that has completed his/her stay and is no longer in hospital.Active RecurringRecurring DischargedAn outpatient that comes for a consecutive series of treatments/visits forthe same medical condition ie. IV therapy, chemotherapy, dialysis, diabeteseducation, etcAn outpatient that has had his/her treatment completed.Emergency DepartmentClinicalProviderSurgical Day CareAn outpatient visit to the emergency department for treatment of conditionsrequiring immediate medical care.A one time minor procedure, test or consult ie. mole removal, ECG, etc foran outpatient.A one time registration used for procedures such as specimens fromanother facility, physician’s office, etc.An outpatient visit for an invasive procedure ie. gastroscopy, heartcatheter, minor surgery or a procedure approved by the Ministry of <strong>Health</strong>.Return to Table of Contents
Navigating EMRPatientHeaderSubdepartmentOptionsClinical DetailsDepartment MenuNavigation Tools
Navigating EMR – Patient HeaderPatient’s nameDisplayed as: Last name, First namedate of birth, age, genderaccount # / unit # / EMR IDPatient’s locationPatient’s allergies. Clicking on the willtake you to additional details about eachof the allergies identified.Menu frame and dataframe displayedPatient’s status
Navigating EMR – Department MenuDepartment MenuThe department menu includes chart sections such as orders,medications, blood bank imaging, etc. Available menu optionsappear in dark blue lettering or red lettering. Click on the availablechart section to view data within that section.
Navigating EMR – Clinical DetailsClinical DetailsThe clinical details section displays detailed clinical results such assodium, potassium, WBC, RBC, Hbg, etc.
Navigating EMR – Sub-departmentOptions and Navigation ToolsSubdepartmentOptionsThe sub-department options demonstrate sub-department optionssuch as chemistry, hematology and coagulation for Laboratory.Navigation tools allow the user to scroll through multiple pages ofresults.Navigation Tools
Navigating EMR - Colors for NewInformation and NavigationCurrent location1. Text on a white background – shows your current location2. on a pale blue background - there is additional datato view under this panel3. on a pale blue background - there is new data to viewsince you last viewed the patient’s information4. on a pale blue background – this option is notavailable or there is currently no information for this optionReturn to Table of Contents
24 Hour Menu1. Once a visit or visits are selected, you will be taken to the “24Hour” menu if there are any new results on your patient withinthe last 24 hours.2. If there are no new results, the “Summary” menu will bedisplayed.3. New results are indicated in red lettering.Return to Table of Contents
Vital Signs, Care Trends, CareActivity and History Menu1. Vital Signs, Care Trends Care Activity and Admission Historymay display for some patients who have been admitted to hospitalsutilizing the Patient Care System (PCS) module in <strong>Meditech</strong>.2. The data displayed here has been collected from the patient andelectronically charted by staff using PCS.Return to Table of Contents
Medications Menu1. Click on the scroll bar to view meds further down the list.2. Click on the med name to get further details on each med.3. The meds displayed can be resorted by clicking on: “Route”, “Start”,“Stop” or “Status”.4. Click on the “Active”, “Discontinued” or “All” panel selection buttonsto display active, discontinued or all meds.5. Medication StatusUNV – these meds have been entered by a pharmacy tech buthaven’t been verified by a pharmacist yet.Cancelled – meds entered incorrectly into the systemDC – med is now discontinuedReturn to Table of Contents
Order History Menu1. Click on each order for further details about the order.2. Orders can be place by nursing staff in <strong>Meditech</strong> Order Entry orby Lab or Medical Imaging staff via their own module.3. The orders can be resorted by clicking on “Service Date”,“Service Time”, “Ordered By”, “Category”, “Procedure” or“Status”.Return to Table of Contents
Laboratory Menu1. Use the “Earlier” or “Later” navigation buttons at the bottom of the screen toview laboratory data not displayed on the table.2. Click on the panel selection buttons above to view different lab panels.3. Explanation of colors and symbols:white highlight – normal resultyellow highlight - abnormal resultpink highlight -- critical valuePending – test hasn’t been resulted yet* - Lab has made notes on this result ie. Notified the nursing unit or physicianL – low value, value is below the normal rangeH – high value, value is above the normal range - significant change in value from previous value- comment attached to this value. Click on the to view the comment.Return to Table of Contents
Microbiology MenuClick on a report icon to display the report.Return to Table of Contents
Blood Bank MenuUse the panel selection buttons to navigate through theBlood Bank menuReturn to Table of Contents
Pathology MenuClick on the report icon to display the report.Return to Table of Contents
Imaging MenuClick on a reporticon to displaythe Radiologistdictated report.Click on acamera iconto display thePACS image.Return to Table of Contents
Other Reports Menu1. Included in this section are reports from other disciplines such as PT,OT, SLP, <strong>Physician</strong>’s Consults, History & Physical reports, Home<strong>Health</strong> Reports and any scanned reports from previous visits.2. Use the panel selection buttons to locate the report you want to view.3. Once you’ve located your report, click on the report icon to view thereport or click on the camera image to view the scanned report.Return to Table of Contents
Summary MenuThe Summary menu displays information about a visit such as height,weight, CCI’s, diagnosis, blood type, providers, next of kin contactinformation, allergies, advanced directives, etc.If no information exists for the 24 Hour Menu, the Summary Menu is thedefault screen.1. Click on the Summary Menu2. Use the Panel Selection buttons to navigate the screenReturn to Table of Contents
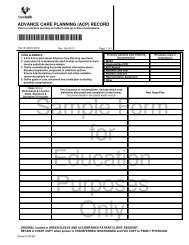
Viewing Advanced DirectivesTo view Advanced Directives:1. Click on the Summary Menu2. Click on the Risk/Legal panel selection button3. Click on the word, “Advance Directive” - not the camera image4. Select the scanned Advanced Directive you wish to view by clickingon the camera image.Note: Scanned documents are historical data from a previous visit. ADNR will still need to be completed for the current visit.Return to Table of Contents
Exiting EMRFINISHED???1. Remember, it is very important to exit the system completelywhen you are finished viewing patient information.2. To exit out of EMR, click on the X at the top right corner.
EMR Updates• Every once in a while an EMR updatewill need to be run on each computeryou are working from in order to bringany changes or “fixes” that are requiredto run the EMR software.• If an update is required, your computerwill prompt you for the update beforeyou can access EMR.Return to Table of Contents
Questions or Comments• For any issues accessing EMR please contact theService Desk at 604-585-5544 or via e-mailServiceDesk@fraserhealth.ca.• For any questions or comments about this usermanual please e-mail <strong>Health</strong>Informatics-CIS@fraserhealth.ca• For additional documentation on EMR please refer tothe FHpulsehttp://fhpulse/clinical_resources/meditech_clinical_resources/EMR%20Documents/Forms/AllItems.aspxReturn to Table of Contents