night vision monocular stargate m
night vision monocular stargate m
night vision monocular stargate m
- No tags were found...

Create successful ePaper yourself
Turn your PDF publications into a flip-book with our unique Google optimized e-Paper software.
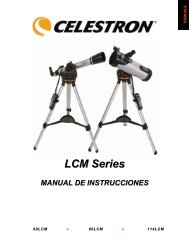
4.CONSTRUCTIONProper operation of the activation lever: Push it down and hold in thisposition. This should provide 30-60 seconds of operation (or more).Once the screen begins to get dimmer boost the image by releasing thehandle and pushing it down again after a few seconds (not immediately!).Pumping the lever up and down rapidly is wrong! That will deactivatethe power mechanism. You will need to wait 15-30 minutes beforeactivating it again. Doing so repeatedly will cause irrecoverable damageto the activation mechanism.When conditions are very dark, use the AP 12 Infa Red illuminator (9).Before usage, install a battery, observing the correct polarity.6. CARE and MAINTENANCEMaintenance includes only cleaning of parts if necessary.6.1.Clean the lens and eyepiece optical surfaces with a soft clothdampened with “lens cleaner” obtained from any camera store. Clean thelens surface carefully with circular movements starting from the center.Picture 11-Housing 2-Lens 3-Eye-piece4-Lens Cover 5-Activation lever 6-Screw Cover7-Pressure Adjustment Screw 8-Bushing9- AP 12 Infra Red Illuminator10-I/R illuminator battery house cover5. OPERATION INSTRUCTIONSWARNING! NEVER OPERATE YOUR NIGHT VISION DEVICEIN DAYLIGHT AREAS WITHOUT THE LENS COVER ON!NEVER DIRECT THE LENS IN THE DIRECTION OF BRIGHTLIGHT!Once in dark environment, take off the lens caps (4). Operationwithout the lens cover on is admissible only at the illumination level ofno more than 1 lux (at this illumination one can read a newspaper textwith difficulty after 5-10 minutes of eyes’ adaptation = twilight anddarker). Check the functioning of the device by switching it on: squeezeactivation lever (5) and look through eyepiece (3). You should see agreenish-lit screen. Rotate eyepiece (3) to achieve sharpest image. Inorder to focus on a different distance, rotate the objective lens (2). Ifeverything works, now is a great time to fill the warranty card.6.2.After a long period of use the brightness of the screen may declinewhen actuating lever is pressed. To regain normal brightness you shouldturn the pressure adjustment screw (7) a quarter (¼) of a turn clockwise.To reach the adjustment screw (7), first remove the screw cover (6) andthe strap, than unscrew the bushing (8). This will expose an opening inthe housing, so one can reach the adjustment screw.7. TROUBLESHOOTINGThe scope does not work.Squeeze the lever all the way. Do not release itThe image does not appear in focus.Bring the inspected object to the center of the image. Turning theeyepiece focusing (3) adjust to achieve the clearest image on the screen.Then obtain the most clear-cut image of the object by rotating the frontlens (2). If the view still does not seem in focus, clean the lenses; theycould be foggy or dusty.Unit flashesIt is normal for the unit to flash within the first 2 minutes of activation. Ifthe flashing continues afterwards the following is possible cause: brightenvironment (even with the cap closed!)