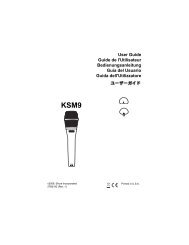
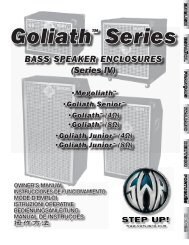
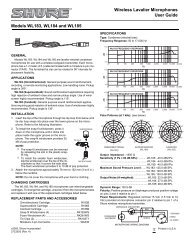
ConnectionsConnecting to External Audio EquipmentSince <strong>the</strong> MM6/MM8 has no built-in speakers, it must be connected to an external amplifier and speakers,headphones, or o<strong>the</strong>r sound output device.■Connecting to Powered Speakers or Monitor Speakers. ● ● ● ● ● ● ● ● ● ● ● ● ● ●For optimum, accurate reproduction of <strong>the</strong> instrument’s rich sounds with effects and full stereo imaging,use a pair of powered speakers. Connect <strong>the</strong> powered speakers to <strong>the</strong> OUTPUT L/MONO and R jacks on<strong>the</strong> rear panel.Keyboard amplifier, monitor speaker, etc.HeadphonesOUTPUT L/MONO jackOUTPUT R jackPHONES jackNOTE• When using just one powered speaker, connect it to <strong>the</strong> OUTPUT L/MONO jack on <strong>the</strong> rear panel.Connecting to External MIDI DevicesNOTE• MIDI data can be received and transmitted via <strong>the</strong> MIDI connectors as well as <strong>the</strong> USB TO HOST terminal.However, <strong>the</strong>y cannot be used at <strong>the</strong> same time.■Controlling an External Tone Module ● ● ● ● ● ● ● ● ● ● ● ● ● ● ● ● ● ● ● ● ● ● ● ● ● ● ● ●This type of connection lets you play an external MIDI tone generator (tone generator module, etc.) from<strong>the</strong> MM6/MM8 keyboard, or by playing back <strong>the</strong> MM6/MM8 songs or patterns.<strong>Use</strong> this connection when you want <strong>the</strong> external instrument to sound as well as <strong>the</strong> MM6/MM8.MIDI OUT ConnectorMIDI IN ConnectorTone ModuleMM6/MM8In order to play <strong>the</strong> external tone module in this type of setup, <strong>the</strong> MIDI receive channel of <strong>the</strong> tone modulemust be set to <strong>the</strong> same channel as <strong>the</strong> MM6/MM8 MIDI transmit channel.The MM6/MM8 transmit channels are fixed, as shown below.Main Voice Channel 1Dual Voice Channel 2Split Voice Channel 374 MM6/MM8 Owner’s Manual
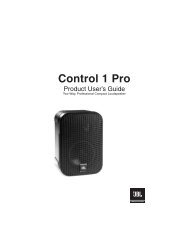
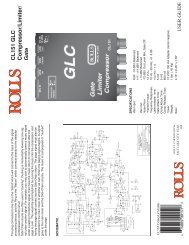
ConnectionsConnecting a USB Storage DeviceYou can connect a USB storage device to <strong>the</strong> USBTO DEVICE terminal on <strong>the</strong> rear panel of thisinstrument.■Precautions when using <strong>the</strong> [USB TO DEVICE] terminalThis instrument features a built-in [USB TO DEVICE] terminal. When connecting a USB device to <strong>the</strong> terminal, be sureto handle <strong>the</strong> USB device with care. Follow <strong>the</strong> important precautions below.NOTE•For more information about <strong>the</strong> handling of USB devices, refer to <strong>the</strong> owner’s manual of <strong>the</strong> USB device.● Compatible USB devices• USB storage devices (flash memory, floppy disk drive,hard disk drive, etc.)The instrument does not necessarily support all commerciallyavailable USB devices. Yamaha cannot guaranteeoperation of USB devices that you purchase. Before purchasinga USB device for use with this instrument, pleasevisit <strong>the</strong> following web page:http://www.yamahasynth.com/NOTE• O<strong>the</strong>r USB devices such as a computer keyboard or mouse cannotbe used.● Connecting USB device• When connecting a USB device to <strong>the</strong> [USB TODEVICE] terminal, make sure that <strong>the</strong> connector on <strong>the</strong>device is appropriate and that it is connected in <strong>the</strong>proper direction.CAUTION• Though <strong>the</strong> instrument supports <strong>the</strong> USB 1.1 standard, youcan connect and use a USB 2.0 storage device with <strong>the</strong> instrument.However, note that <strong>the</strong> transfer speed is that of USB 1.1.● Using USB Storage DevicesBy connecting <strong>the</strong> instrument to a USB storage device, youcan save data you’ve created to <strong>the</strong> connected device, aswell as read data from <strong>the</strong> connected device.NOTE• Although CD-R/RW drives can be used to read data to <strong>the</strong> instrument,<strong>the</strong>y cannot be used for saving data.Formatting USB storage mediaWhen a USB storage device is connected or media isinserted, a message may appear prompting you to format<strong>the</strong> device/media. If so, execute <strong>the</strong> Format operation (page68).CAUTION• The format operation overwrites any previously existing data.Make sure that <strong>the</strong> media you are formatting does not containimportant data.To protect your data (write-protect)To prevent important data from being inadvertently erased,apply <strong>the</strong> write-protect provided with each storage deviceor media. If you are saving data to <strong>the</strong> USB storage device,make sure to disable write-protect.Connecting/removing USB storage deviceBefore removing <strong>the</strong> media from <strong>the</strong> device, make sure that<strong>the</strong> instrument is not accessing data (such as in <strong>the</strong> Save,Copy and Delete operations).CAUTION•Avoid frequently turning <strong>the</strong> power on/off to <strong>the</strong> USB storagedevice, or connecting/disconnecting <strong>the</strong> device too often.Doing so may result in <strong>the</strong> operation of <strong>the</strong> instrument “freezing”or hanging up. While <strong>the</strong> instrument is accessing data(such as during Save, Copy, Delete, Load and Format operations)or is mounting <strong>the</strong> USB storage device (shortly after <strong>the</strong>connection), do NOT unplug <strong>the</strong> USB connector, do NOTremove <strong>the</strong> media from <strong>the</strong> device, and do NOT turn <strong>the</strong> poweroff to ei<strong>the</strong>r device. Doing so may corrupt <strong>the</strong> data on ei<strong>the</strong>r orboth devices.MM6/MM8 Owner’s Manual 75


![2 Use the CATEGORY [DEC] / [INC] but - Pro Music](https://img.yumpu.com/43682164/74/500x640/2-use-the-category-dec-inc-but-pro-music.jpg)