MP3/WMA DIGITAL AUDIO PLAYER - Venturer
MP3/WMA DIGITAL AUDIO PLAYER - Venturer
MP3/WMA DIGITAL AUDIO PLAYER - Venturer
- No tags were found...

Create successful ePaper yourself
Turn your PDF publications into a flip-book with our unique Google optimized e-Paper software.
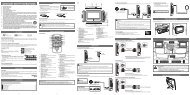
User’s Manual<strong>MP3</strong>/<strong>WMA</strong> <strong>DIGITAL</strong> <strong>AUDIO</strong> <strong>PLAYER</strong>Thank you for purchasing our products.Before using the unit, please read this manual carefullyto obtain the best performance from your unit andretain it for future reference.
CTHIS DEVICE COMPLIES WITH PART 15 OF THE FCC RULES.OPERATION IS SUBJECT TO THE FOLLOWING TWO CONDITIONS:(1) THIS DEVICE MAY NOT CAUSE HARMFUL INTERFERENCE, AND(2) THIS DEVICE MUST ACCEPT ANY INTERFERENCE RECEIVED,INCLUDING INTERFERENCE THAT MAY CAUSE UNDESIREDOPERATION.Note: This equipment has been tested and found to comply with thelimits for a Class B digital device, pursuant to Part 15 of the FCCRules. These limits are designed to provide reasonable protectionagainst harmful interference in a residential installation. This equipmentgenerates, uses, and can radiate radio frequency energy and, if notinstalled and used in accordance with the instructions, may causeharmful interference to radio communications. However, there is noguarantee that interference will not occur in a particular installation. Ifthis equipment does cause harmful interference to radio or televisionreception, which can be determined by turning the equipment off andon, the user is encouraged to try to correct the interference by one ormore of the following measures:-Reorient or relocate the receiving antenna.-Increase the separation between the equipment and receiver.-Connect the equipment into an outlet that is on a circuitdifferent from the one the receiver is connected.-Consult the dealer or an experienced radio/TV technicianfor help.Warnings: Changes or modifications to this unit not expresslyapproved by the party responsible for compliance could void theuser authority to operate the equipment.THIS CLASS B <strong>DIGITAL</strong> APPARATUS COMPLIES WITH CANADIANICES-003.- I -
TABLE OF CONTENTSWARNING & CAUTIONS ...................................................................1NAMES OF EACH PART ...................................................................2CHARGING THE BATTERY ................................................................4REPLACING THE <strong>PLAYER</strong> COVER ..................................................6DISPLAY .......................................................................................7GETTING STARTED ........................................................................8POWER ON ................................................................................8POWER OFF ..............................................................................8HOLD (LOCKING THE BUTTONS) ...................................................9PLAYING MUSIC FILES ....................................................................10MAIN MENU OVERVIEW ................................................................12NAVIGATION...................................................................................13ARTISTS ......................................................................................13ALBUMS ......................................................................................14TRACKS .......................................................................................14FAVORITES .................................................................................15NEW MUSICS ...........................................................................16GENRES .....................................................................................17YEARS ....................................................................................17PLAYLISTS ...............................................................................18FOLDERS ...................................................................................18PLAY SET ....................................................................................18SET EQ. ...................................................................................19SET USER EQ .........................................................................19PLAY MODE .............................................................................20RETURN .....................................................................................22- II -
TIMER SET....................................................................................22POWER OFF...............................................................................23SLEEP TIME...............................................................................23RETURN...................................................................................23GENERAL SET...............................................................................24LCD CONTRAST.........................................................................24USB MODE SET..........................................................................24FREE MEMORY.........................................................................25FACTORY RESET.........................................................................25BACK LIGHT ...............................................................................26LANGUAGE ...............................................................................26DELETE ONE ...............................................................................27QUICK FORMAT ...........................................................................27ABOUT......................................................................................28RETURN...................................................................................28EXIT...................................................................................................28USB DRIVER INSTALLATION (forWindows 98 only).....................29USING IN PC.....................................................................................32Using Your <strong>MP3</strong> Player without Windows Media Player 10...............32Using Your <strong>MP3</strong> Player with Windows Media Player 10.................33Synchronize Tracks to the <strong>MP3</strong> Player...........................................34Creating a Playlist......................................................................36Deleting Tracks of the Playlist from your <strong>MP3</strong> Player..................39Disconnecting the Player from your Computer............................40TROUBLE SHOOTING GUIDE......................................................41SPECIFICATIONS............................................................................42- III -
WARNING & CAUTIONSWARNING: TO PREVENT FIRE OR SHOCK HAZARD, DO NOTEXPOSE THE UNIT TO RAIN OR MOISTURE.TO AVOID ELECTRICAL SHOCK, DO NOT OPEN THECABINET.REFER SERVICING TO QUALIFIED PERSONNELONLY.Cautions• All the safety and operating instructions should be read beforethe unit is operated.• Do not expose the product to direct sunlight or any source ofheat for a long period.• Do not pull the accessory wires (earphone & USB cord) withexcessive force.• The unit should not be used near water - for example, near abathtub, washbowl, kitchen sink, laundry tub, in a wet basement,or near a swimming pool, etc.• Do not use volatile chemicals on this unit. Clean by lightly wipingwith a soft cloth.• Do not attempt to service the appliance.Refer servicing to qualified personnel.-1-
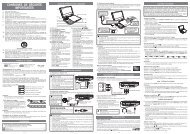
123456789101112! F.F ButtonPress the “!” lightly/repeatedly:To locate the beginning of the next tracks.Keep the “!” depressed:To go ahead at high speed.# REW ButtonPress the “#” lightly/repeatedly:To locate the beginning of the current track or previous tracks.Keep the “#” depressed:To go back at high speed.MINI USB PortFor connecting to your PC with the supplied USB cord.DisplayTo display current status.MENU ButtonPress this button to enter main menu or return to the previousscreen in any setting mode.PLAY/STOP ButtonPress and hold the “ / ” button to begin playing.Press the “ / ” button to pause. Press it again to resume.Press and hold the “ / ” button to stop during playback.Strip MountFor buckling the supplied strip.HOLD KnobTo lock the buttons.RESET HoleFor resetting the player.VOLUME - ButtonTo decrease the volume.PHONES JackFor connecting the headphones/earphones.VOLUME + ButtonTo increase the volume.-3-
4. The charging begins when the “Charging now No USB function”appears on the unit screen.• To install the Windows98 USB driver, please see page 29.• To use the unit in your computer, please see page 32.Notes:• When the built-in battery voltage level is low, “ ” will flash on thescreen of the player.• Playback will automatically come to a stop when the built-in batteryhas no more power. Please recharge it.• If the built-in battery is fully charged, the charging process willautomatically terminate and the “Battery Full” appears on the screenof the player.• The built-in battery recharge time is approximately 2-3 hours.Important NoteIf the notice message “No Space For DB Please Delete MoreThan 4.0MB” always appears on the display, it means that it is notenough space free. Please delete more than 4MB songs from theunit.-5-
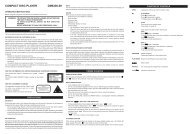
REPLACING THE <strong>PLAYER</strong> COVERYou can replace your desired color covers.1. Gently pull the cover away from the unit.2. Insert the latch of the cover into the corresponding slot. Push thecover until it locks into the place.-6-
ABOUTIn GENERAL SET mode, press the “#” or “!” button to selectABOUT and then press the “ ” button to read the versioninformation.RETURNIn GENERAL SET mode, press the “#” or “!” button to selectRETURN and then press the “ ” button to return to previousmenu.EXITIn main menu mode, press the “#” or “!” button to select EXIT andthen press the “ ” button to exit the main menu.-28-
USB DRIVER INSTALLATION (for Windows 98 only)When connecting the unit to your PC (Windows 98 OS) for the firsttime, the USB mass storage function will not be activated withoutdriver installation. Please use the installation CD to install the driverand follow the two kinds of installation methods below.Method One:1. Insert the supplied installation CD into the CD-ROM drive first.2. Read the readme file of the installation CD.3. Double Click “77xinst”, then Restart Computer.Method Two:1. Insert the supplied installation CD into the CD-ROM driver andconnect the unit to your PC via the supplied USB cord.Note: Do not select the charging battery mode after connecting theunit to your PC. Please see page 4 for details.2. If the player is recognized by your PC, the “Add New HardwareWizard” is activated, and click “Next”.-29-
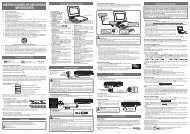
3. Select “Search for the best driver for your device (Recommended)”.Click “Next”.4. Select “Specify a location:” and click “Next”.-30-
5. USB driver file is found. Click “Next”.6. USB driver installation is completed, click “Finish” and restart yourcomputer.-31-
USING IN PCNo Driver is required for Windows Me/2000/XP Operating System.They will detect the Audio Player automatically after the connectionwith the USB port is established.Note:Do not select the charging battery mode after connecting theunit to your PC. Please see page 4 for details.This player supports MSC (Mass Storage Class) and MTP (MediaTransfer Protocol) USB modes, Please see page 24 for settingUSB mode.MSC devices can act as removable hard drives for storage ofimportant files and information.MTP is REQUIRED with the Player if you want to purchase/subscribe/rent music content in Windows XP (above version SP1) from yourfavorite music provider. It is used to validate the licenses of existingmusic files as well as new music files you may have purchased fromonline sources.Using your <strong>MP3</strong> Player without Windows Media Player 10It is unnecessary to set USB mode if you are running the Windows98/ME/2000/XP without Windows Media Player10. After connectingthe player to PC, the player will be recognized as the USB MassStorage Device.1. Use the supplied USB cord to connect theunit to your PC.2. Open Windows Explorer and an additionaldrive will be listed as “Removable Disk”. (InWindows Me/2000/XP, the icon appearson the bottom of the desktop.)3. Transferring files to the Player (in MSC mode)a) From Windows Explorer, highlight all files or folders you want totransfer and copy to the “Removable Disk” drive.-32-
) Once all files/folders appear on the “Removable Disk” drive, thetransferring is complete. (In MSC mode, you can not view filesunder the MTP mode in your computer.)Note: The device is capable of transferring files at hi-speed mode ofUSB 2.0. If USB 2.0 port is available on your computer, use it toconnect to your device. The device is still compatible with the olderUSB 1.1 ports. However, you will not be able to take full advantageof the potential speed increase.Using your <strong>MP3</strong> Player with Windows Media Player 10This player supports Digital Rights Management (DRM) to enablenetworked devices to access content acquired from a host of onlinemusic services. Windows Media Player 10 and Windows XP (aboveversion SP1) PC are required for the device to properly functionwhen in MTP mode.• You can download Windows Media Player 10 from Microsoft bygoing to www.microsoft.com/windows/windowsmedia/download/default.asp.1. Set the USB mode to MTP (Media Transfer Protocol).• If you set the USB mode to MSC, it will act as removable harddrive for storage of the files.2. Use the supplied USB cord to connect thedevice to your PC.3. Open Windows Explorer and an additional drivewill be listed as “MTP/JANUS Player”.4. Open the drive and the “Data” & “Media” foldersappears.Notes:• Do not transfer media files to the Data folder, as the unit can notrecognize the media files of the Data folder.• In MTP mode, you can not view files under the MSC mode.-33-
Do You Want to Buy Musics from an Online Service?You may download musics from an online service (such as, Napster,MusicNow). It is necessary to sign in to your account to performcertain functions in the online service you selected.You may visit http://www.microsoft.com/windows/windowsmedia/mp10/onlinestrores.aspx for details. Below is an example for your reference.1. Login to the online service (example, Napster).2. Search for music on the online service.3. Select the tracks you would like to download and click the“download” button in the track list or right click and choosedownload track(s).4. The track(s) will begin downloading to your PC.Synchronize tracks to the <strong>MP3</strong> Player1. Open Windows Media Player10.a) Click the Library tab from the menu bar on the top of theWindows Media Player screen.b) All songs purchased from online services should be listed inWindows Media Player Library.-34-
2. Locate a music in the Library and right-click on it. Select “Add to ->Sync List”, then the song will be added to “Sync List”. Repeat andadd other songs.3. In Windows Media Player, click Sync and the “Sync List” paneappears. Then select the “MTP/JANUS Player” from the dropdownlist on the right side of this screen.-35-
4. Click “Start Sync” to transfer the musics. A progress indicator willshow each file transferring.After transferring, the “Synchronized to Device (4 items)” messageappears. Total 4 songs are synchronized to the <strong>MP3</strong> player.Creating a PlaylistPlaylists are a great way to control what you listen to on your player.By creating a playlist you can mix any combination of songs youwant, and then enjoy them. Microsoft Windows Media Player 10makes it easier than ever to create playlists.You may visit http://www.microsoft.com/windows/windowsmedia/mp10/newdesign.aspx for details about how to create a playlist.Below is an example for your reference:-36-
1. In Windows Media Player, click Library and then, in the List pane,click the List Name dropdown menu.2. Select “New List -> Playlist” to build a new playlist.-37-
3. Drag items from the contents pane to the new playlist and thenclick “Save Playlist As...”.4. In the File Name box, type the playlist name. Once you save theplaylist, it’s added to the My Playlists category in the library. Thenyou may click Sync Settings to choose a synchronization methodand the playlists you want to synchronize.a. Click Synchronize device automatically and then,b. Choose the option you created or other options from the listpane.c. Click “OK”. Then the tracks of this playlist will be transferred tothe Playlists folder of your <strong>MP3</strong> player.-38-
Deleting Tracks of the Playlist from your <strong>MP3</strong> Player1. In Windows Media Player, click the Library tab and the “MTP/JANUS Player” in the folder tree.2. Select a folder (like folder) from the device tree or select a trackfrom the folder. Right-click the folder/track and choose Removefrom Sync list.3. Wait for the track to be deleted and disconnect your <strong>MP3</strong> playerfrom your computer.Note: After download musics online, the license of the musics willtake some space of the unit. Even if the musics are removed, thelicense will still remain. It is recommended that the unit be formattedperiodically.-39-
Disconnecting the Player from your Computer— Windows 98:After use, you can directly unplug the device and the “RemovableDisk” disappears on the screen of your computer.— Windows XP with MTP mode1) After use, you can directly unplug the device.2) The “MTP/JANUS Player” disappears on the screen of yourcomputer.— Windows Me/2000/XP(Such as Windows 2000):1) Move the mouse to the icon on the bottom of the desktop,and the “Unplug or Eject Hardware” message appears on thedisplay as below:2) Click the icon and the “Stop USB Mass Storage Device”message is shown as below:3) Click the “Stop USB Mass Storage Device” message and popsup the notice message as below:4) Click “OK”, and then you can unplug the unit safely.-40-
TROUBLE SHOOTING GUIDEShould any problem persists after you have made the following checks,consult your nearest service facility.The player cannot power on.• Check if the built-in battery is discharged.Charge the built-in battery.The player does not work.• Make sure the Hold knob is in the off position.• Reset the Player via the RESET hole.• Low level format (All files will be erased after formatting.)a. Slide the HOLD knob to the ON position first.b. Hold the “#” button and then press the “ ” button.No sound from the headsets.• The headphones/earphones plug is not firmly connected to the“ PHONES ” jack .• Check if the volume level is 0. Adjust the “ VOLUME ” control.The files cannot be played normally.• Check if there are <strong>MP3</strong> or <strong>WMA</strong> files on the player.• Check if the audio files are corrupted.Heavy noise• Check if plug of the earphones is clean. Dirty plug may cause thenoise.• Check the music file. If the file data is damaged, heavy noise orskipping may result. Try another music file to confirm.The device cannot appear on the computer as a drive.• Check if the USB cable is correctly connected.• Check the USB control in BIOS and ensure it is enabled.If you have any questions, please contact dealer or refer servicingto qualified personnel.-41-
SPECIFICATIONSItemMemoryMPEG supportSupported OSSpecificationFlash Memory(128Mb/256Mb/512Mb/1GB/2GB)<strong>MP3</strong>, <strong>WMA</strong>, <strong>WMA</strong>-DRMWin.98, Win.Me, Win.2000 & Win.XPPC Interface Standard USB 2.0BatteryMaximum OutputS/N RatioOutput FrequencyUSB InterfaceBuilt-in Lithium-ion RechargeableBattery2 x 7mW (32 Ω )(Output through Earphone)90dB ("A" filter)20Hz~20KHzMSC & MTPDesign and specifications are subject to change without notice!-42-
-43-Printed in China811-331891-041