9â Dovetail Saw Kit Instructions - Tools for Working Wood
9â Dovetail Saw Kit Instructions - Tools for Working Wood
9â Dovetail Saw Kit Instructions - Tools for Working Wood
Create successful ePaper yourself
Turn your PDF publications into a flip-book with our unique Google optimized e-Paper software.
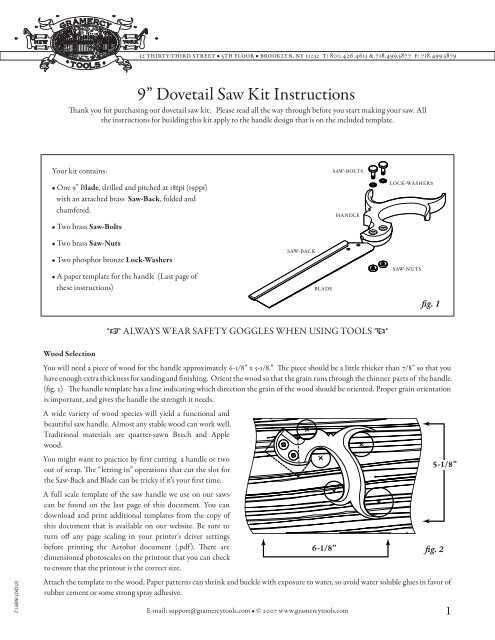
32 Thirty-third street • 5th floor • Brooklyn, NY 11232 t: 800.426.4613 & 718.499.5877 f: 718.499.58799” <strong>Dovetail</strong> <strong>Saw</strong> <strong>Kit</strong> <strong>Instructions</strong>Thank you <strong>for</strong> purchasing our dovetail saw kit. Please read all the way through be<strong>for</strong>e you start making your saw. Allthe instructions <strong>for</strong> building this kit apply to the handle design that is on the included template.Your kit contains:• One 9” Blade, drilled and pitched at 18tpi (19ppi)with an attached brass <strong>Saw</strong>-Back, folded andchamfered.• Two brass <strong>Saw</strong>-Bolts<strong>Saw</strong>-BoltsHandleLock-washers• Two brass <strong>Saw</strong>-Nuts• Two phosphor bronze Lock-Washers• A paper template <strong>for</strong> the handle (Last page ofthese instructions)<strong>Saw</strong>-backBlade<strong>Saw</strong>-Nutsfig. 1*• ALWAYS WEAR SAFETY GOGGLES WHEN USING TOOLS •*GT-DKIT-INSR1-2<strong>Wood</strong> SelectionYou will need a piece of wood <strong>for</strong> the handle approximately 6-1/8” x 5-1/8.” The piece should be a little thicker than 7/8” so that youhave enough extra thickness <strong>for</strong> sanding and finishing. Orient the wood so that the grain runs through the thinner parts of the handle.(fig. 2) The handle template has a line indicating which direction the grain of the wood should be oriented. Proper grain orientationis important, and gives the handle the strength it needs.A wide variety of wood species will yield a functional andbeautiful saw handle. Almost any stable wood can work well.Traditional materials are quarter-sawn Beech and Applewood.You might want to practice by first cutting a handle or twoout of scrap. The “letting in” operations that cut the slot <strong>for</strong>the <strong>Saw</strong>-Back and Blade can be tricky if it’s your first time.A full scale template of the saw handle we use on our sawscan be found on the last page of this document. You candownload and print additional templates from the copy ofthis document that is available on our website. Be sure toturn off any page scaling in your printer’s driver settingsbe<strong>for</strong>e printing the Acrobat document (.pdf). There aredimensioned photoscales on the printout that you can checkto ensure that the printout is the correct size.6-1/8”Attach the template to the wood. Paper patterns can shrink and buckle with exposure to water, so avoid water soluble glues in favor ofrubber cement or some strong spray adhesive.E-mail: support@gramercytools.com • © 2007 www.gramercytools.com5-1/8”fig. 21
Drilling <strong>for</strong> the <strong>Saw</strong> Nuts & BoltsThe first step be<strong>for</strong>e shaping the saw handle is accurately locating and drilling the holes <strong>for</strong> the mounting hardware. A drill press is ideal<strong>for</strong> drilling the multiple concentric holes, but by no means required. You will need the following drill bits:• 1/16” (or smaller) drill <strong>for</strong> piloting.• 3/16” bit <strong>for</strong> the clearance hole <strong>for</strong> the <strong>Saw</strong>-Bolt shank.• 1/2” Forstner or brad-point bit to counterbore <strong>for</strong> the nut and bolt heads.Decide which side of the handle you wish to have the <strong>Saw</strong>-Bolt heads show. Carefully locate both holes <strong>for</strong> the saw from the template.These holes must line up with the corresponding holes in the saw Blade.fig. 31 2 3 4 5Flip1. With the 1/2” diameter Forstnter bit, bore a depth of 9/64.” That should be deep enough <strong>for</strong> the head of the<strong>Saw</strong>-Bolt, plus its Lock-washer.2. Use the center hole left by the guide-point of the Forstner bit to locate your 3/16” diameter bit, and drill downto within 3/16” of the other side of the handle. Don’t drill all the way through yet.3. Switch to your 1/16” bit and drill all the way through the handle. This will serve as pilot hole <strong>for</strong> starting thecounterbore the other side. flip the handle over 4. Using the 1/2” bit again, bore a depth of 1/8.” This recess is <strong>for</strong> the <strong>Saw</strong>-Nut alone; there is no lock washer onthis side.5. Last, run the 3/16” bit through the hole to clear any remaining waste.Note: If you’ve left your material a little thicker than 7/8” as we advise, you’ll need to compensate <strong>for</strong> that extrathickness by cutting slightly deeper counterbores with your <strong>for</strong>stner bit. In general, proceed carefully. Youcan always remove more material later if the brass hardware stands proud.*• ALWAYS WEAR SAFETY GOGGLES WHEN USING TOOLS •*We suggest the method above (fig. 3) , rather than simply starting with 1/16” pilot holes all the way through, because drill bits this thincan be very flexible and may not cut a straight and true hole through 7/8” of hardwood. Control over your drill depth is very alsoimportant here. In the absence of precision measuring equipment such as calipers or a depth micrometer, a tried-and-true strategy <strong>for</strong>fitting these parts together is to drill conservatively, then get to your target depth by twisting the bit by hand, test fitting as you go.Roughing OutPrior to shaping and sculpting the handle, you need to cut away most of the waste material. A bandsaw or a coping saw will work fine<strong>for</strong> this, as will the more traditional turning-saw. You can also use large drill bits or hole saws to cut the main circular curves of thehandle (the big circles shown on the template) and then follow up with a saw to remove the rest.• Leave the reference block: On the template, you’ll notice a dotted line <strong>for</strong>ming a box around the cheek. You’ll want to leave thismaterial in place, temporarily, so you have some good reference/clamping surfaces <strong>for</strong> all of the “letting in” operations described next.Try to cut out this box as squarely as possible.2E-mail: support@gramercytools.com • © 2007 www.gramercytools.com
Letting In“Let in” is a term used when describing how a blade and saw-back fit into their handle. The operations required to make a tight, goodlookingfit are delicate but straight<strong>for</strong>ward. If you take your time and test your fit often, you should be in good shape.BACK SLOT: The slot that receives the <strong>Saw</strong>-Back is approximately 3/16” wide, 25/64” deep, and about 1” long, but with 45˚ interiorchamfers. There might be countless ways to achieve this complex interior shape, but the simplest way we can think of is to drill out asmuch waste as possible, then pare down to the final dimensions with sharp chisels.• Scribe the slot width on your reference block.• Using a 11/64” bit, drill one hole in the long direction, near the intended bottom of the slot.• Now drill a series of holes in the short direction, clearing out most of the waste. Final fitting will be done after the slot <strong>for</strong> the sawBlade is cut.fig. 4BLADE SLOT: Depending on what other saws you have at your disposal, cutting the blade slot can take a lot of different <strong>for</strong>ms. Sincethe blade is only 0.018” thick, it rules out most hand saws, and all but the thinnest band saw blades. We’ve had good results using anextra thin Japanese rip saw, but in a pinch you can actually use the blade in your kit (which is probably the best course of action anyway).fig. 5Here’s how:• Plane down some scrap to half the thickness of your handle,minus half the thickness of your Blade. With an exactly 7/8”thick handle that should be:(0.875” ÷ 2)-(0.018” ÷ 2) = 0.4285”Once again, don’t <strong>for</strong>get if you’re working with oversized stock.Adjust accordingly.• Scribe a center-line around your reference block• Place your scrap and your handle on a smooth, flat surface andrest the saw plate on the block.• Bear in mind that the teeth should hang over the edge of thescrap because the teeth are set wider than the saw plate itself• If your saw Blade teeth sit evenly over the center-line, proceedto cut. If not, you may need to plane down your scrap a littlemore, or shim it up with tape.E-mail: support@gramercytools.com • © 2007 www.gramercytools.com3
After you’ve cut your blade slot you can finish off the slot <strong>for</strong> the <strong>Saw</strong>-Back. Making some practice slotson scrap wood, or a practice handle, is highly advisable. In any case, you need to pare down the sideswith a chisel to get to your final slot width, and you’ll need a very thin chisel or V-gouge to cut inthe chamfers .Shaping UpWhen you are satisfied with the way your Blade and <strong>Saw</strong>-Back fitinto the handle, it’s time to start in on the shaping androunding of the various handle featuresand decorations (aka: the funpart). Cut off the referenceblock and then contour asdesired.fig. 6• Good rasps are excellent <strong>for</strong> shaping and sculpting. A traditional tool <strong>for</strong> rounding the graceful interior curves of saw handles is the<strong>Saw</strong> Handlemaker’s rasp. This tool is available from Gramercy <strong>Tools</strong>. It’s similar to a cabinetmaker’s half round rasp, but it has no teethon the flat side, and the point curls inward enabling the user to round the insides of a closed handle without digging the point into theopposite side.• “Shop rolls,” or cloth-backed abrasive strips, held taut, are an excellent way to round and sand handles. Often they can be split or tornlengthwise to finish tight curves and narrow spaces.• Triangular, or “three-square” needle files are used on our production handles <strong>for</strong> the decorative notches. Notches such as these aretraditional saw handle ornamentation, and serve to personalize as well as refine the look of a handle. In some cases, the size, shape, andplacement of these can help to date an antique— even identify the maker.Final AssemblyInsert the blade/back assembly into the handle, and with a Lock-Washer on each <strong>Saw</strong>-Bolt, insert the screws into the saw handle.Thread on the <strong>Saw</strong>-Nuts from the other side and tighten them up a test fit. If the bolts do not slide into place with ease, it could be <strong>for</strong>any combination of the following of reasons:• There’s interference in the rest of your assembly. This is the likeliest reason. Tap the <strong>Saw</strong>-Back <strong>for</strong>ward so that it is well out of the way,and try to align the Blade holes with the handle holes by inserting an awl or a piece of steel rod, or the taper of a machinist’s scribe. Ifthat doesn’t work, you may need to cut the blade slot a little deeper. You shouldn’t have to cut anything out of the back-slot at this time.If the back-slot is too shallow in either direction, the <strong>Saw</strong>-Back will simply ride high. You can correct this at any time.• The holes are a little undersized. Depending on the make of your bit and any wear it may have sustained, your drill could cut a holequite a bit off from its nominal diameter. If you have a set of straight reamers, or even a bit of sandpaper rolled up tightly, you canenlarge the hole diameters until the <strong>Saw</strong>-Bolts fit.• There’s interference between the hole patterns. If the distance between the holes on the Blade does not match the distance betweenthe holes on the handle, you could have a tough time <strong>for</strong>cing the <strong>Saw</strong>-Bolts in. If the interference is minor, you may be able to twist the<strong>Saw</strong>-Bolts in until the threads are past the blade stock, then <strong>for</strong>ce them the rest of the way home. Don’t try to <strong>for</strong>ce the bolts in if youcan’t get the threads past the Blade. At the very least, you’ll bungle the threads. You may even crack the cheek. Because the holes in thehandle have to remain concentric with their counterbores, the easiest way to correct <strong>for</strong> interference here is by adjusting the holes in theBlade with a round needle file. Proceed slowly. If you remove too much material there is a chance your blade will wobble in its mount.Tighten the <strong>Saw</strong>-Nuts: If you do not have a purpose made split nut driver you can make one from a bit of steel or a screwdriver with agap ground in the middle. Gramercy <strong>Tools</strong> also offers a ready-made Split-Nut Screwdriver bit. A moderate amount of torque will berequired to embed the Lock-Washer.4 E-mail: support@gramercytools.com • © 2007 www.gramercytools.com
Finishing UpA conventional way of finishing off a fine hand saw is to sand down the faces of the handle, while the saw is fully assembled. This hasthe effect of making the hardware perfectly flush with the surface of the handle, leaving uni<strong>for</strong>m, parallel scratches in the brass. Youmay also prefer to polish the brass components prior to assembly with a little buffing compound and a wheel. As always, tool users andbystanders should wear safety goggles.When you are totally satisfied with the shape and fit of your assembly, It’s time to apply the finish. Our production saws are finishedwith oil and wax. Of course, you can use whatever you want.E-mail: support@gramercytools.com • © 2007 www.gramercytools.com5
32 Thirty-third street • 5th floor • Brooklyn, NY 11232 t: 800.426.4613 & 718.499.5877 f: 718.499.5879Using the Gramercy <strong>Tools</strong> <strong>Dovetail</strong> <strong>Saw</strong>Thank you <strong>for</strong> purchasing a Gramercy <strong>Tools</strong> <strong>Dovetail</strong> <strong>Saw</strong>. When you use the Gramercy <strong>Tools</strong> <strong>Dovetail</strong> <strong>Saw</strong> with the right technique you will get the sameadvantages in cutting dovetails that enabled early 19th century craftsmen to work fast and efficiently, even when they were just starting out as apprentices.How to Hold the <strong>Saw</strong>The first thing you will probably notice is that the handle is tiny. The handle is designed to ensure your hand is in the correct position <strong>for</strong> com<strong>for</strong>table sawing,even <strong>for</strong> extended periods. Hold the saw like a pistol, with your index finger outstretched. Only three fingers actually curl under the handle. If you wrap all fourfingers around a saw handle, there is a tendency to make a fist, which leads to cramping. You would also have less directional control. For these reasons, thehandle is designed <strong>for</strong> the three-fingered grip shown above. At the same time, the smaller and lighter handle has less mass to move back and <strong>for</strong>th with eachstroke, and less weight to influence the direction of an angled cut. The handle should sit snugly in the upper part of your hand so that you can easily controlthe saw with your thumb and <strong>for</strong>efinger. This is the key to accurate sawing.Clamping the WorkTo minimize any chance of the wood vibrating as you saw, clamp the wood as close as you can to the topedge of the vise, leaving enough clearance to saw the entire depth of the joint without having to re-clampthe wood, or accidentally sawing into the vise. You want to be able to com<strong>for</strong>tably rest the saw so that theteeth lay evenly across top of the wood. With the handle geometry of our saw, you should find yourselfstanding com<strong>for</strong>tably, and fairly close to the work, so that you can easily check your progress on bothsides of the wood as you proceed.Starting the CutA lot of people have trouble starting a saw cut, so people have developed a lot of different methods to do this. Some pull the saw backwards to score a notchin the wood; others cut a notch with a sharp chisel to the waste side. We found that once we got out of our old habits, just holding the saw with the teeth on thewood worked consistently <strong>for</strong> great starting. Because our saw is has a canted blade, and is so finely toothed, the most frequent problem people have whenstarting our saw is trying too hard. We have also found that with people accustomed to other dovetail saws there is a tendency to use too much downwardpressure and tense up on the saw. Here’s a way of starting a cut that works well with our saw:• Rest the toe of the saw (the tip away from the handle) where you want it to cut, usually on the waste side of a scribed line, just glancing the scribe. Hold thesaw level, the teeth just resting flat all along the top surface to be cut.• USE NO DOWNWARD PRESSURE. Relax and push the saw straight <strong>for</strong>ward, starting the cut. If you tense up or tilt the saw up or down on the work, thesaw will jam. This method doesn’t work well with coarse toothed saws, but with our fine, 19ppi saw, it works great. The problem <strong>for</strong> us was unlearning all thetricks we had learned to start coarser saws.• With the first stroke done, ease up even more, and return the sawto the starting position, keeping the saw in the kerf just made. Doanother stroke the same way, easily, relaxed, with no pressure. Thesaw blade is thin, so if you start cutting askew, the blade will bendand bind in the cut. Be attuned to that feedback and you will quicklylearn to saw straight. Relax your hand and your body, and justpay attention to the saw.•If you have never cut dovetails be<strong>for</strong>e, go slowly and carefully. Try toremove a tiny bit, but not the entire marked line. With practice, youwill gain speed, but it’s important to give yourself and your muscles achance to develop the correct technique.*• ALWAYS WEAR SAFETY GOGGLES WHEN USING TOOLS •*Finishing the CutThe blade of the saw is slightly canted, so you should reach your target depth at the front of the board (the side facing you) first. Slow down, and tilt the sawinto the cut a little to level off. Always take full, com<strong>for</strong>table strokes. With a little experience, you should just graze your front and back scribe lines at the sametime. Successful sawing <strong>for</strong> dovetails means learning to saw square to the wood and at a consistent angle. Consistency and speed come with practice. Sincethis document was not intended to be a definitive guide to dovetailing, we will leave instruction on layout and chiseling <strong>for</strong> a later article.We hope you enjoy your saw. Please call or e-mail us if you have any questions.A Note on Sharpening: Eventually, with enough use, a saw will dull and need sharpening. We recommend a long, triangular Swiss needle file <strong>for</strong> sharpeningyour Gramercy <strong>Tools</strong> <strong>Dovetail</strong> <strong>Saw</strong>. After repeated sharpening, the teeth will need to be set. Neither of these activities is hard to do, but on a saw with teeth thissmall we do not recommend it as a beginner’s sharpening project. We offer a saw sharpening service at a nominal charge. See our website <strong>for</strong> more details.E-mail: support@gramercytools.com • © 2007 www.gramercytools.comG T- D S AW - H O W T O 1 - 3
1/4 "WOOD GRAIN DIRECTIONSAW SLOT LINE1 "0.750 " REFERENCE BOX1/2 "© Copyright tools<strong>for</strong>workingwood.com, 2007. All rights reserved.Authorized <strong>for</strong> personal use only. Any other reproduction is strictly prohibited.Always wear eye protection when using tools.1 "PHOTOSCALE1/4 "4 "PHOTOSCALE4 "Ø1 inØ1/4 in0.784 "0.654 "1/2 "0.559 "10-32 UNF1.297 "Ø 1/2 "SAW NUT & SAW BOLT REFERENCE - DO NOT SCALE7/32 "1/8 "Ø 1/2 "3/64 "NominalSlot Width3/4 "Ø1 inØ1 inØ1 1/4 inØ1 1/2 inTOOLS FOR WORKING WOOD32 THIRTY-THIRD STREET, 5TH FLOOR, BROOKLYN, NY 11232 T: 718.499.5877 F: 718.499.5879SCALETITLETEMPLATE 1:1PARTDATED9" DOVETAIL SAW HANDLE 5/31/2007WORK SAFELY:ALWAYS WEAR EYE PROTECTION.WWW.TOOLSFORWORKINGWOOD.COM1-800-426-4613


