

Shaker Hanging Cabinet - Popular Woodworking Magazine
Shaker Hanging Cabinet - Popular Woodworking Magazine
Shaker Hanging Cabinet - Popular Woodworking Magazine

You also want an ePaper? Increase the reach of your titles
YUMPU automatically turns print PDFs into web optimized ePapers that Google loves.
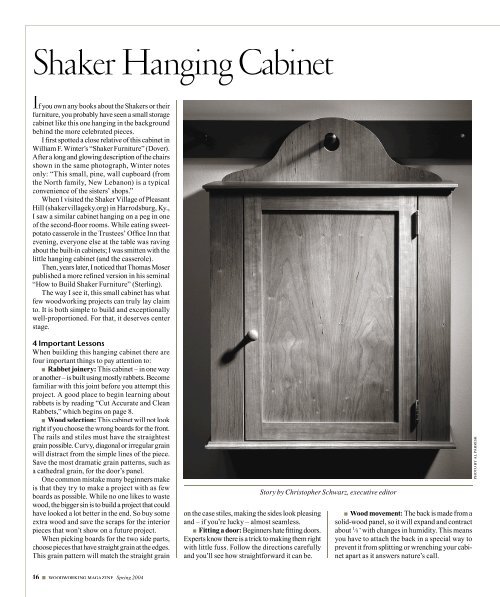
<strong>Shaker</strong> <strong>Hanging</strong> <strong>Cabinet</strong>If you own any books about the <strong>Shaker</strong>s or theirfurniture, you probably have seen a small storagecabinet like this one hanging in the backgroundbehind the more celebrated pieces.I first spotted a close relative of this cabinet inWilliam F. Winter’s “<strong>Shaker</strong> Furniture” (Dover).After a long and glowing description of the chairsshown in the same photograph, Winter notesonly: “This small, pine, wall cupboard (fromthe North family, New Lebanon) is a typicalconvenience of the sisters’ shops.”When I visited the <strong>Shaker</strong> Village of PleasantHill (shakervillageky.org) in Harrodsburg, Ky.,I saw a similar cabinet hanging on a peg in oneof the second-floor rooms. While eating sweetpotatocasserole in the Trustees’ Office Inn thatevening, everyone else at the table was ravingabout the built-in cabinets; I was smitten with thelittle hanging cabinet (and the casserole).Then, years later, I noticed that Thomas Moserpublished a more refined version in his seminal“How to Build <strong>Shaker</strong> Furniture” (Sterling).The way I see it, this small cabinet has whatfew woodworking projects can truly lay claimto. It is both simple to build and exceptionallywell-proportioned. For that, it deserves centerstage.4 Important LessonsWhen building this hanging cabinet there arefour important things to pay attention to:■ Rabbet joinery: This cabinet – in one wayor another – is built using mostly rabbets. Becomefamiliar with this joint before you attempt thisproject. A good place to begin learning aboutrabbets is by reading “Cut Accurate and CleanRabbets,” which begins on page 8.■ Wood selection: This cabinet will not lookright if you choose the wrong boards for the front.The rails and stiles must have the straightestgrain possible. Curvy, diagonal or irregular grainwill distract from the simple lines of the piece.Save the most dramatic grain patterns, such asa cathedral grain, for the door’s panel.One common mistake many beginners makeis that they try to make a project with as fewboards as possible. While no one likes to wastewood, the bigger sin is to build a project that couldhave looked a lot better in the end. So buy someextra wood and save the scraps for the interiorpieces that won’t show on a future project.When picking boards for the two side parts,choose pieces that have straight grain at the edges.This grain pattern will match the straight grainon the case stiles, making the sides look pleasingand – if you’re lucky – almost seamless.■ Fitting a door: Beginners hate fitting doors.Experts know there is a trick to making them rightwith little fuss. Follow the directions carefullyand you’ll see how straightforward it can be.Story by Christopher Schwarz, executive editor■ Wood movement: The back is made from asolid-wood panel, so it will expand and contractabout 1 ⁄ 8 " with changes in humidity. This meansyou have to attach the back in a special way toprevent it from splitting or wrenching your cabinetapart as it answers nature’s call.PHOTO BY AL PARRISH16 ■ woodworking magazine Spring 2004
Making a Strong CaseOnce you select your boards and joint and planethem down to the correct thickness, you shouldmill all the parts for the carcase. Joint one longedge of each board, rip them to width and thencrosscut them to finished length. Leave the doorparts and frame stiles long for now – you will cutthem to fit the assembled carcase.The first joints to cut with this project are thethree rabbets in each side piece. Set up your tablesaw to cut a 3 ⁄ 4 "-wide x 1 ⁄ 4 "-deep rabbet using theinstructions provided in “Cut Accurate and CleanRabbets.” Make a test cut in some scrap that’s thesame thickness as your sides. Check your workwith a square and some care. If this joint does nothave a dead-on 90° corner, your carcase won’thave one either. If it is square, check the dimensionof the rabbet using a dial caliper. This mightsound like overkill, but it’s not. Here’s why: If thisjoint is just a little off, then all the joints that followit will have to compensate for this small error– especially when you start building the door andfitting it to the case. Small errors like this tend toadd up during the course of a project.When you’re satisfied with the setup of yourdado stack and rip fence, lock the height of thearbor. This is important for a couple of reasons.With some less-expensive table saws, you canactually force the arbor to creep downward duringa cut with a dado stack. I’ve seen it happen– your dado will look like a ramp for skateboardersinstead of a properly made joint. Also, youwill be keeping this exact height for the next twojoinery operations, so locking in your setting is agood idea. With your saw set, cut this rabbet onthe ends of the two side pieces. This joint holdsthe top and bottom of the case in place.Next, cut the rabbet in the sides that will holdthe back panel. To create this rabbet, you needonly adjust your rip fence to make a 1 ⁄ 2 "-wide x1 ⁄ 4 "-deep rabbet and cut that rabbet on the longback edge of each side piece.After that, cut the dados in the side pieces thatwill hold the two 1 ⁄ 2 "-thick shelves in place. Tomake your life easier, make sure you do not changethe height of the dado stack you just used to cut therabbets. Remove the dado stack from the arbor andinstall the correct number of wings, chippers andshims to produce a perfect 1 ⁄ 2 "-wide dado.The dados for the shelves are 1 ⁄ 4 " deep. Byleaving the height of the blades alone, you ensurethat the shelves, top and bottom will keep yourcase square. If you change the height of the bladeseven a tiny bit before cutting the dados, one of twobad things will happen. If your cut is too deep,your shelves won’t seat all the way down intothe bottoms of the dados without some extraordinaryclamping pressure. (If you manage toclose this joint, your carcase will end up with anhourglass shape and the rabbets at the top andbottom will be gappy and weak.) If your dado cutis too shallow, the shelves will cause the sides tobulge out in the center and the rabbets at the top andbottom will be gappy, unattractive and weak.To make the dados in the sides, use your tablesaw’s miter gauge (set to 90°) and a gauge blockclamped to your rip fence, as shown in the photobelow. Mark on your side pieces the locations ofboth dados. Sure, it will take an extra minute,but it prevents mistakes. Also mark the top andbottom of each of the sides so you don’t get theright and left sides confused – a common mistakethat even professionals make.With the dados cut, you are almost ready toassemble the basic carcase. It’s always a goodidea to prepare your interior surfaces for fi n-ishing before assembly. Finish-sand the insidefaces of your pieces (start with #100-grit paperand work up to #220), or plane and scrape thesurfaces to your liking.Test the fit of the joints and clamp the casetogether without any glue. Do not skip this step.A rehearsal is worthwhile for several reasons:You’ll figure out exactly how many clamps youneed so you don’t have to go rushing across theroom for more as the glue sets up. You’ll also figureout the best procedure for clamping the casewithout your parts flopping around. And you’llmake sure your rabbets and dados fit soundly.As you make this milk run, make sure youkeep the front edges of the top, bottom and shelvesperfectly flush with the front edge of the sidepieces. The top, bottom and shelves, if you haven’tnoticed, are 1 ⁄ 2 " narrower than the sides.Before you take the clamps off, pay particularattention to the squareness of the case. Measurethe case from corner to corner and compare thetwo dimensions. If they’re the same, everything’ssquare. If they’re not, put a clamp across the twoThe gauge block, which is clamped to the ripfence, sets the location of the dado on the sidepieces. But because the gauge block sits in front ofthe saw blade, there’s no danger of trapping yourside piece between the rip fence and the bladeI recommend using a dado stack for cuttingrabbets because it requires only one setup. Thefeatherboard makes the operation safer and moreaccurate by keeping your work pressed firmlyagainst the saw’s table.corners that produced the longer measurement andapply the tiniest bit of clamping pressure. Comparethe corner-to-corner measurements again.Repeat until everything is perfect. I like to checkthe squareness now because the cabinet usuallybehaves the same once you add the glue.Now add glue in your rabbets and dados. Ifyou are new to woodworking, I recommend aslow-setting glue for casework. There are severalvarieties, the most common being TitebondExtend. The glue’s extra “open time,” which iswhen the glue is wet and your parts can moveMiter gaugeGaugeblockRipfencewhile making this cut – a major source of kickback.If you have a stock miter gauge, this would be anexcellent time to add a piece of adhesive sandpaper(I prefer #100-grit) to its smooth metal face toimprove grip during this operation.woodworking-magazine.com ■ 17
StileAngled nailswedge the jointMindthe gapNails are not an act of the devil. Someday theglue will fail, and it’s the nails that will hold everythingtogether. Make sure you angle your nails(18-gauge brads are good) as shown so that thefasteners wedge the side piece against its mates.around, will allow you to tweak the position ofyour parts. When applying the glue, a thin butconsistent film will bond your joints withoutmaking a big mess. When you apply the clamps,a little glue squeeze-out is good – it means youhaven’t starved your joints of glue.After 45 minutes, take the case out of theclamps and nail the sides to the top and bottompieces, using the above photo as a guide.This is a highly visible joint, so make extra sure you watch out for gaps between the stiles and the sides.World’s Simplest Face FrameTraditionally, face frames are built using both verticalpieces (stiles) and horizontal pieces (rails).Not so with this project, which has only stiles.This makes things a lot easier.Cut your stiles to finished width and length,and finish-sand or plane them. If you’re handywith a block plane, it’s wise to cut your stilesabout 1 ⁄ 32 " long and trim them flush to the caseat the top and bottom after affixing them to thecarcase. If you’re not so confident, just take extracare in cutting your stiles to length.Attach the stiles to the carcase using glue andclamps. Nails aren’t necessary here. Make aneffort to ensure the long edge of each stile is perfectlyflush with its mating side piece; otherwisethe opening for your door will not be square.To complete the opening for the cabinet’s door,you need to attach the additional 1 ⁄ 2 "-thick top andbottom pieces that have the decorative cove cutmilled on them, which is easy to do.As you study the cutting list below, you’llnotice that the outside top and bottom are differentwidths – the top is 1 ⁄ 2 " wider than the bottom.That’s not a mistake. It’s actually a clever way tocreate a notch in the back edge of the outside toppiece (cutting stopped notches is no fun). Let metell you what you’re going to do to that top piece:<strong>Shaker</strong> <strong>Hanging</strong> <strong>Cabinet</strong>NO. PART SIZES (INCHES) MATERIAL NOTES (DIMS IN INCHES)T W LCarcase❑ 2 Sides 3 ⁄ 4 7 19 Cherry 3 ⁄ 4 "-wide x 1 ⁄ 4 "-deep rabbets on ends❑ 2 Inside top & bottom 3 ⁄ 4 6 1 ⁄ 2 17 Cherry❑ 2 Shelves 1 ⁄ 2 6 1 ⁄ 2 17 Cherry Cherry in 1 ⁄ 2 "-wide x 1 ⁄ 4 " - deep dados❑ 2 Stiles 3 ⁄ 4 21 1 ⁄ 2 19 Cherry Glued to carcase❑ 1 Notched outside top 1 ⁄ 2 8 3 ⁄ 4 19 Cherry❑ 1 Outside bottom 1 ⁄ 2 8 1 ⁄ 4 19 Cherry❑ 1 Back 1 ⁄ 2 18 24 1 ⁄ 2CherryDoor❑ 2 Door stiles 3 ⁄ 4 1 1 ⁄ 2 * 20* Cherry 1 ⁄ 4 " -wide x 1 ⁄ 2 "-deep groove on one edge❑ 2 Door rails 3 ⁄ 4 1 1 ⁄ 2 * 11 1 ⁄ 4 * Cherry 1 ⁄ 4 " -wide x 1 ⁄ 2 "-deep groove on one edge, 1 ⁄ 2 " TBE❑ 1 Door panel 1 ⁄ 2 11 17 Cherry 1 ⁄ 2 "-wide x 1 ⁄ 4 " -deep rabbet on four back edges* Dimensions listed are oversized. See the text for details. TBE = tenon both ends18 ■ woodworking magazine Spring 2004
Gap between back and sideallows for expansion(See Back Panel Detail)∕Top detail on back paneloverlaps expansion gap‹Gap between door paneland frame allow for expansion∕∕Slotted screw holesallow for expansion1¬" Dia.Plan∕16ø"1 Square -ø InchBack Panel Detail7"6ø"5"1µ"‹All shelvesare dadoedinto side panel5ø"20"16¬"19"5ø"8"‹Top and bottomare rabbetedinto side panel5ø"1µ" 10¬"2ø"18"19"Elevation<strong>Shaker</strong> <strong>Hanging</strong> <strong>Cabinet</strong>8¬"Note: Side panel removedfor clarityProfilewoodworking-magazine.com ■ 19
Cutting an accurate stopped notch like this isa pain. By ripping the oversized top down andregluing smaller blocks on the ends of the top,you create the perfect notch for the back piece.Centering grooves on your work is child’s play ifyou cut them in two passes. Here you can see thatI milled one half of the groove and have turnedthe piece around to mill the other half.Make the tenons by cutting a rabbet on both sidesof the rails. Use your miter gauge and fence tomake this cut. It’s a safe operation because youcan’t trap your work between the blade and fence.First you’re going to rout the cove detail on threeedges of both the top and bottom.The best way to do this operation is on a routertable that’s set up with a 5 ⁄ 8 " cove bit, though youcan do it hand-held in a pinch. Either way, makesure you rout the detail on the ends first, thencome back and rout the long edge. This will cleanup a good deal of splintering that occurs whenyou exit the cuts on the ends.Next take only the top piece to the table sawand rip the back edge off the board so it’s 7 3 ⁄ 4 "wide. Take the fall-off strip and rip it so it’s 1 ⁄ 2 "wide. Crosscut 1" off each end of that falloff pieceand reglue each end to the back edge of the toppiece, making sure the cove detail matches. Voilà!You have an instant stopped notch in your top.Attaching the top and bottom pieces to thecarcase is easy if your case is square and yourjoints are flush. Before you attach the top andbottom, check their fit against the carcase itself.You want a tight joint at the front and the sides. Ifyou don’t get a seamless fit with only hand pressure,you’ll need to tweak the carcase until youdo. Relying on your clamps to close an imperfectjoint is asking for trouble.Sometimes this process takes a bit of detectivework to figure out what’s wrong. For example,the top of my carcase had an inexplicable“Skill without imagination iscraftsmanship and gives us manyuseful objects such as wicherworkpicnic baskets. Imagination withoutskill gives us modern art.”— Tom Stoppard (1937 – )“Artist Descending a Staircase”but slight bulge in the center, so the top piecewould rock back and forth on it. A sharp blockplane made short work of the problem. As youremove material, try to stay away from the edgesof the carcase. That’s where you can create problemsthat will show in the finished piece.When satisfied with the fit of the top and bottompieces, apply a liberal amount of glue to thecarcase and position the top and bottom in place.When you’ve got them where you want them, nailthem in place through the inside of the cabinet.Use only a couple of nails in each; their job isto hold the top in place as you clamp it. Applyclamps around the cabinet to secure the top andbottom to the carcase and check for gaps.The Stub-tenon DoorBecause this is a light-duty door, we can buildwhat’s called a “stub-tenon” door. Essentially,it’s a traditional mortise-and-tenon door that usesshort (some would say “stubby”) tenons that areonly 1 ⁄ 2 " long. A bigger traditional door would usetenons at least 1" long. We’ve included a tutorialon this style of door starting on page 12.The advantage to these short tenons is theyallow you to build the door without having to cutmortises in the stiles. The 1 ⁄ 4 "-wide x 1 ⁄ 2 "-deepgroove you cut for the door’s panel also servesas the mortise for the tenons on the rails.While stub-tenon doors are a good trick, thereal trick to making perfect doors is to learnabout “horns.” What are horns? Again, take alook at the cutting list and you’ll notice that thestiles are 1” longer than they need to be to fit inthe door’s opening. And both the rails and stilesare 1 ⁄ 8 " wider than called for in the drawing.This extra length and width create what looklike horns on the assembled door. These hornsallow you to make a door that is slightly oversizedwhen compared to the hole in the cabinet.Once the door is assembled, rip and crosscut itsquare to fit perfectly in the door opening. Thereis no easier way to fit a door.So let’s build the door. Cut your stiles, railsand panel to the sizes listed in the cutting list.Now mill the 1 ⁄ 4 "-wide x 1 ⁄ 2 "-deep groove in onelong edge of the rails and stiles. The best way todo this is with a rip blade set to make a 1 ⁄ 2 "-deepcut. A rip blade is best because the top of its teethare flat, so the bottom of your groove also willbe flat. Crosscut teeth will leave “V”-shapedchannels in the bottom of the groove. Positionyour saw’s rip fence so there’s a 1 ⁄ 4 "-wide gapbetween the teeth and the rip fence.Cut the groove first with one face of your workagainst the fence, then turn it around and makethe cut with the other face against the fence. Thismethod ensures that the groove is perfectly centeredon your rails and stiles. If there happens tobe a thin scrap hanging in the middle (as shown inthe photo above center), you can adjust the fenceand make a third pass to eliminate it.Next get your rails and prepare to cut thetenons on the ends. These tenons are made bycutting a rabbet on both faces of the board. Tworabbets make a tenon, as shown in the photoabove right.Set up your dado stack with an accessoryfence just like you did when you cut the rabbetson the side pieces. Bury the dado stack in theaccessory fence so that you’re making a cut thatis exactly 1 ⁄ 2 " wide x 1 ⁄ 4 " deep.Use your miter gauge to guide your railsacross the spinning dado stack. Make a coupleof test cuts on scrap that is the same thickness asyour door stock. Test the fit of your scrap tenonin the grooves you cut in the rails. Fine-tuneyour fence setup and cut the tenons on the endsof both rails.Now fetch your 1 ⁄ 2 "-thick panel. To fit thispanel in the grooves in the rails and stiles youmust first cut a rabbet that is 1 ⁄ 2 " wide x 1 ⁄ 4 " deep20 ■ woodworking magazine Spring 2004
on the panel’s four back edges. Coincidentally(OK, it’s not really a coincidence), this is the samesetup you just used to make your tenons.Now finish-sand your door parts and dry-fitthe door. You’ll notice how the stiles extend pastthe rails. These are the horns I told you aboutearlier. The tenons must close tightly with onlyminimal clamping pressure. If you are strainingto close the joint you are almost certainly twistingyour door so it’s not flat. Take the joint apartand investigate the problem. Usually there’s gunkthat’s preventing a good fit, or the tenon is toolong for the depth of the groove.Once you have a seamless door frame clampedup, take the whole thing apart and glue the tenonsin the grooves. (Never glue a solid-wood panelin place in a door. It has to expand and contractwith changes in humidity.)After about 45 minutes, remove the clampsfrom the door. Measure your door opening andtemporarily screw the hinges to the carcase. Nowtrue one stile of your assembled door by runningit over the jointer. Rip the door to its fi nishedwidth on your table saw, trimming evenly fromthe left and right stile. Then crosscut it to theStileRailHornYou can see here how the stiles stick out past the rails of the door. These are the so-called “horns,” whichyou then trim off to make the door the perfect size.A Better HingeInstalling hinges for an inset doorcan be a brutal lesson in precision.Inset doors, as their nameimplies, sit inside the cabinet orthe cabinet’s face frame. The spacebetween the door and the cabinet– called the “reveal” – has to beperfectly equal all the way aroundthe door or it won’t look right.Overlay doors, on the other hand,are much more forgiving to installbecause a rabbeted lip on the doorThese holes arefor the bradscovers up the gap between thecabinet and the door. If you’rea little off – or sometimes evena lot – no one will ever notice.But overlay doors don’t generallyhave the look of a fine andrefined piece of furniture. Theysay “kitchen cabinet” instead of“prized possession.”So if you want to install insetdoors, you’re going to have towrestle with mortising a buttThese holeslock theposition ofthe doorAll other holes simply holdthe hinge in placeIf you struggle with installing hinges for inset doors, this can make it easier.hinge into both your cabinet anddoor, right? Wrong. During thelast five years we have becomehuge fans of a hinge made byAmerock that is remarkable forthree reasons: One, it lets youinstall the hinge without cutting amortise. Two, once you install thehinge you can tweak its positionuntil the door is perfect and thenlock in your final setting. Andthree, these hinges look great ontraditional cabinets.The secret to these remarkablehinges is that they haveoval-shaped holes for screws thatallow you to shift the door slightlyup and down in its opening andeven cock it deliberately out ofsquare to match a door openingthat’s not perfect. Once you getthe door just right, you secure thehinge permanently with either afinal screw or a brad – dependingif the hinge is designed for a faceframecabinet (which uses whatAmerock calls a “full back-to-backwrap-around hinge”) or a framelesscabinet (which uses a “partialwrap-around hinge”).In the hinge pictured at left, youcan see the holes for the brads inthe leaf that attaches to the case.Curiously, you have to supply yourown brads to lock this leaf in place;my only gripe with this hinge isthat they aren’t included.On the leaf that attaches to thedoor you can see the two screwholes that lock in that setting.(One of the holes has a screw init; the other does not.)The Amerock hinges are availablein a variety of finishes, includingwrought iron, brushed nickel,dark antique brass, antique brassand polished brass. Plus they areavailable in a variety of styles thatmatch many styles of furniturewith a finial tip, a ball tip or just aplain button. These hinges aren’tcheap – about $6 per pair nomatter where you go. But thatprice includes high-quality screwsfor installing them. Once you trythese hinges, we don’t think you’llgo back to traditional mortisehinges unless you have to. WM– Christopher SchwarzAmerock Corporation4000 Auburn Street, P.O.Box 7018,Rockford, IL 61125-7018,800-435-6959 or amerock.comwoodworking-magazine.com ■ 21
correct length. Test the fit in the door’s openingand fine-tune things until the door has a perfectlyconsistent gap all around. You can use a tablesaw to do this, but I prefer a hand plane becauseI mess things up in a much slower fashion thanwith a power tool. Once your door fits, you cantweak its position in its opening if you use thehinges we recommend in the Supplies box below.Add the knob of your choice and a catch (themagnetic ones are the easiest to install).More Notches in Your BackAs I designed this project, I tried different waysto make it so the back was not one piece of 17 1 ⁄ 2 "-wide solid wood. The solutions were more complexthan I liked or they didn’t look right, so Idecided to stick with the original wide back.To make this work, I first had to calculatehow much the back would expand and contractin a typical Midwestern environment (whichhas some pretty radical humidity fluctuations,I can tell you). Using the formulas in R. BruceHoadley’s “Understanding Wood” (TauntonPress), I figured out how much movement toexpect. According to Hoadley’s formulas, thepanel will expand about 1 ⁄ 8 " when the humidityfluctuates between 8 percent and 14 percent. Thisis a reasonable range to expect in our climate.So now you need to measure the spacebetween the two rabbets on the backside of yourassembled carcase. It should measure 17". Sothe lower part of the back piece should measure16 7 ⁄ 8 " wide. That’s simple enough. The real difficultycomes when dealing with the curvy toppart of the back. It’s 17 1 ⁄ 2 " wide. That extra widthoverhangs the top of the cabinet. Once again thismeans you have to create a stopped notch on thetwo long edges of the back.The simplest procedure is to use the sametrick you used for creating the notch on the toppiece: Gluing small pieces on the back to makea notch. And that’s a fine way to do it as long asyou pay close attention to matching the grain.This is a very visible part of the cabinet.Make your back piece a bit wider to start with:18" is about right. Rip two strips off each longedge so the back ends up 16 7 ⁄ 8 " wide. Keep trackof which edge each strip came from because thatwill make it easier to match the grain when regluingthe blocks in place. Now take those narrowstrips and crosscut 5" off the top of each. Regluethese blocks to the back.After the glue dries, mark the curvy shapeon the back and cut to that line. A band saw,scroll saw or coping saw will do. Just make sureit’s a fine-tooth blade. Clean up the rough sawcutedges with sandpaper, files or a spokeshave.Then drill the 1 1 ⁄ 4 "-diameter hanging hole inthe location shown in the drawing. Finish-sandyour back.Attaching the back is easy if you pay attentionto the issue of wood movement. The backGlue stripin placeTo make this notching operation go smoothly,make sure you rip the narrow strips from the backusing a sharp rip blade. This will ensure that you’llget a clean cut and the blocks will be easier toreglue and get a seamless joint.is attached by screwing through it into the topand bottom pieces. You want to secure the backin the center of the cabinet so it expands equallyon either side. Here’s how to do that: Drill sixscrew holes in the back, three along the top andthree along the bottom. The middle hole shouldbe a standard round clearance hole. But the holesto the left and right should be elongated left-toright.It’s these elongated holes that allow theback to expand and contract with changes inhumidity.I’ve seen people make a template to rout perfectelongated ovals. Then they make the countersinkusing a template and a chamfer bit. Thisis not necessary. All you really need to worryabout is allowing the shaft of the screw to pivotas the back moves. The screw’s head can remainbasically in the same place.Here’s how I make elongated holes: Drill astandard clearance hole for your screw that allowsthe screw’s shaft and threads to pass throughwithout biting into the wood. Next, angle yourdrill 45° one way and drill out a bit of one sideof your clearance hole. Then angle the drill 45°the other way and drill out the other side of yourhole. Finally, come back with your countersinkingbit and countersink your clearance hole. Oncedone, then you can screw the back to the caseusing some #8 x 1"-long screws.Finishing CherryBefore you apply a finish to this project, take afew minutes to break the sharp edges with #120-grit sandpaper. This will make your project moreenjoyable to touch and less likely to get damaged.Now remove the back and door.Because cherry darkens nicely with age, I prefernot to add much coloring. In any case, stainingcherry can be difficult because it blotches.But new cherry with a clear finish looks a bitanemic until it gets a couple of years of coloring,so I like to help the process along. BeginThis elongated hole allows the back to expandand contract and still stay tightly secured underthe screw. I make these holes by wiggling my drillbit. The other option is to drill a round hole andelongate it with a small rat-tail file.by wiping on a coat of boiled linseed oil that’sthinned down to a water-like consistency withpaint thinner. Wait about 30 minutes and wipe offthe excess. Then take your project outside and letit bask in the warm sun for an afternoon or two.This will jump-start the coloring process.After a couple of days of letting the oil cure,you can add a protective top coat. The simplestfinish for this is a wiping varnish – essentially athinned-down off-the-shelf varnish. For moredetails on mixing and using this finish, check out“Understanding Wipe-on Finishes” on page 30.If you want to hang this project like the <strong>Shaker</strong>sdid, you’ll need to build and hang a board with<strong>Shaker</strong>-style pegs. The length of the board is up toyou and the scale of your room. We’ve includeda supplier of cherry <strong>Shaker</strong> pegs below.The last trick is to find a place in your homethat really shows off the proportions and workmanshipof this fine piece. You don’t want thisproject to ever languish in the background. WMContact the author at 513-531-2690 ext. 1407or chris.schwarz@fwpubs.com.SuppliesRockler800-279-4441 or rockler.com2 ■ Amerock ball-tip, full wrap-aroundhinges in antique brass, #31300,$5.99/pair1 ■ Cherry <strong>Shaker</strong> 7⁄8” knob, 3⁄8” tenon,#78493, $2.59/pair. (Also available inoak, walnut and maple.)1 ■ Narrow magnetic catch, #26559,$1.49 each■ Cherry classic <strong>Shaker</strong> pegs, #23382,package of eight/$6.48 (Also available inoak and maple.)Prices correct at time of publication.22 ■ woodworking magazine Spring 2004


