ABS Diagnosis System - CelicaTech
ABS Diagnosis System - CelicaTech
ABS Diagnosis System - CelicaTech
You also want an ePaper? Increase the reach of your titles
YUMPU automatically turns print PDFs into web optimized ePapers that Google loves.
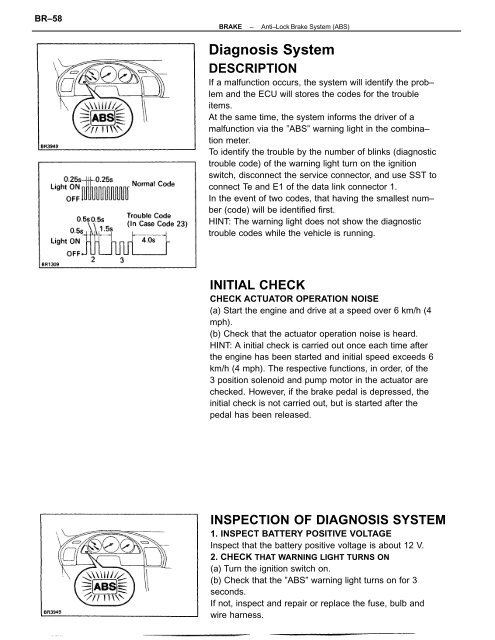
BR–58BRAKE–Anti–Lock Brake <strong>System</strong> (<strong>ABS</strong>)<strong>Diagnosis</strong> <strong>System</strong>DESCRIPTIONIf a malfunction occurs, the system will identify the prob–lem and the ECU will stores the codes for the troubleitems.At the same time, the system informs the driver of amalfunction via the ”<strong>ABS</strong>” warning light in the combina–tion meter.To identify the trouble by the number of blinks (diagnostictrouble code) of the warning light turn on the ignitionswitch, disconnect the service connector, and use SST toconnect Te and E1 of the data link connector 1.In the event of two codes, that having the smallest num–ber (code) will be identified first.HINT: The warning light does not show the diagnostictrouble codes while the vehicle is running.INITIAL CHECKCHECK ACTUATOR OPERATION NOISE(a) Start the engine and drive at a speed over 6 km/h (4mph).(b) Check that the actuator operation noise is heard.HINT: A initial check is carried out once each time afterthe engine has been started and initial speed exceeds 6km/h (4 mph). The respective functions, in order, of the3 position solenoid and pump motor in the actuator arechecked. However, if the brake pedal is depressed, theinitial check is not carried out, but is started after thepedal has been released.INSPECTION OF DIAGNOSIS SYSTEM1. INSPECT BATTERY POSITIVE VOLTAGEInspect that the battery positive voltage is about 12 V.2. CHECK THAT WARNING LIGHT TURNS ON(a) Turn the ignition switch on.(b) Check that the ”<strong>ABS</strong>” warning light turns on for 3seconds.If not, inspect and repair or replace the fuse, bulb andwire harness.
BRAKE–Anti–Lock Brake <strong>System</strong> (<strong>ABS</strong>)BR–593. READ DIAGNOSTIC TROUBLE CODE(a) Turn the ignition switch on.(b) Disconnect the service connector.(c) Using SST, connect terminals Te and E1 of the datalink connector 1.SST 09843–18020(d) In event of a malfunction, 4 seconds later the warn–ing light will begin to blink. Read the number ofblinks.(See DIAGNOSTIC TROUBLE CODE on page BR–60)HINT: The first number of blinks will equal the first digitof a two digit diagnostic trouble code. After a 1.5 secondpause, the 2nd number of blinks will equal the 2nd numberof a two digit code. If there are two or more codes, therewill be a 2.5 second pause between each, and indicationwill begin after 4.0 second pause from the smaller valueand continue in order to large.(e) If the system is operating normally (no malfunc–tion), the warning light will blink once every 0.5seconds.(f) Repair the system.(g) After the malfunctioning components has beenrepaired, clear the diagnostic trouble codes stored inthe ECU.(See page BR–61)HINT: If you disconnect the battery cable while repairing,all diagnostic trouble codes in the ECU will erased.(h) Remove the SST from terminals Te and E1 of thedata link connector 1.SST 09843–18020(i) Connect the service connector.(j) Turn the ignition switch on, and check that the”<strong>ABS</strong>” warning light goes off after the warning lightgoes on for 3 seconds.
BRAKE–Anti–Lock Brake <strong>System</strong> (<strong>ABS</strong>)BR–61CLEARING OF DIAGNOSTIC TROUBLECODESCLEAR DIAGNOSTIC TROUBLE CODES(a) Turn the ignition switch on.(b) Using SST, connect terminals Tc and E1 of the datalink connector 1.SST 09843–18020HINT: Keep the vehicle stopped vehicle speed 0 km/h(0 mph).(e) Clear the diagnostic trouble codes stored in ECU bydepressing the brake pedal 8 or more times within 3seconds.(d) Check that the warning light shows the normalcode.(e) Remove the SST from terminals Te and E1 of thedata link connector 1.SST 09843–18020(f) Check that the warning light goes off.


