

weider pro 495 - Fitness Equipment
weider pro 495 - Fitness Equipment
weider pro 495 - Fitness Equipment

Create successful ePaper yourself
Turn your PDF publications into a flip-book with our unique Google optimized e-Paper software.
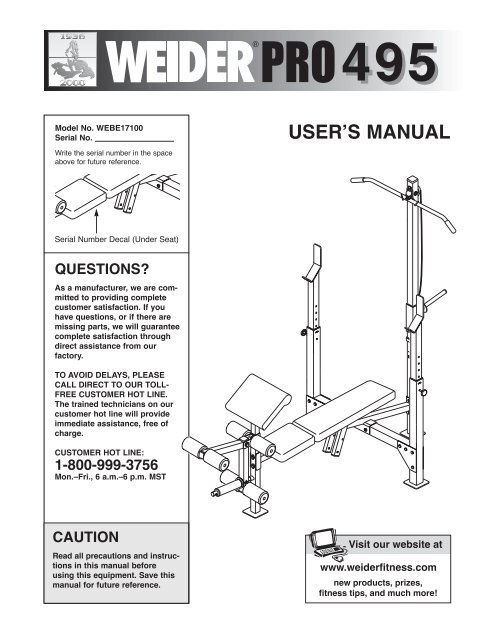
¨<strong>495</strong>Model No. WEBE17100Serial No.Write the serial number in the spaceabove for future reference.USERÕS MANUALSerial Number Decal (Under Seat)QUESTIONS?As a manufacturer, we are committedto <strong>pro</strong>viding completecustomer satisfaction. If youhave questions, or if there aremissing parts, we will guaranteecomplete satisfaction throughdirect assistance from ourfactory.TO AVOID DELAYS, PLEASECALL DIRECT TO OUR TOLL-FREE CUSTOMER HOT LINE.The trained technicians on ourcustomer hot line will <strong>pro</strong>videimmediate assistance, free ofcharge.CUSTOMER HOT LINE:1-800-999-3756Mon.ÐFri., 6 a.m.Ð6 p.m. MSTCAUTIONRead all precautions and instructionsin this manual beforeusing this equipment. Save thismanual for future reference.Visit our website atwww.<strong>weider</strong>fitness.comnew <strong>pro</strong>ducts, prizes,fitness tips, and much more!
Table of ContentsWARNING DECAL PLACEMENT . . . . . . . . . . . . . . . . . . . . . . . . . . . . . . . . . . . . . . . . . . . . . . . . . . . . . . . . . . .2IMPORTANT PRECAUTIONS . . . . . . . . . . . . . . . . . . . . . . . . . . . . . . . . . . . . . . . . . . . . . . . . . . . . . . . . . . . . . .3BEFORE YOU BEGIN . . . . . . . . . . . . . . . . . . . . . . . . . . . . . . . . . . . . . . . . . . . . . . . . . . . . . . . . . . . . . . . . . . .4PART IDENTIFICATION CHART . . . . . . . . . . . . . . . . . . . . . . . . . . . . . . . . . . . . . . . . . . . . . . . . . . . . . . . . . . . .5ASSEMBLY . . . . . . . . . . . . . . . . . . . . . . . . . . . . . . . . . . . . . . . . . . . . . . . . . . . . . . . . . . . . . . . . . . . . . . . . . . .6USING THE WEIGHT BENCH . . . . . . . . . . . . . . . . . . . . . . . . . . . . . . . . . . . . . . . . . . . . . . . . . . . . . . . . . . . .11EXERCISE GUIDELINES . . . . . . . . . . . . . . . . . . . . . . . . . . . . . . . . . . . . . . . . . . . . . . . . . . . . . . . . . . . . . . . .13PART LIST . . . . . . . . . . . . . . . . . . . . . . . . . . . . . . . . . . . . . . . . . . . . . . . . . . . . . . . . . . . . . . . . . . . . . . . . . . .18EXPLODED DRAWING . . . . . . . . . . . . . . . . . . . . . . . . . . . . . . . . . . . . . . . . . . . . . . . . . . . . . . . . . . . . . . . . .19ORDERING REPLACEMENT PARTS . . . . . . . . . . . . . . . . . . . . . . . . . . . . . . . . . . . . . . . . . . . . . . . .Back CoverLIMITED WARRANTY . . . . . . . . . . . . . . . . . . . . . . . . . . . . . . . . . . . . . . . . . . . . . . . . . . . . . . . . . . . .Back CoverWarning Decal PlacementThe decal shown at right has beenplaced on the weight bench. If thedecal is missing, or if it is not legible,please call our CustomerService Department toll-free at1-800-999-3756, Monday throughFriday, 6 a.m. until 6 p.m. MountainTime, to order a free replacementdecal. Apply the replacement decalto the location shown.2
Important PrecautionsWARNING: To reduce the risk of serious injury, read the following important precautionsbefore using the weight bench.1. Read all instructions in this manual beforeusing the weight bench.2. It is the responsibility of the owner to ensurethat all users of the weight bench are adequatelyinformed of all precautions.3. Use the weight bench only as described inthis manual.4. Use the weight bench only on a level surface.Cover the floor beneath the weight bench to<strong>pro</strong>tect the floor.5. Inspect and tighten all parts each time youuse the weight bench. Replace any wornparts immediately.6. Keep children under the age of 12 and petsaway from the weight bench at all times.7. Always be sure there is an equal amount ofweight on each side of your barbell (notincluded) when you are using it. Whenadding or removing weights, always keepsome weight on both ends of the barbell toprevent the barbell from tipping.8. Do not use a barbell that is longer than sixfeet with the weight bench.9. When you are using the leg lever, place abarbell with the same amount of weight onthe weight rests to balance the bench.10. Keep hands and feet away from moving parts.11. Always wear athletic shoes for foot <strong>pro</strong>tectionwhile exercising.12. The weight bench does not include weights.The weight bench is designed to support amaximum of 560 pounds, including the user,a weight bar, and weights. Do not place morethat 310 pounds, including a weight bar andweights, on the weight rests. Do not placemore than 150 pounds on the leg lever or thelat tower.13. When using the backrest in an inclined position,make sure that the adjustment pin isinserted through both adjustment tubes.14. If you feel pain or dizziness at any time whileexercising, stop immediately and begin coolingdown.15. The weight bench is intended for home useonly. Do not use the weight bench in anycommercial, rental, or institutional setting.16. Make sure that the adjustment knobs areinserted completely and tightened into theuprights before beginning any exercise.17. Always exercise with a partner. When youare performing bench press exercises, yourpartner should stand behind you to catch thebarbell if you cannot complete a repetition.18. Always remove the curl post from the frontleg before performing leg curl or leg extensionexercises with the leg lever.19. Always lower the weight carriage in a controlledmanner. Never let the weight carriagedrop.WARNING: Before beginning this or any exercise <strong>pro</strong>gram, consult your physician. Thisis especially important for persons over the age of 35 or persons with pre-existing health <strong>pro</strong>blems.Read all instructions before using. ICON assumes no responsibility for personal injury or <strong>pro</strong>pertydamage sustained by or through the use of this <strong>pro</strong>duct.3
Before You BeginThank you for selecting the WEIDER¨ PRO <strong>495</strong> weightbench. The versatile WEIDER¨ PRO <strong>495</strong> is designedto be used with your own weight set (not included) todevelop every major muscle group of the body.Whether your goal is a shapely figure, dramatic musclesize and strength, or a healthier cardiovascularsystem, the WEIDER¨ PRO <strong>495</strong> will help you toachieve the specific results you want.For your benefit, read this manual carefully beforeusing the WEIDER¨ PRO <strong>495</strong> weight bench. If youhave additional questions, please call our CustomerService Department toll-free at 1-800-999-3756,Monday through Friday, 6 a.m. until 6 p.m. MountainTime (excluding holidays). To help us assist you,please note the <strong>pro</strong>duct model number and serialnumber before calling. The model number isWEBE17100. The serial number can be found on adecal attached to the weight bench (see the frontcover of this manual).Before reading further, please look at the drawingbelow and familiarize yourself with the parts that arelabeled.Lat BarLat TowerWeight RestWeight TubeUprightSeatCurl PadAdjustment KnobBackrestAdjustment TubesWeightAdapterLeg Lever4
This chart is <strong>pro</strong>vided to help you identify the small parts used in assembly. The number in parenthesis beloweach part refers to the key number of the part. The second number refers to the quantity needed for assembly.Important: Some parts may have been pre-assembled for shipping purposes. If you cannot find a part inthe parts bags, check to see if it has been pre-assembled.M10 x 81mm Bolt (43)Ñ10Narrow Spacer (30)Ð1M10 x 178mm Bolt (17)Ñ1M10 x 65mm Bolt (18)Ñ5M6 Washer (25)Ñ4M8 Washer (48)Ñ2M8 x 58mm Bolt (49)Ñ1M8 Nylon Locknut (13)Ñ2M6 x 16mm Screw (15)Ñ6M10 Nylon Locknut (19)Ñ205
AssemblyBefore beginning assembly, carefully read thefollowing information and instructions:¥ Place all parts of the weight bench in a clearedarea and remove the packing materials; do notdispose of the packing materials until assemblyis completed.¥ Read each assembly step before you begin.¥ For help identifying the small parts used inassembly, use the PART IDENTIFICATIONCHART on the previous page. Note: Somesmall parts may have been pre-attached for shippingpurposes. If a part is not in the parts bag,check to see if it has been pre-attached.¥ Tighten all parts as you assemble them, unlessinstructed to do otherwise.¥ As you assemble the weight bench, make surethat all parts are oriented as shown in the drawings.THE FOLLOWING TOOLS (NOT INCLUDED)ARE REQUIRED FOR ASSEMBLY:¥ Two (2) adjustable wrenches¥ One (1) phillips screwdriver¥ One (1) rubber mallet¥ Lubricant, such as grease or petroleum jelly,and soapy water will also be needed.Assembly will be more convenient if you have thefollowing tools: A socket set, a set of open-end orclosed-end wrenches, or a set of ratchet wrenches.1. Before assembling this weight bench, be surethat you have read and understand the informationin the box above.11Position the Crossbar (3) as shown. Attach theCrossbar to each Upright Base (7) with four M10x 81mm Bolts (43), a Support Plate (20) and fourM10 Nylon Locknuts (19). Note the position ofthe warning decal and make sure the UprightBases are oriented exactly as shown.Slide the Uprights (1) into the desired position inthe Upright Base (7) and secure them with twoM10 x 67mm Adjustment Knobs (37).37437WarningDecal20201932071193743202. Slide the welded bracket on the Frame (2) onto theCrossbar (3). Secure the Frame with two M10 x81mm Bolts (43) and two M10 Nylon Locknuts (19).22431936
3. Attach the Front Leg (8) to the Frame (2) with twoM10 x 65mm Bolts (18), two M10 Washers (24),and two M10 Nylon Locknuts (19).319242181984. Tap three 45mm Square Inner Caps (21) into theindicated ends of the Leg Lever (4).Tap a 1Ó Round Inner Cap (23) into the indicatedend of the Weight Tube (52).Insert the Weight Tube (52) into the indicated holein the Leg Lever (4). Press a 1Ó Angle Cap (50)onto the indicated end of the Weight Tube.Press the Adapter Bushings (59) into the ends ofthe Weight Adapter (60) as shown. Slide theWeight Adapter onto the Weight Tube (52) andsecure it by pushing the Detent Pin (58) into theWeight Tube as shown.459216023525821421505. Lubricate an M10 x 72mm Bolt (53). Attach theLeg Lever (4) to the Front Leg (8) with the Boltand an M10 Nylon Locknut (19). Do not overtightenthe Nylon Locknut. The Leg Lever must beable to pivot freely.54198Attach the Narrow Spacer (30) to the Leg Lever(4) with the M8 x 58mm Bolt (49), two M8Washers (48), and an M8 Nylon Locknut (13).Note: The Spacer will fit tightly inside of theLeg Lever.49483053ÐLubricate48136. Attach the Frame (2) to the Lat Tower Base (35)with two M10 x 67mm Bolts (14), two M10Washers (24), and two M10 Nylon Locknuts (19).63514192427
7. Press four 1Ó Square Inner Caps (12) into theindicated ends of the Backrest Tubes (5, 55).Press two 1Ó x 2Ó Inner Caps (45) into the ends ofthe adjustment tubes.With the wide end of the Backrest (6) positionedas shown, attach the Backrest Tubes (5, 55) tothe Backrest (6) with four M6 x 38mm Screws(16) and four M6 Washers (25). The Backrest525Tubes and Backrest must be oriented exactly55as shown. 161225 Adjustment16Tubes2545168. Lubricate the M10 x 178mm Bolt (17). Attach theBackrest (6) to the Frame (2) with the Bolt, two86M10 Washers (24), and an M10 Nylon Locknut(19). Do not overtighten the Nylon Locknut.The Backrest must be able to pivot freely.Secure the Backrest (6) to the Frame (2) with theAdjustment Pin (40) through one of the three setsof holes in the adjustment tubes. Secure theAdjustment Pin with the Pin Clip (57).7WideEnd17ÑLubricate64024AdjustmentTubes12Make sure the Adjustment Pin (40) is completelyinserted through both holes in the adjust-192579. With the wide end of the Seat (11) positioned asshown, attach the Seat to the brackets on theFrame (2) with four M6 x 16mm Screws (15).9WideEnd1121510. Attach the Curl Pad (28) to the Curl Post (27) withtwo M6 x 16mm Screws (15).102815278
11. Slide the Curl Post (27) into the Front Leg (8).Align one of the adjustment holes in the Curl Postwith the adjustment hole in the Front Leg. Fullytighten the M10 x 48mm Adjustment Knob (41)into the adjustment hole in the Front Leg.112784112. Tap two 3/4Ó Round Inner Caps (9) into each PadTube (10). Insert the Pad Tubes into the holes inthe Leg Lever (4) and the Front Leg (8). Slide twoFoam Pads (22) onto each Pad Tube.12224 8109109102213. Locate the Cable (34) and note that it has a loopon one end and a ball on the other end. Insert theend with the loop through the slot in the Lat Tower(26) from the direction shown.134447Next, lay the Cable (34) in the groove of thePulley (29). Attach the Pulley inside the slot in theLat Tower (26) with an M10 x 65mm Bolt (18), twoM10 Washers (24), two Wide Spacers (47), andan M10 Nylon Locknut (19).Press a 50mm Square Inner Cap (44) into the topof the Lat Tower (26).Attach a Cable Clip (33) to indicated end of theCable (34).14183324292419263414. Press a 1Ó Round Inner Cap (23) into the weighttube on the Weight Carriage (32).26Insert the M10 x 19mm Bolt (46) into the bracketon the Weight Carriage (32) from the indicateddirection.BracketNote the position of the Lat Tower (26) in step13. The Lat Tower must be positioned in thismanner. Slide the Weight Carriage (32) onto theLat Tower. Make sure that the Weight Carriageis oriented as shown.4632239
15. Secure the looped end of the Cable (34) to theM19 x 19mm Bolt (46) and the bracket on theWeight Carriage (32) with an M10 Nylon Locknut(19).1526 34Next, slide the Carriage Stop (39) onto the LatTower (26). Secure the Carriage Stop with an M8x 70mm Bolt (54) and an M8 Nylon Locknut (13).Note: The Carriage Stop must be positioned withthe lip on top as shown.4632191354Lip3916. Insert the Lat Tower (26) into the Lat Tower Base(35). Make sure that the Lat Tower is turned asshown. Secure the Lat Tower with two M10 x65mm Bolts (18), four M10 Washers (24), andtwo M10 Nylon Locknuts (19).16262419183517. Attach the Lat Bar (36) to the Cable Clip (33) andplace it in the Lat Bar Rest on the Lat Tower (26).17Lat Bar Rest33362618. Make sure that all parts are <strong>pro</strong>perly tightenedbefore you use the weight bench. The use ofall remaining parts will be explained in USINGTHE WEIGHT BENCH on pages 11 and 12.10
Using the Weight BenchThe weight bench is designed to be used with your own weight set (not included). The steps below explain howthe weight bench can be adjusted. See EXERCISE GUIDELINES on page 13 for important exercise informationand refer to the accompanying exercise poster to see the correct form for several exercises. Refer also to theexercise information accompanying your weight set (not included) for additional exercises.Inspect and tighten all parts each time you use the weight bench. Replace any worn parts immediately. Theweight bench can be cleaned with a damp cloth and a mild, non-abrasive detergent. Do not use solvents.ADJUSTING THE BACKRESTThe Backrest (6) can be used in a decline position, alevel position, or either of two incline positions. Toadjust the Backrest to the decline position, removethe Adjustment Pin (40) and lower the Backrest until itrests directly on the Crossbar (3). Re-insert theAdjustment Pin and secure it with the Pin Clip (57).To adjust the Backrest (6) to the level position, insertthe Adjustment Pin (40) through the top set of holesand secure it with the Pin Clip (57).406To adjust the Backrest (6) to an incline position, insertthe Adjustment Pin (40) through one of the lower twosets of holes in the backrest adjustment tubes.Secure the Adjustment Pin with the Pin Clip (57).Adjustment Tubes573WARNING: When adjusting theposition of the backrest, make sure that theadjustment pin is inserted through both adjustmenttubes.4ATTACHING WEIGHTS TO THE LEG LEVERTo use the Leg Lever (4), slide the desired weights(not included) onto the Weight Adapter (60).60WARNING: Do not place morethan 150 pounds on the leg lever.WeightREMOVING THE PAD TUBE AND PADSTo do leg curl exercises, the indicated Pad Tube (10)and Pads (22) must be removed from the weightbench. To do this, slide one of the Pads off the Tube,then pull the Tube out of the holes.22102211
ATTACHING WEIGHTS TO THE LAT TOWERTo use the Lat Tower (26), slide the desired amount ofweight (not included) onto the weight tube on theWeight Carriage (32).WARNING: Do not place more than150 pounds on the weight carriage.When performing an exercise during which youare sitting on the bench with your back to thelat tower, make sure there is plenty of spacebetween your back and the weight carriage.Always lower the weight carriage in a controlledmanner. Never let the weight carriage drop.26WeightTube32WeightADJUSTING THE UPRIGHTSThe Uprights (1) can be adjusted to five heights fordifferent exercises. To adjust the height, remove theM10 x 67mm Adjustment Knobs (37) from bothUprights and Upright Bases (7). Slide the Uprights tothe desired position and re-insert the AdjustmentKnobs.37171WARNING: Always set bothuprights at the same height. Make sure that theadjustment knobs are inserted completely andtightened into the uprights.737ATTACHING THE CURL POSTNote: When the Curl Post (27) is not in use, the45mm Square Inner Cap (21) should be inserted intothe Front Leg (8).For some exercises, the Curl Post (27) must beattached to the weight bench.2127Slide the Curl Post (27) into the Front Leg (8). Alignone of the adjustment holes in the Curl Post with theadjustment hole in the Front Leg. Tighten the M10 x48mm Adjustment Knob (41) into the adjustment holein the Front Leg. Make sure that you fully tightenthe Adjustment Knob.84112
Exercise GuidelinesTHE FOUR BASIC TYPES OF WORKOUTS¥ Muscle BuildingIn order to increase the size and strength of yourmuscles, you must push your muscles to a high percentageof their capacity. You must also <strong>pro</strong>gressivelyincrease the intensity of your exercise so that yourmuscles will continually adapt and grow. Each individualexercise can be tailored to the <strong>pro</strong>per intensitylevel by changing the amount of weight used, or thenumber of repetitions or sets performed. (A ÒrepetitionÓis one complete cycle of an exercise, such asone sit-up. A ÒsetÓ is a series of repetitions performedconsecutively.)The <strong>pro</strong>per amount of weight for each exercisedepends upon the individual user. It is up to you togauge your limits. Select the amount of weight thatyou think is right for you. Begin with 3 sets of 8 repetitionsfor each exercise that you perform. Rest for 3minutes after each set. When you can complete 3sets of 12 repetitions without difficulty, increase theamount of weight.¥ ToningTo tone your muscles, you must push your muscles toa moderate percentage of their capacity. Select amoderate amount of weight and increase the numberof repetitions in each set. Complete as many sets of15 to 20 repetitions as possible without discomfort.Rest for 1 minute after each set. Work your musclesby completing more sets rather than by using highamounts of weight.¥ Weight LossTo lose weight, use a low amount of weight andincrease the number of repetitions in each set.Exercise for 20 to 30 minutes, resting for a maximumof 30 seconds between sets.¥ Cross TrainingIn the pursuit of a complete and well-balanced fitness<strong>pro</strong>gram, many have found that cross training is theanswer. We recommend that on Monday, Wednesdayand Friday, you plan weight training workouts. OnTuesday and Thursday, plan 20 to 30 minutes of aerobicexercise, such as cycling, running or swimming.Rest from both weight training and aerobic exercisefor at least one full day each week to give your bodytime to regenerate. By combining weight training withaerobic exercise, you can reshape and strengthenyour body, plus develop a stronger heart and lungs.PERSONALIZING YOUR EXERCISE PROGRAMWe have not specified an exact length of time foreach workout, or a specific number of repetitions orsets for each exercise. It is very important to avoidoverdoing it during the first few months of your exercise<strong>pro</strong>gram, and to <strong>pro</strong>gress at your own pace. Ifyou experience pain or dizziness at any time whileexercising, stop immediately and begin to cool down.Find out what is wrong before continuing. Rememberthat adequate rest and a <strong>pro</strong>per diet are also important.WARMING UPBegin each workout with 5 to 10 minutes of lightstretching and exercise to warm up. Warming up preparesyour body for exercise by increasing circulation,raising your body temperature and delivering moreoxygen to your muscles.WORKING OUTEach workout should include 6 to 10 different exercises.Select exercises for every major muscle group,with emphasis on the areas that you want to developthe most. To give balance and variety to your workouts,vary the exercises from workout to workout.Schedule your workouts for the time of day when yourenergy level is the highest. Each workout should befollowed by at least one day of rest. Once you find theschedule that is right for you, stick with it.EXERCISE FORMIn order to obtain the greatest benefits from exercising,it is essential to maintain <strong>pro</strong>per form.Maintaining <strong>pro</strong>per form means moving through thefull range of motion for each exercise, and movingonly the ap<strong>pro</strong>priate parts of the body. Exercising inan uncontrolled manner will leave you feelingexhausted. On the exercise poster accompanying thismanual, you will find photographs showing the correctform for several exercises. A description of each exerciseis also <strong>pro</strong>vided, along with a list of the musclesaffected. Refer to the muscle chart on page 14 to findthe locations of the muscles.The repetitions in each set should be performedsmoothly and without pausing. The exertion stage ofeach repetition should last about half as long as thereturn stage. Proper breathing is important. Exhaleduring the exertion stage of each repetition and inhaleduring the return stroke; never hold your breath. Rest13
for 3 minutes after each set if you are doing a musclebuilding workout, 1 minute after each set if you aredoing a toning workout, and 30 seconds after each setif you are doing a weight loss workout. Plan to spendthe first couple of weeks familiarizing yourself with theequipment and learning the <strong>pro</strong>per form for each exercise.COOLING DOWNEnd each workout with 5 to 10 minutes of stretching.Include stretches for both your arms and legs. Moveslowly as you stretchÑdo not bounce. Ease into eachstretch gradually and go only as far as you can withoutstrain. Stretching at the end of each workout is veryeffective for increasing flexibility.STAYING MOTIVATEDFor motivation, keep a record of each workout. Thecharts on pages 15 and 16 of this manual can bephotocopied and used to schedule and record yourworkouts. List the date, exercises performed, weight,and numbers of sets and repetitions completed.Record your weight and key body measurements atthe end of every month.Remember, the key to achieving the greatest results isto make exercise a regular and enjoyable part of youreveryday life.MUSCLE CHARTA. Sternomastoid (neck)B. Pectoralis Major (chest)C. Biceps (front of arm)D. Obliques (waist)E. Brachioradials (forearm)F. Hip Flexors (upper thigh)G. Abductor (outer thigh)H. Quadriceps (front of thigh)I. Sartorius (front of thigh)J. Tibialis Anterior (front of calf)K. Soleus (front of calf)L. Rectus Abdominus (stomach)M. Adductor (inner thigh)N. Trapezius (upper back)O. Rhomboideus (upper back)P. Deltoid (shoulder)Q. Triceps (back of arm)R. Latissimus Dorsi (mid back)S. Spinae Erectors (lower back)T. Gluteus Medius (hip)U. Gluteus Maximus (buttocks)V. Hamstring (back of leg)W. Gastrocnemius (back of calf)AABCDEHIJKGFLMTNOPQRSUVW14
MONDAYDate:/ /EXERCISE WEIGHT SETS REPSTUESDAYDate:/ /WEDNESDAYDate:/ /AEROBIC EXERCISEEXERCISE WEIGHT SETS REPSTHURSDAYDate:/ /AEROBIC EXERCISEFRIDAYDate:/ /EXERCISE WEIGHT SETS REPSMake photocopies of this page for scheduling and recording your workouts.15
MONDAYDate:/ /EXERCISE WEIGHT SETS REPSTUESDAYDate:/ /WEDNESDAYDate:/ /AEROBIC EXERCISEEXERCISE WEIGHT SETS REPSTHURSDAYDate:/ /AEROBIC EXERCISEFRIDAYDate:/ /EXERCISE WEIGHT SETS REPSMake photocopies of this page for scheduling and recording your workouts.16
Notes17
Part ListÑModel No. WEBE17100R0600AKey No. Qty. Description1 2 Upright2 1 Frame3 1 Crossbar4 1 Leg Lever5 1 Right Backrest Tube6 1 Backrest7 2 Upright Base8 1 Front Leg9 6 3/4Ó Round Inner Cap10 3 Pad Tube11 1 Seat12 4 1Ó Square Inner Cap13 2 M8 Nylon Locknut14 2 M10 x 67mm Bolt15 6 M6 x 16mm Screw16 4 M6 x 38mm Screw17 1 M10 x 178mm Bolt18 5 M10 x 65mm Bolt19 20 M10 Nylon Locknut20 4 Support Plate21 4 45mm Square Inner Cap22 6 Foam Pad23 2 1Ó Round Inner Cap24 12 M10 Washer25 4 M6 Washer26 1 Lat Tower27 1 Curl Post28 1 Curl Pad29 1 Pulley30 1 Narrow Spacer31 5 Carriage BushingKey No. Qty. Description32 1 Weight Carriage33 1 Cable Clip34 1 Cable35 1 Lat Tower Base36 1 Lat Bar37 2 M10 x 67mm Adjustment Knob38 2 60mm x 50mm Bushing39 1 Carriage Stop40 1 Adjustment Pin41 1 M10 x 48mm Adjustment Knob42 4 M4 x 16mm Screw43 10 M10 x 81mm Bolt44 1 50mm Square Inner Cap45 2 1Ó x 2Ó Inner Cap46 1 M10 x 19mm Bolt47 2 Wide Spacer48 2 M8 Washer49 1 M8 x 58mm Bolt50 1 1Ó Angle Cap51 2 Handgrip52 1 Weight Tube53 1 M10 x 72mm Bolt54 1 M8 x 70mm Bolt55 1 Left Backrest Tube56 1 Stop Screw57 1 Pin Clip58 1 Detent Pin59 2 Adapter Bushing60 1 Weight Adapter# 1 UserÕs Manual# 1 Exercise PosterÒ#Ó Indicates a non-illustrated part. Specifications are subject to change without notice. See the back cover forinformation on ordering replacement parts.18
2811264729313274319373831143519244418 2419204319202043311402191915171919418720431943212119531821421231099221527373138461950181819192461212516251616 25 25254554131099222331313922513651242424242424244242424249483048133334525556571958596014471994319Exploded DrawingÑModel No. WEBE17100R0600A19
Ordering Replacement PartsTo order replacement parts, simply call our Customer Service Department toll-free at 1-800-999-3756, Mondaythrough Friday, 6 a.m. until 6 p.m. Mountain Time (excluding holidays). To help us assist you, please be preparedto give the following information when calling:1. The MODEL NUMBER of the <strong>pro</strong>duct (WEBE17100)2. The NAME of the <strong>pro</strong>duct (WEIDER¨ PRO <strong>495</strong> weight bench)3. The SERIAL NUMBER of the <strong>pro</strong>duct (see the front cover of this manual)4. The KEY NUMBER and DESCRIPTION of the desired part(s) (see the PART LIST and the EXPLODEDDRAWING on pages 18 and 19).Limited WarrantyICON Health & <strong>Fitness</strong>, Inc. (ICON), warrants this <strong>pro</strong>duct to be free from defects in workmanship and material,under normal use and service conditions, for a period of ninety (90) days from the date of purchase. Thiswarranty extends only to the original purchaser. ICON's obligation under this warranty is limited to replacingor repairing, at ICON's option, the <strong>pro</strong>duct at one of its authorized service centers. All <strong>pro</strong>ducts for which warrantyclaim is made must be received by ICON at one of its authorized service centers with all freight and othertransportation charges prepaid, accompanied by sufficient <strong>pro</strong>of of purchase. All returns must be pre-authorizedby ICON. This warranty does not extend to any <strong>pro</strong>duct or damage to a <strong>pro</strong>duct caused by or attributableto freight damage, abuse, misuse, im<strong>pro</strong>per or abnormal usage or repairs not <strong>pro</strong>vided by an ICONauthorized service center, <strong>pro</strong>ducts used for commercial or rental purposes, or <strong>pro</strong>ducts used as store displaymodels. No other warranty beyond that specifically set forth above is authorized by ICON.ICON is not responsible or liable for indirect, special or consequential damages arising out of or in connectionwith the use or performance of the <strong>pro</strong>duct or damages with respect to any economic loss, loss of <strong>pro</strong>perty,loss of revenues or <strong>pro</strong>fits, loss of enjoyment or use, costs of removal, installation or other consequential damagesof whatsoever nature. Some states do not allow the exclusion or limitation of incidental or consequentialdamages. Accordingly, the above limitation may not apply to you.The warranty extended hereunder is in lieu of any and all other warranties and any implied warranties of merchantabilityor fitness for a particular purpose is limited in its scope and duration to the terms set forth herein.Some states do not allow limitations on how long an implied warranty lasts. Accordingly, the above limitationmay not apply to you.This warranty gives you specific legal rights. You may also have other rights which vary from state to state.ICON HEALTH & FITNESS, INC., 1500 S. 1000 W., LOGAN, UT 84321-9813Part No. 166297 R0600APrinted in China © 2000 ICON Health & <strong>Fitness</strong>, Inc.


