- Page 1:
CrossWorks for ARMUser GuideRowley
- Page 4 and 5:
38 The status bar40 The editing wor
- Page 6 and 7:
Chapter 16 173 CrossStudio menu sum
- Page 8 and 9:
Part VIAppendicesChapter 35 337 Fil
- Page 11 and 12: 1IntroductionThis guide is divided
- Page 13 and 14: •Integrated Debugger The debugger
- Page 15 and 16: After purchasing CrossWorksWhen you
- Page 17 and 18: •Sequences which may be repeated
- Page 19 and 20: Part IICrossStudio ReferenceThis se
- Page 21 and 22: 2CrossStudio TutorialCrossStudio al
- Page 23 and 24: The Links to system files group sho
- Page 25 and 26: •In the Project Explorer, right c
- Page 27 and 28: •Select the main.c file.•Click
- Page 29 and 30: Building projectsNow that the proje
- Page 31 and 32: Project code and data sizesDevelope
- Page 33 and 34: Displaying the Symbol BrowserTo dis
- Page 35 and 36: Printing Symbol Browser contentsYou
- Page 37 and 38: •Type F5.The workspace will chang
- Page 39 and 40: Setting up againWhat we'll now do i
- Page 41 and 42: Stopping and starting debuggingYou
- Page 43 and 44: 3OverviewThis section introduces th
- Page 45 and 46: The menu barThe menu bar conatins d
- Page 47 and 48: PanelCaret positionCaps lock status
- Page 49 and 50: Changing to Multiple Document Works
- Page 51 and 52: 4Project managementCrossWorks has a
- Page 53 and 54: •Combining — a project that can
- Page 55 and 56: •In the New Project dialog, selec
- Page 57 and 58: •Click on the project item to rem
- Page 59 and 60: There is a special configuration na
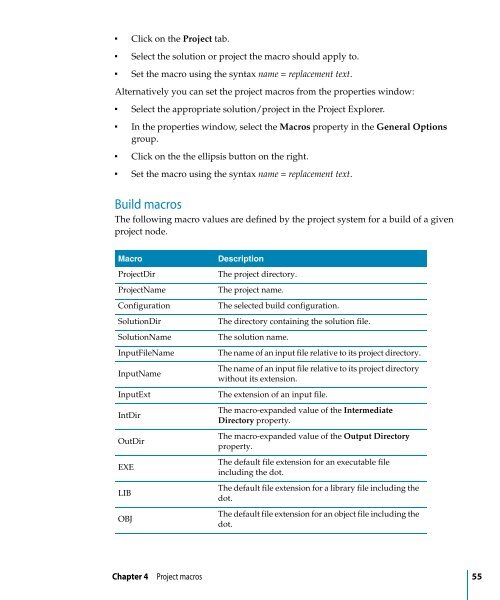
- Page 61: Project dependencies and build orde
- Page 65 and 66: 5Building projectsCrossStudio provi
- Page 67 and 68: •From the Build menu, select Buil
- Page 69 and 70: 6Source code controlCrossWorks supp
- Page 71 and 72: —or—•In the Project Explorer,
- Page 73 and 74: 7Debug expressionsThe debugger can
- Page 75 and 76: 8Basic editingCrossStudio has a bui
- Page 77 and 78: KeystrokeLeftRightHomeEndPageUpPage
- Page 79 and 80: —or—•From the Edit menu, clic
- Page 81 and 82: •Either click somewhere in the do
- Page 83 and 84: To cut whole lines from the current
- Page 85 and 86: •From the Edit menu, click Advanc
- Page 87 and 88: •Set the Indent Closing Brace pro
- Page 89 and 90: •Select Edit | Insert File menu i
- Page 91 and 92: •If the search will be carried ou
- Page 93 and 94: Advanced editor featuresCode Templa
- Page 95 and 96: •Select Edit > Advanced > Uncomme
- Page 97 and 98: 9Memory map editorMemory map files
- Page 99 and 100: •Input Section Names. The optiona
- Page 101 and 102: 10Package managementCrossWorks can
- Page 103 and 104: 11Linking and Section placementExec
- Page 105 and 106: The startup code will need to copy
- Page 107 and 108: 12CrossStudio WindowsThis section i
- Page 109 and 110: •Repeatedly type Ctrl+Shift+V to
- Page 111 and 112: •Enable, disable and delete exist
- Page 113 and 114:
Editing a breakpointTo edit the pro
- Page 115 and 116:
—or—•From the Breakpoints win
- Page 117 and 118:
—or—•On the Debug tool bar, c
- Page 119 and 120:
—or—•On the Debug Location to
- Page 121 and 122:
Globals tool barButtonDescriptionDi
- Page 123 and 124:
Locals tool barButtonDescriptionDis
- Page 125 and 126:
Memory window updatesThe memory win
- Page 127 and 128:
Showing the Registers windowTo disp
- Page 129 and 130:
clicking on one of the entries in t
- Page 131 and 132:
Watch tool barButtonDescriptionDisp
- Page 133 and 134:
Expressions you can watchHelp windo
- Page 135 and 136:
Output windowThe Output window cont
- Page 137 and 138:
The Project Explorer tool barButton
- Page 139 and 140:
Source navigator windowOne of the b
- Page 141 and 142:
—or—•On the Source Navigator
- Page 143 and 144:
variables, the range is the range o
- Page 145 and 146:
Grouping symbols by source fileWhen
- Page 147 and 148:
•In the Symbol Browser, right cli
- Page 149 and 150:
—or—•In the Targets window, c
- Page 151 and 152:
Controlling target connectionsReset
- Page 153 and 154:
13Target interfacesA target interfa
- Page 155 and 156:
•Parallel Port Address The base a
- Page 157 and 158:
•Identify Target Specifies whethe
- Page 159 and 160:
•Processor Stop Time The timeout
- Page 161 and 162:
14ARM Target SupportWhen a target s
- Page 163 and 164:
•fiq_handler - This is the defaul
- Page 165 and 166:
There is a Heap Size linker project
- Page 167 and 168:
Target script fileThe target interf
- Page 169 and 170:
efore the debugger starts accessing
- Page 171 and 172:
DescriptionTargetInterface.peekByte
- Page 173 and 174:
DescriptionTargetInterface.setICEBr
- Page 175 and 176:
•Fast Comms Channel Loader — Th
- Page 177 and 178:
15DialogsDebug file search editorWh
- Page 179 and 180:
•Show full path in title bar. Ena
- Page 181 and 182:
16CrossStudio menu summaryThe follo
- Page 183 and 184:
Menu command Keystroke DescriptionR
- Page 185 and 186:
Menu command Keystroke DescriptionC
- Page 187 and 188:
Menu command Keystroke DescriptionP
- Page 189 and 190:
The Edit Selection menuEdit Selecti
- Page 191 and 192:
Advanced menuThe Advanced menu prov
- Page 193 and 194:
Menu command Keystroke DescriptionL
- Page 195 and 196:
The Browser menuBrowser commandsMen
- Page 197 and 198:
Search menu commandsMenu command Ke
- Page 199 and 200:
The Build menuBuild menu commandsMe
- Page 201 and 202:
Menu command Keystroke DescriptionS
- Page 203 and 204:
Debug Control commandsMenu command
- Page 205 and 206:
The Debug Windows menuDebug Windows
- Page 207 and 208:
Menu command Keystroke DescriptionD
- Page 209 and 210:
The Help menuHelp menu commandsMenu
- Page 211 and 212:
Part IIITasking Library TutorialThi
- Page 213 and 214:
17OverviewThe CTL enables your appl
- Page 215 and 216:
Timer supportIf your application ca
- Page 217 and 218:
18TasksEach task has a correspondin
- Page 219 and 220:
#include void task1(void *p){// tas
- Page 221 and 222:
19Event setsAn event set is a means
- Page 223 and 224:
ctl_events_set_clear(&e1, 1, 0);}vo
- Page 225 and 226:
20SemaphoresA semaphore is a counte
- Page 227 and 228:
}}ctl_semaphore_signal(&s1);/* reso
- Page 229 and 230:
21Message queuesA message queue is
- Page 231 and 232:
void task2(void){void *msg;…ctl_m
- Page 233 and 234:
22Byte queuesA byte queue is a stru
- Page 235 and 236:
{…ctl_byte_queue_init(&m1,queue,
- Page 237 and 238:
23Global interrupts controlThe Cros
- Page 239 and 240:
24Timer supportThe current time is
- Page 241 and 242:
25Programmable interrupt handlingTh
- Page 243 and 244:
26Low-level interrupt handlingIf yo
- Page 245 and 246:
27Memory areasMemory areas provide
- Page 247:
Part IVLibrary ReferenceLibrary Ref
- Page 250 and 251:
- DiagnosticsThe header file defin
- Page 252 and 253:
isalnumSynopsisDescriptionPortabili
- Page 254 and 255:
DescriptionPortabilityispunct retur
- Page 256 and 257:
The header file defines the macros
- Page 258 and 259:
INT_MAXSynopsisDescriptionPortabili
- Page 260 and 261:
UINT_MAXSynopsisDescriptionPortabil
- Page 262 and 263:
coshfsinhsinhftanhtanhfCompute hype
- Page 264 and 265:
DescriptionFast math librarybehavio
- Page 266 and 267:
atanSynopsisDescriptionPortability#
- Page 268 and 269:
atanhfSynopsisDescriptionFast math
- Page 270 and 271:
Fast math librarybehaviorIEC 60559
- Page 272 and 273:
fmaxSynopsis#include double fmax(do
- Page 274 and 275:
frexp stores power of two in the in
- Page 276 and 277:
ldexpSynopsis#include double ldexp(
- Page 278 and 279:
IEC 60559 mathlibrary behaviorPorta
- Page 280 and 281:
If x = +Infinity and y < 0 and y N
- Page 282 and 283:
sinhfSynopsis#include float sinhf(f
- Page 284 and 285:
tanhfSynopsis#include float tanhf(f
- Page 286 and 287:
- Variable argumentsThe header file
- Page 288 and 289:
The behaviour of va_start and va_ar
- Page 290 and 291:
Some CrossWorks library variants do
- Page 292 and 293:
produces ‘INF’ or ‘NAN’ ins
- Page 294 and 295:
A directive that is a conversion sp
- Page 296 and 297:
•‘[’. Matches a nonempty sequ
- Page 298 and 299:
Portabilityputchar conforms to ISO/
- Page 300 and 301:
DescriptionPortabilitysscanf reads
- Page 302 and 303:
DescriptionNotesPortabilityvsprintf
- Page 304 and 305:
Pseudo-random sequence generation f
- Page 306 and 307:
DescriptionPortabilitycalloc alloca
- Page 308 and 309:
Description ldiv_t stores the quoti
- Page 310 and 311:
See Also srand (page 302) RAND_MAX
- Page 312 and 313:
strtofSynopsisDescriptionPortabilit
- Page 314 and 315:
strtollSynopsisDescription#include
- Page 316 and 317:
If the subject sequence begins with
- Page 318 and 319:
Descriptionultoa converts val to a
- Page 320 and 321:
memchr returns a pointer to the loc
- Page 322 and 323:
DescriptionPortabilitystrcmp compar
- Page 324 and 325:
strncmp returns an integer greater
- Page 326 and 327:
strtok then searches from there for
- Page 329 and 330:
29CrossBuildThe command line progra
- Page 331 and 332:
30CrossLoadCrossLoad is a command l
- Page 333 and 334:
This command will produce a list of
- Page 335 and 336:
31mkhdr - C/C++ header file generat
- Page 337 and 338:
32mkpkg - package creatorTo create
- Page 339 and 340:
33GCC Online Documentation
- Page 341 and 342:
34BINUTILS Online Documentation
- Page 343:
Part VIAppendicesAppendices
- Page 346 and 347:
•access The permissable access ty
- Page 348 and 349:
ProgramSection elements have the fo
- Page 350 and 351:
The next entry is the projects elem
- Page 352 and 353:
344 Chapter 35 File formats
- Page 354 and 355:
Property Type Save NameExclude From
- Page 356 and 357:
Property Type Save NameInclude Debu
- Page 358 and 359:
Property Type Save NameSuppress War
- Page 360 and 361:
Property Name Type Save NameARM Arc
- Page 362 and 363:
Property Name Type Save NameARM Flo
- Page 364 and 365:
Property Name Type Save NameGenerat
- Page 366 and 367:
Property Name Type Save NameOptimiz
- Page 368 and 369:
Property Type Save NameUndefine All
- Page 370 and 371:
Property Type Save NameZeroed Secti
- Page 372 and 373:
Property Type Save NameLoad Address
- Page 374 and 375:
Library PropertiesLibrary OptionsTh
- Page 376 and 377:
Printf/Scanf OptionsProperty Type S
- Page 378 and 379:
Property Type Save NameScanf Intege
- Page 380 and 381:
Property Type Save NameAdditional O
- Page 382 and 383:
Property Type Save NameGenerate Map
- Page 384 and 385:
Property Type Save NameMemory Map F
- Page 386 and 387:
Property Type Save NameStack Size (
- Page 388 and 389:
Property Type Save NamePackage Memb
- Page 390 and 391:
Combining OptionsThese properties a
- Page 392 and 393:
Target OptionsProperty Type Save Na
- Page 394 and 395:
Property Type Save NameARM Debug In
- Page 396 and 397:
Property Type Save NameDebug Handle
- Page 398 and 399:
Property Type Save NameJTAG Data Bi
- Page 400 and 401:
Property Type Save NameJTAG Instruc
- Page 402 and 403:
Property Type Save NameLast Loader
- Page 404 and 405:
Property Type Save NameLoader File
- Page 406 and 407:
Simulator OptionsProperty Type Save
- Page 408 and 409:
Keystrokes Menu DescriptionCtrl+Pag
- Page 410 and 411:
Keystrokes Menu DescriptionCtrl+F E
- Page 412 and 413:
Keystrokes Menu DescriptionEdit |Ad
- Page 414 and 415:
Keystrokes Menu ActionF3BackspaceDe
- Page 416:
408 Chapter 39 Glossary





![mbed NXP LPC11U24 Schaltplan 010.2 [PDF/57KB]](https://img.yumpu.com/43869567/1/190x135/mbed-nxp-lpc11u24-schaltplan-0102-pdf-57kb.jpg?quality=85)