Burns Double Six 12 String Wiring Notes - Deaf Eddie
Burns Double Six 12 String Wiring Notes - Deaf Eddie
Burns Double Six 12 String Wiring Notes - Deaf Eddie
- No tags were found...

You also want an ePaper? Increase the reach of your titles
YUMPU automatically turns print PDFs into web optimized ePapers that Google loves.
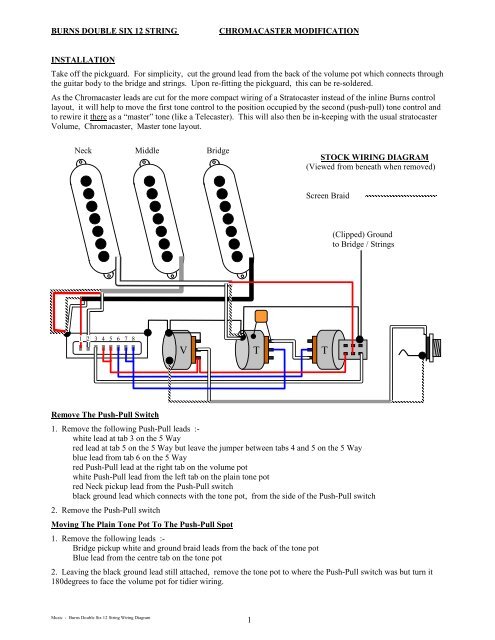
BURNS DOUBLE SIX <strong>12</strong> STRINGCHROMACASTER MODIFICATIONINSTALLATIONTake off the pickguard. For simplicity, cut the ground lead from the back of the volume pot which connects throughthe guitar body to the bridge and strings. Upon re-fitting the pickguard, this can be re-soldered.As the Chromacaster leads are cut for the more compact wiring of a Stratocaster instead of the inline <strong>Burns</strong> controllayout, it will help to move the first tone control to the position occupied by the second (push-pull) tone control andto rewire it there as a “master” tone (like a Telecaster). This will also then be in-keeping with the usual stratocasterVolume, Chromacaster, Master tone layout.NeckMiddleBridgeSTOCK WIRING DIAGRAM(Viewed from beneath when removed)Screen Braid(Clipped) Groundto Bridge / <strong>String</strong>s1 2 3 4 5 6 7 8V T TRemove The Push-Pull Switch1. Remove the following Push-Pull leads :-white lead at tab 3 on the 5 Wayred lead at tab 5 on the 5 Way but leave the jumper between tabs 4 and 5 on the 5 Wayblue lead from tab 6 on the 5 Wayred Push-Pull lead at the right tab on the volume potwhite Push-Pull lead from the left tab on the plain tone potred Neck pickup lead from the Push-Pull switchblack ground lead which connects with the tone pot, from the side of the Push-Pull switch2. Remove the Push-Pull switchMoving The Plain Tone Pot To The Push-Pull Spot1. Remove the following leads :-Bridge pickup white and ground braid leads from the back of the tone potBlue lead from the centre tab on the tone pot2. Leaving the black ground lead still attached, remove the tone pot to where the Push-Pull switch was but turn it180degrees to face the volume pot for tidier wiring.Music - <strong>Burns</strong> <strong>Double</strong> <strong>Six</strong> <strong>12</strong> <strong>String</strong> <strong>Wiring</strong> Diagram1
Converting The Tone Pot To Master Tone Control1. Remove the capacitor leg from the left tab to the centre tab on the Tone pot leaving the other leg still grounded tothe back of the pot.2. The still attached black ground lead from the volume pot will continue to serve as before.3. The black ground lead that connected with the Push-Pull switch will now conveniently serve as the first half of theBridge / <strong>String</strong>s ground lead when re-fitting the pickguard.4. Reconnect the blue lead which came from the tone pot centre tab to the left tab and move the other end of the bluelead from tab 8 to tab 4 on the 5 Way. Make sure the jumper between 5 Way tabs 4 and 5 remains. Remove thejumper between 5 Way tabs 7 and 8.Installing The ChromacasterNeck Middle BridgeCHROMACASTER WIRING DIAGRAMwith Master Tone Control(Viewed from beneath when removed)Screen Braid(Clipped) Ground toBridge / <strong>String</strong>s1 2 3 4 5 6 7 8V<strong>12</strong>M TAs the pickups have three wires, the ground braid and negative leads of the Bridge pickup were separated. Theground braid was attached to the back of the volume pot and the white negative lead attached to tab 2 on the back ofthe Chromacaster. The bridge pickup hot red lead was attached to tab 1 on the back of the Chromacaster.The Middle pickup on the stock guitar was found to be reverse wired (and presumably reverse pole) and thisarrangement was kept when installing the Chromacaster.The Chromacaster leads were attached as per the instruction booklet :-Red to 5 Way tab 8 with a jumper to tab 6Green to 5 Way tab 2 together with the negative lead from the middle pickupWhite to 5 Way tab 1Black to 5 Way tab 3 together with the hot red lead from the neck pickupThe clipped Bridge / <strong>String</strong>s ground wire was then re-joined and the pickguard re-fitted. The body cavity is alreadydeep and there was no risk of any wires / controls touching bottom._________________________________Music - <strong>Burns</strong> <strong>Double</strong> <strong>Six</strong> <strong>12</strong> <strong>String</strong> <strong>Wiring</strong> Diagram2