Installing the Oil Filter Spinon Kit - XJ4Ever
Installing the Oil Filter Spinon Kit - XJ4Ever
Installing the Oil Filter Spinon Kit - XJ4Ever

Create successful ePaper yourself
Turn your PDF publications into a flip-book with our unique Google optimized e-Paper software.
HCP1284 XJ Series Spin-On <strong>Oil</strong> <strong>Filter</strong> Conversion <strong>Kit</strong>Installation InstructionsCongratulations (and thanks!) on your purchase of our XJ Spin-On <strong>Oil</strong> <strong>Filter</strong> Conversion <strong>Kit</strong>. This kit is very simple toinstall and will greatly increase <strong>the</strong> oil filtering performance that your engine receives, while also simplifying future oil filterchanges. Typical installation on stock bikes will require about 30-45 minutes time and some simple hand tools.Although it is recommended that you perform this swap in conjunction with an oil change, that is not absolutely necessaryalthough you will lose a bit of oil when removing your old oil filter unit. Draining your oil before you start will make thingsless messy.Although <strong>the</strong> basic installation is very similar between all models, <strong>the</strong>re are some minor differences between installing thissystem on a factory oil cooler equipped model (XJ650 Turbo and XJ900RK models, as well as some European XJ750models, etc.) and standard, non-factory oil cooler equipped models (all XJ650 except Turbo, all XJ700 models, all XJ750models except European with factory oil coolers). All XJ550 models will also have one extra step involved.The parts included within this kit are:(1) oil filter adapter plate(1) threaded stud(1) special too for installing <strong>the</strong> threaded stud(1) oil filter stud thin retaining nut(1) adapter plate-to-engine block round rubber o-ring(1) HCP278 K&N oil filter, HCP277 Purolator oil filter or HCP279 Amsoil oil filter depending on which kit you ordered1
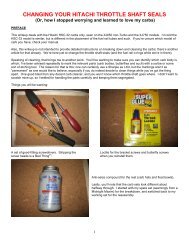
Tools & Supplies needed:HCP1267 Semi-permanent thread-locking compoundHCP1264 anti-seize compoundTorque wrench, if you are so inclined (and you shouldbe)2
Appropriate-sized wrench or socket to remove yourcurrent oil filter housing bolt (12 or 17mm dependingon model), plus a 14mm for <strong>the</strong> special tool to install<strong>the</strong> threaded stud30mm open end wrench or deep socket32mm open end wrench or socket (XJ550 modelsonly)3
Fresh oil as neededCleaning fluid (spray carb or brake cleaner works well)as neededRags, towels, etc. as needed4
XJ550 models (non factory oil cooler equipped versions):Overview:A) Remove <strong>the</strong> entire factory oil system, as you woulddo when performing an oil change.It is recommended that you save all <strong>the</strong>se pieces(cover, bypass valve/cover mounting bolt, filterelement spring and washer plate) in a plastic baggie orsimilar container. You won’t need to reuse any of<strong>the</strong>se, but why throw away good used parts?B) Remove <strong>the</strong> large 32mm union bolt that is screwedinto <strong>the</strong> engine case oil passage hole (note: it’s in<strong>the</strong>re tight!). This is <strong>the</strong> internally/externally threadedbolt hole that <strong>the</strong> cover housing bolt you just removedthreads into. Save this bolt; you won’t need to reuse it,but why throw away good used parts?(Again, this is for <strong>the</strong> 550 only; o<strong>the</strong>r models without oilcoolers do not have this bolt installed. Plus, if you dohave an oil cooler, you won’t need to remove it.)5
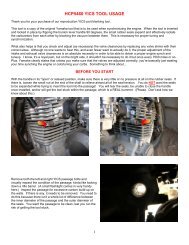
Previous versions of <strong>the</strong> kit used a pair of jam nuts tohelp install <strong>the</strong> stud into <strong>the</strong> oil passage; to makeinstallation easier, we now use a special adapter thatfits into a pair of notches cut into <strong>the</strong> threaded stud.Before we install it, however, we need to do a little bitof prep work.C) Put a small amount of HCP1267 thread-locking fluidonto <strong>the</strong> o<strong>the</strong>r end of <strong>the</strong> stud (<strong>the</strong> end without <strong>the</strong>notches; in o<strong>the</strong>r words, <strong>the</strong> end of <strong>the</strong> stud that you’regoing to thread into <strong>the</strong> engine case oil passage hole).Be conservative with it; just cover 4-5 threads of <strong>the</strong>stud with <strong>the</strong> thread-locking fluid.Coat <strong>the</strong> rest of <strong>the</strong> stud threads with HCP1264 antiseizegrease. (Contrary to popular belief, puttingloctite and anti-seize on <strong>the</strong> same bolt is not like mixingmatter and anti-matter.)6
D) Thread <strong>the</strong> stud into <strong>the</strong> engine case oil passagehole until it seats, hand tight, at <strong>the</strong> bottom of <strong>the</strong> hole.If it won’t go in all <strong>the</strong> way by hand, gently use <strong>the</strong>special tool, and a ratchet with a 14mm socket.E) Now use <strong>the</strong> torque wrench with <strong>the</strong> special tool totighten <strong>the</strong> threaded stud into <strong>the</strong> engine case oilpassage hole to 20 foot-pounds.You may now set <strong>the</strong> special tool aside; it has servedits one and only purpose in life.(I said, “Set it aside”, not “throw it away” – if you everneed to snug that stud down again, or want to removeit for whatever reason, you’ll be wanting to have <strong>the</strong>tool onhand.)F) Lubricate <strong>the</strong> supplied o-ring with engine oil or asimilar substance7
G) Fit <strong>the</strong> o-ring into <strong>the</strong> bottom of <strong>the</strong> adapter plate, asshown here, in <strong>the</strong> machined groove designed for thispurpose. This side of <strong>the</strong> adapter plate installs towards<strong>the</strong> engine block.The spin-on “can” oil filter element will make contactwith <strong>the</strong> top side of <strong>the</strong> adapter plate, which has <strong>the</strong>recessed area.H) Install <strong>the</strong> adapter plate over <strong>the</strong> threaded stud,bottom side with <strong>the</strong> o-ring towards <strong>the</strong> engine, andseat it fully against <strong>the</strong> engine case.If you don’t see a recessed area, it’s on backwards.If you see <strong>the</strong> words “ENGINE SIDE”… it’s onbackwards.If you see <strong>the</strong> o-ring… it’s on backwards!I) Now take <strong>the</strong> thin nut, thread it down over <strong>the</strong> stud,and tighten against <strong>the</strong> adapter plate, thus securing<strong>the</strong> plate firmly against <strong>the</strong> engine block.8
Using a 30mm open wrench or deep socket, tighten<strong>the</strong> thin nut to 12-16 ft-lbs. Our thinwall HCP10298 6-point or HCP10299 12-point socket work well here. Ifyou don’t already have a ½” drive torque wrench andextension, our HCP10300 3/8-to-1/2” adapter would berecommended.J) You’re almost done! Wet <strong>the</strong> rubber gasket on <strong>the</strong>base of <strong>the</strong> oil filter with some engine oil, install <strong>the</strong>filter onto <strong>the</strong> stud, and tighten <strong>the</strong> filter to <strong>the</strong>appropriate setting per <strong>the</strong> manufacturerrecommendations, which is normally 1/4 to ½ turn past<strong>the</strong> first contact of <strong>the</strong> filter’s rubber seal to <strong>the</strong> adapterplate surface. NOTE: overtightening <strong>the</strong> filter can leadto oil leaks, gasket failure, and can make removing <strong>the</strong>filter from <strong>the</strong> stud (during future oil filter changes) verydifficult.Although it can be a little messy if spilled, it isrecommended that <strong>the</strong> filter be filled with as muchfresh oil as possible (which will probably be about ½full) before installing it.9
Okay, so to install your kit onto a factory oil cooler-equipped model, follow all of <strong>the</strong> above instructions for <strong>the</strong> XJ550models except:1) Ignore step B2) since you will be installing <strong>the</strong> threaded stud into <strong>the</strong> internally threaded Union Bolt and not <strong>the</strong> engine case oil passagehole, Step C becomes:“D) You will now install <strong>the</strong> threaded stud into <strong>the</strong> Union Bolt.”Anywhere in Steps D or E where it refers to <strong>the</strong> “engine case oil passage hole”, substitute <strong>the</strong> phrase “union bolt”. Thekey difference is this: on factory oil cooler-equipped models, that Union Bolt is threaded into <strong>the</strong> engine case oil passagehole, and <strong>the</strong> stud that comes with <strong>the</strong> kit threads into that union bolt (instead of <strong>the</strong> engine case oil passage hole, whichis occupied by <strong>the</strong> union bolt). Thus, <strong>the</strong> internal threads of <strong>the</strong> union bolt become <strong>the</strong> internal threads of <strong>the</strong> engine caseoil passage hole, if that makes any sense!Copyright 2008, 2011 xj4ever.com and Schmuckatelli Heavy Industriesinfo@xj4ever.com11