Installation and Pose Room - Smith Micro Software, Inc.
Installation and Pose Room - Smith Micro Software, Inc.
Installation and Pose Room - Smith Micro Software, Inc.

You also want an ePaper? Increase the reach of your titles
YUMPU automatically turns print PDFs into web optimized ePapers that Google loves.
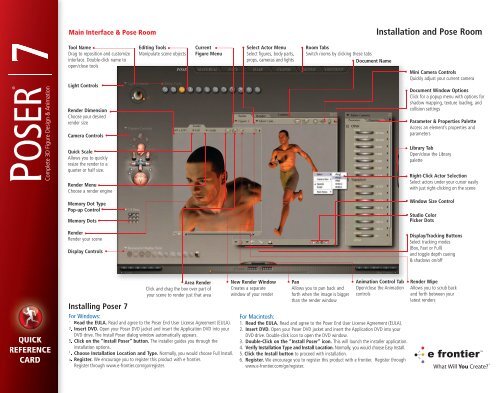
Main Interface & <strong>Pose</strong> <strong>Room</strong>Tool Name •Drag to reposition <strong>and</strong> customizeinterface. Double-click name toopen/close toolsLight Controls •Render DimensionChoose your desiredrender sizeCamera Controls ••••Editing Tools •Manipulate scene objects••••Current •Figure Menu•••• Select Actor MenuSelect figures, body parts,props, cameras <strong>and</strong> lights•••••• <strong>Room</strong> TabsSwitch rooms by clicking these tabs• Document Name•• •<strong>Installation</strong> <strong>and</strong> <strong>Pose</strong> <strong>Room</strong>• Mini Camera ControlsQuickly adjust your current camera• Document Window OptionsClick for a popup menu with options forshadow mapping, texture loading, <strong>and</strong>collision settings• • ParameterParameter & DialsProperties PaletteAccess an element’s properties <strong>and</strong>parametersQuick Scale •Allows you to quicklyresize the render to aquarter or half size.Render Menu •Choose a render engine•• Library TabOpen/close the Librarypalette•• Right-Click Actor SelectionSelect actors under your cursor easilywith just right-clicking on the sceneMemory Dot TypePop-up Control •Memory Dots •••• Window Size Control• Studio ColorPicker DotsRender •Render your sceneDisplay Controls •••••• Display/Tracking ButtonsSelect tracking modes(Box, Fast or Full)<strong>and</strong> toggle depth cueing& shadows on/offQUICKREFERENCECARD• Area RenderClick <strong>and</strong> drag the box over part ofyour scene to render just that areaInstalling <strong>Pose</strong>r 7For Windows:1. Read the EULA. Read <strong>and</strong> agree to the <strong>Pose</strong>r End User License Agreement (EULA).2. Insert DVD. Open your <strong>Pose</strong>r DVD jacket <strong>and</strong> insert the Application DVD into yourDVD drive. The Install <strong>Pose</strong>r dialog window automatically appears.3. Click on the “Install <strong>Pose</strong>r” button. The installer guides you through theinstallation options.4. Choose <strong>Installation</strong> Location <strong>and</strong> Type. Normally, you would choose Full Install.5. Register. We encourage you to register this product with e frontier.Register through www.e-frontier.com/go/register.• New Render Window • Pan• Animation Control Tab • Render WipeCreates a separateOpen/close the Animationwindow of your rendercontrolsAllows you to pan back <strong>and</strong>forth when the image is biggerthan the render windowFor Macintosh:1. Read the EULA. Read <strong>and</strong> agree to the <strong>Pose</strong>r End User License Agreement (EULA).2. Insert DVD. Open your <strong>Pose</strong>r DVD jacket <strong>and</strong> insert the Application DVD into yourDVD drive. Double-click icon to open the DVD window.3. Double-Click on the “Install <strong>Pose</strong>r” icon. This will launch the installer application.4. Verify <strong>Installation</strong> Type <strong>and</strong> Install Location. Normally, you would choose Easy Install.5. Click the Install button to proceed with installation.6. Register. We encourage you to register this product with e frontier. Register throughwww.e-frontier.com/go/register.Allows you to scrub back<strong>and</strong> forth between yourlatest renders
Palettes <strong>and</strong> ControlsEdit Palette•• Rotate ToolRotates elementProperties•• Twist ToolTwists elementaround its center•• Translate/PullRepositionselement• Translate In/OutMoves elementIn/Out•• • Outline • LitSilhouetteWireframe• Scale<strong>Inc</strong>rease/Decreaseelement sizeuniformly• TaperScale one end ofelement•• ColorPicks colorfrom selectedelement•• ••• •• CartoonLined• Chain BreakBreaks chain ofparts affected bytranslation toolsDisplay ControlsChoose to apply display styles to your Document, (current) Figure, or (current) Element (such as a body part orprop). Figure <strong>and</strong> Element modes allow you to apply a higher category display style to your current selection.Wireframe •CurrentActor MenuSelect anelement inyour scene• PropertiesAvailable propertiesdepend on the type ofelement selected• HiddenLine• FlatShaded• Cartoon• SmoothShaded• • • • • • • • • • •• Flat linedParametersCurrent Actor Menu •Select an element inyour sceneGrouped Dials • •Exp<strong>and</strong> <strong>and</strong> collapsedial groups <strong>and</strong> movedials between groups•Parameter Dial • •Click <strong>and</strong> drag toincrease or decreasevalue, double-click tobring up dialog boxNumeric Value •Clicking this value letsyou directly enternew values• SmoothLined• TextureShaded•• View MagnifierZooms in-out ofscene withoutaffecting camera•• GroupingSelects <strong>and</strong>groups specificpolygons/vertices••• Use HigherCategory• Direct ManipulationVisually translate,rotate, <strong>and</strong>/or scaleelements•• Morphing ToolVisually sculpt morphtargets by clicking <strong>and</strong>dragging• Parameters/Properties TabsSwitch back & forth betweenthe Parameters <strong>and</strong> Propertiespalettes•• • Parameters MenuAdd, remove, <strong>and</strong>control dial groups• • Parameter Dial MenuCustomize the selectedparameter• • Resizing H<strong>and</strong>leResize this palette byclicking <strong>and</strong> draggingthis h<strong>and</strong>leMemory DotsClick on an empty dot tosaves pose, UI or camerasetting. ALT-Click occupieddot to clear setting.Morphing Tool• Action ButtonsSelect the action you wish touse to modify verticesRelative To •Specify the relative directionfor your modifications• Brush StyleSelect a brush style• Radius & MagnitudeCustomize the way in which yourchanges will affect the mesh• Morphing Tool Create OptionsConfigure the degree <strong>and</strong> range ofmesh modifications•••••• Display OptionsSelect options to help you visualizeyour modifications• MirrorMirror changes across various axeson the mesh• Zero MorphReset the mesh to its neutral stateSave Copy As •Save your modifications as a newmorph target• Morphing ToolDirectly manipulate verticesusing the Morphing Tool• Clear MorphsClick this button to erase yourchanges <strong>and</strong> start over• Add PinPin vertices in place to preventfurther modificationClear Pins •Removes all pins• Exaggeration ControlsAdjust Morphing Tool sensitivity••••Lock/Unlock All •Disable or enable modifications onall morph targets(point to buttons)• Morph TargetsControl which morphs are affectedby the Morphing Tool (point tohierarchical list)
Cloth <strong>Room</strong> <strong>and</strong> Setup <strong>Room</strong>Cloth <strong>Room</strong>Select Simulation Menu • • Dynamic ControlsEach <strong>Pose</strong>r scene canCloth dynamics controlhave multiple clothhow dynamic clothsimulationsbehaves during animation• Editing Tools• DocumentWindowCloth Collison ObjectsThe Cloth Collisions Objects dialog allows you toselect objects for the cloth to collide against, <strong>and</strong>cloth collision settings.Cloth Simulation •ControlsCreate <strong>and</strong> set upcloth simulations•• ••Cloth Controls •Convert props to/fromdynamic cloth objects <strong>and</strong>set up cloth collisiondetectionCloth Groups •Divide cloth objects intodifferent groups to controlbehavior during animation•Dynamic Group Controls••Dynamic cloth groupsbehave according todynamic settingsChoreographed Group•Position <strong>and</strong> animategroup using keyframesConstrained Group •Map/Animate with theirassociated surfaceSoft Decorated Group•Group deforms as it moveswith dynamic clothSetup <strong>Room</strong>The Setup room allowsyou to create <strong>and</strong> modify<strong>Pose</strong>r figures.••••••• Rigid Decorated GroupGroup moves with surroundingdynamic cloth••• ResetRestore default DynamicControls settings• Bone ToolThe Bone tool lets you add<strong>and</strong> remove bones• BonesBones control how yourfigures move. Whenmanipulating the positionof bone ends, thecursor changes to abulls eye as shown.•ClothifyContent ParadiseThe Clothify dialog is where you convert props to dynamiccloth objects. Select the element to clothify using thepull-down menu.<strong>Pose</strong>r Content room accesses ContentParadise, which is your gateway toleading marketplaces that provide bothfree <strong>and</strong> for-sale <strong>Pose</strong>r content. Need a<strong>Pose</strong>r figure, prop, texture, orsomething else? Content Paradise hasyou covered. And, <strong>Pose</strong>r DownloadManager can auto-install mostdownloaded content <strong>and</strong> add it to theLibrary palette. No more manuallyplacing files in folders!Additional Content Available atwww.contentparadise.comCloth Simulation SettingsThe Simulation Settingsdialog appears when youcreate a new dynamic clothsimulation. Name your newsimulation <strong>and</strong> specify itsname, range, collision, <strong>and</strong>draping options.
Hair <strong>Room</strong> <strong>and</strong> Face <strong>Room</strong>Hair <strong>Room</strong>Current Group Menu •Select the hair groupyou wish to work onGrowth Controls •Control hair length<strong>and</strong> orientationStyling Controls •Create custom effectssuch as curls <strong>and</strong>control the number ofhairs in the currenthair groupDynamics Controls •Hair dynamics controlhow hair behaves duringanimationsHair Style Tool•••• Add Guide HairsAdds guide hairs toyour selection• Hair Growth Group ToolsCreate, name, edit, <strong>and</strong>delete hair groups• Editing Tools••••• Hair Styling ToolThis editing tool appears in the Hair <strong>Room</strong> <strong>and</strong>,when selected, opens the Hair Style Tool palette••• Display ControlsPhoto LineupArea •Create 3Dheads using 2photographs(front & side)• DocumentWindow•••• Camera Controls• Hair StyleTool PaletteThese toolsallow you toselect <strong>and</strong> styleguide hairs• Texture VariationsAdd ethnic, age, <strong>and</strong> genderfeatures to head textures•Face Shaping ToolMorphing Tool •Directly manipulatefacial expressionsusing Morphing toolClear Morphs •Click this buttonto erase yourchanges <strong>and</strong>start overExaggerationControls •Adjust FaceMorphing ToolsensitivityFace <strong>Room</strong>•••••Add PinPin vertices in place toprevent further modification•• Face Sculpting WindowClick <strong>and</strong> drag vertices to visually sculptfacial features using the Morphing tool••• Remove PinRemoves pins• Caricature DialCreate wackyfaces for yourfigures• • Symmetric/AsymmetricMorphsChoose subset ofmorph targets towork with inFace Sculpting• Facial MorphsControl whichmorphs areaffected by theMorphing tool•Remove Guide Hairs • •Removes guide hairsfrom your selectionConstrain Length •Enabling this optionkeeps hairs fromgrowing/shrinkingClear Selection •Deselect all selectedguide hairs•••••• Hair Editing ToolsThese tools function similarly tothe normal Editing Tools, exceptthey only affect guide hairs• FalloffDefines the portion of guidehairs affected by the tools• LengthenGrow or shrink the selectedguide hairsApply Shape •Apply thecustom shapeto the headPhoto/GeometryTools • •Align photos<strong>and</strong> geometryfor best fit <strong>and</strong>highest realism•••••• Face Shaping Tool WindowInteractively sculpt facialexpressions with Morphing ToolTechnology• Reset Face <strong>Room</strong>Restore Face <strong>Room</strong> defaults• R<strong>and</strong>om FaceOne click creates a totallyr<strong>and</strong>om face <strong>and</strong> texture!• Texture PreviewSee the current texture map
AnimationTo Start •Previous• To End Frame •• Next • Scrubber Drag to previewFrame frames or set new timeStop • • Play• Current Frame• Total FramesNext Keyframe •Previous Keyframe •Animation Controls• Display Animation Palette• • • • • •••• • • • •• •••• Cycle Entire AnimationsToggle looping of animation frames on/offAnimation PaletteCurrent Frame Tab •Frame Rate •Current TimecodePosition ofAnimation •••••Time Line•••Frame • • ••RateSettings• •• •Element • •List ScrollBar••MoveKeyframe by• KeyframeOpenGraph• Palette••Add/Delete• Keyframes•Current• Frame•••Tool Tips • Add Keyframe •Describes tool’s functions Delete Keyframe •Skip Frames Toggle frame dropping during playback on/off •• Display OptionsSet options in timeline & interpolation• Total FramesClick in all number windows to enter new values• This Element/All ElementsAdd/delete keyframes based on setting• Interpolation ControlSets transition between frames as Spline, Linear, Constant orBreak Spline• Animation Palette Timeline Displays frame or timecodedepending on choice in “options”Move Up/Down •Reorder animation layersHierarchy List •Displays all figure elements,lights <strong>and</strong> camerasPlay Range •Sets range ofInterpolated Frames •automatically created• Keyframecreated•Sound Whenimported, soundframes shown in by <strong>Pose</strong>rplaybackby changingelementsis displayed abovePlay RangeCurrent Layer • •Select layers from the• Start/End Framepop-up menu• Set start <strong>and</strong> end framesfor each animation layer•• •Current Layer OnlyNew / Delete••Temporarily exclude•Add <strong>and</strong> remove animationother animation•layerslayers from playback• Layers DisplayVisualize <strong>and</strong> directly editLayer Name •individual animation layer settingsIndividually name animationlayers <strong>and</strong> include or hidethem in animation playbackAnimation Palette Layers Tab•• Blend In/Out FramesFade animation layer effectsin <strong>and</strong> out• Composite MethodReplace or combine animationeffects with subsequent layers• KeyframeScroll barWalk Path •Drag 2D walk pathto alter directionWalk Designer• ••Walk PreviewSet Walk StyleBlend styleingredientsto create walkAdjust SecondaryWalk MotionUse Tweaks to finetune components ofchosen walk style
Material <strong>Room</strong> <strong>and</strong> RenderingMaterial <strong>Room</strong>• DocumentWindow•••••• Select Object • Material MenuMenuSelect an object’sSelect an object materialin your scene••••• Editing Tools • Shader Tree WindowChoose between simple• Lighting Controls or advanced mode• Display Controls• Camera Controls•• Shader NodesModify the base node byadding as many nodes as youwish from different categories••• Node Options MenuAdd, remove, <strong>and</strong> select nodesusing this menu• Materials LibraryAvailable in the Material room.Allows you to save <strong>and</strong> usematerials• ConnectorsSee how nodes are connected<strong>and</strong> how they interact toproduce the final material• WacrosEasy access to complexmaterials• Resizing H<strong>and</strong>leResize the Shaderwindow by clicking<strong>and</strong> dragging this• h<strong>and</strong>leRender Settings Dialog (FireFly Renderer Selected)Quality Settings •Select auto or manual,then choose yoursettings includingraytracing, cast shadows,<strong>and</strong> texture filtering•Draft/Final ModeMove the slider back <strong>and</strong>forth to your preferredquality levelSketch Designer• Select Render EngineChoose between theFireFly, <strong>Pose</strong>r 4, Sketch orPreview render engine••• Restore DefaultsRestore defaultRender settings• FireFly Render OptionsSpecify your desired FireFlysettings including motionblur, depth of field, <strong>and</strong>toon outline•••Render Now•Click this button torender your image!Make MovieFormat •Select yourdesired movieoutput formatRenderer •Select renderengineAntialias •Smooth jaggedlookingedges2D Motion Blur•Adds 2D motionblur to animations.Add 3D motion blurusing the RenderSettings dialog•••Render Settings Switches to render settings••••• Resolution••• Time SpanDisplays yourmovie runtime <strong>and</strong> totalframes• Frame RateSpecify yourdesired framerateRealtime Preview Options••• Preset SketchesChoose from several presetstyles in the popup menu, orcreate <strong>and</strong> save your own presets• SketchingWhile a sketch is drawing, clickanywhere on the screen to stopthe rendering•Sliders •Adjust the slidersto create uniquesketches. Customizesketch styles forobjects, background,<strong>and</strong> edges
Keyboard ShortcutsACTION MACINTOSH WINDOWSFile MenuNew -N Ctrl-NOpen -O Ctrl-OClose -W Ctrl-WSave -S Ctrl-SSave As Shift -S Shift Ctrl-SPrint -P Ctrl-PQuit -Q Ctrl-QEdit MenuUndo -Z Ctrl-ZRedo Shift -Z Shift Ctrl-ZCut -X Ctrl-XCopy -C Ctrl-CPaste -V Ctrl-VGeneral Preferences -K Ctrl-KRestoreElement -E Ctrl-EFigure Shift -F Shift Ctrl-FLights Shift -L Shift Ctrl-LCamera Shift -E Shift Ctrl-HAll -A Ctrl-AMemorizeElement Opt -E Alt Ctrl-EFigure Opt -F Alt Ctrl-FLights Opt -L Alt Ctrl-LFigure MenuDrop To Floor -D Ctrl-DHide Figure -H Ctrl-HObject MenuProperties -I Ctrl-IDisplay MenuDepth Cued Shift -D Shift Ctrl-DShow/Hide Bkgrd Pict Shift -B Ctrl-BOpenGL Preview Drawing Opt -O Alt Ctrl-OSreeD Preview Drawing Opt -S Alt Ctrl-SCamera ViewsMain -M Ctrl-MFrom Right -; Ctrl-;From Left -’ Ctrl-’From Top -T Ctrl-TFrom Front -F Ctrl-FFrom Left -’ Ctrl-’Face Camera -= Ctrl-=Posing Camera -, Ctrl-,Left H<strong>and</strong> Camera -[ Ctrl-[Right H<strong>and</strong> Camera -] Ctrl-]Dolly Camera -/ Ctrl-/Flyaround -L Ctrl-LDocument StyleSilhouette -1 Ctrl-1Outline -2 Ctrl-2Wireframe -3 Ctrl-3Hidden Line -4 Ctrl-4Lit Wireframe -5 Ctrl-5Flat Shaded -6 Ctrl-6Cartoon w/Lines -7 Ctrl-7Smooth Shaded -8 Ctrl-8Texture Shaded -9 Ctrl-9www.e-frontier.comFigure StyleUse Document Style Shift-Ctrl-0 Alt Ctrl-0Silhouette Shift-Ctrl-1 Alt Ctrl-1Outline Shift-Ctrl-2 Alt Ctrl-2Wireframe Shift-Ctrl-3 Alt Ctrl-3Hidden Line Shift-Ctrl-4 Alt Ctrl-4Lit Wireframe Shift-Ctrl-5 Alt Ctrl-5Flat Shaded Shift-Ctrl-6 Alt Ctrl-6Cartoon w/ Lines Shift-Ctrl-7 Alt Ctrl-7Smooth Shaded Shift-Ctrl-8 Alt Ctrl-8Texture Shaded Shift-Ctrl-9 Alt Ctrl-9Element StyleUse Figure Style Opt -0 Shift Ctrl-0Silhouette Opt -1 Shift Ctrl-1Outline Opt -2 Shift Ctrl-2Wireframe Opt -3 Shift Ctrl-3Hidden Line Opt -4 Shift Ctrl-4Lit Wireframe Opt -5 Shift Ctrl-5Flat Shaded Opt -6 Shift Ctrl-6Cartoon w/ Lines Opt -7 Shift Ctrl-7Smooth Shaded Opt -8 Shift Ctrl-8Texture Shaded Opt -9 Shift Ctrl-9TrackingBounding Boxes Only Shift- A Shift Ctrl-AFast Tracking Shift- X Shift Ctrl-XFull Tracking Shift- C Shift Ctrl-CGuidesGround Plane -G Ctrl-GRender MenuRender -R Ctrl-RArea Render Opt -N Alt Ctrl-NAnti-alias doc window Opt -R Alt Ctrl-RRender Settings -Y Ctrl-YRender Dimensions Shift -Y Alt Ctrl-DMaterials -U Ctrl-UAnimation MenuMake Movie -J Ctrl-JWindow MenuShow/Hide Animation Palette Shift -V Shift Ctrl-VShow/Hide Graph Shift -G Shift Ctrl-GShow/Hide Libraries Shift -B Shift Ctrl-BShow/Hide Walk Designer Shift -W Shift Ctrl-WShow/Hide Camera Controls Shift -R Shift Ctrl-RShow/Hide Preview Styles Shift -U Shift Ctrl-UShow/Hide Editing Tools Shift -T Shift Ctrl-TShow/Hide Light Controls Shift -I Shift Ctrl-IShow/Hide Memory Dots Shift -M Shift Ctrl-MShow/Hide Parameter Dials Shift -N Shift Ctrl-NShow/Hide Animation Controls Shift -P Shift Ctrl-PShow All Tools -\ Ctrl-\Hide All Tools -0 Ctrl-0Show/Hide Tool Titles - - Ctrl - -SYSTEM REQUIREMENTSWindowsWindows 2000 or XP700 MHz Pentium class or compatible (1 GHz or faster recommended)512 MB system RAM (768 MB or more recommended)OpenGL enabled graphics card or chipset recommended (recent NVIDIAGeForce <strong>and</strong> ATI Radeon preferred)24-bit color display, 1024 x 768 resolution1 GB free hard disk space (4 GB recommended)Internet connection required for Content ParadiseDVD-ROM driveShow/Hide Hierarchy Editor Shift -E Shift Ctrl-EShow/Hide Joint Editor Shift -J Shift Ctrl-JShow/Hide Talk Designer Shift -K Shift Ctrl-KShow/Hide Python Palette Shift -O Shift Ctrl-OHidden Shortcuts<strong>Pose</strong> Mode 1 1Body Mode 2 2Camera Mode 3 3Light Mode 4 4Rotate Tool r rTranslate/Pull Tool t tScale Tool s sTwist Tool w wTranslate In/Out Tool z zTaper Tool p pColor Tool c cCamera Cursor Opt key while dragging tool Alt key while dragging toolsXY Translate Camera Spacebar drag in window Spacebar drag in windowZ Translate Camera -Spacebar drag Ctrl-Spacebar dragPivot Camera Opt-Spacebar drag Alt-Spacebar dragAxis Constraint Shift-drag camera tools Shift-drag camera toolsReset Focal Opt-click Focal Alt-click FocalReset Scale Opt-click Scale Alt-click ScaleReset Roll Opt-click Roll Alt-click RollReset Desktop Color Opt-click Desktop Alt-click DesktopReset Param Dials Opt-click Param Dials Alt-click Param DialsLights On/Off Opt-click Lights Alt-click LightsSystem Color Picker using Color tool/pickers Opt-click Picker Alt-click PickerSpecular Color change using Color tool Cmd-click Color tool on figure part Ctrl-click Color tool on figure partLayout Switcher Display Tools “Opt-click” “Display” Tools “Alt-click” “Display”Layout Switcher Edit Tools “Opt-click” “Edit Tools” “Alt-click” “Edit Tools”Clear Memory Dots Opt-click occupied dot Alt-click occupied dotCycle thru elements Up/Down Arrows Up/Down ArrowsPlay Animation Return EnterStop Animation Return EnterStep Thru Frames Right/Left Arrows Right/Left ArrowsAdvance Thru Keyframes Tab TabRetreat Thru Keyframes Shift-Tab Shift-TabInterrupt Flyaround Mouse click Mouse clickFlyaround Rotate Mouse Right/Left Mouse Right/LeftFlyaround Pitch Mouse Up/Down Mouse Up/DownFlyaround Zoom -Mouse Up/Down Ctrl-mouse Up/DownFlyaround Pause/Resume Hold Down Spacebar Hold Down SpacebarMove Selected KeyFrames Drag selected frames Hold Down SpacebarCopy Selected Keyframes Option-click drag Alt click dragPaste Selected Keyframes -V w/frames selected Ctrl-V w/frames selectedDuplicate Selected Keyframes Opt-drag selected frames Alt-drag selected framesSelect Graph Range Click-drag in Graph Click-drag in Graph<strong>Inc</strong>rease/Decrease Selected Range Shift-drag in selected graph range Shift-drag in selected graph rangeCreate Graph Marker(s) Click in graph display Click in graph displayMove Graph Marker(s) in time Drag selected graph range Drag selected graph rangeMove Graph Marker Vertical -drag selected marker Ctrl-drag selected markerDuplicate Graph Marker(s) Opt-drag selected graph range Alt-drag selected graph rangeDelete Graph Marker(s) Delete key Delete keyDelete Object (figure or prop) Delete (selected object) Delete (selected object)Maintain Selection in a Document Window Shift-Click Shift-clickMacintoshMac OS X 10.3.9 or 10.4700 MHz G4 processor (Intel Core Duo or 1GHz G4 or faster recommended)512 MB system RAM (768 MB or more recommended)OpenGL enabled graphics card or chipset recommended (recent NVIDIAGeForce <strong>and</strong> ATI Radeon preferred)24-bit color display, 1024 x 768 resolution1 GB free hard disk space (4 GB recommended)Internet connection required for Content ParadiseDVD-ROM drive©2006 e frontier America, <strong>Inc</strong>. <strong>and</strong> e frontier, <strong>Inc</strong>. All rights reserved. <strong>Pose</strong>r is a trademark of e frontier America, <strong>Inc</strong>. <strong>and</strong> e frontier, <strong>Inc</strong>. All other trademarks are the property of their respective owners. Licensed product.Z-PSR-C70-C-001